This document provides instructions for configuring a regional internal Application Load Balancer
for your services that run on Compute Engine VMs.
To configure load balancing for your services running in
Google Kubernetes Engine (GKE) Pods, see
[Container-native load balancing through standalone
NEGs](https://docs.cloud.google.com/kubernetes-engine/docs/how-to/standalone-neg)
and the [Attaching an internal Application Load Balancer to standalone
NEGs](https://docs.cloud.google.com/kubernetes-engine/docs/how-to/standalone-neg#attaching-int-https-lb)
section.
To configure load balancing to access Google APIs and services using
Private Service Connect, see [Access regional Google APIs
through backends](https://docs.cloud.google.com/vpc/docs/configure-private-service-connect-controls).
The setup for internal Application Load Balancers has two parts:
- Perform prerequisite tasks, such as ensuring that required accounts have the correct permissions and preparing the Virtual Private Cloud (VPC) network.
- Set up the load balancer resources.
Before following this guide, familiarize yourself with the following:
- [Internal Application Load Balancer overview](https://docs.cloud.google.com/load-balancing/docs/l7-internal.md.txt), including the [Limitations](https://docs.cloud.google.com/load-balancing/docs/l7-internal.md.txt#limitations) section
- [VPC firewall rules overview](https://docs.cloud.google.com/vpc/docs/firewalls)
### Permissions
To follow this guide, you must be able to create instances and modify a
network in a project. You must be either a project
[owner or editor](https://docs.cloud.google.com/iam/docs/roles-overview.md.txt#basic), or you must have all of
the following [Compute Engine IAM roles](https://docs.cloud.google.com/compute/docs/access/iam.md.txt).
| Task | Required role |
|---|---|
| Create networks, subnets, and load balancer components | [Compute Network Admin (`roles/compute.networkAdmin`)](https://docs.cloud.google.com/compute/docs/access/iam.md.txt#compute.networkAdmin) |
| Add and remove firewall rules | [Compute Security Admin (`roles/compute.securityAdmin`)](https://docs.cloud.google.com/compute/docs/access/iam.md.txt#compute.securityAdmin) |
| Create instances | [Compute Instance Admin (`roles/compute.instanceAdmin.v1`)](https://docs.cloud.google.com/compute/docs/access/iam.md.txt#compute.instanceAdmin.v1) |
For more information, see the following guides:
- [Roles and permissions](https://docs.cloud.google.com/load-balancing/docs/access-control.md.txt)
- [IAM Conditions for forwarding rules](https://docs.cloud.google.com/load-balancing/docs/access-control/iam-conditions.md.txt)
### Setup overview
You can configure an internal Application Load Balancer as described in the following
high-level configuration flow. The numbered steps refer to the numbers in the
diagram.
[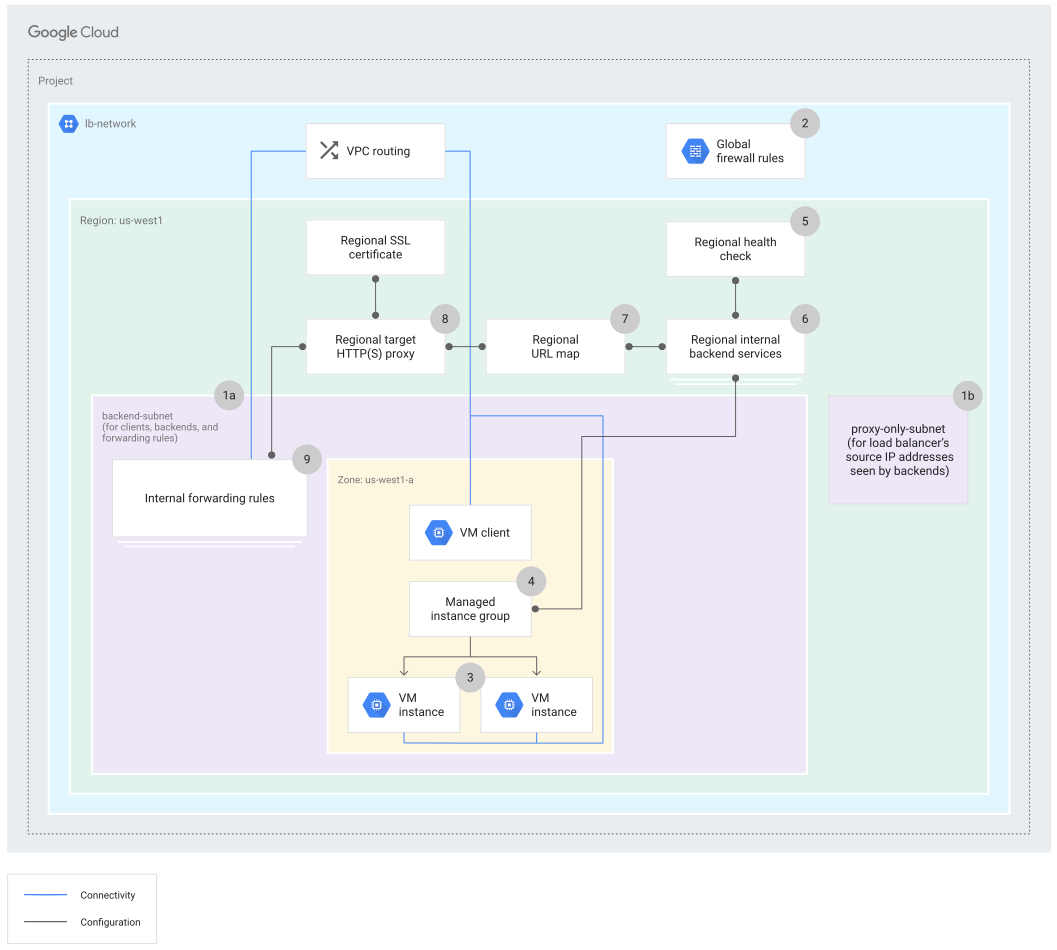](https://docs.cloud.google.com/static/load-balancing/images/ilb-l7-numbered-components.svg) Internal Application Load Balancer numbered components (click to enlarge).
As shown in the diagram, this example creates an internal Application Load Balancer in a
VPC network in region `us-west1`, with one backend service
and two backend groups.
The diagram shows the following:
1. A VPC network with two subnets:
- One subnet is used for backends (instance groups) and the
forwarding rule. Its primary IP address range is `10.1.2.0/24`.
- One subnet is a proxy-only subnet in the `us-west1` region. You must
create one proxy-only subnet in each region of a VPC
network where you use internal Application Load Balancers. The region's
proxy-only subnet is shared among all internal Application Load Balancers in
the region. Source addresses of packets sent from the internal Application Load Balancer
to your service's backends are allocated from the
proxy-only subnet. In this example, the proxy-only subnet for the region
has a primary IP address range of `10.129.0.0/23`, which is the
recommended subnet size. For more information,
see [Proxy-only subnets for Envoy-based load balancers](https://docs.cloud.google.com/load-balancing/docs/proxy-only-subnets.md.txt).
2. Two firewall rules:
- A firewall rule that permits proxy-only subnet traffic flows in your network. This means adding one rule that allows TCP port `80`, `443`, and `8080` traffic from `10.129.0.0/23` (the range of the proxy-only subnet in this example).
- Another firewall rule for the [health check probes](https://docs.cloud.google.com/load-balancing/docs/health-check-concepts.md.txt).
3. Backend Compute Engine VM instances.
4. Managed or unmanaged instance groups for Compute Engine VM deployments.
In each zone, you can have a combination of backend group types based on
the requirements of your deployment.
> [!NOTE]
> **Note:** This setup shows you how to load balance requests to only VM instance group backends. To learn how to load balance requests to GKE Pods, see [GKE Ingress for Application Load Balancers](https://docs.cloud.google.com/kubernetes-engine/docs/concepts/ingress.md.txt).
5. A regional health check that reports the readiness of your backends.
6. A regional backend service that monitors the usage and health of
backends.
7. A regional URL map that parses the URL of a request and forwards
requests to specific backend services based on the host and path of the
request URL.
8. A regional target HTTP or HTTPS proxy that receives a request from the
user and forwards it to the URL map. For HTTPS, configure a regional SSL
certificate resource. The target proxy uses the SSL certificate to decrypt SSL
traffic if you configure HTTPS load balancing. The target proxy can forward
traffic to your instances by using HTTP or HTTPS.
9. A forwarding rule that has the internal IP address of your load
balancer, to forward each incoming request to the target proxy.
The internal IP address associated with the forwarding rule can come from
any subnet in the same network and region. Note the following conditions:
- The IP address can (but does not need to) come from the same subnet as the backend instance groups.
- The IP address must not come from a reserved proxy-only subnet that has its `--purpose` flag set to `REGIONAL_MANAGED_PROXY`.
- If you want to share the internal IP address with multiple forwarding rules, set the IP address's `--purpose` flag to `SHARED_LOADBALANCER_VIP`.
The example on this page uses a reserved internal IP address for the
regional internal Application Load Balancer's forwarding rule, rather than allowing an ephemeral
internal IP address to be allocated. As a best practice, we recommend
reserving IP addresses for forwarding rules.
### Configure the network and subnets
You need a VPC network with two subnets: one for the load
balancer's backends and the other for the load balancer's proxies. An
internal Application Load Balancer is regional. Traffic within the VPC
network is routed to the load balancer if the traffic's source is in a
subnet in the same region as the load balancer.
This example uses the following VPC network, region, and
subnets:
- **Network.** The network is a [custom-mode VPC
network](https://docs.cloud.google.com/vpc/docs/vpc#subnet-ranges) named `lb-network`.
- **Subnet for backends.** A subnet named `backend-subnet` in the
`us-west1` region uses `10.1.2.0/24` for its primary IP range.
- **Subnet for proxies.** A subnet named `proxy-only-subnet` in the
`us-west1` region uses `10.129.0.0/23` for its primary IP range.
To demonstrate [global access](https://docs.cloud.google.com/load-balancing/docs/l7-internal.md.txt#client-access),
this example also creates a second test client VM in a different region and
subnet:
- Region: `europe-west1`
- Subnet: `europe-subnet`, with primary IP address range `10.3.4.0/24`
> [!NOTE]
> **Note:** You can change the name of the network, the region, and the parameters for the subnets; however, subsequent steps in this guide use the network, region, and subnet parameters as outlined here.
#### Configure the network and subnets
### Console
1. In the Google Cloud console, go to the **VPC networks** page.
[Go to VPC networks](https://console.cloud.google.com/networking/networks/list)
2. Click **Create VPC network**.
3. For **Name** , enter `lb-network`.
4. In the **Subnets** section, set the **Subnet creation mode** to
**Custom**.
5. Create a subnet for the load balancer's backends. In the **New subnet**
section, enter the following information:
- **Name** : `backend-subnet`
- **Region** : `us-west1`
- **IP address range** : `10.1.2.0/24`
6. Click **Done**.
7. Click **Add subnet**.
8. Create a subnet to demonstrate [global
access](https://docs.cloud.google.com/load-balancing/docs/l7-internal#client-access). In the **New
subnet** section, enter the following information:
- **Name** : `europe-subnet`
- **Region** : `europe-west1`
- **IP address range** : `10.3.4.0/24`
9. Click **Done**.
10. Click **Create**.
### gcloud
1. Create the custom VPC network with the [`gcloud compute
networks create` command](https://docs.cloud.google.com/sdk/gcloud/reference/compute/networks/create):
```
gcloud compute networks create lb-network --subnet-mode=custom
```
2. Create a subnet in the `lb-network` network in the `us-west1` region with
the [`gcloud compute networks subnets create` command](https://docs.cloud.google.com/sdk/gcloud/reference/compute/networks/subnets/create):
```
gcloud compute networks subnets create backend-subnet \
--network=lb-network \
--range=10.1.2.0/24 \
--region=us-west1
```
3. Create a subnet in the `lb-network` network in the `europe-west1` region
with the [`gcloud compute networks subnets
create` command](https://docs.cloud.google.com/sdk/gcloud/reference/compute/networks/subnets/create):
```
gcloud compute networks subnets create europe-subnet \
--network=lb-network \
--range=10.3.4.0/24 \
--region=europe-west1
```
### API
Make a `POST` request to the
[`networks.insert` method](https://docs.cloud.google.com/compute/docs/reference/rest/v1/networks/insert.md.txt).
Replace `PROJECT_ID` with your project ID.
```
POST https://compute.googleapis.com/compute/v1/projects/PROJECT_ID/global/networks
{
"routingConfig": {
"routingMode": "REGIONAL"
},
"name": "lb-network",
"autoCreateSubnetworks": false
}
```
Make a `POST` request to the
[`subnetworks.insert` method](https://docs.cloud.google.com/compute/docs/reference/rest/v1/subnetworks/insert.md.txt).
Replace `PROJECT_ID` with your project ID.
```
POST https://compute.googleapis.com/compute/v1/projects/PROJECT_ID/regions/us-west1/subnetworks
{
"name": "backend-subnet",
"network": "projects/PROJECT_ID/global/networks/lb-network",
"ipCidrRange": "10.1.2.0/24",
"region": "projects/PROJECT_ID/regions/us-west1",
}
```
Make a `POST` request to the
[`subnetworks.insert` method](https://docs.cloud.google.com/compute/docs/reference/rest/v1/subnetworks/insert.md.txt).
Replace `PROJECT_ID` with your project ID.
```
POST https://compute.googleapis.com/compute/v1/projects/PROJECT_ID/regions/europe-west1/subnetworks
{
"name": "europe-subnet",
"network": "projects/PROJECT_ID/global/networks/lb-network",
"ipCidrRange": "10.3.4.0/24",
"region": "projects/PROJECT_ID/regions/europe-west1",
}
```
#### Configure the proxy-only subnet
This proxy-only subnet is for all [regional Envoy-based load balancers](https://docs.cloud.google.com/load-balancing/docs/proxy-only-subnets.md.txt) in the `us-west1` region of the `lb-network`.
> [!IMPORTANT]
> **Important:** Don't try to assign addresses from the proxy-only subnet to your load balancer's forwarding rule or backends. You assign the forwarding rule's IP address and the backend instance IP addresses from [a different subnet range (or ranges)](https://docs.cloud.google.com/load-balancing/docs/l7-internal/setting-up-l7-internal.md.txt#create-network-subnets), not this one. Google Cloud reserves this subnet range for Google Cloud-managed proxies.
### Console
If you're using the Google Cloud console, you can wait and create the proxy-only
subnet later on the **Load balancing** page.
If you want to create the proxy-only subnet now, use the following steps:
1. In the Google Cloud console, go to the **VPC networks** page.
[Go to VPC networks](https://console.cloud.google.com/networking/networks/list)
2. Click the name of the VPC network: `lb-network`.
3. Click **Add subnet**.
4. For **Name** , enter `proxy-only-subnet`.
5. For **Region** , select `us-west1`.
6. Set **Purpose** to **Regional Managed Proxy**.
7. For **IP address range** , enter `10.129.0.0/23`.
8. Click **Add**.
### gcloud
Create the proxy-only subnet with the [`gcloud compute networks subnets
create` command](https://docs.cloud.google.com/sdk/gcloud/reference/compute/networks/subnets/create).
```
gcloud compute networks subnets create proxy-only-subnet \
--purpose=REGIONAL_MANAGED_PROXY \
--role=ACTIVE \
--region=us-west1 \
--network=lb-network \
--range=10.129.0.0/23
```
### API
Create the proxy-only subnet with the
[`subnetworks.insert` method](https://docs.cloud.google.com/compute/docs/reference/rest/v1/subnetworks/insert.md.txt),
replacing `PROJECT_ID` with your project ID.
```
POST https://compute.googleapis.com/compute/projects/PROJECT_ID/regions/us-west1/subnetworks
{
"name": "proxy-only-subnet",
"ipCidrRange": "10.129.0.0/23",
"network": "projects/PROJECT_ID/global/networks/lb-network",
"region": "projects/PROJECT_ID/regions/us-west1",
"purpose": "REGIONAL_MANAGED_PROXY",
"role": "ACTIVE"
}
```
### Configure firewall rules
This example uses the following firewall rules:
- **`fw-allow-ssh`.** An ingress rule, applicable to the instances being load
balanced, that allows incoming SSH connectivity on TCP port `22` from any
address. You can choose a more restrictive source IP range for this rule; for
example, you can specify just the IP ranges of the system from which you
initiate SSH sessions. This example uses the target tag `allow-ssh` to
identify the VMs that the firewall rule applies to.
- **`fw-allow-health-check`.** An ingress rule, applicable to the instances
being load balanced, that allows all TCP traffic from the [Google Cloud
health check probe ranges](https://docs.cloud.google.com/load-balancing/docs/health-check-concepts#ip-ranges).
This example uses the target tag `load-balanced-backend` to identify the VMs
that the firewall rule applies to.
- **`fw-allow-proxies`.** An ingress rule, applicable to the instances being
load balanced, that allows TCP traffic on ports `80`, `443`, and `8080` from
the internal Application Load Balancer's managed proxies. This example uses the target tag
`load-balanced-backend` to identify the VMs that the firewall rule applies to.
Without these firewall rules, the [default deny
ingress](https://docs.cloud.google.com/vpc/docs/firewalls#default_firewall_rules) rule blocks incoming
traffic to the backend instances.
The [target tags](https://docs.cloud.google.com/vpc/docs/add-remove-network-tags.md.txt#targets_for_firewall_rules)
define the backend instances. Without the target tags, the firewall
rules apply to all of your backend instances in the VPC network.
When you create the backend VMs, make sure to
include the specified target tags, as shown in
[Create a managed VM instance group backend](https://docs.cloud.google.com/load-balancing/docs/l7-internal/setting-up-l7-internal.md.txt#create-instance-group-backend).
### Console
1. In the Google Cloud console, go to the **Firewall policies** page.
[Go to Firewall policies](https://console.cloud.google.com/net-security/firewall-manager/firewall-policies/list)
2. Click **Create firewall rule** to create the rule to allow incoming
SSH connections:
- **Name** : `fw-allow-ssh`
- **Network** : `lb-network`
- **Direction of traffic** : **Ingress**
- **Action on match** : **Allow**
- **Targets** : **Specified target tags**
- **Target tags** : `allow-ssh`
- **Source filter** : **IPv4 ranges**
- **Source IPv4 ranges** : `0.0.0.0/0`
- **Protocols and ports** :
- Choose **Specified protocols and ports**.
- Select the **TCP** checkbox, and then enter `22` for the port number.
3. Click **Create**.
4. Click **Create firewall rule** a second time to create the rule to allow
Google Cloud health checks:
- **Name** : `fw-allow-health-check`
- **Network** : `lb-network`
- **Direction of traffic** : **Ingress**
- **Action on match** : **Allow**
- **Targets** : **Specified target tags**
- **Target tags** : `load-balanced-backend`
- **Source filter** : **IPv4 ranges**
- **Source IPv4 ranges** : `35.191.0.0/16`
- **Protocols and ports** :
- Choose **Specified protocols and ports**.
- Select the **TCP** checkbox, and then enter `80` for the port number.
As a best practice, limit this rule to just the protocols and ports that match those used by your health check. If you use `tcp:80` for the protocol and port, Google Cloud can use HTTP on port `80` to contact your VMs, but it cannot use HTTPS on port `443` to contact them.
5. Click **Create**.
6. Click **Create firewall rule** a third time to create the rule to allow
the load balancer's proxy servers to connect the backends:
- **Name** : `fw-allow-proxies`
- **Network** : `lb-network`
- **Direction of traffic** : **Ingress**
- **Action on match** : **Allow**
- **Targets** : **Specified target tags**
- **Target tags** : `load-balanced-backend`
- **Source filter** : **IPv4 ranges**
- **Source IPv4 ranges** : `10.129.0.0/23`
- **Protocols and ports** :
- Choose **Specified protocols and ports**.
- Select the **TCP** checkbox, and then enter `80, 443, 8080` for the port numbers.
7. Click **Create**.
### gcloud
1. Create the `fw-allow-ssh` firewall rule to allow SSH connectivity to
VMs with the network tag `allow-ssh`. When you omit `source-ranges`,
Google Cloud [interprets the rule to mean any
source](https://docs.cloud.google.com/vpc/docs/firewalls#sources_for_the_rule).
```
gcloud compute firewall-rules create fw-allow-ssh \
--network=lb-network \
--action=allow \
--direction=ingress \
--target-tags=allow-ssh \
--rules=tcp:22
```
2. Create the `fw-allow-health-check` rule to allow Google Cloud
health checks. This example allows all TCP traffic from health check
probers; however, you can configure a narrower set of ports to meet your
needs.
gcloud compute firewall-rules create fw-allow-health-check \
--network=lb-network \
--action=allow \
--direction=ingress \
--source-ranges=35.191.0.0/16 \
--target-tags=load-balanced-backend \
--rules=tcp
3. Create the `fw-allow-proxies` rule to allow the internal Application Load Balancer's
proxies to connect to your backends. Set `source-ranges` to the
allocated ranges of your proxy-only subnet---for example,
`10.129.0.0/23`.
```
gcloud compute firewall-rules create fw-allow-proxies \
--network=lb-network \
--action=allow \
--direction=ingress \
--source-ranges=source-range \
--target-tags=load-balanced-backend \
--rules=tcp:80,tcp:443,tcp:8080
```
### API
Create the `fw-allow-ssh` firewall rule by making a `POST` request to
the [`firewalls.insert` method](https://docs.cloud.google.com/compute/docs/reference/rest/v1/firewalls/insert.md.txt),
replacing `PROJECT_ID` with your project ID.
```
POST https://compute.googleapis.com/compute/v1/projects/PROJECT_ID/global/firewalls
{
"name": "fw-allow-ssh",
"network": "projects/PROJECT_ID/global/networks/lb-network",
"sourceRanges": [
"0.0.0.0/0"
],
"targetTags": [
"allow-ssh"
],
"allowed": [
{
"IPProtocol": "tcp",
"ports": [
"22"
]
}
],
"direction": "INGRESS"
}
```
Create the `fw-allow-health-check` firewall rule by making a `POST` request to
the [`firewalls.insert` method](https://docs.cloud.google.com/compute/docs/reference/rest/v1/firewalls/insert.md.txt),
replacing `PROJECT_ID` with your project ID.
```
POST https://compute.googleapis.com/compute/v1/projects/PROJECT_ID/global/firewalls
{
"name": "fw-allow-health-check",
"network": "projects/PROJECT_ID/global/networks/lb-network",
"sourceRanges": [HEALTH_CHECK_RANGES],
"targetTags": [
"load-balanced-backend"
],
"allowed": [
{
"IPProtocol": "tcp"
}
],
"direction": "INGRESS"
}
```
Replace the following:
- PROJECT_ID: the project ID
- HEALTH_CHECK_RANGES: the comma-separated list of
[Google Cloud health check probe ranges](https://docs.cloud.google.com/load-balancing/docs/health-check-concepts.md.txt#ip-ranges), formatted as quoted strings
(for example, "192.0.2.0/24", "198.51.100.0/24")
Create the `fw-allow-proxies` firewall rule to allow TCP traffic within the
proxy subnet for the
[`firewalls.insert` method](https://docs.cloud.google.com/compute/docs/reference/rest/v1/firewalls/insert.md.txt),
replacing `PROJECT_ID` with your project ID.
```
POST https://compute.googleapis.com/compute/v1/projects/PROJECT_ID/global/firewalls
{
"name": "fw-allow-proxies",
"network": "projects/PROJECT_ID/global/networks/lb-network",
"sourceRanges": [
"10.129.0.0/23"
],
"targetTags": [
"load-balanced-backend"
],
"allowed": [
{
"IPProtocol": "tcp",
"ports": [
"80"
]
},
{
"IPProtocol": "tcp",
"ports": [
"443"
]
},
{
"IPProtocol": "tcp",
"ports": [
"8080"
]
}
],
"direction": "INGRESS"
}
```
### Reserve the load balancer's IP address
By default, one IP address is used for each forwarding rule. You can
reserve a *shared* IP address, which lets you use the same IP address
with multiple forwarding rules. However, if you want to
[publish the load balancer by using Private Service Connect](https://docs.cloud.google.com/vpc/docs/configure-private-service-connect-producer.md.txt#lb-types),
don't use a shared IP address for the forwarding rule.
For the forwarding rule's IP address, use the `backend-subnet`. If you
try to use the [proxy-only
subnet](https://docs.cloud.google.com/load-balancing/docs/proxy-only-subnets), forwarding rule
creation fails.
### Console
You can reserve a standalone internal IP address using the
Google Cloud console.
1. Go to the **VPC networks** page.
[Go to VPC networks](https://console.cloud.google.com/networking/networks/list)
2. Click the network that was used to configure hybrid connectivity between the environments.
3. Click **Static internal IP addresses** , and then click **Reserve static address**.
4. For **Name** , enter `l7-ilb-ip-address`.
5. For the **Subnet** , select `backend-subnet`.
6. If you want to specify which IP address to reserve, under **Static IP
address** , select **Let me choose** , and then fill in a **Custom
IP address**. Otherwise, the system automatically assigns an IP address in the subnet for you.
7. If you want to use this IP address with multiple forwarding rules, under **Purpose** , choose **Shared**.
8. Click **Reserve** to finish the process.
### gcloud
1. Using the gcloud CLI, run the
[`gcloud compute addresses create` command](https://docs.cloud.google.com/sdk/gcloud/reference/compute/addresses/create.md.txt):
```
gcloud compute addresses create l7-ilb-ip-address \
--region=us-west1 \
--subnet=backend-subnet
```
If you want to use the same IP address with multiple forwarding rules,
specify `--purpose=SHARED_LOADBALANCER_VIP`.
2. Use the [`gcloud compute addresses describe`
command](https://docs.cloud.google.com/sdk/gcloud/reference/compute/addresses/describe)
to view the allocated IP address:
```
gcloud compute addresses describe l7-ilb-ip-address \
--region=us-west1
```
### Create a managed VM instance group backend
This section shows how to create an instance group template and a managed
instance group. The managed instance group provides VM instances running the
backend servers of an example regional internal Application Load Balancer. For your instance group,
you can define an HTTP service and map a port name to the relevant port. The
backend service of the load balancer forwards traffic to the [named
ports](https://docs.cloud.google.com/load-balancing/docs/backend-service#named-ports). Traffic from clients
is load balanced to backend servers. For demonstration purposes, backends serve
their own hostnames.
### Console
1. Create an instance template. In the Google Cloud console, go to
the **Instance templates** page.
[Go to Instance templates](https://console.cloud.google.com/compute/instanceTemplates/list)
1. Click **Create instance template**.
2. For **Name** , enter `l7-ilb-backend-template`.
3. Ensure that the **Boot disk** is set to a Debian image, such as **Debian GNU/Linux 12 (bookworm)** . These instructions use commands that are only available on Debian, such as `apt-get`.
4. Click **Advanced options**.
5. Click **Networking** and configure the following fields:
1. For **Network tags** , enter `allow-ssh` and `load-balanced-backend`.
2. For **Network interfaces** , select the following:
- **Network** : `lb-network`
- **Subnet** : `backend-subnet`
6. Click **Management** . Enter the following script into the
**Startup script** field.
```
#! /bin/bash
apt-get update
apt-get install apache2 -y
a2ensite default-ssl
a2enmod ssl
vm_hostname="$(curl -H "Metadata-Flavor:Google" \
http://metadata.google.internal/computeMetadata/v1/instance/name)"
echo "Page served from: $vm_hostname" | \
tee /var/www/html/index.html
systemctl restart apache2
```
7. Click **Create**.
2. Create a managed instance group. In the Google Cloud console, go to
the **Instance groups** page.
[Go to Instance groups](https://console.cloud.google.com/compute/instanceGroups)
1. Click **Create instance group**.
2. Select **New managed instance group (stateless)** . For more information, see [Stateful managed instance
groups](https://docs.cloud.google.com/compute/docs/instance-groups/stateful-migs).
3. For **Name** , enter `l7-ilb-backend-example`.
4. For **Location** , select **Single zone**.
5. For **Region** , select `us-west1`.
6. For **Zone** , select `us-west1-a`.
7. For **Instance template** , select `l7-ilb-backend-template`.
8. Specify the number of instances that you want to create in the group.
For this example, specify the following options under **Autoscaling**:
- For **Autoscaling mode** , select `Off:do not autoscale`.
- For **Maximum number of instances** , enter `2`.
Optionally, in the **Autoscaling** section of the UI, you can configure
the instance group to [automatically add or remove
instances](https://docs.cloud.google.com/compute/docs/autoscaler) based on instance CPU usage.
9. Click **Create**.
### gcloud
The `gcloud` instructions in this guide assume that you are using [Cloud
Shell](https://docs.cloud.google.com/shell/docs) or another environment with bash installed.
1. Create a VM instance template with HTTP server with the
[`gcloud compute instance-templates create` command](https://docs.cloud.google.com/sdk/gcloud/reference/compute/instance-templates/create.md.txt).
```
gcloud compute instance-templates create l7-ilb-backend-template \
--region=us-west1 \
--network=lb-network \
--subnet=backend-subnet \
--tags=allow-ssh,load-balanced-backend \
--image-family=debian-12 \
--image-project=debian-cloud \
--metadata=startup-script='#! /bin/bash
apt-get update
apt-get install apache2 -y
a2ensite default-ssl
a2enmod ssl
vm_hostname="$(curl -H "Metadata-Flavor:Google" \
http://metadata.google.internal/computeMetadata/v1/instance/name)"
echo "Page served from: $vm_hostname" | \
tee /var/www/html/index.html
systemctl restart apache2'
```
2. Create a managed instance group in the zone with the [`gcloud compute
instance-groups managed create` command](https://docs.cloud.google.com/sdk/gcloud/reference/compute/instance-groups/managed/create).
```
gcloud compute instance-groups managed create l7-ilb-backend-example \
--zone=us-west1-a \
--size=2 \
--template=l7-ilb-backend-template
```
### API
Create the instance template with the
[`instanceTemplates.insert` method](https://docs.cloud.google.com/compute/docs/reference/rest/v1/instanceTemplates/insert.md.txt),
replacing `PROJECT_ID` with your project ID.
```
POST https://compute.googleapis.com/compute/v1/projects/PROJECT_ID/global/instanceTemplates
{
"name":"l7-ilb-backend-template",
"properties":{
"machineType":"e2-standard-2",
"tags":{
"items":[
"allow-ssh",
"load-balanced-backend"
]
},
"metadata":{
"kind":"compute#metadata",
"items":[
{
"key":"startup-script",
"value":"#! /bin/bash\napt-get update\napt-get install
apache2 -y\na2ensite default-ssl\na2enmod ssl\n
vm_hostname=\"$(curl -H \"Metadata-Flavor:Google\"
\\\nhttp://metadata.google.internal/computeMetadata/v1/instance/name)\"\n
echo \"Page served from: $vm_hostname\" | \\\ntee
/var/www/html/index.html\nsystemctl restart apache2"
}
]
},
"networkInterfaces":[
{
"network":"projects/PROJECT_ID/global/networks/lb-network",
"subnetwork":"regions/us-west1/subnetworks/backend-subnet",
"accessConfigs":[
{
"type":"ONE_TO_ONE_NAT"
}
]
}
],
"disks":[
{
"index":0,
"boot":true,
"initializeParams":{
"sourceImage":"projects/debian-cloud/global/images/family/debian-12"
},
"autoDelete":true
}
]
}
}
```
Create a managed instance group in each zone with the
[`instanceGroupManagers.insert` method](https://docs.cloud.google.com/compute/docs/reference/rest/v1/instanceGroupManagers/insert.md.txt),
replacing `PROJECT_ID` with your project ID.
```
POST https://compute.googleapis.com/compute/v1/projects/PROJECT_ID/zones/{zone}/instanceGroupManagers
{
"name": "l7-ilb-backend-example",
"zone": "projects/PROJECT_ID/zones/us-west1-a",
"instanceTemplate": "projects/PROJECT_ID/global/instanceTemplates/l7-ilb-backend-template",
"baseInstanceName": "l7-ilb-backend-example",
"targetSize": 2
}
```
## Configure the load balancer
This example shows you how to create the following regional internal Application Load Balancer resources:
- HTTP health check
- Backend service with a managed instance group as the backend
- A [URL map](https://docs.cloud.google.com/load-balancing/docs/l7-internal/traffic-management.md.txt)
- Make sure to refer to a regional URL map if a region is defined for the target HTTP(S) proxy. A regional URL map routes requests to a regional backend service based on rules that you define for the host and path of an incoming URL. A regional URL map can be referenced by a regional target proxy rule in the same region only.
- SSL certificate (for HTTPS)
- Target proxy
- Forwarding rule
#### Proxy availability
Sometimes Google Cloud regions don't have enough proxy capacity for
a new load balancer. If this happens, the Google Cloud console provides a
proxy availability warning message when you are creating your load balancer. To
resolve this issue, you can do one of the following:
- Select a different region for your load balancer. This can be a practical option if you have backends in another region.
- Select a VPC network that already has an allocated proxy-only subnet.
- Wait for the capacity issue to be resolved.
### Console
#### Select the load balancer type
1. In the Google Cloud console, go to the **Load balancing** page.
[Go to Load balancing](https://console.cloud.google.com/net-services/loadbalancing/list)
2. Click **Create load balancer**.
3. For **Type of load balancer** , select **Application Load Balancer
(HTTP/HTTPS)** and click **Next**.
4. For **Public facing or internal** , select **Internal** and click **Next**.
5. For **Cross-region or single region deployment** , select **Best for
regional workloads** and click **Next**.
6. Click **Configure**.
#### Basic configuration
1. For the **Name** of the load balancer, enter `l7-ilb-map`.
2. For **Region** , select `us-west1`.
3. For **Network** , select `lb-network`.
#### Reserve a proxy-only subnet
> [!NOTE]
> **Note:** If you've already reserved a proxy-only subnet, as instructed in the [preparation setup](https://docs.cloud.google.com/load-balancing/docs/l7-internal/setting-up-l7-internal.md.txt#configuring_the_proxy-only_subnet), the **Reserve a Subnet** button isn't displayed, so you need to skip this section and continue with the steps to configure the backend service.
Reserve a proxy-only subnet:
1. Click **Reserve a Subnet**.
2. For **Name** , enter `proxy-only-subnet`.
3. For **IP address range** , enter `10.129.0.0/23`.
4. Click **Add**.
#### Configure the backend service
1. Click **Backend configuration**.
2. From the **Create or select backend services** menu, select **Create a
backend service**.
3. Set the name of the backend service to `l7-ilb-backend-service`.
4. Set **Backend type** to **Instance group**.
5. In the **Health check** list, click **Create a health check** , and then enter the following information:
1. **Name** : `l7-ilb-basic-check`
2. **Protocol** : **HTTP**
3. **Port** : `80`
6. Click **Create**.
7. In the **New backend** section:
1. Set **Instance group** to `l7-ilb-backend-example`.
2. Set **Port numbers** to `80`.
3. Set **Balancing mode** to **Utilization**.
4. Click **Done**.
8. Optional: Configure a default backend security policy. The default security
policy throttles traffic over a user-configured threshold. For more
information about default security policies, see the
[Rate limiting overview](https://docs.cloud.google.com/armor/docs/rate-limiting-overview.md.txt#default-policy).
1. To opt out of the Cloud Armor default security policy, select `None` in the **Cloud Armor backend security policy** list.
2. To configure the Cloud Armor default security policy, select **Default security policy** in the **Cloud Armor backend security policy** list.
3. In the **Policy name** field, accept the automatically generated name or enter a name for your security policy.
4. In the **Request count** field, accept the default request count or enter an integer between `1` and `10,000`.
5. In the **Interval** field, select an interval.
6. In the **Enforce on key** field, choose one of the following values: **All** , **IP address** , or **X-Forwarded-For IP address** . For more information about these options, see [Identifying clients for rate limiting](https://docs.cloud.google.com/armor/docs/rate-limiting-overview.md.txt#identifying_clients_for_rate_limiting).
9. Click **Create**.
#### Configure the URL map
1. Click **Host and path rules**.
2. For **Mode** , select **Simple host and path rule**.
3. Ensure that the `l7-ilb-backend-service` is the only backend service for
any unmatched host and any unmatched path.
For information about traffic management, see [Set up traffic management for
internal Application Load Balancers](https://docs.cloud.google.com/load-balancing/docs/l7-internal/setting-up-traffic-management).
#### Configure the frontend
**For HTTP**:
1. Click **Frontend configuration**.
2. Set the name of the forwarding rule to `l7-ilb-forwarding-rule`.
3. Set **Protocol** to `HTTP`.
4. Set **Subnetwork** to `backend-subnet`.
5. Set the **Port** to `80`.
6. From the **IP address** list, select `l7-ilb-ip-address`.
7. Click **Done**.
**For HTTPS**:
1. Click **Frontend configuration**.
2. Set the name of the forwarding rule to `l7-ilb-forwarding-rule`.
3. Set **Protocol** to `HTTPS (includes HTTP/2)`.
4. Set **Subnetwork** to `backend-subnet`.
5. Ensure that the **Port** is set to `443`, to allow HTTPS traffic.
6. From the **IP address** list, select `l7-ilb-ip-address`.
7. To assign an SSL certificate to the target HTTPS proxy of the
load balancer, you can either use a Compute Engine
SSL certificate or a Certificate Manager certificate.
1. To attach a Certificate Manager certificate to the
target HTTPS proxy of the load balancer, in the
**Choose certificate repository** section, select **Certificates**.
If you already have an existing Certificate Manager
certificate to select, do the following:
1. Click **Add Certificate**.
2. Click **Select an existing certificate** and select the certificate from the list of certificates.
3. Click **Select**.
After you select the new Certificate Manager
certificate, it appears in the list of certificates.
To create a new Certificate Manager certificate,
do the following:
1. Click **Add Certificate**.
2. Click **Create a new certificate**.
3. To create a new certificate, follow the steps
starting from *step 3* as outlined in any one
of the following configuration methods in the
Certificate Manager documentation:
- [Create a Google-managed certificate referencing the DNS authorization](https://docs.cloud.google.com/certificate-manager/docs/deploy-google-managed-regional.md.txt#create-google-managed-certificate-dns-auth)
- [Create a Google-managed certificate issued by your
CA Service instance](https://docs.cloud.google.com/certificate-manager/docs/deploy-google-managed-cas-regional#create-google-managed-certificate-issued-by-your-cas-instance)
- [Upload a self-managed certificate to Certificate Manager](https://docs.cloud.google.com/certificate-manager/docs/deploy-self-managed-regional.md.txt#upload-self-managed-certificate-to-certificate-manager)
After you create the new Certificate Manager
certificate, it appears in the list of certificates.
2. To attach a Compute Engine SSL certificate to the
target HTTPS proxy of the load balancer, in the
**Choose certificate repository** section,
select **Classic Certificates**.
1. In the **Certificate** list, do the following:
1. If you already have a Compute Engine [self-managed SSL certificate](https://docs.cloud.google.com/load-balancing/docs/ssl-certificates.md.txt#certificate-types) resource, select the primary SSL certificate.
2. Click **Create a new certificate** .
1. In the **Name** field, enter `l7-ilb-cert`.
2. In the appropriate fields, upload your PEM-formatted files:
- **Certificate**
- **Private key**
3. Click **Create**.
3. Optional: To add certificates in addition to the primary SSL certificate:
1. Click **Add certificate**.
2. If you already have a certificate, select it from the **Certificates** list.
3. Optional: Click **Create a new certificate** and follow the instructions as specified in the previous step.
8. Select an SSL policy from the **SSL policy** list. Optionally, to create
an SSL policy, do the following:
1. In the **SSL policy** list, select **Create a policy**.
2. Enter a name for the SSL policy.
3. Select a minimum TLS version. The default value is **TLS 1.0**.
4. Select one of the pre-configured Google-managed profiles or select a **Custom** profile that lets you select SSL features individually. The **Enabled features** and **Disabled features** are displayed.
5. Click **Save**.
If you have not created any SSL policies, a
[default Google Cloud SSL policy](https://docs.cloud.google.com/load-balancing/docs/ssl-policies-concepts.md.txt#default-ssl-policy) is applied.
9. Click **Done**.
#### Review the configuration
1. Click **Review and finalize**.
2. Review your load balancer configuration settings.
3. Optional: Click **Equivalent code** to view the REST API request that will be used to create the load balancer.
4. Click **Create**.
### gcloud
1. Define the HTTP health check with the [`gcloud compute health-checks
create http` command](https://docs.cloud.google.com/sdk/gcloud/reference/compute/health-checks/create/http).
```
gcloud compute health-checks create http l7-ilb-basic-check \
--region=us-west1 \
--use-serving-port
```
2. Define the backend service with the [`gcloud compute
backend-services create`
command](https://docs.cloud.google.com/sdk/gcloud/reference/compute/backend-services/create).
```
gcloud compute backend-services create l7-ilb-backend-service \
--load-balancing-scheme=INTERNAL_MANAGED \
--protocol=HTTP \
--health-checks=l7-ilb-basic-check \
--health-checks-region=us-west1 \
--region=us-west1
```
3. Add backends to the backend service with the [`gcloud compute backend-services
add-backend` command](https://docs.cloud.google.com/sdk/gcloud/reference/compute/backend-services/add-backend).
```
gcloud compute backend-services add-backend l7-ilb-backend-service \
--balancing-mode=UTILIZATION \
--instance-group=l7-ilb-backend-example \
--instance-group-zone=us-west1-a \
--region=us-west1
```
4. Create the URL map with the [`gcloud compute url-maps
create` command](https://docs.cloud.google.com/sdk/gcloud/reference/compute/url-maps/create).
```
gcloud compute url-maps create l7-ilb-map \
--default-service=l7-ilb-backend-service \
--region=us-west1
```
5. Create the target proxy.
**For HTTP:**
For an internal HTTP load balancer, create the target proxy
with the [`gcloud compute target-http-proxies
create` command](https://docs.cloud.google.com/sdk/gcloud/reference/compute/target-http-proxies/create).
```
gcloud compute target-http-proxies create l7-ilb-proxy \
--url-map=l7-ilb-map \
--url-map-region=us-west1 \
--region=us-west1
```
**For HTTPS:**
You can create either Compute Engine or Certificate Manager
certificates. Use any of the following methods to create certificates using
Certificate Manager:
- Regional self-managed certificates. For information about creating and using regional self-managed certificates, see [Deploy a regional self-managed
certificate](https://docs.cloud.google.com/certificate-manager/docs/deploy-self-managed-regional). Certificate maps aren't supported.
- Regional Google-managed certificates. Certificate maps aren't supported.
The following types of regional Google-managed certificates are supported by
Certificate Manager:
- Regional Google-managed certificates with per-project DNS authorization. For more information, see [Deploy a regional
Google-managed certificate with DNS authorization](https://docs.cloud.google.com/certificate-manager/docs/deploy-google-managed-regional).
- Regional Google-managed (private) certificates with Certificate Authority Service. For more information, see [Deploy a regional
Google-managed certificate with Certificate Authority Service](https://docs.cloud.google.com/certificate-manager/docs/deploy-google-managed-cas-regional).
After you create certificates, attach the certificate directly to the target
proxy.
Assign your filepaths to variable names.
```
export LB_CERT=path to PEM-formatted file
```
```
export LB_PRIVATE_KEY=path to PEM-formatted file
```
Create a regional SSL certificate using the [`gcloud compute
ssl-certificates
create` command](https://docs.cloud.google.com/sdk/gcloud/reference/compute/ssl-certificates/create).
```
gcloud compute ssl-certificates create l7-ilb-cert \
--certificate=$LB_CERT \
--private-key=$LB_PRIVATE_KEY \
--region=us-west1
```
Use the regional SSL certificate to create a target proxy with the [`gcloud
compute target-https-proxies
create` command](https://docs.cloud.google.com/sdk/gcloud/reference/compute/target-https-proxies/create).
```
gcloud compute target-https-proxies create l7-ilb-proxy \
--url-map=l7-ilb-map \
--region=us-west1 \
--ssl-certificates=l7-ilb-cert
```
6. Create the forwarding rule.
For custom networks, you must reference the subnet in the forwarding
rule. Note that this is the VM subnet, not the proxy subnet.
**For HTTP:**
Use the [`gcloud compute forwarding-rules
create` command](https://docs.cloud.google.com/sdk/gcloud/reference/compute/forwarding-rules/create)
with the correct flags.
```
gcloud compute forwarding-rules create l7-ilb-forwarding-rule \
--load-balancing-scheme=INTERNAL_MANAGED \
--network=lb-network \
--subnet=backend-subnet \
--address=l7-ilb-ip-address \
--ports=80 \
--region=us-west1 \
--target-http-proxy=l7-ilb-proxy \
--target-http-proxy-region=us-west1
```
**For HTTPS:**
Create the forwarding rule with the [`gcloud compute forwarding-rules
create` command](https://docs.cloud.google.com/sdk/gcloud/reference/compute/forwarding-rules/create)
with the correct flags.
```
gcloud compute forwarding-rules create l7-ilb-forwarding-rule \
--load-balancing-scheme=INTERNAL_MANAGED \
--network=lb-network \
--subnet=backend-subnet \
--address=l7-ilb-ip-address \
--ports=443 \
--region=us-west1 \
--target-https-proxy=l7-ilb-proxy \
--target-https-proxy-region=us-west1
```
### API
Create the health check by making a `POST` request to the
[`regionHealthChecks.insert`](https://docs.cloud.google.com/compute/docs/reference/rest/v1/regionHealthChecks/insert.md.txt)
method, replacing `PROJECT_ID` with your project ID.
```
POST https://compute.googleapis.com/compute/v1/projects/PROJECT_ID/regions/{region}/healthChecks
{
"name": "l7-ilb-basic-check",
"type": "HTTP",
"httpHealthCheck": {
"portSpecification": "USE_SERVING_PORT"
}
}
```
Create the regional backend service by making a `POST` request to the
[`regionBackendServices.insert` method](https://docs.cloud.google.com/compute/docs/reference/rest/v1/regionBackendServices/insert.md.txt),
replacing `PROJECT_ID` with your project ID.
```
POST https://compute.googleapis.com/compute/v1/projects/PROJECT_ID/regions/us-west1/backendServices
{
"name": "l7-ilb-backend-service",
"backends": [
{
"group": "projects/PROJECT_ID/zones/us-west1-a/instanceGroups/l7-ilb-backend-example",
"balancingMode": "UTILIZATION"
}
],
"healthChecks": [
"projects/PROJECT_ID/regions/us-west1/healthChecks/l7-ilb-basic-check"
],
"loadBalancingScheme": "INTERNAL_MANAGED"
}
```
Create the URL map by making a `POST` request to the
[`regionUrlMaps.insert` method](https://docs.cloud.google.com/compute/docs/reference/rest/v1/regionUrlMaps/insert.md.txt),
replacing `PROJECT_ID` with your project ID.
```
POST https://compute.googleapis.com/compute/v1/projects/PROJECT_ID/regions/us-west1/urlMaps
{
"name": "l7-ilb-map",
"defaultService": "projects/PROJECT_ID/regions/us-west1/backendServices/l7-ilb-backend-service"
}
```
**For HTTP**:
Create the target HTTP proxy by making a `POST` request to the
[`regionTargetHttpProxies.insert` method](https://docs.cloud.google.com/compute/docs/reference/rest/v1/regionTargetHttpProxies/insert.md.txt),
replacing `PROJECT_ID` with your project ID.
```
POST https://compute.googleapis.com/compute/v1/projects/PROJECT_ID/regions/us-west1/targetHttpProxy
{
"name": "l7-ilb-proxy",
"urlMap": "projects/PROJECT_ID/global/urlMaps/l7-ilb-map",
"region": "us-west1"
}
```
Create the forwarding rule by making a `POST` request to the
[`forwardingRules.insert` method](https://docs.cloud.google.com/compute/docs/reference/rest/v1/forwardingRules/insert.md.txt),
replacing `PROJECT_ID` with your project ID.
```
POST https://compute.googleapis.com/compute/v1/projects/PROJECT_ID/regions/us-west1/forwardingRules
{
"name": "l7-ilb-forwarding-rule",
"IPAddress": "IP_ADDRESS",
"IPProtocol": "TCP",
"portRange": "80-80",
"target": "projects/PROJECT_ID/regions/us-west1/targetHttpProxies/l7-ilb-proxy",
"loadBalancingScheme": "INTERNAL_MANAGED",
"subnetwork": "projects/PROJECT_ID/regions/us-west1/subnetworks/backend-subnet",
"network": "projects/PROJECT_ID/global/networks/lb-network",
"networkTier": "PREMIUM"
}
```
**For HTTPS**:
You can create either Compute Engine or Certificate Manager
certificates. Use any of the following methods to create certificates using
Certificate Manager:
- Regional self-managed certificates. For information about creating and using regional self-managed certificates, see [Deploy a regional self-managed
certificate](https://docs.cloud.google.com/certificate-manager/docs/deploy-self-managed-regional). Certificate maps aren't supported.
- Regional Google-managed certificates. Certificate maps aren't supported.
The following types of regional Google-managed certificates are supported by
Certificate Manager:
- Regional Google-managed certificates with per-project DNS authorization. For more information, see [Deploy a regional
Google-managed certificate with DNS authorization](https://docs.cloud.google.com/certificate-manager/docs/deploy-google-managed-regional).
- Regional Google-managed (private) certificates with Certificate Authority Service. For more information, see [Deploy a regional
Google-managed certificate with Certificate Authority Service](https://docs.cloud.google.com/certificate-manager/docs/deploy-google-managed-cas-regional).
After you create certificates, attach the certificate directly to the target
proxy.
Read the certificate and private key files, and then create the SSL
certificate. The following example shows
how to do this with Python.
```python
from pathlib import Path
from pprint import pprint
from typing import Union
from googleapiclient import discovery
def create_regional_certificate(
project_id: str,
region: str,
certificate_file: Union[str, Path],
private_key_file: Union[str, Path],
certificate_name: str,
description: str = "Certificate created from a code sample.",
) -> dict:
"""
Create a regional SSL self-signed certificate within your Google Cloud project.
Args:
project_id: project ID or project number of the Cloud project you want to use.
region: name of the region you want to use.
certificate_file: path to the file with the certificate you want to create in your project.
private_key_file: path to the private key you used to sign the certificate with.
certificate_name: name for the certificate once it's created in your project.
description: description of the certificate.
Returns:
Dictionary with information about the new regional SSL self-signed certificate.
"""
service = discovery.build("compute", "v1")
# Read the cert into memory
with open(certificate_file) as f:
_temp_cert = f.read()
# Read the private_key into memory
with open(private_key_file) as f:
_temp_key = f.read()
# Now that the certificate and private key are in memory, you can create the
# certificate resource
ssl_certificate_body = {
"name": certificate_name,
"description": description,
"certificate": _temp_cert,
"privateKey": _temp_key,
}
request = service.regionSslCertificates().insert(
project=project_id, region=region, body=ssl_certificate_body
)
response = request.execute()
pprint(response)
return response
```
Create the target HTTPS proxy by making a `POST` request to the
[`regionTargetHttpsProxies.insert` method](https://docs.cloud.google.com/compute/docs/reference/rest/v1/regionTargetHttpsProxies/insert.md.txt),
replacing `PROJECT_ID` with your project ID.
```
POST https://compute.googleapis.com/compute/v1/projects/PROJECT_ID/regions/us-west1/regionTargetHttpsProxy
{
"name": "l7-ilb-proxy",
"urlMap": "projects/PROJECT_ID/regions/us-west1/urlMaps/l7-ilb-map",
"sslCertificates": /projects/PROJECT_ID/regions/us-west1/sslCertificates/SSL_CERT_NAME
}
```
Create the forwarding rule by making a `POST` request to the
[`forwardingRules.insert` method](https://docs.cloud.google.com/compute/docs/reference/rest/v1/forwardingRules/insert.md.txt),
replacing `PROJECT_ID` with your project ID.
```
POST https://compute.googleapis.com/compute/v1/projects/PROJECT_ID/regions/us-west1/forwardingRules
{
"name": "l7-ilb-forwarding-rule",
"IPAddress": "IP_ADDRESS",
"IPProtocol": "TCP",
"portRange": "80-80",
"target": "projects/PROJECT_ID/regions/us-west1/targetHttpsProxies/l7-ilb-proxy",
"loadBalancingScheme": "INTERNAL_MANAGED",
"subnetwork": "projects/PROJECT_ID/regions/us-west1/subnetworks/backend-subnet",
"network": "projects/PROJECT_ID/global/networks/lb-network",
"networkTier": "PREMIUM",
}
```
## Test the load balancer
To test the load balancer, create a client VM. Then, establish an
SSH session with the VM and send traffic from the VM to the load balancer.
### Create a VM instance to test connectivity
### Console
1. In the Google Cloud console, go to the **VM instances** page.
[Go to VM instances](https://console.cloud.google.com/compute/instances)
2. Click **Create instance**.
3. Set **Name** to `l7-ilb-client-us-west1-a`.
4. Set **Zone** to `us-west1-a`.
5. Click **Advanced options**.
6. Click **Networking** and configure the following fields:
1. For **Network tags** , enter `allow-ssh`.
2. For **Network interfaces** , select the following:
1. **Network** : `lb-network`
2. **Subnet** : `backend-subnet`
7. Click **Create**.
### gcloud
```
gcloud compute instances create l7-ilb-client-us-west1-a \
--image-family=debian-12 \
--image-project=debian-cloud \
--network=lb-network \
--subnet=backend-subnet \
--zone=us-west1-a \
--tags=allow-ssh
```
### Send traffic to the load balancer
Sign in to the instance that you just created and test that HTTP(S) services on
the backends are reachable by using the regional internal Application Load Balancer's forwarding
rule IP address, and traffic is being load balanced across the backend
instances.
#### Connect using SSH to each client instance
```
gcloud compute ssh l7-ilb-client-us-west1-a \
--zone=us-west1-a
```
#### Get the load balancer's IP address
Use the [`gcloud compute addresses describe`
command](https://docs.cloud.google.com/sdk/gcloud/reference/compute/addresses/describe)
to view the allocated IP address:
```
gcloud compute addresses describe l7-ilb-ip-address \
--region=us-west1
```
#### Verify that the IP address is serving its hostname
Replace `IP_ADDRESS` with the load balancer's IP address.
**For HTTP testing:**
```
curl IP_ADDRESS
```
**For HTTPS testing:**
```
curl -k -s 'https://DOMAIN_NAME:443' --connect-to DOMAIN_NAME:443:IP_ADDRESS:443
```
Replace `DOMAIN_NAME` with your application domain name, for
example, `test.example.com`.
The `-k` flag causes curl to skip certificate validation.
#### Run 100 requests and confirm that they are load balanced
Replace `IP_ADDRESS` with the load balancer's IP address.
**For HTTP**:
```
{
RESULTS=
for i in {1..100}
do
RESULTS="$RESULTS:$(curl --silent IP_ADDRESS)"
done
echo "***"
echo "*** Results of load-balancing: "
echo "***"
echo "$RESULTS" | tr ':' '\n' | grep -Ev "^$" | sort | uniq -c
echo
}
```
**For HTTPS**:
Replace `DOMAIN_NAME` with your application domain name, for
example, `test.example.com`.
```
{
RESULTS=
for i in {1..100}
do
RESULTS="$RESULTS:$(curl -k -s 'https://DOMAIN_NAME:443' --connect-to DOMAIN_NAME:443:IP_ADDRESS:443)"
done
echo "***"
echo "*** Results of load-balancing: "
echo "***"
echo "$RESULTS" | tr ':' '\n' | grep -Ev "^$" | sort | uniq -c
echo
}
```
## Additional configuration options
This section expands on the configuration example to provide alternative and
additional configuration options. All of the tasks are optional. You can
perform them in any order.
### Enable global access
You can enable [global access](https://docs.cloud.google.com/load-balancing/docs/l7-internal.md.txt#client-access)
for Regional internal Application Load Balancer and Regional internal proxy Network Load Balancer to make them
accessible to clients in all regions. The backends of your example load balancer must
still be located in one region (`us-west1`).
[](https://docs.cloud.google.com/static/load-balancing/images/proxy-ilb-global-access-arch.svg) Regional internal Application Load Balancer with global access (click to enlarge).
You can't modify an existing regional forwarding rule to enable global access.
You must create a new forwarding rule for this purpose and delete the previous
forwarding rule. Additionally, after a
forwarding rule is created with global access enabled, it cannot be
modified. To disable global access, you must create a new regional
access forwarding rule and delete the previous global access forwarding rule.
To configure global access, make the following configuration changes.
### Console
Create a new forwarding rule for the load balancer:
1. In the Google Cloud console, go to the **Load balancing** page.
[Go to Load balancing](https://console.cloud.google.com/networking/loadbalancing/list)
2. In the **Name** column, click your load balancer.
3. Click **Frontend configuration**.
4. Click **Add frontend IP and port**.
5. Enter the name and subnet details for the new forwarding rule.
6. For **Subnetwork** , select **backend-subnet**.
7. For **IP address** , you can either select the same IP address as an
existing forwarding rule, reserve a new IP address, or use an ephemeral
IP address. Sharing the same IP address across multiple
forwarding rules is only possible if you set the IP address `--purpose`
flag to `SHARED_LOADBALANCER_VIP` while creating the IP address.
8. For **Port number** , enter `110`.
9. For **Global access** , select **Enable**.
10. Click **Done**.
11. Click **Update**.
### gcloud
1. Create a new forwarding rule for the load balancer with the
`--allow-global-access` flag.
**For HTTP:**
```
gcloud compute forwarding-rules create l7-ilb-forwarding-rule-global-access \
--load-balancing-scheme=INTERNAL_MANAGED \
--network=lb-network \
--subnet=backend-subnet \
--address=10.1.2.99 \
--ports=80 \
--region=us-west1 \
--target-http-proxy=l7-ilb-proxy \
--target-http-proxy-region=us-west1 \
--allow-global-access
```
**For HTTPS:**
```
gcloud compute forwarding-rules create l7-ilb-forwarding-rule-global-access \
--load-balancing-scheme=INTERNAL_MANAGED \
--network=lb-network \
--subnet=backend-subnet \
--address=10.1.2.99 \
--ports=443 \
--region=us-west1 \
--target-https-proxy=l7-ilb-proxy \
--target-https-proxy-region=us-west1 \
--allow-global-access
```
2. You can use the [`gcloud compute forwarding-rules describe`
command](https://docs.cloud.google.com/sdk/gcloud/reference/compute/forwarding-rules/describe) to
determine whether a forwarding rule has global access enabled. For
example:
```
gcloud compute forwarding-rules describe l7-ilb-forwarding-rule-global-access \
--region=us-west1 \
--format="get(name,region,allowGlobalAccess)"
```
When global access is enabled, the word `True` appears in the output
after the name and region of the forwarding rule.
#### Create a client VM to test global access
### Console
1. In the Google Cloud console, go to the **VM instances** page.
[Go to VM instances](https://console.cloud.google.com/compute/instances)
2. Click **Create instance**.
3. Set **Name** to `europe-client-vm`.
4. Set **Zone** to `europe-west1-b`.
5. Click **Advanced options**.
6. Click **Networking** and configure the following fields:
1. For **Network tags** , enter `allow-ssh`.
2. For **Network interfaces** , select the following:
- **Network** : `lb-network`
- **Subnet** : `europe-subnet`
7. Click **Create**.
### gcloud
Create a client VM in the `europe-west1-b` zone.
```
gcloud compute instances create europe-client-vm \
--zone=europe-west1-b \
--image-family=debian-12 \
--image-project=debian-cloud \
--tags=allow-ssh \
--subnet=europe-subnet
```
#### Connect to the VM client and test connectivity
1. Use `ssh` to connect to the client instance.
```
gcloud compute ssh europe-client-vm \
--zone=europe-west1-b
```
2. Test connections to the load balancer as you did from the `vm-client` in the
`us-west1` region.
```
curl http://10.1.2.99
```
### Enable session affinity
These procedures show you how to update a backend service for the example
regional internal Application Load Balancer or cross-region internal Application Load Balancer
so that the backend service
uses generated cookie affinity, header field affinity, or HTTP cookie affinity.
When generated cookie affinity is enabled, the load balancer issues a cookie
on the first request. For each subsequent request with the same cookie, the load
balancer directs the request to the same backend virtual machine (VM) instance
or endpoint. In this example, the cookie is named `GCILB`.
When header field affinity is enabled, the load balancer routes requests to
backend VMs or endpoints in a network endpoint group (NEG) based on the value of
the HTTP header named in the `--custom-request-header` flag.
Header field affinity is only valid if
the load balancing locality policy is either `RING_HASH` or `MAGLEV` and the
backend service's consistent hash specifies the name of the HTTP header.
When HTTP cookie affinity is enabled, the load balancer routes requests to
backend VMs or endpoints in a NEG, based on an HTTP cookie named in the
`HTTP_COOKIE` flag with the optional `--affinity-cookie-ttl` flag. If the client
doesn't provide the cookie in its HTTP request, the proxy generates
the cookie and returns it to the client in a `Set-Cookie` header. HTTP cookie
affinity is only valid if the load balancing locality policy is either
`RING_HASH` or `MAGLEV` and the backend service's consistent hash specifies the
HTTP cookie.
### Console
To enable or change session affinity for a backend service:
1. In the Google Cloud console, go to the **Load balancing** page.
[Go to Load balancing](https://console.cloud.google.com/net-services/loadbalancing/loadBalancers/list)
2. Click **Backends**.
3. Click **l7-ilb-backend-service** (the name of the backend service you created for this example) and click **Edit**.
4. On the **Backend service details** page, click **Advanced
configuration**.
5. Under **Session affinity**, select the type of session affinity you want.
6. Click **Update**.
### gcloud
Use the following Google Cloud CLI commands to update the
backend service to different types of session affinity:
```
gcloud compute backend-services update l7-ilb-backend-service \
--session-affinity=[GENERATED_COOKIE | HEADER_FIELD | HTTP_COOKIE | CLIENT_IP] \
--region=us-west1
```
### API
To set session affinity, make a \`PATCH\` request to the
[`backendServices/patch` method](https://docs.cloud.google.com/compute/docs/reference/rest/v1/backendServices/patch.md.txt).
```
PATCH https://compute.googleapis.com/compute/v1/projects/[PROJECT_ID]/regions/us-west1/regionBackendServices/l7-ilb-backend-service
{
"sessionAffinity": ["GENERATED_COOKIE" | "HEADER_FIELD" | "HTTP_COOKIE" | "CLIENT_IP" ]
}
```
### Restrict which clients can send traffic to the load balancer
> [!NOTE]
> **Note:** This section shows you how to restrict client access to your regional internal Application Load Balancer by using firewall rules. You can also use Google Cloud Armor to restrict client access to your load balancer. For more information, see the [Security policy
> overview](https://docs.cloud.google.com/armor/docs/security-policy-overview) in the Cloud Armor documentation.
You can restrict clients from connecting to an internal Application Load Balancer
forwarding rule VIP by configuring egress firewall rules on these clients. Set
these firewall rules on specific client VMs based on [service
accounts](https://docs.cloud.google.com/vpc/docs/firewalls#serviceaccounts) or
[tags](https://docs.cloud.google.com/vpc/docs/add-remove-network-tags.md.txt#adding_new_tags_to_vm_instances).
You can't use firewall rules to restrict inbound traffic to specific
internal Application Load Balancer forwarding rule VIPs. Any client on the same VPC
network and in the same region as the forwarding rule VIP can generally send
traffic to the forwarding rule VIP.
Additionally, all requests to backends come from proxies that use IP addresses in
the [proxy-only subnet](https://docs.cloud.google.com/load-balancing/docs/l7-internal.md.txt#proxy-only_subnet)
range. It isn't possible to create firewall rules that allow or deny ingress
traffic on these backends based on the forwarding rule VIP used by a client.
Here are some examples of how to use egress firewall rules to restrict traffic
to the load balancer's forwarding rule VIP.
### Console
To identify the client VMs, [tag the
specific VMs](https://docs.cloud.google.com/vpc/docs/add-remove-network-tags#adding_new_tags_to_vm_instances)
you want to restrict. These tags are used to associate firewall rules with
the tagged client VMs. Then, add the tag to the `TARGET_TAG`
field in the following steps.
Use either a single firewall rule or multiple rules to set this up.
#### Single egress firewall rule
You can configure one firewall egress rule to deny all egress
traffic going from tagged client VMs to a load balancer's VIP.
1. In the Google Cloud console, go to the **Firewall rules** page.
[Go to Firewall rules](https://console.cloud.google.com/networking/firewalls/list)
2. Click **Create firewall rule** to create the rule to deny egress
traffic from tagged client VMs to a load balancer's VIP.
- **Name** : `fr-deny-access`
- **Network** : `lb-network`
- **Priority** : `100`
- **Direction of traffic** : **Egress**
- **Action on match** : **Deny**
- **Targets** : **Specified target tags**
- **Target tags** : `TARGET_TAG`
- **Destination filter** : **IP ranges**
- **Destination IP ranges** : `10.1.2.99`
- **Protocols and ports** :
- Choose **Specified protocols and ports**.
- Select the **tcp** checkbox, and then enter `80` for the port number.
3. Click **Create**.
#### Multiple egress firewall rules
A more scalable approach involves setting two rules. A default, low-priority
rule that restricts all clients from accessing the load balancer's VIP. A
second, higher-priority rule that allows a subset of tagged clients to
access the load balancer's VIP. Only tagged VMs can access the
VIP.
1. In the Google Cloud console, go to the **Firewall rules** page.
[Go to Firewall rules](https://console.cloud.google.com/networking/firewalls/list)
2. Click **Create firewall rule** to create the lower priority rule to deny
access by default:
- **Name** : `fr-deny-all-access-low-priority`
- **Network** : `lb-network`
- **Priority** : `200`
- **Direction of traffic** : **Egress**
- **Action on match** : **Deny**
- **Targets** : **Specified target tags**
- **Target tags** : `TARGET_TAG`
- **Destination filter** : **IP ranges**
- **Destination IP ranges** : `10.1.2.99`
- **Protocols and ports** :
- Choose **Specified protocols and ports**.
- Select the **TCP** checkbox, and then enter `80` for the port number.
3. Click **Create**.
4. Click **Create firewall rule** to create the higher priority rule to
allow traffic from certain tagged instances.
- **Name** : `fr-allow-some-access-high-priority`
- **Network** : `lb-network`
- **Priority** : `100`
- **Direction of traffic** : **Egress**
- **Action on match** : **Allow**
- **Targets** : **Specified target tags**
- **Target tags** : `TARGET_TAG`
- **Destination filter** : **IP ranges**
- **Destination IP ranges** : `10.1.2.99`
- **Protocols and ports** :
- Choose **Specified protocols and ports**.
- Select the **TCP** checkbox, and then enter `80` for the port number.
5. Click **Create**.
### gcloud
To identify the client VMs, [tag the
specific VMs](https://docs.cloud.google.com/vpc/docs/add-remove-network-tags#adding_new_tags_to_vm_instances)
you want to restrict. Then add the tag to the `TARGET_TAG`
field in these steps.
Use either a single firewall rule or multiple rules to set this up.
#### Single egress firewall rule
You can configure one firewall egress rule to deny all egress
traffic going from tagged client VMs to a load balancer's VIP.
```
gcloud compute firewall-rules create fr-deny-access \
--network=lb-network \
--action=deny \
--direction=egress \
--rules=tcp \
--priority=100 \
--destination-ranges=10.1.2.99 \
--target-tags=TARGET_TAG
```
#### Multiple egress firewall rules
A more scalable approach involves setting two rules: a default, low-priority
rule that restricts all clients from accessing the load balancer's VIP, and a
second, higher-priority rule that allows a subset of tagged clients to access
the load balancer's VIP. Only tagged VMs can access the VIP.
1. Create the lower-priority rule:
```
gcloud compute firewall-rules create fr-deny-all-access-low-priority \
--network=lb-network \
--action=deny \
--direction=egress \
--rules=tcp \
--priority=200 \
--destination-ranges=10.1.2.99
```
2. Create the higher priority rule:
```
gcloud compute firewall-rules create fr-allow-some-access-high-priority \
--network=lb-network \
--action=allow \
--direction=egress \
--rules=tcp \
--priority=100 \
--destination-ranges=10.1.2.99 \
--target-tags=TARGET_TAG
```
To use service accounts instead of tags to control access, use
the [`--target-service-accounts`
option](https://docs.cloud.google.com/sdk/gcloud/reference/compute/firewall-rules/create#--target-service-accounts)
instead of the `--target-tags` flag when creating firewall rules.
#### Scale restricted access to internal Application Load Balancer backends based on subnets
Maintaining separate firewall rules or adding new load-balanced IP addresses to
existing rules as described in the previous section becomes inconvenient as the
number of forwarding rules increases. One way to prevent this is to allocate
forwarding rule IP addresses from a reserved subnet.
Then, traffic from tagged instances or
service accounts can be allowed or blocked by using the reserved subnet as the
destination range for firewall rules. This lets you effectively control
access to a group of forwarding rule VIPs without having to maintain
per-VIP firewall egress rules.
Here are the high-level steps to set this up, assuming that you will create
all the other required load balancer resources separately.
### gcloud
1. Create a regional subnet to use to allocate load-balanced IP
addresses for forwarding rules:
```
gcloud compute networks subnets create l7-ilb-restricted-subnet \
--network=lb-network \
--region=us-west1 \
--range=10.127.0.0/24
```
2. Create a forwarding rule that takes an address from the
subnet. The following example uses the address `10.127.0.1` from the subnet
created in the previous step.
```
gcloud compute forwarding-rules create l7-ilb-forwarding-rule-restricted \
--load-balancing-scheme=INTERNAL_MANAGED \
--network=lb-network \
--subnet=l7-ilb-restricted-subnet \
--address=10.127.0.1 \
--ports=80 \
--region=us-west1 \
--target-http-proxy=l7-ilb-proxy \
--target-http-proxy-region=us-west1
```
3. Create a firewall rule to restrict traffic destined for the range IP
addresses in the forwarding rule subnet (`l7-ilb-restricted-subnet`):
```
gcloud compute firewall-rules create restrict-traffic-to-subnet \
--network=lb-network \
--action=deny \
--direction=egress \
--rules=tcp:80 \
--priority=100 \
--destination-ranges=10.127.0.0/24 \
--target-tags=TARGET_TAG
```
### Configure backend subsetting
> [!WARNING]
>
> **Preview**
>
>
> This product or feature is
>
> subject to the "Pre-GA Offerings Terms" in the General Service Terms section
> of the [Service Specific
> Terms](https://docs.cloud.google.com/terms/service-terms#1).
>
> Pre-GA products and features are available "as is" and might have limited support.
>
> For more information, see the
> [launch stage descriptions](https://cloud.google.com/products/#product-launch-stages).
Backend subsetting improves performance and scalability by assigning a subset
of backends to each of the proxy instances. When enabled for a backend service,
backend subsetting adjusts the number of backends utilized by each proxy instance
as follows:
- As the number of proxy instances participating in the load balancer
increases, the subset size decreases.
- When the total number of backends in a network exceeds the capacity of a
single proxy instance, the subset size is reduced automatically for each
service that has backend subsetting enabled.
> [!NOTE]
> **Note:** In the REST API, the `subsetting.subsetSize` setting is available only for Cloud Service Mesh. This setting isn't available for regional internal Application Load Balancer.
This example shows you how to create regional internal Application Load Balancer resources and enable
[backend subsetting](https://docs.cloud.google.com/load-balancing/docs/backend-service.md.txt#https-subsetting):
1. Use the [example configuration](https://docs.cloud.google.com/load-balancing/docs/l7-internal/setting-up-l7-internal.md.txt#proxy_availability) to create a regional backend service `l7-ilb-backend-service`.
2. Enable backend subsetting by specifying the `--subsetting-policy` flag as
`CONSISTENT_HASH_SUBSETTING`. Set the load balancing scheme to
`INTERNAL_MANAGED`.
### gcloud
Use the following `gcloud` command to update `l7-ilb-backend-service`
with backend subsetting:
```
gcloud beta compute backend-services update l7-ilb-backend-service \
--region=us-west1 \
--subsetting-policy=CONSISTENT_HASH_SUBSETTING
```
### API
Make a `PATCH` request to the
[`regionBackendServices/patch` method](https://docs.cloud.google.com/compute/docs/reference/rest/beta/regionBackendServices/patch.md.txt).
```
PATCH https://compute.googleapis.com/compute/beta/projects/PROJECT_ID/regions/us-west1/backendServices/l7-ilb-backend-service
{
"subsetting":
{
"policy": CONSISTENT_HASH_SUBSETTING
}
}
```
You can also refine backend load balancing by setting the `localityLbPolicy` policy.
For more information, see [Traffic policies](https://docs.cloud.google.com/load-balancing/docs/l7-internal/traffic-management.md.txt#traffic_policies).
### Use the same IP address between multiple internal forwarding rules
For multiple internal forwarding rules to share the same internal IP address,
you must reserve the IP address and set its `--purpose` flag to
`SHARED_LOADBALANCER_VIP`.
### gcloud
```
gcloud compute addresses create SHARED_IP_ADDRESS_NAME \
--region=REGION \
--subnet=SUBNET_NAME \
--purpose=SHARED_LOADBALANCER_VIP
```
If you need to redirect HTTP traffic to HTTPS, you can create two forwarding rules that use a common IP address. For more information, see [Set up
HTTP-to-HTTPS redirect for
internal Application Load Balancers](https://docs.cloud.google.com/load-balancing/docs/l7-internal/setting-up-http-to-https-redirect).
### Update client HTTP keepalive timeout
The load balancer created in the previous steps has been configured with a default value for the [client HTTP keepalive
timeout](https://docs.cloud.google.com/load-balancing/docs/l7-internal#http-keepalive-timeout).
To update the client HTTP keepalive timeout, use the following instructions.
### Console
1. In the Google Cloud console, go to the **Load balancing** page.
[Go to Load balancing](https://console.cloud.google.com/networking/loadbalancing/add).
2. Click the name of the load balancer that you want to modify.
3. Click **Edit**.
4. Click **Frontend configuration**.
5. Expand **Advanced features** . For **HTTP keepalive timeout**, enter a timeout value.
6. Click **Update**.
7. To review your changes, click **Review and finalize** , and then click **Update**.
### gcloud
For an HTTP load balancer, update the target HTTP proxy by using the
[`gcloud compute target-http-proxies update` command](https://docs.cloud.google.com/sdk/gcloud/reference/compute/target-http-proxies/update).
```
gcloud compute target-http-proxies update TARGET_HTTP_PROXY_NAME \
--http-keep-alive-timeout-sec=HTTP_KEEP_ALIVE_TIMEOUT_SEC \
--region=REGION
```
For an HTTPS load balancer, update the target HTTPS proxy by using the
[`gcloud compute target-https-proxies update` command](https://docs.cloud.google.com/sdk/gcloud/reference/compute/target-https-proxies/update).
```
gcloud compute target-https-proxies update TARGET_HTTP_PROXY_NAME \
--http-keep-alive-timeout-sec=HTTP_KEEP_ALIVE_TIMEOUT_SEC \
--region REGION
```
Replace the following:
- `TARGET_HTTP_PROXY_NAME`: the name of the target HTTP proxy.
- `TARGET_HTTPS_PROXY_NAME`: the name of the target HTTPS proxy.
- `HTTP_KEEP_ALIVE_TIMEOUT_SEC`: the HTTP keepalive timeout value from 5 to 600 seconds.
## What's next
- [Convert Application Load Balancer to IPv6](https://docs.cloud.google.com/load-balancing/docs/https/convert-applb-dualstack.md.txt)
- [Internal Application Load Balancer overview](https://docs.cloud.google.com/load-balancing/docs/l7-internal.md.txt)
- [Proxy-only subnets for Envoy-based load
balancers](https://docs.cloud.google.com/load-balancing/docs/proxy-only-subnets)
- [Replace or renew an SSL certificate before it
expires](https://docs.cloud.google.com/load-balancing/docs/ssl-certificates/self-managed-certs#replacing-certificates)
- [Clean up a load balancing setup](https://docs.cloud.google.com/load-balancing/docs/cleaning-up-lb-setup.md.txt)