This document shows you how to deploy a cross-region internal Application Load Balancer with
Cloud Run. To set this up, you use a
*serverless NEG* backend for the load balancer.
Although this document describes a Cloud Run configuration, a
serverless NEG for Cloud Run can point to either a
Cloud Run resource or a Cloud Run functions (2nd gen) resource.
[Serverless NEGs](https://docs.cloud.google.com/load-balancing/docs/negs/serverless-neg-concepts.md.txt) let you use
Cloud Run services with your load balancer. After you configure
a load balancer with the serverless NEG backend, requests to the load balancer
are routed to the Cloud Run backend.
Cross-regional load balancing provides redundancy, so that if a region is
unreachable, traffic is automatically diverted to another region.
Based on the location of the Envoy, proxy traffic is distributed to
Cloud Run services as follows:
- If multi-region Cloud Run services are configured in the same region as the Envoy, the NEG that is located in the same region as the Envoy is preferred. Traffic is sent to the failover region only if outlier detection is enabled and the local NEG is unhealthy.
- If multi-region Cloud Run services are not configured in the same region as the Envoy, traffic is distributed evenly across all NEGs. The NEGs located closer are not preferred.
- If [Identity-Aware Proxy](https://docs.cloud.google.com/iap/docs/concepts-overview.md.txt) is enabled, only a single serverless NEG is supported. You can, however, configure additional Cloud Run services but the load balancer does not send any traffic to them.
## Before you begin
Before following this guide, familiarize yourself with the following:
- [Internal Application Load Balancer overview](https://docs.cloud.google.com/load-balancing/docs/l7-internal.md.txt), including the [Limitations](https://docs.cloud.google.com/load-balancing/docs/l7-internal.md.txt#limitations) section
- [VPC firewall rules](https://docs.cloud.google.com/vpc/docs/firewalls)
- [Serverless network endpoint groups overview](https://docs.cloud.google.com/load-balancing/docs/negs/serverless-neg-concepts.md.txt)
### Deploy a Cloud Run service
The instructions on this page assume you already have a
Cloud Run service running.
For the example on this page, you can use [any of the
Cloud Run quickstarts](https://docs.cloud.google.com/run/docs/quickstarts) to deploy a
Cloud Run service.
To prevent access to the Cloud Run service from the
internet, [restrict ingress to `internal`](https://docs.cloud.google.com/run/docs/securing/ingress.md.txt). Traffic
from the internal Application Load Balancer is considered *internal* traffic.
Placing the Cloud Run service in multiple regions helps
prevent failures in a single region. To deploy the
Cloud Run service in `REGION_A` and
`REGION_B` regions, run the following commands:
### gcloud
```
gcloud run deploy CLOUD_RUN_SERVICE_NAMEA \
--platform=managed \
--allow-unauthenticated \
--ingress=internal \
--region=REGION_A \
--image=IMAGE_URLA
```
```
gcloud run deploy CLOUD_RUN_SERVICE_NAMEB \
--platform=managed \
--allow-unauthenticated \
--ingress=internal \
--region=REGION_B \
--image=IMAGE_URLB
```
Note the name of the service that you create. The rest of this page shows you
how to set up a load balancer that routes requests to this service.
### Set up an SSL certificate resource
Create a Certificate Manager SSL certificate resource as follows:
- [Deploy a global self-managed certificate](https://docs.cloud.google.com/certificate-manager/docs/deploy-self-managed.md.txt)
- [Create a Google-managed certificate issued by your Certificate Authority Service instance](https://docs.cloud.google.com/certificate-manager/docs/deploy-google-managed-cas.md.txt#create-google-managed-certificate-issued-by-your-cas-instance)
- [Create a Google-managed certificate with DNS authorization](https://docs.cloud.google.com/certificate-manager/docs/deploy-google-managed-dns-auth.md.txt#create_a_google-managed_certificate_with_dns_authorization)
We recommend using a Google-managed certificate.
### Permissions
To follow this guide, you must be able to create instances and modify a
network in a project. You must be either a project
[owner or editor](https://docs.cloud.google.com/iam/docs/roles-overview.md.txt#basic), or you must have all of
the following [Compute Engine IAM roles](https://docs.cloud.google.com/compute/docs/access/iam.md.txt).
| Task | Required role |
|---|---|
| Create networks, subnets, and load balancer components | [Compute Network Admin](https://docs.cloud.google.com/compute/docs/access/iam.md.txt#compute.networkAdmin) |
| Add and remove firewall rules | [Compute Security Admin](https://docs.cloud.google.com/compute/docs/access/iam.md.txt#compute.securityAdmin) |
| Create instances | [Compute Instance Admin](https://docs.cloud.google.com/compute/docs/access/iam.md.txt#compute.instanceAdmin.v1) |
For more information, see the following guides:
- [Roles and permissions](https://docs.cloud.google.com/load-balancing/docs/access-control.md.txt)
- [IAM Conditions for forwarding rules](https://docs.cloud.google.com/load-balancing/docs/access-control/iam-conditions.md.txt)
## Setup overview
You can configure the cross-region internal Application Load Balancer as described in the following diagram:
[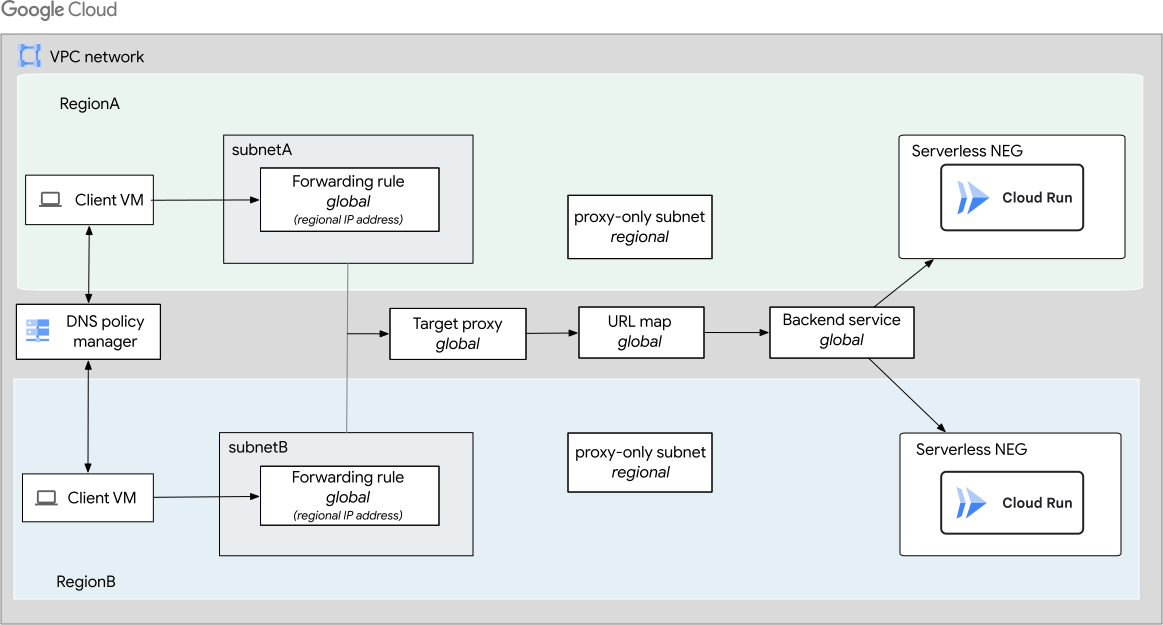](https://docs.cloud.google.com/static/load-balancing/images/cross-reg-int-cloudrun.svg) Cross-region internal Application Load Balancer with Cloud Run deployment (click to enlarge).
As shown in the diagram, this example creates a cross-region internal Application Load Balancer in a
VPC network, with one backend
service and two Cloud Run deployments in
`REGION_A` and
`REGION_B` regions.
The cross-region internal Application Load Balancer setup is described as follows:
1. A VPC network with the following subnets:
- Subnet `SUBNET_A` and a proxy-only subnet in `REGION_A`.
- Subnet `SUBNET_B` and a proxy-only subnet in `REGION_B`.
You must create [proxy-only subnets](https://docs.cloud.google.com/load-balancing/docs/proxy-only-subnets.md.txt)
in each region of a VPC network where you use
cross-region internal Application Load Balancers. The region's
proxy-only subnet is shared among all cross-region internal Application Load Balancers in
the region. Source addresses of packets sent from the load balancer
to your service's backends are allocated from the
proxy-only subnet.
In this example, the proxy-only subnet for the region
`REGION_A` has a primary IP address
range of `10.129.0.0/23` and for `REGION_B`
has a primary IP address range of `10.130.0.0/23` which is the
recommended subnet size.
2. A firewall rule that permits proxy-only subnet traffic flows in your
network. This means adding one rule that allows TCP port `80`, `443`, and
`8080` traffic from `10.129.0.0/23` and `10.130.0.0/23` (the range of the
proxy-only subnets in this example).
3. Another firewall rule for the [health
check probes](https://docs.cloud.google.com/load-balancing/docs/health-check-concepts).
4. A high availability setup that has serverless backends for
Cloud Run deployments in `REGION_A`
and `REGION_B`
regions. If the backends in one region happen to be down, traffic fails over
to the other region.
5. A global backend service that monitors the usage and health of
backends. Ensure that you [enable outlier detection](https://docs.cloud.google.com/load-balancing/docs/l7-internal/setting-up-l7-cross-reg-serverless.md.txt#outlier_detection) on
the backend service.
6. A global URL map that parses the URL of a request and forwards
requests to specific backend services based on the host and path of the
request URL.
7. A global target HTTP or HTTPS proxy, which receives a request from the
user and forwards it to the URL map. For HTTPS, configure a regional SSL
certificate resource. The target proxy uses the SSL certificate to decrypt SSL
traffic if you configure HTTPS load balancing. The target proxy can forward
traffic to your instances by using HTTP or HTTPS.
8. Global forwarding rules, which have the internal IP address of your load
balancer, to forward each incoming request to the target proxy.
The internal IP address associated with the forwarding rule can come from
any subnet in the same network and region. Note the following conditions:
- The IP address can (but does not need to) come from the same subnet as the backend instance groups.
- The IP address must not come from a reserved proxy-only subnet that has its `--purpose` flag set to `GLOBAL_MANAGED_PROXY`.
- If you want to [use the same internal IP address with multiple forwarding
rules](https://docs.cloud.google.com/load-balancing/docs/l7-internal/setting-up-l7-cross-reg-serverless#common_ip), set the IP address `--purpose` flag to `SHARED_LOADBALANCER_VIP`.
9. Optional: [Configure DNS routing policies](https://docs.cloud.google.com/load-balancing/docs/l7-internal/setting-up-l7-cross-reg-hybrid.md.txt#dns-policy-manager)
of type `GEO` to route client traffic to the load balancer VIP in
the region closest to the client.
### Configure the network and subnets
Within the VPC network, configure a subnet in each region
where your backends are configured. In addition, configure a `proxy-only-subnet`
in each region in which you want to configure the load balancer.
This example uses the following VPC network, region, and
subnets:
- **Network** . The network is a [custom mode VPC
network](https://docs.cloud.google.com/vpc/docs/vpc#subnet-ranges) named
`NETWORK`.
- **Subnets for backends** . A subnet named `SUBNET_A` in the
`REGION_A` region uses `10.1.2.0/24` for its primary
IP range. Subnet named `SUBNET_B` in the
`REGION_B` region uses `10.1.3.0/24` for its primary
IP range.
- **Subnet for proxies** . A subnet named `PROXY_SN_A` in the
`REGION_A` region uses `10.129.0.0/23` for its primary
IP range. A subnet named `PROXY_SN_B` in the
`REGION_B` region uses `10.130.0.0/23` for its primary
IP range.
Cross-region internal Application Load Balancers can be accessed from any region within the VPC.
So clients from any region can globally access your load balancer backends.
> [!NOTE]
> **Note:** Subsequent steps in this guide use the network, region, and subnet parameters as outlined here.
### Configure the backend subnets
### Console
1. In the Google Cloud console, go to the **VPC networks** page.
[Go to VPC networks](https://console.cloud.google.com/networking/networks/list)
2. Click **Create VPC network**.
3. Provide a **Name** for the network.
4. In the **Subnets** section, set the **Subnet creation mode** to
**Custom**.
5. Create a subnet for the load balancer's backends. In the **New subnet**
section, enter the following information:
- Provide a **Name** for the subnet.
- Select a **Region** : REGION_A
- Enter an **IP address range** : `10.1.2.0/24`
6. Click **Done**.
7. Click **Add subnet**.
8. Create a subnet for the load balancer's backends. In the **New
subnet** section, enter the following information:
- Provide a **Name** for the subnet.
- Select a **Region** : REGION_B
- Enter an **IP address range** : `10.1.3.0/24`
9. Click **Done**.
10. Click **Create**.
### gcloud
1. Create the custom VPC network with the [`gcloud compute
networks create` command](https://docs.cloud.google.com/sdk/gcloud/reference/compute/networks/create):
```
gcloud compute networks create NETWORK --subnet-mode=custom
```
2. Create a subnet in the `NETWORK`
network in the `REGION_A` region with
the [`gcloud compute networks subnets create` command](https://docs.cloud.google.com/sdk/gcloud/reference/compute/networks/subnets/create):
```
gcloud compute networks subnets create SUBNET_A \
--network=NETWORK \
--range=10.1.2.0/24 \
--region=REGION_A
```
3. Create a subnet in the `NETWORK`
network in the `REGION_B` region with
the [`gcloud compute networks subnets create` command](https://docs.cloud.google.com/sdk/gcloud/reference/compute/networks/subnets/create):
```
gcloud compute networks subnets create SUBNET_B \
--network=NETWORK \
--range=10.1.3.0/24 \
--region=REGION_B
```
### API
Make a `POST` request to the
[`networks.insert` method](https://docs.cloud.google.com/compute/docs/reference/rest/v1/networks/insert.md.txt).
Replace `PROJECT_ID` with your project ID.
```
POST https://compute.googleapis.com/compute/v1/projects/PROJECT_ID/global/networks
{
"routingConfig": {
"routingMode": "regional"
},
"name": "NETWORK",
"autoCreateSubnetworks": false
}
```
Make a `POST` request to the
[`subnetworks.insert` method](https://docs.cloud.google.com/compute/docs/reference/rest/v1/subnetworks/insert.md.txt).
Replace `PROJECT_ID` with your project ID.
```
POST https://compute.googleapis.com/compute/v1/projects/PROJECT_ID/regions/REGION_A/subnetworks
{
"name": "SUBNET_A",
"network": "projects/PROJECT_ID/global/networks/NETWORK",
"ipCidrRange": "10.1.2.0/24",
"region": "projects/PROJECT_ID/regions/REGION_A",
}
```
Make a `POST` request to the
[`subnetworks.insert` method](https://docs.cloud.google.com/compute/docs/reference/rest/v1/subnetworks/insert.md.txt).
Replace `PROJECT_ID` with your project ID.
```
POST https://compute.googleapis.com/compute/v1/projects/PROJECT_ID/regions/REGION_B/subnetworks
{
"name": "SUBNET_B",
"network": "projects/PROJECT_ID/global/networks/NETWORK",
"ipCidrRange": "10.1.3.0/24",
"region": "projects/PROJECT_ID/regions/REGION_B",
}
```
### Configure the proxy-only subnet
A [proxy-only subnet](https://docs.cloud.google.com/load-balancing/docs/proxy-only-subnets.md.txt) provides a
set of IP addresses that Google Cloud uses to run Envoy proxies on your behalf.
The proxies end connections from the client and create connections to the
backends.
This proxy-only subnet is used by all Envoy-based regional load
balancers in the same region as the VPC network. There can only be
one active proxy-only subnet for a given purpose, per region, per network.
> [!IMPORTANT]
> **Important:** Don't try to assign addresses from the proxy-only subnet to your load balancer's forwarding rule or backends. You assign the forwarding rule's IP address and the backend instance IP addresses from [a different subnet range (or ranges)](https://docs.cloud.google.com/load-balancing/docs/l7-internal/setting-up-l7-cross-reg-serverless.md.txt#create-network-subnets), not this one. Google Cloud reserves this subnet range for Google Cloud-managed proxies.
### Console
If you're using the Google Cloud console, you can wait and create the proxy-only
subnet later on the **Load balancing** page.
If you want to create the proxy-only subnet now, use the following steps:
1. In the Google Cloud console, go to the **VPC networks** page.
[Go to VPC networks](https://console.cloud.google.com/networking/networks/list)
2. Click the name of the VPC network.
3. On the **Subnets** tab, click **Add subnet**.
4. Provide a **Name** for the proxy-only subnet.
5. In the **Region** list, select REGION_A.
6. In the **Purpose** list, select **Cross-region Managed Proxy**.
7. In the **IP address range** field, enter `10.129.0.0/23`.
8. Click **Add**.
Create the proxy-only subnet in REGION_B
1. Click **Add subnet**.
2. Provide a **Name** for the proxy-only subnet.
3. In the **Region** list, select REGION_B.
4. In the **Purpose** list, select **Cross-region Managed Proxy**.
5. In the **IP address range** field, enter `10.130.0.0/23`.
6. Click **Add**.
### gcloud
Create the proxy-only subnets with the [`gcloud compute networks subnets create` command](https://docs.cloud.google.com/sdk/gcloud/reference/compute/networks/subnets/create).
```
gcloud compute networks subnets create PROXY_SN_A \
--purpose=GLOBAL_MANAGED_PROXY \
--role=ACTIVE \
--region=REGION_A \
--network=NETWORK \
--range=10.129.0.0/23
```
```
gcloud compute networks subnets create PROXY_SN_B \
--purpose=GLOBAL_MANAGED_PROXY \
--role=ACTIVE \
--region=REGION_B \
--network=NETWORK \
--range=10.130.0.0/23
```
### API
Create the proxy-only subnets with the [`subnetworks.insert` method](https://docs.cloud.google.com/compute/docs/reference/rest/v1/subnetworks/insert.md.txt), replacing
`PROJECT_ID` with your project ID.
```
POST https://compute.googleapis.com/compute/v1/projects/PROJECT_ID/regions/REGION_A/subnetworks
{
"name": "PROXY_SN_A",
"ipCidrRange": "10.129.0.0/23",
"network": "projects/PROJECT_ID/global/networks/NETWORK",
"region": "projects/PROJECT_ID/regions/REGION_A",
"purpose": "GLOBAL_MANAGED_PROXY",
"role": "ACTIVE"
}
```
```
POST https://compute.googleapis.com/compute/v1/projects/PROJECT_ID/regions/REGION_B/subnetworks
{
"name": "PROXY_SN_B",
"ipCidrRange": "10.130.0.0/23",
"network": "projects/PROJECT_ID/global/networks/NETWORK",
"region": "projects/PROJECT_ID/regions/REGION_B",
"purpose": "GLOBAL_MANAGED_PROXY",
"role": "ACTIVE"
}
```
## Create the serverless NEGs
1. Create a serverless NEG for your Cloud Run
service:
```
gcloud compute network-endpoint-groups create gl7ilb-serverless-neg-a \
--region=REGION_A \
--network-endpoint-type=serverless \
--cloud-run-service=CLOUD_RUN_SERVICE_NAMEA
```
```
gcloud compute network-endpoint-groups create gl7ilb-serverless-neg-b \
--region=REGION_B \
--network-endpoint-type=serverless \
--cloud-run-service=CLOUD_RUN_SERVICE_NAMEB
```
## Configure the load balancer
Traffic going from the load balancer to the serverless NEG backends uses special
routes defined outside your VPC that are not subject to firewall
rules. Therefore, if your load balancer only has serverless NEG backends, you
don't need to create firewall rules to allow traffic from the proxy-only subnet
to the serverless backend.
### Console
#### Select the load balancer type
1. In the Google Cloud console, go to the **Load balancing** page.
[Go to Load balancing](https://console.cloud.google.com/net-services/loadbalancing/list)
2. Click **Create load balancer**.
3. For **Type of load balancer** , select **Application Load Balancer
(HTTP/HTTPS)** and click **Next**.
4. For **Public facing or internal** , select **Internal** and click **Next**.
5. For **Cross-region or single region deployment** , select **Best for
cross-region workloads** and click **Next**.
6. Click **Configure**.
**Basic configuration**
1. Provide a **Name** for the load balancer.
2. For **Network** , select NETWORK.
**Configure the frontend with two forwarding rules**
For HTTP:
1. Click **Frontend configuration**.
1. Provide a **Name** for the forwarding rule.
2. In the **Subnetwork region** list, select REGION_A.
**Reserve a proxy-only subnet**
> [!NOTE]
> If you already configured the proxy-only subnet, the **Reserve subnet** button isn't displayed. You can continue with the next steps.
3. In the **Subnetwork** list, select SUBNET_A.
4. In the **IP address** list, click **Create IP address** . The **Reserve a static internal IP address** page opens.
- Provide a **Name** for the static IP address.
- In the **Static IP address** list, select **Let me choose**.
- In the **Custom IP address** field, enter `10.1.2.99`.
- Select **Reserve**.
2. Click **Done**.
3. To add the second forwarding rule, click **Add frontend IP and port**.
1. Provide a **Name** for the forwarding rule.
2. In the **Subnetwork region** list, select REGION_B.
**Reserve a proxy-only subnet**
> [!NOTE]
> Because you have already configured the [proxy-only subnet](https://docs.cloud.google.com/load-balancing/docs/l7-internal/setting-up-l7-cross-reg-serverless.md.txt#create-proxy-only-subnet), the **Reserve subnet** button isn't displayed. You can continue with the next steps.
3. In the **Subnetwork** list, select SUBNET_B.
4. In the **IP address** list, click **Create IP address** . The **Reserve a static internal IP address** page opens.
- Provide a **Name** for the static IP address.
- In the **Static IP address** list, select **Let me choose**.
- In the **Custom IP address** field, enter `10.1.3.99`.
- Select **Reserve**.
4. Click **Done**.
For HTTPS:
To assign an SSL certificate to the target HTTPS proxy of the load
balancer, you need to use a Certificate Manager
certificate.
1. Click **Frontend configuration**.
1. Provide a **Name** for the forwarding rule.
2. In the **Protocol** field, select `HTTPS (includes HTTP/2)`.
3. Ensure that the **Port** is set to `443`.
4. In the **Subnetwork region** list, select REGION_A.
**Reserve a proxy-only subnet**
> [!NOTE]
> Because you have already configured the [proxy-only subnet](https://docs.cloud.google.com/load-balancing/docs/l7-internal/setting-up-l7-cross-reg-serverless.md.txt#create-proxy-only-subnet), the **Reserve subnet** button isn't displayed. You can continue with the next steps.
5. In the **Subnetwork** list, select SUBNET_A.
6. In the **IP address** list, click **Create IP address** . The **Reserve a static internal IP address** page opens.
- Provide a **Name** for the static IP address.
- In the **Static IP address** list, select **Let me choose**.
- In the **Custom IP address** field, enter `10.1.3.99`.
- Select **Reserve**.
7. Click **Add certificate** to select an existing certificate or create a new certificate.
If you already have an existing Certificate Manager certificate to select, do the following:
1. Click **Add Certificate**.
2. Click **Select an existing certificate** and select the certificate from the list of certificates.
3. Click **Select**.
After you select the new Certificate Manager certificate, it appears in the list of certificates.
To create a new Certificate Manager certificate, do the following:
1. Click **Add Certificate**.
2. Click **Create a new certificate**.
3. To create a new certificate, follow the steps starting from *step 3* as outlined in any one of the following configuration methods in the Certificate Manager documentation:
- [Create a Google-managed certificate referencing the DNS authorization](https://docs.cloud.google.com/certificate-manager/docs/deploy-google-managed-dns-auth-cross-reg.md.txt#create-google-managed-certificate-dns-auth)
- [Create a Google-managed certificate issued by your CA Service instance](https://docs.cloud.google.com/certificate-manager/docs/deploy-google-managed-cas-cross-reg.md.txt#create-google-managed-certificate-issued-by-your-cas-instance)
- [Upload a self-managed certificate to Certificate Manager](https://docs.cloud.google.com/certificate-manager/docs/deploy-self-managed-cross-reg.md.txt#upload-self-managed)
8. Select an SSL policy from the **SSL policy** list. If you have not created any SSL policies, a [default Google Cloud SSL policy](https://docs.cloud.google.com/load-balancing/docs/ssl-policies-concepts.md.txt#default-ssl-policy) is applied.
9. Click **Done**.
2. **Add the second frontend configuration:**
1. Provide a **Name** for the frontend configuration.
2. In the **Protocol** field, select `HTTPS (includes HTTP/2)`.
3. Ensure that the **Port** is set to `443`.
4. In the **Subnetwork region** list, select REGION_B.
**Reserve a proxy-only subnet**
> [!NOTE]
> Because you have already configured the [proxy-only subnet](https://docs.cloud.google.com/load-balancing/docs/l7-internal/setting-up-l7-cross-reg-serverless.md.txt#create-proxy-only-subnet), the **Reserve subnet** button isn't displayed. You can continue with the next steps.
5. In the **Subnetwork** list, select SUBNET_B.
6. In the **IP address** list, click **Create IP address** . The **Reserve a static internal IP address** page opens.
- Provide a **Name** for the static IP address.
- In the **Static IP address** list, select **Let me choose**.
- In the **Custom IP address** field, enter `10.1.3.99`.
- Select **Reserve**.
7. Click **Add certificate** and then select an existing certificate or create a new certificate.
8. Select an SSL policy from the **SSL policy** list. If you have not created any SSL policies, a [default Google Cloud SSL policy](https://docs.cloud.google.com/load-balancing/docs/ssl-policies-concepts.md.txt#default-ssl-policy) is applied.
9. Click **Done**.
**Configure the backend service**
1. Click **Backend configuration**.
2. In the **Create or select backend services** list, click **Create a
backend service**.
3. Provide a **Name** for the backend service.
4. For **Protocol** , select **HTTP**.
5. For **Named Port** , enter `http`.
6. In the **Backend type** list, select **Serverless network endpoint group**.
7. In the **New backend** section:
1. In the **Serverless network endpoint group** list, select `gl7ilb-serverless-neg-a`.
2. Click **Done**.
3. To add another backend, click **Add backend**.
4. In the **Serverless network endpoint group** list, select `gl7ilb-serverless-neg-b`.
5. Click **Done**.
3. **Configure the routing rules**
1. Click **Routing rules**.
2. For **Mode** , select **Simple host and path rule**.
3. Ensure that there is only one backend service for any unmatched host and any unmatched path.
4. **Review the configuration**
1. Click **Review and finalize**.
2. Review your load balancer configuration settings.
3. Click **Create**.
### gcloud
1. Define the backend service with the [`gcloud compute backend-services
create` command](https://docs.cloud.google.com/sdk/gcloud/reference/compute/backend-services/create).
```
gcloud compute backend-services create gil7-backend-service \
--load-balancing-scheme=INTERNAL_MANAGED \
--protocol=HTTP \
--global
```
2. Add backends to the backend service with the [`gcloud compute backend-services
add-backend` command](https://docs.cloud.google.com/sdk/gcloud/reference/compute/backend-services/add-backend).
```
gcloud compute backend-services add-backend gil7-backend-service \
--network-endpoint-group=gl7ilb-serverless-neg-a \
--network-endpoint-group-region=REGION_A \
--global
```
```
gcloud compute backend-services add-backend gil7-backend-service \
--network-endpoint-group=gl7ilb-serverless-neg-b \
--network-endpoint-group-region=REGION_B \
--global
```
3. Create the URL map with the [`gcloud compute url-maps
create` command](https://docs.cloud.google.com/sdk/gcloud/reference/compute/url-maps/create).
```
gcloud compute url-maps create gil7-map \
--default-service=gil7-backend-service \
--global
```
4. Create the target proxy.
**For HTTP:**
Create the target proxy with the [`gcloud compute target-http-proxies
create` command](https://docs.cloud.google.com/sdk/gcloud/reference/compute/target-http-proxies/create).
```
gcloud compute target-http-proxies create gil7-http-proxy \
--url-map=gil7-map \
--global
```
**For HTTPS:**
To create a Google-managed certificate, see the following documentation:
- [Create a Google-managed certificate issued by your Certificate Authority Service instance](https://docs.cloud.google.com/certificate-manager/docs/deploy-google-managed-cas.md.txt#create-google-managed-certificate-issued-by-your-cas-instance)
- [Create a Google-managed certificate with DNS authorization](https://docs.cloud.google.com/certificate-manager/docs/deploy-google-managed-dns-auth.md.txt#create_a_google-managed_certificate_with_dns_authorization)
After you create the Google-managed certificate,
[attach the certificate directly to the target proxy](https://docs.cloud.google.com/certificate-manager/docs/deploy-google-managed-dns-auth.md.txt#att-cert-target-proxy).
Certificate maps are not supported by cross-region internal Application Load Balancers.
To create a self-managed certificate, see the following documentation:
- [Create a private key and certificate](https://docs.cloud.google.com/load-balancing/docs/ssl-certificates/self-managed-certs.md.txt#create-key-and-cert)
Assign your file paths to variable names.
```
export LB_CERT=PATH_TO_PEM_FORMATTED_FILE
```
```
export LB_PRIVATE_KEY=PATH_TO_LB_PRIVATE_KEY_FILE
```
Create an all region SSL certificate using the [`gcloud certificate-manager
certificates create` command](https://docs.cloud.google.com/sdk/gcloud/reference/certificate-manager/certificates/create).
```
gcloud certificate-manager certificates create gilb-certificate \
--private-key-file=$LB_PRIVATE_KEY \
--certificate-file=$LB_CERT \
–-scope=all-regions
```
Use the SSL certificate to create a target proxy with the [`gcloud
compute target-https-proxies create` command](https://docs.cloud.google.com/sdk/gcloud/reference/compute/target-https-proxies/create)
```
gcloud compute target-https-proxies create gil7-https-proxy \
--url-map=gil7-map \
--certificate-manager-certificates=gilb-certificate
```
5. Create two forwarding rules: one with a VIP (`10.1.2.99`) in the
`REGION_B` region and
another one with a VIP (`10.1.3.99`) in the
`REGION_A` region.
For custom networks, you must reference the subnet in the forwarding
rule. Note that this is the virtual machine (VM) instance subnet, not the
proxy subnet.
**For HTTP:**
Use the [`gcloud compute forwarding-rules
create` command](https://docs.cloud.google.com/sdk/gcloud/reference/compute/forwarding-rules/create)
with the correct flags.
```
gcloud compute forwarding-rules create gil7-forwarding-rule-a \
--load-balancing-scheme=INTERNAL_MANAGED \
--network=NETWORK \
--subnet=SUBNET_B \
--subnet-region=REGION_B \
--address=10.1.3.99 \
--ports=80 \
--target-http-proxy=gil7-http-proxy \
--global
```
```
gcloud compute forwarding-rules create gil7-forwarding-rule-b \
--load-balancing-scheme=INTERNAL_MANAGED \
--network=NETWORK \
--subnet=SUBNET_A \
--subnet-region=REGION_A \
--address=10.1.2.99 \
--ports=80 \
--target-http-proxy=gil7-http-proxy \
--global
```
**For HTTPS:**
Create the forwarding rule with the [`gcloud compute forwarding-rules
create` command](https://docs.cloud.google.com/sdk/gcloud/reference/compute/forwarding-rules/create)
with the correct flags.
```
gcloud compute forwarding-rules create gil7-forwarding-rule-a \
--load-balancing-scheme=INTERNAL_MANAGED \
--network=NETWORK \
--subnet=SUBNET_B \
--address=10.1.3.99 \
--ports=443 \
--target-https-proxy=gil7-https-proxy \
--global
```
```
gcloud compute forwarding-rules create gil7-forwarding-rule-b \
--load-balancing-scheme=INTERNAL_MANAGED \
--network=NETWORK \
--subnet=SUBNET_A \
--address=10.1.2.99 \
--ports=443 \
--target-https-proxy=gil7-https-proxy \
--global
```
### API
Create the global backend service by making a `POST` request to the
[`backendServices.insert` method](https://docs.cloud.google.com/compute/docs/reference/rest/v1/backendServices/insert.md.txt),
replacing `PROJECT_ID` with your project ID.
```
POST https://compute.googleapis.com/compute/v1/projects/PROJECT_ID/global/backendServices
{
"name": "gil7-backend-service",
"backends": [
{
"group": "projects/PROJECT_ID/zones/ZONE_A/instanceGroups/gl7ilb_serverless_negwest",
"balancingMode": "UTILIZATION"
},
{
"group": "projects/PROJECT_ID/zones/ZONE_B/instanceGroups/gl7ilb_serverless_negeast",
}
],
"loadBalancingScheme": "INTERNAL_MANAGED"
}
```
Create the URL map by making a `POST` request to the
[`urlMaps.insert` method](https://docs.cloud.google.com/compute/docs/reference/rest/v1/urlMaps/insert.md.txt),
replacing `PROJECT_ID` with your project ID.
```
POST https://compute.googleapis.com/compute/v1/projects/PROJECT_ID/global/urlMaps
{
"name": "l7-ilb-map",
"defaultService": "projects/PROJECT_ID/global/backendServices/gil7-backend-service"
}
```
**For HTTP**:
Create the target HTTP proxy by making a `POST` request to the
[`targetHttpProxies.insert` method](https://docs.cloud.google.com/compute/docs/reference/rest/v1/targetHttpProxies/insert.md.txt),
replacing `PROJECT_ID` with your project ID.
```
POST https://compute.googleapis.com/compute/v1/projects/PROJECT_ID/global/targetHttpProxy
{
"name": "l7-ilb-proxy",
"urlMap": "projects/PROJECT_ID/global/urlMaps/l7-ilb-map"
}
```
Create the forwarding rule by making a `POST` request to the
[`globalforwardingRules.insert` method](https://docs.cloud.google.com/compute/docs/reference/rest/v1/globalForwardingRules/insert.md.txt),
replacing `PROJECT_ID` with your project ID.
```
POST https://compute.googleapis.com/compute/v1/projects/PROJECT_ID/global/forwardingRules
{
"name": "gil7-forwarding-rule-a",
"IPAddress": "10.1.2.99",
"IPProtocol": "TCP",
"portRange": "80-80",
"target": "projects/PROJECT_ID/global/targetHttpProxies/l7-ilb-proxy",
"loadBalancingScheme": "INTERNAL_MANAGED",
"subnetwork": "projects/PROJECT_ID/regions/REGION_A/subnetworks/SUBNET_A",
"network": "projects/PROJECT_ID/global/networks/NETWORK",
"networkTier": "PREMIUM"
}
```
```
POST https://compute.googleapis.com/compute/v1/projects/PROJECT_ID/global/forwardingRules
{
"name": "gil7-forwarding-rule-b",
"IPAddress": "10.1.3.99",
"IPProtocol": "TCP",
"portRange": "80-80",
"target": "projects/PROJECT_ID/global/targetHttpProxies/l7-ilb-proxy",
"loadBalancingScheme": "INTERNAL_MANAGED",
"subnetwork": "projects/PROJECT_ID/regions/REGION_B/subnetworks/SUBNET_B",
"network": "projects/PROJECT_ID/global/networks/NETWORK",
"networkTier": "PREMIUM"
}
```
**For HTTPS**:
Read the certificate and private key files, and then create the SSL
certificate. The following example shows
how to do this with Python.
Create the target HTTPS proxy by making a `POST` request to the
[`targetHttpsProxies.insert` method](https://docs.cloud.google.com/compute/docs/reference/rest/v1/targetHttpsProxies/insert.md.txt),
replacing `PROJECT_ID` with your project ID.
```
POST https://compute.googleapis.com/compute/v1/projects/PROJECT_ID/global/targetHttpsProxy
{
"name": "l7-ilb-proxy",
"urlMap": "projects/PROJECT_ID/global/urlMaps/l7-ilb-map",
"sslCertificates": /projects/PROJECT_ID/global/sslCertificates/SSL_CERT_NAME
}
```
Create the forwarding rule by making a `POST` request to the
[`globalForwardingRules.insert` method](https://docs.cloud.google.com/compute/docs/reference/rest/v1/globalForwardingRules/insert.md.txt),
replacing `PROJECT_ID` with your project ID.
```
POST https://compute.googleapis.com/compute/v1/projects/PROJECT_ID/global/forwardingRules
{
"name": "gil7-forwarding-rule-a",
"IPAddress": "10.1.2.99",
"IPProtocol": "TCP",
"portRange": "80-80",
"target": "projects/PROJECT_ID/global/targetHttpsProxies/l7-ilb-proxy",
"loadBalancingScheme": "INTERNAL_MANAGED",
"subnetwork": "projects/PROJECT_ID/regions/REGION_A/subnetworks/SUBNET_A",
"network": "projects/PROJECT_ID/global/networks/NETWORK",
"networkTier": "PREMIUM"
}
```
```
POST https://compute.googleapis.com/compute/v1/projects/PROJECT_ID/global/forwardingRules
{
"name": "gil7-forwarding-rule-b",
"IPAddress": "10.1.3.99",
"IPProtocol": "TCP",
"portRange": "80-80",
"target": "projects/PROJECT_ID/global/targetHttpsProxies/l7-ilb-proxy",
"loadBalancingScheme": "INTERNAL_MANAGED",
"subnetwork": "projects/PROJECT_ID/regions/REGION_B/subnetworks/SUBNET_B",
"network": "projects/PROJECT_ID/global/networks/NETWORK",
"networkTier": "PREMIUM"
}
```
## Test the load balancer
Now that the load balancing service is running, you can send traffic to the
forwarding rule and observe the traffic being dispersed to different instances.
### Configure the firewall rule
This example requires the `fw-allow-ssh` firewall rule for the test client VM.
`fw-allow-ssh` is an ingress rule that is applicable to the test client VM and
that allows incoming SSH connectivity on TCP port `22` from any
address. You can choose a more restrictive source IP address range for this
rule; for example, you can specify just the IP address ranges of the system from
which you initiate SSH sessions. This example uses the target tag `allow-ssh`.
### gcloud
1. Create the `fw-allow-ssh` firewall rule to allow SSH connectivity to
VMs with the network tag `allow-ssh`. When you omit `source-ranges`,
Google Cloud [interprets the rule to mean any
source](https://docs.cloud.google.com/vpc/docs/firewalls#sources_for_the_rule).
```
gcloud compute firewall-rules create fw-allow-ssh \
--network=NETWORK \
--action=allow \
--direction=ingress \
--target-tags=allow-ssh \
--rules=tcp:22
```
### Create a VM instance to test connectivity
1. Create a client VM:
```
gcloud compute instances create l7-ilb-client-a \
--image-family=debian-12 \
--image-project=debian-cloud \
--network=NETWORK \
--subnet=SUBNET_A \
--zone=ZONE_A \
--tags=allow-ssh
```
```
gcloud compute instances create l7-ilb-client-b \
--image-family=debian-12 \
--image-project=debian-cloud \
--network=NETWORK \
--subnet=SUBNET_B \
--zone=ZONE_B \
--tags=allow-ssh
```
2. Connect, using SSH, to each client instance.
```
gcloud compute ssh l7-ilb-client-a \
--zone=ZONE_A
```
```
gcloud compute ssh l7-ilb-client-b \
--zone=ZONE_B
```
3. Verify that the IP address is serving its hostname.
- Verify that the client VM can reach both IP addresses. The command succeeds
and returns the name of the backend VM that served the request:
**For HTTP testing:**
```
curl 10.1.2.99
```
```
curl 10.1.3.99
```
**For HTTPS testing:**
```
curl -k -s 'https://DOMAIN_NAME:443' --connect-to DOMAIN_NAME:443:10.1.2.99:443
```
```
curl -k -s 'https://DOMAIN_NAME:443' --connect-to DOMAIN_NAME:443:10.1.3.99:443
```
Replace DOMAIN_NAME with your application domain name, for
example, `test.example.com`.
The `-k` flag causes curl to skip certificate validation.
- Optional: Use the configured [DNS record](https://docs.cloud.google.com/load-balancing/docs/l7-internal/setting-up-l7-cross-reg-serverless.md.txt#dns-policy-manager) to resolve
the IP address.
```
curl service.example.com
```
#### Run 100 requests and confirm that they are load balanced
**For HTTP**:
```
{
RESULTS=
for i in {1..100}
do
RESULTS="$RESULTS:$(curl --silent 10.1.2.99)"
done
echo ""
echo " Results of load-balancing to 10.1.2.99: "
echo "***"
echo "$RESULTS" | tr ':' '\n' | grep -Ev "^$" | sort | uniq -c
echo
}
```
```
{
RESULTS=
for i in {1..100}
do
RESULTS="$RESULTS:$(curl --silent 10.1.3.99)"
done
echo ""
echo " Results of load-balancing to 10.1.3.99: "
echo "***"
echo "$RESULTS" | tr ':' '\n' | grep -Ev "^$" | sort | uniq -c
echo
}
```
**For HTTPS**:
Replace DOMAIN_NAME with your application domain name, for
example, `test.example.com`.
```
{
RESULTS=
for i in {1..100}
do
RESULTS="$RESULTS:$(curl -k -s 'https://DOMAIN_NAME:443' --connect-to DOMAIN_NAME:443:10.1.2.99:443)"
done
echo ""
echo " Results of load-balancing to 10.1.2.99: "
echo "***"
echo "$RESULTS" | tr ':' '\n' | grep -Ev "^$" | sort | uniq -c
echo
}
```
```
{
RESULTS=
for i in {1..100}
do
RESULTS="$RESULTS:$(curl -k -s 'https://DOMAIN_NAME:443' --connect-to DOMAIN_NAME:443:10.1.3.99:443)"
done
echo ""
echo " Results of load-balancing to 10.1.3.99: "
echo "***"
echo "$RESULTS" | tr ':' '\n' | grep -Ev "^$" | sort | uniq -c
echo
}
```
### Test failover
1. Verify failover to backends in the `REGION_A`
region when backends in the
`REGION_B` regions are unhealthy or
unreachable. We simulate this by removing all of the
backends from `REGION_B`:
```
gcloud compute backend-services remove-backend gil7-backend-service \
--network-endpoint-group=gl7ilb-serverless-neg-b \
--network-endpoint-group-zone=ZONE_B
```
2. Connect, using SSH, to a client VM in
`REGION_B`.
```
gcloud compute ssh l7-ilb-client-b \
--zone=ZONE_B
```
3. Send requests to the load balanced IP address in the
`REGION_B` region.
The command output displays responses from backend VMs in
`REGION_A`.
Replace DOMAIN_NAME with your application domain name, for
example, `test.example.com`.
```
{
RESULTS=
for i in {1..100}
do
RESULTS="$RESULTS:$(curl -k -s 'https://DOMAIN_NAME:443' --connect-to DOMAIN_NAME:443:10.1.3.99:443)"
done
echo "***"
echo "*** Results of load-balancing to 10.1.3.99: "
echo "***"
echo "$RESULTS" | tr ':' '\n' | grep -Ev "^$" | sort | uniq -c
echo
}
```
## Additional configuration options
This section expands on the configuration example to provide alternative and
additional configuration options. All of the tasks are optional. You can perform
them in any order.
### Using a URL mask
When creating a serverless NEG, instead of selecting a specific
Cloud Run service, you can use a URL mask to point to
multiple services serving at the same domain. A URL mask is a template of your
URL schema. The serverless NEG uses this template to extract the service
name from the incoming request's URL and map the request to the appropriate
service.
URL masks are particularly useful if your service is [mapped to a custom
domain](https://docs.cloud.google.com/run/docs/mapping-custom-domains) rather than to the default address
that Google Cloud provides for the deployed service. A URL mask lets you
target multiple services and versions with a single rule even when your
application is using a custom URL pattern.
If you haven't already done so, make sure you read the [Serverless NEGS
overview: URL
Masks](https://docs.cloud.google.com/load-balancing/docs/negs/serverless-neg-concepts#url_masks).
#### Construct a URL mask
To construct a URL mask for your load balancer, start with the URL of your
service. This example uses a sample serverless app running at
`https://example.com/login`. This is the URL where the app's `login` service
is served.
1. Remove the `http` or `https` from the URL. You are left with `example.com/login`.
2. Replace the service name with a placeholder for the URL mask.
- Cloud Run: Replace the Cloud Run service name with the placeholder ``. If the Cloud Run service has a tag associated with it, replace the tag name with the placeholder ``. In this example, the URL mask you are left with is `example.com/`.
3. Optional: If the service name can be
extracted from the path portion of the URL, the domain can be omitted. The
path part of the URL mask is distinguished
by the first slash (`/`) character. If a slash (`/`) is not present in the
URL mask, the mask is understood to represent the host only. Therefore, for
this example, the URL mask can be reduced to `/`.
Similarly, if `` can be extracted from the host part of the
URL, you can omit the path altogether from the URL mask.
You can also omit
any host or subdomain components that come before the first placeholder as
well as any path components that come after the last placeholder. In such
cases, the placeholder captures the required information for the component.
Here are a few more examples that demonstrate these rules:
This table assumes that you have a custom domain called `example.com` and
all your Cloud Run services are being [mapped
to this domain](https://docs.cloud.google.com/run/docs/mapping-custom-domains).
| Service, Tag name | Cloud Run custom domain URL | URL mask |
|---|---|---|
| service: login | https://login-home.example.com/web | \-home.example.com |
| service: login | https://example.com/login/web | example.com/\ or /\ |
| service: login, tag: test | https://test.login.example.com/web | \.\.example.com |
| service: login, tag: test | https://example.com/home/login/test | example.com/home/\/\ or /home/\/\ |
| service: login, tag: test | https://test.example.com/home/login/web | \.example.com/home/\ |
#### Creating a serverless NEG with a URL mask
### Console
For a new load balancer, you can use the same end-to-end process as
described previously in this document. When configuring the backend service,
instead of selecting a specific service, enter a URL mask.
If you have an existing load balancer, you can edit the backend configuration
and have the serverless NEG point to a URL mask instead of a specific service.
To add a URL mask-based serverless NEG to an existing backend service,
do the following:
1. In the Google Cloud console, go to the **Load balancing** page.
[Go to Load balancing](https://console.cloud.google.com/networking/loadbalancing/)
2. Click the name of the load balancer that has the backend service you want to edit.
3. On the **Load balancer details** page, click **Edit**.
4. On the **Edit global external Application Load Balancer** page, click **Backend configuration**.
5. On the **Backend configuration** page, click **Edit** for the backend service you want to modify.
6. Click **Add backend**.
7. Select **Create Serverless network endpoint group**.
1. For the **Name** , enter `helloworld-serverless-neg`.
2. Under **Region**, the region of the load balancer is displayed.
3. Under **Serverless network endpoint group type** , **Cloud Run** is the only supported network endpoint group type.
1. Select **Use URL Mask**.
2. Enter a URL mask. For information about how to create a URL mask, see [Constructing a URL mask](https://docs.cloud.google.com/load-balancing/docs/l7-internal/setting-up-l7-cross-reg-serverless.md.txt#constructing-url-mask).
3. Click **Create**.
8. In the **New backend** , click **Done**.
9. Click **Update**.
### gcloud
To create a serverless NEG with a sample URL mask of
`example.com/`:
```
gcloud compute network-endpoint-groups create SERVERLESS_NEG_MASK_NAME \
--region=REGION \
--network-endpoint-type=serverless \
--cloud-run-url-mask="example.com/"
```
### Use the same IP address between multiple internal forwarding rules
For multiple internal forwarding rules to share the same internal IP address,
you must reserve the IP address and set its `--purpose` flag to
`SHARED_LOADBALANCER_VIP`.
### gcloud
```
gcloud compute addresses create SHARED_IP_ADDRESS_NAME \
--region=REGION \
--subnet=SUBNET_NAME \
--purpose=SHARED_LOADBALANCER_VIP
```
If you need to redirect HTTP traffic to HTTPS, you can create two forwarding rules that use a common IP address. For more information, see [Set up
HTTP-to-HTTPS redirect for
internal Application Load Balancers](https://docs.cloud.google.com/load-balancing/docs/l7-internal/setting-up-http-to-https-redirect).
### Configure DNS routing policies
If your clients are in multiple regions, you might want to make your
cross-region internal Application Load Balancer accessible by using VIPs in these regions. You can use
DNS routing policies of type `GEO` to route client
traffic to the load balancer VIP in the region closest to the client. This
multi-region setup minimizes latency and network transit costs. In addition, it
lets you set up a DNS-based, global, load balancing solution that provides
resilience against regional outages.
Cloud DNS supports health checking and enables automatic failover when
the endpoints fail their health checks. During a failover, Cloud DNS
automatically adjusts the traffic split among the remaining healthy endpoints.
For more information, see [Manage DNS routing policies and health
checks](https://docs.cloud.google.com/dns/docs/zones/manage-routing-policies).
### gcloud
To create a DNS entry with a 30 second TTL, use the
[`gcloud dns record-sets create` command](https://docs.cloud.google.com/sdk/gcloud/reference/dns/record-sets/create).
```
gcloud dns record-sets create DNS_ENTRY --ttl="30" \
--type="A" --zone="service-zone" \
--routing-policy-type="GEO" \
--routing-policy-data="REGION_A=gil7-forwarding-rule-a@global;REGION_B=gil7-forwarding-rule-b@global" \
--enable-health-checking
```
Replace the following:
- `DNS_ENTRY`: DNS or domain name of the record-set
For example, `service.example.com`
- `REGION_A` and `REGION_B`: the regions where you have configured the load balancer
### API
Create the DNS record by making a `POST` request to the
[`ResourceRecordSets.create` method](https://docs.cloud.google.com/dns/docs/reference/v1beta2/resourceRecordSets/create).
Replace PROJECT_ID with your project ID.
```
POST https://www.googleapis.com/dns/v1/projects/PROJECT_ID/managedZones/SERVICE_ZONE/rrsets
{
"name": "DNS_ENTRY",
"type": "A",
"ttl": 30,
"routingPolicy": {
"geo": {
"items": [
{
"location": "REGION_A",
"healthCheckedTargets": {
"internalLoadBalancers": [
{
"loadBalancerType": "globalL7ilb",
"ipAddress": "IP_ADDRESS",
"port": "80",
"ipProtocol": "tcp",
"networkUrl": "https://www.googleapis.com/compute/v1/projects/PROJECT_ID/global/networks/lb-network",
"project": "PROJECT_ID"
}
]
}
},
{
"location": "REGION_B",
"healthCheckedTargets": {
"internalLoadBalancers": [
{
"loadBalancerType": "globalL7ilb",
"ipAddress": "IP_ADDRESS_B",
"port": "80",
"ipProtocol": "tcp",
"networkUrl": "https://www.googleapis.com/compute/v1/projects/PROJECT_ID/global/networks/lb-network",
"project": "PROJECT_ID"
}
]
}
}
]
}
}
}
```
### Enable outlier detection
You can enable [outlier
detection](https://docs.cloud.google.com/load-balancing/docs/negs/serverless-neg-concepts#outlier-detection)
on global backend services to identify unhealthy serverless NEGs and reduce the
number the requests sent to the unhealthy serverless NEGs.
Outlier detection is enabled on the backend service by using one of the following methods:
- The `consecutiveErrors` method (`outlierDetection.consecutiveErrors`), in which a `5*xx*` series HTTP status code qualifies as an error.
- The `consecutiveGatewayFailure` method (`outlierDetection.consecutiveGatewayFailure`), in which only the `502`, `503`, and `504` HTTP status codes qualify as an error.
Use the following steps to enable outlier detection for an existing backend
service. Note that even after enabling outlier detection, some requests can be
sent to the unhealthy service and return a `5*xx*` status code to
the clients. To further reduce the error rate, you can configure more aggressive
values for the outlier detection parameters. For more information, see the
[`outlierDetection` field](https://docs.cloud.google.com/compute/docs/reference/rest/v1/backendServices.md.txt#BackendService.FIELDS.outlier_detection).
### Console
1. In the Google Cloud console, go to the **Load balancing** page.
[Go to Load balancing](https://console.cloud.google.com/networking/loadbalancing/)
2. Click the name of the load balancer whose backend service you want to
edit.
3. On the **Load balancer details** page, click
**Edit**.
4. On the **Edit cross-region internal Application Load Balancer** page, click **Backend configuration**.
5. On the **Backend configuration** page, click
**Edit** for the backend service that
you want to modify.
6. Scroll down and expand the **Advanced configurations** section.
7. In the **Outlier detection** section, select the **Enable** checkbox.
8. Click **Edit** to configure
outlier detection.
Verify that the following options are configured with these values:
| Property | Value |
|---|---|
| **Consecutive errors** | 5 |
| **Interval** | 1000 |
| **Base ejection time** | 30000 |
| **Max ejection percent** | 50 |
| **Enforcing consecutive errors** | 100 |
In this example, the outlier detection analysis runs every one second. If
the number of consecutive HTTP `5*xx*` status codes
received by an
Envoy proxy is five or more, the backend endpoint is ejected from the
load-balancing pool of that Envoy proxy for 30 seconds. When the
enforcing percentage is set to 100%, the backend service enforces the
ejection of unhealthy endpoints from the load-balancing pools of those
specific Envoy proxies every time the outlier detection analysis runs. If
the ejection conditions are met, up to 50% of the backend endpoints from
the load-balancing pool can be ejected.
9. Click **Save**.
10. To update the backend service, click **Update**.
11. To update the load balancer, on the **Edit cross-region internal Application Load Balancer** page, click **Update**.
### gcloud
1. Export the backend service into a YAML file.
```
gcloud compute backend-services export BACKEND_SERVICE_NAME \
--destination=BACKEND_SERVICE_NAME.yaml --global
```
Replace `BACKEND_SERVICE_NAME` with the name of the
backend service.
2. Edit the YAML configuration of the backend service to add the fields for
outlier detection as highlighted in the following YAML configuration,
in the `outlierDetection` section:
In this example, the outlier detection analysis runs every one second. If
the number of consecutive HTTP `5*xx*` status codes
received by an
Envoy proxy is five or more, the backend endpoint is ejected from the
load-balancing pool of that Envoy proxy for 30 seconds. When the
enforcing percentage is set to 100%, the backend service enforces the
ejection of unhealthy endpoints from the load-balancing pools of those
specific Envoy proxies every time the outlier detection analysis runs. If
the ejection conditions are met, up to 50% of the backend endpoints from
the load-balancing pool can be ejected.
```
name: BACKEND_SERVICE_NAME
backends:
- balancingMode: UTILIZATION
capacityScaler: 1.0
group: https://www.googleapis.com/compute/v1/projects/PROJECT_ID/regions/REGION_A/networkEndpointGroups/SERVERLESS_NEG_NAME
- balancingMode: UTILIZATION
capacityScaler: 1.0
group: https://www.googleapis.com/compute/v1/projects/PROJECT_ID/regions/REGION_B/networkEndpointGroups/SERVERLESS_NEG_NAME_2
outlierDetection:
baseEjectionTime:
nanos: 0
seconds: 30
consecutiveErrors: 5
enforcingConsecutiveErrors: 100
interval:
nanos: 0
seconds: 1
maxEjectionPercent: 50
port: 80
selfLink: https://www.googleapis.com/compute/v1/projects/PROJECT_ID/global/backendServices/BACKEND_SERVICE_NAME
sessionAffinity: NONE
timeoutSec: 30
...
```
Replace the following:
- `BACKEND_SERVICE_NAME`: the name of the backend service
- `PROJECT_ID`: the ID of your project
- `REGION_A` and `REGION_B`: the regions where the load balancer has been configured.
- `SERVERLESS_NEG_NAME`: the name of the first serverless NEG
- `SERVERLESS_NEG_NAME_2`: the name of the second serverless NEG
3. Update the backend service by importing the latest configuration.
```
gcloud compute backend-services import BACKEND_SERVICE_NAME \
--source=BACKEND_SERVICE_NAME.yaml --global
```
Outlier detection is now enabled on the backend service.
## Deleting a serverless NEG
A network endpoint group cannot be deleted if it is attached to a backend
service. Before you delete a NEG, ensure that it is detached from the
backend service.
### Console
1. To make sure the serverless NEG you want to delete is not in use by any backend service, go to the **Backend services** tab on the **Load balancing components** page.
[Go to Backend services](https://console.cloud.google.com/networking/loadbalancing/advanced/backendServices/list)
2. If the serverless NEG is in use, do the following:
1. Click the name of the backend service that is using the serverless NEG.
2. Click **Edit**.
3. From the list of **Backends** , click to remove the serverless NEG backend from the backend service.
4. Click **Save**.
3. Go to the **Network endpoint group** page in the Google Cloud console.
[Go to Network endpoint group](https://console.cloud.google.com/compute/networkendpointgroups/list)
4. Select the checkbox for the serverless NEG you want to delete.
5. Click **Delete**.
6. Click **Delete** again to confirm.
### gcloud
To remove a serverless NEG from a backend service, you must specify
the region where the NEG was created.
```
gcloud compute backend-services remove-backend BACKEND_SERVICE_NAME \
--network-endpoint-group=SERVERLESS_NEG_NAME \
--network-endpoint-group-region=REGION \
--region=REGION
```
To delete the serverless NEG:
```
gcloud compute network-endpoint-groups delete SERVERLESS_NEG_NAME \
--region=REGION
```
## What's next
- [Deploy an internal Application Load Balancer with Cloud Run by using Terraform](https://github.com/GoogleCloudPlatform/cloud-foundation-fabric/tree/v43.0.0/blueprints/serverless/cloud-run-corporate)
- [Clean up a load balancing setup](https://docs.cloud.google.com/load-balancing/docs/cleaning-up-lb-setup.md.txt)
- [Deprovision Shared VPC](https://docs.cloud.google.com/vpc/docs/deprovisioning-shared-vpc.md.txt)
- [Internal Application Load Balancer logging and monitoring](https://docs.cloud.google.com/load-balancing/docs/l7-internal/monitoring.md.txt)
- [Troubleshoot issues with internal Application Load Balancers](https://docs.cloud.google.com/load-balancing/docs/l7-internal/troubleshooting-l7-ilb.md.txt)