This tutorial describes how to use
[VPC Network Peering](https://docs.cloud.google.com/vpc/docs/overview.md.txt)
to deploy a hub-and-spoke architecture.
This tutorial is for cloud network engineers and operations professionals who
want to implement a hub-and-spoke architecture in their
Google Cloud environment by using centralized appliances consisting
of Compute Engine virtual machines. In this tutorial, you deploy these virtual
machines as NAT gateways, but you can use the same approach for other
functions such as next-generation firewalls. This tutorial assumes that you are
familiar with VPC networks and
[Compute Engine](https://docs.cloud.google.com/compute/docs.md.txt).
## Architecture
In this architecture, a
set of *spoke VPC networks* communicate with the outside through
a *hub VPC network* in which traffic is routed through a
centralized pool of appliances, in this case
[network address translation (NAT)](https://wikipedia.org/wiki/Network_address_translation)
gateways. The relevant routes are exported from the hub VPC
network into the spoke VPC networks. The NAT gateways are
configured as backends of an internal
load balancer with a new default route, which has an
[internal passthrough Network Load Balancer from Cloud Load Balancing as the next hop](https://docs.cloud.google.com/load-balancing/docs/internal/ilb-next-hop-overview.md.txt).
You can achieve the same type of load distribution and high availability by
using multiple routes with
[equal cost multi-path (ECMP)](https://wikipedia.org/wiki/Equal-cost_multi-path_routing)
routing. However, using the internal passthrough Network Load Balancer has the following advantages:
- Traffic is only forwarded to healthy instances when you rely on health checks. With ECMP, traffic is forwarded to all active instances that the route points to; using an internal passthrough Network Load Balancer eliminates the possibility of unused routes. Also, there is no need to clean up routes when instances are terminated or restarted.
- There is a potentially faster failover because you can fine-tune the health-check timers. If you use managed instance groups and autohealing, you can still customize the health-check timers, but they're used to [recreate the instance](https://docs.cloud.google.com/compute/docs/instance-groups.md.txt#autohealing), not route traffic.
Google also offers
[Cloud NAT](https://docs.cloud.google.com/nat/docs/overview.md.txt)
as a managed service, providing high availability without user management and
intervention. However, Cloud NAT isn't supported in this use case because the
[NAT configuration isn't imported into a peered network](https://docs.cloud.google.com/nat/docs/overview.md.txt#vpc_network_peering).
The following diagram shows the topology that you build in this tutorial.
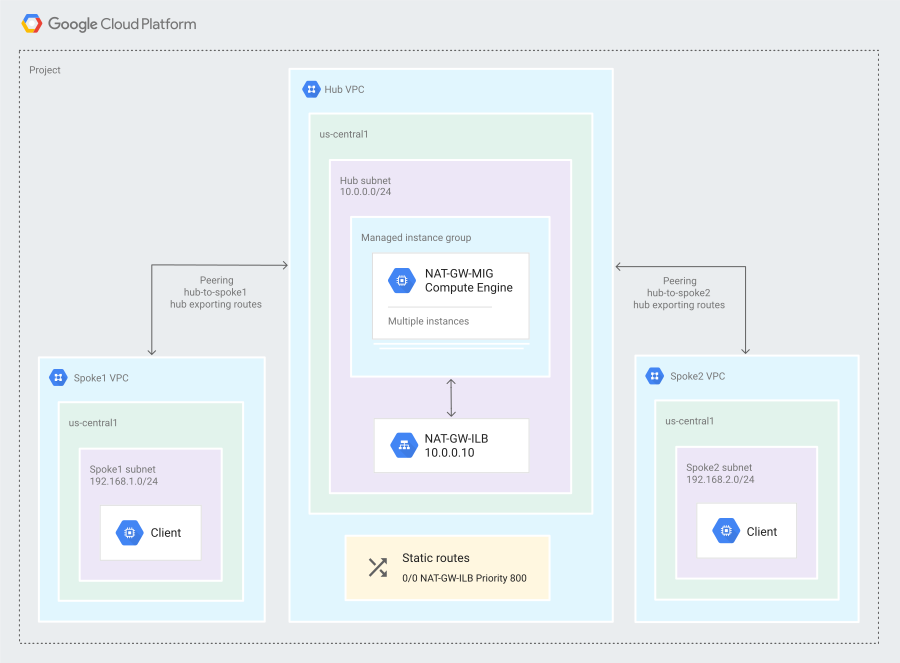
The topology consists of a hub VPC network and two spoke
VPC networks that are peered with the hub VPC
network by using VPC Network Peering. The hub VPC
network has two NAT gateway instances behind an internal passthrough Network Load Balancer.
A static default route (`0/0 NAT-GW-ILB`) points to the internal passthrough Network Load Balancer
as the next hop. This static default route is exported over
VPC Network Peering by using
[custom routes](https://docs.cloud.google.com/vpc/docs/vpc-peering.md.txt#importing-exporting-routes).
## Objectives
- Create multiple VPC networks and peer them by using a hub-and-spoke architecture.
- Create and configure NAT gateways in the hub VPC network.
- Set up and configure the internal passthrough Network Load Balancer as the next hop.
- Verify connectivity from the spoke VPC networks to the public internet.
## Costs
In this document, you use the following billable components of Google Cloud:
- [Compute Engine](https://docs.cloud.google.com/compute/pricing)
To generate a cost estimate based on your projected usage,
use the [pricing calculator](https://docs.cloud.google.com/products/calculator).
New Google Cloud users might be eligible for a [free trial](https://docs.cloud.google.com/free).
When you finish the tasks that are described in this document, you can avoid
continued billing by deleting the resources that you created. For more information, see
[Clean up](https://docs.cloud.google.com/load-balancing/docs/internal/deploying-ilb-next-hop-vm.md.txt#clean-up).
## Before you begin
1. In the Google Cloud console, activate Cloud Shell.
[Activate Cloud Shell](https://console.cloud.google.com/?cloudshell=true)
At the bottom of the Google Cloud console, a
[Cloud Shell](https://docs.cloud.google.com/shell/docs/how-cloud-shell-works.md.txt)
session starts and displays a command-line prompt. Cloud Shell is a shell environment
with the Google Cloud CLI
already installed and with values already set for
your current project. It can take a few seconds for the session to initialize.
In this tutorial, you run all commands from Cloud Shell.
## Setting up your environment
1. In Cloud Shell, make sure you are working in the
Google Cloud project that you created or selected. Replace
`project-id` with your Google Cloud project.
```
gcloud config set project project-id
export PROJECT_ID=`gcloud config list --format="value(core.project)"`
```
2. Set the default compute region and zone.
gcloud config set compute/region us-central1
gcloud config set compute/zone us-central1-c
export REGION=us-central1
export ZONE=us-central1-c
In this tutorial, the region is `us-central1` and the zone is
`us-central1-c`.
## Creating the VPC networks and subnets
1. In Cloud Shell, create the hub VPC network and subnet:
gcloud compute networks create hub-vpc --subnet-mode custom
gcloud compute networks subnets create hub-subnet1 \
--network hub-vpc --range 10.0.0.0/24
2. Create the spoke VPC networks, called `spoke1-vpc` and
`spoke2-vpc`, with one subnet each:
gcloud compute networks create spoke1-vpc --subnet-mode custom
gcloud compute networks create spoke2-vpc --subnet-mode custom
gcloud compute networks subnets create spoke1-subnet1 \
--network spoke1-vpc --range 192.168.1.0/24
gcloud compute networks subnets create spoke2-subnet1 \
--network spoke2-vpc --range 192.168.2.0/24
3. Create firewall rules in the hub VPC network and the spoke
VPC networks. These rules allow internal traffic (TCP/80 and 443,
UDP/53 and ICMP) from the specified RFC 1918 ranges:
gcloud compute firewall-rules create hub-vpc-web-ping-dns \
--network hub-vpc --allow tcp:80,tcp:443,icmp,udp:53 \
--source-ranges 10.0.0.0/24,192.168.1.0/24,192.168.2.0/24
gcloud compute firewall-rules create spoke1-vpc-web-ping-dns \
--network spoke1-vpc --allow tcp:80,tcp:443,icmp,udp:53 \
--source-ranges 10.0.0.0/24,192.168.1.0/24
gcloud compute firewall-rules create spoke2-vpc-web-ping-dns \
--network spoke2-vpc --allow tcp:80,tcp:443,icmp,udp:53 \
--source-ranges 10.0.0.0/24,192.168.2.0/24
4. Create firewall rules in the hub VPC network and the spoke
VPC networks to allow
[IAP for SSH](https://docs.cloud.google.com/iap/docs/using-tcp-forwarding.md.txt#before_you_begin)
to access all your virtual machines:
gcloud compute firewall-rules create hub-vpc-iap \
--network hub-vpc --allow tcp:22 \
--source-ranges 35.235.240.0/20
gcloud compute firewall-rules create spoke1-vpc-iap \
--network spoke1-vpc --allow tcp:22 \
--source-ranges 35.235.240.0/20
gcloud compute firewall-rules create spoke2-vpc-iap \
--network spoke2-vpc --allow tcp:22 \
--source-ranges 35.235.240.0/20
This tutorial uses
[Identity-Aware Proxy (IAP) for SSH](https://docs.cloud.google.com/iap/docs/using-tcp-forwarding.md.txt#starting_ssh).
For more information, see
[Connecting to instances that don't have external IP addresses](https://docs.cloud.google.com/compute/docs/instances/connecting-advanced#sshbetweeninstances).
5. Create a firewall rule to allow health checks for
[autohealing instance groups](https://docs.cloud.google.com/compute/docs/instance-groups/creating-groups-of-managed-instances.md.txt#monitoring_groups)
in the hub VPC network:
gcloud compute firewall-rules create hub-vpc-health-checks \
--network hub-vpc --allow tcp:443 --target-tags nat-gw \
--source-ranges `35.191.0.0/16`
## Creating the instances and required routes
1. In Cloud Shell, create the instance template for the NAT gateway
that has a startup script that sets up the NAT gateway:
gcloud compute instance-templates create \
hub-nat-gw-ilbnhop-template \
--network hub-vpc \
--subnet hub-subnet1 \
--machine-type n1-standard-2 --can-ip-forward \
--tags nat-gw --scopes default,compute-rw \
--metadata startup-script='#! /bin/bash
apt-get update
# Enable IP forwarding:
echo 1 > /proc/sys/net/ipv4/ip_forward
echo "net.ipv4.ip_forward=1" > /etc/sysctl.d/20-example.conf
# Read VM network configuration:
md_vm="http://metadata.google.internal/computeMetadata/v1/instance/"
md_net="$md_vm/network-interfaces"
nic0_gw="$(curl $md_net/0/gateway -H "Metadata-Flavor:Google")"
nic0_mask="$(curl $md_net/0/subnetmask -H "Metadata-Flavor:Google")"
nic0_addr="$(curl $md_net/0/ip -H "Metadata-Flavor:Google")"
nic0_id="$(ip addr show | grep $nic0_addr | tail -c 5)"
# Use a web server to pass the health check for this example.
# In production, use a more complete test.
sudo apt-get update
sudo apt-get install apache2 -y
sudo a2ensite default-ssl
sudo a2enmod ssl
echo "Example web page to pass health check" | \
tee /var/www/html/index.html
sudo systemctl restart apache2
# Enable IP masquerading
iptables -t nat -A POSTROUTING -o $nic0_id -j MASQUERADE'
This tutorial is using `n1-standard-2` as the instance type, but you can use
any other number or size of gateway that you want. Make sure to consider
[factors such as the maximum egress bandwidth per
VM](https://docs.cloud.google.com/compute/docs/network-bandwidth).
2. Create an HTTP health-check:
gcloud compute health-checks create http nat-gw-ilbnhop-health-check \
--region us-central1 \
--port 80
3. Create a
[regional instance group](https://docs.cloud.google.com/compute/docs/instance-groups/distributing-instances-with-regional-instance-groups.md.txt)
with two instances that are distributed across a single region:
gcloud compute instance-groups managed create \
hub-nat-gw-ilbnhop-mig \
--region us-central1 --size=2 \
--template=hub-nat-gw-ilbnhop-template \
--health-check nat-gw-ilbnhop-health-check \
--initial-delay 15
In this tutorial, the initial delay is set to 15 seconds. In a production
deployment, customize this setting according to your requirements. This
tutorial isn't using
[autoscaling policies](https://docs.cloud.google.com/compute/docs/autoscaler.md.txt).
4. Create a backend service and add the instance group:
gcloud compute backend-services create hub-nat-gw-ilbnhop-backend \
--load-balancing-scheme=internal \
--protocol=tcp \
--health-checks=nat-gw-ilbnhop-health-check
gcloud compute backend-services add-backend \
hub-nat-gw-ilbnhop-backend \
--instance-group=hub-nat-gw-ilbnhop-mig \
--instance-group-region=us-central1
5. Create a forwarding rule:
gcloud compute forwarding-rules create \
hub-nat-gw-ilbnhop \
--load-balancing-scheme=internal \
--network=hub-vpc \
--subnet=hub-subnet1 \
--address=10.0.0.10 \
--ip-protocol=TCP \
--ports=all \
--backend-service=hub-nat-gw-ilbnhop-backend \
--backend-service-region=us-central1 \
--service-label=hub-nat-gw-ilbnhop
Even though the forwarding rule is defined only with TCP, when you use the
internal passthrough Network Load Balancer as the next hop, the forwarding rule [forwards all
traffic](https://docs.cloud.google.com/load-balancing/docs/internal/ilb-next-hop-overview#all-traffic)
to all ports on the backend VMs. The internal passthrough Network Load Balancer is a regional load
balancer.
6. Create a new route with the forwarding rule as the next hop:
gcloud compute routes create hub-nat-gw-ilbnhop \
--network=hub-vpc \
--destination-range=0.0.0.0/0 \
--next-hop-ilb=hub-nat-gw-ilbnhop \
--next-hop-ilb-region=us-central1 \
--priority=800
You can specify network tags so that the next-hop route only applies to
client instances that have been configured with the tag, but the tags are
not exported or imported through VPC Network Peering.
7. Delete the
[default route](https://docs.cloud.google.com/vpc/docs/routes.md.txt#routingpacketsinternet)
from the hub VPC:
export hub_default_route=$(gcloud compute routes list \
--format="value(name)" --filter="network:hub-vpc AND \
nextHopGateway:default-internet-gateway" | head -n 1)
gcloud compute routes delete $hub_default_route -q
8. Create a new tagged route to allow traffic only from the NAT gateways:
gcloud compute routes create hub-default-tagged \
--network hub-vpc --destination-range 0.0.0.0/0 \
--next-hop-gateway default-internet-gateway \
--priority 700 --tags nat-gw
9. Delete the default routes to the internet from VPC of each
spoke:
export spoke1_default_route=$(gcloud compute routes list \
--format="value(name)" --filter="network:spoke1-vpc AND \
nextHopGateway:default-internet-gateway")
gcloud compute routes delete $spoke1_default_route -q
export spoke2_default_route=$(gcloud compute routes list \
--format="value(name)" \
--filter="network:spoke2-vpc AND nextHopGateway:default-internet-gateway")
gcloud compute routes delete $spoke2_default_route -q
When there is a conflict between local and imported routes, the local
ones always take precedence. For more information, see
[Routing order](https://docs.cloud.google.com/vpc/docs/routes.md.txt#routeselection).
10. Create client VMs:
gcloud compute instances create spoke1-client \
--subnet=spoke1-subnet1 --no-address \
--metadata startup-script='#! /bin/bash
apt-get update
apt-get install dnsutils -y'
gcloud compute instances create spoke2-client \
--subnet=spoke2-subnet1 --no-address \
--metadata startup-script='#! /bin/bash
apt-get update
apt-get install dnsutils -y'
## Creating the VPC Network Peering connections
VPC Network Peering is bidirectional, and thus it must be defined
on both ends. A VPC network can peer with multiple
VPC networks, but
[limits](https://docs.cloud.google.com/vpc/docs/quota.md.txt#vpc-peering)
apply. To reach the default route over VPC Network Peering, you
use the feature
[*importing and exporting custom routes over VPC Network Peering*](https://docs.cloud.google.com/vpc/docs/vpc-peering.md.txt#importing-exporting-routes).
For this tutorial, you create all of the VPC networks in the same
Google Cloud project.
1. In Cloud Shell, create the VPC
connections from the hub VPC network to the spoke VPC
networks with the route export flag enabled:
gcloud compute networks peerings create hub-to-spoke1 \
--network hub-vpc --peer-network spoke1-vpc \
--peer-project $PROJECT_ID \
--export-custom-routes
gcloud compute networks peerings create hub-to-spoke2 \
--network hub-vpc --peer-network spoke2-vpc \
--peer-project $PROJECT_ID \
--export-custom-routes
2. Create a VPC Network Peering connection from the `spoke1`
VPC network to the hub VPC network with the
route import flag enabled:
gcloud compute networks peerings create spoke1-to-hub \
--network spoke1-vpc --peer-network hub-vpc \
--peer-project $PROJECT_ID \
--import-custom-routes
3. Create a VPC Network Peering connection from the `spoke2`
VPC network to the hub VPC network with the
route import flag enabled:
gcloud compute networks peerings create spoke2-to-hub \
--network spoke2-vpc --peer-network hub-vpc \
--peer-project $PROJECT_ID \
--import-custom-routes
## Verifying route propagation and connectivity
1. In Cloud Shell, verify that the static routes were correctly
created as part of the startup scripts.
gcloud compute routes list --filter="network:hub-vpc"
Make sure that the `hub-default-tagged` and `hub-nat-gw-ilbanhop`
routes are present in the output:
```
NAME NETWORK DEST_RANGE NEXT_HOP PRIORITY
default-route-13a4b635b5eab48c hub-vpc 10.0.0.0/24 hub-vpc 1000
hub-default-tagged hub-vpc 0.0.0.0/0 default-internet-gateway 700
hub-nat-gw-ilbanhop hub-vpc 0.0.0.0/0 10.0.0.10 800
peering-route-3274f1257a9842a0 hub-vpc 192.168.2.0/24 hub-to-spoke2 1000
peering-route-798c5777f13094bc hub-vpc 192.168.1.0/24 hub-to-spoke1 1000
```
2. Verify the `spoke1-vpc` routing table to make sure the default route
was correctly imported:
gcloud compute routes list --filter="network:spoke1-vpc"
Make sure that there is a route starting with
`peering-route` with `0.0.0.0/0` as the `DEST_RANGE` value in the output:
```
NAME NETWORK DEST_RANGE NEXT_HOP PRIORITY
default-route-75f6ea8f5fc54813 spoke1-vpc 192.168.1.0/24 spoke1-vpc 1000
peering-route-6c7f130b860bfd39 spoke1-vpc 10.0.0.0/24 spoke1-to-hub 1000
peering-route-9d44d362f98afbd8 spoke1-vpc 0.0.0.0/0 spoke1-to-hub 800
```
3. Connect to one of the clients using SSH through
IAP:
gcloud compute ssh spoke1-client --tunnel-through-iap
4. Verify connectivity by testing the Google public DNS through the NAT gateway:
sudo hping3 -S -p 80 -c 3 dns.google
Because the internal passthrough Network Load Balancer supports TCP and UDP, you can't
verify internet connectivity by using an ICMP-based ping, so you have to
use a tool such as hping3.
The output is similar to the following:
```
HPING dns.google (eth0 8.8.4.4): S set, 40 headers + 0 data bytes
len=44 ip=8.8.4.4 ttl=126 DF id=0 sport=80 flags=SA seq=0 win=65535 rtt=4.6 ms
len=44 ip=8.8.4.4 ttl=126 DF id=0 sport=80 flags=SA seq=1 win=65535 rtt=4.4 ms
len=44 ip=8.8.4.4 ttl=126 DF id=0 sport=80 flags=SA seq=2 win=65535 rtt=4.3 ms
--- dns.google hping statistic ---
3 packets transmitted, 3 packets received, 0% packet loss
round-trip min/avg/max = 4.3/4.4/4.6 ms
```
5. Verify the public IP address you use to communicate with the internet:
curl ifconfig.co
The output displays a public IP address of one of the NAT gateway
instances. If you run the command again, the output might display a
different public IP address because the connections are distributed by
using the configured internal load-balancing
[session affinity](https://docs.cloud.google.com/load-balancing/docs/internal.md.txt#session_affinity)
(by default, client IP, protocol, and port).
[VPC Network Peering is non-transitive](https://docs.cloud.google.com/vpc/docs/vpc-peering.md.txt#restrictions),
so there is no connectivity between the spoke VPC networks
through VPC Network Peering.
## Considerations for a production environment
The configuration that you create in this tutorial provides two NAT gateways in
a single region. ECMP load balancing isn't perfect,
though, and an individual flow isn't spread across multiple links, which is what
you want when using stateful devices such as
[next-generation firewalls](https://wikipedia.org/wiki/Next-generation_firewall).
To deploy this configuration in the production environment, consider the
following points:
- This configuration is best for ephemeral or non-stateful outbound links. If the size of the NAT gateway pool changes, TCP connections might be rebalanced, which could result in an established connection being reset.
- The nodes aren't automatically updated, so if a default Debian installation has a security vulnerability, you need to update the image manually.
- If you have VMs in multiple regions, you need to set up NAT gateways in each region.
- The bandwidth per gateway can vary according to the hardware type. Make sure to consider factors such as the [maximum egress
bandwidth](https://docs.cloud.google.com/compute/docs/network-bandwidth) per VM. During a gateway failure, traffic is distributed to the remaining gateways. Because running flows aren't reprogrammed, traffic doesn't immediately resettle when the gateway comes back online. So make sure you allow enough overhead when sizing.
- To be alerted of unexpected results, use [Cloud Monitoring](https://docs.cloud.google.com/monitoring) to monitor the managed instance groups and network traffic.
## Clean up
The easiest way to eliminate billing is to delete the Google Cloud project you
created for the tutorial. Alternatively, you can delete the individual
resources.
### Delete the project
> [!CAUTION]
> **Caution** : Deleting a project has the following effects:
>
> - **Everything in the project is deleted.** If you used an existing project for the tasks in this document, when you delete it, you also delete any other work you've done in the project.
> - **Custom project IDs are lost.** When you created this project, you might have created a custom project ID that you want to use in the future. To preserve the URLs that use the project ID, such as an `appspot.com` URL, delete selected resources inside the project instead of deleting the whole project.
1. In the Google Cloud console, go to the **Manage resources** page.
[Go to Manage resources](https://console.cloud.google.com/iam-admin/projects)
2. In the project list, select the project that you want to delete, and then click **Delete**.
3. In the dialog, type the project ID, and then click **Shut down** to delete the project.
### Delete the individual resources
If you want to keep the Google Cloud project, you can delete the resources
that you created for this tutorial.
1. Delete the VPC Network Peering connections:
gcloud compute networks peerings delete spoke2-to-hub \
--network spoke2-vpc -q
gcloud compute networks peerings delete spoke1-to-hub \
--network spoke1-vpc -q
gcloud compute networks peerings delete hub-to-spoke1 \
--network hub-vpc -q
gcloud compute networks peerings delete hub-to-spoke2 \
--network hub-vpc -q
2. Delete the instances, load balancer resources, templates, and routes:
gcloud compute instances delete spoke1-client \
--zone=us-central1-c -q
gcloud compute instances delete spoke2-client \
--zone=us-central1-c -q
gcloud compute routes delete hub-nat-gw-ilbnhop -q
gcloud compute forwarding-rules delete hub-nat-gw-ilbnhop -q
gcloud compute backend-services delete -q hub-nat-gw-ilbnhop-backend -q
gcloud compute instance-groups managed delete hub-nat-gw-ilbnhop-mig \
--region us-central1 -q
gcloud compute health-checks delete nat-gw-ilbnhop-health-check -q
gcloud compute instance-templates delete hub-nat-gw-ilbnhop-template -q
gcloud compute routes delete hub-default-tagged -q
3. Delete the firewall rules, subnets, and VPC networks:
gcloud compute firewall-rules delete spoke2-vpc-iap -q
gcloud compute firewall-rules delete spoke2-vpc-web-ping-dns -q
gcloud compute firewall-rules delete spoke1-vpc-iap -q
gcloud compute firewall-rules delete spoke1-vpc-web-ping-dns -q
gcloud compute firewall-rules delete hub-vpc-iap -q
gcloud compute firewall-rules delete hub-vpc-web-ping-dns -q
gcloud compute firewall-rules delete hub-vpc-health-checks -q
gcloud compute networks subnets delete spoke1-subnet1 \
--region us-central1 -q
gcloud compute networks subnets delete spoke2-subnet1 \
--region us-central1 -q
gcloud compute networks subnets delete hub-subnet1 \
--region us-central1 -q
gcloud compute networks delete spoke1-vpc -q
gcloud compute networks delete spoke2-vpc -q
gcloud compute networks delete hub-vpc -q
## What's next
- Read about [Best practices and reference architectures for VPC design](https://docs.cloud.google.com/solutions/best-practices-vpc-design).
- Review the [VPC Network Peering](https://docs.cloud.google.com/vpc/docs/vpc-peering.md.txt) and [Internal passthrough Network Load Balancers as next hops](https://docs.cloud.google.com/load-balancing/docs/internal/ilb-next-hop-overview.md.txt) documentation.
- Read about [special configurations for VM instances](https://docs.cloud.google.com/vpc/docs/special-configurations).