This page describes how to create video on demand (VOD) clips from a live stream
using the Live Stream API. VOD clips are made up of HLS manifest files
and segment files that have been saved from a live stream. Only HLS manifests
are supported.
## Differences between VOD clips and DVR sessions
VOD clips (also known as channel clips) are similar to DVR sessions with the
following key differences:
- DVR sessions:
- The API saves the DVR manifest in the same location as the live stream segments so there is no additional copying to Cloud Storage. The DVR manifest is similar to the live stream manifest but longer. When the retention window expires, the manifest is deleted along with the segment files.
- You can create a DVR session for past, current, and future content. For example, a DVR session can follow a live stream, or you can schedule a DVR session to start and stop at a future time.
- A typical use case for DVR sessions is to support DVR capabilities for live streaming events. For example, a viewer can join the live stream one hour after it begins and view the content with a one hour lag (or skip parts of it).
- Channel clips:
- The Live Stream API copies the clip manifest and the associated segment files to a user-specified directory so they are not deleted when the retention window expires. You have complete control of the clip.
- Only past content can be clipped. Live clips and scheduling future clips are not supported.
- A typical use case for clips is to archive a live stream, making the live stream available as a VOD file indefinitely.
For more information on DVR sessions, see [Create a DVR session](https://docs.cloud.google.com/livestream/docs/how-to/create-dvr-session.md.txt).
## Set up your Google Cloud project and authentication
If you have not created a [Google Cloud project](https://docs.cloud.google.com/docs/overview.md.txt#projects) and credentials, see [Before you begin](https://docs.cloud.google.com/livestream/docs/how-to/before-you-begin.md.txt).
## Create an input endpoint
To create an input endpoint, use the
[`projects.locations.inputs.create`](https://docs.cloud.google.com/livestream/docs/reference/rest/v1/projects.locations.inputs/create.md.txt) method.
Before using any of the request data,
make the following replacements:
- `PROJECT_NUMBER`: your Google Cloud project number; this is located in the **Project number** field on the [IAM Settings](https://console.cloud.google.com/iam-admin/settings) page
- `LOCATION`: the location in which to create the input endpoint; use one of the [supported regions](https://docs.cloud.google.com/livestream/docs/locations.md.txt) Show locations
- `us-central1`
- `us-east1`
- `us-east4`
- `us-west1`
- `us-west2`
- `northamerica-northeast1`
- `southamerica-east1`
- `asia-east1`
- `asia-east2`
- `asia-south1`
- `asia-northeast1`
- `asia-southeast1`
- `australia-southeast1`
- `europe-north1`
- `europe-west1`
- `europe-west2`
- `europe-west3`
- `europe-west4`
- `INPUT_ID`: a user-defined identifier for the new input endpoint to create (to which you send your input stream). This value must be 1-63 characters, begin and end with `[a-z0-9]`, and can contain dashes (-) between characters. For example, `my-input`.
To send your request, expand one of these options:
#### curl (Linux, macOS, or Cloud Shell)
> [!NOTE]
> **Note:** The following command assumes that you have logged in to the `gcloud` CLI with your user account by running [`gcloud init`](https://docs.cloud.google.com/sdk/gcloud/reference/init) or [`gcloud auth login`](https://docs.cloud.google.com/sdk/gcloud/reference/auth/login.md.txt) , or by using [Cloud Shell](https://docs.cloud.google.com/shell/docs.md.txt), which automatically logs you into the `gcloud` CLI . You can check the currently active account by running [`gcloud auth list`](https://docs.cloud.google.com/sdk/gcloud/reference/auth/list.md.txt).
Save the request body in a file named `request.json`.
Run the following command in the terminal to create or overwrite
this file in the current directory:
```
cat > request.json << 'EOF'
{
"type": "RTMP_PUSH"
}
EOF
```
Then execute the following command to send your REST request:
```
curl -X POST \
-H "Authorization: Bearer $(gcloud auth print-access-token)" \
-H "Content-Type: application/json; charset=utf-8" \
-d @request.json \
"https://livestream.googleapis.com/v1/projects/PROJECT_NUMBER/locations/LOCATION/inputs?inputId=INPUT_ID"
```
#### PowerShell (Windows)
> [!NOTE]
> **Note:** The following command assumes that you have logged in to the `gcloud` CLI with your user account by running [`gcloud init`](https://docs.cloud.google.com/sdk/gcloud/reference/init) or [`gcloud auth login`](https://docs.cloud.google.com/sdk/gcloud/reference/auth/login.md.txt) . You can check the currently active account by running [`gcloud auth list`](https://docs.cloud.google.com/sdk/gcloud/reference/auth/list.md.txt).
Save the request body in a file named `request.json`.
Run the following command in the terminal to create or overwrite
this file in the current directory:
```
@'
{
"type": "RTMP_PUSH"
}
'@ | Out-File -FilePath request.json -Encoding utf8
```
Then execute the following command to send your REST request:
```
$cred = gcloud auth print-access-token
$headers = @{ "Authorization" = "Bearer $cred" }
Invoke-WebRequest `
-Method POST `
-Headers $headers `
-ContentType: "application/json; charset=utf-8" `
-InFile request.json `
-Uri "https://livestream.googleapis.com/v1/projects/PROJECT_NUMBER/locations/LOCATION/inputs?inputId=INPUT_ID" | Select-Object -Expand Content
```
You should receive a JSON response similar to the following:
```
{
"name": "projects/PROJECT_NUMBER/locations/LOCATION/operations/OPERATION_ID",
"metadata": {
"@type": "type.googleapis.com/google.cloud.video.livestream.v1.OperationMetadata",
"createTime": CREATE_TIME,
"target": "projects/PROJECT_NUMBER/locations/LOCATION/inputs/INPUT_ID",
"verb": "create",
"requestedCancellation": false,
"apiVersion": "v1"
},
"done": false
}
```
This command creates a long-running operation (LRO) that you can use
to track the progress of your request. See
[Manage long-running operations](https://docs.cloud.google.com/livestream/docs/how-to/manage-long-running-operations.md.txt) for more information.
## Get input endpoint details
To get the details of the input endpoint, use the
[`projects.locations.inputs.get`](https://docs.cloud.google.com/livestream/docs/reference/rest/v1/projects.locations.inputs/get.md.txt) method.
Before using any of the request data,
make the following replacements:
- `PROJECT_NUMBER`: your Google Cloud project number; this is located in the **Project number** field on the [IAM Settings](https://console.cloud.google.com/iam-admin/settings) page
- `LOCATION`: the location where your input endpoint is located; use one of the [supported regions](https://docs.cloud.google.com/livestream/docs/locations.md.txt) Show locations
- `us-central1`
- `us-east1`
- `us-east4`
- `us-west1`
- `us-west2`
- `northamerica-northeast1`
- `southamerica-east1`
- `asia-east1`
- `asia-east2`
- `asia-south1`
- `asia-northeast1`
- `asia-southeast1`
- `australia-southeast1`
- `europe-north1`
- `europe-west1`
- `europe-west2`
- `europe-west3`
- `europe-west4`
- `INPUT_ID`: the user-defined identifier for the input endpoint
To send your request, expand one of these options:
#### curl (Linux, macOS, or Cloud Shell)
> [!NOTE]
> **Note:** The following command assumes that you have logged in to the `gcloud` CLI with your user account by running [`gcloud init`](https://docs.cloud.google.com/sdk/gcloud/reference/init) or [`gcloud auth login`](https://docs.cloud.google.com/sdk/gcloud/reference/auth/login.md.txt) , or by using [Cloud Shell](https://docs.cloud.google.com/shell/docs.md.txt), which automatically logs you into the `gcloud` CLI . You can check the currently active account by running [`gcloud auth list`](https://docs.cloud.google.com/sdk/gcloud/reference/auth/list.md.txt).
Execute the following command:
```
curl -X GET \
-H "Authorization: Bearer $(gcloud auth print-access-token)" \
"https://livestream.googleapis.com/v1/projects/PROJECT_NUMBER/locations/LOCATION/inputs/INPUT_ID"
```
#### PowerShell (Windows)
> [!NOTE]
> **Note:** The following command assumes that you have logged in to the `gcloud` CLI with your user account by running [`gcloud init`](https://docs.cloud.google.com/sdk/gcloud/reference/init) or [`gcloud auth login`](https://docs.cloud.google.com/sdk/gcloud/reference/auth/login.md.txt) . You can check the currently active account by running [`gcloud auth list`](https://docs.cloud.google.com/sdk/gcloud/reference/auth/list.md.txt).
Execute the following command:
```
$cred = gcloud auth print-access-token
$headers = @{ "Authorization" = "Bearer $cred" }
Invoke-WebRequest `
-Method GET `
-Headers $headers `
-Uri "https://livestream.googleapis.com/v1/projects/PROJECT_NUMBER/locations/LOCATION/inputs/INPUT_ID" | Select-Object -Expand Content
```
You should receive a JSON response similar to the following:
```
{
"name": "projects/PROJECT_NUMBER/locations/LOCATION/inputs/INPUT_ID",
"createTime": CREATE_TIME,
"updateTime": UPDATE_TIME,
"type": "RTMP_PUSH",
"uri": "INPUT_STREAM_URI", # For example, "rtmp://1.2.3.4/live/b8ebdd94-c8d9-4d88-a16e-b963c43a953b",
"tier": "HD"
}
```
Find the `uri` field and copy the returned
INPUT_STREAM_URI to use later
in the [Send the input stream](https://docs.cloud.google.com/livestream/docs/how-to/live-to-vod.md.txt#send-input-stream) section.
## Create a channel
To create a channel, use the
[`projects.locations.channels.create`](https://docs.cloud.google.com/livestream/docs/reference/rest/v1/projects.locations.channels/create.md.txt)
method. The following samples create a channel that generates an HLS live
stream. The live stream consists of a single, high-definition (1280x720)
rendition.
To enable the creation of VOD clips, add the
[`retentionConfig`](https://docs.cloud.google.com/livestream/docs/reference/rest/v1/projects.locations.channels.md.txt#Channel.FIELDS.retention_config) object to the channel configuration.
```json
"retentionConfig": {
"retentionWindowDuration": {
"seconds": 86400
}
},
```
When retention is enabled for a live stream channel, the live stream segments
and manifest are retained in order to create VOD clips. The
[`retentionWindowDuration`](https://docs.cloud.google.com/livestream/docs/reference/rest/v1/projects.locations.channels.md.txt#RetentionConfig.FIELDS.retention_window_duration) object specifies the
length of time for which the live stream output is saved after being uploaded to
Cloud Storage. The retention window begins at the time the segment is
created in Cloud Storage.
**The retention window is limited to 30 days. After the retention window has
passed, the live stream segment files and manifest file are automatically
deleted from Cloud Storage. (The VOD clip manifest and its associated
segment files are not automatically deleted.) You can't create VOD clips using
deleted segments.** The deletion process is asynchronous and may take up to 24
hours to complete.
Specify a key for the manifest to enable VOD clip creation. You refer to this
key when actually creating the clip. Only HLS manifests are supported.
```json
"manifests": [
{
...
"key": "manifest_hls"
}
```
Before using any of the request data,
make the following replacements:
- `PROJECT_NUMBER`: your Google Cloud project number; this is located in the **Project number** field on the [IAM Settings](https://console.cloud.google.com/iam-admin/settings) page
- `LOCATION`: the location in which to create the channel; use one of the [supported regions](https://docs.cloud.google.com/livestream/docs/locations.md.txt) Show locations
- `us-central1`
- `us-east1`
- `us-east4`
- `us-west1`
- `us-west2`
- `northamerica-northeast1`
- `southamerica-east1`
- `asia-east1`
- `asia-east2`
- `asia-south1`
- `asia-northeast1`
- `asia-southeast1`
- `australia-southeast1`
- `europe-north1`
- `europe-west1`
- `europe-west2`
- `europe-west3`
- `europe-west4`
- `CHANNEL_ID`: a user-defined identifier for the channel to create; this value must be 1-63 characters, begin and end with `[a-z0-9]`, and can contain dashes (-) between characters
- `INPUT_ID`: the user-defined identifier for the input endpoint
- `BUCKET_NAME`: the name of the Cloud Storage bucket you created to hold the live stream manifest and segment files
To send your request, expand one of these options:
#### curl (Linux, macOS, or Cloud Shell)
> [!NOTE]
> **Note:** The following command assumes that you have logged in to the `gcloud` CLI with your user account by running [`gcloud init`](https://docs.cloud.google.com/sdk/gcloud/reference/init) or [`gcloud auth login`](https://docs.cloud.google.com/sdk/gcloud/reference/auth/login.md.txt) , or by using [Cloud Shell](https://docs.cloud.google.com/shell/docs.md.txt), which automatically logs you into the `gcloud` CLI . You can check the currently active account by running [`gcloud auth list`](https://docs.cloud.google.com/sdk/gcloud/reference/auth/list.md.txt).
Save the request body in a file named `request.json`.
Run the following command in the terminal to create or overwrite
this file in the current directory:
```
cat > request.json << 'EOF'
{
"inputAttachments": [
{
"key": "my-input",
"input": "projects/PROJECT_NUMBER/locations/LOCATION/inputs/INPUT_ID"
}
],
"output": {
"uri": "gs://BUCKET_NAME"
},
"elementaryStreams": [
{
"key": "es_video",
"videoStream": {
"h264": {
"profile": "high",
"widthPixels": 1280,
"heightPixels": 720,
"bitrateBps": 3000000,
"frameRate": 30
}
}
},
{
"key": "es_audio",
"audioStream": {
"codec": "aac",
"channelCount": 2,
"bitrateBps": 160000
}
}
],
"muxStreams": [
{
"key": "mux_video_ts",
"container": "ts",
"elementaryStreams": ["es_video", "es_audio"],
"segmentSettings": { "segmentDuration": "2s" }
}
],
"manifests": [
{
"fileName": "main.m3u8",
"type": "HLS",
"key": "manifest_hls",
"muxStreams": [
"mux_video_ts"
],
"maxSegmentCount": 5
}
],
"retentionConfig": {
"retentionWindowDuration": {
"seconds": 86400
}
}
}
EOF
```
Then execute the following command to send your REST request:
```
curl -X POST \
-H "Authorization: Bearer $(gcloud auth print-access-token)" \
-H "Content-Type: application/json; charset=utf-8" \
-d @request.json \
"https://livestream.googleapis.com/v1/projects/PROJECT_NUMBER/locations/LOCATION/channels?channelId=CHANNEL_ID"
```
#### PowerShell (Windows)
> [!NOTE]
> **Note:** The following command assumes that you have logged in to the `gcloud` CLI with your user account by running [`gcloud init`](https://docs.cloud.google.com/sdk/gcloud/reference/init) or [`gcloud auth login`](https://docs.cloud.google.com/sdk/gcloud/reference/auth/login.md.txt) . You can check the currently active account by running [`gcloud auth list`](https://docs.cloud.google.com/sdk/gcloud/reference/auth/list.md.txt).
Save the request body in a file named `request.json`.
Run the following command in the terminal to create or overwrite
this file in the current directory:
```
@'
{
"inputAttachments": [
{
"key": "my-input",
"input": "projects/PROJECT_NUMBER/locations/LOCATION/inputs/INPUT_ID"
}
],
"output": {
"uri": "gs://BUCKET_NAME"
},
"elementaryStreams": [
{
"key": "es_video",
"videoStream": {
"h264": {
"profile": "high",
"widthPixels": 1280,
"heightPixels": 720,
"bitrateBps": 3000000,
"frameRate": 30
}
}
},
{
"key": "es_audio",
"audioStream": {
"codec": "aac",
"channelCount": 2,
"bitrateBps": 160000
}
}
],
"muxStreams": [
{
"key": "mux_video_ts",
"container": "ts",
"elementaryStreams": ["es_video", "es_audio"],
"segmentSettings": { "segmentDuration": "2s" }
}
],
"manifests": [
{
"fileName": "main.m3u8",
"type": "HLS",
"key": "manifest_hls",
"muxStreams": [
"mux_video_ts"
],
"maxSegmentCount": 5
}
],
"retentionConfig": {
"retentionWindowDuration": {
"seconds": 86400
}
}
}
'@ | Out-File -FilePath request.json -Encoding utf8
```
Then execute the following command to send your REST request:
```
$cred = gcloud auth print-access-token
$headers = @{ "Authorization" = "Bearer $cred" }
Invoke-WebRequest `
-Method POST `
-Headers $headers `
-ContentType: "application/json; charset=utf-8" `
-InFile request.json `
-Uri "https://livestream.googleapis.com/v1/projects/PROJECT_NUMBER/locations/LOCATION/channels?channelId=CHANNEL_ID" | Select-Object -Expand Content
```
You should receive a JSON response similar to the following:
```
{
"name": "projects/PROJECT_NUMBER/locations/LOCATION/operations/OPERATION_ID",
"metadata": {
"@type": "type.googleapis.com/google.cloud.video.livestream.v1.OperationMetadata",
"createTime": CREATE_TIME,
"target": "projects/PROJECT_NUMBER/locations/LOCATION/channels/CHANNEL_ID",
"verb": "create",
"requestedCancellation": false,
"apiVersion": "v1"
},
"done": false
}
```
This command creates a long-running operation (LRO) that you can use
to track the progress of your request. See
[Manage long-running operations](https://docs.cloud.google.com/livestream/docs/how-to/manage-long-running-operations.md.txt) for more information.
## Start the channel
To start a channel, use the
[`projects.locations.channels.start`](https://docs.cloud.google.com/livestream/docs/reference/rest/v1/projects.locations.channels/start.md.txt) method.
Before using any of the request data,
make the following replacements:
- `PROJECT_NUMBER`: your Google Cloud project number; this is located in the **Project number** field on the [IAM Settings](https://console.cloud.google.com/iam-admin/settings) page
- `LOCATION`: the location where your channel is located; use one of the [supported regions](https://docs.cloud.google.com/livestream/docs/locations.md.txt) Show locations
- `us-central1`
- `us-east1`
- `us-east4`
- `us-west1`
- `us-west2`
- `northamerica-northeast1`
- `southamerica-east1`
- `asia-east1`
- `asia-east2`
- `asia-south1`
- `asia-northeast1`
- `asia-southeast1`
- `australia-southeast1`
- `europe-north1`
- `europe-west1`
- `europe-west2`
- `europe-west3`
- `europe-west4`
- `CHANNEL_ID`: a user-defined identifier for the channel
To send your request, expand one of these options:
#### curl (Linux, macOS, or Cloud Shell)
> [!NOTE]
> **Note:** The following command assumes that you have logged in to the `gcloud` CLI with your user account by running [`gcloud init`](https://docs.cloud.google.com/sdk/gcloud/reference/init) or [`gcloud auth login`](https://docs.cloud.google.com/sdk/gcloud/reference/auth/login.md.txt) , or by using [Cloud Shell](https://docs.cloud.google.com/shell/docs.md.txt), which automatically logs you into the `gcloud` CLI . You can check the currently active account by running [`gcloud auth list`](https://docs.cloud.google.com/sdk/gcloud/reference/auth/list.md.txt).
Execute the following command:
```
curl -X POST \
-H "Authorization: Bearer $(gcloud auth print-access-token)" \
-H "Content-Type: application/json; charset=utf-8" \
-d "" \
"https://livestream.googleapis.com/v1/projects/PROJECT_NUMBER/locations/LOCATION/channels/CHANNEL_ID:start"
```
#### PowerShell (Windows)
> [!NOTE]
> **Note:** The following command assumes that you have logged in to the `gcloud` CLI with your user account by running [`gcloud init`](https://docs.cloud.google.com/sdk/gcloud/reference/init) or [`gcloud auth login`](https://docs.cloud.google.com/sdk/gcloud/reference/auth/login.md.txt) . You can check the currently active account by running [`gcloud auth list`](https://docs.cloud.google.com/sdk/gcloud/reference/auth/list.md.txt).
Execute the following command:
```
$cred = gcloud auth print-access-token
$headers = @{ "Authorization" = "Bearer $cred" }
Invoke-WebRequest `
-Method POST `
-Headers $headers `
-Uri "https://livestream.googleapis.com/v1/projects/PROJECT_NUMBER/locations/LOCATION/channels/CHANNEL_ID:start" | Select-Object -Expand Content
```
You should receive a JSON response similar to the following:
```
{
"name": "projects/PROJECT_NUMBER/locations/LOCATION/operations/OPERATION_ID",
"metadata": {
"@type": "type.googleapis.com/google.cloud.video.livestream.v1.OperationMetadata",
"createTime": CREATE_TIME,
"target": "projects/PROJECT_NUMBER/locations/LOCATION/channels/CHANNEL_ID",
"verb": "start",
"requestedCancellation": false,
"apiVersion": "v1"
},
"done": false
}
```
This command creates a long-running operation (LRO) that you can use
to track the progress of your request. See
[Manage long-running operations](https://docs.cloud.google.com/livestream/docs/how-to/manage-long-running-operations.md.txt) for more information.
## Send the input stream
Open a new terminal window. Run the following command, using
INPUT_STREAM_URI from the
[Get input endpoint details](https://docs.cloud.google.com/livestream/docs/how-to/live-to-vod.md.txt#get-input-endpoint-details) section:
```bash
ffmpeg -re -f lavfi -i "testsrc=size=1280x720 [out0]; sine=frequency=500 [out1]" \
-acodec aac -vcodec h264 -f flv INPUT_STREAM_URI
```
## Create a VOD clip
To create a VOD clip, use the
[`projects.locations.channels.clips.create`](https://docs.cloud.google.com/livestream/docs/reference/rest/v1/projects.locations.channels.clips/create.md.txt) method.
Use the [`outputUri`](https://docs.cloud.google.com/livestream/docs/reference/rest/v1/projects.locations.channels.clips.md.txt#Clip.FIELDS.output_uri) field to specify the location in which to save
the clips and clip manifest file in Cloud Storage. You can use the same
bucket you created for the live stream manifest or a different bucket. You can
also append a directory name to the bucket name (for example,
`my-bucket/vod-clip`).
Use the [`manifestKey`](https://docs.cloud.google.com/livestream/docs/reference/rest/v1/projects.locations.channels.clips.md.txt#ClipManifest.FIELDS.manifest_key) field in the
[`clipManifests`](https://docs.cloud.google.com/livestream/docs/reference/rest/v1/projects.locations.channels.clips.md.txt#Clip.FIELDS.clip_manifests) array to specify the manifest to save clips
from. In the example [channel configuration](https://docs.cloud.google.com/livestream/docs/how-to/live-to-vod.md.txt#create-channel) on this page, this
key is set to `manifest_hls`.
Use the [`outputType`](https://docs.cloud.google.com/livestream/docs/reference/rest/v1/projects.locations.channels.clips.md.txt#Clip.FIELDS.output_type) field to specify one of the supported clip output
formats: `MANIFEST` (default) or `MP4`. In the example channel configuration on
this page, this field is set to `MANIFEST`, which generates a VOD manifest
similar to the channel output.
You can combine multiple time sections from the live stream into a single clip
by adding [`timeSlice`](https://docs.cloud.google.com/livestream/docs/reference/rest/v1/projects.locations.channels.clips.md.txt#Slice.FIELDS.time_slice) objects to the [`slices`](https://docs.cloud.google.com/livestream/docs/reference/rest/v1/projects.locations.channels.clips.md.txt#Clip.FIELDS.slices) array.
```json
"outputUri": "gs://my-bucket",
"clipManifests":[
{
"manifestKey": "manifest_hls"
}
],
"slices":[
{
"timeSlice": {
"markinTime": "2022-07-08T23:03:20.000Z",
"markoutTime": "2022-07-08T23:04:20.000Z"
}
},
{
"timeSlice": {
"markinTime": "2022-07-08T23:05:20.000Z",
"markoutTime": "2022-07-08T23:06:20.000Z"
}
}
]
```
Note the following:
- Each clip must contain at least one [`timeSlice`](https://docs.cloud.google.com/livestream/docs/reference/rest/v1/projects.locations.channels.clips.md.txt#Slice.FIELDS.time_slice) in [`slices`](https://docs.cloud.google.com/livestream/docs/reference/rest/v1/projects.locations.channels.clips.md.txt#Clip.FIELDS.slices).
- The [`clipManifests.manifestKey`](https://docs.cloud.google.com/livestream/docs/reference/rest/v1/projects.locations.channels.clips.md.txt#ClipManifest.FIELDS.manifest_key) field must refer to a defined HLS manifest in the clip's parent channel. If the clip job creation request succeeds, then the URI of the generated clip manifest is returned in the [`clipManifests.outputUri`](https://docs.cloud.google.com/livestream/docs/reference/rest/v1/projects.locations.channels.clips.md.txt#ClipManifest.FIELDS.output_uri) field. This URI is in the path specified by the clip's [`outputUri`](https://docs.cloud.google.com/livestream/docs/reference/rest/v1/projects.locations.channels.clips.md.txt#Clip.FIELDS.output_uri) field.
- The [`clipManifests`](https://docs.cloud.google.com/livestream/docs/reference/rest/v1/projects.locations.channels.clips.md.txt#Clip.FIELDS.clip_manifests) array supports only one manifest per request. If you want to generate multiple manifests for the same clip job, then you need to split the manifests into multiple clip job requests.
- Clip slices must be homogenous; every element must be of type [`timeSlice`](https://docs.cloud.google.com/livestream/docs/reference/rest/v1/projects.locations.channels.clips.md.txt#Slice.FIELDS.time_slice).
- The set of [`timeSlice`](https://docs.cloud.google.com/livestream/docs/reference/rest/v1/projects.locations.channels.clips.md.txt#Slice.FIELDS.time_slice) objects must be non-overlapping and in chronological order. The [`markinTime`](https://docs.cloud.google.com/livestream/docs/reference/rest/v1/projects.locations.channels.clips.md.txt#TimeSlice.FIELDS.markin_time) must be earlier than the [`markoutTime`](https://docs.cloud.google.com/livestream/docs/reference/rest/v1/projects.locations.channels.clips.md.txt#TimeSlice.FIELDS.markout_time) in every [`timeSlice`](https://docs.cloud.google.com/livestream/docs/reference/rest/v1/projects.locations.channels.clips.md.txt#Slice.FIELDS.time_slice).
- If the latest [`markinTime`](https://docs.cloud.google.com/livestream/docs/reference/rest/v1/projects.locations.channels.clips.md.txt#TimeSlice.FIELDS.markin_time) of a clip is earlier than the channel start time or the start of the retention window, then the mark-in time is set to the later of the two.
- If the latest [`markoutTime`](https://docs.cloud.google.com/livestream/docs/reference/rest/v1/projects.locations.channels.clips.md.txt#TimeSlice.FIELDS.markout_time) of a clip is later than the channel stop time, then it is set to the channel stop time. If the latest [`markoutTime`](https://docs.cloud.google.com/livestream/docs/reference/rest/v1/projects.locations.channels.clips.md.txt#TimeSlice.FIELDS.markout_time) of a clip is later than the current system wall clock time, then it is set to the time that the API actually starts the clipping task.
- For clips with the `MANIFEST` output type, the maximum duration is 24 hours. For clips with the `MP4` output type, the maximum duration is 6 hours.
Before using any of the request data,
make the following replacements:
- `PROJECT_NUMBER`: your Google Cloud project number; this is located in the **Project number** field on the [IAM Settings](https://console.cloud.google.com/iam-admin/settings) page
- `LOCATION`: the location where your channel is located; use one of the [supported regions](https://docs.cloud.google.com/livestream/docs/locations.md.txt) Show locations
- `us-central1`
- `us-east1`
- `us-east4`
- `us-west1`
- `us-west2`
- `northamerica-northeast1`
- `southamerica-east1`
- `asia-east1`
- `asia-east2`
- `asia-south1`
- `asia-northeast1`
- `asia-southeast1`
- `australia-southeast1`
- `europe-north1`
- `europe-west1`
- `europe-west2`
- `europe-west3`
- `europe-west4`
- `CHANNEL_ID`: a user-defined identifier for the channel
- `CLIP_ID`: a user-defined identifier for the VOD clip
- `MARK_IN_TIME`: the mark-in Unix epoch time in the original live stream manifest; uses a timestamp in RFC3339 UTC "Zulu" format (for example, `2014-10-02T15:01:23Z`)
- `MARK_OUT_TIME`: the mark-out Unix epoch time in the original live stream manifest; uses a timestamp in RFC3339 UTC "Zulu" format (for example, `2014-10-02T15:01:23Z`)
- `BUCKET_NAME`: the name of the Cloud Storage bucket you created to hold the VOD clip manifest and segment files; you can use the same bucket you created for the live stream manifest or a different bucket; you can also append a directory name to the bucket name (for example `my-bucket/vod-clip`)
To send your request, expand one of these options:
#### curl (Linux, macOS, or Cloud Shell)
> [!NOTE]
> **Note:** The following command assumes that you have logged in to the `gcloud` CLI with your user account by running [`gcloud init`](https://docs.cloud.google.com/sdk/gcloud/reference/init) or [`gcloud auth login`](https://docs.cloud.google.com/sdk/gcloud/reference/auth/login.md.txt) , or by using [Cloud Shell](https://docs.cloud.google.com/shell/docs.md.txt), which automatically logs you into the `gcloud` CLI . You can check the currently active account by running [`gcloud auth list`](https://docs.cloud.google.com/sdk/gcloud/reference/auth/list.md.txt).
Save the request body in a file named `request.json`.
Run the following command in the terminal to create or overwrite
this file in the current directory:
```
cat > request.json << 'EOF'
{
"outputUri": "gs://BUCKET_NAME",
"clipManifests":[
{
"manifestKey": "manifest_hls"
}
],
"slices":[
{
"timeSlice": {
"markinTime": "MARK_IN_TIME",
"markoutTime": "MARK_OUT_TIME"
}
}
]
}
EOF
```
Then execute the following command to send your REST request:
```
curl -X POST \
-H "Authorization: Bearer $(gcloud auth print-access-token)" \
-H "Content-Type: application/json; charset=utf-8" \
-d @request.json \
"https://livestream.googleapis.com/v1/projects/PROJECT_NUMBER/locations/LOCATION/channels/CHANNEL_ID/clips?clipId=CLIP_ID"
```
#### PowerShell (Windows)
> [!NOTE]
> **Note:** The following command assumes that you have logged in to the `gcloud` CLI with your user account by running [`gcloud init`](https://docs.cloud.google.com/sdk/gcloud/reference/init) or [`gcloud auth login`](https://docs.cloud.google.com/sdk/gcloud/reference/auth/login.md.txt) . You can check the currently active account by running [`gcloud auth list`](https://docs.cloud.google.com/sdk/gcloud/reference/auth/list.md.txt).
Save the request body in a file named `request.json`.
Run the following command in the terminal to create or overwrite
this file in the current directory:
```
@'
{
"outputUri": "gs://BUCKET_NAME",
"clipManifests":[
{
"manifestKey": "manifest_hls"
}
],
"slices":[
{
"timeSlice": {
"markinTime": "MARK_IN_TIME",
"markoutTime": "MARK_OUT_TIME"
}
}
]
}
'@ | Out-File -FilePath request.json -Encoding utf8
```
Then execute the following command to send your REST request:
```
$cred = gcloud auth print-access-token
$headers = @{ "Authorization" = "Bearer $cred" }
Invoke-WebRequest `
-Method POST `
-Headers $headers `
-ContentType: "application/json; charset=utf-8" `
-InFile request.json `
-Uri "https://livestream.googleapis.com/v1/projects/PROJECT_NUMBER/locations/LOCATION/channels/CHANNEL_ID/clips?clipId=CLIP_ID" | Select-Object -Expand Content
```
You should receive a JSON response similar to the following:
```
{
"name": "projects/PROJECT_NUMBER/locations/LOCATION/operations/OPERATION_ID",
"metadata": {
"@type": "type.googleapis.com/google.cloud.video.livestream.v1.OperationMetadata",
"createTime": CREATE_TIME,
"target": "projects/PROJECT_NUMBER/locations/LOCATION/channels/CHANNEL_ID/clips/CLIP_ID",
"verb": "create",
"requestedCancellation": false,
"apiVersion": "v1"
},
"done": false
}
```
This command creates a long-running operation (LRO) that you can use
to track the progress of your request. See
[Manage long-running operations](https://docs.cloud.google.com/livestream/docs/how-to/manage-long-running-operations.md.txt) for more information.
## Get the VOD clip
To get a VOD clip, use the [`projects.locations.channels.clips.get`](https://docs.cloud.google.com/livestream/docs/reference/rest/v1/projects.locations.channels.clips/get.md.txt)
method.
Before using any of the request data,
make the following replacements:
- `PROJECT_NUMBER`: your Google Cloud project number; this is located in the **Project number** field on the [IAM Settings](https://console.cloud.google.com/iam-admin/settings) page
- `LOCATION`: the location where your channel is located; use one of the [supported regions](https://docs.cloud.google.com/livestream/docs/locations.md.txt) Show locations
- `us-central1`
- `us-east1`
- `us-east4`
- `us-west1`
- `us-west2`
- `northamerica-northeast1`
- `southamerica-east1`
- `asia-east1`
- `asia-east2`
- `asia-south1`
- `asia-northeast1`
- `asia-southeast1`
- `australia-southeast1`
- `europe-north1`
- `europe-west1`
- `europe-west2`
- `europe-west3`
- `europe-west4`
- `CHANNEL_ID`: a user-defined identifier for the channel
- `CLIP_ID`: a user-defined identifier for the VOD clip
To send your request, expand one of these options:
#### curl (Linux, macOS, or Cloud Shell)
> [!NOTE]
> **Note:** The following command assumes that you have logged in to the `gcloud` CLI with your user account by running [`gcloud init`](https://docs.cloud.google.com/sdk/gcloud/reference/init) or [`gcloud auth login`](https://docs.cloud.google.com/sdk/gcloud/reference/auth/login.md.txt) , or by using [Cloud Shell](https://docs.cloud.google.com/shell/docs.md.txt), which automatically logs you into the `gcloud` CLI . You can check the currently active account by running [`gcloud auth list`](https://docs.cloud.google.com/sdk/gcloud/reference/auth/list.md.txt).
Execute the following command:
```
curl -X GET \
-H "Authorization: Bearer $(gcloud auth print-access-token)" \
"https://livestream.googleapis.com/v1/projects/PROJECT_NUMBER/locations/LOCATION/channels/CHANNEL_ID/clips/CLIP_ID"
```
#### PowerShell (Windows)
> [!NOTE]
> **Note:** The following command assumes that you have logged in to the `gcloud` CLI with your user account by running [`gcloud init`](https://docs.cloud.google.com/sdk/gcloud/reference/init) or [`gcloud auth login`](https://docs.cloud.google.com/sdk/gcloud/reference/auth/login.md.txt) . You can check the currently active account by running [`gcloud auth list`](https://docs.cloud.google.com/sdk/gcloud/reference/auth/list.md.txt).
Execute the following command:
```
$cred = gcloud auth print-access-token
$headers = @{ "Authorization" = "Bearer $cred" }
Invoke-WebRequest `
-Method GET `
-Headers $headers `
-Uri "https://livestream.googleapis.com/v1/projects/PROJECT_NUMBER/locations/LOCATION/channels/CHANNEL_ID/clips/CLIP_ID" | Select-Object -Expand Content
```
You should receive a JSON response similar to the following:
```
{
"name": "projects/PROJECT_NUMBER/locations/LOCATION/channels/CHANNEL_ID/clips/CLIP_ID",
"createTime": CREATE_TIME,
"startTime": START_TIME,
"updateTime": UPDATE_TIME,
"state": "SUCCEEDED",
"outputUri": "gs://BUCKET_NAME",
"slices": [
{
"timeSlice": {
"markinTime": "MARK_IN_TIME",
"markoutTime": "MARK_OUT_TIME"
}
}
],
"features": {},
"clipManifests": [
{
"manifestKey": "manifest_hls",
"outputUri": "gs://BUCKET_NAME/main.m3u8"
}
]
}
```
The generated manifest is located at the URI specified in the
[`clipManifests.outputUri`](https://docs.cloud.google.com/livestream/docs/reference/rest/v1/projects.locations.channels.clips.md.txt#ClipManifest.FIELDS.output_uri) field. The manifest
filename is the same as the parent channel's
[`manifests.fileName`](https://docs.cloud.google.com/livestream/docs/reference/rest/v1/projects.locations.channels.md.txt#Manifest.FIELDS.file_name) field value.
The response should contain the following:
```json
{
...
"state": "SUCCEEDED"
...
}
```
Only the most recent 1000 clip job records per channel are available
using the
[`projects.locations.channels.clips.get`](https://docs.cloud.google.com/livestream/docs/reference/rest/v1/projects.locations.channels.clips/get.md.txt)
method. Any clip job records older than the limit are removed. You must manage the generated clip
files specified by the
[`outputUri`](https://docs.cloud.google.com/livestream/docs/reference/rest/v1/projects.locations.channels.clips.md.txt#ClipManifest.FIELDS.output_uri);
the Live Stream API does not delete these files from Cloud Storage.
## Verify bucket contents
Open the Cloud Storage bucket as specified in the clip's
[`outputUri`](https://docs.cloud.google.com/livestream/docs/reference/rest/v1/projects.locations.channels.clips.md.txt#Clip.FIELDS.output_uri) field. Verify that it contains the following files and
directories:
- A top-level manifest for the clip with the same name as the [`manifests.fileName`](https://docs.cloud.google.com/livestream/docs/reference/rest/v1/projects.locations.channels.md.txt#Manifest.FIELDS.file_name) specified in the channel configuration (for example, `main.m3u8`); you can play this manifest using an online media player
- A directory for each [`muxStreams.key`](https://docs.cloud.google.com/livestream/docs/reference/rest/v1/projects.locations.channels.md.txt#MuxStream.FIELDS.key) specified in the channel (for example, `mux_video_ts`)
- A playlist for the clip (for example, `index-1.m3u8`)
- A directory named using the format `YYYYMMDDTHHMMSSZ` (for example, `20220708T203309Z/`); this directory holds the VOD clip segments
- Multiple segment `segment-number.ts` files that make up the VOD clip
## Play the VOD clip
> [!NOTE]
> **Note:** If you want to create a CDN for the media outputs, see the [Media CDN quickstart](https://docs.cloud.google.com/media-cdn/docs/quickstart.md.txt).
To play the generated media file in [Shaka Player](https://shaka-player-demo.appspot.com/demo/),
complete the following steps:
1. [Make the Cloud Storage bucket you created publicly readable](https://docs.cloud.google.com/storage/docs/access-control/making-data-public.md.txt#buckets).
2. To [enable cross-origin resource
sharing (CORS) on a Cloud Storage bucket](https://docs.cloud.google.com/storage/docs/using-cors#configure-cors-bucket), do the following:
1. Create a JSON file that contains the following:
```
[
{
"origin": ["https://shaka-player-demo.appspot.com/"],
"responseHeader": ["Content-Type", "Range"],
"method": ["GET", "HEAD"],
"maxAgeSeconds": 3600
}
]
```
2. Run the following command after replacing `JSON_FILE_NAME` with the name of the JSON file you created in the previous step:
```
gcloud storage buckets update gs://BUCKET_NAME --cors-file=JSON_FILE_NAME.json
```
3. In the Cloud Storage bucket, find the generated file. Click **Copy URL** in the file's **Public access** column.
4. Navigate to [Shaka Player](https://shaka-player-demo.appspot.com/demo/), an online live stream player.
5. Click **Custom Content** in the top navigation bar.
6. Click the **+** button.
7. Paste the public URL of the file into the **Manifest URL** box.
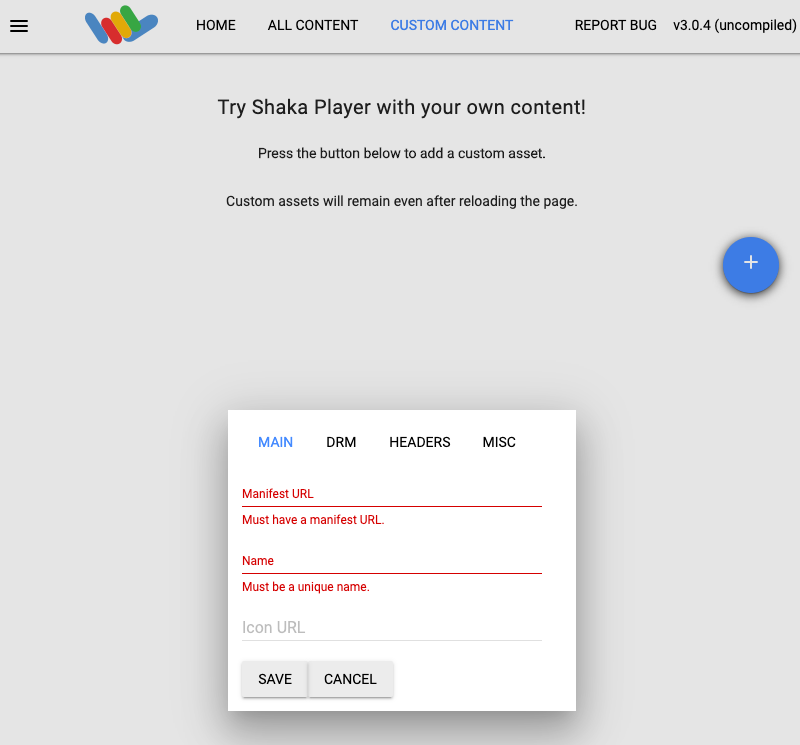
8. Type a name in the **Name** box.
9. Click **Save**.
10. Click **Play**.
You should see a test pattern play as the live stream.

## Ad break and slate events
If you
[created an ad break event](https://docs.cloud.google.com/livestream/docs/how-to/create-channel-events.md.txt#create_channel_event) for the live stream, the VOD clips
won't contain the ads. The API generates a playlist with the ad breakpoints
replaced by the following tags:
#EXT-X-CUE-OUT: AD_BREAK_DURATION
#EXT-X-CUE-IN
Slates that appear at the start or the end of the VOD clip are automatically
removed. Slates that appear within the stream, surrounded by the live stream
content, are retained in the generated VOD clip.