This tutorial provides recommended practices for creating
a [stateful](https://docs.cloud.google.com/kubernetes-engine/docs/concepts/statefulset.md.txt) application and
upgrading the Google Kubernetes Engine (GKE) cluster that's running the application.
This tutorial uses [Redis](https://redis.io/) as an example for deploying a stateful
application, but the same concepts are applicable to other types of stateful
applications deployed on GKE.
## Objectives
This tutorial covers the following steps:
1. Create a GKE cluster enrolled in a release channel.
2. Create a [Redis Cluster](https://redis.io/topics/cluster-spec) on GKE.
3. Deploy the Redis client application to GKE.
4. Perform these best practices for node pool upgrades:
1. Set up the [Pod Disruption Budget (PDB)](https://kubernetes.io/docs/concepts/workloads/pods/disruptions/).
2. Set up the [maintenance window and exclusions](https://docs.cloud.google.com/kubernetes-engine/docs/concepts/maintenance-windows-and-exclusions.md.txt).
3. Set up the [node upgrade strategy](https://docs.cloud.google.com/kubernetes-engine/docs/concepts/node-pool-upgrade-strategies.md.txt) to either [surge upgrade](https://docs.cloud.google.com/kubernetes-engine/docs/concepts/node-pool-upgrade-strategies.md.txt#surge) or [blue-green upgrade](https://docs.cloud.google.com/kubernetes-engine/docs/concepts/node-pool-upgrade-strategies.md.txt#blue-green-upgrade-strategy).
5. Test the application.
6. Upgrade the cluster.
7. Test workload disruption.
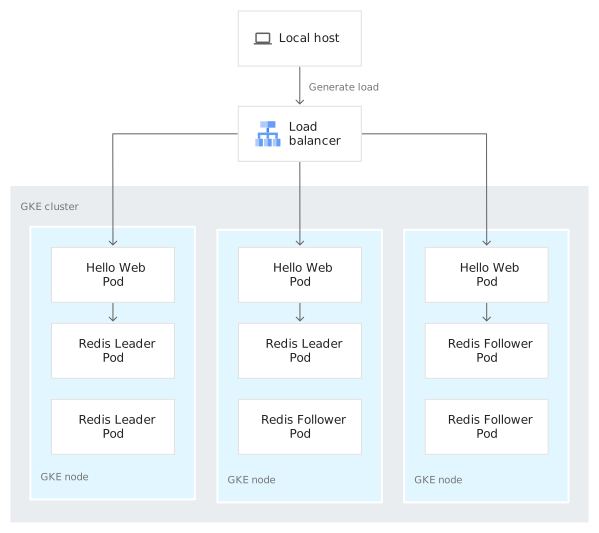
The following diagram shows you a high-level view of the cluster architecture for this tutorial:
## Costs
In this document, you use the following billable components of Google Cloud:
- [GKE](https://cloud.google.com/kubernetes-engine/pricing/)
To generate a cost estimate based on your projected usage,
use the [pricing calculator](https://docs.cloud.google.com/products/calculator).
New Google Cloud users might be eligible for a [free trial](https://docs.cloud.google.com/free).
When you finish the tasks that are described in this document, you can avoid
continued billing by deleting the resources that you created. For more information, see
[Clean up](https://docs.cloud.google.com/kubernetes-engine/docs/tutorials/upgrading-stateful-workload.md.txt#clean-up).
## Before you begin
### Set up your project
### Set defaults for the Google Cloud CLI
1. In the Google Cloud console, start a Cloud Shell instance:
[Open Cloud Shell](https://console.cloud.google.com/?cloudshell=true)
2. Download the source code for this sample app:
```bash
git clone https://github.com/GoogleCloudPlatform/kubernetes-engine-samples
cd kubernetes-engine-samples/quickstarts/hello-app-redis/manifests
```
3. Set the default environment variables:
```bash
gcloud config set project PROJECT-ID
gcloud config set compute/zone COMPUTE-ZONE
```
Replace the following values:
- PROJECT_ID: your Google Cloud [project ID](https://docs.cloud.google.com/resource-manager/docs/creating-managing-projects.md.txt#identifying_projects).
- COMPUTE_ZONE: the [Compute Engine zone](https://docs.cloud.google.com/compute/docs/regions-zones.md.txt#available).
## Create a GKE cluster enrolled in a release channel
To create your GKE cluster, complete the following steps:
1. Create a cluster named `redis-test` with three nodes:
```bash
gcloud container clusters create redis-test \
--location CONTROL_PLANE_LOCATION \
--num-nodes=3 \
--release-channel regular
```
Replace CONTROL_PLANE_LOCATION with the Compute Engine
[location](https://docs.cloud.google.com/compute/docs/regions-zones.md.txt#available) of the control plane of your
cluster. Provide a region for regional clusters, or a zone for zonal clusters.
Once the cluster is created, you should see output similar to the following
example:
NAME: redis-test
LOCATION: us-central1-c
MASTER_VERSION: 1.22.10-gke.600
MASTER_IP: 34.69.67.7
MACHINE_TYPE: e2-medium
NODE_VERSION: 1.22.10-gke.600
NUM_NODES: 3
STATUS: RUNNING
2. Configure `kubectl` to communicate with the cluster:
```bash
gcloud container clusters get-credentials redis-test
```
## Create a Redis Cluster on GKE
In this section, you add a Redis Cluster on top of the GKE
cluster you previously created by deploying a
[ConfigMap](https://kubernetes.io/docs/concepts/configuration/configmap/),
[StatefulSet](https://docs.cloud.google.com/kubernetes-engine/docs/concepts/statefulset.md.txt),
and [headless Service](https://kubernetes.io/docs/concepts/services-networking/service/#headless-services).
To create a Redis cluster, complete these steps:
1. Refer to the ConfigMap file (`redis-configmap.yaml`) which stores the Redis configuration.
The snippet below shows the Readiness probe and the Liveness probe scripts.
```yaml
readiness.sh: |-
#!/bin/sh
pingResponse="$(redis-cli -h localhost ping)"
if [ "$?" -eq "124" ]; then
echo "PING timed out"
exit 1
fi
if [ "$pingResponse" != "PONG"]; then
echo "$pingResponse"
exit 1
fi
liveness.sh: |-
#!/bin/sh
pingResponse="$(redis-cli -h localhost ping | head -n1 | awk '{print $1;}')"
if [ "$?" -eq "124" ]; then
echo "PING timed out"
exit 1
fi
if [ "$pingResponse" != "PONG"] && [ "$pingResponse" != "LOADING" ] && [ "$pingResponse" != "MASTERDOWN" ]; then
echo "$pingResponse"
exit 1
fi
```
The `readiness.sh` and `liveness.sh` scripts use [redis-cli ping](https://redis.io/commands/ping/) to check if the redis server is running or not. If it returns `PONG`, the Redis server is up and running. These scripts will be used in the `redis-cluster.yaml`.
To learn more about the Redis parameters in this ConfigMap, see the Redis Cluster
configuration parameters section in the
[Redis Cluster tutorial](https://redis.io/docs/manual/scaling/#redis-cluster-configuration-parameters).
2. Deploy the ConfigMap:
```bash
kubectl apply -f redis-configmap.yaml
```
3. Refer to the StatefulSet (`redis-cluster.yaml`) snippet below which shows the usage of the Readiness probe and the Liveness probe.
To learn about how to configure probes in Kubernetes, see [Configure Probes](https://kubernetes.io/docs/tasks/configure-pod-container/configure-liveness-readiness-startup-probes/#configure-probes).
```yaml
startupProbe:
periodSeconds: 5
timeoutSeconds: 5
successThreshold: 1
failureThreshold: 20
tcpSocket:
port: redis
livenessProbe:
periodSeconds: 5
timeoutSeconds: 5
successThreshold: 1
failureThreshold: 5
exec:
command: ["sh", "-c", "/probes/liveness.sh"]
readinessProbe:
periodSeconds: 5
timeoutSeconds: 1
successThreshold: 1
failureThreshold: 5
exec:
command: ["sh", "-c", "/probes/readiness.sh"]
```
We strongly recommend that you use Readiness and Liveness probes when upgrading node pools; this ensures that your Pods are ready during an upgrade.
4. Deploy the StatefulSet:
```bash
kubectl apply -f redis-cluster.yaml
```
5. The headless Service named [`redis-service.yaml`](https://github.com/GoogleCloudPlatform/kubernetes-engine-samples/blob/main/quickstarts/hello-app-redis/manifests/redis-service.yaml) is for the Redis
nodes' connection. The `clusterIP` field is set to `None` in order to create a headless Service.
Deploy the Service:
```bash
kubectl apply -f redis-service.yaml
```
6. Wait approximately two minutes and verify all the Pods are running by using
the following command:
```bash
kubectl get pods
```
You should see output similar to the following example:
NAME READY STATUS RESTARTS AGE
redis-0 1/1 Running 0 2m29s
redis-1 1/1 Running 0 2m8s
redis-2 1/1 Running 0 107s
redis-3 1/1 Running 0 85s
redis-4 1/1 Running 0 54s
redis-5 1/1 Running 0 23s
7. Verify the persistent volumes were created by running the following command:
```bash
kubectl get pv
```
You should see output similar to the following example:
NAME CAPACITY ACCESS MODES RECLAIM POLICY STATUS CLAIM STORAGECLASS REASON AGE
pvc-HASH 1Gi RWO Delete Bound default/data-redis-5 standard 75s
pvc-HASH 1Gi RWO Delete Bound default/data-redis-1 standard 2m59s
pvc-HASH 1Gi RWO Delete Bound default/data-redis-3 standard 2m16s
pvc-HASH 1Gi RWO Delete Bound default/data-redis-2 standard 2m38s
pvc-HASH 1Gi RWO Delete Bound default/data-redis-0 standard 3m20s
pvc-HASH 1Gi RWO Delete Bound default/data-redis-4 standard 104s
In this output, HASH represents a hash which is attached to each
persistent volume name.
### Assign roles to your Redis Cluster
Once the configuration is complete, assign roles to the Redis Cluster.
The following script obtains the Pod IP addresses, then assigns the leader and
follower roles by passing each of the Pod IP addresses into the command:
```bash
#!/bin/bash
# Usage: ./roles.sh
urls=$(kubectl get pods -l app=redis -o jsonpath='{range.items[*]}{.status.podIP} ')
command="kubectl exec -it redis-0 -- redis-cli --cluster create --cluster-replicas 1 "
for url in $urls
do
command+=$url":6379 "
done
echo "Executing command: " $command
$command
```
To assign roles to your Redis cluster, complete these steps:
1. Run the script:
```bash
chmod +x ./roles.sh
./roles.sh
```
2. Type `yes` when prompted.
3. Log in to a Redis node to check its role. For example, to verify that
that `redis-0` has a leader role, run the following command:
```bash
kubectl exec -it redis-0 -- redis-cli role
```
You should see output similar to the following example:
1) "master"
2) (integer) 574
3) 1) 1) "10.28.2.3"
2) "6379"
3) "574"
## Deploy the Redis client application
To deploy your application to the GKE cluster you created, define
a Deployment for your application.
The file named [`app-deployment.yaml`](https://github.com/GoogleCloudPlatform/kubernetes-engine-samples/blob/main/quickstarts/hello-app-redis/manifests/app-deployment.yaml)
contains the deployment definition for the application.
To learn more about the probes and Pod affinity rules used in this Deployment,
see [GKE best practices: Designing and building highly available clusters](https://cloud.google.com/blog/products/containers-kubernetes/best-practices-for-creating-a-highly-available-gke-cluster).
To create the Deployment, complete the following steps:
1. Apply the Deployment:
```bash
kubectl apply -f app-deployment.yaml
```
2. Expose the application through a load balancer:
```bash
kubectl expose deployment hello-web \
--type=LoadBalancer \
--port 80 \
--target-port 8080
```
3. Wait approximately one minute and retrieve the application's external IP
address by running the following command:
```bash
kubectl get service
```
From the output, copy the value listed in `hello-web's` `EXTERNAL-IP` column:
NAME TYPE CLUSTER-IP EXTERNAL-IP PORT(S) AGE
hello-web LoadBalancer 10.13.10.55 EXTERNAL_IP 80:30703/TCP 166m
4. Verify the application is working by pasting the EXTERNAL_IP into
your web browser. You should see output similar to the following example:
I have been hit [1] times since deployment!
Take note of the visit number. You need to use it in the
[Testing the application's disruption](https://docs.cloud.google.com/kubernetes-engine/docs/tutorials/upgrading-stateful-workload.md.txt#test) section.
5. Set a variable for the EXTERNAL_IP you just copied. You use this
value when you
[create scripts to test your application](https://docs.cloud.google.com/kubernetes-engine/docs/tutorials/upgrading-stateful-workload.md.txt#scripts) in the next section:
```bash
export IP=EXTERNAL_IP
```
## Configure best practices for node pool upgrades
Perform these best practices for stateful applications to optimize for better availability during node pool upgrades.
### Set up the Pod Disruption Budget (PDB)
Create a [Pod Disruption Budget](https://kubernetes.io/docs/concepts/workloads/pods/disruptions/)
to limit the number of replicated Pods that are down simultaneously during a voluntary disruption.
This is useful for stateful application where there needs to be a quorum for the number of replicas to be available during an upgrade.
```yaml
apiVersion: policy/v1
kind: PodDisruptionBudget
metadata:
name: redis-pdb
spec:
minAvailable: 3
selector:
matchLabels:
app: redis
```
In a PDB definition:
- `app` specifies which application this PDB applies to.
- `minAvailable` sets the minimum number of Pods to be available during a disruption. It can be a value or a percentage (e.g. 30%).
- `maxUnavailable` sets the maximum number of Pods that can be unavailable during a disruption. It can be a value or a percentage as well.
> [!NOTE]
> **Note:** Based on the quorum or preference of the application, choose one of `minAvailable` or `maxUnavailable` for the PDB.
> [!NOTE]
> **Note:** Once the `PodDisruptionBudget` is set, GKE will not shut down Pods in your application [if the number of pods is equal to or less than a configured limit](https://kubernetes.io/docs/tasks/run-application/configure-pdb/#specifying-a-poddisruptionbudget) for up to 60 minutes.
To set up the PDB, complete these steps:
1. Deploy the PDB:
```bash
kubectl apply -f pdb-minavailable.yaml
```
2. Verify that the PDB has been created:
```bash
kubectl get pdb
```
### Set up the maintenance windows and exclusions
Node auto-upgrades streamline the upgrade process and keep the nodes in the cluster up-to-date when the control plane is upgraded on your behalf. This feature is enabled by default.
To learn more, see [Auto-upgrading nodes](https://docs.cloud.google.com/kubernetes-engine/docs/how-to/node-auto-upgrades.md.txt).
Use [maintenance windows and maintenance exclusions](https://docs.cloud.google.com/kubernetes-engine/docs/concepts/maintenance-windows-and-exclusions.md.txt) to set up time frames and control when maintenance can and cannot occur on GKE clusters:
1. Set up a maintenance window that starts at 2:00 AM UTC on August 19, 2022, and finishes four hours later. This maintenance window runs daily. During this time, automatic maintenance is permitted.
```bash
gcloud container clusters update redis-test \
--maintenance-window-start 2022-08-19T02:00:00Z \
--maintenance-window-duration 4H \
--maintenance-window-recurrence FREQ=DAILY
```
2. Set up an exclusion window that prevents maintenance during the New Year holiday. This maintenance exclusion uses the `no_upgrades` scope. During this time, no automatic maintenance of any kind is permitted. To learn more, see [Scope of maintenance to exclude](https://docs.cloud.google.com/kubernetes-engine/docs/concepts/maintenance-windows-and-exclusions.md.txt#scope_of_maintenance_to_exclude).
```bash
gcloud container clusters update redis-test \
--add-maintenance-exclusion-name new-year \
--add-maintenance-exclusion-start 2022-12-26T00:00:00Z \
--add-maintenance-exclusion-end 2023-01-02T02:00:00Z \
--add-maintenance-exclusion-scope no_upgrades
```
3. Verify the maintenance window and exclusions are applied. Look under `maintenancePolicy:`
gcloud container clusters describe redis-test
To learn more, see [Configure maintenance windows and exclusions](https://docs.cloud.google.com/kubernetes-engine/docs/how-to/maintenance-windows-and-exclusions.md.txt).
### Configure a node upgrade strategy
There are two node upgrade strategies you can use for the node pools in your GKE cluster: **Blue-green upgrades** and **surge upgrades** . To learn more, see [Node upgrade strategies](https://docs.cloud.google.com/kubernetes-engine/docs/concepts/node-pool-upgrade-strategies.md.txt#choose-surge-upgrades).
### Blue-green upgrades
Choose blue-green upgrades if the workloads are less tolerant of disruptions, and a temporary cost increase due to higher resource usage is acceptable.
Run the following command to change the current node pools to [blue-green upgrade](https://docs.cloud.google.com/kubernetes-engine/docs/concepts/node-pool-upgrade-strategies.md.txt#blue-green-upgrade-strategy) strategy.
```bash
gcloud container node-pools update default-pool \
--cluster=redis-test \
--enable-blue-green-upgrade \
--location CONTROL_PLANE_LOCATION \
--node-pool-soak-duration=120s
```
Node pool soak duration is set to two minutes to save time during the soak node pool phase for the purpose of this tutorial. This phase is used to verify the workload's health after the blue pool nodes have been drained.
We recommend setting the node pool soak duration to one hour (3600 seconds) or a duration that best suits the application.
For more information about managing pod allocation, see
[Deploy a Pod to a specific node pool](https://docs.cloud.google.com/kubernetes-engine/docs/how-to/node-pools.md.txt#deploy)
and [Deploying Services to specific node pools](https://docs.cloud.google.com/kubernetes-engine/docs/concepts/node-pools.md.txt#deploying_services_to_specific_node_pools).
For more information about configuring blue-green upgrades, see [Configure blue-green upgrades](https://docs.cloud.google.com/kubernetes-engine/docs/how-to/node-pool-upgrade-strategies.md.txt#configure-blue-green-upgrades).
### Surge upgrades
Choose surge upgrades if cost optimization is important and if workloads can tolerate a graceful shutdown in less than 60 minutes (GKE respects PDB up to 60 minutes).
Run the following command to change the current node pools to [surge upgrade](https://docs.cloud.google.com/kubernetes-engine/docs/how-to/node-pool-upgrade-strategies.md.txt#surge) strategy.
```bash
gcloud container node-pools update default-pool \
--max-surge-upgrade=1 \
--max-unavailable-upgrade=0 \
--cluster=redis-test
```
With this configuration (`maxSurge=1` and `maxUnavailable=0`), only one surge node
can be added to the node pool during an upgrade, so only one node can be
upgraded at a time. This setting speeds up Pod restarts during upgrades while
progressing conservatively.
For more information about configuring surge upgrades, see [Configure surge upgrades](https://docs.cloud.google.com/kubernetes-engine/docs/how-to/node-pool-upgrade-strategies.md.txt#surge).
Check the current node pool configuration:
```bash
gcloud container node-pools describe default-pool \
--cluster redis-test \
--location CONTROL_PLANE_LOCATION
```
For more information on viewing node pools, see [View node pools in a cluster](https://docs.cloud.google.com/kubernetes-engine/docs/how-to/node-pools.md.txt#viewing_node_pools_in_a_cluster).
## Test the application
In this section you use two scripts, one that sends requests to your application,
and one that measures the success rate of the requests. You use these scripts
to measure what happens when you upgrade your cluster.
To create the scripts:
1. Change to the directory containing the scripts:
```bash
cd
cd kubernetes-engine-samples/quickstarts/hello-app-redis/scripts
```
2. Refer to the script named `generate_load.sh` which sends a queries-per-second
(QPS) request to your application. The script saves the HTTP response code
into the current directory to a file named `output`. The value of `output`
is used in the script you create in the next step.
```bash
#!/bin/bash
# Usage: ./generate_load.sh
IP=$1
QPS=$2
while true
do for N in $(seq 1 $QPS)
do curl -I -m 5 -s -w "%{http_code}\n" -o /dev/null http://${IP}/ >> output &
done
sleep 1
done
```
3. Refer to the script named `print_error_rate.sh` which calculates the success
rate based on the output generated by `generate_load.sh`.
```bash
#!/bin/bash
# Usage: watch ./print_error_rate.sh
TOTAL=$(cat output | wc -l);
SUCCESS=$(grep "200" output | wc -l);
ERROR1=$(grep "000" output | wc -l)
ERROR2=$(grep "503" output | wc -l)
ERROR3=$(grep "500" output | wc -l)
SUCCESS_RATE=$(($SUCCESS * 100 / TOTAL))
ERROR_RATE=$(($ERROR1 * 100 / TOTAL))
ERROR_RATE_2=$(($ERROR2 * 100 / TOTAL))
ERROR_RATE_3=$(($ERROR3 * 100 / TOTAL))
echo "Success rate: $SUCCESS/$TOTAL (${SUCCESS_RATE}%)"
echo "App network Error rate: $ERROR1/$TOTAL (${ERROR_RATE}%)"
echo "Resource Error rate: $ERROR2/$TOTAL (${ERROR_RATE_2}%)"
echo "Redis Error rate: $ERROR3/$TOTAL (${ERROR_RATE_3}%)"
```
4. Give yourself permission to run the scripts:
```bash
chmod u+x generate_load.sh print_error_rate.sh
```
5. Set a variable for the number of QPS. This value is used in the
`generate_load.sh` script as is the variable you set for the
EXTERNAL_IP. We recommend you set a value of 40.
```bash
export QPS=40
```
6. Run the `generate_load.sh` script to start sending QPS:
```bash
./generate_load.sh $IP $QPS 2>&1
```
7. Leave the `generate_load.sh` script running and open a new terminal. In
the new terminal, run the `print_error_rate.sh` script to check the error rate:
```bash
cd
cd kubernetes-engine-samples/quickstarts/hello-app-redis/scripts
watch ./print_error_rate.sh
```
You should see a 100% success rate and 0% error rates as the QPS are made.
8. Leave both scripts running and open a third terminal in preparation for the
next section.
## Upgrade the cluster
To upgrade the cluster, complete these steps:
1. Determine which GKE version the `redis-test` cluster is using:
```bash
V=$(gcloud container clusters describe redis-test | grep "version:" | sed "s/version: //")
echo $V
```
You should see output similar to the following example: `1.22.9-gke.2000`.
2. Retrieve a list of available Kubernetes versions:
```bash
gcloud container get-server-config
```
3. In the list of versions, locate the `validMasterVersions:` section and look
for the `redis-test` version you retrieved in the previous step. To avoid
violating the [GKE version skew
policy](https://docs.cloud.google.com/kubernetes-engine/versioning#version-skew) by picking a version
incompatible with the nodes, copy the version from the list that is listed
immediately before the `redis-test` version.
4. Upgrade the cluster's control plane to the version you selected and type `y`
when prompted:
```bash
gcloud container clusters upgrade redis-test \
--master \
--cluster-version VERSION
```
Replace VERSION with the version you selected from the list in the
previous step.
The control plane upgrade takes several minutes.
5. Upgrade the cluster's nodes to the version you selected and type `y`
when prompted:
```bash
gcloud container clusters upgrade redis-test \
--cluster-version=VERSION \
--node-pool=default-pool
```
Replace VERSION with the version you selected from the list.
## Test workload disruption
In this section, you test your application's status and observe workload disruption.
1. Return to the terminal window running `./print_error_rate.sh`
and observe how the success rate changed during the upgrade. You should
notice a slight decrease in the success rate and a slight increase in the
app network error rate as the nodes are taken down to
be upgraded.
In the `Success rate` field, you'll see how many visits were
successfully made to the website. Take a note of this value.
2. Stop both scripts from running by entering `CTRL+C` in the relevant terminals.
3. Return to the website for your application by entering its IP address
(this is the EXTERNAL_IP you copied during the
[Deploy the Redis client application](https://docs.cloud.google.com/kubernetes-engine/docs/tutorials/upgrading-stateful-workload.md.txt#deploy-gke) section) into your
browser.
4. Observe the visit number for your application. The number you see should equal:
`ORIGINAL_VISIT_NUMBER + SUCCESSFUL_VISIT_NUMBER`
where ORIGINAL_VISIT_NUMBER is the number you recorded in the final
step of [Deploy the Redis client application](https://docs.cloud.google.com/kubernetes-engine/docs/tutorials/upgrading-stateful-workload.md.txt#deploy-gke) and SUCCESSFUL_VISIT_NUMBER
is the value you recorded in the first step of this section.
## Clean up
After you finish the tutorial, you can clean up the resources that you created so that they
stop using quota and incurring charges. The following sections describe how to delete or turn off
these resources.
### Delete the project
The easiest way to eliminate billing is to delete the project that you
created for the tutorial.
To delete the project:
> [!CAUTION]
> **Caution** : Deleting a project has the following effects:
>
> - **Everything in the project is deleted.** If you used an existing project for the tasks in this document, when you delete it, you also delete any other work you've done in the project.
> - **Custom project IDs are lost.** When you created this project, you might have created a custom project ID that you want to use in the future. To preserve the URLs that use the project ID, such as an `appspot.com` URL, delete selected resources inside the project instead of deleting the whole project.
>
>
> If you plan to explore multiple architectures, tutorials, or quickstarts, reusing projects
> can help you avoid exceeding project quota limits.
1. In the Google Cloud console, go to the **Manage resources** page.
[Go to Manage resources](https://console.cloud.google.com/iam-admin/projects)
2. In the project list, select the project that you want to delete, and then click **Delete**.
3. In the dialog, type the project ID, and then click **Shut down** to delete the project.
### Delete the cluster
To delete the cluster you created for this tutorial, run the following command:
```bash
gcloud container clusters delete redis-test
```
## What's next
- [Best practices for upgrading clusters](https://docs.cloud.google.com/kubernetes-engine/docs/best-practices/upgrading-clusters.md.txt)
- [How to set Cluster notifications](https://docs.cloud.google.com/kubernetes-engine/docs/concepts/cluster-notifications.md.txt)
- [GKE Best Practices: Day 2 Operations](https://docs.cloud.google.com/blog/products/containers-kubernetes/ensuring-reliability-and-uptime-for-your-gke-cluster)
- [Set up Health checks with Probes](https://docs.cloud.google.com/blog/products/containers-kubernetes/kubernetes-best-practices-setting-up-health-checks-with-readiness-and-liveness-probes)