This tutorial shows you how to serve large language models (LLMs) using Tensor
Processing Units (TPUs) on Google Kubernetes Engine (GKE) with the
[vLLM](https://docs.vllm.ai/en/latest/) serving framework. In this tutorial, you
serve [Llama 3.1 70b](https://huggingface.co/meta-llama/Llama-3.1-70B), use
TPU Trillium, and set up [horizontal Pod autoscaling](https://docs.cloud.google.com/kubernetes-engine/docs/concepts/horizontalpodautoscaler.md.txt) using
vLLM server metrics.
This document is a good starting point if you need the granular control, scalability,
resilience, portability, and cost-effectiveness of managed Kubernetes when
you deploy and serve your AI/ML workloads.
## Background
By using TPU Trillium on GKE, you
can implement a robust, production-ready serving solution with all the
benefits of managed [Kubernetes](https://kubernetes.io/), including efficient scalability and higher
availability. This section describes the key technologies used in this guide.
### TPU Trillium
TPUs are Google's custom-developed application-specific integrated circuits
(ASICs). TPUs are used to accelerate machine learning and AI models built using frameworks
such as [TensorFlow](https://www.tensorflow.org/),
[PyTorch](https://pytorch.org/), and [JAX](https://github.com/google/jax).
This tutorial uses TPU Trillium, which is Google's sixth generation TPU.
Before you use TPUs in GKE, we recommend that you complete the
following learning path:
1. Learn about TPU Trillium [system architecture](https://docs.cloud.google.com/tpu/docs/v6e-intro).
2. Learn [about TPUs in GKE](https://docs.cloud.google.com/kubernetes-engine/docs/concepts/tpus.md.txt).
### vLLM
vLLM is a highly optimized, open-source framework for serving LLMs. vLLM can
increase serving throughput on TPUs, with features such as the following:
- Optimized transformer implementation with [PagedAttention](https://huggingface.co/docs/text-generation-inference/en/conceptual/paged_attention).
- Continuous batching to improve the overall serving throughput.
- Tensor parallelism and distributed serving on multiple TPUs.
To learn more, refer to the [vLLM documentation](https://docs.vllm.ai/en/latest/).
### Supported models and features
Before you deploy LLMs with vLLM on TPUs, we recommend that you verify model
compatibility and supported features to avoid deployment issues. The
[`vllm-project/tpu-inference`](https://github.com/vllm-project/tpu-inference)
library provides the necessary backend for vLLM to run on TPUs.
For a comprehensive list of supported models and features, refer to the
official documentation:
- [vLLM TPU Inference GitHub repository](https://github.com/vllm-project/tpu-inference)
- [Recommended Models and Features for vLLM on TPU](https://docs.vllm.ai/projects/tpu/en/latest/recommended_models_features/)
> [!NOTE]
> **Note:** This tutorial focuses on deploying vLLM in a single-host configuration, which is ideal for models that can be served from a single TPU slice, such as Llama 3.1 70b on a `ct6e-standard-8t` machine type. It's important to note that multi-host configurations are not supported when using vLLM with TPUs on GKE. The lack of multi-host support limits the use of vLLM for serving extremely large models (for example 400B+ parameters) that require the aggregated memory and compute of multiple hosts. For production systems or models that require a multi-host setup, the recommended and performance-optimized solution is to use JetStream, Google's engine for TPU inference. To get started with a multi-host deployment, see [JetStream MaxText inference on v6e TPU](https://docs.cloud.google.com/tpu/docs/tutorials/LLM/jetstream-maxtext-inference-v6e).
### Cloud Storage FUSE
Cloud Storage FUSE provides access from your GKE cluster to Cloud Storage for model weights that reside in
object storage buckets. In this tutorial, the created Cloud Storage bucket will initially be empty.
When vLLM starts up, GKE downloads the model from Hugging Face and
caches the weights to the Cloud Storage bucket. On Pod restart, or deployment scale-up, subsequent
model loads will download cached data from the Cloud Storage bucket, leveraging parallel
downloads for optimal performance.
To learn more, refer to the [Cloud Storage FUSE CSI driver documentation](https://docs.cloud.google.com/kubernetes-engine/docs/how-to/persistent-volumes/cloud-storage-fuse-csi-driver.md.txt).
## Objectives
This tutorial is intended for MLOps or DevOps engineers or platform administrators who want to use GKE orchestration capabilities for serving LLMs.
This tutorial covers the following steps:
1. Create a GKE cluster with the recommended TPU Trillium topology based on the model characteristics.
2. Deploy the vLLM framework on a node pool in your cluster.
3. Use the vLLM framework to serve Llama 3.1 70b using a load balancer.
4. Set up horizontal Pod autoscaling using vLLM server metrics.
5. Serve the model.
## Before you begin
-
Make sure that you have the following role or roles on the project:
`roles/container.admin`, `roles/iam.serviceAccountAdmin`, `roles/iam.securityAdmin`, `roles/artifactregistry.writer`, `roles/container.clusterAdmin`
#### Check for the roles
1.
In the Google Cloud console, go to the **IAM** page.
[Go to IAM](https://console.cloud.google.com/projectselector/iam-admin/iam?supportedpurview=project)
2. Select the project.
3.
In the **Principal** column, find all rows that identify you or a group that
you're included in. To learn which groups you're included in, contact your
administrator.
4. For all rows that specify or include you, check the **Role** column to see whether the list of roles includes the required roles.
#### Grant the roles
1.
In the Google Cloud console, go to the **IAM** page.
[Go to IAM](https://console.cloud.google.com/projectselector/iam-admin/iam?supportedpurview=project)
2. Select the project.
3. Click **Grant access**.
4.
In the **New principals** field, enter your user identifier.
This is typically the email address for a Google Account.
5. Click **Select a role**, then search for the role.
6. To grant additional roles, click **Add
another role** and add each additional role.
7. Click **Save**.
- Create a [Hugging Face](https://huggingface.co/) account, if you don't already have one.
- [Ensure your project has sufficient quota](https://docs.cloud.google.com/kubernetes-engine/docs/how-to/tpus.md.txt#ensure-quota) for Cloud TPU in GKE.
## Prepare the environment
In this section, you provision the resources that you need to deploy vLLM and the model.
### Get access to the model
You must sign the consent agreement to use Llama 3.1 70b in the [Hugging Face repository](https://huggingface.co/meta-llama/Llama-3.1-70B).
### Generate an access token
If you don't already have one, generate a new [Hugging Face token](https://huggingface.co/docs/hub/security-tokens):
1. Click **Your Profile \> Settings \> Access Tokens**.
2. Select **New Token**.
3. Specify a Name of your choice and a Role of at least `Read`.
4. Select **Generate a token**.
### Launch Cloud Shell
In this tutorial, you use [Cloud Shell](https://docs.cloud.google.com/shell) to manage resources hosted on
Google Cloud. Cloud Shell comes preinstalled with the software you need
for this tutorial, including
[`kubectl`](https://kubernetes.io/docs/reference/kubectl/) and the
[gcloud CLI](https://docs.cloud.google.com/sdk/gcloud.md.txt).
To set up your environment with Cloud Shell, follow these steps:
1. In the Google Cloud console, launch a Cloud Shell session by clicking

**Activate Cloud Shell** in the [Google Cloud console](http://console.cloud.google.com). This launches a session in the
bottom pane of the Google Cloud console.
2. Set the default environment variables:
```bash
gcloud config set project PROJECT_ID && \
gcloud config set billing/quota_project PROJECT_ID && \
export PROJECT_ID=$(gcloud config get project) && \
export PROJECT_NUMBER=$(gcloud projects describe ${PROJECT_ID} --format="value(projectNumber)") && \
export CLUSTER_NAME=CLUSTER_NAME && \
export CONTROL_PLANE_LOCATION=CONTROL_PLANE_LOCATION && \
export ZONE=ZONE && \
export HF_TOKEN=HUGGING_FACE_TOKEN && \
export CLUSTER_VERSION=CLUSTER_VERSION && \
export GSBUCKET=GSBUCKET && \
export KSA_NAME=KSA_NAME && \
export NAMESPACE=NAMESPACE
```
Replace the following values:
- PROJECT_ID : your Google Cloud [project ID](https://docs.cloud.google.com/resource-manager/docs/creating-managing-projects.md.txt#identifying_projects).
- CLUSTER_NAME : the name of your GKE cluster.
- CONTROL_PLANE_LOCATION: the Compute Engine [region](https://docs.cloud.google.com/compute/docs/regions-zones.md.txt#available) of the control plane of your cluster. Provide a region that supports TPU Trillium (v6e).
- ZONE : a zone that supports TPU Trillium (v6e).
- CLUSTER_VERSION : a GKE version that supports TPU Trillium (v6e). For more information, see [Validate TPU availability in GKE](https://docs.cloud.google.com/kubernetes-engine/docs/concepts/plan-tpus.md.txt#availability).
- GSBUCKET : the name of the Cloud Storage bucket to use for [Cloud Storage FUSE](https://docs.cloud.google.com/storage/docs/gcs-fuse).
- KSA_NAME : the name of the Kubernetes ServiceAccount that's used to access Cloud Storage buckets. Bucket access is needed for Cloud Storage FUSE to work.
- NAMESPACE : the Kubernetes namespace where you want to deploy the vLLM assets.
### Create a GKE cluster
You can serve LLMs on TPUs in a GKE Autopilot
or Standard cluster. We recommend that you use a Autopilot
cluster for a fully managed Kubernetes experience. To choose the
GKE mode of operation that's the best fit for your workloads,
see [Choose a GKE mode of operation](https://docs.cloud.google.com/kubernetes-engine/docs/concepts/choose-cluster-mode.md.txt).
### Autopilot
1. Create a GKE Autopilot cluster:
```bash
gcloud container clusters create-auto ${CLUSTER_NAME} \
--cluster-version=${CLUSTER_VERSION} \
--location=${CONTROL_PLANE_LOCATION}
```
> [!NOTE]
> **Note:** If your Cloud Shell instance disconnects throughout the tutorial execution, repeat the preceding step.
### Standard
1. Create a GKE Standard cluster:
```bash
gcloud container clusters create ${CLUSTER_NAME} \
--project=${PROJECT_ID} \
--location=${CONTROL_PLANE_LOCATION} \
--node-locations=${ZONE} \
--cluster-version=${CLUSTER_VERSION} \
--workload-pool=${PROJECT_ID}.svc.id.goog \
--addons GcsFuseCsiDriver
```
This command creates a GKE Standard cluster,
and enables [Workload Identity Federation](https://docs.cloud.google.com/kubernetes-engine/docs/concepts/workload-identity.md.txt)
and the [Cloud Storage FUSE CSI driver](https://docs.cloud.google.com/kubernetes-engine/docs/how-to/persistent-volumes/cloud-storage-fuse-csi-driver.md.txt).
If you are using an existing cluster, ensure that the [Cloud Storage FUSE CSI driver is enabled](https://docs.cloud.google.com/kubernetes-engine/docs/how-to/cloud-storage-fuse-csi-driver-setup.md.txt#enable).
1. Create a TPU slice node pool:
```bash
gcloud container node-pools create tpunodepool \
--location=${CONTROL_PLANE_LOCATION} \
--node-locations=${ZONE} \
--num-nodes=1 \
--machine-type=ct6e-standard-8t \
--cluster=${CLUSTER_NAME} \
--enable-autoscaling --total-min-nodes=1 --total-max-nodes=2
```
GKE creates the following resources for the LLM:
- A GKE Standard cluster that uses [Workload Identity Federation for GKE](https://docs.cloud.google.com/kubernetes-engine/docs/concepts/workload-identity.md.txt) and has [Cloud Storage FUSE CSI driver](https://docs.cloud.google.com/kubernetes-engine/docs/how-to/persistent-volumes/cloud-storage-fuse-csi-driver.md.txt) enabled.
- A TPU Trillium node pool with a `ct6e-standard-8t` machine type. This node pool has one node, eight TPU chips, and autoscaling enabled.
### Configure kubectl to communicate with your cluster
To configure kubectl to communicate with your cluster, run the following
command:
```bash
gcloud container clusters get-credentials ${CLUSTER_NAME} --location=${CONTROL_PLANE_LOCATION}
```
### Create a Kubernetes Secret for Hugging Face credentials
1. Create a namespace. You can skip this step if you are using the `default` namespace:
```bash
kubectl create namespace ${NAMESPACE}
```
2. Create a Kubernetes Secret that contains the Hugging Face token, run the
following command:
```bash
kubectl create secret generic hf-secret \
--from-literal=hf_api_token=${HF_TOKEN} \
--namespace ${NAMESPACE}
```
### Create a Cloud Storage bucket
In Cloud Shell, run the following command:
```bash
gcloud storage buckets create gs://${GSBUCKET} \
--uniform-bucket-level-access
```
This creates a Cloud Storage bucket to store the model files you
download from Hugging Face.
### Set up a Kubernetes ServiceAccount to access the bucket
1. Create the Kubernetes ServiceAccount:
```bash
kubectl create serviceaccount ${KSA_NAME} --namespace ${NAMESPACE}
```
2. Grant read-write access to the Kubernetes ServiceAccount in order to access the Cloud Storage bucket:
```bash
gcloud storage buckets add-iam-policy-binding gs://${GSBUCKET} \
--member "principal://iam.googleapis.com/projects/${PROJECT_NUMBER}/locations/global/workloadIdentityPools/${PROJECT_ID}.svc.id.goog/subject/ns/${NAMESPACE}/sa/${KSA_NAME}" \
--role "roles/storage.objectUser"
```
3. Alternatively, you can grant read-write access to all Cloud Storage
buckets in the project:
```bash
gcloud projects add-iam-policy-binding ${PROJECT_ID} \
--member "principal://iam.googleapis.com/projects/${PROJECT_NUMBER}/locations/global/workloadIdentityPools/${PROJECT_ID}.svc.id.goog/subject/ns/${NAMESPACE}/sa/${KSA_NAME}" \
--role "roles/storage.objectUser"
```
GKE creates the following resources for the LLM:
1. A Cloud Storage bucket to store the downloaded model and the compilation cache. A [Cloud Storage FUSE CSI driver](https://docs.cloud.google.com/kubernetes-engine/docs/how-to/persistent-volumes/cloud-storage-fuse-csi-driver.md.txt) reads the content of the bucket.
2. [Volumes with file caching enabled](https://docs.cloud.google.com/kubernetes-engine/docs/how-to/cloud-storage-fuse-csi-driver-perf.md.txt#configure-caching) and the [parallel download](https://docs.cloud.google.com/kubernetes-engine/docs/how-to/cloud-storage-fuse-csi-driver-perf.md.txt#parallel-download) feature of Cloud Storage FUSE.
**Best practice** :
Use a file cache backed by
`tmpfs`
or
`Hyperdisk / Persistent Disk`
depending on the expected size of the model contents, for example, weight files.
In this tutorial, you use Cloud Storage FUSE file cache backed by RAM.
## Deploy vLLM model server
To deploy the vLLM model server, this tutorial uses a Kubernetes Deployment. A *Deployment* is a Kubernetes API object that lets you run multiple replicas of Pods that are distributed among the nodes in a cluster..
1. Inspect the following Deployment manifest saved as `vllm-llama3-70b.yaml`, that uses a single replica:
```yaml
apiVersion: apps/v1
kind: Deployment
metadata:
name: vllm-tpu
spec:
replicas: 1
selector:
matchLabels:
app: vllm-tpu
template:
metadata:
labels:
app: vllm-tpu
annotations:
gke-gcsfuse/volumes: "true"
gke-gcsfuse/cpu-limit: "0"
gke-gcsfuse/memory-limit: "0"
gke-gcsfuse/ephemeral-storage-limit: "0"
spec:
serviceAccountName: KSA_NAME
nodeSelector:
cloud.google.com/gke-tpu-topology: 2x4
cloud.google.com/gke-tpu-accelerator: tpu-v6e-slice
containers:
- name: vllm-tpu
image: vllm/vllm-tpu:latest
command: ["python3", "-m", "vllm.entrypoints.openai.api_server"]
args:
- --host=0.0.0.0
- --port=8000
- --tensor-parallel-size=8
- --max-model-len=4096
- --model=meta-llama/Llama-3.1-70B
- --download-dir=/data
- --max-num-batched-tokens=512
- --max-num-seqs=128
env:
- name: HUGGING_FACE_HUB_TOKEN
valueFrom:
secretKeyRef:
name: hf-secret
key: hf_api_token
- name: VLLM_XLA_CACHE_PATH
value: "/data"
- name: VLLM_USE_V1
value: "1"
ports:
- containerPort: 8000
resources:
limits:
google.com/tpu: 8
readinessProbe:
tcpSocket:
port: 8000
initialDelaySeconds: 15
periodSeconds: 10
volumeMounts:
- name: gcs-fuse-csi-ephemeral
mountPath: /data
- name: dshm
mountPath: /dev/shm
volumes:
- name: gke-gcsfuse-cache
emptyDir:
medium: Memory
- name: dshm
emptyDir:
medium: Memory
- name: gcs-fuse-csi-ephemeral
csi:
driver: gcsfuse.csi.storage.gke.io
volumeAttributes:
bucketName: GSBUCKET
mountOptions: "implicit-dirs,file-cache:enable-parallel-downloads:true,file-cache:parallel-downloads-per-file:100,file-cache:max-parallel-downloads:-1,file-cache:download-chunk-size-mb:10,file-cache:max-size-mb:-1"
---
apiVersion: v1
kind: Service
metadata:
name: vllm-service
spec:
selector:
app: vllm-tpu
type: LoadBalancer
ports:
- name: http
protocol: TCP
port: 8000
targetPort: 8000
```
If you scale up the Deployment to multiple replicas, the concurrent writes to the `VLLM_XLA_CACHE_PATH` will cause the error: `RuntimeError: filesystem error: cannot create directories`. To prevent this error, you have two options:
1. Remove the XLA cache location by removing the following block from the Deployment YAML. This means all replicas will recompile the cache.
- name: VLLM_XLA_CACHE_PATH
value: "/data"
2. Scale the Deployment to `1`, and wait for the first replica to become ready and write to the XLA cache. Then scale to additional replicas. This allows the remainder of the replicas to read the cache, without attempting to write it.
2. Apply the manifest by running the following command:
```bash
kubectl apply -f vllm-llama3-70b.yaml -n ${NAMESPACE}
```
3. View the logs from the running model server:
```bash
kubectl logs -f -l app=vllm-tpu -n ${NAMESPACE}
```
The output should look similar to the following:
INFO: Started server process [1]
INFO: Waiting for application startup.
INFO: Application startup complete.
INFO: Uvicorn running on http://0.0.0.0:8080 (Press CTRL+C to quit)
## Serve the model
1. To get the external IP address of the VLLM service, run the following command:
```bash
export vllm_service=$(kubectl get service vllm-service -o jsonpath='{.status.loadBalancer.ingress[0].ip}' -n ${NAMESPACE})
```
2. Interact with the model using `curl`:
```bash
curl http://$vllm_service:8000/v1/completions \
-H "Content-Type: application/json" \
-d '{
"model": "meta-llama/Llama-3.1-70B",
"prompt": "San Francisco is a",
"max_tokens": 7,
"temperature": 0
}'
```
The output should be similar to the following:
{"id":"cmpl-6b4bb29482494ab88408d537da1e608f","object":"text_completion","created":1727822657,"model":"meta-llama/Llama-3-8B","choices":[{"index":0,"text":" top holiday destination featuring scenic beauty and","logprobs":null,"finish_reason":"length","stop_reason":null,"prompt_logprobs":null}],"usage":{"prompt_tokens":5,"total_tokens":12,"completion_tokens":7}}
## Set up the custom autoscaler
In this section, you set up horizontal Pod autoscaling using custom
Prometheus metrics. You use the Google Cloud Managed Service for Prometheus metrics from the vLLM server.
To learn more, see
[Google Cloud Managed Service for Prometheus](https://docs.cloud.google.com/stackdriver/docs/managed-prometheus/setup-managed.md.txt).
This should be enabled by default on the GKE cluster.
1. Set up the Custom Metrics Stackdriver Adapter on
your cluster:
```bash
kubectl apply -f https://raw.githubusercontent.com/GoogleCloudPlatform/k8s-stackdriver/master/custom-metrics-stackdriver-adapter/deploy/production/adapter_new_resource_model.yaml
```
2. Add the Monitoring Viewer role to the service account that the Custom Metrics Stackdriver Adapter uses:
```bash
gcloud projects add-iam-policy-binding projects/${PROJECT_ID} \
--role roles/monitoring.viewer \
--member=principal://iam.googleapis.com/projects/${PROJECT_NUMBER}/locations/global/workloadIdentityPools/${PROJECT_ID}.svc.id.goog/subject/ns/custom-metrics/sa/custom-metrics-stackdriver-adapter
```
> [!NOTE]
> **Note:** Ensure that the service account that your GKE cluster uses has the [Monitoring Metric Writer](https://docs.cloud.google.com/iam/docs/roles-permissions/monitoring.md.txt) role. This tutorial uses the default Compute Engine service account.
3. Save the following manifest as `vllm_pod_monitor.yaml`:
```yaml
apiVersion: monitoring.googleapis.com/v1
kind: PodMonitoring
metadata:
name: vllm-pod-monitoring
spec:
selector:
matchLabels:
app: vllm-tpu
endpoints:
- path: /metrics
port: 8000
interval: 15s
```
4. Apply it to the cluster:
```bash
kubectl apply -f vllm_pod_monitor.yaml -n ${NAMESPACE}
```
> [!TIP]
> **Success:** Google Cloud Managed Service for Prometheus is now configured to scrape the vLLM server metrics and make them visible to the horizontal Pod autoscaling controller.
### Create load on the vLLM endpoint
Create load to the vLLM server to test how GKE autoscales with a custom vLLM metric.
1. Run a bash script (`load.sh`) to send `N` number of parallel
requests to the vLLM endpoint:
```bash
#!/bin/bash
N=PARALLEL_PROCESSES
export vllm_service=$(kubectl get service vllm-service -o jsonpath='{.status.loadBalancer.ingress[0].ip}' -n ${NAMESPACE})
for i in $(seq 1 $N); do
while true; do
curl http://$vllm_service:8000/v1/completions -H "Content-Type: application/json" -d '{"model": "meta-llama/Llama-3.1-70B", "prompt": "Write a story about san francisco", "max_tokens": 1000, "temperature": 0}'
done & # Run in the background
done
wait
```
Replace PARALLEL_PROCESSES with the number of parallel
processes that you want to run.
2. Run the bash script:
```bash
chmod +x load.sh
nohup ./load.sh &
```
### Verify that Google Cloud Managed Service for Prometheus ingests the metrics
After Google Cloud Managed Service for Prometheus scrapes the metrics and you're adding load to the vLLM endpoint,
you can view metrics on Cloud Monitoring.
1. In the Google Cloud console, go to the **Metrics explorer** page.
[Go to Metrics explorer](https://console.cloud.google.com/monitoring/metrics-explorer)
2. Click **\< \> PromQL**.
3. Enter the following query to observe traffic metrics:
```bash
vllm:num_requests_waiting{cluster='CLUSTER_NAME'}
```
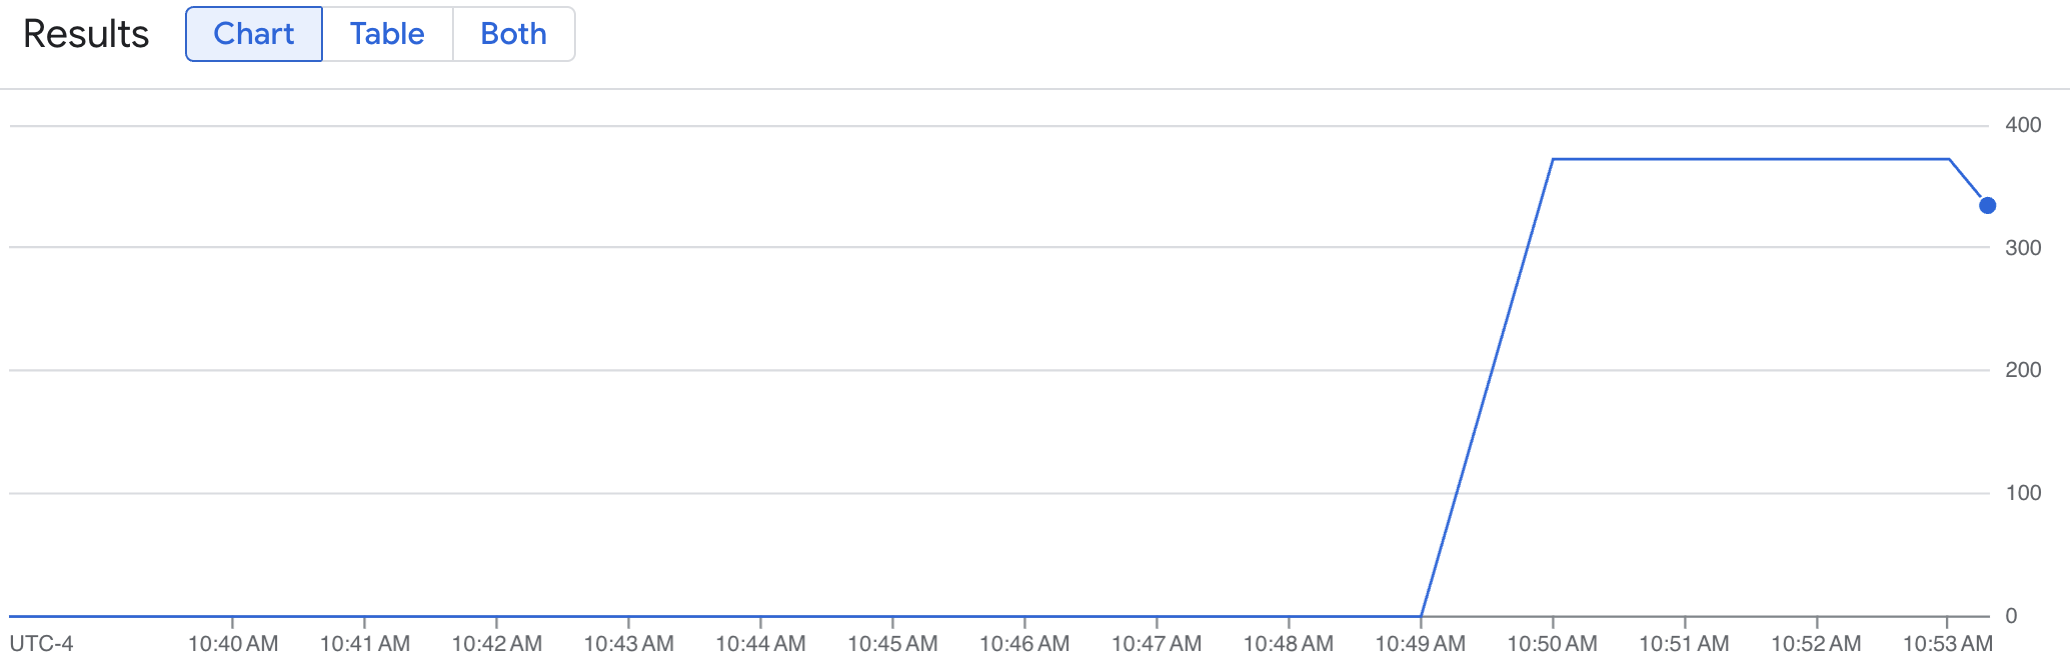
A line graph shows your vLLM metric (num_requests_waiting) measured over time. The vLLM metric scales up from 0 (pre-load) to a value
(post-load). This graph confirms your vLLM metrics are being ingested into
Google Cloud Managed Service for Prometheus. The following example graph shows a starting
pre-load value of 0, which reaches a maximum post-load value of close to 400
within one minute.
### Deploy the Horizontal Pod Autoscaler configuration
When deciding which metric to autoscale on, we recommend the following metrics for vLLM TPU:
- **`num_requests_waiting`**: This metric relates to the number of requests waiting in the model server's queue. This number starts to noticeably grow when the kv cache is full.
- **`gpu_cache_usage_perc`**: This metric relates to the kv cache utilization, which directly correlates to the number of requests being processed for a given inference cycle on the model server. Note that this metric works the same on GPUs and TPUs, though it is tied to the GPU naming schema.
We recommend that you use **`num_requests_waiting`** when optimizing for throughput and cost, and when your latency targets are achievable with your model server's maximum throughput.
We recommend that you use **`gpu_cache_usage_perc`** when you have latency-sensitive workloads where queue-based scaling isn't fast enough to meet your requirements.
For further explanation, check out [Best practices for autoscaling large language model (LLM) inference workloads with TPUs](https://docs.cloud.google.com/kubernetes-engine/docs/best-practices/machine-learning/inference/autoscaling-tpu.md.txt).
When selecting an `averageValue` target for your HPA config, you will have to determine this experimentally. Check out the [Save on GPUs: Smarter autoscaling for your GKE inferencing workloads](https://cloud.google.com/blog/products/containers-kubernetes/tuning-the-gke-hpa-to-run-inference-on-gpus) blog post for additional ideas on how to optimize this part. The [profile-generator](https://github.com/GoogleCloudPlatform/ai-on-gke/blob/main/benchmarks/benchmark/tools/profile-generator/README.md) used in this blog post works for vLLM TPU as well.
In the following instructions, you deploy your HPA configuration by using the **num_requests_waiting** metric. For demonstration purposes, you set the metric to a low value so that the HPA configuration scales your vLLM replicas to two. To deploy the Horizontal Pod Autoscaler configuration using **num_requests_waiting**, follow these steps:
1. Save the following manifest as `vllm-hpa.yaml`:
```yaml
apiVersion: autoscaling/v2
kind: HorizontalPodAutoscaler
metadata:
name: vllm-hpa
spec:
scaleTargetRef:
apiVersion: apps/v1
kind: Deployment
name: vllm-tpu
minReplicas: 1
maxReplicas: 2
metrics:
- type: Pods
pods:
metric:
name: prometheus.googleapis.com|vllm:num_requests_waiting|gauge
target:
type: AverageValue
averageValue: 10
```
The vLLM metrics in Google Cloud Managed Service for Prometheus follow the `vllm:metric_name` format.
**Best practice** :
Use
`num_requests_waiting` for scaling throughput. Use
`gpu_cache_usage_perc` for latency-sensitive TPU use cases.
2. Deploy the Horizontal Pod Autoscaler configuration:
```bash
kubectl apply -f vllm-hpa.yaml -n ${NAMESPACE}
```
GKE schedules another Pod to deploy,
which triggers the node pool autoscaler to add a second node before it deploys
the second vLLM replica.
3. Watch the progress of the Pod autoscaling:
```bash
kubectl get hpa --watch -n ${NAMESPACE}
```
The output is similar to the following:
NAME REFERENCE TARGETS MINPODS MAXPODS REPLICAS AGE
vllm-hpa Deployment/vllm-tpu /10 1 2 0 6s
vllm-hpa Deployment/vllm-tpu 34972m/10 1 2 1 16s
vllm-hpa Deployment/vllm-tpu 25112m/10 1 2 2 31s
vllm-hpa Deployment/vllm-tpu 35301m/10 1 2 2 46s
vllm-hpa Deployment/vllm-tpu 25098m/10 1 2 2 62s
vllm-hpa Deployment/vllm-tpu 35348m/10 1 2 2 77s
> [!TIP]
> **Success:** GKE scales up the vLLM server using custom Prometheus metrics.
4. Wait for 10 minutes and repeat the steps in the [Verify that
Google Cloud Managed Service for Prometheus ingests the metrics](https://docs.cloud.google.com/kubernetes-engine/docs/tutorials/serve-vllm-tpu#verify-prometheus) section.
Google Cloud Managed Service for Prometheus ingests the metrics from both vLLM endpoints now.
## Clean up
To avoid incurring charges to your Google Cloud account for the resources used in this
tutorial, either delete the project that contains the resources, or keep the project and
delete the individual resources.
### Delete the deployed resources
To avoid incurring charges to your Google Cloud account for the resources
that you created in this guide, run the following commands:
```bash
ps -ef | grep load.sh | awk '{print $2}' | xargs -n1 kill -9
```
```bash
gcloud container clusters delete ${CLUSTER_NAME} \
--location=${CONTROL_PLANE_LOCATION}
```
## What's next
- Learn more about [TPUs in GKE](https://docs.cloud.google.com/kubernetes-engine/docs/concepts/tpus.md.txt).
- Learn more about [the available metrics to set up your Horizontal Pod Autoscaler](https://docs.cloud.google.com/kubernetes-engine/docs/best-practices/machine-learning/inference/autoscaling-tpu.md.txt).
- Explore the vLLM [GitHub repository](https://github.com/vllm-project/vllm) and [documentation](https://docs.vllm.ai/en/latest/).