> [!NOTE]
> **Note:** vLLM is now the recommended solution for serving LLMs on TPUs in GKE. To get started, see [Serve an LLM using TPU Trillium on GKE with vLLM](https://docs.cloud.google.com/kubernetes-engine/docs/tutorials/serve-vllm-tpu.md.txt).
This tutorial shows you how to serve a
[Gemma](https://ai.google.dev/gemma/docs/) large language model (LLM)
using Tensor Processing Units (TPUs) on Google Kubernetes Engine (GKE). You deploy a
prebuilt container with
[JetStream](https://github.com/google/JetStream) and
[MaxText](https://github.com/google/maxtext) to GKE. You also
configure GKE to load the Gemma 7B weights from
Cloud Storage at runtime.
This tutorial is intended for Machine learning (ML) engineers,
Platform admins and operators, and for Data and AI specialists who are interested
in using Kubernetes container orchestration capabilities for serving LLMs. To
learn more about common roles and example tasks that we reference in
Google Cloud content, see
[Common GKE user roles and tasks](https://docs.cloud.google.com/anthos/docs/concepts/roles-tasks).
Before reading this page, ensure that you're familiar with the following:
- [Autopilot mode and Standard mode](https://docs.cloud.google.com/kubernetes-engine/docs/concepts/choose-cluster-mode.md.txt)
- Current TPU version availability with the [Cloud TPU system architecture](https://docs.cloud.google.com/tpu/docs/system-architecture-tpu-vm.md.txt#versions)
- [TPUs in GKE](https://docs.cloud.google.com/kubernetes-engine/docs/concepts/tpus.md.txt)
## Background
This section describes the key technologies used in this tutorial.
### Gemma
[Gemma](https://ai.google.dev/gemma/docs/) is
a set of openly available, lightweight, generative artificial intelligence (AI)
models released under an open license. These AI models are available to run
in your applications, hardware, mobile devices, or hosted services.
You can use the Gemma models for text generation, however you can also
tune these models for specialized tasks.
To learn more, see the [Gemma documentation](https://ai.google.dev/gemma/docs).
### TPUs
TPUs are Google's custom-developed application-specific integrated circuits
(ASICs) used to accelerate machine learning and AI models built using frameworks
such as [TensorFlow](https://www.tensorflow.org/),
[PyTorch](https://pytorch.org/), and [JAX](https://github.com/google/jax).
This tutorial covers serving the Gemma 7B model. GKE
deploys the model on single-host TPUv5e nodes with TPU topologies configured
based on the model requirements for serving prompts with low latency.
### JetStream
[JetStream](https://github.com/google/JetStream) is an open source inference
serving framework developed by Google. JetStream enables high-performance,
high-throughput, and memory-optimized inference on TPUs and GPUs. It
provides advanced performance optimizations, including continuous batching and
quantization techniques, to facilitate LLM deployment. JetStream enables
PyTorch/XLA and JAX TPU serving to achieve optimal performance.
To learn more about these optimizations, refer to the [JetStream PyTorch](https://github.com/google/jetstream-pytorch) and [JetStream MaxText](https://github.com/google/JetStream)
project repositories.
### MaxText
[MaxText](https://github.com/google/maxtext) is a performant, scalable, and
adaptable JAX LLM implementation, built on open source JAX libraries such as
[Flax](https://github.com/google/flax), [Orbax](https://github.com/google/orbax),
and [Optax](https://github.com/google-deepmind/optax). MaxText's decoder-only
LLM implementation is written in Python. It leverages the XLA compiler heavily
to achieve high performance without needing to build custom kernels.
To learn more about the latest models and parameter sizes that MaxText supports,
see the [MaxtText project repository](https://github.com/google/maxtext).
## Objectives
1. Prepare a GKE Autopilot or Standard cluster with the recommended TPU topology based on the model characteristics.
2. Deploy JetStream components on GKE.
3. Get and publish the Gemma 7B instruction tuned model.
4. Serve and interact with the published model.
## Architecture
This section describes the GKE architecture used in this tutorial.
The architecture comprises a GKE Autopilot or
Standard cluster that provisions TPUs and hosts JetStream components
to deploy and serve the models.
The following diagram shows you the components of this architecture:
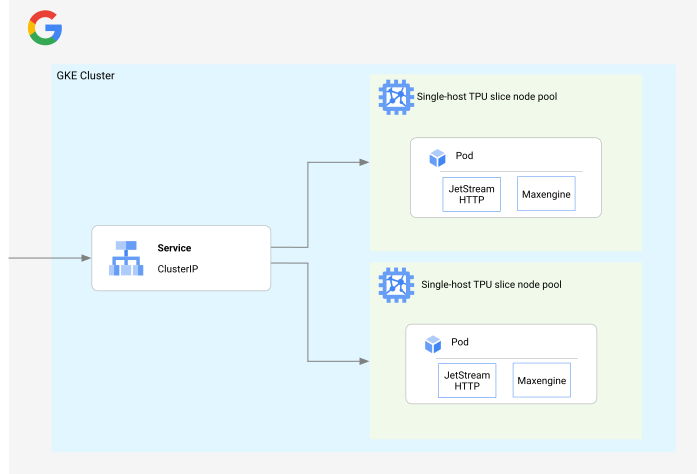
This architecture includes the following components:
- A GKE Autopilot or Standard regional cluster.
- Two single-host TPU slice node pools that host the JetStream deployment.
- The Service component spreads inbound traffic to all `JetStream HTTP` replicas.
- `JetStream HTTP` is an HTTP server which accepts requests as a wrapper to JetStream's required format and sends it to [JetStream's GRPC client](https://github.com/google/JetStream/blob/main/jetstream/core/proto/jetstream_pb2_grpc.py).
- `Maxengine` is a JetStream server that performs inferencing with continuous batching.
## Before you begin
-
Make sure that you have the following role or roles on the project:
roles/container.admin, roles/iam.serviceAccountAdmin, roles/resourcemanager.projectIamAdmin
#### Check for the roles
1.
In the Google Cloud console, go to the **IAM** page.
[Go to IAM](https://console.cloud.google.com/projectselector/iam-admin/iam?supportedpurview=project)
2. Select the project.
3.
In the **Principal** column, find all rows that identify you or a group that
you're included in. To learn which groups you're included in, contact your
administrator.
4. For all rows that specify or include you, check the **Role** column to see whether the list of roles includes the required roles.
#### Grant the roles
1.
In the Google Cloud console, go to the **IAM** page.
[Go to IAM](https://console.cloud.google.com/projectselector/iam-admin/iam?supportedpurview=project)
2. Select the project.
3. Click **Grant access**.
4.
In the **New principals** field, enter your user identifier.
This is typically the email address for a Google Account.
5. Click **Select a role**, then search for the role.
6. To grant additional roles, click **Add
another role** and add each additional role.
7. Click **Save**.
- Ensure that you have sufficient quota for eight TPU v5e PodSlice Lite chips. In this tutorial, you use [on-demand instances](https://docs.cloud.google.com/kubernetes-engine/docs/how-to/tpus.md.txt#ensure-quota).
- Create a [Kaggle account](https://www.kaggle.com/), if you don't already have one.
## Get access to the model
To get access to the Gemma model for deployment to
GKE, you must first sign the license consent agreement.
### Sign the license consent agreement
You must sign the consent agreement to use Gemma.
Follow these instructions:
1. Access the [Gemma model consent page](https://www.kaggle.com/models/google/gemma) on Kaggle.com.
2. Login to Kaggle if you haven't done so already.
3. Click **Request Access**.
4. In the **Choose Account for Consent** section, select **Verify via Kaggle
Account** to use your Kaggle account for consent.
5. Accept the model **Terms and Conditions**.
### Generate an access token
To access the model through Kaggle, you need a Kaggle API token.
Follow these steps to generate a new token if you don't have one already:
1. In your browser, go to [Kaggle settings](https://www.kaggle.com/settings).
2. Under the **API** section, click **Create New Token**.
A file named `kaggle.json` is downloaded.
## Prepare the environment
In this tutorial, you use [Cloud Shell](https://docs.cloud.google.com/shell) to manage resources hosted on
Google Cloud. Cloud Shell comes preinstalled with the software you'll need
for this tutorial, including
[`kubectl`](https://kubernetes.io/docs/reference/kubectl/) and [gcloud CLI](https://docs.cloud.google.com/sdk/gcloud.md.txt).
To set up your environment with Cloud Shell, follow these steps:
1. In the Google Cloud console, launch a Cloud Shell session by clicking

**Activate Cloud Shell** in the [Google Cloud console](http://console.cloud.google.com). This launches a session in the
bottom pane of Google Cloud console.
2. Set the default environment variables:
```bash
gcloud config set project PROJECT_ID
gcloud config set billing/quota_project PROJECT_ID
export PROJECT_ID=$(gcloud config get project)
export PROJECT_NUMBER=$(gcloud projects describe ${PROJECT_ID} --format="value(projectNumber)")
export CLUSTER_NAME=CLUSTER_NAME
export BUCKET_NAME=BUCKET_NAME
export CONTROL_PLANE_LOCATION=CONTROL_PLANE_LOCATION
export NODE_LOCATION=NODE_LOCATION
export CLUSTER_VERSION=CLUSTER_VERSION
```
Replace the following values:
- PROJECT_ID: your Google Cloud [project ID](https://docs.cloud.google.com/resource-manager/docs/creating-managing-projects.md.txt#identifying_projects).
- CLUSTER_NAME: the name of your GKE cluster.
- BUCKET_NAME: the name of your Cloud Storage bucket. You don't need to specify the `gs://` prefix.
- CONTROL_PLANE_LOCATION: the Compute Engine [region](https://docs.cloud.google.com/compute/docs/regions-zones.md.txt#available) of the control plane of your cluster. This region must contain zones where TPU v5e machine types are available (for example, `us-west1`, `us-west4`, `us-central1`, `us-east1`, `us-east5`, or `europe-west4`). For Autopilot clusters, ensure that you have sufficient [TPU v5e zonal resources](https://docs.cloud.google.com/tpu/docs/regions-zones.md.txt) for your region of choice.
- (Standard cluster only) NODE_LOCATION: the zone where the [TPU resources are available](https://docs.cloud.google.com/kubernetes-engine/docs/concepts/tpus.md.txt#availability) (for example, `us-west4-a`). For Autopilot clusters, you don't need to specify this value.
- `CLUSTER_VERSION`: the GKE version, which must support the machine type that you want to use. Note that the default GKE version might not have availability for your target TPU. For a list of minimum GKE versions available by TPU machine type, see [TPU availability in GKE](https://docs.cloud.google.com/kubernetes-engine/docs/concepts/tpus.md.txt#availability).
## Create and configure Google Cloud resources
Follow these instructions to create the required resources.
> [!NOTE]
> **Note:** You may need to create a capacity reservation for usage of some accelerators. To learn how to reserve and consume reserved resources, see [Consuming reserved zonal resources](https://docs.cloud.google.com/kubernetes-engine/docs/how-to/consuming-reservations.md.txt).
### Create a GKE cluster
You can serve Gemma on TPUs in a GKE Autopilot
or Standard cluster. We recommend that you use a Autopilot
cluster for a fully managed Kubernetes experience. To choose the GKE mode of operation that's the best fit for your workloads, see [Choose a GKE mode of operation](https://docs.cloud.google.com/kubernetes-engine/docs/concepts/choose-cluster-mode.md.txt).
### Autopilot
In Cloud Shell, run the following command:
```bash
gcloud container clusters create-auto ${CLUSTER_NAME} \
--project=${PROJECT_ID} \
--location=${CONTROL_PLANE_LOCATION} \
--cluster-version=${CLUSTER_VERSION}
```
### Standard
1. Create a regional GKE Standard cluster that uses [Workload Identity Federation for GKE](https://docs.cloud.google.com/kubernetes-engine/docs/how-to/workload-identity.md.txt).
```bash
gcloud container clusters create ${CLUSTER_NAME} \
--enable-ip-alias \
--machine-type=e2-standard-4 \
--num-nodes=2 \
--cluster-version=${CLUSTER_VERSION} \
--workload-pool=${PROJECT_ID}.svc.id.goog \
--location=${CONTROL_PLANE_LOCATION}
```
The cluster creation might take several minutes.
2. Run the following command to create a
[node pool](https://docs.cloud.google.com/kubernetes-engine/docs/concepts/node-pools.md.txt) for your cluster:
```bash
gcloud container node-pools create gemma-7b-tpu-nodepool \
--cluster=${CLUSTER_NAME} \
--machine-type=ct5lp-hightpu-8t \
--project=${PROJECT_ID} \
--num-nodes=2 \
--location=${CONTROL_PLANE_LOCATION} \
--node-locations=${NODE_LOCATION}
```
GKE creates a TPU v5e node pool with a `2x4` topology
and two nodes.
### Create a Cloud Storage bucket
In Cloud Shell, run the following command:
```bash
gcloud storage buckets create gs://${BUCKET_NAME} \
--location=${CONTROL_PLANE_LOCATION} \
--uniform-bucket-level-access
```
This creates a Cloud Storage bucket to store the model files you
download from Kaggle.
### Upload the access token to Cloud Shell
In Cloud Shell, you can upload the Kaggle API token to your Google Cloud
project:
1. In Cloud Shell, click **More** \> **Upload**.
2. Select File and click **Choose Files**.
3. Open the `kaggle.json` file.
4. Click **Upload**.
### Create a Kubernetes Secret for Kaggle credentials
In Cloud Shell, do the following:
1. Configure `kubectl` to communicate with your cluster:
```bash
gcloud container clusters get-credentials ${CLUSTER_NAME} --location=${CONTROL_PLANE_LOCATION}
```
2. Create a Secret to store the Kaggle credentials:
```bash
kubectl create secret generic kaggle-secret \
--from-file=kaggle.json
```
### Configure your workloads access using Workload Identity Federation for GKE
Grant the `default` [Kubernetes ServiceAccount](https://kubernetes.io/docs/concepts/security/service-accounts/) in the `default` namespace the required IAM roles (`roles/storage.objectUser` and `roles/storage.insightsCollectorService`) to manage Cloud Storage:
```bash
gcloud projects add-iam-policy-binding ${PROJECT_ID} \
--member="principal://iam.googleapis.com/projects/${PROJECT_NUMBER}/locations/global/workloadIdentityPools/${PROJECT_ID}.svc.id.goog/subject/ns/default/sa/default" \
--role="roles/storage.objectUser" \
--condition=None
gcloud projects add-iam-policy-binding ${PROJECT_ID} \
--member="principal://iam.googleapis.com/projects/${PROJECT_NUMBER}/locations/global/workloadIdentityPools/${PROJECT_ID}.svc.id.goog/subject/ns/default/sa/default" \
--role="roles/storage.insightsCollectorService" \
--condition=None
```
## Convert the model checkpoints
In this section, you create a Job to do the following:
1. Download the base [Orbax](https://github.com/google/orbax) checkpoint from Kaggle.
2. Upload the checkpoint to a Cloud Storage bucket.
3. Convert the checkpoint to a MaxText compatible checkpoint.
4. Unscan the checkpoint to be used for serving.
### Deploy the model checkpoint conversion Job
Follow these instructions to download and convert the Gemma 7B
model checkpoint files. This tutorial uses a Kubernetes Job. A Job controller in Kubernetes creates one or more
Pods and helps ensure that they successfully execute a specific
task.
1. Create the following manifest as `job-7b.yaml`.
```yaml
apiVersion: batch/v1
kind: Job
metadata:
name: data-loader-7b
spec:
ttlSecondsAfterFinished: 30
template:
spec:
restartPolicy: Never
containers:
- name: inference-checkpoint
image: us-docker.pkg.dev/cloud-tpu-images/inference/inference-checkpoint:v0.2.5
args:
- -b=BUCKET_NAME
- -m=google/gemma/maxtext/7b-it/2
volumeMounts:
- mountPath: "/kaggle/"
name: kaggle-credentials
readOnly: true
resources:
requests:
google.com/tpu: 8
limits:
google.com/tpu: 8
nodeSelector:
cloud.google.com/gke-tpu-topology: 2x4
cloud.google.com/gke-tpu-accelerator: tpu-v5-lite-podslice
volumes:
- name: kaggle-credentials
secret:
defaultMode: 0400
secretName: kaggle-secret
```
2. Apply the manifest:
```bash
kubectl apply -f job-7b.yaml
```
3. Wait for the Pod scheduling the Job to begin running:
```bash
kubectl get pod -w
```
The output will be similar to the following, this may take a few minutes:
NAME READY STATUS RESTARTS AGE
data-loader-7b-abcd 0/1 ContainerCreating 0 28s
data-loader-7b-abcd 1/1 Running 0 51s
For Autopilot clusters, it may take a few minutes to provision the required TPU resources.
4. View the logs from the Job:
```bash
kubectl logs -f jobs/data-loader-7b
```
When the Job is completed, the output is similar to the following:
Successfully generated decode checkpoint at: gs://BUCKET_NAME/final/unscanned/gemma_7b-it/0/checkpoints/0/items
+ echo -e '\nCompleted unscanning checkpoint to gs://BUCKET_NAME/final/unscanned/gemma_7b-it/0/checkpoints/0/items'
Completed unscanning checkpoint to gs://BUCKET_NAME/final/unscanned/gemma_7b-it/0/checkpoints/0/items
## Deploy JetStream
In this section, you deploy the JetStream container to serve the Gemma
model.
Follow these instructions to deploy the Gemma 7B
instruction tuned model. This tutorial uses a Kubernetes Deployment. A *Deployment* is a Kubernetes API object that lets you run multiple replicas of Pods that are distributed among the nodes in a cluster..
1. Save the following Deployment manifest as
`jetstream-gemma-deployment.yaml`:
```yaml
apiVersion: apps/v1
kind: Deployment
metadata:
name: maxengine-server
spec:
replicas: 1
selector:
matchLabels:
app: maxengine-server
template:
metadata:
labels:
app: maxengine-server
spec:
nodeSelector:
cloud.google.com/gke-tpu-topology: 2x4
cloud.google.com/gke-tpu-accelerator: tpu-v5-lite-podslice
containers:
- name: maxengine-server
image: us-docker.pkg.dev/cloud-tpu-images/inference/maxengine-server:v0.2.4
args:
- model_name=gemma-7b
- tokenizer_path=assets/tokenizer.gemma
- per_device_batch_size=4
- max_prefill_predict_length=1024
- max_target_length=2048
- async_checkpointing=false
- ici_fsdp_parallelism=1
- ici_autoregressive_parallelism=-1
- ici_tensor_parallelism=1
- scan_layers=false
- weight_dtype=bfloat16
- load_parameters_path=gs://BUCKET_NAME/final/unscanned/gemma_7b-it/0/checkpoints/0/items
- prometheus_port=PROMETHEUS_PORT
ports:
- containerPort: 9000
resources:
requests:
google.com/tpu: 8
limits:
google.com/tpu: 8
- name: jetstream-http
image: us-docker.pkg.dev/cloud-tpu-images/inference/jetstream-http:v0.2.4
ports:
- containerPort: 8000
---
apiVersion: v1
kind: Service
metadata:
name: jetstream-svc
spec:
selector:
app: maxengine-server
ports:
- protocol: TCP
name: jetstream-http
port: 8000
targetPort: 8000
- protocol: TCP
name: jetstream-grpc
port: 9000
targetPort: 9000
```
The manifest sets the following key properties:
- `tokenizer_path`: the path to your model's tokenizer.
- `load_parameters_path`: the path in the Cloud Storage bucket where your checkpoints are stored.
- `per_device_batch_size`: the decoding batch size per device, where one TPU chip equals one device.
- `max_prefill_predict_length`: the maximum length for the prefill when doing autoregression.
- `max_target_length`: the maximum sequence length.
- `model_name`: the model name (`gemma-7b`).
- `ici_fsdp_parallelism`: the number of shards for fully sharded data parallelism (FSDP).
- `ici_tensor_parallelism`: the number of shards for tensor parallelism.
- `ici_autoregressive_parallelism`: the number of shards for autoregressive parallelism.
- `prometheus_port`: port to expose prometheus metrics. Remove this argument if metrics aren't needed.
- `scan_layers`: scan layers boolean flag (boolean).
- `weight_dtype`: the weight data type (bfloat16).
2. Apply the manifest:
```bash
kubectl apply -f jetstream-gemma-deployment.yaml
```
3. Verify the Deployment:
```bash
kubectl get deployment
```
The output is similar to the following:
NAME READY UP-TO-DATE AVAILABLE AGE
maxengine-server 2/2 2 2 ##s
For Autopilot clusters, it may take a few minutes to provision the required TPU resources.
4. View the HTTP server logs to check that the model has been loaded and compiled.
It may take the server a few minutes to complete this operation.
```bash
kubectl logs deploy/maxengine-server -f -c jetstream-http
```
The output is similar to the following:
kubectl logs deploy/maxengine-server -f -c jetstream-http
INFO: Started server process [1]
INFO: Waiting for application startup.
INFO: Application startup complete.
INFO: Uvicorn running on http://0.0.0.0:8000 (Press CTRL+C to quit)
5. View the MaxEngine logs and verify that the compilation is done.
```bash
kubectl logs deploy/maxengine-server -f -c maxengine-server
```
The output is similar to the following:
2024-03-29 17:09:08,047 - jax._src.dispatch - DEBUG - Finished XLA compilation of jit(initialize) in 0.26236414909362793 sec
2024-03-29 17:09:08,150 - root - INFO - ---Generate params 0 loaded.---
## Serve the model
In this section, you interact with the model.
### Set up port forwarding
You can access the JetStream Deployment through the [ClusterIP Service](https://docs.cloud.google.com/kubernetes-engine/docs/concepts/service.md.txt#services_of_type_clusterip) that you
created in the preceding step. The ClusterIP Services are only reachable from within
the cluster. Therefore, to access the Service from outside the cluster, complete
the following steps:
To establish a port forwarding session, run the following command:
```bash
kubectl port-forward svc/jetstream-svc 8000:8000
```
> [!TIP]
> **Success:** You've successfully served Gemma using TPUs on GKE with JetStream. You can now interact with the model.
### Interact with the model using curl
1. Verify that you can access the JetStream HTTP server by opening a new terminal
and running the following command:
```bash
curl --request POST \
--header "Content-type: application/json" \
-s \
localhost:8000/generate \
--data \
'{
"prompt": "What are the top 5 programming languages",
"max_tokens": 200
}'
```
The initial request can take several seconds to complete due to model warmup.
The output is similar to the following:
{
"response": "\nfor data science in 2023?\n\n**1. Python:**\n- Widely used for data science due to its simplicity, readability, and extensive libraries for data wrangling, analysis, visualization, and machine learning.\n- Popular libraries include pandas, scikit-learn, and matplotlib.\n\n**2. R:**\n- Statistical programming language widely used for data analysis, visualization, and modeling.\n- Popular libraries include ggplot2, dplyr, and caret.\n\n**3. Java:**\n- Enterprise-grade language with strong performance and scalability.\n- Popular libraries include Spark, TensorFlow, and Weka.\n\n**4. C++:**\n- High-performance language often used for data analytics and machine learning models.\n- Popular libraries include TensorFlow, PyTorch, and OpenCV.\n\n**5. SQL:**\n- Relational database language essential for data wrangling and querying large datasets.\n- Popular tools"
}
### (Optional) Interact with the model through a Gradio chat interface
In this section, you build a web chat application that lets you interact with
your instruction tuned model.
[Gradio](https://github.com/gradio-app/gradio) is a Python library that has a
`ChatInterface` wrapper that creates user interfaces for chatbots.
#### Deploy the chat interface
1. In Cloud Shell, save the following manifest as `gradio.yaml`:
```yaml
apiVersion: apps/v1
kind: Deployment
metadata:
name: gradio
labels:
app: gradio
spec:
replicas: 1
selector:
matchLabels:
app: gradio
template:
metadata:
labels:
app: gradio
spec:
containers:
- name: gradio
image: us-docker.pkg.dev/google-samples/containers/gke/gradio-app:v1.0.3
resources:
requests:
cpu: "512m"
memory: "512Mi"
limits:
cpu: "1"
memory: "512Mi"
env:
- name: CONTEXT_PATH
value: "/generate"
- name: HOST
value: "http://jetstream-svc:8000"
- name: LLM_ENGINE
value: "max"
- name: MODEL_ID
value: "gemma"
- name: USER_PROMPT
value: "user\nprompt\n"
- name: SYSTEM_PROMPT
value: "model\nprompt\n"
ports:
- containerPort: 7860
---
apiVersion: v1
kind: Service
metadata:
name: gradio
spec:
selector:
app: gradio
ports:
- protocol: TCP
port: 8080
targetPort: 7860
type: ClusterIP
```
2. Apply the manifest:
```bash
kubectl apply -f gradio.yaml
```
3. Wait for the deployment to be available:
```bash
kubectl wait --for=condition=Available --timeout=300s deployment/gradio
```
#### Use the chat interface
1. In Cloud Shell, run the following command:
```bash
kubectl port-forward service/gradio 8080:8080
```
This creates a port forward from Cloud Shell to the Gradio service.
2. Click the  **Web Preview** button which can be found on the top right of the Cloud Shell taskbar. Click **Preview on Port 8080**. A new tab opens in your browser.
3. Interact with Gemma using the Gradio chat interface. Add a prompt and click **Submit**.
## Troubleshoot issues
- If you get the message `Empty reply from server`, it's possible the container has not finished downloading the model data. [Check the Pod's logs](https://docs.cloud.google.com/kubernetes-engine/docs/tutorials/serve-gemma-tpu-jetstream.md.txt#deploy-jetstream) again for the `Connected` message which indicates that the model is ready to serve.
- If you see `Connection refused`, verify that your [port forwarding is active](https://docs.cloud.google.com/kubernetes-engine/docs/tutorials/serve-gemma-tpu-jetstream.md.txt#setup-port-forwarding).
## Clean up
To avoid incurring charges to your Google Cloud account for the resources used in this
tutorial, either delete the project that contains the resources, or keep the project and
delete the individual resources.
### Delete the deployed resources
To avoid incurring charges to your Google Cloud account for the resources
that you created in this guide, run the following commands and follow the prompts:
```bash
gcloud container clusters delete ${CLUSTER_NAME} --location=${CONTROL_PLANE_LOCATION}
gcloud storage rm --recursive gs://BUCKET_NAME
```
## What's next
- Discover how you can run [Gemma models on GKE](https://docs.cloud.google.com/kubernetes-engine/docs/integrations/ai-infra.md.txt#serve-open-models-on-gke) and how to run optimized AI/ML workloads with [GKE platform orchestration capabilities](https://docs.cloud.google.com/kubernetes-engine/docs/integrations/ai-infra.md.txt).
- Learn more about [TPUs in
GKE](https://docs.cloud.google.com/kubernetes-engine/docs/concepts/tpus).
- Explore the JetStream [GitHub repository](https://github.com/google/JetStream).
- Explore the [Vertex AI Model Garden](https://console.cloud.google.com/vertex-ai/model-garden).