This tutorial demonstrates how to expose multiple gRPC services deployed on
Google Kubernetes Engine (GKE) on a single external IP address by using a
[regional external passthrough Network Load Balancer](https://docs.cloud.google.com/load-balancing/docs/network)
and
[Envoy Proxy](https://www.envoyproxy.io/).
The tutorial highlights some of the advanced features that Envoy provides
for gRPC.
## Introduction
[gRPC](https://grpc.io/)
is an open source, language-independent RPC framework based on HTTP/2 that uses
protocol buffers for efficient on-the-wire representation and fast
serialization. Inspired by
[Stubby](https://grpc.io/blog/principles),
the internal Google RPC framework, gRPC enables low-latency
communication between microservices and between mobile clients and APIs.
gRPC runs over HTTP/2 and offers several advantages over HTTP/1.1, such as
efficient binary encoding, multiplexing of requests and responses over a single
connection, and automatic flow control. gRPC also offers several options for
load balancing. This tutorial focuses on situations where clients are untrusted,
such as mobile clients and clients running outside the trust boundary of the
service provider. Of the load-balancing options that gRPC provides,
you use proxy-based load balancing in this tutorial.
In the tutorial, you deploy a Kubernetes Service of `TYPE=LoadBalancer`, which
is exposed as a transport layer (layer 4) regional external passthrough Network Load Balancer on
Google Cloud. This service provides a single public IP address and passes
TCP connections directly to the configured backends. In the tutorial, the
backend is a Kubernetes Deployment of Envoy instances.
Envoy is an open source application layer (layer 7) proxy that offers
many advanced features. In this tutorial, you use it to terminate TLS
connections and route gRPC traffic to the appropriate Kubernetes Service.
Compared to other application layer solutions such as Kubernetes Ingress, using
Envoy directly provides multiple customization options, like the
following:
- Service discovery
- Load-balancing algorithms
- Transforming requests and responses---for instance, to JSON or gRPC-Web
- Authenticating requests by validating JWT tokens
- gRPC health checks
By combining a regional external passthrough Network Load Balancer with Envoy, you can set up an endpoint
(external IP address) that forwards traffic to a set of Envoy instances
running in a Google Kubernetes Engine cluster. These instances then use application layer
information to proxy requests to different gRPC services running in the cluster.
The Envoy instances use cluster DNS to identify and load-balance incoming
gRPC requests to the healthy and running pods for each service. This means
traffic is load-balanced to the pods per RPC request rather than per TCP
connection from the client.
## Architecture
In this tutorial, you deploy two gRPC services, `echo-grpc` and `reverse-grpc`,
in a Google Kubernetes Engine (GKE) cluster and expose them to the internet
on a public IP address. The following diagram shows the architecture
for exposing these two services through a single endpoint:
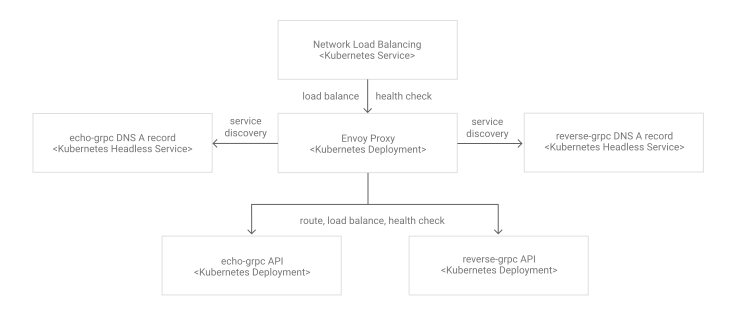
A regional external passthrough Network Load Balancer accepts incoming requests from the internet (for example,
from mobile clients or service consumers outside your company). The
regional external passthrough Network Load Balancer performs the following tasks:
- Load-balances incoming connections to the nodes in the pool. Traffic is forwarded to the `envoy` Kubernetes Service, which is exposed on all nodes in the cluster. The Kubernetes network proxy forwards these connections to pods that are running Envoy.
- Performs HTTP health checks against the nodes in the cluster.
Envoy performs the following tasks:
- Terminates TLS connections.
- Discovers pods running the gRPC services by querying the internal cluster DNS service.
- Routes and load-balances traffic to the gRPC service pods.
- Performs health checks of the gRPC services according to the [gRPC Health Checking Protocol](https://github.com/grpc/grpc/blob/master/doc/health-checking.md).
- Exposes an endpoint for health checking of Envoy instances by the regional external passthrough Network Load Balancer.
The gRPC services (`echo-grpc` and `reverse-grpc`) are exposed as
[Kubernetes headless Services](https://kubernetes.io/docs/concepts/services-networking/service/#headless-services).
This means that no `clusterIP` address is assigned, and the Kubernetes network
proxy doesn't load-balance traffic to the pods. Instead, a DNS A record that
contains the pod IP addresses is created in the cluster DNS service. Envoy
discovers the pod IP addresses from this DNS entry and load-balances
across them according to the policy configured in Envoy.
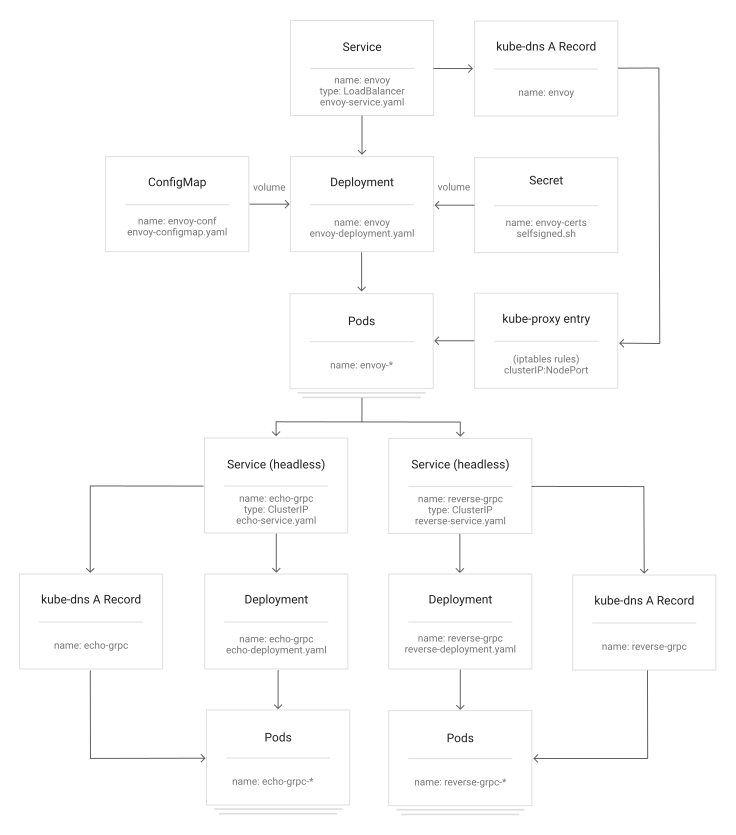
The following diagram shows the Kubernetes objects involved in this tutorial:
## Costs
In this document, you use the following billable components of Google Cloud:
- [Artifact Registry](https://docs.cloud.google.com/artifact-registry/pricing)
- [Google Kubernetes Engine (GKE)](https://docs.cloud.google.com/kubernetes-engine/pricing)
To generate a cost estimate based on your projected usage,
use the [pricing calculator](https://docs.cloud.google.com/products/calculator).
New Google Cloud users might be eligible for a [free trial](https://docs.cloud.google.com/free).
When you finish the tasks that are described in this document, you can avoid
continued billing by deleting the resources that you created. For more information, see
[Clean up](https://docs.cloud.google.com/kubernetes-engine/docs/tutorials/exposing-grpc-services-on-gke-using-envoy-proxy.md.txt#clean-up).
## Before you begin
1. In the Google Cloud console, on the project selector page,
select or create a Google Cloud project.
**Roles required to select or create a project**
- **Select a project**: Selecting a project doesn't require a specific IAM role---you can select any project that you've been granted a role on.
- **Create a project** : To create a project, you need the Project Creator role (`roles/resourcemanager.projectCreator`), which contains the `resourcemanager.projects.create` permission. [Learn how to grant
roles](https://docs.cloud.google.com/iam/docs/granting-changing-revoking-access).
[Go to project selector](https://console.cloud.google.com/projectselector2/home/dashboard)
2.
[Verify that billing is enabled for your Google Cloud project](https://docs.cloud.google.com/billing/docs/how-to/verify-billing-enabled.md.txt#confirm_billing_is_enabled_on_a_project).
3. In the Google Cloud console, activate Cloud Shell.
[Activate Cloud Shell](https://console.cloud.google.com/?cloudshell=true)
## Prepare the environment
1. In Cloud Shell, set the Google Cloud project that you want
to use for this tutorial:
```bash
gcloud config set project PROJECT_ID
```
Replace `PROJECT_ID` with your
Google Cloud project ID.
2. Enable the Artifact Registry and GKE APIs:
```bash
gcloud services enable artifactregistry.googleapis.com \
container.googleapis.com
```
## Create the GKE cluster
1. In Cloud Shell, create a GKE cluster for running
your gRPC services:
```bash
gcloud container clusters create envoy-grpc-tutorial \
--enable-ip-alias \
--release-channel rapid \
--scopes cloud-platform \
--workload-pool PROJECT_ID.svc.id.goog \
--location us-central1-f
```
This tutorial uses the `us-central1-f` zone. You can use a
[different zone or region](https://docs.cloud.google.com/compute/docs/regions-zones.md.txt).
2. Verify that the `kubectl` context has been set up by listing the
nodes in your cluster:
```bash
kubectl get nodes --output name
```
The output looks similar to this:
```
node/gke-envoy-grpc-tutorial-default-pool-c9a3c791-1kpt
node/gke-envoy-grpc-tutorial-default-pool-c9a3c791-qn92
node/gke-envoy-grpc-tutorial-default-pool-c9a3c791-wf2h
```
## Create the Artifact Registry repository
1. In Cloud Shell, create a new repository to store container images:
```bash
gcloud artifacts repositories create envoy-grpc-tutorial-images \
--repository-format docker \
--location us-central1
```
You create the repository in the same region as the GKE
cluster to help optimize latency and network bandwidth when nodes pull
container images.
2. Grant the
[Artifact Registry Reader](https://docs.cloud.google.com/artifact-registry/docs/access-control.md.txt#roles)
role on the repository to the Google service account used by the node VMs
of the GKE cluster:
```bash
PROJECT_NUMBER=$(gcloud projects describe PROJECT_ID --format 'value(projectNumber)')
gcloud artifacts repositories add-iam-policy-binding envoy-grpc-tutorial-images \
--location us-central1 \
--member serviceAccount:$PROJECT_NUMBER-compute@developer.gserviceaccount.com \
--role roles/artifactregistry.reader
```
3. Add a credential helper entry for the repository hostname to the Docker
configuration file in your Cloud Shell home directory:
```bash
gcloud auth configure-docker us-central1-docker.pkg.dev
```
The credential helper entry enables container image tools running in
Cloud Shell to authenticate to the Artifact Registry repository
location for pulling and pushing images.
## Deploy the gRPC services
To route traffic to multiple gRPC services behind one load balancer, you deploy
two sample gRPC services: `echo-grpc` and `reverse-grpc`. Both services expose a
unary method that takes a string in the `content` request field. `echo-grpc`
responds with the content unaltered, while `reverse-grpc` responds with the
content string reversed.
1. In Cloud Shell, clone the repository containing the gRPC services
and switch to the repository directory:
```bash
git clone https://github.com/GoogleCloudPlatform/kubernetes-engine-samples
cd kubernetes-engine-samples/networking/grpc-gke-nlb-tutorial/
```
2. Create a self-signed TLS certificate and private key:
```bash
openssl req -x509 -newkey rsa:4096 -nodes -sha256 -days 365 \
-keyout privkey.pem -out cert.pem -extensions san \
-config \
<(echo "[req]";
echo distinguished_name=req;
echo "[san]";
echo subjectAltName=DNS:grpc.example.com
) \
-subj '/CN=grpc.example.com'
```
3. Create a Kubernetes Secret called `envoy-certs` that contains the
self-signed TLS certificate and private key:
```bash
kubectl create secret tls envoy-certs \
--key privkey.pem --cert cert.pem \
--dry-run=client --output yaml | kubectl apply --filename -
```
Envoy uses this TLS certificate and private key when it terminates TLS
connections.
4. Build the container images for the sample apps `echo-grpc` and
`reverse-grpc`, push the images to Artifact Registry, and deploy the apps
to the GKE cluster, using Skaffold:
```bash
skaffold run \
--default-repo=us-central1-docker.pkg.dev/PROJECT_ID/envoy-grpc-tutorial-images \
--module=echo-grpc,reverse-grpc \
--skip-tests
```
[Skaffold](https://skaffold.dev)
is an open source tool from Google that automates workflows for developing,
building, pushing, and deploying applications as containers.
> [!CAUTION]
> **Caution** : Skaffold
> [will be removed](https://groups.google.com/g/skaffold-users/c/FTR3xLJpePY)
> from gcloud CLI releases after January 15, 2027. Going forward, Skaffold can be installed
> following the instructions in the
> [Installing Skaffold documentation](https://skaffold.dev/docs/install/).
>
>
>
> On January 29, 2027 the Skaffold GitHub repository will be archived. All
> existing releases will remain available to users.
5. Deploy Envoy to the GKE cluster using Skaffold:
```bash
skaffold run \
--digest-source=none \
--module=envoy \
--skip-tests
```
6. Verify that two pods are ready for each deployment:
```bash
kubectl get deployments
```
The output looks similar to the following. The values for `READY` should be
`2/2` for all deployments.
```
NAME READY UP-TO-DATE AVAILABLE AGE
echo-grpc 2/2 2 2 1m
envoy 2/2 2 2 1m
reverse-grpc 2/2 2 2 1m
```
7. Verify that `echo-grpc`, `envoy`, and `reverse-grpc` exist as Kubernetes
Services:
```bash
kubectl get services --selector skaffold.dev/run-id
```
The output looks similar to the following. Both `echo-grpc` and
`reverse-grpc` should have `TYPE=ClusterIP` and `CLUSTER-IP=None`.
```
NAME TYPE CLUSTER-IP EXTERNAL-IP PORT(S) AGE
echo-grpc ClusterIP None 8081/TCP 2m
envoy LoadBalancer 10.40.2.203 203.0.113.1 443:31516/TCP 2m
reverse-grpc ClusterIP None 8082/TCP 2m
```
**Note** : In this tutorial, the public IP address of the
regional external passthrough Network Load Balancer forwarding rule is used to communicate with the services.
For a production-quality deployment, we recommend that you create a
[DNS A record](https://docs.cloud.google.com/dns/docs/overview.md.txt#supported_dns_record_types)
that points to the public IP address. You can use
[Cloud DNS](https://docs.cloud.google.com/dns/docs.md.txt)
or third-party DNS services to create this record.
With the DNS record in place, you call your APIs using the domain name instead
of the IP address. This approach allows you to change the IP address in the
future without making changes to your API clients. Also, a domain name is
required in order to obtain a TLS certificate from public certificate
authorities.
## Test the gRPC services
To test the services, you use the
[`grpcurl`](https://github.com/fullstorydev/grpcurl/blob/master/README.md)
command-line tool.
1. In Cloud Shell, install `grpcurl`:
```bash
go install github.com/fullstorydev/grpcurl/cmd/grpcurl@latest
```
2. Get the external IP address of the `envoy` Kubernetes Service and store it
in an environment variable:
```bash
EXTERNAL_IP=$(kubectl get service envoy \
--output=jsonpath='{.status.loadBalancer.ingress[0].ip}')
```
3. Send a request to the `echo-grpc` sample app:
```bash
grpcurl -v -d '{"content": "echo"}' \
-proto echo-grpc/api/echo.proto \
-authority grpc.example.com -cacert cert.pem \
$EXTERNAL_IP:443 api.Echo/Echo
```
The output looks similar to this:
```
Resolved method descriptor:
rpc Echo ( .api.EchoRequest ) returns ( .api.EchoResponse );
Request metadata to send:
(empty)
Response headers received:
content-type: application/grpc
date: Wed, 02 Jun 2021 07:18:22 GMT
hostname: echo-grpc-75947768c9-jkdcw
server: envoy
x-envoy-upstream-service-time: 3
Response contents:
{
"content": "echo"
}
Response trailers received:
(empty)
Sent 1 request and received 1 response
```
The `hostname` response header shows the name of the `echo-grpc` pod
that handled the request. If you repeat the command a few times, you should
see two different values for the `hostname` response header, corresponding
to the names of the `echo-grpc` pods.
4. Verify the same behavior with the Reverse gRPC service:
```bash
grpcurl -v -d '{"content": "reverse"}' \
-proto reverse-grpc/api/reverse.proto \
-authority grpc.example.com -cacert cert.pem \
$EXTERNAL_IP:443 api.Reverse/Reverse
```
The output looks similar to this:
```
Resolved method descriptor:
rpc Reverse ( .api.ReverseRequest ) returns ( .api.ReverseResponse );
Request metadata to send:
(empty)
Response headers received:
content-type: application/grpc
date: Wed, 02 Jun 2021 07:20:15 GMT
hostname: reverse-grpc-5c9b974f54-wlfwt
server: envoy
x-envoy-upstream-service-time: 1
Response contents:
{
"content": "esrever"
}
Response trailers received:
(empty)
Sent 1 request and received 1 response
```
## Envoy configuration
To understand the Envoy configuration better, you can look at the configuration
file `envoy/k8s/envoy.yaml` in the Git repository.
The `route_config` section specifies how incoming requests are routed to the
`echo-grpc` and `reverse-grpc` sample apps.
```yaml
route_config:
name: local_route
virtual_hosts:
- name: local_service
domains:
- "*"
routes:
- match:
prefix: "/api.Echo/"
route:
cluster: echo-grpc
- match:
prefix: "/api.Reverse/"
route:
cluster: reverse-grpc
```
The sample apps are defined as
[Envoy clusters](https://www.envoyproxy.io/docs/envoy/latest/api-v3/config/cluster/v3/cluster.proto).
```yaml
clusters:
- name: echo-grpc
connect_timeout: 0.5s
type: STRICT_DNS
dns_lookup_family: V4_ONLY
lb_policy: ROUND_ROBIN
http2_protocol_options: {}
load_assignment:
cluster_name: echo-grpc
endpoints:
- lb_endpoints:
- endpoint:
address:
socket_address:
address: echo-grpc.default.svc.cluster.local
port_value: 8081
health_checks:
timeout: 1s
interval: 10s
unhealthy_threshold: 2
healthy_threshold: 2
grpc_health_check: {}
```
The `type: STRICT_DNS` and `lb_policy: ROUND_ROBIN` fields in the cluster
definition specify that Envoy performs DNS lookups of the hostname specified
in the `address` field and load-balances across the IP addresses in the
response to the DNS lookup. The response contains multiple IP addresses because
the Kubernetes Service objects that define the sample apps specify headless
services.
The `http2_protocol_options` field specifies that Envoy uses the HTTP/2
protocol to the sample apps.
The `grpc_health_check` field in the `health_checks` section specifies that
Envoy uses the gRPC health checking protocol to determine the health of the
sample apps.
## Troubleshoot
If you run into problems with this tutorial, we recommend that you review these
documents:
- [Troubleshooting Kubernetes clusters](https://kubernetes.io/docs/tasks/debug/debug-cluster/)
- [Troubleshooting applications deployed on Kubernetes](https://kubernetes.io/docs/tasks/debug/debug-application/)
You can also explore the Envoy administration interface to diagnose problems
with the Envoy configuration.
1. To open the administration interface, set up port forwarding from
Cloud Shell to the `admin` port of one of the Envoy pods:
```bash
kubectl port-forward \
$(kubectl get pods -o name | grep envoy | head -n1) 8080:8090
```
2. Wait until you see this output in the console:
```
Forwarding from 127.0.0.1:8080 -> 8090
```
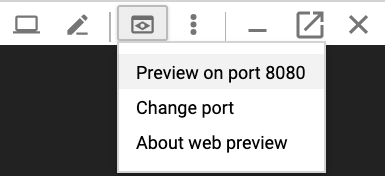
3. Click the **Web preview** button in Cloud Shell and select
**Preview on port 8080**. This opens a new browser window showing the
administration interface.
4. When you are done, switch back to Cloud Shell and
press `Control+C` to end port forwarding.
## Alternative ways to route gRPC traffic
You can modify this solution in a number of ways to suit your environment.
### Alternative application layer load balancers
Some of the application layer functionality that Envoy provides can also
be provided by other load-balancing solutions:
- You can use a
[global external Application Load Balancer or regional external Application Load Balancer](https://docs.cloud.google.com/load-balancing/docs/https.md.txt)
instead of a regional external passthrough Network Load Balancer and self-managed Envoy. Using an
external Application Load Balancer provides several benefits compared to a regional external passthrough Network Load Balancer,
such as advanced traffic management capability, managed TLS certificates,
and integration with other Google Cloud products such as Cloud CDN,
Google Cloud Armor, and IAP.
We recommend that you use a global external Application Load Balancer or
regional external Application Load Balancer if the traffic management capabilities they offer
satisfy your use cases and if you do not need support for client
certificate-based authentication, also known as mutual TLS (mTLS)
authentication. For more information, see the following documents:
- [Traffic management overview for global external Application Load Balancers](https://docs.cloud.google.com/load-balancing/docs/https/traffic-management-global.md.txt)
- [Traffic management overview for regional external Application Load Balancers](https://docs.cloud.google.com/load-balancing/docs/https/traffic-management-regional.md.txt)
- If you use Cloud Service Mesh or Istio, you can use their features to route and
load-balance gRPC traffic. Both Cloud Service Mesh and Istio provide an
[ingress gateway](https://istio.io/docs/tasks/traffic-management/ingress/)
that is deployed as a regional external passthrough Network Load Balancer with an Envoy backend, similar
to the architecture in this tutorial. The main difference is that Envoy
is configured through Istio's
[traffic routing](https://istio.io/docs/reference/config/)
objects.
To make the example services in this tutorial routable in the Cloud Service Mesh
or Istio service mesh, you must remove the line `clusterIP: None` from the
Kubernetes Service manifests (`echo-service.yaml` and
`reverse-service.yaml`). This means using the service discovery and load
balancing functionality of Cloud Service Mesh or Istio instead of the similar
functionality in Envoy.
If you already use Cloud Service Mesh or Istio, we recommend using the ingress
gateway to route to your gRPC services.
- You can use NGINX in place of Envoy, either as a Deployment or
using the
[NGINX Ingress Controller for Kubernetes](https://github.com/kubernetes/ingress-nginx).
Envoy is used in this tutorial because it provides more advanced gRPC
functionality, such as support for the
[gRPC health checking protocol](https://github.com/grpc/grpc/blob/master/doc/health-checking.md).
### Internal VPC network connectivity
If you want to expose the services outside your GKE cluster but
only inside your VPC network, you can use either an
[internal passthrough Network Load Balancer](https://docs.cloud.google.com/kubernetes-engine/docs/how-to/internal-load-balancing.md.txt)
or an
[internal Application Load Balancer](https://docs.cloud.google.com/load-balancing/docs/l7-internal.md.txt).
To use an internal passthrough Network Load Balancer in place of a regional external passthrough Network Load Balancer, add the
annotation `cloud.google.com/load-balancer-type: "Internal"` to the
`envoy-service.yaml` manifest.
To use an internal Application Load Balancer, consult the documentation on
[configuring Ingress for internal Application Load Balancers](https://docs.cloud.google.com/kubernetes-engine/docs/how-to/internal-load-balance-ingress.md.txt).
## Clean up
After you finish the tutorial, you can clean up the resources that you created so that they
stop using quota and incurring charges. The following sections describe how to delete or turn off
these resources.
### Delete the project
> [!CAUTION]
> **Caution** : Deleting a project has the following effects:
>
> - **Everything in the project is deleted.** If you used an existing project for the tasks in this document, when you delete it, you also delete any other work you've done in the project.
> - **Custom project IDs are lost.** When you created this project, you might have created a custom project ID that you want to use in the future. To preserve the URLs that use the project ID, such as an `appspot.com` URL, delete selected resources inside the project instead of deleting the whole project.
1. In the Google Cloud console, go to the **Manage resources** page.
[Go to Manage resources](https://console.cloud.google.com/iam-admin/projects)
2. In the project list, select the project that you want to delete, and then click **Delete**.
3. In the dialog, type the project ID, and then click **Shut down** to delete the project.
### Delete the resources
If you want to keep the Google Cloud project you used in this tutorial,
delete the individual resources:
1. In Cloud Shell, delete the local Git repository clone:
```bash
cd ; rm -rf kubernetes-engine-samples/networking/grpc-gke-nlb-tutorial/
```
2. Delete the GKE cluster:
```bash
gcloud container clusters delete envoy-grpc-tutorial \
--location us-central1-f --async --quiet
```
3. Delete the repository in Artifact Registry:
```bash
gcloud artifacts repositories delete envoy-grpc-tutorial-images \
--location us-central1 --async --quiet
```
## What's next
- Read about [GKE networking](https://docs.cloud.google.com/kubernetes-engine/docs/concepts/network-overview).
- Browse examples on how to [expose gRPC services to clients inside your Kubernetes cluster](https://github.com/jtattermusch/grpc-loadbalancing-kubernetes-examples).
- Explore options for
[gRPC load-balancing](https://grpc.io/blog/loadbalancing).
-
Explore reference architectures, diagrams, and best practices about Google Cloud.
Take a look at our
[Cloud Architecture Center](https://docs.cloud.google.com/architecture).