This guide covers how to simplify and accelerate the loading of AI/ML model
weights on Google Kubernetes Engine (GKE) using Hyperdisk ML.
The Compute Engine Persistent Disk CSI driver is the primary way for you to
access [Hyperdisk ML storage with GKE clusters](https://docs.cloud.google.com/kubernetes-engine/docs/concepts/hyperdisk.md.txt).
## Overview
Hyperdisk ML is a high performance storage solution that can be used to
scale out your applications. It provides high aggregate throughput to many
virtual machines concurrently, making it ideal if you want to run AI/ML
workloads that need access to large amounts of data.
When enabled in read-only-many mode, you can use Hyperdisk ML to accelerate
the loading of model weights by up to 11.9X relative to loading directly from a
model registry. This acceleration is made possible by the [Google Cloud Hyperdisk
architecture](https://docs.cloud.google.com/compute/docs/disks/hyperdisks) that allows [scaling to 2,500
concurrent nodes at 1.2 TiB/s](https://docs.cloud.google.com/compute/docs/disks/hd-types/hyperdisk-ml#size_limits).
This lets you drive better load times
and reduce Pod over-provisioning for your AI/ML inference workloads.
The high level steps to create and use Hyperdisk ML are as follows:
1. [Pre-cache or *hydrate* data in a Persistent Disk disk image](https://docs.cloud.google.com/kubernetes-engine/docs/how-to/persistent-volumes/hyperdisk-ml.md.txt#pre-cache-data): Load Hyperdisk ML volumes with data from an external data source (for example, Gemma weights loaded from Cloud Storage) that can be used for serving. The Persistent Disk for the disk image must be compatible with Google Cloud Hyperdisk.
2. [Create a Hyperdisk ML volume using a pre-existing
Google Cloud Hyperdisk](https://docs.cloud.google.com/kubernetes-engine/docs/how-to/persistent-volumes/hyperdisk-ml#create-from-hd): Create a Kubernetes volume that references the Hyperdisk ML volume loaded with data. Optionally, you can [create multi-zone storage classes](https://docs.cloud.google.com/kubernetes-engine/docs/how-to/persistent-volumes/hyperdisk-ml.md.txt#multi-zone) to ensure your data is available in all zones that your Pods will run.
3. [Create a Kubernetes Deployment to consume the Hyperdisk ML volume](https://docs.cloud.google.com/kubernetes-engine/docs/how-to/persistent-volumes/hyperdisk-ml.md.txt#create-deployment): Reference the Hyperdisk ML volume with accelerated data loading for your applications to consume.
> [!NOTE]
> **Note:** When you create the PersistentVolumeClaim associated with a StorageClass that supports Hyperdisk ML, GKE automatically creates the underlying Hyperdisk ML backing storage and attaches the storage to a node. For [dynamically provisioned volumes](https://docs.cloud.google.com/kubernetes-engine/docs/concepts/persistent-volumes.md.txt#dynamic_provisioning), you don't need to separately create and attach Hyperdisk ML storage to your nodes.
### Multi-zone Hyperdisk ML volumes
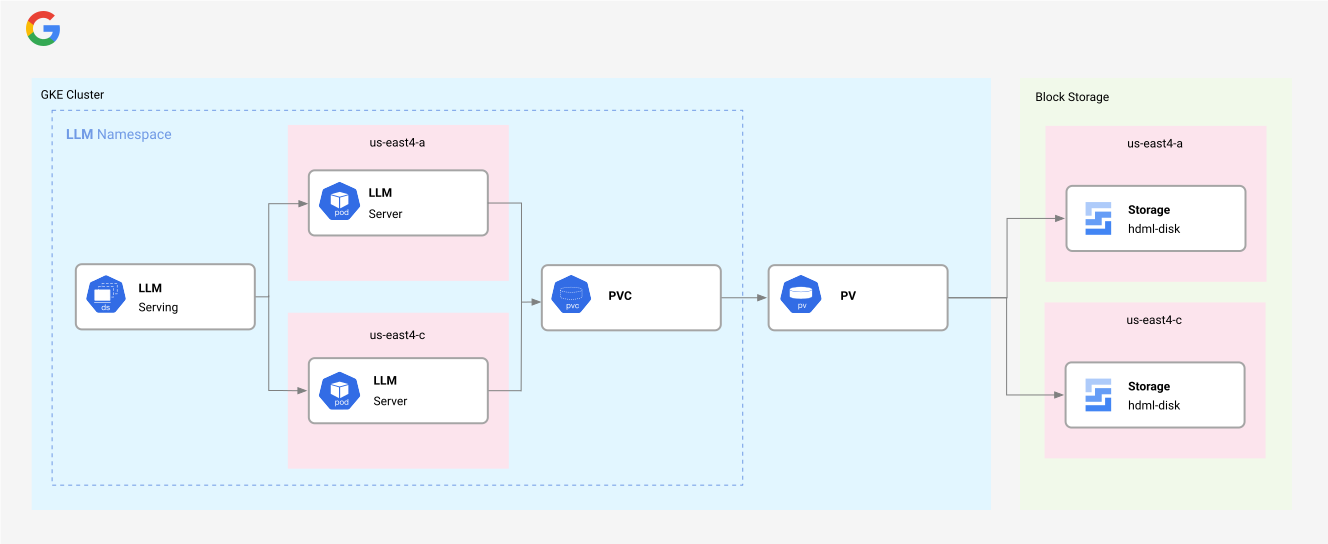
Hyperdisk ML disks are only available in a single zone. Optionally, you can
use the Hyperdisk ML multi-zone feature to dynamically
link multiple zonal disks that contain the same content in a single logical
PersistentVolumeClaim and PersistentVolume. Zonal disks referenced by the
multi-zone feature must be located in the same region. For example, if your
regional cluster is created in `us-central1`, the multi-zone disks must be located
in the same region (for example, `us-central1-a`, `us-central1-b`).
A common use case for AI/ML inference is to run Pods across zones for improved
accelerator availability and cost efficiency with
[Spot VMs](https://docs.cloud.google.com/kubernetes-engine/docs/concepts/spot-vms.md.txt). Since Hyperdisk ML is
zonal, if your inference server runs many Pods across zones, GKE
automatically clone the disks across zones to ensure your data follows your
application.
Multi-zone Hyperdisk ML volumes have the following limitations:
- Volume resize and volume snapshots operations are not supported.
- Multi-zone Hyperdisk ML volumes are only supported in read-only mode.
- When using pre-existing disks with a multi-zone Hyperdisk ML volume, GKE does not perform checks to validate that the disk content across zones are the same. If any of the disks contain diverging content, make sure your application takes potential inconsistency between zones into account.
To learn more, see
[Create a multi-zone ReadOnlyMany Hyperdisk ML volume from a VolumeSnapshot](https://docs.cloud.google.com/kubernetes-engine/docs/how-to/persistent-volumes/hyperdisk-ml.md.txt#create-from-vs).
## Before you begin
Before you start, make sure that you have performed the following tasks:
- Enable the Google Kubernetes Engine API.
[Enable Google Kubernetes Engine API](https://console.cloud.google.com/apis/enableflow?apiid=container.googleapis.com)
- To use the Google Cloud CLI for this task, [install](https://docs.cloud.google.com/sdk/docs/install) and then [initialize](https://docs.cloud.google.com/sdk/docs/initialize.md.txt) the gcloud CLI. If you previously installed the gcloud CLI, get the latest version by running the `gcloud components update` command. Earlier gcloud CLI versions might not support running the commands in this document.
> [!NOTE]
> **Note:** For existing gcloud CLI installations, make sure to set the `compute/region` [property](https://docs.cloud.google.com/sdk/docs/properties.md.txt#setting_properties). If you use primarily zonal clusters, set the `compute/zone` instead. By setting a default location, you can avoid errors in the gcloud CLI like the following: `One of [--zone, --region] must be supplied: Please specify location`. You might need to specify the location in certain commands if the location of your cluster differs from the default that you set.
- Set your default region and zone to one of the [supported values](https://docs.cloud.google.com/compute/docs/disks/hd-types/hyperdisk-ml.md.txt#supported-regions).
- Ensure your Google Cloud project has [sufficient quota](https://docs.cloud.google.com/docs/quotas/view-manage.md.txt) to create the necessary nodes in this guide. The example code for GKE cluster and Kubernetes resource creation require the following minimum quota in the region of your choice: 88 C3 CPUs, 8 NVIDIA L4 GPUs.
### Requirements
To use Hyperdisk ML volumes in GKE, your clusters must meet
the following requirements:
- Use Linux clusters running GKE version 1.30.2-gke.1394000 or later. If you use a [release channel](https://docs.cloud.google.com/kubernetes-engine/docs/concepts/release-channels.md.txt), ensure that the channel has the minimum GKE version or later that is required for this driver.
- Make sure that the [Compute Engine Persistent Disk CSI driver](https://docs.cloud.google.com/kubernetes-engine/docs/how-to/persistent-volumes/gce-pd-csi-driver.md.txt) is enabled. The Compute Engine Persistent Disk driver is enabled by default on new Autopilot and Standard clusters and cannot be disabled or edited when using Autopilot. If you need to enable the Compute Engine Persistent Disk CSI driver from your cluster, see [Enabling the Compute Engine Persistent Disk CSI Driver on an existing cluster](https://docs.cloud.google.com/kubernetes-engine/docs/how-to/persistent-volumes/gce-pd-csi-driver.md.txt#enabling_the_on_an_existing_cluster).
- If you want to [tune the readahead value](https://docs.cloud.google.com/kubernetes-engine/docs/how-to/persistent-volumes/hyperdisk-ml.md.txt#tune), use GKE version 1.29.2-gke.1217000 or later.
- If you want to use the multi-zone dynamically provisioned feature, use GKE version 1.30.2-gke.1394000 or later.
- Hyperdisk ML is only supported on certain node types and zones. To learn more, see [About Hyperdisk ML](https://docs.cloud.google.com/compute/docs/disks/hd-types/hyperdisk-ml.md.txt) in the Compute Engine documentation.
## Get access to the model
To get access to the Gemma models for deployment to
GKE, you must first sign the license consent agreement then generate a
Hugging Face access token.
### Sign the license consent agreement
You must sign the consent agreement to use Gemma. Follow these instructions:
1. Access the [model consent page](https://www.kaggle.com/models/google/gemma) on Kaggle.com.
2. Verify consent using your Hugging Face account.
3. Accept the model terms.
### Generate an access token
To access the model through Hugging Face, you'll need a [Hugging Face
token](https://huggingface.co/docs/hub/security-tokens).
Follow these steps to generate a new token if you don't have one already:
1. Click **Your Profile \> Settings \> Access Tokens**.
2. Select **New Token**.
3. Specify a Name of your choice and a Role of at least `Read`.
4. Select **Generate a token**.
5. Copy the generated token to your clipboard.
## Create a GKE cluster
You can serve LLMs on GPUs in a GKE Autopilot or
Standard cluster. We recommend that you use a Autopilot
cluster for a fully managed Kubernetes experience. To choose the
GKE mode of operation that's the best fit for your workloads,
see [Choose a GKE mode of operation](https://docs.cloud.google.com/kubernetes-engine/docs/concepts/choose-cluster-mode.md.txt).
### Autopilot
1. In Cloud Shell, run the following command:
```bash
gcloud container clusters create-auto hdml-gpu-l4 \
--project=PROJECT \
--location=CONTROL_PLANE_LOCATION \
--release-channel=rapid \
--cluster-version=1.30.2-gke.1394000
```
Replace the following values:
- PROJECT: the Google Cloud project ID.
- CONTROL_PLANE_LOCATION: the Compute Engine [region](https://docs.cloud.google.com/compute/docs/regions-zones.md.txt#available) of the control plane of your cluster. Provide a region that supports the accelerator type you want to use, for example, `us-east4` for L4 GPU.
GKE creates an Autopilot cluster with CPU and GPU
nodes as requested by the deployed workloads.
2. Configure `kubectl` to communicate with your cluster:
```bash
gcloud container clusters get-credentials hdml-gpu-l4 \
--location=CONTROL_PLANE_LOCATION
```
### Standard
1. In Cloud Shell, run the following command to create a
Standard cluster and node pools:
```bash
gcloud container clusters create hdml-gpu-l4 \
--location=CONTROL_PLANE_LOCATION \
--num-nodes=1 \
--machine-type=c3-standard-44 \
--release-channel=rapid \
--cluster-version=CLUSTER_VERSION \
--node-locations=ZONES \
--project=PROJECT
gcloud container node-pools create gpupool \
--accelerator type=nvidia-l4,count=2,gpu-driver-version=latest \
--location=CONTROL_PLANE_LOCATION \
--project=PROJECT \
--node-locations=ZONES \
--cluster=hdml-gpu-l4 \
--machine-type=g2-standard-24 \
--num-nodes=2
```
Replace the following values:
- CLUSTER_VERSION: the version of your GKE cluster (for example, 1.30.2-gke.1394000).
- CONTROL_PLANE_LOCATION: the Compute Engine [location](https://docs.cloud.google.com/compute/docs/regions-zones.md.txt#available) of the control plane of your cluster. For regional clusters, provide a region with a zone that supports the accelerator you want to use. For zonal clusters, provide a zone that supports the accelerator you want to use. To check where GPUs are available, see [GPU locations](https://docs.cloud.google.com/compute/docs/regions-zones/gpu-regions-zones.md.txt).
- ZONES: the zones in which nodes are created. You can specify as many zones as needed for your cluster. All zones must be in the same region as the cluster's control plane, specified by the `--location` flag. For zonal clusters, `--node-locations` must contain the cluster's primary zone.
- PROJECT: the Google Cloud project ID.
The cluster creation might take several minutes.
2. Configure `kubectl` to communicate with your cluster:
```bash
gcloud container clusters get-credentials hdml-gpu-l4
```
## Pre-cache data to a Persistent Disk disk image
To use Hyperdisk ML, you pre-cache data in a disk image, and create a
Hyperdisk ML volume for read access by your workload in GKE.
This approach (also called *data hydration*) ensures that your
data is available when your workload needs it.
The following steps describe how to manually copy data from a source, like Hugging Face repository, directly to a Hyperdisk ML volume by using a Kubernetes Job.
If your data is already in a Cloud Storage bucket, you can use the [Hyperdisk ML](https://docs.cloud.google.com/kubernetes-engine/docs/how-to/persistent-volumes/volume-populator-hdml.md.txt) to automate the data transfer from Cloud Storage to Hyperdisk ML. This eliminates the need for the manual Job creation steps described in the following sections.
### Create a StorageClass that supports Hyperdisk ML
1. Save the following StorageClass manifest in a file named
`hyperdisk-ml.yaml`.
```yaml
apiVersion: storage.k8s.io/v1
kind: StorageClass
metadata:
name: hyperdisk-ml
parameters:
type: hyperdisk-ml
provisioned-throughput-on-create: "2400Mi"
provisioner: pd.csi.storage.gke.io
allowVolumeExpansion: false
reclaimPolicy: Delete
volumeBindingMode: WaitForFirstConsumer
mountOptions:
- read_ahead_kb=4096
```
> [!TIP]
> **Tip:** If you want to [tune the readahead value](https://docs.cloud.google.com/kubernetes-engine/docs/how-to/persistent-volumes/hyperdisk-ml.md.txt#tune), add the `read_ahead_kb` parameter to the `mountOptions` field.
2. Create the StorageClass by running this command:
```bash
kubectl create -f hyperdisk-ml.yaml
```
### Create a ReadWriteOnce (RWO) PersistentVolumeClaim
1. Save the following PersistentVolumeClaim manifest in a file named
`producer-pvc.yaml`. You'll use the StorageClass you created earlier. This PVC
uses the `ReadWriteOnce` access mode because it is used by a Kubernetes Job
to download model data to the persistent disk, which requires write access.
The `ReadWriteMany` access mode isn't supported by Google Cloud Hyperdisk.
Make sure that your disk has sufficient capacity to store your data.
```yaml
kind: PersistentVolumeClaim
apiVersion: v1
metadata:
name: producer-pvc
spec:
storageClassName: hyperdisk-ml
accessModes:
- ReadWriteOnce
resources:
requests:
storage: 300Gi
```
2. Create the PersistentVolumeClaim by running this command:
```bash
kubectl create -f producer-pvc.yaml
```
### Create a Kubernetes Job to populate the mounted Google Cloud Hyperdisk volume
This section shows an example of creating a Kubernetes Job that provisions a
disk and downloads the Gemma 7B instruction tuned model from Hugging Face
onto the mounted Google Cloud Hyperdisk volume.
1. To access the Gemma LLM that the examples in this guide uses, create
a Kubernetes Secret that contains the Hugging Face token:
```bash
kubectl create secret generic hf-secret \
--from-literal=hf_api_token=HF_TOKEN\
--dry-run=client -o yaml | kubectl apply -f -
```
Replace HF_TOKEN with the Hugging Face token
you generated earlier.
2. Save the following example manifest as `producer-job.yaml`:
```yaml
apiVersion: batch/v1
kind: Job
metadata:
name: producer-job
spec:
template:
spec:
affinity:
# Node affinity ensures that Pods are scheduled on the nodes that support Hyperdisk ML.
nodeAffinity:
requiredDuringSchedulingIgnoredDuringExecution:
nodeSelectorTerms:
- matchExpressions:
- key: cloud.google.com/machine-family
operator: In
values:
- "c3"
# Restricts Pod scheduling to a specific zone because Hyperdisk ML disks
# are a zonal resource.
- key: topology.kubernetes.io/zone
operator: In
values:
- "ZONE"
containers:
- name: copy
resources:
requests:
cpu: "32"
limits:
cpu: "32"
# The image used to download models from Hugging Face.
image: huggingface/downloader:0.17.3
command: [ "huggingface-cli" ]
args:
- download
# The Hugging Face model to download.
- google/gemma-1.1-7b-it
# Destination directory within the container.
- --local-dir=/data/gemma-7b
- --local-dir-use-symlinks=False
env:
- name: HUGGING_FACE_HUB_TOKEN
valueFrom:
secretKeyRef:
name: hf-secret
key: hf_api_token
volumeMounts:
# Mount path for the PersistentVolume.
- mountPath: "/data"
name: volume
# Prevents Pod restarts on scheduling failures. The Job will create new Pods
# for retries, up to the specified "backoffLimit".
restartPolicy: Never
volumes:
- name: volume
persistentVolumeClaim:
# References the Hyperdisk ML PVC created earlier.
claimName: producer-pvc
# Runs only one Pod at any given time.
parallelism: 1
# After the Pod runs successfully, the Job is complete.
completions: 1
# Max retries on Pod failure.
backoffLimit: 4
```
Replace ZONE with the compute zone where you want
the Hyperdisk to be created. If you're using it with the
Deployment example, ensure it is a zone that has G2 machine capacity.
3. Create the Job by running this command:
```bash
kubectl apply -f producer-job.yaml
```
It might take a few minutes for the Job to finish copying data to the
Persistent Disk volume. When the Job completes provisioning, its status is
marked "Complete".
4. To check the progress of your Job status, run the following
command:
```bash
kubectl get job producer-job
```
5. Once the Job is complete, you can clean up the Job by running this command:
```bash
kubectl delete job producer-job
```
## Create a ReadOnlyMany Hyperdisk ML volume from a pre-existing Google Cloud Hyperdisk
This section covers the steps for creating a [ReadOnlyMany](https://kubernetes.io/docs/concepts/storage/persistent-volumes/#access-modes) (ROM) PersistentVolume and
PersistentVolumeClaim pair from a pre-existing Google Cloud Hyperdisk volume.
To learn more, see [Using pre-existing persistent disks as PersistentVolumes](https://docs.cloud.google.com/kubernetes-engine/docs/how-to/persistent-volumes/preexisting-pd.md.txt).
1. In GKE version 1.30.2-gke.1394000 and later, GKE
automatically converts the access mode of a `READ_WRITE_SINGLE`
Google Cloud Hyperdisk volume to `READ_ONLY_MANY`.
If you are using a pre-existing Google Cloud Hyperdisk volume on an earlier
version of GKE, you must modify the access mode manually
by running the following command:
```bash
gcloud compute disks update HDML_DISK_NAME \
--zone=ZONE \
--access-mode=READ_ONLY_MANY
```
Replace the following values:
- HDML_DISK_NAME: the name of your Hyperdisk ML volume.
- ZONE: the [compute zone](https://docs.cloud.google.com/compute/docs/regions-zones.md.txt#available) where the pre-existing Google Cloud Hyperdisk volume is created.
2. Create a PersistentVolume and PersistentVolumeClaim pair, referencing the
disk you previously populated.
1. Save the following manifest as `hdml-static-pv.yaml`:
```bash
apiVersion: v1
kind: PersistentVolume
metadata:
name: hdml-static-pv
spec:
storageClassName: "hyperdisk-ml"
capacity:
storage: 300Gi
# The "ReadOnlyMany" access mode allows the volume to be mounted by multiple
# nodes for read-only access.
accessModes:
- ReadOnlyMany
# ClaimRef links this PersistentVolume to a PersistentVolumeClaim.
claimRef:
namespace: default
name: hdml-static-pvc
csi:
driver: pd.csi.storage.gke.io
# The unique identifier of the Compute Engine disk resource backing
# this volume.
volumeHandle: projects/PROJECT/zones/ZONE/disks/DISK_NAME
fsType: ext4
readOnly: true
# Node affinity ensures that Pod is scheduled in a zone where the volume
# is replicated.
nodeAffinity:
required:
nodeSelectorTerms:
- matchExpressions:
- key: topology.gke.io/zone
operator: In
values:
- ZONE
---
apiVersion: v1
kind: PersistentVolumeClaim
metadata:
namespace: default
name: hdml-static-pvc
spec:
storageClassName: "hyperdisk-ml"
volumeName: hdml-static-pv
accessModes:
- ReadOnlyMany
resources:
requests:
storage: 300Gi
```
Replace the following values:
- PROJECT: the project where your GKE cluster is created.
- ZONE: the zone where the pre-existing Google Cloud Hyperdisk volume is created.
- DISK_NAME: the name of the pre-existing Google Cloud Hyperdisk volume.
2. Create the PersistentVolume and PersistentVolumeClaim resources by
running this command:
```bash
kubectl apply -f hdml-static-pv.yaml
```
## Create a multi-zone ReadOnlyMany Hyperdisk ML volume from a VolumeSnapshot
This section covers the steps for creating a multi-zone Hyperdisk ML volume
in ReadOnlyMany access mode. You use a VolumeSnapshot for a
pre-existing Persistent Disk disk image. To learn more, see [Back up Persistent Disk
storage using volume snapshots](https://docs.cloud.google.com/kubernetes-engine/docs/how-to/persistent-volumes/backup-pd-volume-snapshots#create-snapshotclass).
To create the multi-zone Hyperdisk ML volume, follow these steps:
### Create a VolumeSnapshot of your disk
1. Save the following manifest as a file called `disk-image-vsc.yaml`.
```yaml
apiVersion: snapshot.storage.k8s.io/v1
kind: VolumeSnapshotClass
metadata:
name: disk-image-vsc
driver: pd.csi.storage.gke.io
# The snapshot will be deleted when the "VolumeSnapshot" object is deleted.
deletionPolicy: Delete
parameters:
snapshot-type: images
```
2. Create the VolumeSnapshotClass by running the following command:
```bash
kubectl apply -f disk-image-vsc.yaml
```
3. Save the following manifest as a file called `my-snapshot.yaml`. You'll
reference the PersistentVolumeClaim you created earlier in
[Create a ReadWriteOnce (RWO) PersistentVolumeClaim](https://docs.cloud.google.com/kubernetes-engine/docs/how-to/persistent-volumes/hyperdisk-ml.md.txt#rwo-pvc).
```yaml
apiVersion: snapshot.storage.k8s.io/v1
kind: VolumeSnapshot
metadata:
name: my-snapshot
spec:
volumeSnapshotClassName: disk-image-vsc
source:
# The name of the PersistentVolumeClaim to snapshot.
persistentVolumeClaimName: producer-pvc
```
4. Create the VolumeSnapshot by running the following command:
```bash
kubectl apply -f my-snapshot.yaml
```
5. When the VolumeSnapshot is marked "Ready", run the following command to
create the Hyperdisk ML volume:
```bash
kubectl wait --for=jsonpath='{.status.readyToUse}'=true \
--timeout=300s volumesnapshot my-snapshot
```
### Create a multi-zone StorageClass
If you want copies of your data to be accessible in more than one zone, specify
the `enable-multi-zone-provisioning` parameter in your StorageClass, which
creates disks in the zones you specified in the `allowedTopologies` field.
To create the StorageClass, follow these steps:
1. Save the following manifest as a file called `hyperdisk-ml-multi-zone.yaml`.
```yaml
apiVersion: storage.k8s.io/v1
kind: StorageClass
metadata:
name: hyperdisk-ml-multi-zone
parameters:
type: hyperdisk-ml
provisioned-throughput-on-create: "4800Mi"
enable-multi-zone-provisioning: "true"
provisioner: pd.csi.storage.gke.io
allowVolumeExpansion: false
reclaimPolicy: Delete
volumeBindingMode: Immediate
allowedTopologies:
- matchLabelExpressions:
- key: topology.gke.io/zone
values:
- ZONE_1
- ZONE_2
mountOptions:
- read_ahead_kb=8192
```
Replace ZONE_1, ZONE_2, ...,
ZONE_N with the zones where your storage can be
accessed.
This example sets the volumeBindingMode to `Immediate`, allowing
GKE to provision the PersistentVolumeClaim prior to any
consumer referencing it.
2. Create the StorageClass by running the following command:
```bash
kubectl apply -f hyperdisk-ml-multi-zone.yaml
```
### Create a PersistentVolumeClaim that uses the multi-zone StorageClass
The next step is to create a PersistentVolumeClaim that references the
StorageClass.
GKE uses the content of the disk image specified to automatically
provision a Hyperdisk ML volume in each zone specified in your
snapshot.
To create the PersistentVolumeClaim, follow these steps:
1. Save the following manifest as a file called `hdml-consumer-pvc.yaml`.
```yaml
kind: PersistentVolumeClaim
apiVersion: v1
metadata:
name: hdml-consumer-pvc
spec:
# Specifies that the new PersistentVolumeClaim should be provisioned from the
# contents of the volume snapshot named "my-snapshot".
dataSource:
name: my-snapshot
kind: VolumeSnapshot
apiGroup: snapshot.storage.k8s.io
accessModes:
- ReadOnlyMany
storageClassName: hyperdisk-ml-multi-zone
resources:
requests:
storage: 300Gi
```
2. Create the PersistentVolumeClaim by running the following command:
```bash
kubectl apply -f hdml-consumer-pvc.yaml
```
## Create a Deployment to consume the Hyperdisk ML volume
When using Pods with PersistentVolumes, we recommend that you use a workload
controller (such as a [Deployment](https://kubernetes.io/docs/concepts/workloads/controllers/deployment/)
or [StatefulSet](https://kubernetes.io/docs/concepts/workloads/controllers/statefulset/)).
If you want to use a pre-existing PersistentVolume in ReadOnlyMany mode with a
Deployment, refer to [Use persistent disks with multiple readers](https://docs.cloud.google.com/kubernetes-engine/docs/how-to/persistent-volumes/readonlymany-disks.md.txt).
To create and test your Deployment, follow these steps:
1. Save the following example manifest as `vllm-gemma-deployment.yaml`.
```yaml
apiVersion: apps/v1
kind: Deployment
metadata:
name: vllm-gemma-deployment
spec:
replicas: 2
selector:
# Labels used to select the Pods managed by this Deployment.
matchLabels:
app: gemma-server
template:
metadata:
labels:
app: gemma-server
# Labels for AI/GKE integration.
ai.gke.io/model: gemma-7b
ai.gke.io/inference-server: vllm
spec:
affinity:
# Node affinity ensures Pods run on nodes with L4 GPUs.
nodeAffinity:
requiredDuringSchedulingIgnoredDuringExecution:
nodeSelectorTerms:
- matchExpressions:
- key: cloud.google.com/gke-accelerator
operator: In
values:
- nvidia-l4
# Pod anti-affinity prefers scheduling Pods in different zones for
# higher availability.
podAntiAffinity:
preferredDuringSchedulingIgnoredDuringExecution:
- weight: 100
podAffinityTerm:
labelSelector:
matchExpressions:
- key: app
operator: In
values:
- gemma-server
topologyKey: topology.kubernetes.io/zone
containers:
- name: inference-server
# The container image for the vLLM inference server.
image: us-docker.pkg.dev/vertex-ai/vertex-vision-model-garden-dockers/pytorch-vllm-serve:latest
resources:
requests:
cpu: "2"
memory: "25Gi"
ephemeral-storage: "25Gi"
nvidia.com/gpu: 2
limits:
cpu: "2"
memory: "25Gi"
ephemeral-storage: "25Gi"
nvidia.com/gpu: 2
# Command to run the vLLM API server.
command: ["python3", "-m", "vllm.entrypoints.api_server"]
args:
# Specifies the model to load, using an environment variable.
- --model=$(MODEL_ID)
- --tensor-parallel-size=2
env:
# Environment variable to define the model path.
- name: MODEL_ID
value: /models/gemma-7b
volumeMounts:
- mountPath: /dev/shm
name: dshm
# Mount point for the Hyperdisk ML volume containing the model.
- mountPath: /models
name: gemma-7b
volumes:
- name: dshm
emptyDir:
medium: Memory
- name: gemma-7b
# References the PersistentVolumeClaim for the Hyperdisk ML volume.
persistentVolumeClaim:
claimName: CLAIM_NAME
---
apiVersion: v1
kind: Service
metadata:
name: llm-service
spec:
# Selects Pods with the label "app: gemma-server".
selector:
app: gemma-server
# The "ClusterIP" field makes the Service reachable only within the cluster.
type: ClusterIP
ports:
- protocol: TCP
port: 8000
targetPort: 8000
```
Replace CLAIM_NAME with one of these values:
- `hdml-static-pvc`: if you are using a Hyperdisk ML volume from a existing Google Cloud Hyperdisk.
- `hdml-consumer-pvc`: if you are using a Hyperdisk ML volume from a VolumeSnapshot disk image.
2. To apply the Deployment and Service, run the following command:
```bash
kubectl apply -f vllm-gemma-deployment.yaml
```
3. Run the following command to wait for the inference server to be available:
```bash
kubectl wait --for=condition=Available --timeout=700s deployment/vllm-gemma-deployment
```
4. To test that your vLLM server is up and running, follow these steps:
1. Run the following command to set up port forwarding to the model:
```bash
kubectl port-forward service/llm-service 8000:8000
```
2. Run a `curl` command to send a request to the model:
```bash
USER_PROMPT="I'm new to coding. If you could only recommend one programming language to start with, what would it be and why?"
curl -X POST http://localhost:8000/generate \
-H "Content-Type: application/json" \
-d @- <user\n${USER_PROMPT}\n",
"temperature": 0.90,
"top_p": 1.0,
"max_tokens": 128
}
EOF
```
The following output shows an example of the model response:
{"predictions":["Prompt:\nuser\nI'm new to coding. If you could only recommend one programming language to start with, what would it be and why?\nOutput:\nPython is often recommended for beginners due to its clear, readable syntax, simple data types, and extensive libraries.\n\n**Reasons why Python is a great language for beginners:**\n\n* **Easy to read:** Python's syntax is straightforward and uses natural language conventions, making it easier for beginners to understand the code.\n* **Simple data types:** Python has basic data types like integers, strings, and lists that are easy to grasp and manipulate.\n* **Extensive libraries:** Python has a vast collection of well-documented libraries covering various tasks, allowing beginners to build projects without reinventing the wheel.\n* **Large supportive community:**"]}
## Tune the readahead value
If you have workloads that perform sequential I/O, they may benefit from tuning
the [readahead value](https://docs.cloud.google.com/compute/docs/disks/optimizing-pd-performance.md.txt#adjust_the_readahead_value).
This typically applies to inference or training workloads that need to load
AI/ML model weights into memory. Most workloads with sequential I/O typically
see a performance improvement with a readahead value of 1024 KB or higher.
### Tune the readahead value for new volumes
You can specify this option by adding `read_ahead_kb` to the `mountOptions`
field on your StorageClass. The following example
shows how you can tune the readahead value to 4096 KB. This will apply
to new dynamically provisioned PersistentVolumes created using the
`hyperdisk-ml` StorageClass.
```yaml
apiVersion: storage.k8s.io/v1
kind: StorageClass
metadata:
name: hyperdisk-ml
parameters:
type: hyperdisk-ml
provisioner: pd.csi.storage.gke.io
allowVolumeExpansion: false
reclaimPolicy: Delete
volumeBindingMode: WaitForFirstConsumer
mountOptions:
- read_ahead_kb=4096
```
> [!NOTE]
> **Note:** The StorageClass `mountOptions` are copied to the PersistentVolume when it is created. In order to apply the mount options to your existing PersistentVolume, you must either delete and re-create the PersistentVolume, or modify the `mountOptions` field of the PersistentVolume directly.
### Tune the readahead value for existing volumes
For statically provisioned volumes, or pre-existing PersistentVolumes, you can
specify this option by adding `read_ahead_kb` to the `spec.mountOptions` field.
The following example shows how you can tune the readahead value to
4096 KB.
```yaml
apiVersion: v1
kind: PersistentVolume
name: DISK_NAME
spec:
accessModes:
- ReadOnlyMany
capacity:
storage: 300Gi
csi:
driver: pd.csi.storage.gke.io
fsType: ext4
readOnly: true
# The unique identifier of the Compute Engine disk resource backing this volume.
volumeHandle: projects/PROJECT/zones/ZONE/disks/DISK_NAME
# Node affinity ensures that Pods are scheduled in the zone where the volume exists.
nodeAffinity:
required:
nodeSelectorTerms:
- matchExpressions:
- key: topology.gke.io/zone
operator: In
values:
- ZONE
storageClassName: hyperdisk-ml
mountOptions:
- read_ahead_kb=4096
```
> [!NOTE]
> **Note:** The `mountOptions` are only applied at volume mount time, after a Pod is bound to a node. In order to apply the mount options to a workload that is already running, you must delete and recreate all consumer pods.
Replace the following values:
- DISK_NAME: the name of the pre-existing Google Cloud Hyperdisk volume.
- ZONE: the zone where the pre-existing Google Cloud Hyperdisk volume is created.
## Test and benchmark your Hyperdisk ML volume performance
This section shows how you can use [Flexible I/O Tester](https://fio.readthedocs.io/en/latest/index.html) (FIO) to benchmark the performance of your Hyperdisk ML volumes for
reading pre-existing data . You can use these metrics to evaluate your
volume's performance for specific workloads and configurations.
1. Save the following example manifest as `benchmark-job.yaml`:
```yaml
apiVersion: batch/v1
kind: Job
metadata:
name: benchmark-job
spec:
template: # Template for the Pods the Job will create.
spec:
affinity:
nodeAffinity:
requiredDuringSchedulingIgnoredDuringExecution:
nodeSelectorTerms:
- matchExpressions:
- key: cloud.google.com/machine-family
operator: In
values:
- "c3"
containers:
- name: fio
resources:
requests:
cpu: "32"
image: litmuschaos/fio
args:
- fio
# Specifies the files to use for the benchmark. Multiple files can be separated by colons.
- --filename
- /models/gemma-7b/model-00001-of-00004.safetensors:/models/gemma-7b/model-00002-of-00004.safetensors:/models/gemma-7b/model-00003-of-00004.safetensors:/models/gemma-7b/model-00004-of-00004.safetensors:/models/gemma-7b/model-00004-of-00004.safetensors
# Use non-buffered I/O.
- --direct=1
# Set the I/O pattern to read.
- --rw=read
# Open files in read-only mode.
- --readonly
# Block size for I/O operations.
- --bs=4096k
# I/O engine to use.
- --ioengine=libaio
# Number of I/O units to keep in flight against each file.
- --iodepth=8
# Duration of the test in seconds.
- --runtime=60
# Number of jobs to run.
- --numjobs=1
# Name of the job.
- --name=read_benchmark
volumeMounts:
- mountPath: "/models"
name: volume
restartPolicy: Never
volumes:
- name: volume
persistentVolumeClaim:
claimName: hdml-static-pvc
parallelism: 1
completions: 1
backoffLimit: 1
```
Replace CLAIM_NAME with the name of your
PersistentVolumeClaim (for example, `hdml-static-pvc`).
2. Create the Job by running the following command:
```bash
kubectl apply -f benchmark-job.yaml.
```
3. Use `kubectl` logs to view the output of the `fio` tool:
```bash
kubectl logs benchmark-job-nrk88 -f
```
The output looks similar to the following:
read_benchmark: (g=0): rw=read, bs=4M-4M/4M-4M/4M-4M, ioengine=libaio, iodepth=8
fio-2.2.10
Starting 1 process
read_benchmark: (groupid=0, jobs=1): err= 0: pid=32: Fri Jul 12 21:29:32 2024
read : io=18300MB, bw=2407.3MB/s, iops=601, runt= 7602msec
slat (usec): min=86, max=1614, avg=111.17, stdev=64.46
clat (msec): min=2, max=33, avg=13.17, stdev= 1.08
lat (msec): min=2, max=33, avg=13.28, stdev= 1.06
clat percentiles (usec):
| 1.00th=[11072], 5.00th=[12352], 10.00th=[12608], 20.00th=[12736],
| 30.00th=[12992], 40.00th=[13120], 50.00th=[13248], 60.00th=[13376],
| 70.00th=[13504], 80.00th=[13632], 90.00th=[13888], 95.00th=[14016],
| 99.00th=[14400], 99.50th=[15296], 99.90th=[22144], 99.95th=[25728],
| 99.99th=[33024]
bw (MB /s): min= 2395, max= 2514, per=100.00%, avg=2409.79, stdev=29.34
lat (msec) : 4=0.39%, 10=0.31%, 20=99.15%, 50=0.15%
cpu : usr=0.28%, sys=8.08%, ctx=4555, majf=0, minf=8203
IO depths : 1=0.1%, 2=0.1%, 4=0.1%, 8=99.8%, 16=0.0%, 32=0.0%, >=64=0.0%
submit : 0=0.0%, 4=100.0%, 8=0.0%, 16=0.0%, 32=0.0%, 64=0.0%, >=64=0.0%
complete : 0=0.0%, 4=100.0%, 8=0.1%, 16=0.0%, 32=0.0%, 64=0.0%, >=64=0.0%
issued : total=r=4575/w=0/d=0, short=r=0/w=0/d=0, drop=r=0/w=0/d=0
latency : target=0, window=0, percentile=100.00%, depth=8
Run status group 0 (all jobs):
READ: io=18300MB, aggrb=2407.3MB/s, minb=2407.3MB/s, maxb=2407.3MB/s, mint=7602msec, maxt=7602msec
Disk stats (read/write):
nvme0n2: ios=71239/0, merge=0/0, ticks=868737/0, in_queue=868737, util=98.72%
## Monitor throughput or IOPS on a Hyperdisk ML volume
To monitor the provisioned performance of your Hyperdisk ML volume, see
[Analyze provisioned IOPS and throughput](https://docs.cloud.google.com/compute/docs/disks/analyze-iops-hyperdisk.md.txt)
in the Compute Engine documentation.
To update the provisioned throughput or IOPS of an existing Hyperdisk ML
volume, or to learn about additional Google Cloud Hyperdisk parameters you can
specify in your StorageClass, refer to [Scale your storage performance using Google Cloud Hyperdisk](https://docs.cloud.google.com/kubernetes-engine/docs/how-to/persistent-volumes/hyperdisk.md.txt).
## Troubleshooting
This section provides troubleshooting guidance to resolve issues with
Hyperdisk ML volumes on GKE.
### The disk access mode cannot be updated
The following error occurs when a Hyperdisk ML volume is already being used
by and attached by a node in [ReadWriteOnce access mode](https://kubernetes.io/docs/concepts/storage/persistent-volumes/#access-modes).
AttachVolume.Attach failed for volume ... Failed to update access mode:
failed to set access mode for zonal volume ...
'Access mode cannot be updated when the disk is attached to instance(s).'., invalidResourceUsage
GKE automatically updates the Hyperdisk ML volume's accessMode
from `READ_WRITE_SINGLE` to `READ_ONLY_MANY`, when it is used by a
ReadOnlyMany access mode PersistentVolume. This update is done when the disk is
attached to a new node.
To resolve this issue, delete all Pods that are referencing the disk using a
PersistentVolume in ReadWriteOnce mode. Wait for the disk to be detached, and
then re-create the workload that consumes the PersistentVolume in ReadOnlyMany mode.
### The disk cannot be attached with `READ_WRITE` mode
The following error indicates that GKE attempted to attach a
Hyperdisk ML volume in `READ_ONLY_MANY` access mode to a GKE
node using [ReadWriteOnce access mode](https://kubernetes.io/docs/concepts/storage/persistent-volumes/#access-modes).
AttachVolume.Attach failed for volume ...
Failed to Attach: failed cloud service attach disk call ...
The disk cannot be attached with READ_WRITE mode., badRequest
GKE automatically updates the Hyperdisk ML volume's
accessMode from `READ_WRITE_SINGLE` to `READ_ONLY_MANY`, when it is used by a
ReadOnlyMany access mode PersistentVolume. However, GKE won't
automatically update the access mode from `READ_ONLY_MANY` to
`READ_WRITE_SINGLE`. This is a safety mechanism to help ensure that
[multi-zone](https://docs.cloud.google.com/kubernetes-engine/docs/how-to/persistent-volumes/hyperdisk-ml.md.txt#multi-zone) disks are not written to by accident, as this could
result in diverging content between multi-zone disks.
To resolve this issue, we recommend that you follow the
[Pre-cache data to a Persistent Disk disk image](https://docs.cloud.google.com/kubernetes-engine/docs/how-to/persistent-volumes/hyperdisk-ml.md.txt#pre-cache-data) workflow if
you need updated content. If you need more control over the
Hyperdisk ML volume's access mode and other settings, see
[Set the access mode of a Hyperdisk volume](https://docs.cloud.google.com/compute/docs/disks/modify-persistent-disk.md.txt#change_access_mode).
### Quota exceeded - Insufficient throughput quota
The following error indicates that there was insufficient Hyperdisk ML
throughput quota at the time of disk provisioning.
failed to provision volume with StorageClass ... failed (QUOTA_EXCEEDED): Quota 'HDML_TOTAL_THROUGHPUT' exceeded
To resolve this issue, see [Disk Quotas](https://docs.cloud.google.com/compute/resource-usage.md.txt#disk_quota) to
learn more about Hyperdisk quota and how to increase the disk
quota in your project.
For additional troubleshooting guidance, refer to
[Scale your storage performance with Google Cloud Hyperdisk](https://docs.cloud.google.com/kubernetes-engine/docs/how-to/persistent-volumes/hyperdisk.md.txt#troubleshooting).
## What's next
- [Learn how to automate data transfer from Cloud Storage to a Hyperdisk volume using GKE Volume Populator](https://docs.cloud.google.com/kubernetes-engine/docs/how-to/persistent-volumes/volume-populator-hdml.md.txt).
- [Learn how to migrate Persistent Disk volumes to Hyperdisk](https://docs.cloud.google.com/compute/docs/disks/migrate-to-hyperdisk.md.txt#gcloud).
- [Read more about the Persistent Disk CSI driver on GitHub](https://github.com/kubernetes-sigs/gcp-compute-persistent-disk-csi-driver).