This document describes how to use NodeLocal DNSCache to reduce DNS lookup latency
and improve your application's performance in your Google Kubernetes Engine (GKE)
cluster.
NodeLocal DNSCache is a GKE add-on that improves DNS performance by
running a DNS cache directly on each cluster node as a DaemonSet. When your Pods
make a DNS request, the request first goes to the local cache on the same node.
Handling requests locally significantly reduces average DNS lookup times and
decreases the load on your cluster's central DNS provider, such as kube-dns or
[Cloud DNS for GKE](https://docs.cloud.google.com/kubernetes-engine/docs/how-to/cloud-dns.md.txt).
For a detailed explanation of DNS architecture and the benefits of
NodeLocal DNSCache, see [About service
discovery](https://docs.cloud.google.com/kubernetes-engine/docs/concepts/service-discovery).
In GKE Autopilot clusters, NodeLocal DNSCache is enabled
by default, and you can't disable it. In GKE Standard
clusters running version 1.34.1-gke.3720000 and later, NodeLocal DNSCache is enabled by
default, but you can disable it.
This document is for GKE users, including
Developers and Admins and architects. To learn more about common
roles and example tasks in Google Cloud, see [Common
GKE user roles and
tasks](https://docs.cloud.google.com/kubernetes-engine/enterprise/docs/concepts/roles-tasks).
This document assumes you are familiar with the following:
- [Kubernetes
Service](https://kubernetes.io/docs/concepts/services-networking/service/).
- [Multi-cluster
Services](https://docs.cloud.google.com/kubernetes-engine/docs/how-to/multi-cluster-services).
- [About service
discovery](https://docs.cloud.google.com/kubernetes-engine/docs/concepts/about-service-discovery).
- [About Cloud DNS](https://docs.cloud.google.com/kubernetes-engine/docs/concepts/about-cloud-dns.md.txt).
## Architecture
NodeLocal DNSCache is a GKE add-on that you can run in addition to
[`kube-dns`](https://docs.cloud.google.com/kubernetes-engine/docs/concepts/service-discovery.md.txt).
GKE implements NodeLocal DNSCache as a
[DaemonSet](https://kubernetes.io/docs/concepts/workloads/controllers/daemonset/)
that runs a DNS cache on each node in your cluster.
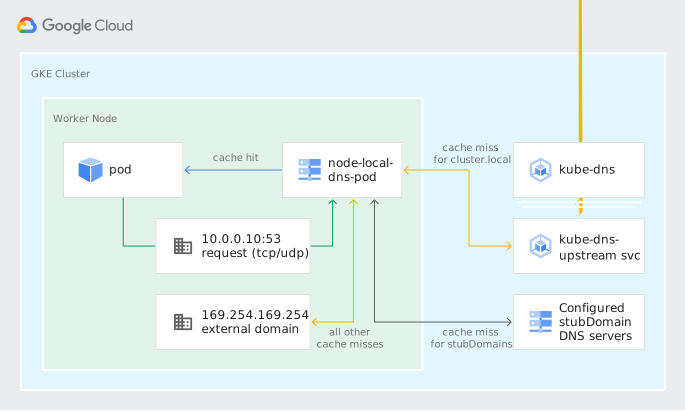
When a Pod makes a DNS request, the request goes to the DNS cache that runs on
the same node as the Pod. If the cache can't resolve the DNS request, the cache
forwards the request to one of the following places, based on the query
destination and the configured DNS provider:
- **kube-dns** : all queries for the cluster DNS domain (`cluster.local`) are forwarded to `kube-dns`. The node-local-dns Pods use the `kube-dns-upstream` Service to access `kube-dns` Pods.
- **Custom stub domains or upstream name servers**: queries are forwarded directly from NodeLocal DNSCache Pods.
- **Cloud DNS** : all other queries are forwarded to the [local metadata
server](https://docs.cloud.google.com/compute/docs/metadata/overview) that runs on the same node where the query originated. The local metadata server accesses Cloud DNS.
When you enable NodeLocal DNSCache in an existing cluster, GKE
re-creates all cluster nodes that run GKE version 1.15 and later
according to the [node upgrade
process](https://docs.cloud.google.com/kubernetes-engine/docs/how-to/upgrading-a-cluster#upgrading-nodes).
After GKE re-creates the nodes, GKE automatically
adds the `addon.gke.io/node-local-dns-ds-ready=true` label to the nodes. You
must not add this label to the cluster nodes manually.
### Benefits of NodeLocal DNSCache
NodeLocal DNSCache provides the following benefits:
- Reduced average DNS lookup time
- Connections from Pods to their local cache don't create [conntrack](https://www.usenix.org/system/files/login/articles/892-neira.pdf) table entries. This behavior prevents dropped and rejected connections that are caused by conntrack table exhaustion and race conditions.
- You can use NodeLocal DNSCache with [Cloud DNS for
GKE](https://docs.cloud.google.com/kubernetes-engine/docs/how-to/cloud-dns).
- DNS queries for external URLs (URLs that don't refer to cluster resources) are forwarded directly to the [local metadata
server](https://docs.cloud.google.com/compute/docs/metadata/overview) and bypass `kube-dns`.
- The local DNS caches automatically pick up stub domains and upstream name servers that are specified in the [Adding custom resolvers for stub
domains](https://docs.cloud.google.com/kubernetes-engine/docs/concepts/kube-dns#customize-kube-dns) section.
### Requirements and limitations
- NodeLocal DNSCache consumes compute resources on each node of your cluster.
- NodeLocal DNSCache is not supported with Windows Server node pools.
- NodeLocal DNSCache requires GKE version 1.15 or later.
- NodeLocal DNSCache accesses `kube-dns` Pods by using TCP.
- NodeLocal DNSCache accesses `upstreamServers` and `stubDomains` by using TCP and UDP on GKE versions 1.18 or later. The DNS server must be reachable by using TCP and UDP.
- DNS records are cached for the following periods:
- The record's time to live (TTL), or 30 seconds if the TTL is more than 30 seconds.
- 5 seconds if the DNS response is `NXDOMAIN`.
- NodeLocal DNSCache Pods listen on port 53, 9253, 9353, and 8080 on the nodes. If you run any other `hostNetwork` Pod or configure a `hostPorts` with those ports, NodeLocal DNSCache fails and DNS errors occur. NodeLocal DNSCache Pods don't use `hostNetwork` mode when they use [GKE Dataplane V2](https://docs.cloud.google.com/kubernetes-engine/docs/concepts/dataplane-v2.md.txt) and don't use [Cloud DNS for
GKE](https://docs.cloud.google.com/kubernetes-engine/docs/how-to/cloud-dns).
- The local DNS cache runs only on node pools that run GKE versions 1.15 and later. If you enable NodeLocal DNSCache in a cluster with nodes that run earlier versions, Pods on those nodes use `kube-dns`.
## Before you begin
Before you start, make sure that you have performed the following tasks:
- Enable the Google Kubernetes Engine API.
[Enable Google Kubernetes Engine API](https://console.cloud.google.com/apis/enableflow?apiid=container.googleapis.com)
- To use the Google Cloud CLI for this task, [install](https://docs.cloud.google.com/sdk/docs/install) and then [initialize](https://docs.cloud.google.com/sdk/docs/initialize.md.txt) the gcloud CLI. If you previously installed the gcloud CLI, get the latest version by running the `gcloud components update` command. Earlier gcloud CLI versions might not support running the commands in this document.
> [!NOTE]
> **Note:** For existing gcloud CLI installations, make sure to set the `compute/region` [property](https://docs.cloud.google.com/sdk/docs/properties.md.txt#setting_properties). If you use primarily zonal clusters, set the `compute/zone` instead. By setting a default location, you can avoid errors in the gcloud CLI like the following: `One of [--zone, --region] must be supplied: Please specify location`. You might need to specify the location in certain commands if the location of your cluster differs from the default that you set.
- Ensure that you have an existing Autopilot or Standard cluster. If you need one, [create an Autopilot
cluster](https://docs.cloud.google.com/kubernetes-engine/docs/how-to/creating-an-autopilot-cluster). For Autopilot clusters, NodeLocal DNSCache is enabled by default and can't be overridden.
## Enable NodeLocal DNSCache
For Standard clusters, NodeLocal DNSCache is enabled by default from
version 1.34.1-gke.3720000 and later. If your cluster is on a version earlier
than 1.34.1-gke.3720000, you can use the Google Cloud CLI to enable
NodeLocal DNSCache in both new or existing clusters. You can also use the
Google Cloud console to enable NodeLocal DNSCache only in new clusters.
### gcloud
To enable NodeLocal DNSCache in an existing cluster, use the `--update-addons`
flag with the `NodeLocalDNS=ENABLED` argument:
```bash
gcloud container clusters update CLUSTER_NAME \
--location=COMPUTE_LOCATION \
--update-addons=NodeLocalDNS=ENABLED
```
Replace the following:
- `CLUSTER_NAME`: the name of your cluster.
- `COMPUTE_LOCATION`: the [Compute Engine location](https://docs.cloud.google.com/compute/docs/regions-zones/viewing-regions-zones.md.txt) for the cluster.
### Console
To enable NodeLocal DNSCache in a new cluster, use the following steps:
1. Go to the **Google Kubernetes Engine** page in the Google Cloud console.
[Go to Kubernetes clusters](https://console.cloud.google.com/kubernetes/list)
2. Click the name of the cluster you want to modify.
3. Under **Networking** , in the **DNS provider** field, click
**Edit DNS provider**.
4. Select the **Enable NodeLocal DNSCache** checkbox.
5. Click **Save changes**.
This change requires recreating the nodes, which can cause disruption to your
running workloads. For details about this specific change, find the
corresponding row in the [manual changes that recreate the nodes using a node
upgrade strategy and respecting maintenance
policies](https://docs.cloud.google.com/kubernetes-engine/docs/concepts/managing-clusters#manual-changes-respecting-policies)
table. To learn more about node updates, see [Planning for node update
disruptions](https://docs.cloud.google.com/kubernetes-engine/docs/concepts/managing-clusters#plan-node-disruption).
> [!IMPORTANT]
> **Important:** GKE respects maintenance policies when recreating the nodes for this change using the node upgrade strategy, and depends on [resource
> availability](https://docs.cloud.google.com/kubernetes-engine/docs/how-to/node-upgrades-quota). Disabling node auto-upgrades [doesn't prevent this
> change](https://docs.cloud.google.com/kubernetes-engine/docs/how-to/node-auto-upgrades#disable-only-versions). To manually apply the changes to the nodes, use the gcloud CLI to call the [`gcloud container clusters
> upgrade`](https://docs.cloud.google.com/sdk/gcloud/reference/container/clusters/upgrade) command, passing the `--cluster-version` flag with the same GKE version that the node pool is already running.
## Verify that NodeLocal DNSCache is enabled
You can verify that NodeLocal DNSCache is running by listing the `node-local-dns`
Pods:
```bash
kubectl get pods -n kube-system -o wide | grep node-local-dns
```
The output is similar to the following:
node-local-dns-869mt 1/1 Running 0 6m24s 10.128.0.35 gke-test-pool-69efb6b8-5d7m
node-local-dns-htx4w 1/1 Running 0 6m24s 10.128.0.36 gke-test-pool-69efb6b8-wssk
node-local-dns-v5njk 1/1 Running 0 6m24s 10.128.0.33 gke-test-pool-69efb6b8-bhz3
The output shows a `node-local-dns` Pod for each node that runs
GKE version 1.15 or later.
## Disable NodeLocal DNSCache
For GKE Autopilot clusters, NodeLocal DNSCache is enabled
by default and cannot be disabled.
### Disable NodeLocal DNSCache in a new cluster
You can disable NodeLocal DNSCache when you create a new GKE
Standard cluster on version 1.34.1-gke.3720000 or later by running the following
command:
```bash
gcloud container clusters create CLUSTER_NAME \
--location=COMPUTE_LOCATION \
--addons=NodeLocalDNS=DISABLED
```
Replace the following:
- `CLUSTER_NAME`: the name of your new cluster.
- `COMPUTE_LOCATION`: the [Compute Engine location](https://docs.cloud.google.com/compute/docs/regions-zones/viewing-regions-zones.md.txt) for the cluster.
### Disable NodeLocal DNSCache in an existing cluster
You can disable NodeLocal DNSCache on your existing GKE cluster by
running the following command:
```bash
gcloud container clusters update CLUSTER_NAME \
--location=COMPUTE_LOCATION \
--update-addons=NodeLocalDNS=DISABLED
```
Replace the following:
- `CLUSTER_NAME`: the name of the cluster to disable.
- `COMPUTE_LOCATION`: the [Compute Engine location](https://docs.cloud.google.com/compute/docs/regions-zones/viewing-regions-zones.md.txt) for the cluster.
This change requires recreating the nodes, which can cause disruption to your
running workloads. For details about this specific change, find the
corresponding row in the [manual changes that recreate the nodes using a node
upgrade strategy and respecting maintenance
policies](https://docs.cloud.google.com/kubernetes-engine/docs/concepts/managing-clusters#manual-changes-respecting-policies)
table. To learn more about node updates, see [Planning for node update
disruptions](https://docs.cloud.google.com/kubernetes-engine/docs/concepts/managing-clusters#plan-node-disruption).
> [!IMPORTANT]
> **Important:** GKE respects maintenance policies when recreating the nodes for this change using the node upgrade strategy, and depends on [resource
> availability](https://docs.cloud.google.com/kubernetes-engine/docs/how-to/node-upgrades-quota). Disabling node auto-upgrades [doesn't prevent this
> change](https://docs.cloud.google.com/kubernetes-engine/docs/how-to/node-auto-upgrades#disable-only-versions). To manually apply the changes to the nodes, use the gcloud CLI to call the [`gcloud container clusters
> upgrade`](https://docs.cloud.google.com/sdk/gcloud/reference/container/clusters/upgrade) command, passing the `--cluster-version` flag with the same GKE version that the node pool is already running.
## Troubleshoot NodeLocal DNSCache
For general information about diagnosing Kubernetes DNS issues, see
[Debugging DNS Resolution](https://kubernetes.io/docs/tasks/administer-cluster/dns-debugging-resolution/).
### NodeLocal DNSCache is not enabled immediately
When you enable NodeLocal DNSCache in an existing cluster, GKE
might not update the nodes immediately if the cluster has a configured
[maintenance window or exclusion](https://docs.cloud.google.com/kubernetes-engine/docs/concepts/maintenance-windows-and-exclusions.md.txt). For more information, see
[caveats for node re-creation and maintenance windows](https://docs.cloud.google.com/kubernetes-engine/docs/concepts/maintenance-windows-and-exclusions.md.txt#node-recreation-maintenance-windows).
If you prefer not to wait, you can manually apply the changes to the nodes by
calling the [`gcloud container clusters upgrade`](https://docs.cloud.google.com/sdk/gcloud/reference/container/clusters/upgrade.md.txt)
command and passing the `--cluster-version` flag with the same
GKE version that the node pool is already running. You must use
the Google Cloud CLI for this workaround.
### NodeLocal DNSCache with Cloud DNS
If you use NodeLocal DNSCache with
[Cloud DNS](https://docs.cloud.google.com/kubernetes-engine/docs/how-to/cloud-dns.md.txt), the cluster
uses the name server IP address `169.254.20.10`, as shown in the following
diagram:
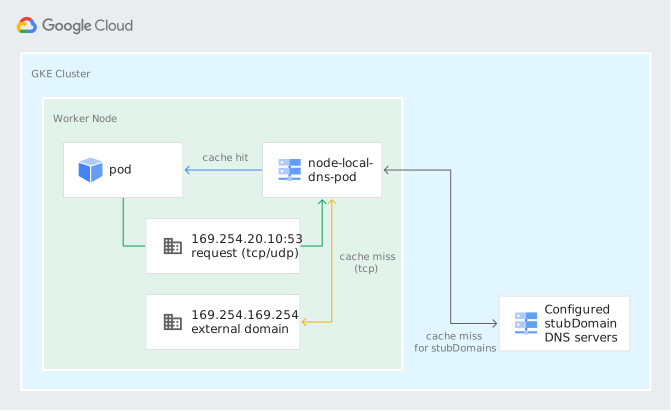
As a result, the IP address of the `kube-dns` Service might be different from
the name server IP address that your Pods use. This difference in IP addresses
is expected, because the `169.254.20.10` name server IP address is required
for Cloud DNS to work correctly.
To check the IP addresses, run the following commands:
1. View the IP address of the `kube-dns` Service:
```bash
kubectl get svc -n kube-system kube-dns -o jsonpath="{.spec.clusterIP}"
```
The output is the IP address of `kube-dns`, such as `10.0.0.10`
2. Open a shell session in your Pod:
```bash
kubectl exec -it POD_NAME -- /bin/bash
```
3. In the Pod shell session, read the contents of the `/etc/resolv.conf` file:
```bash
cat /etc/resolv.conf
```
The output is `169.254.20.10`
### Network policy with NodeLocal DNSCache
If you use [network policy](https://docs.cloud.google.com/kubernetes-engine/docs/how-to/network-policy.md.txt)
with NodeLocal DNSCache and you are not using
[Cloud DNS](https://docs.cloud.google.com/kubernetes-engine/docs/how-to/cloud-dns.md.txt) or
[GKE Dataplane V2](https://docs.cloud.google.com/kubernetes-engine/docs/concepts/dataplane-v2.md.txt),
you must configure rules to permit your workloads and the `node-local-dns`
Pods to send DNS queries.
Use an `ipBlock` rule in your manifest to allow communication between
your Pods and `kube-dns`.
The following manifest describes a network policy that uses an `ipBlock` rule:
```yaml
spec:
egress:
- ports:
- port: 53
protocol: TCP
- port: 53
protocol: UDP
to:
- ipBlock:
cidr: KUBE_DNS_SVC_CLUSTER_IP/32
podSelector: {}
policyTypes:
- Egress
```
Replace `KUBE_DNS_SVC_CLUSTER_IP` with the IP address of the
`kube-dns` service. You can get the IP address of the `kube-dns` service by using the
following command:
```bash
kubectl get svc -n kube-system kube-dns -o jsonpath="{.spec.clusterIP}"
```
## Known issues
This section lists known issues with NodeLocal DNSCache.
### DNS timeout in ClusterFirstWithHostNet dnsPolicy when using NodeLocal DNSCache and GKE Dataplane V2
On clusters that use GKE Dataplane V2 and NodeLocal DNSCache, Pods with the
`hostNetwork` field set to `true` and the `dnsPolicy` field set to
`ClusterFirstWithHostNet` cannot reach cluster DNS backends. DNS logs might
contain entries similar to the following:
dnslookup: write to 'a.b.c.d': Operation not permitted
;; connection timed out; no servers could be reached
The output indicates that the DNS requests cannot reach the backend servers.
A workaround is to set the `dnsPolicy` and `dnsConfig` fields for `hostNetwork` Pods:
```yaml
spec:
dnsPolicy: "None"
dnsConfig:
nameservers:
- KUBE_DNS_UPSTREAM
searches:
- NAMESPACE.svc.cluster.local
- svc.cluster.local
- cluster.local
- c.PROJECT_ID.internal
- google.internal
options:
- name: ndots
value: "5"
```
Replace the following:
- `NAMESPACE`: the namespace of the `hostNetwork` pod.
- `PROJECT_ID`: the ID of your Google Cloud project.
- `KUBE_DNS_UPSTREAM`: the `ClusterIP` of the upstream
`kube-dns` service. You can get this value by using the following command:
```bash
kubectl get svc -n kube-system kube-dns-upstream -o jsonpath="{.spec.clusterIP}"
```
DNS requests from the Pod can now reach `kube-dns` and bypass NodeLocal DNSCache.
### NodeLocal DNSCache timeout errors
On clusters that have NodeLocal DNSCache enabled, the logs might contain entries
similar to the following:
[ERROR] plugin/errors: 2 A: read tcp ->:53: i/o timeout
> [!NOTE]
> **Note:** If the output contains `169.254.169.254:53 i/o timeout`, the timeouts are coming from the metadata server, and the following workarounds don't apply.
The output includes the IP address of the `kube-dns-upstream` Cluster IP
Service. In this example, the response to a DNS request was not received from
`kube-dns` in two seconds. This issue could be due to one of the following
reasons:
- An underlying network connectivity problem.
- Significantly increased DNS queries from the workload or from node pool upscaling.
As a result, the existing `kube-dns` Pods can't handle all requests in time. The
workaround is to increase the number of `kube-dns` replicas by [scaling up
kube-dns](https://docs.cloud.google.com/kubernetes-engine/docs/how-to/nodelocal-dns-cache#scaling-up-kube-dns).
### Scaling up `kube-dns`
You can use a lower value for the `nodesPerReplica` field to help ensure that
more `kube-dns` Pods are created while cluster nodes scale up. We highly
recommend setting an explicit `max` value to help ensure that the
GKE control plane virtual machine (VM) is not overwhelmed by the
large number of `kube-dns` Pods watching the Kubernetes API.
You can set the `max` field to the number of nodes in the cluster. If the
cluster has more than 500 nodes, set the `max` field to `500`.
> [!NOTE]
> **Note:** Setting the `max` field to `500` does not create 500 replicas. Instead, it helps ensure that `kube-dns` replicas don't scale up beyond the value of the `max` setting. In most cases, you should set the `max` field to a value much lower than 500.
For Standard clusters, you can modify the number of `kube-dns` replicas
by editing the `kube-dns-autoscaler` ConfigMap. This configuration is not
supported in Autopilot clusters.
```bash
kubectl edit configmap kube-dns-autoscaler --namespace=kube-system
```
The output is similar to the following:
linear: '{"coresPerReplica":256, "nodesPerReplica":16,"preventSinglePointFailure":true}'
The number of `kube-dns` replicas is calculated using the following formula:
`replicas = max(ceil(cores * 1/coresPerReplica), ceil(nodes *
1/nodesPerReplica))`
If you define the `min` and `max` fields in the ConfigMap, the replicas are
bounded by these values. To scale up, change the value of the `nodesPerReplica`
field to a smaller value and include a value for the `max` field:
linear: '{"coresPerReplica":256, "nodesPerReplica":8,"max": 15,"preventSinglePointFailure":true}'
The configuration creates one `kube-dns` Pod for every eight nodes in the
cluster. A 24-node cluster has three replicas, and a 40-node cluster has five
replicas. If the cluster grows beyond 120 nodes, the number of `kube-dns`
replicas does not grow beyond 15, which is the `max` value.
To help ensure a baseline level of DNS availability in your cluster, set a
minimum replica count for `kube-dns`.
The output for the `kube-dns-autoscaler` ConfigMap that has a defined `min`
field would be similar to the following:
linear: '{"coresPerReplica":256, "nodesPerReplica":8,"max": 15,"min": 5,"preventSinglePointFailure":true}'
## What's next
- [Read an overview](https://docs.cloud.google.com/kubernetes-engine/docs/concepts/about-service-discovery.md.txt) of how GKE provides managed DNS.
- Read [DNS for Services and
Pods](https://kubernetes.io/docs/concepts/services-networking/dns-pod-service/) for a general overview of how DNS is used in Kubernetes clusters.
- Learn how to use [Cloud DNS for
GKE](https://docs.cloud.google.com/kubernetes-engine/docs/how-to/cloud-dns).