- [Latest](https://docs.cloud.google.com/kubernetes-engine/docs/how-to/latest/network-isolation.md.txt)
- [Version 1.28 and earlier](https://docs.cloud.google.com/kubernetes-engine/docs/how-to/legacy/network-isolation.md.txt)
This page explains how to create a private Google Kubernetes Engine (GKE) cluster,
which is a type of VPC-native cluster. In a private cluster,
nodes only have [internal IP addresses](https://docs.cloud.google.com/vpc/docs/ip-addresses.md.txt), which means
that nodes and Pods are isolated from the internet by default. You may choose to
have no client access, limited access, or unrestricted access to the control
plane.
> [!NOTE]
> **Note:** We recommend that you create your cluster in version 1.29 and later for customizable and simplified access to the control plane and cluster network. To learn more see, [Customize your network isolation in GKE](https://docs.cloud.google.com/kubernetes-engine/docs/how-to/latest/network-isolation.md.txt).
## Restrictions and limitations
Private clusters must be
[VPC-native
clusters](https://docs.cloud.google.com/kubernetes-engine/docs/how-to/alias-ips). VPC-native
clusters don't support [legacy networks](https://docs.cloud.google.com/vpc/docs/legacy.md.txt).
**Node pool-level Pod secondary ranges** : when creating a GKE
cluster, if you specify a Pod secondary range smaller than `/24` per node pool
using the UI, you might encounter the following error:
Getting Pod secondary range 'pod' must have a CIDR block larger or equal to /24
GKE does not support specifying a range smaller than `/24` at the
node pool level. However, specifying a smaller range at the cluster level is
supported. This can be done by using Google Cloud CLI with the
`--cluster-ipv4-cidr` argument. For more information, see [Creating a cluster
with a specific CIDR
range](https://docs.cloud.google.com/kubernetes-engine/docs/how-to/alias-ips#cluster_sizing).
Expand the following sections to view the rules around IP address ranges and
traffic when creating a cluster.
#### Control plane
- When you use `172.17.0.0/16` for your control plane IP range, you cannot use this range for nodes, Pods, or Services IP addresses.
- The size of the RFC 1918 block for the cluster control plane must be `/28`.
- You can add up to 100 authorized networks, including both external and internal IP addresses, in a project with the `master-authorized-networks` flag that this page explains.
- While GKE can detect overlap with the control plane address block, it cannot detect overlap within a [Shared VPC](https://docs.cloud.google.com/vpc/docs/shared-vpc.md.txt) network.
#### Cluster networking
- Internal IP addresses for nodes come from the primary IP address range of the subnet you choose for the cluster. Pod IP addresses and Service IP addresses come from two subnet secondary IP address ranges of that same subnet. For more information, see [IP ranges
for VPC-native clusters](https://docs.cloud.google.com/kubernetes-engine/docs/concepts/alias-ips#cluster_sizing).
- GKE supports any internal IP address ranges, including private ranges (RFC 1918 and other private ranges) and privately used external IP address ranges. See the VPC documentation for a list of [valid internal IP address
ranges](https://docs.cloud.google.com/vpc/docs/subnets#valid-ranges).
- If you [expand the primary
IP range of a subnet](https://docs.cloud.google.com/vpc/docs/create-modify-vpc-networks#expand-subnet) to accommodate additional nodes, then you must add the expanded subnet's primary IP address range to the list of authorized networks for your cluster. If you don't, ingress-allow firewall rules relevant to the control plane aren't updated, and new nodes created in the expanded IP address space won't be able to register with the control plane. This can lead to an outage where new nodes are continuously deleted and replaced. Such an outage can happen when performing node pool upgrades or when nodes are automatically replaced due to liveness probe failures.
- All nodes in a private cluster are created without an external IP; they have limited access to Google Cloud APIs and services. To provide outbound internet access for your private nodes, you can use [Cloud NAT](https://docs.cloud.google.com/nat/docs/overview.md.txt#NATwithGKE).
- [Private Google Access](https://docs.cloud.google.com/vpc/docs/private-google-access.md.txt) is enabled automatically when you create a cluster unless you are using Shared VPC. You must not disable Private Google Access unless you are using NAT to access the internet.
## Before you begin
Before you start, make sure that you have performed the following tasks:
- Enable the Google Kubernetes Engine API.
[Enable Google Kubernetes Engine API](https://console.cloud.google.com/apis/enableflow?apiid=container.googleapis.com)
- To use the Google Cloud CLI for this task, [install](https://docs.cloud.google.com/sdk/docs/install) and then [initialize](https://docs.cloud.google.com/sdk/docs/initialize.md.txt) the gcloud CLI. If you previously installed the gcloud CLI, get the latest version by running the `gcloud components update` command. Earlier gcloud CLI versions might not support running the commands in this document.
> [!NOTE]
> **Note:** For existing gcloud CLI installations, make sure to set the `compute/region` [property](https://docs.cloud.google.com/sdk/docs/properties.md.txt#setting_properties). If you use primarily zonal clusters, set the `compute/zone` instead. By setting a default location, you can avoid errors in the gcloud CLI like the following: `One of [--zone, --region] must be supplied: Please specify location`. You might need to specify the location in certain commands if the location of your cluster differs from the default that you set.
- Ensure you have the correct permission to create clusters. At minimum, you
should be a [Kubernetes Engine Cluster Admin](https://docs.cloud.google.com/iam/docs/roles-permissions/container.md.txt).
- Ensure you have a route to the Default Internet Gateway.
## Creating a private cluster with no client access to the public endpoint
In this section, you create the following resources:
- A private cluster named `private-cluster-0` that has private nodes, and that has no client access to the public endpoint.
- A network named `my-net-0`.
- A subnet named `my-subnet-0`.
> [!IMPORTANT]
> **Important:** Even if you disable access to the public endpoint, GKE can use the control plane's public endpoint for cluster management purposes, such as [scheduled maintenance](https://docs.cloud.google.com/kubernetes-engine/docs/scheduled-maintenance) and [automatic upgrades](https://docs.cloud.google.com/kubernetes-engine/versioning-and-upgrades#automatic_cp_upgrades).
### Console
### Create a network and subnet
1. Go to the **VPC networks** page in the Google Cloud console.
[Go to VPC networks](https://console.cloud.google.com/networking/networks/list)
2. Click **Create VPC network**.
3. For **Name** , enter `my-net-0`.
4. For **Subnet creation mode** , select **Custom**.
5. In the **New subnet** section, for **Name** , enter `my-subnet-0`.
6. In the **Region** list, select the region that you want.
7. For **IP address range** , enter `10.2.204.0/22`.
8. Set **Private Google Access** to **On**.
9. Click **Done**.
10. Click **Create**.
### Create a private cluster
1. Go to the **Google Kubernetes Engine** page in the Google Cloud console.
[Go to Google Kubernetes Engine](https://console.cloud.google.com/kubernetes/list)
2. Click **Create** , and then in the Standard or Autopilot section, click **Configure**.
3. For the **Name** , specify `private-cluster-0`.
4. In the navigation pane, click **Networking**.
5. In the **Network** list, select **my-net-0**.
6. In the **Node subnet** list, select **my-subnet-0**.
7. Select the **Private cluster** radio button.
8. Clear the **Access control plane using its external IP address** checkbox.
9. (Optional for Autopilot): Set **Control plane IP range** to
`172.16.0.32/28`.
10. Click **Create**.
### gcloud
- For Autopilot clusters, run the following command:
```bash
gcloud container clusters create-auto private-cluster-0 \
--create-subnetwork name=my-subnet-0 \
--enable-master-authorized-networks \
--enable-private-nodes \
--enable-private-endpoint
```
- For Standard clusters, run the following command:
```bash
gcloud container clusters create private-cluster-0 \
--create-subnetwork name=my-subnet-0 \
--enable-master-authorized-networks \
--enable-ip-alias \
--enable-private-nodes \
--enable-private-endpoint \
--master-ipv4-cidr 172.16.0.32/28
```
where:
- `--create-subnetwork name=my-subnet-0` causes GKE to automatically create a subnet named `my-subnet-0`.
- `--enable-master-authorized-networks` specifies that access to the public endpoint is restricted to IP address ranges that you authorize.
- `--enable-ip-alias` makes the cluster VPC-native (not required for Autopilot).
- `--enable-private-nodes` indicates that the cluster's nodes don't have external IP addresses.
- `--enable-private-endpoint` indicates that the cluster is managed using the internal IP address of the control plane API endpoint.
- `--master-ipv4-cidr 172.16.0.32/28` specifies an internal IP address range for the control plane (optional for Autopilot). This setting is permanent for this cluster and must be unique within the VPC. The [use of non RFC 1918 internal IP addresses](https://docs.cloud.google.com/kubernetes-engine/docs/concepts/alias-ips.md.txt#internal_ip_addresses) is supported.
### API
To create a cluster without a publicly-reachable control plane, specify the
`enablePrivateEndpoint: true` field in the `privateClusterConfig` resource.
> [!NOTE]
> **Note:** In an Autopilot cluster, the `--master-ipv4-cidr` parameter is assigned a subnet within the 172.16.0.0/16 range by default. This range allows for various subnet sizes.
At this point, these are the only IP addresses that have access to the control
plane:
- The primary range of `my-subnet-0`.
- The secondary range used for Pods.
For example, suppose you created a VM in the primary range of `my-subnet-0`.
Then on that VM, you could
[configure `kubectl` to use the internal IP address](https://docs.cloud.google.com/kubernetes-engine/docs/how-to/cluster-access-for-kubectl.md.txt#internal_ip)
of the control plane.
If you want to access the control plane from outside `my-subnet-0`, you must
authorize at least one address range to have access to the private endpoint.
Suppose you have a VM that is in the default network, in the same region as
your cluster, but not in `my-subnet-0`.
For example:
- `my-subnet-0`: `10.0.0.0/22`
- Pod secondary range: `10.52.0.0/14`
- VM address: `10.128.0.3`
You could authorize the VM to access the control plane by using this command:
```bash
gcloud container clusters update private-cluster-0 \
--enable-master-authorized-networks \
--master-authorized-networks 10.128.0.3/32
```
## Creating a private cluster with limited access to the public endpoint
When creating a private cluster using this configuration, you can choose to
use an automatically generated subnet, or a custom subnet.
### Using an automatically generated subnet
In this section, you create a private cluster named `private-cluster-1` where
GKE automatically generates a subnet for your cluster nodes.
The subnet has Private Google Access enabled. In the subnet,
GKE automatically creates two secondary ranges: one for Pods
and one for Services.
You can use the Google Cloud CLI or the GKE API.
### gcloud
- For Autopilot clusters, run the following command:
```bash
gcloud container clusters create-auto private-cluster-1 \
--create-subnetwork name=my-subnet-1 \
--enable-master-authorized-networks \
--enable-private-nodes
```
- For Standard clusters, run the following command:
```bash
gcloud container clusters create private-cluster-1 \
--create-subnetwork name=my-subnet-1 \
--enable-master-authorized-networks \
--enable-ip-alias \
--enable-private-nodes \
--master-ipv4-cidr 172.16.0.0/28
```
where:
- `--create-subnetwork name=my-subnet-1` causes GKE to automatically create a subnet named `my-subnet-1`.
- `--enable-master-authorized-networks` specifies that access to the public endpoint is restricted to IP address ranges that you authorize.
- `--enable-ip-alias` makes the cluster VPC-native (not required for Autopilot).
- `--enable-private-nodes` indicates that the cluster's nodes don't have external IP addresses.
- `--master-ipv4-cidr 172.16.0.0/28` specifies an internal IP address range for the control plane (optional for Autopilot). This setting is permanent for this cluster and must be unique within the VPC. The [use of non RFC 1918 internal IP addresses](https://docs.cloud.google.com/kubernetes-engine/docs/concepts/alias-ips.md.txt#internal_ip_addresses) is supported.
### API
Specify the `privateClusterConfig` field in the `Cluster` API resource:
```json
{
"name": "private-cluster-1",
...
"ipAllocationPolicy": {
"createSubnetwork": true,
},
...
"privateClusterConfig" {
"enablePrivateNodes": boolean # Creates nodes with internal IP addresses only
"enablePrivateEndpoint": boolean # false creates a cluster control plane with a publicly-reachable endpoint
"masterIpv4CidrBlock": string # CIDR block for the cluster control plane
"privateEndpoint": string # Output only
"publicEndpoint": string # Output only
}
}
```
At this point, these are the only IP addresses that have access to the cluster
control plane:
- The primary range of `my-subnet-1`.
- The secondary range used for Pods.
Suppose you have a group of machines, outside of your VPC network,
that have addresses in the range `203.0.113.0/29`. You could authorize those
machines to access the public endpoint by entering this command:
```bash
gcloud container clusters update private-cluster-1 \
--enable-master-authorized-networks \
--master-authorized-networks 203.0.113.0/29
```
Now these are the only IP addresses that have access to the control plane:
- The primary range of `my-subnet-1`.
- The secondary range used for Pods.
- Address ranges that you have authorized, for example, `203.0.113.0/29`.
### Using a custom subnet
In this section, you create the following resources:
- A private cluster named `private-cluster-2`.
- A network named `my-net-2`.
- A subnet named `my-subnet-2`, with primary range `192.168.0.0/20`, for your cluster nodes. Your subnet has the following secondary address ranges:
- `my-pods` for the Pod IP addresses.
- `my-services` for the Service IP addresses.
### Console
#### Create a network, subnet, and secondary ranges
1. Go to the **VPC networks** page in the Google Cloud console.
[Go to VPC networks](https://console.cloud.google.com/networking/networks/list)
2. Click **Create VPC network**.
3. For **Name** , enter `my-net-2`.
4. For **Subnet creation mode** , select **Custom**.
5. In the **New subnet** section, for **Name** , enter `my-subnet-2`.
6. In the **Region** list, select the region that you want.
7. For **IP address range** , enter `192.168.0.0/20`.
8. Click **Create secondary IP range** . For **Subnet range name** , enter
`my-services`, and for **Secondary IP range** , enter `10.0.32.0/20`.
9. Click **Add IP range** . For **Subnet range name** , enter
`my-pods`, and for **Secondary IP range** , enter `10.4.0.0/14`.
10. Set **Private Google Access** to **On**.
11. Click **Done**.
12. Click **Create**.
#### Create a private cluster
Create a private cluster that uses your subnet:
1. Go to the **Google Kubernetes Engine** page in the Google Cloud console.
[Go to Google Kubernetes Engine](https://console.cloud.google.com/kubernetes/list)
2. Click **Create** , and then in the Standard or Autopilot section, click **Configure**.
3. For the **Name** , enter `private-cluster-2`.
4. From the navigation pane, click **Networking**.
5. Select the **Private cluster** radio button.
6. To create a control plane that is accessible from authorized external IP
ranges, keep the **Access control plane using its external IP address** checkbox
selected.
7. (Optional for Autopilot) Set **Control plane IP range** to `172.16.0.16/28`.
8. In the **Network** list, select **my-net-2**.
9. In the **Node subnet** list, select **my-subnet-2**.
10. Clear the **Automatically create secondary ranges** checkbox.
11. In the **Pod secondary CIDR range** list, select **my-pods**.
12. In the **Services secondary CIDR range** list, select
**my-services**.
13. Select the **Enable control plane authorized networks** checkbox.
14. Click **Create**.
### gcloud
#### Create a network
First, create a network for your cluster. The following command creates a
network, `my-net-2`:
```bash
gcloud compute networks create my-net-2 \
--subnet-mode custom
```
#### Create a subnet and secondary ranges
Next, create a subnet, `my-subnet-2`, in the `my-net-2` network, with
secondary ranges `my-pods` for Pods and `my-services` for Services:
```bash
gcloud compute networks subnets create my-subnet-2 \
--network my-net-2 \
--range 192.168.0.0/20 \
--secondary-range my-pods=10.4.0.0/14,my-services=10.0.32.0/20 \
--enable-private-ip-google-access
```
#### Create a private cluster
Now, create a private cluster, `private-cluster-2`, using the network,
subnet, and secondary ranges you created.
- For Autopilot clusters, run the following command:
```bash
gcloud container clusters create-auto private-cluster-2 \
--enable-master-authorized-networks \
--network my-net-2 \
--subnetwork my-subnet-2 \
--cluster-secondary-range-name my-pods \
--services-secondary-range-name my-services \
--enable-private-nodes
```
- For Standard clusters, run the following command:
```bash
gcloud container clusters create private-cluster-2 \
--enable-master-authorized-networks \
--network my-net-2 \
--subnetwork my-subnet-2 \
--cluster-secondary-range-name my-pods \
--services-secondary-range-name my-services \
--enable-private-nodes \
--enable-ip-alias \
--master-ipv4-cidr 172.16.0.16/28 \
--no-enable-basic-auth \
--no-issue-client-certificate
```
At this point, these are the only IP addresses that have access to the control
plane:
- The primary range of `my-subnet-2`.
- The secondary range `my-pods`.
Suppose you have a group of machines, outside of `my-net-2`, that have addresses
in the range `203.0.113.0/29`. You could authorize those machines to access the
public endpoint by entering this command:
```bash
gcloud container clusters update private-cluster-2 \
--enable-master-authorized-networks \
--master-authorized-networks 203.0.113.0/29
```
At this point, these are the only IP addresses that have access to the control
plane:
- The primary range of `my-subnet-2`.
- The secondary range `my-pods`.
- Address ranges that you have authorized, for example, `203.0.113.0/29`.
### Using Cloud Shell to access a private cluster
If you have enabled a private endpoint, you can't access your
GKE control plane with Cloud Shell.
If you want to use [Cloud Shell](https://docs.cloud.google.com/shell/docs/deploy-gke-app.md.txt) to access your
cluster, you must add the external IP address of your Cloud Shell to the
cluster's list of authorized networks.
To do this:
1. In your Cloud Shell command-line window, use `dig` to find the external IP
address of your Cloud Shell:
```bash
dig +short myip.opendns.com @resolver1.opendns.com
```
2. Add the external address of your Cloud Shell to your cluster's list of
authorized networks:
```bash
gcloud container clusters update CLUSTER_NAME \
--enable-master-authorized-networks \
--master-authorized-networks EXISTING_AUTH_NETS,SHELL_IP/32
```
Replace the following:
- `CLUSTER_NAME`: the name of your cluster.
- `EXISTING_AUTH_NETS`: the IP addresses of your
existing list of authorized
networks. You can find your authorized networks in the console or by
running the following command:
```bash
gcloud container clusters describe CLUSTER_NAME --format "flattened(masterAuthorizedNetworksConfig.cidrBlocks[])"
```
- `SHELL_IP`: the external IP address of your
Cloud Shell.
3. Get credentials, so that you can use `kubectl` to access the cluster:
```bash
gcloud container clusters get-credentials CLUSTER_NAME \
--project=PROJECT_ID \
--internal-ip
```
Replace `PROJECT_ID` with your project ID.
4. Use `kubectl` in Cloud Shell to access your cluster:
```bash
kubectl get nodes
```
The output is similar to the following:
NAME STATUS ROLES AGE VERSION
gke-cluster-1-default-pool-7d914212-18jv Ready 104m v1.21.5-gke.1302
gke-cluster-1-default-pool-7d914212-3d9p Ready 104m v1.21.5-gke.1302
gke-cluster-1-default-pool-7d914212-wgqf Ready 104m v1.21.5-gke.1302
## Creating a private cluster with unrestricted access to the public endpoint
In this section, you create a private cluster where any IP address can access
the control plane.
### Console
1. Go to the **Google Kubernetes Engine** page in the Google Cloud console.
[Go to Google Kubernetes Engine](https://console.cloud.google.com/kubernetes/list)
2. Click **Create** , and then in the Standard or Autopilot section, click **Configure**.
3. For the **Name** , enter `private-cluster-3`.
4. In the navigation pane, click **Networking**.
5. Select the **Private cluster** option.
6. Keep the **Access control plane using its external IP address** checkbox selected.
7. (Optional for Autopilot) Set **Control plane IP range** to `172.16.0.32/28`.
8. Leave **Network** and **Node subnet** set to `default`. This causes
GKE to generate a subnet for your cluster.
9. Clear the **Enable control plane authorized networks** checkbox.
10. Click **Create**.
### gcloud
- For Autopilot clusters, run the following command:
```bash
gcloud container clusters create-auto private-cluster-3 \
--create-subnetwork name=my-subnet-3 \
--no-enable-master-authorized-networks \
--enable-private-nodes
```
- For Standard clusters, run the following command:
```bash
gcloud container clusters create private-cluster-3 \
--create-subnetwork name=my-subnet-3 \
--no-enable-master-authorized-networks \
--enable-ip-alias \
--enable-private-nodes \
--master-ipv4-cidr 172.16.0.32/28
```
where:
- `--create-subnetwork name=my-subnet-3` causes GKE to automatically create a subnet named `my-subnet-3`.
- `--no-enable-master-authorized-networks` disables authorized networks for the cluster.
- `--enable-ip-alias` makes the cluster VPC-native (not required for Autopilot).
- `--enable-private-nodes` indicates that the cluster's nodes don't have external IP addresses.
- `--master-ipv4-cidr 172.16.0.32/28` specifies an internal IP address range for the control plane (optional for Autopilot). This setting is permanent for this cluster and must be unique within the VPC. The [use of non RFC 1918 internal IP addresses](https://docs.cloud.google.com/kubernetes-engine/docs/concepts/alias-ips.md.txt#internal_ip_addresses) is supported.
### Add firewall rules for specific use cases
This section explains how to add a firewall rule to a cluster. By
default, firewall rules restrict your cluster control plane to only initiate TCP
connections to your nodes and Pods on ports `443` (HTTPS) and `10250` (kubelet).
For some Kubernetes features, you might need to add firewall rules to allow
access on additional ports. Don't create firewall rules or
[hierarchical firewall policy rules](https://docs.cloud.google.com/vpc/docs/firewall-policies#hierarchical_firewall_policy_rule_details)
that have a
[higher priority](https://docs.cloud.google.com/vpc/docs/firewalls#priority_order_for_firewall_rules) than the
[automatically created firewall rules](https://docs.cloud.google.com/kubernetes-engine/docs/concepts/firewall-rules.md.txt#cluster-fws).
> [!NOTE]
> **Note:** The allowed ports (`443` and `10250`) refer to the ports exposed by your nodes and Pods, *not* the ports exposed by any Kubernetes services. For example, if the cluster control plane attempts to access a service on port `443`, but the service is *implemented* by a pod using port `9443`, this will be blocked by the firewall unless you add a firewall rule to explicitly allow ingress to port `9443`.
Kubernetes features that require additional firewall rules include:
- [Admission webhooks](https://kubernetes.io/docs/reference/access-authn-authz/extensible-admission-controllers/)
- [Aggregated API servers](https://kubernetes.io/docs/concepts/extend-kubernetes/api-extension/apiserver-aggregation/)
- [Webhook conversion](https://kubernetes.io/docs/tasks/extend-kubernetes/custom-resources/custom-resource-definition-versioning/#webhook-conversion)
- [Dynamic audit configuration](https://kubernetes.io/docs/tasks/debug/debug-cluster/audit/#service-reference)
- Generally, any API that has a ServiceReference field requires additional firewall rules.
Adding a firewall rule allows traffic from the cluster control plane to all of the following:
- The specified port of each node (hostPort).
- The specified port of each Pod running on these nodes.
- The specified port of each Service running on these nodes.
To learn about firewall rules, refer to [Firewall rules](https://docs.cloud.google.com/load-balancing/docs/https.md.txt#firewall_rules)
in the Cloud Load Balancing documentation.
To add a firewall rule in a cluster, you need to record the cluster
control plane's CIDR block and the target used. After you have recorded this you can
create the rule.
#### View control plane's CIDR block
You need the cluster control plane's CIDR block to add a firewall rule.
### Console
1. Go to the **Google Kubernetes Engine** page in the Google Cloud console.
[Go to Google Kubernetes Engine](https://console.cloud.google.com/kubernetes/list)
2. In the cluster list, click the cluster name.
In the **Details** tab, under **Networking** , take note of the value in the
**Control plane address range** field.
### gcloud
Run the following command:
```bash
gcloud container clusters describe CLUSTER_NAME
```
Replace `CLUSTER_NAME` with the name of your
cluster.
In the command output, take note of the value in the **masterIpv4CidrBlock**
field.
#### View existing firewall rules
You need to specify the [*target*](https://docs.cloud.google.com/vpc/docs/firewalls#rule_assignment)
(in this case, the destination nodes) that the cluster's existing firewall rules
use.
### Console
1. Go to the **Firewall policies** page in the Google Cloud console.
[Go to Firewall policies](https://console.cloud.google.com/net-security/firewall-manager/firewall-policies/list)
2. For **Filter table** for **VPC firewall rules** , enter
`gke-CLUSTER_NAME`.
In the results, take note of the value in the **Targets** field.
### gcloud
Run the following command:
```bash
gcloud compute firewall-rules list \
--filter 'name~^gke-CLUSTER_NAME' \
--format 'table(
name,
network,
direction,
sourceRanges.list():label=SRC_RANGES,
allowed[].map().firewall_rule().list():label=ALLOW,
targetTags.list():label=TARGET_TAGS
)'
```
In the command output, take note of the value in the **Targets** field.
To view firewall rules for a Shared VPC, add the
`--project HOST_PROJECT_ID` flag to the command.
#### Add a firewall rule
### Console
1. Go to the **Firewall policies** page in the Google Cloud console.
[Go to Firewall policies](https://console.cloud.google.com/net-security/firewall-manager/firewall-policies/list)
2. Click **Create Firewall Rule**.
3. For **Name**, enter the name for the firewall rule.
4. In the **Network** list, select the relevant network.
5. In **Direction of traffic** , click **Ingress**.
6. In **Action on match** , click **Allow**.
7. In the **Targets** list, select **Specified target tags**.
8. For **Target tags**, enter the target value that you noted previously.
9. In the **Source filter** list, select **IPv4 ranges**.
10. For **Source IPv4 ranges**, enter the cluster control plane's CIDR block.
11. In **Protocols and ports** , click **Specified protocols and ports** ,
select the checkbox for the relevant protocol (**tcp** or **udp**), and
enter the port number in the protocol field.
12. Click **Create**.
### gcloud
Run the following command:
```bash
gcloud compute firewall-rules create FIREWALL_RULE_NAME \
--action ALLOW \
--direction INGRESS \
--source-ranges CONTROL_PLANE_RANGE \
--rules PROTOCOL:PORT \
--target-tags TARGET
```
Replace the following:
- `FIREWALL_RULE_NAME`: the name you choose for the firewall rule.
- `CONTROL_PLANE_RANGE`: the cluster control plane's IP address range (`masterIpv4CidrBlock`) that you collected previously.
- `PROTOCOL:PORT`: the port and its protocol, `tcp` or `udp`.
- `TARGET`: the target (`Targets`) value that you collected previously.
To add a firewall rule for a Shared VPC, add
the following flags to the command:
```bash
--project HOST_PROJECT_ID
--network NETWORK_ID
```
## Verify that nodes don't have external IP addresses
After you create a private cluster, verify that the cluster's nodes
don't have external IP addresses.
### Console
1. Go to the **Google Kubernetes Engine** page in the Google Cloud console.
[Go to Google Kubernetes Engine](https://console.cloud.google.com/kubernetes/list)
2. In the list of clusters, click the cluster name.
3. For Autopilot clusters, in the **Cluster basics** section, check the
**External endpoint** field. The value is **Disabled**.
For Standard clusters, do the following:
1. On the **Clusters** page, click the **Nodes** tab.
2. Under **Node Pools**, click the node pool name.
3. On the **Node pool details** page, under **Instance groups**, click the name of your instance group. For example, gke-private-cluster-0-default-pool-5c5add1f-grp\`.
4. In the list of instances, verify that your instances do not have external IP addresses.
### gcloud
Run the following command:
```bash
kubectl get nodes --output wide
```
The output's `EXTERNAL-IP` column is empty:
STATUS ... VERSION EXTERNAL-IP OS-IMAGE ...
Ready v.8.7-gke.1 Container-Optimized OS
Ready v1.8.7-gke.1 Container-Optimized OS
Ready v1.8.7-gke.1 Container-Optimized OS
## Verify VPC peering reuse in cluster
Any GKE clusters with private nodes you create after January 15, 2020
[reuse VPC Network Peering connections](https://docs.cloud.google.com/kubernetes-engine/docs/concepts/network-isolation.md.txt).
You can check if your private cluster reuses VPC Network Peering connections
using the gcloud CLI or the Google Cloud console.
### Console
Check the **VPC peering** row on the **Cluster details** page. If your cluster is
reusing VPC peering connections, the output begins with `gke-n`.
For example, `gke-n34a117b968dee3b2221-93c6-40af-peer`.
### gcloud
```bash
gcloud container clusters describe CLUSTER_NAME \
--format="value(privateClusterConfig.peeringName)"
```
If your cluster is reusing VPC peering connections, the output
begins with `gke-n`. For example, `gke-n34a117b968dee3b2221-93c6-40af-peer`.
## Advanced cluster configurations
This section describes some advanced configurations that you might want when
creating a private cluster.
### Granting private nodes outbound internet access
To provide outbound internet access for your private nodes, such as to pull
images from an external registry, use [Cloud NAT](https://docs.cloud.google.com/nat/docs/overview.md.txt) to
create and configure a Cloud Router. Cloud NAT lets private nodes
establish outbound connections over the internet to send and receive packets.
The Cloud Router allows all your nodes in the region to use
Cloud NAT for all primary and [alias IP ranges](https://docs.cloud.google.com/vpc/docs/alias-ip.md.txt). It
also automatically allocates the external IP addresses for the NAT gateway.
For instructions to create and configure a Cloud Router, refer to
[Create a Cloud NAT configuration using Cloud Router](https://docs.cloud.google.com/nat/docs/gke-example.md.txt#create-nat)
in the Cloud NAT documentation.
> [!NOTE]
> **Note:** To provide outbound internet access for your Pods and Services, configure Cloud NAT to [Specify subnet ranges for NAT](https://docs.cloud.google.com/nat/docs/set-up-manage-network-address-translation.md.txt#specify_subnet_ranges_for_nat)
### Creating a private cluster in a Shared VPC network
To learn how to create a private cluster in a Shared VPC network, see
[Creating a private cluster in a Shared VPC](https://docs.cloud.google.com/kubernetes-engine/docs/how-to/cluster-shared-vpc.md.txt#create_private_cluster).
### Deploying a Windows Server container application
To learn how to deploy a Windows Server container application to a cluster with private nodes, refer to the
[Windows node pool documentation](https://docs.cloud.google.com/kubernetes-engine/docs/how-to/deploying-windows-app.md.txt#deploying_a_windows_server_application_to_a_private_cluster).
### Accessing the control plane's private endpoint globally
The control plane's private endpoint is implemented by an internal passthrough Network Load Balancer in
the control plane's VPC network. Clients that are internal or are
connected through Cloud VPN tunnels and Cloud Interconnect
VLAN attachments can access internal passthrough Network Load Balancers.
By default, these clients must be
[located in the same region](https://docs.cloud.google.com/load-balancing/docs/internal.md.txt#client-access) as the
load balancer.
When you enable control plane global access, the internal passthrough Network Load Balancer is globally
accessible: Client VMs and on-premises systems can connect to the control plane's
private endpoint, subject to the authorized networks configuration, from
any region.
For more information about the internal passthrough Network Load Balancers and global access, see [Internal
load balancers and connected
networks](https://docs.cloud.google.com/load-balancing/docs/internal/internal-tcp-udp-lb-and-other-networks).
> [!NOTE]
> **Note:** Egress charges apply for traffic between regions in the Google Cloud network, so accessing the control plane's private endpoint from another region incurs [standard cross-regional egress charges](https://docs.cloud.google.com/vpc/network-pricing#general).
#### Enabling control plane private endpoint global access
By default, global access is not enabled for the control plane's private
endpoint when you create a private cluster. To enable control plane global
access, use the following tools based on your cluster mode:
- For Standard clusters, you can use `Google Cloud CLI` or the Google Cloud console.
- For Autopilot clusters, you can use the `google_container_cluster` Terraform resource.
### Console
To create a new private cluster with control plane global access enabled,
perform the following steps:
1.
In the Google Cloud console, go to the **Create an Autopilot cluster** page.
[Go to Create an Autopilot cluster](https://console.cloud.google.com/kubernetes/auto/add)
You can also complete this task by
[creating a Standard cluster](https://docs.cloud.google.com/kubernetes-engine/docs/how-to/creating-a-cluster).
2. Enter a **Name**.
3. In the navigation pane, click **Networking**.
4. Select **Private cluster**.
5. Select the **Enable Control plane global access** checkbox.
6. Configure other fields as you want.
7. Click **Create**.
To enable control plane global access for an existing private cluster, perform
the following steps:
1. Go to the **Google Kubernetes Engine** page in the Google Cloud console.
[Go to Google Kubernetes Engine](https://console.cloud.google.com/kubernetes/list)
2. Next to the cluster you want to edit, click
**Actions** , then click **Edit**.
3. In the **Networking** section, next to **Control plane global
access** , click **Edit**.
4. In the **Edit control plane global access** dialog, select the
**Enable Control plane global access** checkbox.
5. Click **Save Changes**.
### gcloud
Add the `--enable-master-global-access` flag to create a private cluster with
global access to the control plane's private endpoint enabled:
```bash
gcloud container clusters create CLUSTER_NAME \
--enable-private-nodes \
--enable-master-global-access
```
You can also enable global access to the control plane's private endpoint for
an existing private cluster:
```bash
gcloud container clusters update CLUSTER_NAME \
--enable-master-global-access
```
> [!NOTE]
> **Note:** To disable control plane private endpoint global access, use the `--no-enable-master-global-access` flag.
#### Verifying control plane private endpoint global access
You can verify that global access to the control plane's private endpoint is
enabled by running the following command and looking at its output.
```bash
gcloud container clusters describe CLUSTER_NAME
```
The output includes a `privateClusterConfig` section where you can see the
status of `masterGlobalAccessConfig`.
privateClusterConfig:
enablePrivateNodes: true
masterIpv4CidrBlock: 172.16.1.0/28
peeringName: gke-1921aee31283146cdde5-9bae-9cf1-peer
privateEndpoint: 172.16.1.2
publicEndpoint: 34.68.128.12
masterGlobalAccessConfig:
enabled: true
### Accessing the control plane's private endpoint from other networks
When you create a
[GKE private cluster](https://docs.cloud.google.com/kubernetes-engine/docs/how-to/private-clusters)
and disable the control plane's public endpoint, you must administer the cluster
with tools like `kubectl` using its control plane's private endpoint. You can
access the cluster's control plane's private endpoint from another network,
including the following:
- An on-premises network that's connected to the cluster's VPC network using Cloud VPN tunnels or Cloud Interconnect VLAN attachments
- Another VPC network that's connected to the cluster's VPC network using Cloud VPN tunnels
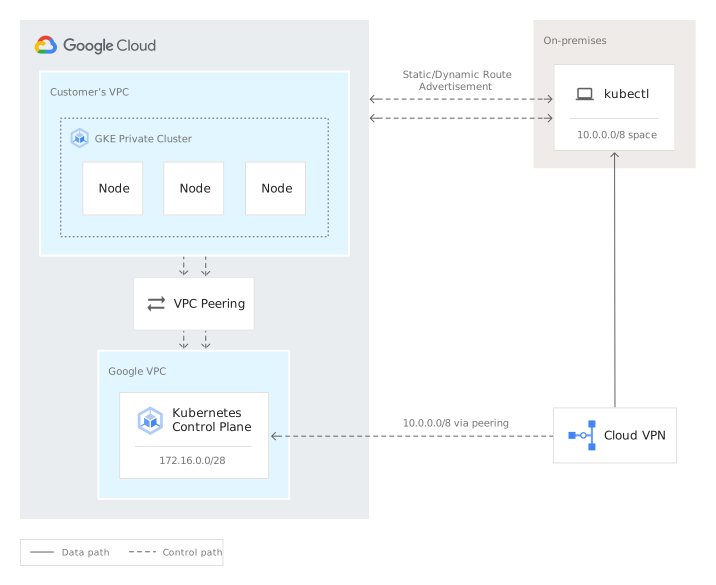
The following diagram shows a routing path between an on-premises network and
GKE control plane nodes:
To allow systems in another network to connect to a cluster's control plane
private endpoint, complete the following requirements:
1. Identify and record relevant network information for the cluster and its
control plane's private endpoint.
```bash
gcloud container clusters describe CLUSTER_NAME \
--location=COMPUTE_LOCATION \
--format="yaml(network, privateClusterConfig)"
```
Replace the following:
- `CLUSTER_NAME`: the name for the cluster.
- `COMPUTE_LOCATION`: the [Compute Engine location](https://docs.cloud.google.com/compute/docs/regions-zones/viewing-regions-zones.md.txt) of the cluster
From the output of the command, identify and record the following information
to use in the next steps:
- `network`: The name or URI for the cluster's VPC network.
- `privateEndpoint`: The IPv4 address of the control plane's private endpoint or the enclosing IPv4 CIDR range (`masterIpv4CidrBlock`).
- `peeringName`: The name of the VPC Network Peering connection used to connect the cluster's VPC network to the control plane's VPC network.
The output is similar to the following:
```yaml
network: cluster-network
privateClusterConfig:
enablePrivateNodes: true
masterGlobalAccessConfig:
enabled: true
masterIpv4CidrBlock: 172.16.1.0/28
peeringName: gke-1921aee31283146cdde5-9bae-9cf1-peer
privateEndpoint: 172.16.1.2
publicEndpoint: 34.68.128.12
```
2. Consider [enabling control plane private endpoint global
access](https://docs.cloud.google.com/kubernetes-engine/docs/how-to/legacy/network-isolation#cp-global-access-enable) to allow packets to enter from any region
in the cluster's VPC network. Enabling control plane private
endpoint global access lets you connect to the private endpoint using
Cloud VPN tunnels or Cloud Interconnect VLAN attachments
located in any region, not just the cluster's region.
3. Create a route for the `privateEndpoint` IP address or the
`masterIpv4CidrBlock` IP address range in the other network. Because the
control plane's private endpoint IP address always fits within the
`masterIpv4CidrBlock` IPv4 address range, creating a route for either the
`privateEndpoint` IP address or its enclosing range provides a path for
packets from the other network to the control plane's private endpoint if:
- **The other network connects to the cluster's VPC
network using Cloud Interconnect VLAN attachments or Cloud VPN
tunnels that use dynamic (BGP) routes** : Use a Cloud Router
custom advertised route. For more information, see [Advertise custom
address ranges](https://docs.cloud.google.com/network-connectivity/docs/router/docs/how-to/advertising-custom-ip)
in the Cloud Router documentation.
- **The other network connects to the cluster's VPC
network using Classic VPN tunnels that *do not* use dynamic
routes**: You must configure a static route in the other network.
> [!IMPORTANT]
> **Important:** If [control plane global access](https://docs.cloud.google.com/kubernetes-engine/docs/how-to/legacy/network-isolation.md.txt#cp-global-access) is disabled, the Cloud VPN tunnels or Cloud Interconnect VLAN attachments that connect the cluster's VPC network to the other network must be located in the same region as the cluster.
4. Configure the cluster's VPC network to export its custom
routes in the peering relationship to the control plane's VPC
network. Google Cloud always configures the control plane's
VPC network to import custom routes from the cluster's
VPC network. This step provides a path for packets from
the control plane's private endpoint back to the other network.
To enable custom route export from your cluster's VPC network,
use the following command:
```bash
gcloud compute networks peerings update PEERING_NAME \
--network=CLUSTER_VPC_NETWORK \
--export-custom-routes
```
Replace the following:
- `PEERING_NAME`: the name for the peering that connects the cluster's VPC network to the control plane VPC network
- `CLUSTER_VPC_NETWORK`: the name or URI of the cluster's VPC network
When custom route export is enabled for the VPC, creating routes that overlap
with [Google Cloud IP
ranges](https://docs.cloud.google.com/vpc/docs/configure-private-google-access#ip-addr-defaults) might
break your cluster.
For more details about how to update route exchange for existing
VPC Network Peering connections, see [Update the peering
connection](https://docs.cloud.google.com/vpc/docs/using-vpc-peering#update-peer-connection).
Custom routes in the cluster's VPC network include routes whose
destinations are IP address ranges in other networks, for example, an
on-premises network. To ensure that these routes become effective as *peering*
custom routes in the control plane's VPC network, see
[Supported destinations from the other network](https://docs.cloud.google.com/kubernetes-engine/docs/how-to/legacy/network-isolation.md.txt#to_on_prem).
#### Supported destinations from the other network
The address ranges that the other network sends to Cloud Routers in the
cluster's VPC network must adhere to the following conditions:
- While your cluster's VPC might accept a default route
(`0.0.0.0/0`), the control plane's VPC network always rejects
default routes because it already has a local default route. If the other
network sends a default route to your VPC network, the other
network must also send the specific destinations of systems that need to
connect to the control plane's private endpoint. For more details, see
[Routing order](https://docs.cloud.google.com/vpc/docs/routes.md.txt#routeselection).
- If the control plane's VPC network accepts routes that
effectively replace a default route, those routes break connectivity to
Google Cloud APIs and services, interrupting the cluster control plane.
As a representative example, the other network must not advertise routes with
destinations `0.0.0.0/1` and `128.0.0.0/1`. Refer to the previous point for an
alternative.
Monitor the [Cloud Router limits](https://docs.cloud.google.com/network-connectivity/docs/router/quotas.md.txt#limits), especially
the maximum number of unique destinations for learned routes.
### Protecting a private cluster with VPC Service Controls
To further secure your GKE private clusters, you
can protect them using VPC Service Controls.
VPC Service Controls provides additional security for your
GKE private clusters to help mitigate the risk of data
exfiltration. Using VPC Service Controls, you can add projects to service
perimeters that protect resources and services from requests that originate
outside the perimeter.
To learn more about service perimeters, see
[Service perimeter details and configuration](https://docs.cloud.google.com/vpc-service-controls/docs/service-perimeters.md.txt).
If you use Artifact Registry with your GKE private cluster in a VPC Service Controls service perimeter, you must
[configure routing to the restricted virtual IP](https://docs.cloud.google.com/vpc-service-controls/docs/set-up-gke)
to prevent exfiltration of data.
## Cleaning up
> [!NOTE]
> **Note:** If you delete a VPC Network Peering connection while there are resources attached on the GKE cluster, the cluster goes in a repair state resulting in permanent loss of the attached resources. You can't recover the deleted resources. For information on workaround, see [Troubleshooting: VPC Network Peering connection on private
> cluster is accidentally
> deleted](https://docs.cloud.google.com/kubernetes-engine/docs/troubleshooting/private-clusters#vpc_peering_network).
After completing the tasks on this page, follow these steps to remove the
resources to prevent unwanted charges incurring on your account:
### Delete the clusters
### Console
1. Go to the **Google Kubernetes Engine** page in the Google Cloud console.
[Go to Google Kubernetes Engine](https://console.cloud.google.com/kubernetes/list)
2. Select each cluster.
3. Click **Delete**.
### gcloud
```bash
gcloud container clusters delete -q private-cluster-0 private-cluster-1 private-cluster-2 private-cluster-3
```
### Delete the network
### Console
1. Go to the **VPC networks** page in the Google Cloud console.
[Go to VPC networks](https://console.cloud.google.com/networking/networks/list)
2. In the list of networks, click `my-net-0`.
3. On the **VPC network details** page, click **Delete VPC Network**.
4. In the **Delete a network** dialog, click **Delete**.
### gcloud
```bash
gcloud compute networks delete my-net-0
```
## What's next
- [Learn advanced configurations with private clusters](https://docs.cloud.google.com/kubernetes-engine/docs/how-to/advanced-private-cluster-config).
- [Learn how to create VPC-native clusters](https://docs.cloud.google.com/kubernetes-engine/docs/how-to/alias-ips.md.txt).
- [Learn more about VPC Network Peering](https://docs.cloud.google.com/vpc/docs/vpc-peering.md.txt).
- [Follow the tutorial about accessing private GKE clusters with Cloud Build private pools](https://docs.cloud.google.com/architecture/accessing-private-gke-clusters-with-cloud-build-private-pools).