This tutorial shows how to create an ASP.NET web application that uses IIS with
[Integrated Windows Authentication](https://docs.microsoft.com/aspnet/web-api/overview/security/integrated-windows-authentication),
and how to deploy it using a Windows container to a Google Kubernetes Engine (GKE)
cluster that has domain-joined Windows Server nodes. This configuration is
useful for deploying ASP.NET applications in Windows containers on Google Cloud
so that the applications can authenticate to other Windows resources. The
tutorial also shows how to create a group Managed Service Account (gMSA) in
Active Directory and how to configure the web application deployment in
GKE to use it.
This tutorial is intended for system admins. It assumes that you are familiar
with Active Directory and have experience working with
Google Kubernetes Engine (GKE).
> [!NOTE]
> **Note:** This tutorial requires that you have completed a related tutorial, [Configuring Active Directory for VMs to automatically join a domain](https://docs.cloud.google.com/architecture/configuring-active-directory-for-vms-to-automatically-join-the-domain.md.txt#costs), as explained later in this document.
## Objectives
- Create a GKE cluster that has domain-joined Windows Server nodes and configure the cluster to support Active Directory gMSAs.
- Build and deploy an ASP.NET web application container image that uses IIS with Integrated Windows Authentication.
## Costs
In this document, you use the following billable components of Google Cloud:
- [Compute Engine](https://cloud.google.com//compute/pricing)
- [GKE](https://cloud.google.com//kubernetes-engine/pricing)
- [Artifact Registry](https://cloud.google.com//artifact-registry/pricing)
- Other costs that are associated with the related tutorial [Configuring Active Directory for VMs to automatically join a domain](https://docs.cloud.google.com/architecture/configuring-active-directory-for-vms-to-automatically-join-the-domain.md.txt#costs):
- [Serverless VPC Access](https://cloud.google.com//vpc/network-pricing#vpc-pricing)
- [Cloud Run](https://cloud.google.com//run/pricing)
- [Artifact Registry](https://cloud.google.com/artifact-registry/pricing)
- [Secret Manager](https://cloud.google.com//secret-manager/pricing)
- [Cloud Scheduler](https://cloud.google.com//scheduler/pricing)
To generate a cost estimate based on your projected usage,
use the [pricing calculator](https://docs.cloud.google.com/products/calculator).
New Google Cloud users might be eligible for a [free trial](https://docs.cloud.google.com/free).
## Before you begin
1. Follow the steps in the
[Configuring Active Directory for VMs to automatically join a domain](https://docs.cloud.google.com/architecture/configuring-active-directory-for-vms-to-automatically-join-the-domain.md.txt)
tutorial to create the Active Directory domain-join
Cloud Run service.
> [!NOTE]
> **Note:** *Do not* perform the steps in the [Cleaning up](https://docs.cloud.google.com/architecture/configuring-active-directory-for-vms-to-automatically-join-the-domain.md.txt#clean-up) section, because you use the resources from that tutorial in this tutorial.
2. If you are running this tutorial in a different Google Cloud project than the one
where you created a VM to test the automatic domain joining, then perform
the steps for
[enabling a project for automatic domain joining](https://docs.cloud.google.com/architecture/configuring-active-directory-for-vms-to-automatically-join-the-domain.md.txt#enabling_a_project_for_automatic_domain_joining)
in your Google Cloud project.
When you complete the other tutorial, you have a new
Cloud Run service and its URL is printed in the PowerShell
window (the value of the `$RegisterUrl` variable). Note the address of the
service, because you use it in this tutorial.
3. Make sure that you've enabled the APIs for Compute Engine,
GKE, Cloud Build, Artifact Registry, and
Cloud Resource Manager API:
[Enable the APIs](https://console.cloud.google.com/apis/enableflow?apiid=compute,container,cloudbuild.googleapis.com,artifactregistry.googleapis.com,cloudresourcemanager.googleapis.com)
When you complete this tutorial, you can avoid continued billing by
deleting the resources you created. For more information, see
[Cleaning up](https://docs.cloud.google.com/kubernetes-engine/docs/how-to/deploying-aspnet-with-windows-authentication-in-gke-windows-containers.md.txt#additional_considerations_for_production_applications).
## Architecture
Windows-based applications that run in a domain-joined Windows Server often use
Microsoft Active Directory (AD) identities to authenticate users and
applications. Common use cases for this are the following:
- Creating ASP.NET web applications that use [Integrated Windows Authentication](https://docs.microsoft.com/aspnet/web-api/overview/security/integrated-windows-authentication) to authenticate Active Directory users as they attempt to sign in to the web application.
- Creating applications that use the server's Active Directory computer account to access resources over the network, such as a remote SMB share or a remote Microsoft SQL Server instance.
Windows containers cannot be domain-joined and therefore do not have computer
accounts in Active Directory. Because of this, ASP.NET web applications that run
on Windows containers cannot authenticate Active Directory users through
Integrated Windows Authentication, and therefore cannot access secured resources
in the network. For more information about how ASP.NET accesses secured
resources, see
[Application Pool Identities](https://docs.microsoft.com/iis/manage/configuring-security/application-pool-identities#accessing-the-network)
in the Microsoft documentation.
Instead of using a computer account, Windows containers can use an Active
Directory group Managed Service Account (gMSA) identity to access Active
Directory and other secured resources in the network, such as file shares and
SQL Server instances. For more information, see
[Group Managed Service Accounts Overview](https://docs.microsoft.com/windows-server/security/group-managed-service-accounts/group-managed-service-accounts-overview)
in the Microsoft documentation.
The following architectural diagram shows the resources that are used in this
tutorial:
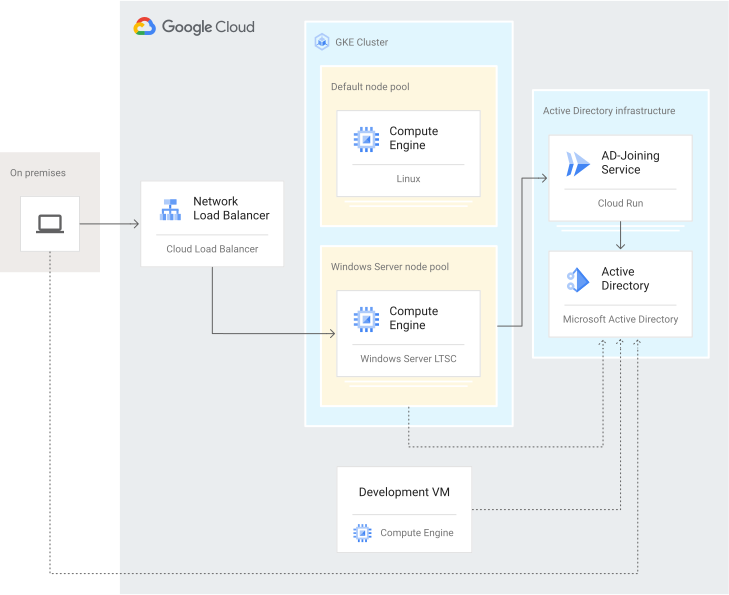
The diagram shows the following elements:
- **Development VM**. In this tutorial, you create a Windows Server VM that you use for building the ASP.NET web application container image and for creating the gMSA.
- **GKE cluster and nodes** . The GKE cluster in this tutorial has both a Linux node pool and a Windows Server node pool that are used in the following ways:
- The Linux nodes run system components that run only on the Linux operating systems, such as the GKE metrics server.
- The Windows Server nodes are used for hosting Windows Server containers and are joined to an Active Directory domain.
- **Active Directory infrastructure** . To get the GKE Windows nodes to be domain-joined, you first run through the [Configuring Active Directory for VMs to automatically join a domain](https://docs.cloud.google.com/architecture/configuring-active-directory-for-vms-to-automatically-join-the-domain.md.txt) tutorial. In that tutorial, you create a Cloud Run service that's responsible for registering new computers (instances) in Active Directory, and providing to each new instance a temporary password that the instance uses to complete the domain join process. Each new instance in the Windows Server node pool calls the Cloud Run service to join itself to the Active Directory domain.
- **Network load balancer**. When an on-premises user opens their browser and browses to the ASP.NET web application, the traffic goes through a network load balancer. The load balancer is created by GKE when you create a GKE LoadBalancer service for your web application. The user also authenticates to the web application by passing their Active Directory credentials to the web application.
## Creating the infrastructure
After you've finished the related tutorial, you create the infrastructure
components for the current tutorial, which includes the following:
- A Windows Server VM that has an ASP.NET web application container image.
- A GKE cluster that has a Windows Server node pool.
- Firewall rules that give the GKE Pods access to Active Directory.
- A webhook in the GKE cluster that handles the configuration and population of gMSA resources in deployments.
### Create a development VM
The Windows Server container image that you create must match the Windows
Server version of the VM where you build the container image. This version must
also match the Windows Server version of your GKE Window
Server nodes. Creating a container image or running a container in a different
version of Windows Server results in an error. For more information about the
compatibility requirements of Windows containers, see
[Matching container host version with container image versions](https://docs.microsoft.com/virtualization/windowscontainers/deploy-containers/version-compatibility?tabs=windows-server-20H2,windows-10-20H2#matching-container-host-version-with-container-image-versions).
This tutorial uses the Long-Term Servicing Channel (LTSC) 2022 version of
Windows Server for the VM, the Windows Server nodes in GKE,
and the container image. For more information, see
[version mapping](https://docs.cloud.google.com/kubernetes-engine/docs/how-to/creating-a-cluster-windows.md.txt#version_mapping)
between Windows Server versions and GKE versions.
> [!NOTE]
> **Note:** If you plan on using multiple versions of Windows Server in the GKE cluster, then you can build [Windows Server multi-arch images](https://docs.cloud.google.com/kubernetes-engine/docs/tutorials/building-windows-multi-arch-images.md.txt). This tutorial does not cover this topic.
1. In the Google Cloud console, activate Cloud Shell.
[Activate Cloud Shell](https://console.cloud.google.com/?cloudshell=true)
At the bottom of the Google Cloud console, a
[Cloud Shell](https://docs.cloud.google.com/shell/docs/how-cloud-shell-works.md.txt)
session starts and displays a command-line prompt. Cloud Shell is a shell environment
with the Google Cloud CLI
already installed and with values already set for
your current project. It can take a few seconds for the session to initialize.
2. If PowerShell is open, close it by typing `exit`.
3. Set environment variables for the network and subnetwork name and for
the Active Directory service URL:
export NETWORK_NAME=NETWORK-NAME
export SUBNETWORK_NAME=SUBNETWORK-NAME
export AD_JOIN_SERVICE_URL=AD-JOIN-SERVICE-URL
Replace the following:
- `NETWORK-NAME`: The VPC network to deploy VMs in.
- `SUBNETWORK-NAME`: The subnet to deploy VMs in.
- `AD-JOIN-SERVICE-URL`: The URL of the Cloud Run service you deployed in the [Before you begin](https://docs.cloud.google.com/kubernetes-engine/docs/how-to/deploying-aspnet-with-windows-authentication-in-gke-windows-containers.md.txt#before-you-begin) section.
4. Set your Google Cloud project ID and region for the current environment:
gcloud config set project PROJECT-ID
gcloud config set compute/zone ZONE-NAME
Replace the following:
- `PROJECT-ID`: Your Google Cloud project ID.
- `ZONE-NAME`: The zone to deploy all VMs in. To reduce latency, we recommend that you select a zone in the same region where you deployed the Active Directory domain-join Cloud Run service.
5. Create a service account for the development VM:
export SERVICE_ACCOUNT_NAME=dev-vm
export SERVICE_ACCOUNT_EMAIL=$SERVICE_ACCOUNT_NAME@$GOOGLE_CLOUD_PROJECT.iam.gserviceaccount.com
gcloud iam service-accounts create $SERVICE_ACCOUNT_NAME \
--display-name="Development VM Service Account"
6. Grant the service account
[access](https://docs.cloud.google.com/artifact-registry/docs/access-control.md.txt)
to Artifact Registry:
gcloud projects add-iam-policy-binding $GOOGLE_CLOUD_PROJECT \
--member="serviceAccount:$SERVICE_ACCOUNT_EMAIL" \
--role="roles/artifactregistry.writer"
7. Grant the service account access to GKE:
gcloud projects add-iam-policy-binding $GOOGLE_CLOUD_PROJECT \
--member="serviceAccount:$SERVICE_ACCOUNT_EMAIL" \
--role="roles/container.admin"
The service account is granted the `container.admin` role because this
role has permissions both to create GKE clusters in
the project and to manage resources in clusters, including role-based
access control (RBAC) resources. RBAC resources are necessary in order to
control which Pod is permitted to use a gMSA.
8. Create a new Windows Server 2022 VM:
gcloud compute instances create gmsa-dev-vm \
--image-project windows-cloud \
--image-family windows-2022-core \
--machine-type n1-standard-2 \
--boot-disk-type=pd-ssd \
--boot-disk-size=100GB \
--network $NETWORK_NAME \
--subnet $SUBNETWORK_NAME \
--service-account=$SERVICE_ACCOUNT_EMAIL \
--scopes https://www.googleapis.com/auth/cloud-platform \
--metadata sysprep-specialize-script-ps1="iex((New-Object System.Net.WebClient).DownloadString('$AD_JOIN_SERVICE_URL')); Add-WindowsFeature RSAT-AD-PowerShell"
> [!NOTE]
> **Note:** If the VMs in your VPC have ways of accessing the internet without an external IP address, such as using [Cloud NAT](https://docs.cloud.google.com/nat), you can remove the external IP address or add the `--no-address` parameter to the command before running it.
If you plan to deploy your containerized applications to Windows Server 2019
containers, change the `--image-family` parameter value to
`windows-2019-core-for-containers`.
The scope `https://www.googleapis.com/auth/cloud-platform` enables the
instance to access all Google Cloud APIs, depending on the IAM roles
that are defined for the instance's service account.
The VM is created with an
[external IP address](https://docs.cloud.google.com/compute/docs/ip-addresses.md.txt#externaladdresses)
to enable it to communicate with the internet. You need the VM to have
internet access so that it can download several utilities, such as
[git](https://www.powershellgallery.com/packages/Install-Git)
and
[kubectl](https://www.powershellgallery.com/packages/install-kubectl),
and to download the ASP.NET web application from GitHub.
During the `sysprep` stage, the new instance is joined to the Active
Directory domain to enable you to remotely access the instance by using
your domain account. The script in the `sysprep` command also installs the
PowerShell module for Active Directory.
### Create an Artifact Registry Docker repository
1. In Cloud Shell, set the default location for new
Artifact Registry repositories:
```bash
gcloud config set artifacts/location LOCATION
```
Replace `LOCATION` with a
[region](https://docs.cloud.google.com/artifact-registry/docs/repositories/repo-locations.md.txt#location-r)
where you want to create the Artifact Registry repository. To reduce
latency, we recommend that you select the same region where you deployed
the development VM.
2. Create the Artifact Registry Docker repository:
```bash
gcloud artifacts repositories create windows-container-images \
--repository-format=docker
```
### Create a GKE cluster
1. In Cloud Shell, set an environment variable for the name of
the GKE cluster:
export GKE_CLUSTER_NAME=cluster-1
2. Create the GKE cluster:
gcloud container clusters create $GKE_CLUSTER_NAME \
--release-channel rapid \
--network $NETWORK_NAME \
--subnetwork $SUBNETWORK_NAME \
--enable-ip-alias
Setting the
[`--release-channel` parameter](https://docs.cloud.google.com/kubernetes-engine/docs/concepts/release-channels.md.txt)
to `rapid` deploys the GKE cluster with the latest
Kubernetes version. The `--enable-ip-alias` parameter turns on
[alias IP](https://docs.cloud.google.com/vpc/docs/alias-ip.md.txt).
Alias IP is required for Windows Server nodes.
### Create a Windows Server node pool in GKE
When you create a new GKE cluster through the CLI, the
cluster is created with a Linux node pool. To use Windows Server on
GKE, you create a Windows Server node pool.
GKE clusters must have at least one Linux node to run the
cluster's internal (system) containers. A GKE cluster
cannot be created with only Windows Server nodes.
1. In Cloud Shell, set an environment variable for the name of
the Windows server node pool:
export NODE_POOL_NAME=windows-server-pool
2. Create a GKE Windows Server node pool:
gcloud container node-pools create $NODE_POOL_NAME \
--cluster $GKE_CLUSTER_NAME \
--machine-type n1-standard-2 \
--image-type WINDOWS_LTSC_CONTAINERD \
--windows-os-version=ltsc2022 \
--num-nodes 2 \
--no-enable-autoupgrade \
--metadata sysprep-specialize-script-ps1="iex((New-Object System.Net.WebClient).DownloadString('$AD_JOIN_SERVICE_URL'))"
If you plan to deploy your containerized applications to Windows Server 2019
containers, change the `--windows-os-version` parameter to `ltsc2019`.
The `sysprep-specialize-script-ps1` metadata key is a
[built-in key](https://docs.cloud.google.com/compute/docs/instances/startup-scripts/windows.md.txt#metadata-keys)
that points to a PowerShell script that is executed during the
[GCESysprep](https://docs.cloud.google.com/compute/docs/instances/windows/creating-windows-os-image.md.txt#create_server_image)
step, before the instance boots for the first time.
The
[`iex`](https://docs.microsoft.com/powershell/module/microsoft.powershell.utility/invoke-expression)
cmdlet downloads the PowerShell script from the Active Directory
domain-join service that you deployed to Cloud Run. It then
runs the script that joins the new instance to the Active Directory domain.
The `--no-enable-autoupgrade` parameter disables
[node auto upgrade](https://docs.cloud.google.com/kubernetes-engine/docs/how-to/node-auto-upgrades.md.txt)
for all nodes in the pool. It does this because upgrading a node's Windows
image can cause incompatibility between the node's Windows Server version
and the Pod's Windows Server version. For more information, see
[Upgrading Windows Server node pools](https://docs.cloud.google.com/kubernetes-engine/docs/how-to/creating-a-cluster-windows.md.txt#upgrading_windows_server_node_pools).
After each node is created, the `domain-join` PowerShell script joins
the node to the domain.
3. Wait several minutes until the node pool is created and then run the
following command to verify that all the nodes joined the domain:
kubectl get node \
-l cloud.google.com/gke-nodepool=$NODE_POOL_NAME \
-o custom-columns=":metadata.name" --no-headers \
| xargs -I{} gcloud compute instances get-serial-port-output {} --port 1 \
| grep "sysprep-specialize-script-ps1:.*success" --ignore-case
If the nodes have been joined to the domain, the output is the following:
```
timestamp GCEMetadataScripts: sysprep-specialize-script-ps1: Successfully registered computer account.
timestamp GCEMetadataScripts: sysprep-specialize-script-ps1: Computer successfully joined to domain
Specify --start=152874 in the next get-serial-port-output invocation to get only the new output starting from here.
```
If you want to see the full script output, remove `.*success` from the
`grep` command.
### Grant the GKE Pods access to Active Directory
You need to create a firewall rule that permits the GKE
cluster's Pods to access your domain controllers by using the following
protocols:
- Kerberos (UDP/88, TCP/88)
- NTP (UDP/123)
- RPC (TCP/135, TCP/49152-65535)
- LDAP (UDP/389, TCP/389)
- SMB (UDP/445, TCP/445)
- LDAP GC (TCP/3268)
- Active Directory Web Services (TCP/9389)
You can apply the rule based on a service account that you have assigned to
your domain controllers, or you can apply it by using a network tag as is done
in this tutorial. To learn more about Active Directory related ports, see the
documentation on
[Active Directory port and protocol requirements](https://docs.microsoft.com/troubleshoot/windows-server/networking/service-overview-and-network-port-requirements#active-directory-port-and-protocol-requirements)
and
[using Active Directory across firewalls](https://docs.cloud.google.com/managed-microsoft-ad/docs/firewalls.md.txt).
If you are using the
[Managed Service for Microsoft Active Directory](https://docs.cloud.google.com/managed-microsoft-ad/docs/overview.md.txt)
(Managed Microsoft AD), you can skip this procedure.
1. In Cloud Shell, get the GKE cluster's Pod
IP address range:
CLUSTER_IP_RANGE=`gcloud container clusters describe $GKE_CLUSTER_NAME --format="value(clusterIpv4Cidr)"`
2. Create a firewall rule to give the GKE Pods access
to Active Directory:
gcloud compute firewall-rules create allow-gke-pods-to-ad \
--network $NETWORK_NAME \
--allow udp:88,tcp:88,udp:123,tcp:135,tcp:49152-65535,udp:389,tcp:389,udp:445,tcp:445,tcp:3268,tcp:9389 \
--source-ranges=$CLUSTER_IP_RANGE \
--target-tags DC-TAG
Replace `DC-TAG` with the network tag that's assigned to your
domain controllers' VMs.
### Configure GKE to support the use of gMSAs
To use a gMSA in Windows Server nodes, you need to create the gMSA object in
Active Directory, create a matching gMSA resource in GKE,
and enable newly created Pods to fetch their gMSA credentials.
1. In Cloud Shell, download and run the gMSA webhook script:
export K8S_GMSA_DEPLOY_DOWNLOAD_REV=b685a27adc40511bb5756dfb3ada2e8578ee72e1
curl https://raw.githubusercontent.com/kubernetes-sigs/windows-gmsa/$K8S_GMSA_DEPLOY_DOWNLOAD_REV/admission-webhook/deploy/deploy-gmsa-webhook.sh -o deploy-gmsa-webhook.sh && chmod +x deploy-gmsa-webhook.sh
./deploy-gmsa-webhook.sh --file ./gmsa-webhook.yml --namespace gmsa-webhook --overwrite
rm -drf gmsa-webhook-certs
The script adds the gMSA
[custom resource definition](https://kubernetes.io/docs/concepts/extend-kubernetes/api-extension/custom-resources/)
(CRD) manifest to your GKE cluster and deploys a
webhook that provides the gMSA specifications to Pods. You can now store
gMSA specifications in your cluster and configure gMSAs for Pods and
containers.
To learn more about Kubernetes and gMSAs, see
[Configure GMSA for Windows Pods and containers](https://kubernetes.io/docs/tasks/configure-pod-container/configure-gmsa/).
Your GKE cluster is now ready to run Windows applications
that require the use of a gMSA. For example, you can run an ASP.NET web
application in your Windows Server nodes. You can configure the application to
sign in users with Windows authentication or have the application use the Pod's
gMSA to access a remote network share or a SQL Server database.
## Integrating with Active Directory
Next, you create a gMSA for your ASP.NET web application in Active Directory,
configure how it can be used and by whom, and then add its configuration to
GKE.
### Log in and start PowerShell
1. [Connect to](https://docs.cloud.google.com/compute/docs/instances/connecting-to-windows.md.txt) the `gmsa-dev-vm` VM.
2. Log in to Windows using an Active Directory account that is permitted to
create a gMSA.
Your account needs to be a member of the `Domain Admins` group or must
be able to create `msDS-GroupManagedServiceAccount` objects. For more
information, see
[Provisioning group Managed Service Accounts](https://docs.microsoft.com/windows-server/security/group-managed-service-accounts/getting-started-with-group-managed-service-accounts#BKMK_Step1).
If you use Managed Microsoft AD, then your account needs to be a member
of the `Cloud Service Managed Service Account Administrators` group. For
more information, see
[Delegate administration of Managed Service Accounts](https://docs.cloud.google.com/managed-microsoft-ad/docs/create-gmsa.md.txt#delegate-administration).
3. Type `15` to exit the menu to command line (PowerShell).
### Install a container runtime
Windows Server 2022 requires a container runtime, such as Docker Community
Edition (CE), to create and run Windows containers. For more information about
installing a container runtime on Windows Server, see
[Get started: Prep Windows for containers](https://learn.microsoft.com/virtualization/windowscontainers/quick-start/set-up-environment?tabs=dockerce#windows-server-1)
in the Microsoft documentation.
If you created the development VM using the `windows-2019-core-for-containers`
image, you can skip the following procedure, because the image already has
Docker installed.
1. Install Docker Community Edition (CE):
Invoke-WebRequest -UseBasicParsing -o install-docker-ce.ps1 `
"https://raw.githubusercontent.com/microsoft/Windows-Containers/Main/helpful_tools/Install-DockerCE/install-docker-ce.ps1"
.\install-docker-ce.ps1
If during the install process the remote desktop connection closes,
reconnect to the VM.
2. Wait for the install process to complete and then type `exit` to close the
new PowerShell window.
3. Type `15` to exit the menu to command line (PowerShell).
### Create a KDS root key
Before you create a gMSA, you must make sure that your Active Directory domain
controller has a
[Key Distribution Services (KDS) root key](https://docs.microsoft.com/windows-server/security/group-managed-service-accounts/create-the-key-distribution-services-kds-root-key).
Active Directory uses the KDS root key to generate passwords for gMSAs.
If you are using Managed Microsoft AD, you can skip the following procedure
because Managed Microsoft AD creates the KDS root key when you create the
domain.
1. On `gmsa-dev-vm`, check if Active Directory already has the KDS root key:
Get-KdsRootKey
This command displays the key ID if it exists.
2. If you do not get a key ID in response, create the key:
Add-KdsRootKey -EffectiveTime ((get-date).addhours(-10))
### Create the gMSA
When you create a gMSA, you need to provide the names of the computers that
have access to the gMSA. As a security best practice, you should grant
permission to the gMSA only to the instances where your application runs. When
you create a domain-joined Windows Server node pool, a new Active Directory
group is created for the node pool's computers. The name of the group matches
the name of the managed instance group (MIG) that GKE
creates for the node pool.
1. In PowerShell, set variables for the Google Cloud project ID, the cluster
name, the Windows node pool name, the gMSA name, and the AD domain name:
$ProjectId = "PROJECT-ID"
$GkeClusterName = "cluster-1"
$PermittedNodePool = "windows-server-pool"
$GmsaName = "WebApp-01"
$AdDomain = (Get-ADDomain).DNSRoot
Replace `PROJECT-ID` with your Google Cloud project ID.
2. Set the cluster configuration for the `gcloud` tool:
gcloud config set project $ProjectId
gcloud config set compute/zone "ZONE-NAME"
Replace `ZONE-NAME` with the zone where you deployed the
GKE cluster.
3. Retrieve the domain name of the Active Directory group that was created
for the node pool:
$InstanceGroupUri = gcloud container node-pools describe $PermittedNodePool `
--cluster $GkeClusterName `
--format="value(instanceGroupUrls)"
$InstanceGroupName=([System.Uri]$instanceGroupUri).Segments[-1]
$GroupDN=(Get-ADGroup -Filter "name -eq '$InstanceGroupName'")
Write-Host $GroupDN.DistinguishedName
4. Create the gMSA:
New-ADServiceAccount -Name $GmsaName `
-DNSHostName "$GmsaName.$AdDomain" `
-PrincipalsAllowedToRetrieveManagedPassword $GroupDN
5. Verify that the gMSA was created:
Get-ADServiceAccount -Identity $GmsaName
If the gMSA was created, the output is similar to the following:
```
DistinguishedName : CN=WebApp01,CN=Managed Service Accounts,DC=corp,DC=example,DC=com
Enabled : True
Name : WebApp01
ObjectClass : msDS-GroupManagedServiceAccount
ObjectGUID : 5afcff45-cf15-467d-aaeb-d65e53288253
SamAccountName : WebApp01$
SID : S-1-5-21-780151012-601164977-3226406772-2103
UserPrincipalName :
```
### Add the gMSA to GKE
To use a gMSA in a Kubernetes cluster, you need to create a gMSA resource in
Kubernetes and configure which namespaces and accounts are permitted to use
it.
1. On `gmsa-dev-vm`, in PowerShell, install the `git` tool:
Install-Script -Name Install-Git -Force
Install-Git.ps1
$env:Path += ";c:\program files\git\bin"
2. Install the `kubectl` tool:
$version = (Invoke-WebRequest -UseBasicParsing -Uri "https://dl.k8s.io/release/stable.txt").Content
$uri = "https://dl.k8s.io/release/$version/bin/windows/amd64/kubectl.exe"
New-Item -Type Directory $env:ProgramFiles\kubectl
Start-BitsTransfer -Source $uri -Destination $env:ProgramFiles\kubectl\
$env:Path += ";$env:ProgramFiles\kubectl"
3. Install the `gke-gcloud-auth-plugin` binary:
```bash
gcloud components install gke-gcloud-auth-plugin
```
Wait for several minutes for the installation process to finish.
4. Initialize the `kubectl` tool with your GKE
cluster's credentials:
gcloud container clusters get-credentials $GkeClusterName
5. Create the
[gMSA credentials specification](https://kubernetes.io/docs/tasks/configure-pod-container/configure-gmsa/#create-gmsa-credential-spec-resources)
file:
Install-Module CredentialSpec -Force
$GmsaName = $GmsaName.ToLower()
$CredSpecFile = Join-Path $env:TEMP "$GmsaName-credspec.json"
New-CredentialSpec -AccountName $GmsaName -Path $CredSpecFile
$CredentialsSpec=@{
"apiVersion" = "windows.k8s.io/v1";
"kind" = "GMSACredentialSpec";
"metadata" = @{"name" = $GmsaName}
"credspec" = (Get-Content $CredSpecFile | ConvertFrom-Json)
}
$CredentialsSpec | ConvertTo-Json -Depth 5 | Set-Content $CredSpecFile
The name of the `GMSACredentialSpec` resource in Kubernetes
[must use lowercase characters](https://kubernetes.io/docs/concepts/overview/working-with-objects/names/#dns-subdomain-names).
The script changes the capitalization of the `$GmsaName` variable to comply
with this restriction.
The script displays a warning message that testing the Managed Service
Account failed, which is expected. Your development VM is not a member of
the group that's assigned to the gMSA, and therefore you cannot test the
gMSA from the VM. The warning message does not stop the command from
generating the gMSA credentials specification.
6. Add the gMSA credentials specification to the GKE
cluster:
kubectl apply -f $CredSpecFile
7. Clone the GitHub repository:
git clone https://github.com/GoogleCloudPlatform/kubernetes-engine-samples
cd kubernetes-engine-samples/windows/aspnet-gmsa/
8. Add the gMSA RBAC objects to your cluster:
kubectl apply -f gmsa-rbac-webapp-01.yaml
The `gmsa-rbac-webapp-01.yaml` creates a `ClusterRole` RBAC object for the
gMSA and then binds the new cluster role to the default service account in
the `default` namespace. If you are deploying your application to a
different namespace, edit the `gmsa-rbac-webapp-01.yaml` file and change the
namespace for the role binding and for the service account.
## Deploying and using the web application
Next, you build the web application and the container image, deploy the new
container image to your GKE cluster, and open the web
application in the browser to verify that the web application can use the gMSA.
### Build and deploy the ASP.NET web application
1. On `gmsa-dev-vm`, in PowerShell, set variables for the registry
location, registry name, and image tag:
$RegistryLocation = "LOCATION-docker.pkg.dev"
$ProjectsRegistry = "$RegistryLocation/$ProjectId"
$ImageTag = "$ProjectsRegistry/windows-container-images/test-gmsa:latest"
Replace `LOCATION` with the location where you
created the Artifact Registry repository.
2. Build the container image:
docker build -t $ImageTag -f Dockerfile-WINDOWS_LTSC2022 .
To build container images for Windows Server 2019, set the `-f` parameter
value to `Dockerfile-WINDOWS_LTSC2019`.
3. Push the container image to Artifact Registry:
gcloud auth configure-docker $RegistryLocation --quiet
docker push $ImageTag
4. Download the application's YAML file and update it with your gMSA
configuration:
$ApplicationYaml = Join-Path $env:TEMP "gmsa-test-webapp-01.yaml"
(Get-Content gmsa-test-webapp-01.yaml.template) `
-Replace '\${image_path}',$ImageTag | `
Set-Content $ApplicationYaml
If you create Windows Server 2019 nodes in GKE, edit the
application's YAML file and change the value of
`cloud.google.com/gke-windows-os-version` from `2022` to `2019`.
5. Deploy the web application to your GKE cluster:
kubectl apply -f $ApplicationYaml
### Verify that the ASP.NET web application is running
The web application is exposed to the internet using a `LoadBalancer` service.
Before you can browse to the web application, you need to wait for the Pod and
the service to deploy. Deploying the Pod can take several minutes because
Windows Server Core container images are large (the web application image is
larger than 7 GB) and it takes some time for the node to download the image and
create the container.
1. Check the status of the Pod:
kubectl get pods --selector=app=gmsa-test-webapp-01
Repeat the command until the output shows that the Pod status
is **Running**:
NAME READY STATUS RESTARTS AGE
gmsa-test-webapp-01-76c6d64975-zrtgq 1/1 Running 0 28s
If the status of the Pod remains **Pending** and does not change to
either **ContainerCreating** or **Running** ,
[check the source image of your Windows node](https://docs.cloud.google.com/compute/docs/instances/view-vm-image.md.txt#viewing_source_image)
to make sure it is Windows Server 2022. You can also check the
[version mapping](https://docs.cloud.google.com/kubernetes-engine/docs/how-to/creating-a-cluster-windows.md.txt#version_mapping)
table to see how GKE versions map to Windows Server
versions. If the versions don't match, duplicate the
`Dockerfile-WINDOWS_LTSC2022` file, set the
[base container image](https://hub.docker.com/_/microsoft-dotnet-framework-aspnet/)
in the new file to matches the Windows Server version of your nodes, and then repeat the
steps to
[build and deploy the ASP.NET web application](https://docs.cloud.google.com/kubernetes-engine/docs/how-to/deploying-aspnet-with-windows-authentication-in-gke-windows-containers.md.txt#build_and_deploy_the_aspnet_web_application).
2. Check the status of the service:
kubectl get service --selector=app=gmsa-test-webapp-01
Repeat the command until the output shows the service has an
external IP address:
```
NAME TYPE CLUSTER-IP EXTERNAL-IP PORT(S) AGE
gmsa-test-webapp-01 LoadBalancer 10.44.2.112 external-ip 80:32233/TCP 17s
```
3. Note the **external-ip** value in the output; you need this value later.
### Run preliminary tests in the ASP.NET web application
The Pod is now running and is accessible from the internet through a network
load balancer. Next, you run preliminary tests to verify that the container was
deployed successfully and that it has permissions to use the gMSA.
1. In a browser, go to `http://EXTERNAL-IP` to see the gMSA
test web application.
Replace `EXTERNAL-IP` with the IP address that you
got in the preceding procedure.
2. Scroll to the **Preflight Checks** section and then click the **Run
Preflight Checks** button to verify that all tests passed.
If the tests pass, the output is the following:
```
[PASS] Active Directory RSAT PowerShell Module Installed
[PASS] IIS Document Root found
C:\inetpub\wwwroot\
[PASS] PowerShell Scripts Folder found
C:\inetpub\wwwroot\Powershell\
[PASS] Container Diagnostic Script found
C:\inetpub\wwwroot\Powershell\\containerDiag.ps1
[PASS] Domain Diagnostic Script found
C:\inetpub\wwwroot\Powershell\\domainDiag.ps1
[RES] Result: PASS All checks passed! Please proceed to run the different tests.
```
3. Scroll to the **Container Information** section and then click the
**Run Script** button. Verify that you see information about the container
and the node, and that no error is displayed.
### Use the gMSA in Windows Containers
You can now verify that the gMSA setup is working correctly by running several
tests in the web application. Each of the tests uses the gMSA for a different
purpose. If all tests are successful, then you configured the gMSA properly.
#### Validate the gMSA container configuration
- Scroll to the **Domain Connectivity** section, type the name of your
gMSA (`WebApp-01`) in the **Account Name** box, and then click **Run
Script**. Wait a few seconds for the tests to finish.
The output is similar to the following:
```
***** C O N T A I N E R D I A G N O S T I C S *****
[INFO] Starting script execution at 01-05-2021-13:53:11
[INFO] Using gMSA: WebApp-01
[PASS] gMSA Account found in Active Directory
CN=WebApp01,CN=Managed Service Accounts,DC=corp,DC=example,DC=com
[PASS] This Container (gmsa-test-webapp01-5bc485b8d5-9lbb7) is running on a GKE Windows Node that is authorized to use WebApp01
[INFO] Script execution complete at 01-05-2021-13:53:12
***** E N D O F D I A G N O S T I C S *****
```
The script uses two PowerShell cmdlets to test access to the gMSA:
- [`Get-ADServiceAccount`](https://docs.microsoft.com/powershell/module/activedirectory/get-adserviceaccount): This cmdlet retrieves information about a gMSA. If this cmdlt runs successfully, then the container is running with a valid gMSA.
- [`Test-ADServiceAccount`](https://docs.microsoft.com/powershell/module/activedirectory/test-adserviceaccount): This cmdlet tests if it can retrieve the gMSA credentials. If the cmdlt runs successfully, then the container is running in a Windows Server node that is permitted to access the gMSA credentials.
#### Sign users in with Windows Authentication
1. In the top navigation bar of the page, click **Login**.
2. When you are prompted to enter your credentials, enter your domain username and password.
3. If you see the **Secure** page with your account information, and you're
not prompted for credentials, then your browser automatically logged you in
using your current identity.
After you're authenticated, you see the **Secure** page. Make sure you
see the following three sections:
- **User information**: Displays your username and the type of authentication that was used.
- **Groups**: Displays the list of groups that you belong to. The group names in the list are retrieved from Active Directory.
- **User Claims** : Displays the list of claims for the user as provided by Active Directory during sign-in. The group membership claims show the Active Directory Group [SID](https://wikipedia.org/wiki/Security_Identifier), not their names.
In addition to supporting Integrated Windows Authentication, the ASP.NET web
application can use its gMSA for authentication when calling remote servers.
Using the gMSA, the web application and any other application running in the
Windows container can access resources in the network that require Windows
authentication, such as SQL Server instances and SMB-based network shares.
## Troubleshooting
If you encounter any error messages during the setup process or while testing
the web application, refer to the following troubleshooting pages:
- [Troubleshooting Windows Server on GKE](https://docs.cloud.google.com/kubernetes-engine/docs/troubleshooting/windows-server-node-pools.md.txt)
- Kubernetes documentation on [troubleshooting Windows Server containers](https://kubernetes.io/docs/tasks/configure-pod-container/configure-gmsa/#troubleshooting)
- Microsoft documentation on [troubleshooting gMSAs for Windows Containers](https://docs.microsoft.com/virtualization/windowscontainers/manage-containers/gmsa-troubleshooting)
## Additional considerations for production applications
The instructions you have followed were written to provide an optimal path for
purposes of the tutorial. For a production environment, you might make changes
to some of the procedures to make the result more robust, as described in the
following sections.
### Windows Server node pool considerations
If you plan to deploy your own application that uses a gMSA, and the
application supports client sessions, we recommend that you create at least two
nodes in the node pool. Having multiple nodes lets you use out-of-process
session storage to verify that your application can handle distributed sessions
properly.
In this tutorial, you create a single Windows Server node pool to host your
applications. However, there might be situations where you want to create
multiple Windows Server node pools in your cluster---for example, one node pool
with HDD persistent disks (PDs) and another node pool with SSD PDs. If you need
to deploy your application to multiple node pools, provide an array of Active
Directory group objects to the `PrincipalsAllowedToRetrieveManagedPassword`
parameter, when you
[create the gMSA](https://docs.cloud.google.com/kubernetes-engine/docs/how-to/deploying-aspnet-with-windows-authentication-in-gke-windows-containers.md.txt#create_the_gmsa)
using the `New-ADServiceAccount` cmdlet.
### gMSA and service principal name (SPN) considerations
If your application requires you to authenticate users using Kerberos (for
example, to support identity delegation), then you need to access your
application by using a custom DNS and configure the gMSA with a
[service principal name (SPN)](https://docs.microsoft.com/windows/win32/ad/service-principal-names).
For example, if your load balancer exposes the application on
GKE through `https://my-web-app/`, then you need to create
an SPN named `HTTP/my-web-app` in one of the following ways:
- For a new gMSA, create the gMSA with the required SPNs. For example:
New-ADServiceAccount -Name $GmsaName `
-DNSHostName "$GmsaName.$AdDomain" `
-PrincipalsAllowedToRetrieveManagedPassword $Groups `
-ServicePrincipalNames "HTTP/my-web-app", "HTTP/my-web-app.$AdDomain"
- For an existing gMSA, call `Set-ADServiceAccount` to add the
required SPNs to the gMSA. For example:
Set-ADServiceAccount $GmsaName -ServicePrincipalNames @{Add="HTTP/my-web-app", "HTTP/my-web-app.$AdDomain"}
Depending on your DNS configuration, you might also need to create an SPN for
`HTTP/www.my-web-app` and `HTTP/www.my-web-app.$AdDomain`.
For non-HTTP protocols, such as a WCF service that's configured with TCP
binding and Windows Authentication, you might need to create other types of
SPNs, such as a `HOST/` SPN.
### Choosing the IIS application pool identity
ASP.NET Web applications run in Windows on the IIS web server. In IIS, you
configure groups of web applications that share the same process. This group is
called an
[application pool](https://docs.microsoft.com/iis/configuration/system.applicationhost/applicationpools/).
Each application pool is hosted in a dedicated process that's named `w3wp`. IIS
application pools provide process configuration, such as whether the process is
a 32-bit or 64-bit process, and they provide the process's identity. When you
run a web application in a Windows container, you set the application pool's
process identity to use the built-in
[Network Service](https://docs.microsoft.com/virtualization/windowscontainers/manage-containers/gmsa-configure-app)
account.
The local
[application pool identity](https://docs.microsoft.com/iis/manage/configuring-security/application-pool-identities)
accounts, which IIS also supports, are not required in Windows containers. The
application pool identity accounts were created by IIS as a means to enforce a
[local security boundary](https://docs.microsoft.com/iis/manage/configuring-security/application-pool-identities#securing-resources)
when running multiple web applications on the same IIS instance. With Windows
containers, where each web application is hosted in a separate container, there
is no need to create a security boundary within the container, because the
container itself provides the security boundary.
Even though the application pool identity is configured to use the Network
Service account, if the application makes a request to an external resource that
requires authentication, the application authenticates by using the gMSA that
you configured for the Windows container.
> [!NOTE]
> **Note:** You can still configure application pools in IIS to use the application pool identity accounts---for example, if you want to host multiple web applications in the same container and you require a local security boundary. As noted, when a web application authenticates to external network resources, it uses the gMSA whether the identity is set to an application pool identity account or to the NetworkService account.
## Clean up
To avoid incurring charges to your Google Cloud account for the resources used in this
tutorial, either delete the project that contains the resources, or keep the project and
delete the individual resources.
> [!CAUTION]
> **Caution** : Deleting a project has the following effects:
>
> - **Everything in the project is deleted.** If you used an existing project for the tasks in this document, when you delete it, you also delete any other work you've done in the project.
> - **Custom project IDs are lost.** When you created this project, you might have created a custom project ID that you want to use in the future. To preserve the URLs that use the project ID, such as an `appspot.com` URL, delete selected resources inside the project instead of deleting the whole project.
>
>
> If you plan to explore multiple architectures, tutorials, or quickstarts, reusing projects
> can help you avoid exceeding project quota limits.
1. In the Google Cloud console, go to the **Manage resources** page.
[Go to Manage resources](https://console.cloud.google.com/iam-admin/projects)
2. In the project list, select the project that you want to delete, and then click **Delete**.
3. In the dialog, type the project ID, and then click **Shut down** to delete the project.
### Removing individual resources
If you want to keep your Google Cloud project but you don't want to delete the
Google Cloud resources that you created for this tutorial, you can remove
the resources individually.
#### Revert Active Directory changes
1. Connect to the development VM and log in as a user that has administrative access to your Active Directory domain.
2. In the `gmsa-dev-vm` VM, if PowerShell isn't already open, open it:
PowerShell
3. Delete the gMSA:
Remove-ADServiceAccount -Identity "WebApp-01" -Confirm:$false
#### Delete cloud resources
1.
In the Google Cloud console, activate Cloud Shell.
[Activate Cloud Shell](https://console.cloud.google.com/?cloudshell=true)
2. Initialize the `gcloud` environment:
gcloud config set project PROJECT-ID
gcloud config set compute/zone ZONE-NAME
gcloud config set artifacts/location LOCATION
Replace the following:
- `PROJECT-ID`: Your Google Cloud project ID.
- `ZONE-NAME`: The zone where you deployed the GKE cluster and development VM.
- `LOCATION`: The region where you deployed the Artifact Registry repository.
3. Delete the development VM:
gcloud compute instances delete gmsa-dev-vm --quiet
4. Delete the service account:
gcloud iam service-accounts delete dev-vm@$GOOGLE_CLOUD_PROJECT.iam.gserviceaccount.com --quiet
5. Delete the GKE cluster:
gcloud container clusters delete cluster-1 --quiet
6. If you created a firewall rule for your Active Directory controllers,
delete it:
gcloud compute firewall-rules delete allow-gke-pods-to-ad --quiet
7. Delete the Artifact Registry Docker repository:
gcloud artifacts repositories delete windows-container-images --quiet
To finish, follow the clean-up steps in
[Configuring Active Directory for VMs to automatically join a domain](https://docs.cloud.google.com/architecture/configuring-active-directory-for-vms-to-automatically-join-the-domain.md.txt#clean-up).
## What's next
- Read about [Windows Server containers on GKE](https://docs.cloud.google.com/kubernetes-engine/docs/concepts/windows-server-gke.md.txt).
- Learn about [creating a GKE cluster using Windows Server node pools](https://docs.cloud.google.com/kubernetes-engine/docs/how-to/creating-a-cluster-windows.md.txt).
- Read of additional ways to [deploy Windows Server applications](https://docs.cloud.google.com/kubernetes-engine/docs/how-to/deploying-windows-app.md.txt).
- Review our [best practices for deploying an Active Directory resource forest on Google Cloud](https://docs.cloud.google.com/compute/docs/instances/windows/best-practices.md.txt).