> [!NOTE]
> **Note:** vLLM is now the recommended solution for serving LLMs on TPUs in GKE. To get started, see [Serve an LLM using TPU Trillium on GKE with vLLM](https://docs.cloud.google.com/kubernetes-engine/docs/tutorials/serve-vllm-tpu.md.txt).
This tutorial demonstrates how to deploy and serve a Gemma 2
large language model (LLM) using TPUs on GKE with the
[Saxml](https://github.com/google/saxml#saxml-aka-sax) serving framework.
This tutorial provides a foundation for understanding and exploring practical LLM
deployment for inference in a managed Kubernetes environment. You deploy a
pre-built container with Saxml to GKE. You also configure
GKE to load the Gemma 2B and 7B weights from
Cloud Storage at runtime.
This tutorial is intended for Machine learning (ML) engineers,
Platform admins and operators and for Data and AI specialists who are interested
in using Kubernetes container orchestration capabilities for serving LLMs.
To learn more about common roles and example tasks that we reference in
Google Cloud content, see
[Common GKE user roles and tasks](https://docs.cloud.google.com/anthos/docs/concepts/roles-tasks).
Before reading this page, ensure that you're familiar with the following:
- Current TPU version availability with the [Cloud TPU system architecture](https://docs.cloud.google.com/tpu/docs/system-architecture-tpu-vm.md.txt#versions)
- [TPUs in GKE](https://docs.cloud.google.com/kubernetes-engine/docs/concepts/tpus.md.txt)
If you need a unified managed AI
platform to rapidly build and serve ML models cost effectively, we recommend
that you try our [Vertex AI](https://docs.cloud.google.com/vertex-ai) deployment solution.
## Background
This section describes the key technologies used in this tutorial.
### Gemma
Gemma is a set of openly available, lightweight generative
AI models released under an open license. These AI
models are available to run in your applications, hardware, mobile devices, or
hosted services. You can use the
Gemma models for text generation, plus you can tune these
models for specialized tasks.
To learn more, see the [Gemma documentation](https://ai.google.dev/gemma/docs).
### TPUs
TPUs are Google's custom-developed application-specific integrated circuits
(ASICs) used to accelerate data processing frameworks such as [TensorFlow](https://www.tensorflow.org/learn),
[PyTorch](https://pytorch.org/), and [JAX](https://docs.jax.dev/en/latest/).
This tutorial serves the Gemma 2B and Gemma 7B models.
GKE hosts these models on
the following single-host TPU v5e node pools:
- **Gemma 2B** : Instruction tuned model hosted in a TPU v5e node pool with `1x1` topology that represents one TPU chip. The machine type for the nodes is `ct5lp-hightpu-1t`.
- **Gemma 7B** : Instruction tuned model hosted in a TPU v5e node pool with `2x2` topology that represents four TPU chips. The machine type for the nodes is `ct5lp-hightpu-4t`.
### Saxml
[Saxml](https://github.com/google/saxml) is an experimental system that serves
[Paxml](https://github.com/google/paxml), [JAX](https://github.com/google/jax),
and [PyTorch](https://pytorch.org) models for inference. The Saxml
system includes the following components:
- **Saxml cell or Sax cluster**: An admin server and a group of model servers. The admin server keeps track of model servers, assigns published models to model servers to serve, and helps clients locate model servers serving specific published models.
- **Saxml client** : The user-facing programming interface for the Saxml system. The Saxml client includes a command line tool ([saxutil](https://github.com/google/saxml/tree/main?tab=readme-ov-file#use-sax)) and a suite of [client libraries](https://github.com/google/saxml/tree/main?tab=readme-ov-file#use-sax) in Python, C++, and Go.
In this tutorial, you also use the Saxml HTTP server.
The Saxml HTTP Server is a custom HTTP server that encapsulates the Saxml Python
client library and exposes REST APIs to interact with the Saxml system. The
REST APIs includes endpoints to publish, list, unpublish models, and generate
predictions.
## Objectives
1. Prepare a GKE Standard cluster with the recommended TPU topology based on the model characteristics.
2. Deploy Saxml components on GKE.
3. Get and publish the Gemma 2B or Gemma 7B parameter model.
4. Serve and interact with the published models.
## Architecture
This section describes the GKE architecture used in this tutorial.
The architecture comprises a GKE Standard cluster that
provisions TPUs and hosts Saxml components to deploy and serve Gemma 2B
or 7B models. The following diagram shows the components of this
architecture:
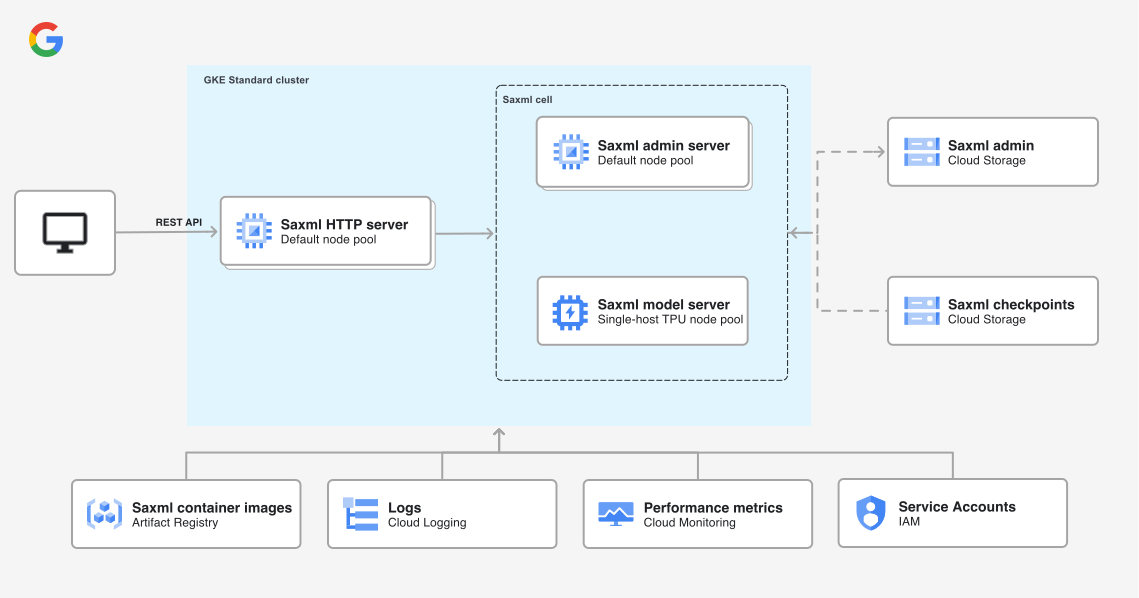
This architecture includes the following components:
- A GKE Standard, zonal cluster.
- A single-host TPU slice node pool that depends on the Gemma model you want to serve:
- **Gemma 2B** : Configured with a TPU v5e with a `1x1` topology. One instance of the Saxml Model server is configured to use this node pool.
- **Gemma 7B** : Configured with a TPU v5e with a `2x2` topology. One instance of the Saxml Model server is configured to use this node pool.
- A default CPU node pool where the Saxml Admin server and Saxml HTTP server are deployed.
- Two [Cloud Storage buckets](https://docs.cloud.google.com/storage/docs/buckets.md.txt):
- One Cloud Storage bucket stores the state managed by an Admin server.
- One Cloud Storage bucket stores the Gemma model checkpoints.
This architecture has the following characteristics:
- A public [Artifact Registry](https://docs.cloud.google.com/artifact-registry) manages the containers images for the Saxml components.
- The GKE cluster uses [Workload Identity Federation for GKE](https://docs.cloud.google.com/kubernetes-engine/docs/concepts/workload-identity.md.txt). All Saxml components use a Workload Identity Federation that integrates an IAM Service account to access external Services like Cloud Storage buckets.
- The logs generated by Saxml components are integrated into [Cloud Logging](https://docs.cloud.google.com/logging/docs/overview.md.txt).
- You can use [Cloud Monitoring](https://docs.cloud.google.com/monitoring/docs/monitoring-overview.md.txt) to analyze the performance metrics of GKE node pools, such as this tutorial creates.
## Before you begin
-
Make sure that you have the following role or roles on the project:
roles/container.admin, roles/iam.serviceAccountAdmin, roles/iam.policyAdmin, roles/iam.securityAdmin, roles/iam.roleAdmin
#### Check for the roles
1.
In the Google Cloud console, go to the **IAM** page.
[Go to IAM](https://console.cloud.google.com/projectselector/iam-admin/iam?supportedpurview=project)
2. Select the project.
3.
In the **Principal** column, find all rows that identify you or a group that
you're included in. To learn which groups you're included in, contact your
administrator.
4. For all rows that specify or include you, check the **Role** column to see whether the list of roles includes the required roles.
#### Grant the roles
1.
In the Google Cloud console, go to the **IAM** page.
[Go to IAM](https://console.cloud.google.com/projectselector/iam-admin/iam?supportedpurview=project)
2. Select the project.
3. Click **Grant access**.
4.
In the **New principals** field, enter your user identifier.
This is typically the email address for a Google Account.
5. Click **Select a role**, then search for the role.
6. To grant additional roles, click **Add
another role** and add each additional role.
7. Click **Save**.
- Ensure that you have sufficient quotas for 5 TPU v5e chips. In this tutorial, you use [on-demand instances](https://docs.cloud.google.com/kubernetes-engine/docs/how-to/tpus.md.txt#ensure-quota).
- Create a [Kaggle account](https://www.kaggle.com/), if you don't already have one.
## Prepare the environment for Gemma
### Launch Cloud Shell
In this tutorial, you use [Cloud Shell](https://docs.cloud.google.com/shell) to manage resources hosted
on Google Cloud. Cloud Shell is preinstalled with the software
you need for this tutorial, including
[`kubectl`](https://kubernetes.io/docs/reference/kubectl/) and [gcloud CLI](https://docs.cloud.google.com/sdk/gcloud.md.txt).
1. In the Google Cloud console, start a Cloud Shell instance:
[Open Cloud Shell](https://console.cloud.google.com/?cloudshell=true)
2. Set the default environment variables:
```bash
gcloud config set project PROJECT_ID
export PROJECT_ID=$(gcloud config get project)
export LOCATION=LOCATION
export CLUSTER_NAME=saxml-tpu
```
Replace the following values:
- PROJECT_ID: Your Google Cloud [project ID](https://docs.cloud.google.com/resource-manager/docs/creating-managing-projects.md.txt#identifying_projects).
- LOCATION: The name of the Compute Engine zone where the [TPU v5e machine types are available](https://docs.cloud.google.com/kubernetes-engine/docs/concepts/plan-tpus.md.txt#availability).
### Create a Standard cluster
In this section, you create the GKE cluster and node pool.
### Gemma 2B-it
Use Cloud Shell to do the following:
1. Create a Standard cluster that uses
[Workload Identity Federation for GKE](https://docs.cloud.google.com/kubernetes-engine/docs/how-to/workload-identity.md.txt):
```bash
gcloud container clusters create ${CLUSTER_NAME} \
--enable-ip-alias \
--machine-type=e2-standard-4 \
--num-nodes=2 \
--release-channel=rapid \
--workload-pool=${PROJECT_ID}.svc.id.goog \
--location=${LOCATION}
```
The cluster creation can take several minutes.
2. Create a TPU v5e node pool with a `1x1` topology and one node:
```bash
gcloud container node-pools create tpu-v5e-1x1 \
--cluster=${CLUSTER_NAME} \
--machine-type=ct5lp-hightpu-1t \
--num-nodes=1 \
--location=${LOCATION}
```
You serve the Gemma 2B model in this node pool.
### Gemma 7B-it
Use Cloud Shell to do the following:
1. Create a Standard cluster that uses
[Workload Identity Federation for GKE](https://docs.cloud.google.com/kubernetes-engine/docs/how-to/workload-identity.md.txt):
```bash
gcloud container clusters create ${CLUSTER_NAME} \
--enable-ip-alias \
--machine-type=e2-standard-4 \
--num-nodes=2 \
--release-channel=rapid \
--workload-pool=${PROJECT_ID}.svc.id.goog \
--location=${LOCATION}
```
The cluster creation can take several minutes.
2. Create a TPU v5e node pool with a `2x2` topology and one node:
```bash
gcloud container node-pools create tpu-v5e-2x2 \
--cluster=${CLUSTER_NAME} \
--machine-type=ct5lp-hightpu-4t \
--num-nodes=1 \
--location=${LOCATION}
```
You serve the Gemma 7B model in this node pool.
### Create the Cloud Storage buckets
Create two Cloud Storage bucket to manages the state of the Saxml Admin server and the model checkpoints.
In Cloud Shell, run the following:
1. Create a Cloud Storage bucket to store Saxml Admin server configurations.
```bash
gcloud storage buckets create gs://ADMIN_BUCKET_NAME
```
Replace the ADMIN_BUCKET_NAME with the name of the
Cloud Storage bucket that stores the Saxml Admin server.
2. Create a Cloud Storage bucket to store model checkpoints:
```bash
gcloud storage buckets create gs://CHECKPOINTS_BUCKET_NAME
```
Replace the CHECKPOINTS_BUCKET_NAME with the name of the
Cloud Storage bucket that stores the model checkpoints.
### Configure your workloads access using Workload Identity Federation for GKE
Assign a [Kubernetes ServiceAccount](https://kubernetes.io/docs/concepts/security/service-accounts/) to the application and configure that
Kubernetes ServiceAccount to act as an IAM service account.
1. Configure `kubectl` to communicate with your cluster:
```bash
gcloud container clusters get-credentials ${CLUSTER_NAME} --location=${LOCATION}
```
2. Create a Kubernetes ServiceAccount for your application to use:
```bash
gcloud iam service-accounts create wi-sax
```
3. Add an [IAM policy binding](https://docs.cloud.google.com/sdk/gcloud/reference/iam/service-accounts/add-iam-policy-binding) for your IAM service account to
read and write to Cloud Storage:
```bash
gcloud projects add-iam-policy-binding ${PROJECT_ID} \
--member "serviceAccount:wi-sax@${PROJECT_ID}.iam.gserviceaccount.com" \
--role roles/storage.objectUser
gcloud projects add-iam-policy-binding ${PROJECT_ID} \
--member "serviceAccount:wi-sax@${PROJECT_ID}.iam.gserviceaccount.com" \
--role roles/storage.insightsCollectorService
```
4. Allow the Kubernetes ServiceAccount to [impersonate the IAM service account](https://docs.cloud.google.com/iam/docs/service-account-overview.md.txt#impersonation) by adding an IAM
policy binding between the two service accounts. This binding allows the Kubernetes
ServiceAccount to act as the IAM service account:
```bash
gcloud iam service-accounts add-iam-policy-binding wi-sax@${PROJECT_ID}.iam.gserviceaccount.com \
--role roles/iam.workloadIdentityUser \
--member "serviceAccount:${PROJECT_ID}.svc.id.goog[default/default]"
```
5. [Annotate](https://kubernetes.io/docs/concepts/overview/working-with-objects/annotations/)
the Kubernetes service account with the email address of the IAM
service account:
```bash
kubectl annotate serviceaccount default \
iam.gke.io/gcp-service-account=wi-sax@${PROJECT_ID}.iam.gserviceaccount.com
```
## Get access to the model
To get access to the Gemma models for deployment to
GKE, you must sign in to the
[Kaggle platform](https://www.kaggle.com/), sign the license consent agreement, and get
a Kaggle
API token. In this tutorial, you use a Kubernetes Secret for the Kaggle
credentials.
### Sign the license consent agreement
You must sign the consent agreement to use Gemma. Follow these instructions:
1. Access the [model consent page](https://www.kaggle.com/models/google/gemma) on Kaggle.com.
2. Sign in to Kaggle, if you haven't done so already.
3. Click **Request Access**.
4. In the **Choose Account for Consent** section, select **Verify via Kaggle
Account** to use your Kaggle account for granting consent.
5. Accept the model **Terms and Conditions**.
### Generate an access token
To access the model through Kaggle, you need a [Kaggle API token](https://github.com/Kaggle/kaggle-api).
Follow these steps to generate a new token, if you don't have one already:
1. In your browser, go to [Kaggle settings](https://www.kaggle.com/settings).
2. Under the **API** section, click **Create New Token**.
Kaggle downloads a file named `kaggle.json`.
### Upload the access token to Cloud Shell
In Cloud Shell, you can upload the Kaggle API token to your Google Cloud
project:
1. In Cloud Shell, click **More** \> **Upload**.
2. Select File and click **Choose Files**.
3. Open the `kaggle.json` file.
4. Click **Upload**.
### Create Kubernetes Secret for Kaggle credentials
In Cloud Shell, do the following steps:
1. Configure `kubectl` to communicate with your cluster:
```bash
gcloud container clusters get-credentials ${CLUSTER_NAME} --location=${LOCATION}
```
2. Create a Secret to store the Kaggle credentials:
```bash
kubectl create secret generic kaggle-secret \
--from-file=kaggle.json
```
## Deploy Saxml
In this section, you deploy the Saxml admin server, model servers, and the HTTP server. This tutorial uses Kubernetes Deployment manifests. A *Deployment* is a Kubernetes API object that lets you run multiple replicas of Pods that are distributed among the nodes in a cluster..
### Deploy the Saxml admin server
In this section, you deploy the Saxml admin server.
1. Create the following `saxml-admin-server.yaml` manifest:
```yaml
apiVersion: apps/v1
kind: Deployment
metadata:
name: sax-admin-server
spec:
replicas: 1
selector:
matchLabels:
app: sax-admin-server
template:
metadata:
labels:
app: sax-admin-server
spec:
hostNetwork: false
containers:
- name: sax-admin-server
image: us-docker.pkg.dev/cloud-tpu-images/inference/sax-admin-server:v1.2.0
securityContext:
privileged: true
ports:
- containerPort: 10000
env:
- name: GSBUCKET
value: ADMIN_BUCKET_NAME
```
Replace the ADMIN_BUCKET_NAME with the name of the
bucket you created in the [Create Cloud Storage buckets](https://docs.cloud.google.com/kubernetes-engine/docs/deprecations/serve-gemma-tpu-saxml.md.txt#create-storage-bucket)
section. Don't include the `gs://` prefix.
2. Apply the manifest:
```bash
kubectl apply -f saxml-admin-server.yaml
```
3. Verify the admin server deployment:
```bash
kubectl get deployment
```
The output looks similar to the following:
NAME READY UP-TO-DATE AVAILABLE AGE
sax-admin-server 1/1 1 1 ##s
### Deploy the Saxml model server
Follow these instructions to deploy the model server for the Gemma 2B or Gemma 7B model.
### Gemma 2B-it
1. Create the following `saxml-model-server-1x1.yaml` manifest:
```yaml
apiVersion: apps/v1
kind: Deployment
metadata:
name: sax-model-server-v5e-1x1
spec:
replicas: 1
selector:
matchLabels:
app: gemma-server
strategy:
type: Recreate
template:
metadata:
labels:
app: gemma-server
ai.gke.io/model: gemma-2b-it
ai.gke.io/inference-server: saxml
examples.ai.gke.io/source: user-guide
spec:
nodeSelector:
cloud.google.com/gke-tpu-topology: 1x1
cloud.google.com/gke-tpu-accelerator: tpu-v5-lite-podslice
hostNetwork: false
restartPolicy: Always
containers:
- name: inference-server
image: us-docker.pkg.dev/cloud-tpu-images/inference/sax-model-server:v1.2.0
args:
- "--jax_platforms=tpu"
- "--platform_chip=tpuv5e"
- "--platform_topology=1x1"
- "--port=10001"
- "--sax_cell=/sax/test"
ports:
- containerPort: 10001
securityContext:
privileged: true
env:
- name: SAX_ROOT
value: "gs://ADMIN_BUCKET_NAME/sax-root"
resources:
requests:
google.com/tpu: 1
limits:
google.com/tpu: 1
```
Replace the ADMIN_BUCKET_NAME with the name of the
bucket you created in the [Create Cloud Storage buckets](https://docs.cloud.google.com/kubernetes-engine/docs/deprecations/serve-gemma-tpu-saxml.md.txt#create-storage-bucket)
section. Don't include the `gs://` prefix.
2. Apply the manifest:
```bash
kubectl apply -f saxml-model-server-1x1.yaml
```
3. Verify the status of the model server Deployment:
```bash
kubectl get deployment
```
The output looks similar to the following:
NAME READY STATUS RESTARTS AGE
sax-admin-server 1/1 Running 0 ##m
sax-model-server-v5e-1x1 1/1 Running 0 ##s
> [!TIP]
> **Success:** You have deployed a model server on a TPU v5e node pool with a 1x1 slice to serve the Gemma 2B model.
### Gemma 7B-it
1. Create the following `saxml-model-server-2x2.yaml` manifest:
```yaml
apiVersion: apps/v1
kind: Deployment
metadata:
name: sax-model-server-v5e-2x2
spec:
replicas: 1
selector:
matchLabels:
app: gemma-server
strategy:
type: Recreate
template:
metadata:
labels:
app: gemma-server
ai.gke.io/model: gemma-7b-it
ai.gke.io/inference-server: saxml
examples.ai.gke.io/source: user-guide
spec:
nodeSelector:
cloud.google.com/gke-tpu-topology: 2x2
cloud.google.com/gke-tpu-accelerator: tpu-v5-lite-podslice
hostNetwork: false
restartPolicy: Always
containers:
- name: inference-server
image: us-docker.pkg.dev/cloud-tpu-images/inference/sax-model-server:v1.2.0
args:
- "--jax_platforms=tpu"
- "--platform_chip=tpuv5e"
- "--platform_topology=2x2"
- "--port=10001"
- "--sax_cell=/sax/test"
ports:
- containerPort: 10001
securityContext:
privileged: true
env:
- name: SAX_ROOT
value: "gs://ADMIN_BUCKET_NAME/sax-root"
resources:
requests:
google.com/tpu: 4
limits:
google.com/tpu: 4
```
Replace the ADMIN_BUCKET_NAME with the name of the
bucket you created in the [Create Cloud Storage buckets](https://docs.cloud.google.com/kubernetes-engine/docs/deprecations/serve-gemma-tpu-saxml.md.txt#create-storage-bucket)
section. Don't include the `gs://` prefix.
2. Apply the manifest:
```bash
kubectl apply -f saxml-model-server-2x2.yaml
```
3. Verify the status of the model server Deployment:
```bash
kubectl get deployment
```
The output looks similar to the following:
NAME READY STATUS RESTARTS AGE
sax-admin-server 1/1 Running 0 ##m
sax-model-server-v5e-2x2 1/1 Running 0 ##s
> [!TIP]
> **Success:** You have deployed a model server on a TPU v5e node pool with a `2x2` slice to serve the Gemma 7B model.
### Deploy the Saxml HTTP server
In this section, you deploy the Saxml HTTP server and create a Cluster IP
Service that you use to access the server.
1. Create the following `saxml-http.yaml` manifest:
```yaml
apiVersion: apps/v1
kind: Deployment
metadata:
name: sax-http
spec:
replicas: 1
selector:
matchLabels:
app: sax-http
template:
metadata:
labels:
app: sax-http
spec:
hostNetwork: false
containers:
- name: sax-http
image: us-docker.pkg.dev/cloud-tpu-images/inference/sax-http:v1.2.0
imagePullPolicy: Always
ports:
- containerPort: 8888
env:
- name: SAX_ROOT
value: "gs://ADMIN_BUCKET_NAME/sax-root"
---
apiVersion: v1
kind: Service
metadata:
name: sax-http-svc
spec:
selector:
app: sax-http
ports:
- protocol: TCP
port: 8888
targetPort: 8888
type: ClusterIP
```
Replace the ADMIN_BUCKET_NAME with the name of the
Cloud Storage bucket that stores the Saxml Admin server.
2. Apply the manifest:
```bash
kubectl apply -f saxml-http.yaml
```
3. Verify the status of the Saxml HTTP server deployment:
```bash
kubectl get deployment
```
### Gemma 2B-it
The output looks similar to the following:
NAME READY STATUS RESTARTS AGE
sax-admin-server 1/1 Running 0 ##m
sax-model-server-v5e-1x1 1/1 Running 0 ##m
sax-http 1/1 Running 0 ##s
### Gemma 7B-it
The output looks similar to the following:
NAME READY STATUS RESTARTS AGE
sax-admin-server 1/1 Running 0 ##m
sax-model-server-v5e-2x2 1/1 Running 0 ##m
sax-http 1/1 Running 0 ##s
### Download the model checkpoint
In this section, you run a Kubernetes Job that fetches, downloads, and stores
the model checkpoint. A Job controller in Kubernetes creates one or more
Pods and helps ensure that they successfully execute a specific
task.
Follow the steps for the Gemma model that
you want to use:
### Gemma 2B-it
1. Create the following `job-2b.yaml` manifest:
```yaml
apiVersion: v1
kind: ConfigMap
metadata:
name: fetch-model-scripts
data:
fetch_model.sh: |-
#!/usr/bin/bash -x
pip install kaggle --break-system-packages && \
MODEL_NAME=$(echo ${MODEL_PATH} | awk -F'/' '{print $2}') && \
VARIATION_NAME=$(echo ${MODEL_PATH} | awk -F'/' '{print $4}') && \
mkdir -p /data/${MODEL_NAME}_${VARIATION_NAME} &&\
kaggle models instances versions download ${MODEL_PATH} --untar -p /data/${MODEL_NAME}_${VARIATION_NAME} && \
echo -e "\nCompleted extraction to /data/${MODEL_NAME}_${VARIATION_NAME}" && \
gcloud storage rsync --recursive --no-clobber /data/${MODEL_NAME}_${VARIATION_NAME} gs://${BUCKET_NAME}/${MODEL_NAME}_${VARIATION_NAME} && \
echo -e "\nCompleted copy of data to gs://${BUCKET_NAME}/${MODEL_NAME}_${VARIATION_NAME}"
---
apiVersion: batch/v1
kind: Job
metadata:
name: data-loader-2b
labels:
app: data-loader-2b
spec:
ttlSecondsAfterFinished: 120
template:
metadata:
labels:
app: data-loader-2b
spec:
restartPolicy: OnFailure
containers:
- name: gcloud
image: gcr.io/google.com/cloudsdktool/google-cloud-cli:slim
command:
- /scripts/fetch_model.sh
env:
- name: BUCKET_NAME
value: CHECKPOINTS_BUCKET_NAME
- name: KAGGLE_CONFIG_DIR
value: /kaggle
- name: MODEL_PATH
value: "google/gemma/pax/2b-it/2"
volumeMounts:
- mountPath: "/kaggle/"
name: kaggle-credentials
readOnly: true
- mountPath: "/scripts/"
name: scripts-volume
readOnly: true
volumes:
- name: kaggle-credentials
secret:
defaultMode: 0400
secretName: kaggle-secret
- name: scripts-volume
configMap:
defaultMode: 0700
name: fetch-model-scripts
```
Replace the CHECKPOINTS_BUCKET_NAME with the name of the
bucket you created in the [Create Cloud Storage buckets](https://docs.cloud.google.com/kubernetes-engine/docs/deprecations/serve-gemma-tpu-saxml.md.txt#create-storage-bucket)
section. Don't include the `gs://` prefix.
2. Apply the manifest:
```bash
kubectl apply -f job-2b.yaml
```
3. Wait for the Job to complete:
```bash
kubectl wait --for=condition=complete --timeout=180s job/data-loader-2b
```
The output looks similar to the following:
job.batch/data-loader-2b condition met
4. Verify that the Job completed successfully:
```bash
kubectl get job/data-loader-2b
```
The output looks similar to the following:
NAME COMPLETIONS DURATION AGE
data-loader-2b 1/1 ##s #m##s
5. View the logs for the Job:
```bash
kubectl logs --follow job/data-loader-2b
```
The Job uploads the checkpoint to `gs://CHECKPOINTS_BUCKET_NAME/gemma_2b-it/checkpoint_00000000`.
### Gemma 7B-it
1. Create the following `job-7b.yaml` manifest:
```yaml
apiVersion: v1
kind: ConfigMap
metadata:
name: fetch-model-scripts
data:
fetch_model.sh: |-
#!/usr/bin/bash -x
pip install kaggle --break-system-packages && \
MODEL_NAME=$(echo ${MODEL_PATH} | awk -F'/' '{print $2}') && \
VARIATION_NAME=$(echo ${MODEL_PATH} | awk -F'/' '{print $4}') && \
mkdir -p /data/${MODEL_NAME}_${VARIATION_NAME} &&\
kaggle models instances versions download ${MODEL_PATH} --untar -p /data/${MODEL_NAME}_${VARIATION_NAME} && \
echo -e "\nCompleted extraction to /data/${MODEL_NAME}_${VARIATION_NAME}" && \
gcloud storage rsync --recursive --no-clobber /data/${MODEL_NAME}_${VARIATION_NAME} gs://${BUCKET_NAME}/${MODEL_NAME}_${VARIATION_NAME} && \
echo -e "\nCompleted copy of data to gs://${BUCKET_NAME}/${MODEL_NAME}_${VARIATION_NAME}"
---
apiVersion: batch/v1
kind: Job
metadata:
name: data-loader-7b
labels:
app: data-loader-7b
spec:
ttlSecondsAfterFinished: 120
template:
metadata:
labels:
app: data-loader-7b
spec:
restartPolicy: OnFailure
containers:
- name: gcloud
image: gcr.io/google.com/cloudsdktool/google-cloud-cli:slim
command:
- /scripts/fetch_model.sh
env:
- name: BUCKET_NAME
value: CHECKPOINTS_BUCKET_NAME
- name: KAGGLE_CONFIG_DIR
value: /kaggle
- name: MODEL_PATH
value: "google/gemma/pax/7b-it/2"
volumeMounts:
- mountPath: "/kaggle/"
name: kaggle-credentials
readOnly: true
- mountPath: "/scripts/"
name: scripts-volume
readOnly: true
volumes:
- name: kaggle-credentials
secret:
defaultMode: 0400
secretName: kaggle-secret
- name: scripts-volume
configMap:
defaultMode: 0700
name: fetch-model-scripts
```
Replace the CHECKPOINTS_BUCKET_NAME with the name of the
bucket you created in the [Create Cloud Storage buckets](https://docs.cloud.google.com/kubernetes-engine/docs/deprecations/serve-gemma-tpu-saxml.md.txt#create-storage-bucket)
section. Do include the `gs://` prefix.
2. Apply the manifest:
```bash
kubectl apply -f job-7b.yaml
```
3. Wait for the Job to complete:
```bash
kubectl wait --for=condition=complete --timeout=360s job/data-loader-7b
```
The output looks similar to the following:
job.batch/data-loader-7b condition met
4. Verify that the Job completed successfully:
```bash
kubectl get job/data-loader-7b
```
The output looks similar to the following:
NAME COMPLETIONS DURATION AGE
data-loader-7b 1/1 ##s #m##s
5. View the logs for the Job:
```bash
kubectl logs --follow job/data-loader-7b
```
The Job uploads the checkpoint to `gs://CHECKPOINTS_BUCKET_NAME/gemma_7b_it/checkpoint_00000000`.
## Expose the Saxml HTTP server
You can access the Saxml HTTP server through the [ClusterIP Service](https://docs.cloud.google.com/kubernetes-engine/docs/concepts/service.md.txt#services_of_type_clusterip) that you
created when [deploying the Saxml HTTP server](https://docs.cloud.google.com/kubernetes-engine/docs/deprecations/serve-gemma-tpu-saxml.md.txt#deploy-saxml-http-server). The ClusterIP Services are only reachable from within
the cluster. Therefore, to access the Service from outside the cluster, complete
the following steps:
1. Establish a port forwarding session:
```bash
kubectl port-forward service/sax-http-svc 8888:8888
```
2. Verify that you can access the Saxml HTTP server by opening a new terminal
and running the following command:
```bash
curl -s localhost:8888
```
The output looks similar to the following:
{
"Message": "HTTP Server for SAX Client"
}
The Saxml HTTP server encapsulates the client interface to the Saxml system and
exposes it through a set of REST APIs. You use these APIs to publish,
manage, and interface with Gemma 2B and Gemma 7B models.
## Publish the Gemma model
Next, you can publish the Gemma model to a
model server that runs in a TPU slice node pool. You use the Saxml HTTP server's
`publish` API to publish a model. Follow these steps to publish the Gemma 2B
or 7B parameter model.
To learn more about the Saxml HTTP server's API, see
[Saxml HTTP APIs](https://github.com/GoogleCloudPlatform/ai-on-gke/tree/main/tools/saxml-on-gke/httpserver#saxml-http-server-apis).
### Gemma 2B-it
1. Make sure that your port forwarding session is still active:
```bash
curl -s localhost:8888
```
2. Publish the Gemma 2B parameter:
```bash
curl --request POST \
--header "Content-type: application/json" \
-s \
localhost:8888/publish \
--data \
'{
"model": "/sax/test/gemma2bfp16",
"model_path": "saxml.server.pax.lm.params.gemma.Gemma2BFP16",
"checkpoint": "gs://CHECKPOINTS_BUCKET_NAME/gemma_2b-it/checkpoint_00000000",
"replicas": "1"
}'
```
The output looks similar to the following:
{
"model": "/sax/test/gemma2bfp16",
"model_path": "saxml.server.pax.lm.params.gemma.Gemma2BFP16",
"checkpoint": "gs://CHECKPOINTS_BUCKET_NAME/gemma_2b-it/checkpoint_00000000",
"replicas": 1
}
See the next step for monitoring the progress of the deployment.
3. Monitor the progress by observing logs in a model server Pod of the
`sax-model-server-v5e-1x1` deployment.
```bash
kubectl logs --follow deployment/sax-model-server-v5e-1x1
```
This deployment can take up to five minutes to complete. Wait until you
see a message similar to the following:
I0125 15:34:31.685555 139063071708736 servable_model.py:699] loading completed.
I0125 15:34:31.686286 139063071708736 model_service_base.py:532] Successfully loaded model for key: /sax/test/gemma2bfp16
4. Verify that you can access the model, by displaying the model information:
```bash
curl --request GET \
--header "Content-type: application/json" \
-s \
localhost:8888/listcell \
--data \
'{
"model": "/sax/test/gemma2bfp16"
}'
```
The output looks similar to the following:
{
"model": "/sax/test/gemma2bfp16",
"model_path": "saxml.server.pax.lm.params.gemma.Gemma2BFP16",
"checkpoint": "gs://CHECKPOINTS_BUCKET_NAME/gemma_2b-it/checkpoint_00000000",
"max_replicas": 1,
"active_replicas": 1
}
> [!TIP]
> **Success:** You have published a Gemma 2B model. You can now interact with the model.
### Gemma 7B-it
1. Make sure that your port forwarding session is still active:
```bash
curl -s localhost:8888
```
2. Publish the Gemma 7B parameter:
```bash
curl --request POST \
--header "Content-type: application/json" \
-s \
localhost:8888/publish \
--data \
'{
"model": "/sax/test/gemma7bfp16",
"model_path": "saxml.server.pax.lm.params.gemma.Gemma7BFP16",
"checkpoint": "gs://CHECKPOINTS_BUCKET_NAME/gemma_7b-it/checkpoint_00000000",
"replicas": "1"
}'
```
The output looks similar to the following:
{
"model": "/sax/test/gemma7bfp16",
"model_path": "saxml.server.pax.lm.params.gemma.Gemma7BFP16",
"checkpoint": "gs://CHECKPOINTS_BUCKET_NAME/gemma_7b-it/checkpoint_00000000",
"replicas": 1
}
See the next step for monitoring the progress of the deployment.
3. Monitor the progress by observing logs in a model server Pod of the
`sax-model-server-v5e-2x2` deployment.
```bash
kubectl logs --follow deployment/sax-model-server-v5e-2x2
```
Wait until you see a message similar to the following:
I0125 15:34:31.685555 139063071708736 servable_model.py:699] loading completed.
I0125 15:34:31.686286 139063071708736 model_service_base.py:532] Successfully loaded model for key: /sax/test/gemma7bfp16
4. Verify that the model was published by displaying the model information:
```bash
curl --request GET \
--header "Content-type: application/json" \
-s \
localhost:8888/listcell \
--data \
'{
"model": "/sax/test/gemma7bfp16"
}'
```
The output is similar to the following:
{
"model": "/sax/test/gemma7bfp16",
"model_path": "saxml.server.pax.lm.params.gemma.Gemma7BFP16",
"checkpoint": "gs://CHECKPOINTS_BUCKET_NAME/gemma_7b-it/checkpoint_00000000",
"max_replicas": 1,
"active_replicas": 1
}
> [!TIP]
> **Success:** You have published a Gemma 7B model. You can now interact with the model.
## Use the model
You can interact with the Gemma 2B or 7B models. Use the Saxml HTTP
server's `generate` API to send a prompt to the model.
### Gemma 2B-it
Serve a prompt request by using the `generate` endpoint of the Saxml HTTP server:
```bash
curl --request POST \
--header "Content-type: application/json" \
-s \
localhost:8888/generate \
--data \
'{
"model": "/sax/test/gemma2bfp16",
"query": "What are the top 5 most popular programming languages?"
}'
```
The following is an example of the model response.
The actual output varies, based on the prompt that you serve:
[
[
"\n\n1. **Python**\n2. **JavaScript**\n3. **Java**\n4. **C++**\n5. **Go**",
-3.0704939365386963
]
]
You can run the command with different `query` parameters. You also can modify
extra parameters such `temperature`, `top_k`, `topc_p` by using the
`generate` API. To learn more about the Saxml HTTP server's API, see [Saxml HTTP APIs](https://github.com/GoogleCloudPlatform/ai-on-gke/tree/main/tools/saxml-on-gke/httpserver#saxml-http-server-apis).
### Gemma 7B-it
Serve a prompt request by using the `generate` endpoint of the Saxml HTTP server:
```bash
curl --request POST \
--header "Content-type: application/json" \
-s \
localhost:8888/generate \
--data \
'{
"model": "/sax/test/gemma7bfp16",
"query": "What are the top 5 most popular programming languages?"
}'
```
The following is an example of the model response. The output might vary in
every prompt that you serve:
[
[
"\n\n**1. JavaScript**\n\n* Most widely used language on the web.\n* Used for front-end development, such as websites and mobile apps.\n* Extensive libraries and frameworks available.\n\n**2. Python**\n\n* Known for its simplicity and readability.\n* Versatile, used for various tasks, including data science, machine learning, and web development.\n* Large and active community.\n\n**3. Java**\n\n* Object-oriented language widely used in enterprise applications.\n* Used for web applications, mobile apps, and enterprise software.\n* Strong ecosystem and support.\n\n**4. Go**\n\n",
-16.806324005126953
]
]
You can run the command with different `query` parameters. You can also modify
extra parameters such `temperature`, `top_k`, `topc_p` by using the
`generate` API. To learn more about the Saxml HTTP server's API, see [Saxml HTTP APIs](https://github.com/GoogleCloudPlatform/ai-on-gke/tree/main/tools/saxml-on-gke/httpserver#saxml-http-server-apis).
## Unpublish the model
Follow these steps to unpublish your model:
### Gemma 2B-it
To unpublish the Gemma 2B-it model, run the following command:
```bash
curl --request POST \
--header "Content-type: application/json" \
-s \
localhost:8888/unpublish \
--data \
'{
"model": "/sax/test/gemma2bfp16"
}'
```
The output looks similar to the following:
{
"model": "/sax/test/gemma2bfp16"
}
You can run the command with different prompts that are passed in the `query` parameter.
### Gemma 7B-it
To unpublish the Gemma 7B-it model, run the following command:
```bash
curl --request POST \
--header "Content-type: application/json" \
-s \
localhost:8888/unpublish \
--data \
'{
"model": "/sax/test/gemma7bfp16"
}'
```
The output looks similar to the following:
{
"model": "/sax/test/gemma7bfp16"
}
You can run the command with different prompts that are passed in the `query` parameter.
## Troubleshoot issues
- If you get the message `Empty reply from server`, it's possible that the container has not finished downloading the model data. [Check the Pod's logs](https://docs.cloud.google.com/kubernetes-engine/docs/deprecations/serve-gemma-tpu-saxml.md.txt#publish-model) again for the `Connected` message which indicates that the model is ready to serve.
- If you see `Connection refused`, [verify that your port forwarding is active](https://docs.cloud.google.com/kubernetes-engine/docs/deprecations/serve-gemma-tpu-saxml.md.txt#expose-http-server).
## Clean up
To avoid incurring charges to your Google Cloud account for the resources used in this
tutorial, either delete the project that contains the resources, or keep the project and
delete the individual resources.
### Delete the deployed resources
To avoid incurring charges to your Google Cloud account for the resources
that you created in this guide, run the following command:
```bash
gcloud container clusters delete ${CLUSTER_NAME} --location=${LOCATION}
gcloud iam service-accounts delete --quiet wi-sax@${PROJECT_ID}.iam.gserviceaccount.com
gcloud storage rm --recursive gs://ADMIN_BUCKET_NAME
gcloud storage rm --recursive gs://CHECKPOINTS_BUCKET_NAME
```
Replace the following:
- ADMIN_BUCKET_NAME: The name of the Cloud Storage bucket that stores the Saxml Admin server.
- CHECKPOINTS_BUCKET_NAME: The name of the Cloud Storage bucket that stores the model checkpoints.
## What's next
- Learn more about [TPUs in GKE](https://docs.cloud.google.com/kubernetes-engine/docs/concepts/tpus.md.txt).
- Explore the Saxml [GitHub repository](https://github.com/google/saxml), including the [Saxml HTTP APIs](https://github.com/GoogleCloudPlatform/ai-on-gke/tree/main/tools/saxml-on-gke/httpserver#saxml-http-server-apis).
- Explore the [Vertex AI Model Garden](https://console.cloud.google.com/vertex-ai/model-garden).
- Discover how to run optimized AI/ML workloads with [GKE platform orchestration capabilities](https://docs.cloud.google.com/kubernetes-engine/docs/integrations/ai-infra.md.txt).
- Explore reference architectures, diagrams, and best practices about Google Cloud. Take a look at our [Cloud Architecture Center](https://docs.cloud.google.com/architecture).