You can configure a Google Distributed Cloud user cluster to send custom logs and metrics from your applications to Cloud Logging, Cloud Monitoring, and [Google Cloud Managed Service for Prometheus](https://cloud.google.com/managed-prometheus). This telemetry helps you monitor workload health and troubleshoot issues. With Google Cloud Managed Service for Prometheus, you can also monitor and alert on your workloads globally by using [Prometheus](https://prometheus.io/).
## Enable Google Cloud Managed Service for Prometheus
The configuration for Google Cloud Managed Service for Prometheus is
specified in a Stackdriver object named `stackdriver`. For additional information,
including best practices and troubleshooting, see the
[Google Cloud Managed Service for Prometheus documentation](https://docs.cloud.google.com/stackdriver/docs/managed-prometheus.md.txt).
1. Open the `stackdriver` object for editing:
```bash
kubectl --kubeconfig=USER_CLUSTER_KUBECONFIG --namespace kube-system edit stackdriver stackdriver
```
Replace USER_CLUSTER_KUBECONFIG with the path of
your user cluster kubeconfig file.
2. Under `spec`, set `enableGMPForApplications` to `true`:
```yaml
apiVersion: addons.gke.io/v1alpha1
kind: Stackdriver
metadata:
name: stackdriver
namespace: kube-system
spec:
projectID: ...
clusterName: ...
clusterLocation: ...
proxyConfigSecretName: ...
enableGMPForApplications: true
enableVPC: ...
optimizedMetrics: true
```
3. Save and close the edited file.
The Google-managed Prometheus components start automatically in the cluster
in the `gmp-system` namespace.
4. Check the components:
```bash
kubectl --kubeconfig=USER_CLUSTER_KUBECONFIG --namespace gmp-system get pods
```
The output of this command is similar to the following:
NAME READY STATUS RESTARTS AGE
collector-abcde 2/2 Running 1 (5d18h ago) 5d18h
collector-fghij 2/2 Running 1 (5d18h ago) 5d18h
collector-klmno 2/2 Running 1 (5d18h ago) 5d18h
gmp-operator-68d49656fc-abcde 1/1 Running 0 5d18h
rule-evaluator-7c686485fc-fghij 2/2 Running 1 (5d18h ago) 5d18h
Google Cloud Managed Service for Prometheus supports rule evaluation and alerting. To set up
rule evaluation, see [Rule evaluation](https://docs.cloud.google.com/stackdriver/docs/managed-prometheus/rules-managed.md.txt#eval-rules2).
### Run an example application
In this section, you create an application that emits Prometheus metrics, and
use Google Cloud Managed Service for Prometheus to collect the metrics. For more information, see
[Google Cloud Managed Service for Prometheus](https://docs.cloud.google.com/stackdriver/docs/managed-prometheus.md.txt).
#### Deploy the example application
To deploy the application:
1. Create the `gmp-test` namespace for resources you create as part of the
example application:
```bash
kubectl --kubeconfig=USER_CLUSTER_KUBECONFIG create ns gmp-test
```
2. The managed service provides a manifest for an example application that
emits Prometheus metrics on its `metrics` port. The application uses three
replicas.
To deploy the example application, run the following command:
```bash
kubectl --kubeconfig USER_CLUSTER_KUBECONFIG -n gmp-test apply -f https://raw.githubusercontent.com/GoogleCloudPlatform/prometheus-engine/v0.4.1/examples/example-app.yaml
```
#### Configure a PodMonitoring resource
Configure a
[`PodMonitoring`](https://github.com/GoogleCloudPlatform/prometheus-engine/blob/v0.4.1/doc/api.md#podmonitoring)
custom resource to capture metrics data emitted by the example application and
send it to Google Cloud Managed Service for Prometheus. The `PodMonitoring` custom resource
uses target scraping. In this case, the collector agents scrape the `/metrics`
endpoint to which the sample application emits data.
A PodMonitoring custom resource scrapes targets only in the namespace the custom
resource is deployed in. To scrape targets in multiple namespaces, deploy the
same PodMonitoring custom resource in each namespace. You can verify the
PodMonitoring resource is installed in the intended namespace by running the
following command:
kubectl --kubeconfig USER_CLUSTER_KUBECONFIG get podmonitoring -A
For reference documentation about all the Google Cloud Managed Service for Prometheus
custom resources, see the
[prometheus-engine/doc/api reference](https://github.com/GoogleCloudPlatform/prometheus-engine/blob/v0.4.1/doc/api.md).
The following manifest defines a PodMonitoring resource, `prom-example`, in
the `gmp-test` namespace. The resource finds all Pods in the namespace that
have the label `app` with the value `prom-example`. The matching Pods are
scraped on a port named `metrics`, every 30 seconds, on the `/metrics`
HTTP path.
```yaml
apiVersion: monitoring.googleapis.com/v1
kind: PodMonitoring
metadata:
name: prom-example
spec:
selector:
matchLabels:
app: prom-example
endpoints:
- port: metrics
interval: 30s
```
To apply this resource, run the following command:
```bash
kubectl --kubeconfig USER_CLUSTER_KUBECONFIG -n gmp-test apply -f https://raw.githubusercontent.com/GoogleCloudPlatform/prometheus-engine/v0.4.1/examples/pod-monitoring.yaml
```
Google Cloud Managed Service for Prometheus is now scraping the matching Pods.
### Query metrics data
The simplest way to verify that your Prometheus data is being exported is to use
PromQL queries in the **Metrics Explorer** in the Google Cloud console.
To run a PromQL query, do the following:
1. In the Google Cloud console, go to the **Monitoring** page or click the
following button:
[Go to Monitoring](https://console.cloud.google.com/monitoring)
2. In the navigation pane, select

**Metrics Explorer**.
3. Use Prometheus Query Language (PromQL) to specify the data to display on the
chart:
1. In the toolbar of the **Select a metric** pane, select **Code Editor**.
2. Select **PromQL** in the **Language** toggle. The language toggle is at
the bottom of the **Code Editor** pane.
3. Enter your query into the query editor. For example, to chart the
average number of seconds CPUs spent in each mode over the past hour,
use the following query:
```promql
avg(rate({
"__name__"="kubernetes.io/anthos/container/cpu/core_usage_time",
"monitored_resource"="k8s_container"}[1h]))
```
For more information about using PromQL,
see [PromQL in Cloud Monitoring](https://docs.cloud.google.com/monitoring/promql.md.txt).
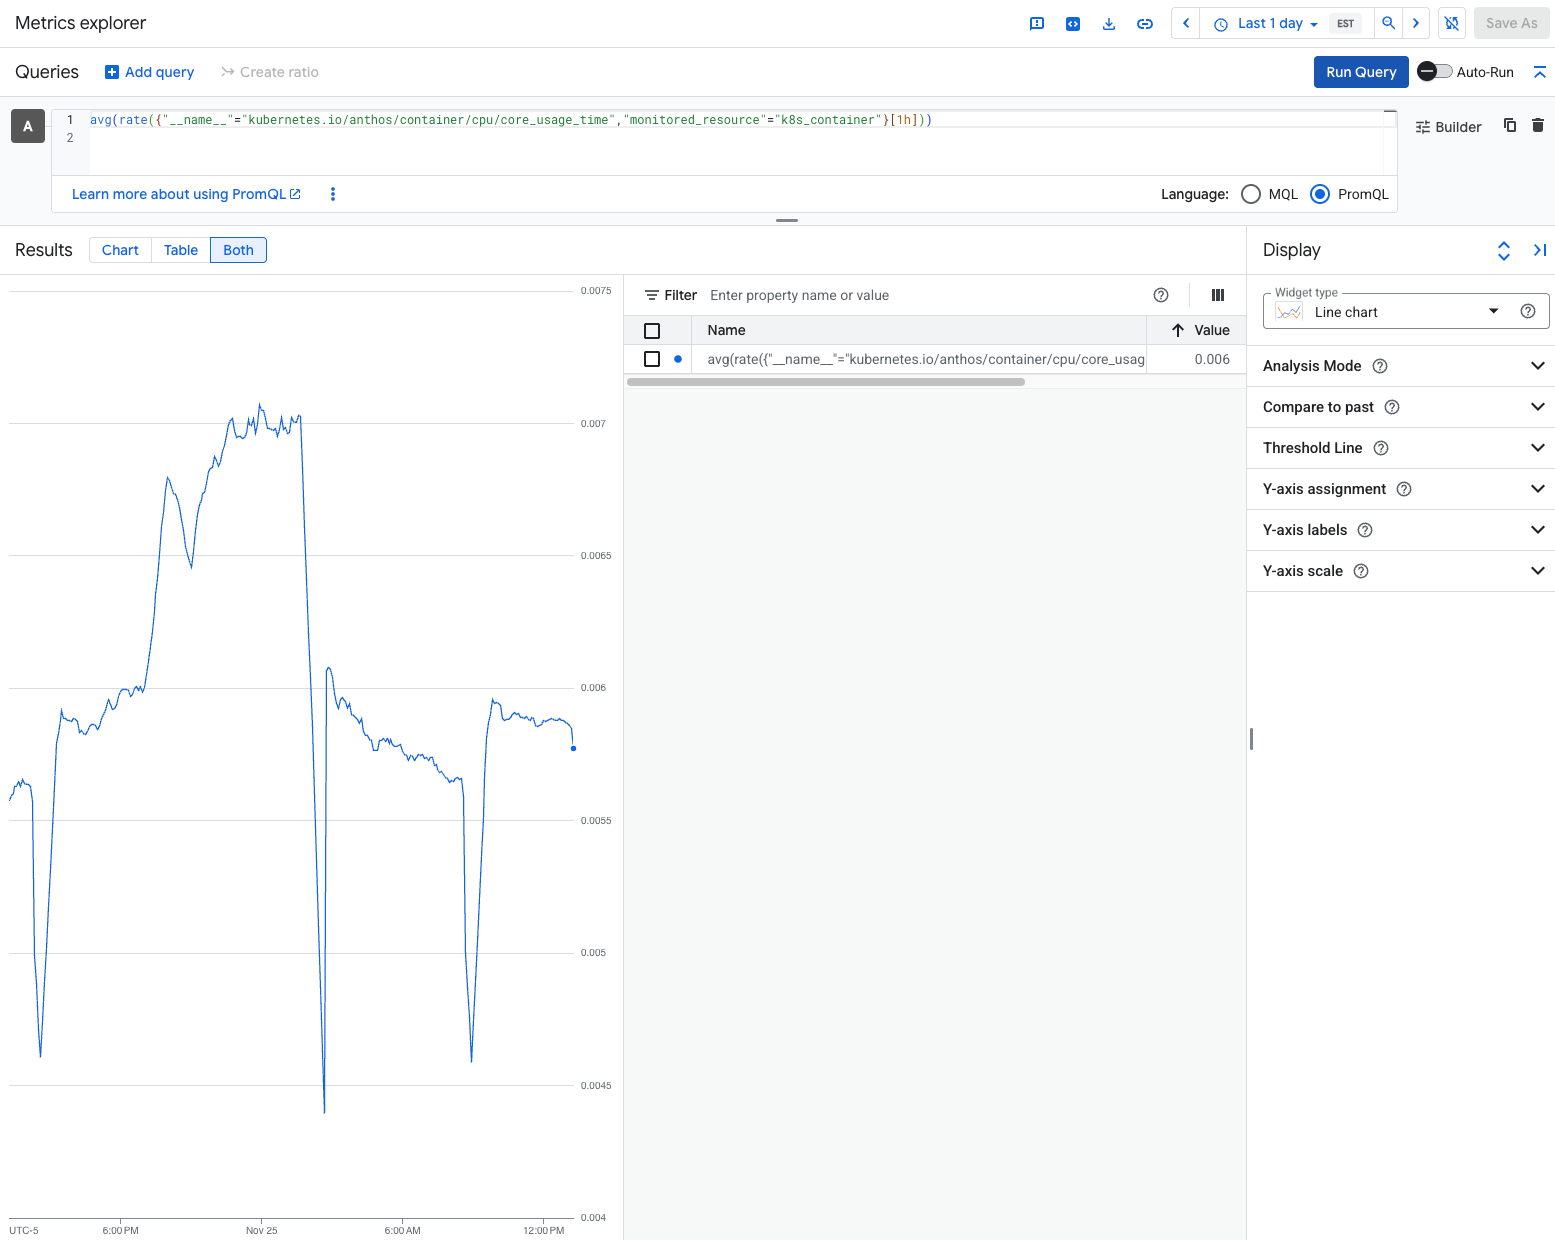
The following screenshot shows a chart that displays the
`kubernetes.io/anthos/container/cpu/core_usage_time` metric:
If you collect a lot of data, you might want to
[filter exported metrics](https://docs.cloud.google.com/stackdriver/docs/managed-prometheus/setup-managed.md.txt#filter-metrics)
to keep costs down.
## Enabling Cloud Logging for user applications
The configuration for Logging and Cloud Monitoring is held in a Stackdriver object
named stackdriver.
1. Open the `stackdriver` object for editing:
```bash
kubectl --kubeconfig=USER_CLUSTER_KUBECONFIG --namespace kube-system edit stackdriver stackdriver
```
Replace USER_CLUSTER_KUBECONFIG with the path of
your user cluster kubeconfig file.
2. Under `spec`, set `enableCloudLoggingForApplications` to `true`:
```yaml
apiVersion: addons.gke.io/v1alpha1
kind: Stackdriver
metadata:
name: stackdriver
namespace: kube-system
spec:
projectID: ...
clusterName: ...
clusterLocation: ...
proxyConfigSecretName: ...
enableCloudLoggingForApplications: true
enableVPC: ...
optimizedMetrics: true
```
3. Save and close the edited file.
### Run an example application
In this section, you create an application that writes custom logs.
1. Save the following Deployment manifest to a file named `my-app.yaml`.
```yaml
apiVersion: apps/v1
kind: Deployment
metadata:
name: "monitoring-example"
namespace: "default"
labels:
app: "monitoring-example"
spec:
replicas: 1
selector:
matchLabels:
app: "monitoring-example"
template:
metadata:
labels:
app: "monitoring-example"
spec:
containers:
- image: gcr.io/google-samples/prometheus-dummy-exporter:latest
name: prometheus-example-exporter
imagePullPolicy: Always
command:
- /bin/sh
- -c
- ./prometheus-dummy-exporter --metric-name=example_monitoring_up --metric-value=1 --port=9090
resources:
requests:
cpu: 100m
```
2. Create the deployment:
```bash
kubectl --kubeconfig USER_CLUSTER_KUBECONFIG apply -f my-app.yaml
```
### View application logs
### Console
1. Go to the Logs explorer in the Google Cloud console.
[Go to the Logs explorer](https://console.cloud.google.com/logs/query)
2. Click **Resource** . Under **ALL_RESOURCE_TYPES** , select `Kubernetes
Container`.
3. Under **CLUSTER_NAME**, select the name of your user cluster.
4. Under **NAMESPACE_NAME** , select `default`.
5. Click **Add** and then click **Run Query**.
6. Under **Query results** , you can see log entries from the
`monitoring-example` Deployment. For example:
```json
{
"textPayload": "2020/11/14 01:24:24 Starting to listen on :9090\n",
"insertId": "1oa4vhg3qfxidt",
"resource": {
"type": "k8s_container",
"labels": {
"pod_name": "monitoring-example-7685d96496-xqfsf",
"cluster_name": ...,
"namespace_name": "default",
"project_id": ...,
"location": "us-west1",
"container_name": "prometheus-example-exporter"
}
},
"timestamp": "2020-11-14T01:24:24.358600252Z",
"labels": {
"k8s-pod/pod-template-hash": "7685d96496",
"k8s-pod/app": "monitoring-example"
},
"logName": "projects/.../logs/stdout",
"receiveTimestamp": "2020-11-14T01:24:39.562864735Z"
}
```
### gcloud
1. Run this command:
```bash
gcloud logging read 'resource.labels.project_id="PROJECT_ID" AND \
resource.type="k8s_container" AND resource.labels.namespace_name="default"'
```
Replace PROJECT_ID with the ID of your [logging-monitoring project](https://docs.cloud.google.com/kubernetes-engine/distributed-cloud/vmware/docs/how-to/service-accounts.md.txt#logging_monitoring_service_account).
2. In the output, you can see log entries from the `monitoring-example`
Deployment. For example:
```yaml
insertId: 1oa4vhg3qfxidt
labels:
k8s-pod/app: monitoring-example
k8s- pod/pod-template-hash: 7685d96496
logName: projects/.../logs/stdout
receiveTimestamp: '2020-11-14T01:24:39.562864735Z'
resource:
labels:
cluster_name: ...
container_name: prometheus-example-exporter
location: us-west1
namespace_name: default
pod_name: monitoring-example-7685d96496-xqfsf
project_id: ...
type: k8s_container
textPayload: |
2020/11/14 01:24:24 Starting to listen on :9090
timestamp: '2020-11-14T01:24:24.358600252Z'
```
### Filter application logs
Application log filtering can reduce application logging billing and network
traffic from the cluster to Cloud Logging. Starting with
Google Distributed Cloud release 1.15.0, when `enableCloudLoggingForApplications`
is set to `true`, you can filter application logs by the following criteria:
- Pod labels (`podLabelSelectors`)
- Namespaces (`namespaces`)
- Regular expressions for log content (`contentRegexes`)
Google Distributed Cloud sends only the filter results to Cloud Logging.
#### Define application log filters
The configuration for Logging is specified in a Stackdriver
object named `stackdriver`.
1. Open the `stackdriver` object for editing:
```bash
kubectl --kubeconfig USER_CLUSTER_KUBECONFIG --namespace kube-system \
edit stackdriver stackdriver
```
Replace
USER_CLUSTER_KUBECONFIG
with the path to your user cluster kubeconfig file.
2. Add an `appLogFilter` section to the `spec`:
```yaml
apiVersion: addons.gke.io/v1alpha1
kind: Stackdriver
metadata:
name: stackdriver
namespace: kube-system
spec:enableCloudLoggingForApplications: true
projectID: ...
clusterName: ...
clusterLocation: ...appLogFilter:
keepLogRules:
- namespaces:
- prod
ruleName: include-prod-logs
dropLogRules:
- podLabelSelectors:
- disableGCPLogging=yes
ruleName: drop-logs
```
3. Save and close the edited file.
4. (Optional) If you're using `podLabelSelectors`, restart the
`stackdriver-log-forwarder` DaemonSet to effect your changes as soon as
possible:
```bash
kubectl --kubeconfig USER_CLUSTER_KUBECONFIG --namespace kube-system \
rollout restart daemonset stackdriver-log-forwarder
```
Normally, `podLabelSelectors` are effective after 10 minutes. Restarting the
DaemonSet `stackdriver-log-forwarder` makes the changes take effect more
quickly.
#### Example: Include `ERROR` or `WARN` logs in `prod` namespace only
The following example illustrates an application log filter works. You define a
filter that uses a namespace (`prod`), a regular expression
(`.*(ERROR|WARN).*`), and a Pod label (`disableGCPLogging=yes`). Then, to
verify that the filter works, you run a Pod in the `prod` namespace to test
these filter conditions.
To define and test an application log filter:
1. Specify an application log filter in the Stackdriver object:
In the following `appLogFilter` example, only `ERROR` or `WARN` logs in the
`prod` namespace are kept. Any logs for Pods with the label
`disableGCPLogging=yes` are dropped:
```yaml
apiVersion: addons.gke.io/v1alpha1
kind: Stackdriver
metadata:
name: stackdriver
namespace: kube-system
spec:
...
appLogFilter:
keepLogRules:
- namespaces:
- prod
contentRegexes:
- ".*(ERROR|WARN).*"
ruleName: include-prod-logs
dropLogRules:
- podLabelSelectors:
- disableGCPLogging=yes # kubectl label pods pod disableGCPLogging=yes
ruleName: drop-logs
```
2. Deploy a Pod in the `prod` namespace and run a script that generates `ERROR`
and `INFO` log entries:
```bash
kubectl --kubeconfig USER_CLUSTER_KUBECONFIG run pod1 \
--image gcr.io/cloud-marketplace-containers/google/debian10:latest \
--namespace prod --restart Never --command -- \
/bin/sh -c "while true; do echo 'ERROR is 404\\nINFO is not 404' && sleep 1; done"
```
The filtered logs should contain the `ERROR` entries only, not the `INFO`
entries.
3. Add the label `disableGCPLogging=yes` to the Pod:
```bash
kubectl --kubeconfig USER_CLUSTER_KUBECONFIG label pods pod1 \
--namespace prod disableGCPLogging=yes
```
The filtered log should no longer contain any entries for the `pod1` Pod.
#### Application log filter API definition
The definition for the application log filter is declared within the stackdriver
custom resource definition.
To get the stackdriver custom resource definition, run the following command:
```bash
kubectl --kubeconfig USER_CLUSTER_KUBECONFIG get crd stackdrivers.addons.gke.io \
--namespace kube-system -o yaml
```