# Track data lineage for a BigQuery table
Data lineage lets you track where data comes from, how
it's transformed, and where it moves across BigQuery tables over
time. Tracing these movements helps you maintain compliance, troubleshoot data
issues, and perform root-cause analysis. In this quickstart, you use the
Google Cloud console to copy two public `new_york_taxi_trips` tables, combine
their ride counts into a new BigQuery table, and view the
lineage visualization graph. To interact with data lineage
programmatically instead, see [Knowledge Catalog and
data lineage client
libraries](https://docs.cloud.google.com/knowledge-catalog/docs/reference/libraries).
## Before you begin
Set up your project:
> [!CAUTION]
> **Caution:** Data lineage is enabled on a per-project basis, not a per-service basis. After you enable the Data Lineage API, lineage information is automatically reported for multiple Google Cloud services in the project, depending on their product-level lineage control. For more details, see [Data lineage considerations and limitations](https://docs.cloud.google.com/knowledge-catalog/docs/about-data-lineage.md.txt#lineage-considerations).
### Required roles
To get the permissions that
you need to view lineage visualization graphs,
ask your administrator to grant you the
following IAM roles:
- [Dataplex Catalog Viewer](https://docs.cloud.google.com/iam/docs/roles-permissions/dataplex.md.txt#dataplex.catalogViewer) (`roles/dataplex.catalogViewer`) on the Knowledge Catalog (formerly Dataplex Universal Catalog) resource project
- [Data Lineage Viewer](https://docs.cloud.google.com/iam/docs/roles-permissions/datalineage.md.txt#datalineage.viewer) (`roles/datalineage.viewer`) on the project where you use BigQuery
- [BigQuery Data Viewer](https://docs.cloud.google.com/iam/docs/roles-permissions/bigquery.md.txt#bigquery.dataViewer) (`roles/bigquery.dataViewer`) on the project where you use BigQuery
For more information about granting roles, see [Manage access to projects, folders, and organizations](https://docs.cloud.google.com/iam/docs/granting-changing-revoking-access.md.txt).
You might also be able to get
the required permissions through [custom
roles](https://docs.cloud.google.com/iam/docs/creating-custom-roles) or other [predefined
roles](https://docs.cloud.google.com/iam/docs/roles-overview#predefined).
## Add a public dataset to your project
1. In the Google Cloud console, go to the BigQuery page.
[Go to BigQuery](https://console.cloud.google.com/bigquery)
2. In the left pane, click database **Data Explorer**.
If you don't see the left pane, click **Expand left pane** to open the pane.
3. In the **Data** pane, click **Add data**.
4. In the **Add data** pane, select **Public datasets**.
5. In the **Marketplace** pane, search for `NYC TLC Trips` and click the
**NYC TLC Trips** result.
6. Click **View dataset**.
This adds the public dataset's project as a reference that you can view in the
**Explorer** pane. The details pane shows **Dataset info** , including information
such as **Dataset ID** , **Data location** , and **Last modified** date.
## Create a dataset in your project
1. In the left pane, click **Explorer**.
2. In the **Explorer** pane, select the project where you want to create the
dataset.
3. Click **Actions** and click **Create
dataset**.
4. On the **Create dataset** page, in the **Dataset ID** field, enter:
`data_lineage_demo`. Leave the other fields with their default values.
5. Click **Create dataset**.
6. In the **Explorer** pane, click **Datasets** , and then click the newly added
`data_lineage_demo`.
The details pane shows its **Dataset info**.
## Copy two publicly accessible tables to your dataset
1. Open a query editor: In the details pane, next to the tab called
`data_lineage_demo`, click
**SQL query** . This step creates a tab called `Untitled`.
2. In the query editor, copy the first table by entering the following
query. Replace `PROJECT_ID` with your [project's
identifier](https://docs.cloud.google.com/resource-manager/docs/creating-managing-projects#identifying_projects).
```sql
CREATE TABLE `PROJECT_ID.data_lineage_demo.nyc_green_trips_2021`
COPY `bigquery-public-data.new_york_taxi_trips.tlc_green_trips_2021`
```
3. Click **Run** . This step
creates the first table, called `nyc_green_trips_2021`.
4. In the **Query results** pane, click **Go to table**. This step displays
the contents of the first table.
5. In the query editor, copy the second table by replacing the previous
query with the following query. Replace `PROJECT_ID` with your
[project's
identifier](https://docs.cloud.google.com/resource-manager/docs/creating-managing-projects#identifying_projects).
```sql
CREATE TABLE `PROJECT_ID.data_lineage_demo.nyc_green_trips_2022`
COPY `bigquery-public-data.new_york_taxi_trips.tlc_green_trips_2022`
```
6. Click **Run** . This step
creates the second table, called `nyc_green_trips_2022`.
7. In the **Query results** pane, click **Go to table**. This step displays
the contents of the second table.
## Aggregate data into a new table
1. In the query editor, enter the following query. Replace `PROJECT_ID` with
your
[project's identifier](https://docs.cloud.google.com/resource-manager/docs/creating-managing-projects.md.txt#identifying_projects).
```sql
CREATE TABLE `PROJECT_ID.data_lineage_demo.total_green_trips_22_21`
AS SELECT vendor_id, COUNT(*) AS number_of_trips
FROM (
SELECT vendor_id FROM `PROJECT_ID.data_lineage_demo.nyc_green_trips_2022`
UNION ALL
SELECT vendor_id FROM `PROJECT_ID.data_lineage_demo.nyc_green_trips_2021`
)
GROUP BY vendor_id
```
2. Click **Run** . This step
creates a combined table, called `total_green_trips_22_21`.
3. In the **Query results** pane, click **Go to table**. This step displays
the combined table.
## View the lineage graph in Knowledge Catalog
1. In the Google Cloud console, go to the Knowledge Catalog **Search** page.
[Go to Search](https://console.cloud.google.com/dataplex/dp-search)
2. In the **Search** box, enter `total_green_trips_22_21` and click **Search**.
3. From the results list, click `total_green_trips_22_21`. This step displays
the BigQuery table **Details** tab.
4. Click the **Lineage** tab.
> [!NOTE]
> **Note:** It might take some time for automatic lineage to pick up these changes. If you don't see the lineage graph yet, check again after several minutes.
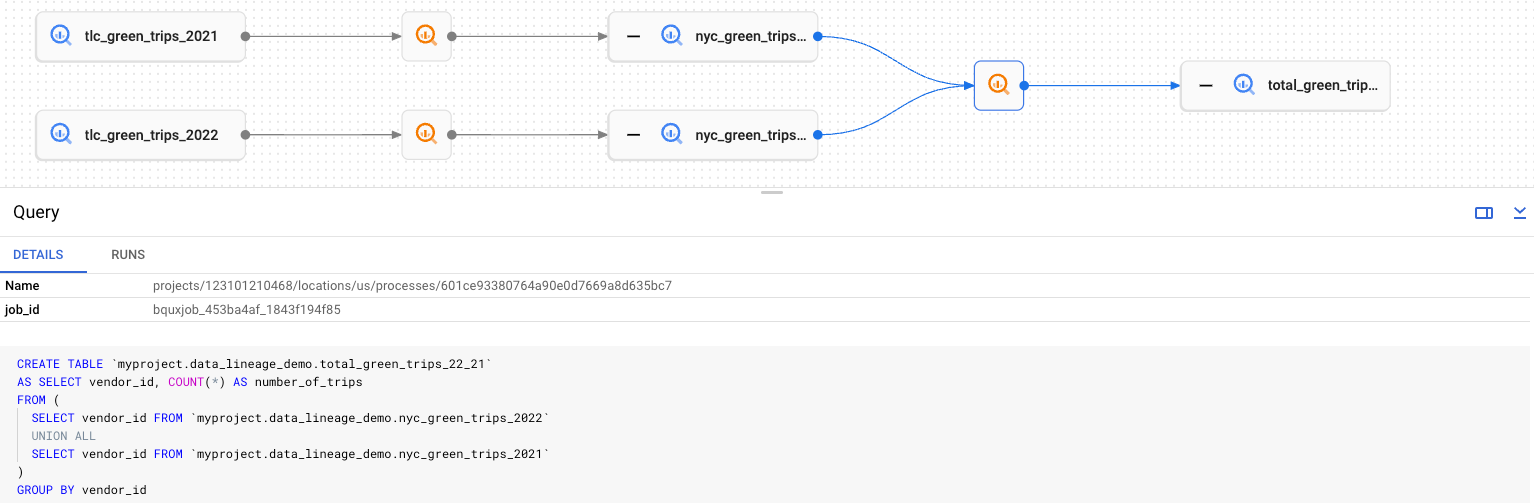 **Figure 1.** Data lineage with node details
In the lineage graph, each rectangular node represents a table, either an
original, copied, or combined table. You can do the following:
- To show or hide the origin of a table, click **+** (Expand) or **-**
(Collapse).
- To show table information, click a node. This step displays a node
**Details** pane.
- To show process information, click
.
This step displays a process **Details** pane showing the job that
transformed a source table to a target table.
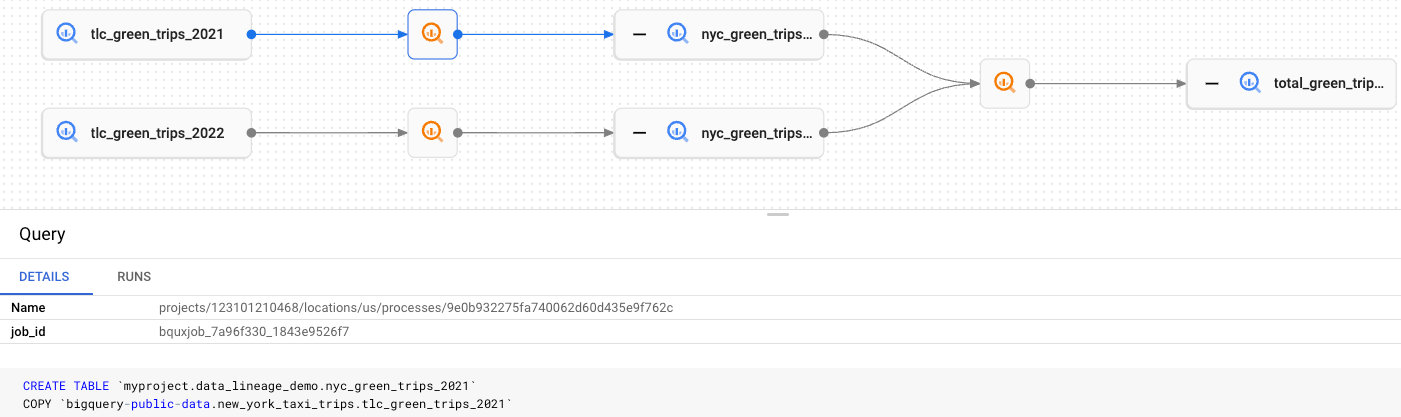 **Figure 2.** Data lineage with process details
## Clean up
To avoid incurring charges to your Google Cloud account for
the resources used on this page, follow these steps.
### Delete the project
> [!CAUTION]
> **Caution** : Deleting a project has the following effects:
>
> - **Everything in the project is deleted.** If you used an existing project for the tasks in this document, when you delete it, you also delete any other work you've done in the project.
> - **Custom project IDs are lost.** When you created this project, you might have created a custom project ID that you want to use in the future. To preserve the URLs that use the project ID, such as an `appspot.com` URL, delete selected resources inside the project instead of deleting the whole project.
>
>
> If you plan to explore multiple architectures, tutorials, or quickstarts, reusing projects
> can help you avoid exceeding project quota limits.
1. In the Google Cloud console, go to the **Manage resources** page.
[Go to Manage resources](https://console.cloud.google.com/iam-admin/projects)
2. In the project list, select the project that you want to delete, and then click **Delete**.
3. In the dialog, type the project ID, and then click **Shut down** to delete the project.
### Delete the dataset
1. In the Google Cloud console, go to the **BigQuery** page.
[Go to BigQuery](https://console.cloud.google.com/bigquery)
2. In the left pane, click **Explorer**.
3. In the **Explorer** pane, search for the `data_lineage_demo` dataset that
you created.
4. Click the dataset, and then click **Delete**.
5. Confirm your delete action.
## What's next
- Learn more about [data lineage](https://docs.cloud.google.com/knowledge-catalog/docs/about-data-lineage.md.txt).
- Learn how to [run BigQuery
queries](https://docs.cloud.google.com/bigquery/docs/running-queries).
- Learn how to [use data lineage](https://docs.cloud.google.com/knowledge-catalog/docs/use-lineage.md.txt).
- Learn how to use [Knowledge Catalog and Data Lineage client libraries](https://docs.cloud.google.com/knowledge-catalog/docs/reference/libraries.md.txt).
- Learn about [Knowledge Catalog pricing](https://cloud.google.com/dataplex/pricing).
- Try [Knowledge Catalog use cases](https://docs.cloud.google.com/knowledge-catalog/docs/use-cases).