This guide describes how to use Workload Identity Federation to let workloads
use Active Directory credentials to authenticate to Google Cloud.
If you're running Windows Server workloads in an Active Directory environment,
then these workloads might have access to Active Directory credentials.
For example:
- A Windows Service might be configured to log on as a domain user.
- An IIS application might be configured to run as a group managed service account (gMSA).
By using Workload Identity Federation in combination with Active Directory
Federation Services (AD FS), you can let these workloads exchange their Active
Directory Kerberos credentials for short-lived Google Cloud credentials.
Workloads can use these short-lived credentials to access Google Cloud
APIs.
Exchanging Active Directory credentials against short-lived Google Cloud
credentials works by [chaining two token exchanges](https://docs.cloud.google.com/iam/docs/best-practices-for-using-workload-identity-federation.md.txt#additional-token-exchange):
1. A workload uses OpenID Connect (OIDC), SAML-POST, or WS-Trust to request an OIDC token or SAML assertion from AD FS. To authenticate to AD FS, the workload uses [integrated Windows authentication (IWA)](https://docs.microsoft.com/en-us/aspnet/web-api/overview/security/integrated-windows-authentication) and its existing Active Directory credentials.
2. The workload then uses Workload Identity Federation to exchange the OIDC token or SAML assertion against an Security Token Service token and, optionally, to impersonate a Google Cloud service account.
This document shows you how you can automate this process in a way that doesn't
require changes to your application by using the [Workload Authenticator for Windows](https://github.com/GoogleCloudPlatform/iam-windows-authenticator).
## Prepare AD FS
You only need to perform these steps once.
### Select a protocol
The way to prepare AD FS depends on which protocol you want to use:
- SAML: You can let workloads use SAML or WS-Trust to obtain SAML assertions.
To use SAML or WS-Trust, you create a *relying party* in AD FS and
configure a workload identity pool to trust assertions issued for this
relying party.
A workload can use its Active Directory user to authenticate to AD FS
either by using the SAML-POST binding or WS-Trust. AD FS then issues a SAML
assertion that contains information about the workload's Active Directory
user and additional information such as group memberships.
Using SAML or WS-Trust requires AD FS 3.0, AD FS for Windows Server 2016, or
a newer version of AD FS.
- OIDC: You can let workloads use OIDC to obtain OIDC tokens.
To use OIDC, you create an OIDC client (*native application* ) and an OIDC
resource (*Web API* ) in AD FS. You then configure a workload identity pool
to trust access tokens issued for the *Web API*.
A workload can use its Active Directory user and the OAuth `client_credentials`
grant to authenticate to AD FS. AD FS then issues an access token, but no ID
token.
The access token contains information about the OIDC client application,
but doesn't include any information about the workload's Active Directory
user or its group memberships.
Because access tokens don't contain any information about the Active
Directory user, using OIDC can be less flexible than using SAML or WS-Trust.
Using OIDC requires AD FS for Windows Server 2016 or a newer
version of AD FS.
For sign-in, your IdP must provide signed authentication information: OIDC IdPs must provide a JWT,
and SAML IdP responses must be signed.
### IWA prerequisites
This section describes IWA prerequisites that are required in order to use this
guide.
If you haven't used IWA with AD FS before, make sure that you meet the following
prerequisites:
- You've [configured AD FS to allow Windows Authentication](https://docs.microsoft.com/en-us/windows-server/identity/ad-fs/operations/configure-authentication-policies) and [to use the right service principal name](https://docs.microsoft.com/en-us/windows-server/identity/ad-fs/troubleshooting/ad-fs-tshoot-iwa#spn-misconfiguration).
- You've configured [extended protection for authentication](https://docs.microsoft.com/en-us/windows-server/identity/ad-fs/design/best-practices-for-secure-planning-and-deployment-of-ad-fs) so that it's compatible with your AD FS deployment.
### Register the workload
To register your workload in AD FS, do the following:
### OIDC
To let workloads use OIDC, you need two
[application registrations](https://docs.microsoft.com/en-us/windows-server/identity/ad-fs/development/ad-fs-openid-connect-oauth-concepts#application-types)
in AD FS:
- An application registration of type **native application** or
**server application**.
- An application registration of type **Web API** that corresponds to
a workload identity pool provider on Google Cloud.
**Registering the client application**
Create a client application that represents the workload. If you have
multiple workloads that need access to Google Cloud, you might need to
create multiple client applications.
To register a client application in AD FS, do the following:
1. Open the AD FS MMC snap-in and navigate to **Application Groups**.
2. Click **Add application group**.
3. On the **Welcome** page, do the following:
1. In the text field, enter a name for the client.
2. Select **Server application**.
3. Click **Next**.
4. On the **Server application** page, do the following:
1. In the **text-field** text field, enter a client identifier
(Client ID) and a redirect URI.
If you're only planning to use the `client_credentials`
grant type, the redirect URI won't be used and you can use a URI
such as `http://localhost/`.
2. Click **Next**.
5. On the **Configure application credentials** page, do the following:
1. Choose how the client authenticates. To use IWA, set **Windows Integrated Authentication** to **enabled**.
2. Select the domain user that your application is configured to run as.
3. Click **Next**.
6. On the **Summary** page, review the settings and click **Next**.
7. Click **Close** to dismiss the dialog.
**Creating a Web API application for the workload identity pool**
Create another application registration of type **Web API**. This
application corresponds to a workload identity pool provider, and you use it
to set up a trust relationship to Google Cloud.
To create the application in AD FS, do the following:
1. Open the AD FS MMC snap-in and navigate to **Application Groups**.
2. Click **Add application group**.
3. On the **Welcome page** , enter a name such as `Workload Identity Federation (test environment)` and select **Web API** . Then click **Next**.
4. On the **Configure Web API** page, enter a relying party identifier for
the Web API.
Instead of defining a custom relying party identifier, you can use the
following URI as relying party identifier:
```
https://iam.googleapis.com/projects/PROJECT_NUMBER/locations/global/workloadIdentityPools/WORKLOAD_POOL_ID/providers/WORKLOAD_PROVIDER_ID
```
Replace the following:
- `PROJECT_NUMBER`: the [project number](https://docs.cloud.google.com/resource-manager/docs/creating-managing-projects.md.txt) of the Google Cloud project that you use to create workload identity pool.
- `WORKLOAD_POOL_ID`: an ID of your choice that identifies the workload identity pool. You must use the same ID when creating the workload identity pool later.
- `WORKLOAD_PROVIDER_ID`: an ID of your choice that identifies the workload identity pool provider. You must use the same ID when you create the workload identity pool provider later.
Formatting the URI this way ensures that the relying party identifier
uniquely identifies a workload identity pool provider.
You need the relying party identifier later when you configure the
workload identity pool provider.
5. Click **Next**.
6. On the **Apply access control policy** page, select an appropriate
[access policy](https://docs.microsoft.com/en-us/windows-server/identity/ad-fs/operations/access-control-policies-in-ad-fs#access-control-policy-templates-in-ad-fs),
then click **Next**.
7. On the **Configure application permissions** page, add the client
application that you created previously. Then click **Next**.
8. On the **Summary** page, review the settings and click **Next**.
9. Click **Close** to dismiss the dialog.
### SAML or WS-Trust
Create a relying party trust in AD FS:
1. Open the AD FS MMC snap-in.
2. Navigate to **Relying party trusts**.
3. Click **Add relying party trust**.
4. On the **Welcome** page of the **Add relying party trust** wizard, do the following:
1. Select **Claims aware**
2. Click **Start**.
5. On the **Select data source** page, do the following:
1. Select **Enter data about the relying party manually**.
2. Click **Next**.
6. On the **Specify display name** page, do the following:
1. Enter a name for the trust.
2. Click **Next**.
7. On the **Configure certificate** page, click **Next** . While
Workload Identity Federation supports encrypted SAML, it is not
described in this procedure. To learn more, see the
gcloud CLI instructions in [Create the identity pool and provider](https://docs.cloud.google.com/iam/docs/workload-identity-federation-with-active-directory.md.txt#create-pool-provider),
later in this guide.
8. On the **Configure URL** page, do the following:
### SAML
Use the following settings:
- Set **Enable support for the SAML 2.0 WebSSO protocol** to **enabled**
- In the **Relying party SAML 2.0 SSO service URL** field, enter
the following URL:
```
https://sts.googleapis.com/v1/token
```
### WS-Trust
Keep the default settings
9. Click **Next**.
10. On the **Configure identifiers** page, enter a relying party identifier.
Instead of defining a custom relying party identifier, you can use the following
URI as relying party identifier:
```
https://iam.googleapis.com/projects/PROJECT_NUMBER/locations/global/workloadIdentityPools/WORKLOAD_POOL_ID/providers/WORKLOAD_PROVIDER_ID
```
Replace the following:
- `PROJECT_NUMBER`: the [project number](https://docs.cloud.google.com/resource-manager/docs/creating-managing-projects.md.txt) of the Google Cloud project that you use to create workload identity pool.
- `WORKLOAD_POOL_ID`: an ID of your choice that identifies the workload identity pool. You must use the same ID when creating the workload identity pool later.
- `WORKLOAD_PROVIDER_ID`: an ID of your choice that identifies the workload identity pool provider. You must use the same ID when creating the workload identity pool provider later.
Formatting the URI this way ensures that the relying party identifier
uniquely identifies a workload identity pool provider.
You need the relying party identifier later when you configure the
workload identity pool provider.
11. Click **Next**.
12. On the **Choose access control policy** page, select an appropriate
[access control policy](https://docs.microsoft.com/en-us/windows-server/identity/ad-fs/operations/access-control-policies-in-ad-fs#access-control-policy-templates-in-ad-fs),
then click **Next**.
13. On the **Ready to add trust** page, review the settings and click
**Next**.
14. On the **Finish** page, click **Close** to dismiss the dialog.
To be compatible with Workload Identity Federation, SAML assertions must
contain at least one [claim](https://docs.microsoft.com/en-us/windows-server/identity/ad-fs/technical-reference/the-role-of-claims)
that uniquely identifies the Active Directory user. Typically, you use
the **Name ID** claim for this purpose, which corresponds to the value of
the `NameID` element in the SAML assertion.
To customize the SAML assertion's set of claims, you must edit the
relying party trust's claim issuance policy. To edit the claim issuance
policy, do the following:
1. In the list of relying party trusts, select the trust that you just created and click **Edit claim issuance policy**.
2. Click **Add rule**
3. On the **Choose rule type** page of the **Add transform claim rule** wizard, do the following:
1. Select **Transform an incoming claim**.
2. Click **Next**.
4. On the **Configure claim rule** page, configure the following settings:
- **Claim rule name** : `Name Identifier`.
- **Incoming claim type** : Select **Primary SID** , **UPN**, or a different claim to uniquely identify the subject.
- **Outgoing claim type** : **Name ID**.
- **Outgoing name ID format** : **Unspecified**.
5. Select **Pass through all claim values** and click **Finish**.
6. Optionally, [configure additional rules](https://docs.microsoft.com/en-us/windows-server/identity/ad-fs/operations/configure-claim-rules)
to include more attributes in the SAML assertions.
7. Click **OK** to close the claim issuance policy dialog.
## Configure Workload Identity Federation
You only need to perform these steps once for each Microsoft Active Directory
domain that you want to federate with. You can then use the same workload
identity pool and provider for multiple workloads and across multiple
Google Cloud projects.
To start configuring Workload Identity Federation, do the following:
1. In the Google Cloud console, on the project selector page,
select or create a Google Cloud project.
**Roles required to select or create a project**
- **Select a project**: Selecting a project doesn't require a specific IAM role---you can select any project that you've been granted a role on.
- **Create a project** : To create a project, you need the Project Creator role (`roles/resourcemanager.projectCreator`), which contains the `resourcemanager.projects.create` permission. [Learn how to grant
roles](https://docs.cloud.google.com/iam/docs/granting-changing-revoking-access).
[Go to project selector](https://console.cloud.google.com/projectselector2/home/dashboard)
It's best to [use a dedicated project to manage workload identity pools and providers](https://docs.cloud.google.com/iam/docs/best-practices-for-using-workload-identity-federation.md.txt#dedicated-project).
2.
[Verify that billing is enabled for your Google Cloud project](https://docs.cloud.google.com/billing/docs/how-to/verify-billing-enabled.md.txt#confirm_billing_is_enabled_on_a_project).
3. Enable the IAM, Resource Manager, Service Account Credentials, and Security Token Service APIs, if any are not already enabled.
**Roles required to enable APIs**
To enable APIs, you need the `serviceusage.services.enable` permission. If you
created the project, then you likely already have this permission through the
Owner role (`roles/owner`). Otherwise, you can get this permission through the
Service Usage Admin role (`roles/serviceusage.serviceUsageAdmin`).
[Learn how to grant roles](https://docs.cloud.google.com/iam/docs/granting-changing-revoking-access.md.txt).
4. [Enable the APIs](https://console.cloud.google.com/apis/enableflow?apiid=iam.googleapis.com,cloudresourcemanager.googleapis.com,iamcredentials.googleapis.com,sts.googleapis.com&redirect=https://console.cloud.google.com)
### Define an attribute mapping and condition
The environment-specific credentials of your Active Directory workload contain
multiple attributes, and you must decide which attribute you want to use as
the subject identifier (`google.subject`) in Google Cloud.
Optionally, you can [map additional attributes](https://docs.cloud.google.com/iam/docs/workload-identity-federation.md.txt#mapping).
You can then refer to these additional attributes when granting access to
resources.
### OIDC
Your attribute mappings can use the
[claims embedded in AD FS access tokens](https://docs.microsoft.com/en-us/previous-versions/windows/it-pro/windows-server-2012-R2-and-2012/ee913589(v=ws.11)?redirectedfrom=MSDN#what-are-claim-types)
as source attributes.
To authenticate an application, you can use the following attribute mapping:
```
google.subject=assertion.appid
```
This mapping sets `google.subject` to the value of the `appid` claim, which
contains the Client ID of the AD FS application.
### SAML or WS-Trust
Your attribute mappings can use the claims embedded in the assertion issued
by AD FS, as described earlier in this guide.
Use the following mapping to let Workload Identity Federation use the
**Name ID** claim from the SAML assertion to uniquely identify the user:
```
google.subject=assertion.subject
```
If you've configured your claim issuance policy to include additional claims
in SAML assertions, you can add additional mappings. For example:
```
google.groups=assertion.attributes['http://schemas.microsoft.com/ws/2008/06/identity/claims/groupsid']
attribute.userip=['http://schemas.microsoft.com/2014/09/requestcontext/claims/userip'][0]
```
Optionally, define an [attribute condition](https://docs.cloud.google.com/iam/docs/workload-identity-federation.md.txt#conditions). Attribute conditions
are CEL expressions that can check assertion attributes and target attributes.
If the attribute condition evaluates to `true` for a given credential, the
credential is accepted. Otherwise, the credential is rejected.
### OIDC
You can use an attribute condition to restrict which clients
can use Workload Identity Federation to obtain short-lived
Google Cloud tokens.
For example, the following condition defines that applications have to use
IWA to authenticate to AD FS:
```
assertion.authmethod=='http://schemas.microsoft.com/ws/2008/06/identity/authenticationmethod/windows'
```
To control the list of applications that can obtain short-lived credential
for Google Cloud, don't define attribute conditions. Instead,
use [client permissions](https://docs.microsoft.com/en-us/powershell/module/adfs/set-adfsapplicationpermission?view=windowsserver2019-ps)
in AD FS to define which applications are allowed.
### SAML or WS-Trust
You can use an attribute condition to restrict which Active Directory users
can use Workload Identity Federation to obtain short-lived
Google Cloud tokens.
For example, the following condition only permits SAML
assertions that include a certain group membership claim:
```
"S-1-5-6" in google.groups
```
### Create the workload identity pool and provider
#### Required roles
To get the permissions that
you need to configure Workload Identity Federation,
ask your administrator to grant you the
following IAM roles on the project:
- [Workload Identity Pool Admin](https://docs.cloud.google.com/iam/docs/roles-permissions/iam.md.txt#iam.workloadIdentityPoolAdmin) (`roles/iam.workloadIdentityPoolAdmin`)
- [Service Account Admin](https://docs.cloud.google.com/iam/docs/roles-permissions/iam.md.txt#iam.serviceAccountAdmin) (`roles/iam.serviceAccountAdmin`)
For more information about granting roles, see [Manage access to projects, folders, and organizations](https://docs.cloud.google.com/iam/docs/granting-changing-revoking-access.md.txt).
You might also be able to get
the required permissions through [custom
roles](https://docs.cloud.google.com/iam/docs/creating-custom-roles) or other [predefined
roles](https://docs.cloud.google.com/iam/docs/roles-overview#predefined).
Alternatively, the IAM Owner (`roles/owner`) basic role also includes permissions to configure identity federation. You should not grant basic roles in a production environment, but you can grant them in a development or test environment.
### Console
1. In the Google Cloud console, go to the
**New workload provider and pool** page.
[Go to New workload provider and pool](https://console.cloud.google.com/iam-admin/workload-identity-pools/create)
2. Under **Create an identity pool**, enter the following:
- **Name**: Name for the pool. The name is also used as the pool ID. You can't change the pool ID later.
- **Description**: Text that describes the purpose of the pool.
3. Click **Continue**.
4. Configure provider settings:
### OIDC
- **Select a provider** : **OpenID Connect (OIDC)**.
- **Provider name**: the name of the provider. The name is also used as the provider ID. You cannot change the provider ID later.
- **Issuer URL** : `https://ADFS_DOMAIN/adfs` where `ADFS_DOMAIN` is the public domain name of the AD FS server or farm.
### SAML
To configure Workload Identity Federation from a **SAML** 2.0
compatible IdP, you can use the gcloud CLI
instructions.
5. Click **Continue**.
6. Under **Configure provider attributes** , add
the [attribute mappings that you've identified previously](https://docs.cloud.google.com/iam/docs/workload-identity-federation-with-active-directory.md.txt#mappings-and-conditions).
7. Under **Attribute conditions** , enter the
[attribute condition that you've identified previously](https://docs.cloud.google.com/iam/docs/workload-identity-federation-with-active-directory.md.txt#mappings-and-conditions).
Leave the field blank if you don't have an attribute condition.
8. Click **Save** to create the workload identity pool and provider.
### gcloud
1. Create a new workload identity pool:
```
gcloud iam workload-identity-pools create WORKLOAD_POOL_ID \
--location="global" \
--description="DESCRIPTION" \
--display-name="DISPLAY_NAME"
```
Replace the following:
- `WORKLOAD_POOL_ID`: Unique ID for the pool.
- `DISPLAY_NAME`: Name of the pool.
- `DESCRIPTION`: Description of the pool. This description appears when granting access to pool identities.
2. Add a workload identity pool provider:
### OIDC
gcloud iam workload-identity-pools providers create-oidc WORKLOAD_PROVIDER_ID \
--location="global" \
--workload-identity-pool="WORKLOAD_POOL_ID" \
--issuer-uri="https://ADFS_DOMAIN/adfs" \
--allowed-audiences="RELYING_PARTY_ID" \
--attribute-mapping="MAPPINGS" \
--attribute-condition="CONDITIONS"
Replace the following:
- `WORKLOAD_PROVIDER_ID`: a unique ID for the provider.
- `WORKLOAD_POOL_ID`: the ID of the pool.
- `ADFS_DOMAIN`: the public domain name of the AD FS server or farm.
- `RELYING_PARTY_ID`: the relying party identifier of the [Web API application for the workload identity pool](https://docs.cloud.google.com/iam/docs/workload-identity-federation-with-active-directory.md.txt#prepare) in AD FS. You only need this parameter if you use a custom relying party identifier.
- `MAPPINGS`: Comma-separated list of [attribute mappings that you've identified previously](https://docs.cloud.google.com/iam/docs/workload-identity-federation-with-active-directory.md.txt#mappings-and-conditions).
- `CONDITIONS`: [Attribute condition that you've identified previously](https://docs.cloud.google.com/iam/docs/workload-identity-federation-with-active-directory.md.txt#mappings-and-conditions). Remove the parameter if you don't have an attribute condition.
The prefix `gcp-` is reserved and can't be used in a workforce identity pool or workforce identity pool provider ID.
### SAML or WS-Trust
```
curl -O https://ADFS_DOMAIN/federationmetadata/2007-06/federationmetadata.xml
gcloud iam workload-identity-pools providers create-saml WORKLOAD_PROVIDER_ID \
--location="global" \
--workload-identity-pool="POOL_ID" \
--idp-metadata-path="federationmetadata.xml" \
--attribute-mapping="MAPPINGS" \
--attribute-condition="CONDITIONS"
```
Replace the following:
- `WORKLOAD_PROVIDER_ID`: a unique ID for the provider.
- `ADFS_DOMAIN`: the domain name of your AD FS server or server farm.
- `WORKLOAD_POOL_ID`: the ID of the pool.
- `MAPPINGS`: a comma-separated list of [attribute mappings that you've identified previously](https://docs.cloud.google.com/iam/docs/workload-identity-federation-with-active-directory.md.txt#mappings-and-conditions).
- `CONDITIONS`: Optional: the [attribute condition](https://docs.cloud.google.com/iam/docs/workload-identity-federation-with-active-directory.md.txt#mappings-and-conditions) that you created earlier in this guide.
The prefix `gcp-` is reserved and can't be used in a workforce identity pool or workforce identity pool provider ID.
Example:
```
gcloud iam workload-identity-pools providers create-saml example-provider \
--location="global" \
--workload-identity-pool="pool-1" \
--idp-metadata-path="federationmetadata.xml" \
--attribute-mapping=google.subject=assertion.subject"
```
### Optional: Accept encrypted SAML assertions from your IdP
To enable your SAML 2.0 IdP to produce encrypted SAML
assertions that can be accepted by workload identity federation, do the following:
- In workload identity federation, do the following:
- Create an asymmetric key pair for your workload identity pool provider.
- Download a certificate file that contains the public key.
- Configure your SAML IdP to use the public key to encrypt SAML assertions it issues.
- In your IdP, do the following:
- Enable assertion encryption, also known as token encryption.
- Upload the public key that you created in workload identity federation.
- Confirm that your IdP produces encrypted SAML assertions.
Note that, even with SAML encryption provider keys configured, workload identity federation can still process a plaintext assertion.
#### Create workload identity federation SAML assertion encryption keys
This section guides you through creating an asymmetric key pair that enables
workload identity federation to accept encrypted SAML assertions.
Google Cloud uses the private key to decrypt the SAML assertions that your
IdP issues. To create an asymmetric key pair for use with SAML encryption, run the following command. To learn more, see [Supported SAML encryption algorithms](https://docs.cloud.google.com/iam/docs/workload-identity-federation-with-active-directory.md.txt#supported-saml-encryption-algorithms).
```bash
gcloud iam workload-identity-pools providers keys create KEY_ID \
--workload-identity-pool WORKLOAD_POOL_ID \
--provider WORKLOAD_PROVIDER_ID \
--location global \
--use encryption \
--spec KEY_SPECIFICATION
```
Replace the following:
- `KEY_ID`: a key name of your choice
- `WORKLOAD_POOL_ID`: the pool ID
- `WORKLOAD_PROVIDER_ID`: the workforce identity pool provider ID
- `KEY_SPECIFICATION`: the key specification, which can be one of `rsa-2048`, `rsa-3072`, and `rsa-4096`.
After the key pair is created, to download the public key into a certificate
file, execute the following command. Only workload identity federation has
access to the private key.
```bash
gcloud iam workload-identity-pools providers keys describe KEY_ID \
--workload-identity-pool WORKLOAD_POOL_ID \
--provider WORKLOAD_PROVIDER_ID \
--location global \
--format "value(keyData.key)" \
> CERTIFICATE_PATH
```
Replace the following:
- `KEY_ID`: the key name
- `WORKLOAD_POOL_ID`: the pool ID
- `WORKLOAD_PROVIDER_ID`: the workforce identity pool provider ID
- `CERTIFICATE_PATH`: the path to write the certificate to---for example, `saml-certificate.cer` or `saml-certificate.pem`
#### Configure your SAML 2.0-compliant IdP to issue encrypted SAML assertions
1. Move the certificate file to your AD FS server.
2. On your AD FS server, right-click the **Start** button (or press **Win** +**X** ) and click **Windows PowerShell
(Admin)**.
3. In PowerShell, run the following command to enable encryption:
```
Set-AdfsRelyingPartyTrust `
-TargetName NAME `
-SamlResponseSignature MessageAndAssertion `
-EncryptionCertificate PATH `
-EncryptClaims $True
```
Replace the following:
- `NAME`: the name of your relying party trust
- `PATH`: the path of the certificate file
WS-Trust users: This feature is only available when you use SAML.
After you configure your IdP to encrypt SAML assertions, we recommend that you check to make sure that the assertions it generates are actually encrypted. Even with SAML assertion encryption configured, workload identity federation can still process plaintext assertions.
#### Delete workload identity federation encryption keys
To delete SAML encryption keys run the following command:
```bash
gcloud iam workload-identity-pools providers keys delete KEY_ID \
--workload-identity-pool WORKLOAD_POOL_ID \
--provider WORKLOAD_PROVIDER_ID \
--location global
```
Replace the following:
- `KEY_ID`: the key name
- `WORKLOAD_POOL_ID`: the pool ID
- `WORKLOAD_PROVIDER_ID`: the workforce identity pool provider ID
#### Supported SAML encryption algorithms
Workload identity federation supports the following key transport algorithms:
-
- [http://www.w3.org/2009/xmlenc11#rsa-oaep"](http://www.w3.org/2009/xmlenc11#rsa-oaep)
- [http://www.w3.org/2001/04/xmlenc#rsa-1_5"](http://www.w3.org/2001/04/xmlenc#rsa-1_5)
Workload identity federation supports the following block encryption algorithms:
-
-
-
-
-
### Optional: Enable SAML encryption
SAML assertions that are issued by AD FS are cryptographically signed
and exchanged over an encrypted TLS channel. However, the SAML
assertions themselves are not encrypted. By using SAML encryption, you can
configure AD FS to encrypt assertions so that they can only be decrypted
and read by your workload identity pool.
### OIDC
This feature is only available when you use SAML.
### SAML or WS-Trust
1. Create an encryption key for your workload identity pool provider:
```
gcloud iam workload-identity-pools providers keys create rsa2048 \
--workload-identity-pool=POOL_ID \
--provider=WORKLOAD_PROVIDER_ID \
--location=global \
--use=ENCRYPTION \
--spec=RSA_2048
```
Replace the following:
- `WORKLOAD_PROVIDER_ID`: ID of the provider.
- `POOL_ID`: the ID of the pool.
The key pair is stored and managed by Workload Identity Federation. You
can export the public key, but only Workload Identity Federation can access
the private key.
2. Export a certificate that contains the public key:
```
gcloud iam workload-identity-pools providers keys describe rsa2048 \
--workload-identity-pool=POOL_ID \
--provider=WORKLOAD_PROVIDER_ID \
--location=global \
--format="value(keyData.key)" > workload-identity-federation.cer
```
3. Move the certificate file to your AD FS server.
4. On your AD FS server, right-click **Start** , then click
**Windows PowerShell (Admin)**.
5. In PowerShell, modify the relying party trust so that it uses encryption:
```
Set-AdfsRelyingPartyTrust `
-TargetName NAME `
-SamlResponseSignature MessageAndAssertion `
-EncryptionCertificate PATH `
-EncryptClaims $True
```
Replace the following:
- `NAME`: the name of your relying party trust
- `PATH`: the path of the certificate file
## Authenticate a workload
You must perform these steps once per workload.
### Allow your external workload to access Google Cloud resources
To provide your workload with access to Google Cloud resources, we
recommend that you grant direct resource access to the principal. In this case,
the principal is the federated user. Some Google Cloud products have
[Google Cloud API limitations](https://docs.cloud.google.com/iam/docs/federated-identity-supported-services.md.txt).
If your workload calls an API endpoint that has a limitation, you can instead
use service account impersonation. In this case, the principal is the
Google Cloud service account, which acts as the identity. You grant access
to the service account on the resource.
### Direct resource access
You can grant access to a federated identity directly on resources by using
the Google Cloud console or the gcloud CLI.
### Console
To use the Google Cloud console to grant IAM roles
directly on a resource, you must go to the resource's page, and then
grant the role. The following example shows you how to go
to the Cloud Storage page and grant the role Storage Object Viewer
(`roles/storage.objectViewer`) to a federated identity directly on a
Cloud Storage bucket.
1. In the Google Cloud console, go to the Cloud Storage **Buckets** page.
[Go to Buckets](https://console.cloud.google.com/storage/browser)
2. In the list of buckets, click the name of the bucket for which you
want to grant the role.
3. Select the **Permissions** tab near the top of the page.
4. Click the
**Grant access** button.
The **Add principals** dialog appears.
5. In the **New principals** field, enter one or more identities
that need access to your bucket.
### By subject
principal://iam.googleapis.com/projects/PROJECT_NUMBER/locations/global/workloadIdentityPools/POOL_ID/subject/SUBJECT
Replace the following:
- `PROJECT_NUMBER`: the project number
- `POOL_ID`: the workload pool ID
- `SUBJECT`: the individual subject mapped from your IdP---for example, `administrator@example.com`
### By group
principalSet://iam.googleapis.com/projects/PROJECT_NUMBER/locations/global/workloadIdentityPools/POOL_ID/group/GROUP
Replace the following:
- `PROJECT_NUMBER`: the project number
- `WORKLOAD_POOL_ID`: the workload pool ID
- `GROUP`: the group mapped from your IdP---for example: `administrator-group@example.com`
### By attribute
principalSet://iam.googleapis.com/projects/PROJECT_NUMBER/locations/global/workloadIdentityPools/POOL_ID/attribute.ATTRIBUTE_NAME/ATTRIBUTE_VALUE
Replace the following:
- `PROJECT_NUMBER`: the project number
- `WORKLOAD_POOL_ID`: the workload pool ID
- `ATTRIBUTE_NAME`: one of the attributes that was mapped from your IdP
- `ATTRIBUTE_VALUE`: the value of the attribute
6. Select a role (or roles) from the **Select a role** drop-down menu.
The roles you select appear in the pane with a short description of
the permissions they grant.
7. Click **Save**.
### gcloud
To use the gcloud CLI to grant IAM roles on a
resource in a project, do the following:
1. Obtain the project number of the project in which the resource
is defined.
```
gcloud projects describe $(gcloud config get-value core/project) --format=value\(projectNumber\)
```
2. Grant access to the resource.
To use the gcloud CLI to grant the role Storage Object Viewer
(`roles/storage.objectViewer`) to external identities that meet certain criteria,
run the following command.
### By subject
```
gcloud storage buckets add-iam-policy-binding BUCKET_ID \
--role=roles/storage.objectViewer \
--member="principal://iam.googleapis.com/projects/PROJECT_NUMBER/locations/global/workloadIdentityPools/POOL_ID/subject/SUBJECT"
```
### By group
```
gcloud storage buckets add-iam-policy-binding BUCKET_ID \
--role=roles/storage.objectViewer \
--member="principalSet://iam.googleapis.com/projects/PROJECT_NUMBER/locations/global/workloadIdentityPools/POOL_ID/group/GROUP"
```
### By attribute
```
gcloud storage buckets add-iam-policy-binding BUCKET_ID \
--role=roles/storage.objectViewer \
--member="principalSet://iam.googleapis.com/projects/PROJECT_NUMBER/locations/global/workloadIdentityPools/POOL_ID/attribute.ATTRIBUTE_NAME/ATTRIBUTE_VALUE"
```
Replace the following:
- `BUCKET_ID`: the bucket on which to grant access
- `PROJECT_NUMBER`: the [project number](https://docs.cloud.google.com/resource-manager/docs/creating-managing-projects.md.txt). of the project that contains the workload identity pool
- `POOL_ID`: the pool ID of the workload identity pool
- `SUBJECT`: the expected value for the attribute that [you've mapped](https://docs.cloud.google.com/iam/docs/workload-identity-federation-with-active-directory.md.txt#mappings-and-conditions) to `google.subject`
- `GROUP`: the expected value for the attribute that [you've mapped](https://docs.cloud.google.com/iam/docs/workload-identity-federation-with-active-directory.md.txt#mappings-and-conditions) to `google.groups`
- `ATTRIBUTE_NAME`: the name of a custom attribute in [your attribute mapping](https://docs.cloud.google.com/iam/docs/workload-identity-federation-with-active-directory.md.txt#mappings-and-conditions)
- `ATTRIBUTE_VALUE`: the value of the custom attribute in [your attribute mapping](https://docs.cloud.google.com/iam/docs/workload-identity-federation-with-active-directory.md.txt#mappings-and-conditions)
You can grant roles on any Google Cloud resource that supports
IAM allow policies.
> [!NOTE]
> **Note:** You must use the project number, not the project ID, in the member identifier.
### Service account impersonation
1. To create a service account for the external workload, do the following:
1.
Enable the IAM, Security Token Service, and Service Account Credentials APIs, if any are not already enabled.
**Roles required to enable APIs**
To enable APIs, you need the `serviceusage.services.enable` permission. If you
created the project, then you likely already have this permission through the
Owner role (`roles/owner`). Otherwise, you can get this permission through the
Service Usage Admin role (`roles/serviceusage.serviceUsageAdmin`).
[Learn how to grant roles](https://docs.cloud.google.com/iam/docs/granting-changing-revoking-access.md.txt).
[Enable the APIs](https://console.cloud.google.com/apis/enableflow?apiid=iam.googleapis.com,sts.googleapis.com,iamcredentials.googleapis.com&redirect=https://console.cloud.google.com)
2. [Create a service account](https://docs.cloud.google.com/iam/docs/creating-managing-service-accounts#creating)
that represents the workload. We recommend that you [use a dedicated service account for each workload](https://docs.cloud.google.com/iam/docs/best-practices-for-using-workload-identity-federation.md.txt#use-dedicated-service-accounts).
The service account doesn't need to be in the same project as the
workload identity pool, but you must refer to the project that
contains the service account.
3. [Grant the service account access](https://docs.cloud.google.com/iam/docs/granting-changing-revoking-access.md.txt)
to resources that you want external identities to access.
2. To let the federated identity impersonate the service account, do the
following:
### Console
To use the Google Cloud console to grant IAM roles
to a federated identity with service account, do the following:
### Service Account in the same project
1. To grant access using service account impersonation for a
service account in the same project, do the following:
1. Go to the **Workload Identity Pools** page.
[Go to Workload Identity Pools](https://console.cloud.google.com/iam-admin/workload-identity-pools)
2. Select **Grant access**.
3. In the **Grant access to service account** dialog, select
**Grant access using Service Account impersonation**.
4. In the **Service accounts** list, select the
service account for the external identities to impersonate,
and do the following:
5. To choose which identities in the pool can impersonate the
service account, perform one of the following actions:
- To allow only specific identities of the workload
identity pool to impersonate the service account, select
**Only identities matching the filter**.
- In the **Attribute name** list, select the attribute
that you want to filter on.
- In the **Attribute value** field, enter the expected
value of the attribute; for example, if you use an
attribute mapping `google.subject=assertion.sub`, set
**Attribute** name to `subject` and **Attribute value**
to the value of the `sub` claim in tokens that are
issued by your external identity provider.
6. To save the configuration, click **Save** and then
**Dismiss**.
### Service account in a different project
> [!NOTE]
> **Note:** Service accounts from different projects won't appear in the "CONNECTED SERVICE ACCOUNTS" section of your **Workload Identity Pool**.
1. To grant access using service account impersonation for a
service account in a different project, do the following:
1. Go to the **Service Accounts** page.
[Go to Service Accounts](https://console.cloud.google.com/iam-admin/serviceaccounts)
2. Select the service account that you want to impersonate.
3. Click **Manage access**.
4. Click **Add principal**.
5. In the **New principal** field, enter one of the following
[principal identifiers](https://docs.cloud.google.com/iam/docs/workload-identity-federation.md.txt#principal-types)
for the identities in your pool that will impersonate the
service account.
### By subject
principal://iam.googleapis.com/projects/PROJECT_NUMBER/locations/global/workloadIdentityPools/POOL_ID/subject/SUBJECT
Replace the following:
- `PROJECT_NUMBER`: the project number
- `POOL_ID`: the workload pool ID
- `SUBJECT`: the individual subject mapped from your IdP---for example, `administrator@example.com`
### By group
principalSet://iam.googleapis.com/projects/PROJECT_NUMBER/locations/global/workloadIdentityPools/POOL_ID/group/GROUP
Replace the following:
- `PROJECT_NUMBER`: the project number
- `WORKLOAD_POOL_ID`: the workload pool ID
- `GROUP`: the group mapped from your IdP---for example: `administrator-group@example.com`
### By attribute
principalSet://iam.googleapis.com/projects/PROJECT_NUMBER/locations/global/workloadIdentityPools/POOL_ID/attribute.ATTRIBUTE_NAME/ATTRIBUTE_VALUE
Replace the following:
- `PROJECT_NUMBER`: the project number
- `WORKLOAD_POOL_ID`: the workload pool ID
- `ATTRIBUTE_NAME`: one of the attributes that was mapped from your IdP
- `ATTRIBUTE_VALUE`: the value of the attribute
### By pool
principalSet://iam.googleapis.com/projects/PROJECT_NUMBER/locations/global/workloadIdentityPools/POOL_ID/*
Replace the following:
- `PROJECT_NUMBER`: the project number
- `WORKLOAD_POOL_ID`: the workload pool ID
6. In **Select a role** , select the Workload Identity User
role (`roles/iam.workloadIdentityUser`).
7. To save the configuration, click **Save**.
### gcloud
To grant the Workload Identity User role (`roles/iam.workloadIdentityUser`)
to a federated principal or principal set, run the following
command. To learn more about Workload Identity Federation principal
identifiers, see [Principal types](https://docs.cloud.google.com/iam/docs/workload-identity-federation.md.txt#principal-types).
### By subject
```
gcloud iam service-accounts add-iam-policy-binding SERVICE_ACCOUNT_EMAIL \
--role=roles/iam.workloadIdentityUser \
--member="principal://iam.googleapis.com/projects/PROJECT_NUMBER/locations/global/workloadIdentityPools/POOL_ID/subject/SUBJECT"
```
### By group
```
gcloud iam service-accounts add-iam-policy-binding SERVICE_ACCOUNT_EMAIL \
--role=roles/iam.workloadIdentityUser \
--member="principalSet://iam.googleapis.com/projects/PROJECT_NUMBER/locations/global/workloadIdentityPools/POOL_ID/group/GROUP"
```
### By attribute
```
gcloud iam service-accounts add-iam-policy-binding SERVICE_ACCOUNT_EMAIL \
--role=roles/iam.workloadIdentityUser \
--member="principalSet://iam.googleapis.com/projects/PROJECT_NUMBER/locations/global/workloadIdentityPools/POOL_ID/attribute.ATTRIBUTE_NAME/ATTRIBUTE_VALUE"
```
Replace the following:
- `SERVICE_ACCOUNT_EMAIL`: the email address of the service account
- `PROJECT_NUMBER`: the [project number](https://docs.cloud.google.com/resource-manager/docs/creating-managing-projects.md.txt). of the project that contains the workload identity pool
- `POOL_ID`: the pool ID of the workload identity pool
- `SUBJECT`: the expected value for the attribute that [you've mapped](https://docs.cloud.google.com/iam/docs/workload-identity-federation-with-active-directory.md.txt#mappings-and-conditions) to `google.subject`
- `GROUP`: the expected value for the attribute that [you've mapped](https://docs.cloud.google.com/iam/docs/workload-identity-federation-with-active-directory.md.txt#mappings-and-conditions) to `google.groups`
- `ATTRIBUTE_NAME`: the name of a custom attribute in [your attribute mapping](https://docs.cloud.google.com/iam/docs/workload-identity-federation-with-active-directory.md.txt#mappings-and-conditions)
- `ATTRIBUTE_VALUE`: the value of the custom attribute in [your attribute mapping](https://docs.cloud.google.com/iam/docs/workload-identity-federation-with-active-directory.md.txt#mappings-and-conditions)
> [!NOTE]
> **Note:** You must use the project number, not the project ID, in the member identifier.
### Create a credential configuration
You can let [Cloud Client Libraries](https://docs.cloud.google.com/apis/docs/cloud-client-libraries.md.txt) and tools
such as the gcloud CLI and Terraform use Active Directory credentials
to authenticate to Google Cloud by using the [Workload Authenticator for Windows](https://github.com/GoogleCloudPlatform/iam-windows-authenticator/releases/latest/download/wwauth.exe).
Workload Authenticator for Windows is an open-source tool that acts as a plugin
for the Cloud Client Libraries and tools such as the gcloud CLI:
1. When the tool or library needs a new credential, it launches the Workload Authenticator in the background.
2. The Workload Authenticator uses OIDC, SAML, or WS-Trust to obtain a new token or SAML assertion from AD FS and passes it back to the tool or library.
3. The tool or library then uses exchanges the token or SAML assertion against short-lived Google Cloud credentials by using Workload Identity Federation.
To use the Workload Authenticator for Windows, you must create a credential
configuration file. This file defines the following:
- Where to find the Workload Authenticator for Windows executable (`wwauth.exe`), and which parameters to run it with
- Which workload identity pool and provider to use
- Which service account to impersonate
To create a credential configuration file, do the following on the Windows
Server that runs your workload:
1. Right-click the **Start** button (or press **Win+X** ) and click **Windows PowerShell**.
2. Download the [Workload Authenticator for Windows](https://github.com/GoogleCloudPlatform/iam-windows-authenticator/releases/latest/download/wwauth.exe)
and save it to a location that's accessible by your workload:
```
(New-Object Net.WebClient).DownloadFile(
"https://github.com/GoogleCloudPlatform/iam-windows-authenticator/releases/latest/download/wwauth.exe",
"${env:ProgramData}\wwauth.exe")
```
If you create a credential configuration file by using the Workload
Authenticator for Windows, the file contains the path to its executable. If
you later delete or move the executable, workloads won't be able to find and
use the executable.
3. Launch `wwauth.exe`:
```
& ${env:ProgramData}\wwauth.exe
```
A configuration dialog opens:
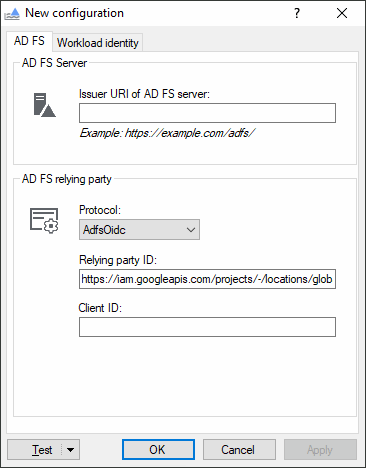
4. Select the **AD FS** tab and enter the following settings:
- **Issuer URI of AD FS server**: Public URI of your AD FS server or farm.
```
https://ADFS_DOMAIN/adfs/
```
Replace `ADFS_DOMAIN` with the public domain name
of your AD FS server or server farm.
The next settings depend on the protocol you want to use:
### OIDC
- **Protocol** : **AdfsOidc**
- **Relying party ID**: Keep the default.
- **Client ID** Client identifier (Client ID) of the [server application](https://docs.cloud.google.com/iam/docs/workload-identity-federation-with-active-directory.md.txt#prepare) in AD FS.
### SAML
- **Protocol** : **AdfsSamlPost**
- **Assertion consumer service URL** : `https://sts.googleapis.com/v1/token`.
- **Sign requests using certificate** : **disabled**
### WS-Trust
- **Protocol** : **AdfsWsTrust**
5. Select the **Workload identity** tab and enter the following settings:
- **Project number**: Project number of the project that contains the workload identity pool
- **Pool ID**: ID of the workload identity pool
- **Provider ID**: ID of the workload identity pool provider
- **Impersonate service account** : **enabled**, if you use service account impersonation
- **Email address**: Email address of the service account, if you use service account impersonation
6. Select the **AD FS** tab and verify that the **Relying Party ID** field
now contains the URL of your workload identity pool provider.
7. Click **Apply** and choose a file location to save the credential configuration
file to.
Unlike a [service account key](https://docs.cloud.google.com/iam/docs/creating-managing-service-account-keys#creating_service_account_keys),
a credential configuration file doesn't contain any secrets and doesn't need
to be kept confidential. Details about the credential configuration file are
available at .
You're now ready to test your configuration:
1. Select an Active Directory user to test with. This can be the Active
Directory user of the workload or the user you're currently logged in with.
2. To test the configuration with your current user, click **Test**.
To test with a different user, select **Test \> Test configuration as user**
and enter the credentials for the user.
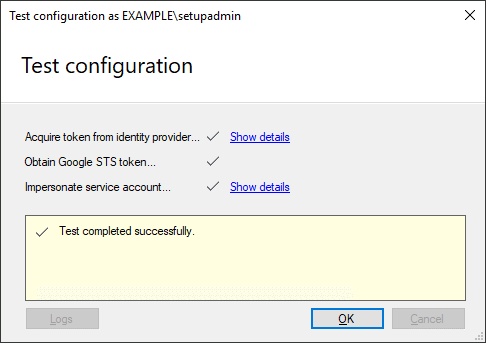
The tool now tries to authenticate to Google Cloud by performing
the following steps:
1. Acquire an OIDC token or SAML assertion from AD FS.
2. Obtain a Google Security Token Service token.
3. Impersonate the service account, if you use service account impersonation.
If the authentication succeeds, you see the message
*Test completed successfully*:
### Use the credential configuration to access Google Cloud
To let tools and client libraries use your credential configuration, do the
following on the Windows Server that runs your workload:
1. Right-click the **Start** button and click **Run**.
2. Enter `sysdm.cpl` and click **OK**.
3. On the **Advanced** tab, click **Environment variables**.
4. In the **System variables** section, add two new variables:
| Name | Value |
|---|---|
| `GOOGLE_APPLICATION_CREDENTIALS` | Path to the credential configuration file |
| `GOOGLE_EXTERNAL_ACCOUNT_ALLOW_EXECUTABLES` | `1` |
We highly recommended that you edit the credential configuration file,
and use a [regional Security Token Service endpoint](https://docs.cloud.google.com/iam/docs/best-practices-for-using-workload-identity-federation.md.txt#sts-regional-endpoints),
if it is available.
5. Click **OK**.
6. Use a client library or tool that supports Workload Identity Federation
and can [find credentials automatically](https://docs.cloud.google.com/docs/authentication/client-libraries.md.txt):
### C++
The
[Google Cloud Client Libraries for C++](https://docs.cloud.google.com/cpp/docs.md.txt)
support Workload Identity Federation since version
[v2.6.0](https://github.com/googleapis/google-cloud-cpp/releases/tag/v2.6.0).
To use Workload Identity Federation, you must build the client libraries
with version 1.36.0 or later of gRPC.
### Go
Client libraries for Go support Workload Identity Federation if they use version
v0.0.0-20210218202405-ba52d332ba99 or later of the `golang.org/x/oauth2` module.
To check which version of this module your client library uses, run the
following commands:
```bash
cd $GOPATH/src/cloud.google.com/go
go list -m golang.org/x/oauth2
```
### Java
Client libraries for Java support Workload Identity Federation if they use version 0.24.0
or later of the
[`com.google.auth:google-auth-library-oauth2-http` artifact](https://search.maven.org/artifact/com.google.auth/google-auth-library-oauth2-http).
To check which version of this artifact your client library uses, run the
following Maven command in your application directory:
```bash
mvn dependency:list -DincludeArtifactIds=google-auth-library-oauth2-http
```
### Node.js
Client libraries for Node.js support Workload Identity Federation if they use version
7.0.2 or later of the
[`google-auth-library` package](https://github.com/googleapis/google-auth-library-nodejs).
To check which version of this package your client library uses, run the
following command in your application directory:
```bash
npm list google-auth-library
```
When you create a `GoogleAuth` object, you can specify a project ID, or you can
allow `GoogleAuth` to find the project ID automatically. To find the project ID
automatically, the service account in the configuration file must have the
Browser role (`roles/browser`), or a role with equivalent permissions, on your
project. For details, see the
[`README` for the `google-auth-library` package](https://github.com/googleapis/google-auth-library-nodejs#using-external-identities).
### Python
Client libraries for Python support Workload Identity Federation if they use version
1.27.0 or later of the
[`google-auth` package](https://github.com/googleapis/google-cloud-python/tree/main/packages/google-auth).
To check which version of this package your client library uses, run the
following command in the environment where the package is installed:
```bash
pip show google-auth
```
To specify a project ID for the authentication client, you can set the
`GOOGLE_CLOUD_PROJECT` environment variable, or you can allow the client to find
the project ID automatically. To find the project ID automatically, the service
account in the configuration file must have the Browser role (`roles/browser`),
or a role with equivalent permissions, on your project. For details, see the
[user guide for the `google-auth` package](https://github.com/googleapis/google-cloud-python/blob/main/packages/google-auth/docs/user-guide.rst#using-external-identities).
### gcloud
To authenticate using Workload Identity Federation, use the
[`gcloud auth login`](https://docs.cloud.google.com/sdk/gcloud/reference/auth/login.md.txt) command:
```
gcloud auth login --cred-file=FILEPATH.json
```
Replace `FILEPATH` with the path to the
credential configuration file.
Support for Workload Identity Federation in gcloud CLI is available in
[version 363.0.0 and later versions of the gcloud CLI](https://docs.cloud.google.com/sdk/docs/components.md.txt#updating_components).
### Terraform
The [Google Cloud provider](https://registry.terraform.io/providers/hashicorp/google/latest/docs)
supports Workload Identity Federation if you use version 3.61.0 or later:
```
terraform {
required_providers {
google = {
source = "hashicorp/google"
version = "~> 3.61.0"
}
}
}
```
### bq
To authenticate using Workload Identity Federation, use the
[`gcloud auth login`](https://docs.cloud.google.com/sdk/gcloud/reference/auth/login.md.txt) command, as follows:
```
gcloud auth login --cred-file=FILEPATH.json
```
Replace `FILEPATH` with the path to the
credential configuration file.
Support for Workload Identity Federation in bq is available in
[version 390.0.0 and later versions of the gcloud CLI](https://docs.cloud.google.com/sdk/docs/components.md.txt#updating_components).
## What's next
- Read more about [Workload Identity Federation](https://docs.cloud.google.com/iam/docs/workload-identity-federation.md.txt).
- Learn about [best practices for using Workload Identity Federation](https://docs.cloud.google.com/iam/docs/best-practices-for-using-workload-identity-federation.md.txt).
- See how you can [manage workload identity pools and providers](https://docs.cloud.google.com/iam/docs/manage-workload-identity-pools-providers.md.txt).