[Workload Identity Federation](https://docs.cloud.google.com/iam/docs/workload-identity-federation.md.txt)
lets you connect workloads running outside Google Cloud to stateless
containerized microservices hosted on
[Cloud Run](https://docs.cloud.google.com/run).
In this tutorial for administrators, you integrate
Workload Identity Federation with an existing identity provider (IdP) by
configuring Jenkins as your external workload, Keycloak as your IdP, and
Cloud Run. Completing these steps shows how to authenticate your
Jenkins application with Google Cloud by using
[OpenID Connect](https://openid.net/connect/)
(OIDC).
> [!NOTE]
> **Note:** Because this setup demonstrates a concept, some configurations aren't suited for a production environment and include recommendations where applicable.
## External workload authentication using Workload Identity Federation
[Workload Identity Federation](https://docs.cloud.google.com/iam/docs/workload-identity-federation.md.txt) lets you
authenticate workloads outside of Google Cloud without using a static
service account key. Any external workload that needs to consume services in
Google Cloud can benefit from this feature.
Workload Identity Federation lets you use your IdP to authenticate directly with
Google Cloud. To authenticate, you use
[OpenID Connect](https://en.wikipedia.org/wiki/OpenID#OpenID_Connect_(OIDC)).
Cloud Run accepts OpenID Connect tokens from your IdP for
authentication.
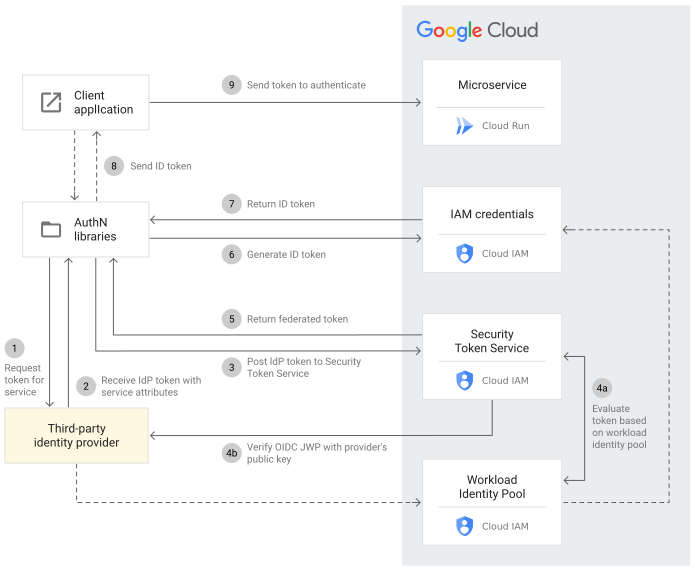
The authentication process when using Workload Identity Federation is the
following:
1. Your authentication (AUTHN) library sends a JSON web token (JWT) request to the IdP.
2. Your IdP signs the JSON web tokens (JWT). The AUTHN library reads this data from a variable.
3. The library sends a POST command to the [Security Token Service](https://docs.cloud.google.com/iam/docs/reference/sts/rest.md.txt) that includes the signed token.
4. The Security Token Service looks at the workload identify pool provider that you configured to build trust and verifies the identity on the credential.
5. The Security Token Service sends back a [federated access token](https://docs.cloud.google.com/docs/authentication/token-types.md.txt#fed-access-tokens).
6. The library sends the federated access token to IAM.
7. IAM exchanges the federated access token for an [ID token](https://docs.cloud.google.com/docs/authentication/token-types.md.txt#identity-tokens). For more information, see [Create an OpenID Connect (OIDC) ID token](https://docs.cloud.google.com/iam/docs/create-short-lived-credentials-direct.md.txt#sa-credentials-oidc).
8. The library provides the ID token to Jenkins.
9. Jenkins uses this token to authenticate with Cloud Run.
The following diagram demonstrates the authentication flow:
## Objectives
- Configure Jenkins as the external workload.
- Configure [Keycloak](https://www.keycloak.org/) as the IdP that is compatible with OpenID Connect.
- Connect Jenkins with Keycloak.
- Install Cloud Client Libraries to get the JWT token from Keycloak to Google Cloud.
- Connect Google Cloud to Keycloak and Jenkins.
- Get the JWT for the authenticated user from Keycloak.
Although this tutorial uses Keycloak, you can use any identity provider that
supports OpenID Connect, such as GitLab, Okta, or OneLogin.
## Costs
In this document, you use the following billable components of Google Cloud:
- [Cloud Run](https://docs.cloud.google.com/run/pricing)
To generate a cost estimate based on your projected usage,
use the [pricing calculator](https://docs.cloud.google.com/products/calculator).
New Google Cloud users might be eligible for a [free trial](https://docs.cloud.google.com/free).
When you finish the tasks that are described in this document, you can avoid
continued billing by deleting the resources that you created. For more information, see
[Clean up](https://docs.cloud.google.com/iam/docs/tutorial-cloud-run-workload-id-federation.md.txt#clean-up).
## Before you begin
1. In the Google Cloud console, go to the project selector page.
[Go to project selector](https://console.cloud.google.com/projectselector2/home/dashboard)
2. Select or create a Google Cloud project.
**Roles required to select or create a project**
- **Select a project**: Selecting a project doesn't require a specific IAM role---you can select any project that you've been granted a role on.
- **Create a project** : To create a project, you need the Project Creator role (`roles/resourcemanager.projectCreator`), which contains the `resourcemanager.projects.create` permission. [Learn how to grant
roles](https://docs.cloud.google.com/iam/docs/granting-changing-revoking-access).
> [!NOTE]
> **Note**: If you don't plan to keep the resources that you create in this procedure, create a project instead of selecting an existing project. After you finish these steps, you can delete the project, removing all resources associated with the project.
3.
[Verify that billing is enabled for your Google Cloud project](https://docs.cloud.google.com/billing/docs/how-to/verify-billing-enabled.md.txt#confirm_billing_is_enabled_on_a_project).
4. Set up a microservice on Cloud Run. For more information, see [Quickstart: Deploy a container to Cloud Run](https://docs.cloud.google.com/run/docs/quickstarts/deploy-container.md.txt).
## Configure Jenkins
Complete these tasks in a non-Google Cloud environment, such as your
on-premises environment or on another cloud.
If you already have an identity provider that supports OpenID Connect and an
external workload, you can skip this step and go to
[Installing Cloud Client Libraries.](https://docs.cloud.google.com/iam/docs/tutorial-cloud-run-workload-id-federation.md.txt#client_lib)
To simulate an outside workload, you can use a VM with
[Jenkins installed](https://www.jenkins.io/doc/book/installing/linux/#debianubuntu)
on it. You can run Jenkins as a Docker image or you can install it directly to
your server. The following steps demonstrate how to install it directly on the
server.
1. On a VM of your choice, open a command line.
2. Install Java:
```bash
$ sudo apt update
$ sudo apt install openjdk-11-jre
$ java -version
```
3. Install Jenkins:
```bash
curl -fsSL https://pkg.jenkins.io/debian-stable/jenkins.io-2023.key | sudo tee \
/usr/share/keyrings/jenkins-keyring.asc > /dev/null
echo deb [signed-by=/usr/share/keyrings/jenkins-keyring.asc] \
https://pkg.jenkins.io/debian-stable binary/ | sudo tee \
/etc/apt/sources.list.d/jenkins.list > /dev/null
sudo apt-get update
sudo apt-get install jenkins
```
4. Verify that you can access your Jenkins server on port 8080. If you are
using a VM that sits behind a firewall, make sure that the appropriate ports
are open.
5. Get your administrator password and set up Jenkins. For instructions, see
[Post-installation setup wizard](https://www.jenkins.io/doc/book/installing/linux/#setup-wizard).
6. Complete the following actions to set up SSL:
1. If you have a domain provider, you can use their certificate authority (CA) to request a signed certificate. Alternatively, you can get a free signed certificate that lasts 90 days from [zerossl.com](http://www.zerossl.com).
2. Download your certificate zip file and transfer it to your server that
is running Jenkins:
scp -i CERTFILE.pem -r CERTFILE.zip VM_FQDN:/home/USERNAME
Replace the following:
- `CERTFILE` with the name of the certificate file that includes your public key.
- `VM_FQDN` with the FQDN of your server outside of Google Cloud.
- `USERNAME` with your username.
3. Rename the files and generate a .pkcs12 file that Jenkins can use:
`openssl rsa -in KEYFILE.com.key -out
KEYFILE.com.key`
Replace `KEYFILE` with the name of the certificate
file.
7. Update the `/etc/sysconfig/jenkins` file:
1. Open the file in a text editor:
vi /etc/sysconfig/jenkins
2. Set `JENKINS_PORT` to `-1`.
3. Set `JENKINS_HTTPS_PORT` to `8443`.
4. At the bottom of the file, add the following arguments:
`JENKINS_ARGS="--httpsCertificate=/var/lib/jenkins/.ssl/CERTFILE.crt
--httpsPrivateKeys=/var/lib/jenkins/.ssl/KEYFILE.pkcs1.key"`
Replace the following:
- `CERTFILE` with the filename of the certificate file using .crt format.
- `KEYFILE` with the filename of the PKCS key.
8. Restart your Jenkins server.
9. Verify that you have port 8443 open on your firewall and access Jenkins on
port 8443.
10. Install a Jenkins plugin that you require to integrate Keycloak with
Jenkins. You can choose one of the following:
- [OpenId Connect Authentication](https://plugins.jenkins.io/oic-auth/)
- [Keycloak Authentication](https://plugins.jenkins.io/keycloak/)
To install the plugin, do the following:
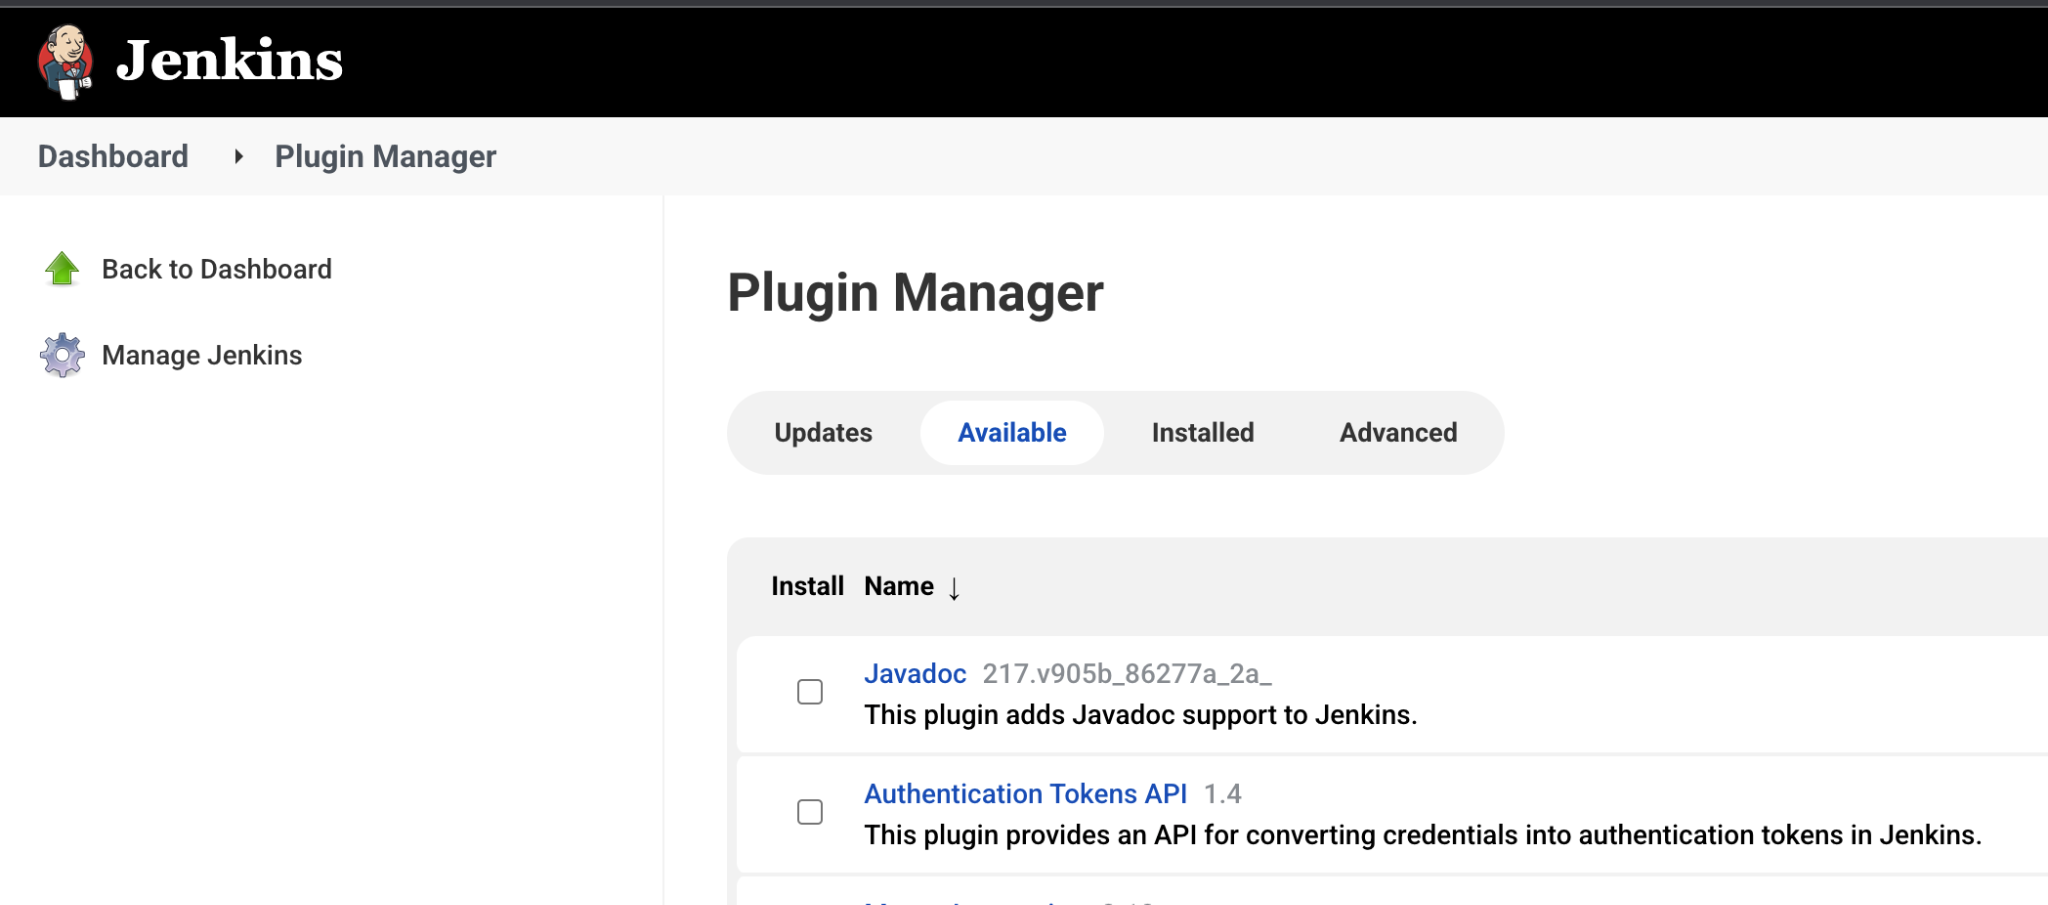
1. In the Jenkins dashboard, go to **Manage Jenkins \> Manage Plugins**.
2. Select **Available** and search for the plugin of your choice. The
following screenshot shows the Plugin Manager with the **Available** tab
selected.
3. Install the plugin.
## Configure Keycloak
In this tutorial, Keycloak manages the users, groups, and roles. Keycloak uses
[*realms*](https://www.keycloak.org/docs/latest/server_admin/)
to manage users.
> [!NOTE]
> **Note:** This tutorial uses the default realm, named *Master*, that is automatically created when you install the Keycloak server. The default realm can access all the other realms on your system. In a production environment, we recommend that you create a separate realm if you want to deploy Keycloak.
1. On the VM that is running outside Google Cloud, install the Keycloak
server. For this tutorial, we recommend
[installing Keycloak](https://www.keycloak.org/guides#getting-started)
from a Docker container.
2. Open the Keycloak Admin Console.
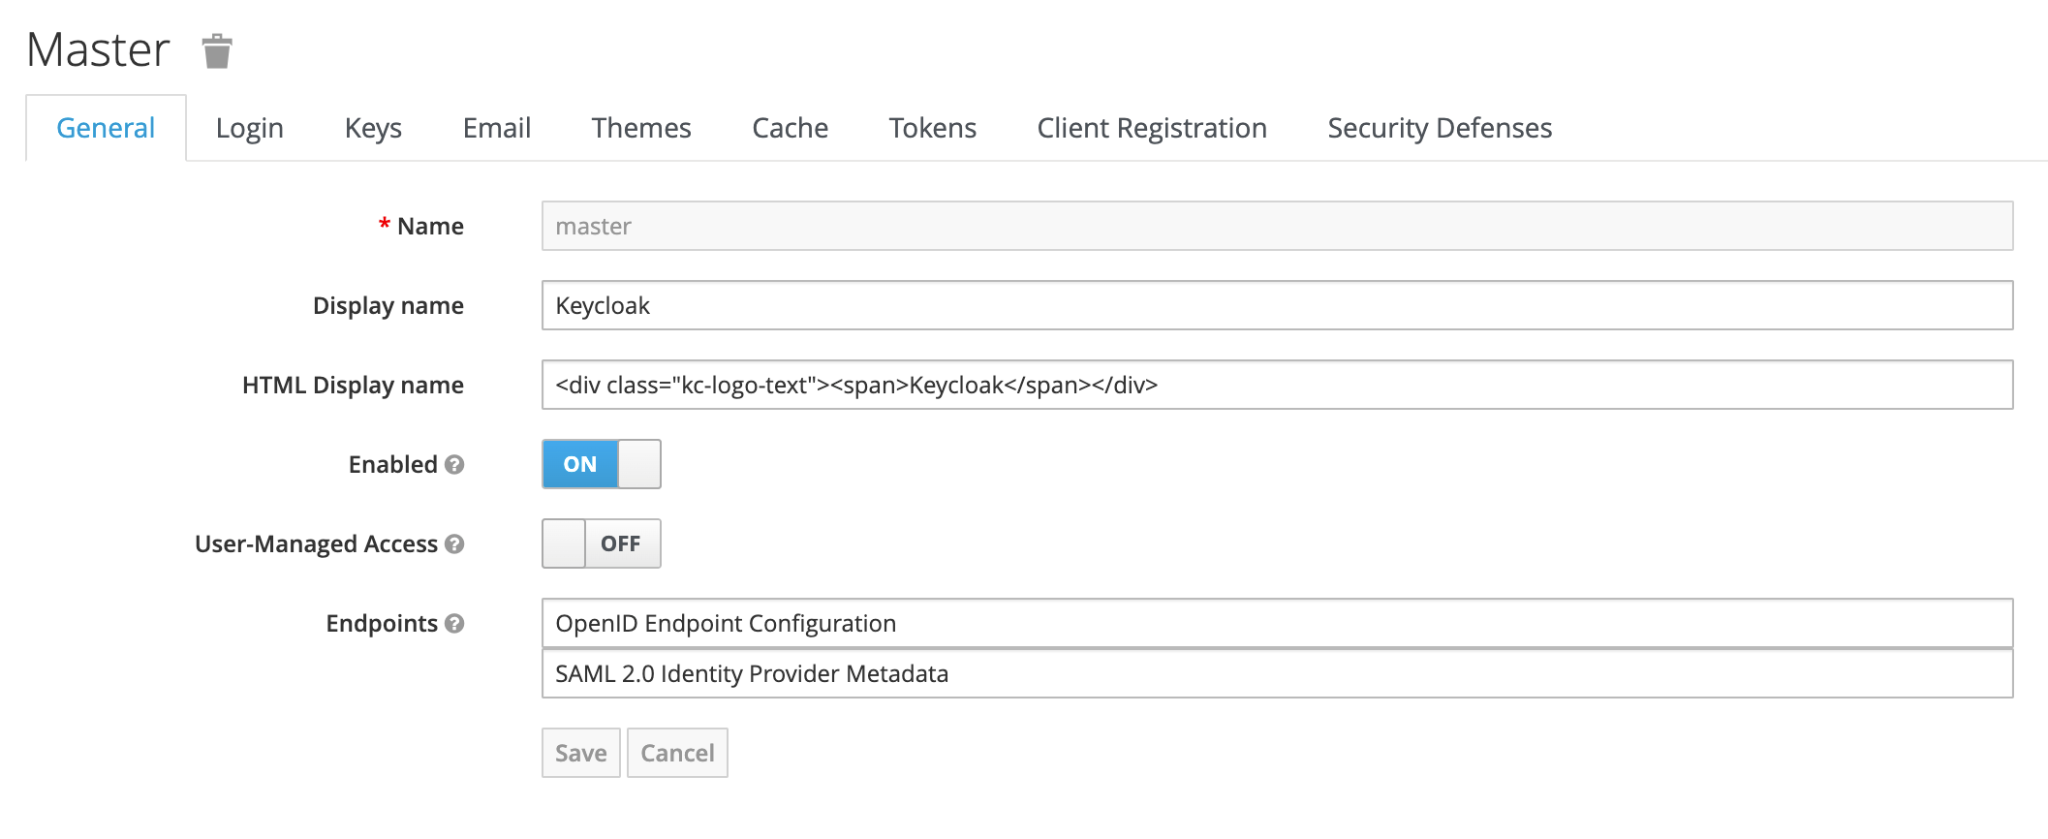
3. Go to **Realm settings**.
4. In the **General** tab, verify that the fields are set as follows:
- **Enabled** : **ON**
- **User-Managed Access** : **OFF**
- **Endpoints** : **OpenID Endpoint Configuration** and **SAML 2.0 Identity
Provider Metadata**
The following screenshot shows the fields that you must configure.
5. Create a client so that you have an entity that can request Keycloak to
authenticate a user. Often, clients are applications and services that use
Keycloak to provide a single sign-on (SSO) solution.
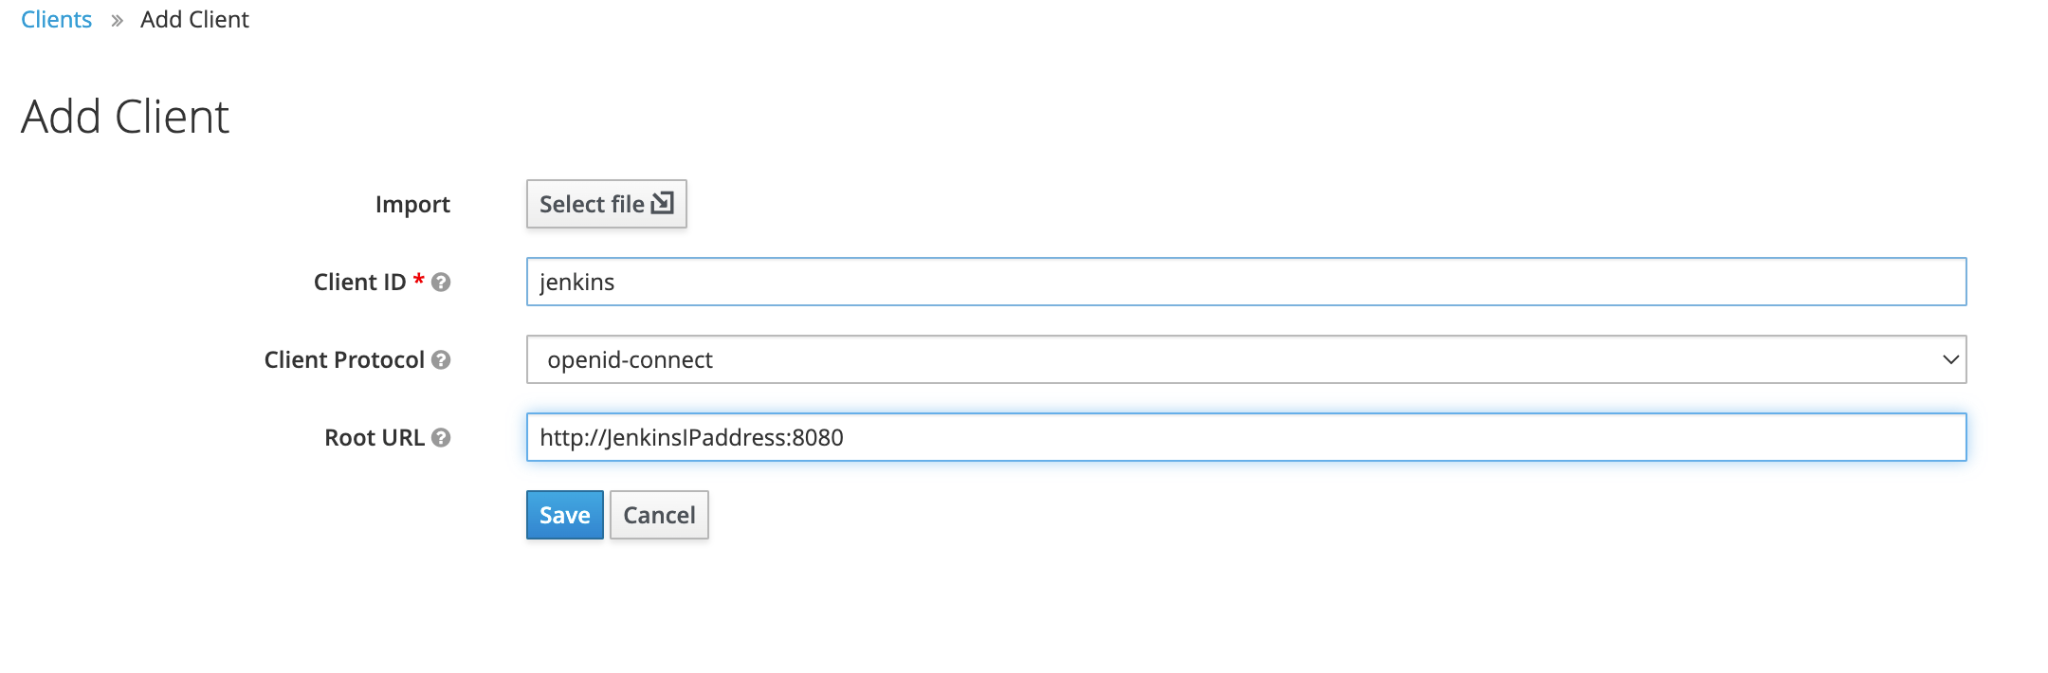
1. In the Keycloak Admin console, click **Clients \> Create.**
2. Enter the following:
- **Client ID** : **jenkins**
- **Client Protocol** : **openid-connect**
- **Root URL** : **http://JENKINS_IP_ADDRESS:8080** , where JENKINS_IP_ADDRESS is the IP address of your Jenkins server.
The following screenshot shows the fields that you must configure.
3. Click **Save**.
6. On the **Installation** tab, verify that the token format is *Keycloak OIDC
JSON*. Make a copy of this token as you will need it to complete your Jenkins setup.
7. To create a test group, do the following:
1. In the Keycloak Admin Console, click **Groups \> New**.
2. Enter a name for your group and click **Save**.
3. Create one more test group. You can assign roles to your groups, but this tutorial does not require them.
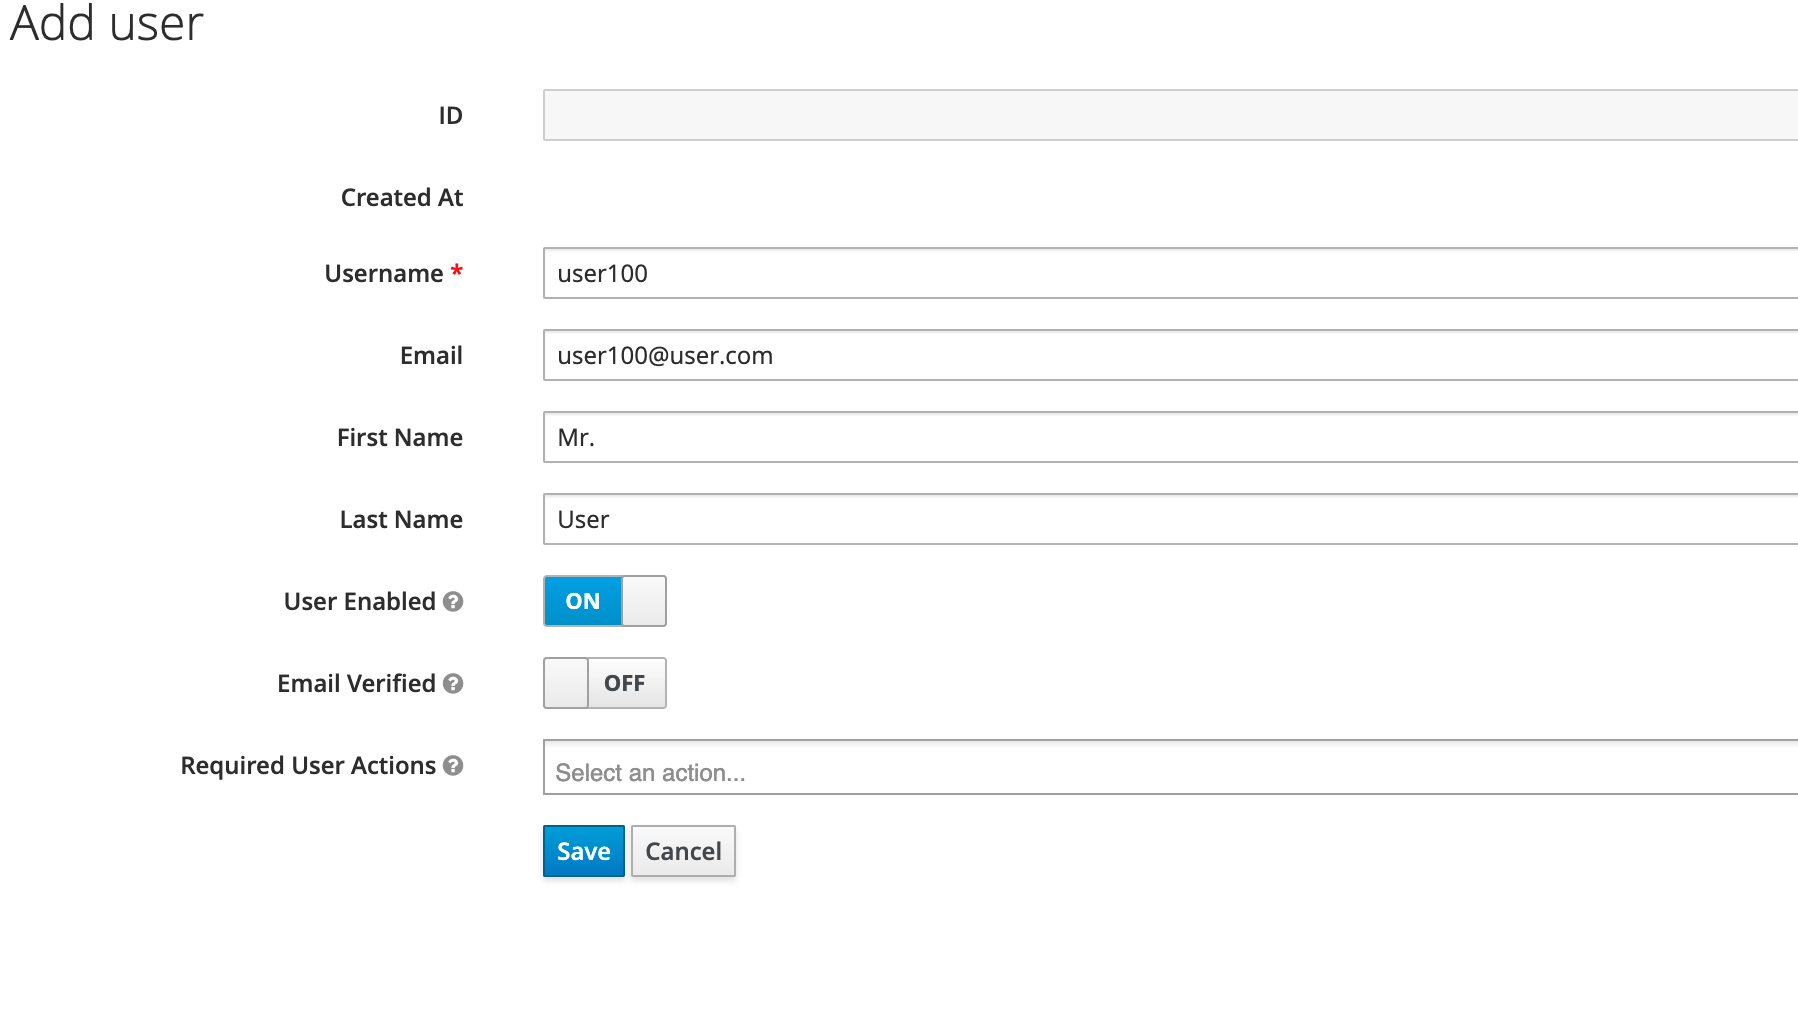
8. To create a test user to add to the group, do the following:
1. In the Keycloak Admin Console, click **Manage user \> Add users.**
2. Fill in the user information and click **Save**.
The following screenshot shows example information for a user account.
3. Click the **Credentials** tab and verify that **Temporary** is set to
**Off**.
4. Reset the password.
You will use this account later in the JWT for authentication.
The following screenshot shows the **Credentials** tab with the fields
that you must configure.

5. Click the **Groups** tab and select one of the groups that you created
previously.
6. Click **Join**.
7. Repeat this step to create more test users.
## Configure Jenkins for OpenID Connect configuration
This section describes how to configure the OpenID Connect plugin for Jenkins.
1. On your Jenkins server, go to **Manage Jenkins \> Configure Global
Security**.
2. Under Security Realm, select **Keycloak Authentication Plugin** . Click
**Save**.
3. Click **Configure system**.
4. Under **Global Keycloak** settings, copy your Keycloak installation JSON
that you created in
[Configure Keycloak](https://docs.cloud.google.com/iam/docs/tutorial-cloud-run-workload-id-federation.md.txt#configure-keycloak).
If you need to get the JSON data again, complete the following:
1. In the Keycloak Admin Console, go to **Clients**.
2. Click the name of your client.
3. In the **Installation** tab, click **Format Option** and select **Keycloak OIDC JSON**.
The following is an example of Keycloak JSON:
```json
{
"realm":"master"
"auth-server-url":"AUTHSERVERURL"
"ssl-required":"none"
"resource":"jenkins"
"public-client":true
"confidential-port":0
}
```
The AUTHSERVERURL is the URL for your
authentication server.
5. To save the OIDC configuration, click **Save.**
Jenkins can now redirect to Keycloak to get user information.
## Install Cloud Client Libraries
To send a JWT from Keycloak to Google Cloud, you must install the
Cloud Client Libraries
on the Jenkins server. This tutorial uses Python to interact with
Google Cloud using the SDK.
1. On the Jenkins server, install Python. The following steps show how to
install python3:
```bash
sudo apt update
sudo apt install software-properties-common
sudo add-apt-repository ppa:deadsnakes/ppa
sudo apt update
sudo apt install python3.8
```
2. Install pip3 so that you can download and import
[Cloud Client Libraries](https://docs.cloud.google.com/apis/docs/cloud-client-libraries.md.txt):
```bash
pip3 --version
sudo apt update
sudo apt install python3-pip
pip3 --version
```
3. Install the
[Cloud Client Libraries for Python](https://developers.google.com/docs/api/how-tos/libraries#python) using pip3:
```bash
pip3 install --upgrade google-api-python-client google-auth-httplib2 google-auth-oauthlib
```
For example:
```bash
pip3 install --upgrade google-api-python-client google-auth-httplib2 google-auth-oauthlib
Collecting google-api-python-client
Downloading google_api_python_client-2.42.0-py2.py3-none-any.whl (8.3 MB)
USERNAME | 8.3 MB 19.9 MB/s
Collecting google-auth-httplib2
Downloading google_auth_httplib2-0.1.0-py2.py3-none-any.whl (9.3 MB)
Collecting google-auth-oauthlib
Downloading google_auth_oauthlib-0.5.1-py2.py3-non-any.whl (19 KB)
```
Replace USERNAME with your username.
4. Install the Google Cloud CLI on your Jenkins server. For instructions,
see
[Quickstart: Install the gcloud CLI](https://docs.cloud.google.com/sdk/docs/install-sdk.md.txt#deb).
## Configure your Google Cloud environment
This section describes the steps that you must complete to ensure that your
Google Cloud environment that hosts your serverless container can connect
with Jenkins and Keycloak.
1. In Google Cloud, create a
[service account](https://docs.cloud.google.com/iam/docs/service-accounts)
so that the microservice on Cloud Run can access the
permissions that are attached to it.
For example, to create a service account using
[gcloud CLI](https://docs.cloud.google.com/sdk/docs/install-sdk.md.txt#deb), you do the following:
```bash
gcloud iam service-accounts create cloudrun-oidc \
---description="cloud run oidc sa" \
---display-name="cloudrun-oidc"
```
By default,
[Cloud Run creates a default service account for you](https://docs.cloud.google.com/run/docs/securing/service-identity.md.txt#about_the_default_service_account).
However, using the default service account is not a security best practice
because the account has a broad set of permissions. Therefore, we recommend
creating a separate service account for your microservice. For instructions
on creating a service account for Cloud Run, see
[Creating and managing service accounts](https://docs.cloud.google.com/iam/docs/creating-managing-service-accounts).
2. Create a
[workload identity pool](https://docs.cloud.google.com/iam/docs/configuring-workload-identity-federation#create_the_workload_identity_pool_and_provider). To create a pool using
[gcloud CLI](https://docs.cloud.google.com/sdk/docs/install-sdk.md.txt#deb),
run the following:
```bash
gcloud iam workload-identity-pools create cloudrun-oidc-pool \
--location="global" \
---description="cloudrun-oidc" \
---display-name="cloudrun-oidc"
```
3. Create a workload identity pool provider for OpenID Connect:
```bash
gcloud iam workload-identity-pools providers create-oidc cloud-run-provider \
--workload-identity-pool="cloudrun-oidc-pool" \
--issuer-uri="VAR_LINK_TO_ENDPOINT" \
--location="global" \
--attribute-mapping ="google.subject=assertion.sub,attribute.isadmin-assertion.isadmin,attribute.aud=assertion.aud" \
--attribute-condition="attribute.isadmin=='true'"
```
Replace `VAR_LINK_TO_ENDPOINT` with a variable that
contains the link to the Keycloak OIDC endpoint. To find this link, in the
KeyCloud Admin Console, in the **Realm** window, click the **General** tab.
The endpoint must be HTTPS, which means that you must configure your
Keycloak server with HTTPS.
## Get the JWT for the authenticated user from Keycloak
1. On your VM that runs Keycloak, download the token to a text file. For
example, on Linux, run the following:
```bash
curl -L -X POST 'https://IP_FOR_KEYCLOAK:8080/auth/realms/master/protocol/openid-connect/token' -H 'Content-Type: application/x-www-form-urlencoded' \
--data-urlencode 'client_id=jenks' \
--data-urlencode 'grant_type=password' \
--data-urlencode 'client_secret=CLIENT_SECRET \
--data-urlencode 'scope=openid' \
--data-urlencode 'username=USERNAME' \
--data-urlencode 'password=PASSWORD' | grep access_token | cut -c18-1490 > token.txt
```
Replace the following:
- `IP_FOR_KEYCLOAK` with the Keycloak server IP address.
- `CLIENT_SECRET` with the Keycloak client secret.
- `USERNAME` with a Keycloak user.
- `PASSWORD` with the password for the Keycloak user.
This command includes the client ID, client secret, username, and
password. As a security best practice, we recommend using environmental
variables to mask these values instead of using the command line. The
example command redirects the credentials to a file named `token.txt`.
Optionally, to automate this step, you can create a bash script.
2. Validate your token at
[jwt.io](https://jwt.io).
3. On the VM, create your credentials file:
```bash
gcloud iam workload-identity-pools create-cred-config \
projects/$PROJECT_NUMBER/locations/global/workloadIdentityPools/cloudrun-oidc-pool/providers/cloud-run/provider \
--output-file=sts-creds.json \
--credential-source-file=token.txt
```
For more information, see
[gcloud iam workload-identity-pools create-cred-config](https://docs.cloud.google.com/sdk/gcloud/reference/iam/workload-identity-pools/create-cred-config.md.txt#--credential-source-file).
Your output file should look like the following:
{
"type": "external_account",
"audience": "//iam.google.apis.com/projects/PROJECT_NUMBER/locations/global/workloadIdentityPools/cloudrun-oidc-pool/subject/USER_EMAIL",
"subject_token_type": "urn:ietf:params:oauth:token-type:jwt",
"token_url": "https://sts.googleapis.com/v1/token",
"credential_source": {
"file" "token.txt" }
}
`PROJECT_NUMBER` is your project number.
4. On the VM, set the `sts.creds.json` file as a variable for ADC:
export GOOGLE_APPLICATION_CREDENTIALS=/Users/USERNAME/sts-creds.json
Replace USERNAME with your UNIX username.
Before Workload Identity Federation was launched, this value was the service
account key. With Workload Identity Federation, this value is the
newly created credentials file.
5. Create a role binding for the user to impersonate the service account:
```bash
gcloud iam service-accounts add-iam-policy-binding SERVICE_ACCOUNT \
--role roles/iam.workloadIdentityUser \
--member "principal://iam.googleapis.com/projects/$PROJECT_NUMBER/locations/global/workloadIdentityPools/cloudrun-oidc-pool/subject/USER_EMAIL
```
Replace the following:
- `SERVICE_ACCOUNT` with the email address of the
service account that you created in
[Configure your Google Cloud environment](https://docs.cloud.google.com/iam/docs/tutorial-cloud-run-workload-id-federation.md.txt#configure-your-google-cloud-environment).
For more information, see
[gcloud iam service-accounts add-iam-policy-binding](https://docs.cloud.google.com/sdk/gcloud/reference/iam/service-accounts/add-iam-policy-binding).
- `USER_EMAIL` with your email address.
6. Allow the service account to access the Cloud Run service:
```bash
gcloud run services add-iam-policy-binding SERVICE_NAME
--member-"serviceAccount:SERVICE_ACCOUNT" \
--role="roles/run.invoker"
```
Replace the following:
- `SERVICE_NAME` with the name of the microservice running on Cloud Run.
- `SERVICE_ACCOUNT` with the email address of the service account for Cloud Run.
For more information, see
[gcloud run services add-iam-policy-binding](https://docs.cloud.google.com/sdk/gcloud/reference/run/services/add-iam-policy-binding).
7. Generate an ID token:
```bash
#!/usr/bin/python
from google.auth import credentials
from google.cloud import iam_credentials_v1
import google.auth
import google.oauth2.credentials
from google.auth.transport.requests import AuthorizedSession, Request
url = "https://WORKLOAD_FQDN"
aud = "https://WORKLOAD_FQDN"
service_account = 'SERVICE_ACCOUNT'
client = iam_credentials_v1.IAMCredentialsClient()
name = "projects/-/serviceAccounts/{}".format(service_account)
id_token = client.generate_id_token(name=name,audience=aud, include_email=True)
print(id_token.token)
creds = google.oauth2.credentials.Credentials(id_token.token)
authed_session = AuthorizedSession(creds)
r = authed_session.get(url)
print(r.status_code)
print(r.text)
```
Replace the following:
- `WORKLOAD_FQDN` with the FQDN for your workload.
- `SERVICE_ACCOUNT` with the email address of the
service account for Cloud Run.
The token that you use can call the Identity and Access Management API, which will give you the new JWT
that you need to invoke your Cloud Run service.
You can use your token within a Jenkins pipeline to invoke the serverless
container that you are running in Cloud Run. However, these steps
are out of the scope of this tutorial.
## Clean up
To avoid incurring charges to your Google Cloud account for the resources
used in this tutorial, you can delete your project.
### Delete the project
> [!CAUTION]
> **Caution** : Deleting a project has the following effects:
>
> - **Everything in the project is deleted.** If you used an existing project for the tasks in this document, when you delete it, you also delete any other work you've done in the project.
> - **Custom project IDs are lost.** When you created this project, you might have created a custom project ID that you want to use in the future. To preserve the URLs that use the project ID, such as an `appspot.com` URL, delete selected resources inside the project instead of deleting the whole project.
>
>
> If you plan to explore multiple architectures, tutorials, or quickstarts, reusing projects
> can help you avoid exceeding project quota limits.
1. In the Google Cloud console, go to the **Manage resources** page.
[Go to Manage resources](https://console.cloud.google.com/iam-admin/projects)
2. In the project list, select the project that you want to delete, and then click **Delete**.
3. In the dialog, type the project ID, and then click **Shut down** to delete the project.
## What's next
- Read more about [Workload Identity Federation](https://cloud.google.com/iam/docs/configuring-workload-identity-federation).
- For more reference architectures, diagrams, and best practices, explore the [Cloud Architecture Center](https://docs.cloud.google.com/architecture).