In a custom Virtual Private Cloud (VPC) network with multiple subnets, by default, egress traffic is allowed, but ingress traffic is denied. To enable ingress traffic and allow VM instances in different subnets to communicate with each other, you can create a [global network firewall policy](https://docs.cloud.google.com/firewall/docs/network-firewall-policies.md.txt) in Cloud Next Generation Firewall (Cloud NGFW) on the VPC network, which allows ingress traffic from a specific IP address range of the subnet.
This tutorial describes how to configure a global network firewall policy to
allow internal traffic between VM subnets in a custom VPC network.
## Objectives
This tutorial shows you how to complete the following tasks:
- Create a custom VPC network with two subnets.
- Create two Linux VM instances (a client VM and a server VM) without external IP addresses in separate subnets of the VPC network.
- Create a Cloud Router and a Cloud NAT gateway as a best practice to download software packages.
- Install the Apache server on the server VM.
- Create a global network firewall policy with the following rules:
- Allow egress traffic to any destination.
- Enable firewall logging.
- Use Identity-Aware Proxy (IAP) to allow SSH connectivity to the VMs.
- Allow the client VM to connect to the server VM running the Apache server.
- Test the connection.
The following diagram shows the flow of the traffic between subnets of a custom VPC network after a global network firewall policy allows internal ingress traffic.
[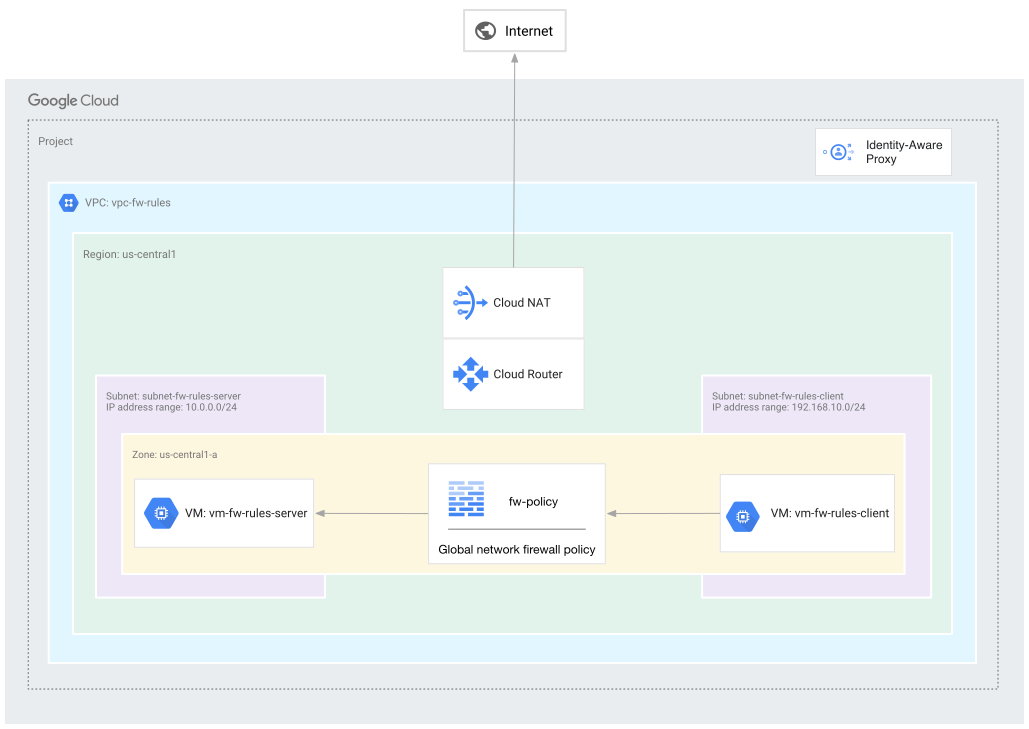](https://docs.cloud.google.com/static/firewall/images/firewall-policies/firewall-policy-tutorial.svg) A global network firewall policy allowing ingress traffic from a subnet in a custom VPC network (click to enlarge).
## Before you begin
1. Enable the [Compute Engine API](https://console.cloud.google.com/marketplace/product/google/compute.googleapis.com) for your project.
2. Make sure that you have the [Compute Network Admin](https://docs.cloud.google.com/compute/docs/access/iam.md.txt#compute.networkAdmin) (`roles/compute.networkAdmin`) Identity and Access Management (IAM) role.
3. If you prefer to work from the command line, install the Google Cloud CLI. For the conceptual and installation information about the tool, see [gcloud CLI overview](https://docs.cloud.google.com/sdk/gcloud.md.txt).
**Note:** If you haven't run the Google Cloud CLI previously, first run
[`gcloud init`](https://docs.cloud.google.com/sdk/gcloud/reference/init) to initialize your gcloud CLI directory.
## Create a custom VPC network with subnets
In this section, you create a custom mode VPC network with two IPv4 subnets.
### Console
1. In the Google Cloud console, go to the **VPC networks** page.
[Go to VPC networks](https://console.cloud.google.com/networking/networks/list)
2. Click **Create VPC network**.
3. For **Name** , enter `vpc-fw-rules`.
4. For **Description** , enter `VPC network for the firewall rules tutorial`.
5. For **Subnet creation mode** , select **Custom**.
6. In the **New subnet** section, specify the following configuration parameters for a subnet:
- **Name** : `subnet-fw-rules-server`
- **Region** : `us-central1 (Iowa)`
- **IPv4 range** : `10.0.0.0/24`
- **Private Google Access** : **On**
7. Click **Done**.
8. Click **Add subnet** and specify the following configuration parameters:
- **Name** : `subnet-fw-rules-client`
- **Region** : `us-central1 (Iowa)`
- **IPv4 range** : `192.168.10.0/24`
- **Private Google Access** : **On**
9. Click **Done**.
10. Click **Create**.
### gcloud
1. To create a VPC network, run the following command:
```
gcloud compute networks create vpc-fw-rules \
--subnet-mode=custom \
--description="VPC network for the firewall rules tutorial"
```
2. Optional: In the **Authorize cloud shell** dialog, click **Authorize**.
3. To create a subnet, run the following command:
```
gcloud compute networks subnets create subnet-fw-rules-server \
--network=vpc-fw-rules \
--region=us-central1 \
--range=10.0.0.0/24 \
--enable-private-ip-google-access
```
4. To create another subnet, run the following command:
```
gcloud compute networks subnets create subnet-fw-rules-client \
--network=vpc-fw-rules \
--region=us-central1 \
--range=192.168.10.0/24 \
--enable-private-ip-google-access
```
By default, the VPC network has two implied IPv4 rules:
- An `allow` egress rule with destination `0.0.0.0/0` and lowest possible priority (65535) that allows any instance to send traffic to any destination, except for traffic blocked by Google Cloud.
- A `deny` ingress with source `0.0.0.0/0` and lowest possible priority (65535) that protects all instances by blocking incoming connections to them.
For more information, see [Implied rules](https://docs.cloud.google.com/firewall/docs/firewalls.md.txt#default_firewall_rules).
## Create client and server VMs
In this section, you create two Linux VMs without external IP addresses in the
subnets of the VPC network you created in the previous section.
### Create the server VM
### Console
To create the server VM, follow these steps:
1. In the Google Cloud console, go to the **Create an instance** page.
[Go to Create an instance](https://console.cloud.google.com/compute/instancesAdd)
2. In the **Machine configuration** pane, do the following:
1. For **Name** , enter `vm-fw-rules-server`.
2. For **Region** , select `us-central1 (Iowa)`.
3. In the navigation menu, click **Networking**.
1. In the **Network interfaces** section, click **`default`** and specify the following configuration parameters:
- **Network** : **`vpc-fw-rules`**
- **Subnetwork** : **`subnet-fw-rules-server IPv4 (10.0.0.0/24)`**
- **External IPv4 address** : **None**
2. Click **Done**.
4. Click **Create**.
### gcloud
To create the server VM, run the following command:
```
gcloud compute instances create vm-fw-rules-server \
--network=vpc-fw-rules \
--zone=us-central1-a \
--subnet=subnet-fw-rules-server \
--stack-type=IPV4_ONLY \
--no-address
```
### Create the client VM
### Console
To create the client VM, follow these steps:
1. In the Google Cloud console, go to the **Create an instance** page.
[Go to Create an instance](https://console.cloud.google.com/compute/instancesAdd)
2. In the **Machine configuration** pane, do the following:
1. For **Name** , enter `vm-fw-rules-client`.
2. For **Region** , select `us-central1 (Iowa)`.
3. In the navigation menu, click **Networking**.
1. In the **Network interfaces** section, click **`default`** and specify the following configuration parameters:
- **Network** : **`vpc-fw-rules`**
- **Subnetwork** : **`subnet-fw-rules-client IPv4 (192.168.10.0/24)`**
- **External IPv4 address** : **None**
2. Click **Done**.
4. Click **Create**.
### gcloud
To create the client VM, run the following command:
```
gcloud compute instances create vm-fw-rules-client \
--network=vpc-fw-rules \
--zone=us-central1-a \
--subnet=subnet-fw-rules-client \
--stack-type=IPV4_ONLY \
--no-address
```
## Create a Cloud Router and a Cloud NAT gateway
In the previous section, you created two Linux VMs without public IPv4 addresses.
To allow those VMs to access the public internet, you create a
Cloud Router and a Cloud NAT gateway.
### Console
1. In the Google Cloud console, go to the **Cloud NAT** page.
[Go to Cloud NAT](https://console.cloud.google.com/net-services/nat/list)
2. Click **Get started** or **Create Cloud NAT gateway**.
3. For **Gateway name** , enter `gateway-fw-rules`.
4. For **NAT type** , select **Public**.
5. In the **Select Cloud Router** section, specify the following configuration parameters:
- **Network** : **`vpc-fw-rules`**
- **Region** : **`us-central1`**
- **Cloud Router** : **Create new router** .
1. For **Name** , enter `router-fw-rules`.
2. Click **Create**.
6. Click **Create**.
### gcloud
1. To create a Cloud Router, run the following command:
```
gcloud compute routers create router-fw-rules \
--network=vpc-fw-rules \
--region=us-central1
```
2. To create a Cloud NAT gateway, run the following command:
```
gcloud compute routers nats create gateway-fw-rules \
--router=router-fw-rules \
--region=us-central1 \
--auto-allocate-nat-external-ips \
--nat-all-subnet-ip-ranges
```
## Create a global network firewall policy
In this section, you create a global network firewall policy with the following:
- An egress rule with `0.0.0.0./0` as the destination.
- Logging enabled. VPC firewall rules logging lets you audit, verify, and
analyze the effects of your firewall rules.
### Console
1. In the Google Cloud console, go to the **Firewall policies** page.
[Go to Firewall policies](https://console.cloud.google.com/net-security/firewall-manager/firewall-policies/list)
2. Click **Create firewall policy**.
3. In the **Configure policy** step, for **Policy name** , enter `fw-policy`.
4. For **Deployment scope** , select **Global** and click **Continue**.
5. In the **Add rules** step, click **Create firewall rule**.
1. For **Priority** , enter `65534`.
2. For **Direction of traffic** , select **Egress**.
3. For **Logs** , select **Enabled**.
4. In the **Destination** section, for **IP ranges** , enter `0.0.0.0/0`.
5. Click **Create**.
6. Click **Continue**.
7. In the **Add mirroring rules** step, click **Continue**.
8. In the **Associate policy with networks** step, click **Associate**.
9. In the **Associate policy with VPC networks** pane, select the checkbox of **`vpc-fw-rules`** and click **Associate**.
10. Click **Continue**.
11. Click **Create**.
### gcloud
1. To create a firewall policy, run the following command:
```
gcloud compute network-firewall-policies create fw-policy \
--global
```
2. To create a firewall rule that allows traffic to all destinations and enables logs, run the following command:
```
gcloud compute network-firewall-policies rules create 65534 \
--firewall-policy=fw-policy \
--direction=EGRESS \
--action=ALLOW \
--dest-ip-ranges=0.0.0.0/0 \
--layer4-configs=all \
--global-firewall-policy \
--enable-logging
```
3. To associate the firewall policy with the VPC network, run the following command:
```
gcloud compute network-firewall-policies associations create \
--firewall-policy=fw-policy \
--network=vpc-fw-rules \
--name=pol-association-fw-rules \
--global-firewall-policy
```
## Add a firewall rule for IAP
In the previous section, you created Linux VMs without external IP addresses.
In this section, you enable Identity-Aware Proxy (IAP) to allow administrative
access to the VM instances that don't have external IP addresses.
To allow IAP to connect to your VM instances, create a firewall
rule that:
- applies to all VM instances that you want to be accessible by using IAP.
- allows ingress traffic from the IP range `35.235.240.0/20`. This range contains all IP addresses that IAP uses for TCP forwarding.
For IPv6 VMs, use the following IP range: `2600:2d00:1:7::/64`.
- allows connections to all ports that you want to be accessible by using IAP TCP forwarding, for example, port `22` for SSH and port `3389` for RDP.
### Console
To allow RDP and SSH access to all VM instances in the **vpc-fw-rules** network, do the following:
1. In the Google Cloud console, go to the **Firewall policies** page.
[Go to Firewall policies](https://console.cloud.google.com/net-security/firewall-manager/firewall-policies/list)
2. In the **Network firewall policies** section, click **`fw-policy`**.
3. Click **Create firewall rule**.
4. For **Priority** , enter `500`.
5. For **Logs** , select **Enabled**.
6. In the **Source** section, for **IP ranges** , enter `35.235.240.0/20`.
7. In the **Protocols and ports** section, select **Specified protocols and ports**.
8. Select the **TCP** checkbox, and for **Ports** , enter `22,3389`.
9. Click **Create**.
### gcloud
To allow RDP and SSH access to all VM instances in the **vpc-fw-rules**
network, run the following command:
```
gcloud compute network-firewall-policies rules create 500 \
--firewall-policy=fw-policy \
--direction=INGRESS \
--action=ALLOW \
--src-ip-ranges=35.235.240.0/20 \
--global-firewall-policy \
--layer4-configs tcp:22,tcp:3389 \
--enable-logging
```
## Install the Apache server
In this section, you install the Apache server on the server VM.
1. In the Google Cloud console, go to the **VM instances** page.
[Go to VM instances](https://console.cloud.google.com/compute/instances)
2. In the **Connect** column of the **`vm-fw-rules-server`** VM, click **SSH**.
3. In the **SSH-in-browser** dialog, click **Authorize** and wait for the connection to establish.
4. To install the `apache2` package, at the command prompt, run the following
command:
```
sudo apt update && sudo apt -y install apache2
```
After installing Apache, the operating system automatically starts the
Apache server.
5. To verify that Apache is running, run the following command:
```
sudo systemctl status apache2 --no-pager
```
6. To overwrite the Apache web server default web page, run the following command:
echo 'Hello World!
' | sudo tee /var/www/html/index.html
7. Close the **SSH-in-browser** dialog.
## Test the connection
After installing the Apache server on the server VM, connect to the server VM
from the client VM using the internal IP address of the server VM.
1. In the Google Cloud console, go to the **VM instances** page.
[Go to VM instances](https://console.cloud.google.com/compute/instances)
2. From the **Internal IP** column of the **`vm-fw-rules-server`** VM, copy the
internal IP address of the VM.
3. In the **Connect** column of the **`vm-fw-rules-client`** VM, click **SSH**.
4. In the **SSH-in-browser** dialog, click **Authorize** and wait for the connection to establish.
5. To verify the connection, run the following command:
```
curl INTERNAL_IP -m 2
```
Replace `INTERNAL_IP` with the IP address of the
**`vm-fw-rules-server`** VM.
The `Connection timed out` message is expected because every VM creates an
implicit ingress firewall rule that denies all traffic. To allow traffic, you
add an ingress rule to the firewall policy.
6. Close the **SSH-in-browser** dialog.
## Update the global network firewall policy to allow internal traffic
In this section, you update the global network firewall policy to allow internal
traffic from the subnet of the client VM.
### Console
1. In the Google Cloud console, go to the **Firewall policies** page.
[Go to Firewall policies](https://console.cloud.google.com/net-security/firewall-manager/firewall-policies/list)
2. In the **Network firewall policies** section, click **`fw-policy`**.
3. Click **Create firewall rule**.
4. For **Priority** , enter `501`.
5. For **Logs** , select **Enabled**.
6. In the **Source** section, for **IP ranges** , enter `192.168.10.0/24`.
Remember, the IP range `192.168.10.0/24` is assigned to
**subnet-fw-rules-client**.
7. In the **Destination** section, for **IP ranges** , enter `10.0.0.0/24`.
Remember, the IP range `10.0.0.0/24` is assigned to
**subnet-fw-rules-server**.
8. Click **Create**.
### gcloud
To update the firewall policy, run the following command:
```
gcloud compute network-firewall-policies rules create 501 \
--firewall-policy=fw-policy \
--direction=INGRESS \
--action=ALLOW \
--src-ip-ranges=192.168.10.0/24 \
--dest-ip-ranges=10.0.0.0/24 \
--layer4-configs=all \
--global-firewall-policy \
--enable-logging
```
## Test the connection
After creating the firewall policy, connect to the server VM from the client VM
using the internal IP address of the server VM.
1. In the Google Cloud console, go to the **VM instances** page.
[Go to VM instances](https://console.cloud.google.com/compute/instances)
2. From the **Internal IP** column of the **`vm-fw-rules-server`** VM, copy the
internal IP address of the VM.
3. In the **Connect** column of the **`vm-fw-rules-client`** VM, click **SSH**.
4. In the **SSH-in-browser** dialog, click **Authorize** and wait for the connection to establish.
5. To verify the connection, run the following command:
```
curl INTERNAL_IP -m 2
```
Replace `INTERNAL_IP` with the IP address of the
**`vm-fw-rules-server`** VM.
The expected message is `Hello World!
`.
6. Close the **SSH-in-browser** dialog.
To view firewall logs, see [View
logs](https://docs.cloud.google.com/firewall/docs/manage-firewall-policy-rules-logging#viewing_logs).
## Clean up
To avoid incurring charges to your Google Cloud account for the resources used in this
tutorial, either delete the project that contains the resources, or keep the project and
delete the individual resources.
In this section, you delete the resources created in this tutorial.
### Delete the firewall policy
### Console
1. In the Google Cloud console, go to the **Firewall policies** page.
[Go to Firewall policies](https://console.cloud.google.com/net-security/firewall-manager/firewall-policies/list)
2. In the **Network firewall policies** section, click the **`fw-policy`** name.
3. Click the **Associations** tab.
4. Select the checkbox of **`vpc-fw-rules`** and click **Remove association**.
5. In the **Remove a firewall policy association** dialog, click **Remove**.
6. Next to the **`fw-policy`** title, click **Delete**.
7. In the **Delete a firewall policy** dialog, click **Delete**.
After a policy is deleted, the Google Cloud console shows the **Firewall policies** page.
### gcloud
1. Remove the association between the firewall policy and the VPC network.
```
gcloud compute network-firewall-policies associations delete \
--name=pol-association-fw-rules \
--firewall-policy=fw-policy \
--global-firewall-policy
```
If you set up the association between the firewall policy and the
VPC network through Google Cloud console, don't use the
gcloud CLI command to remove the association. If you can't
remember how you created the association or get the `The network firewall
policy does not have an association with pol-association-fw-rules.` error
when you run the command, use the Google Cloud console to remove the
association.
2. Delete the firewall policy.
```
gcloud compute network-firewall-policies delete fw-policy \
--global
```
### Delete the VMs
### Console
1. In the Google Cloud console, go to the **VM instances** page.
[Go to VM instances](https://console.cloud.google.com/compute/instances)
2. Select the checkboxes of **`vm-fw-rules-client`** and **`vm-fw-rules-server`** VMs.
3. Click **Delete**.
4. In the **Delete 2 instances?** dialog, click **Delete**.
### gcloud
To delete **`vm-fw-rules-client`** and **`vm-fw-rules-server`** VMs, run the
following command:
```
gcloud compute instances delete vm-fw-rules-client vm-fw-rules-server \
--zone=us-central1-a
```
When prompted, press Y to confirm, and then press Enter.
### Delete the Cloud NAT gateway and Cloud Router
### Console
1. In the Google Cloud console, go to the **Cloud routers** page.
[Go to Cloud routers](https://console.cloud.google.com/hybrid/routers/list)
2. Select the **`router-fw-rules`** checkbox.
3. Click **Delete**.
4. In the **Delete router-fw-rules** dialog, click **Delete**.
When you delete a Cloud Router, the associated Cloud NAT
gateway is also deleted.
### gcloud
To delete the **router-fw-rules** Cloud Router, run the following command:
```
gcloud compute routers delete router-fw-rules \
--region=us-central1
```
When prompted, press Y to confirm, and then press Enter.
When you delete a Cloud Router, the associated Cloud NAT
gateway is also deleted.
### Delete the VPC network and its subnets
### Console
1. In the Google Cloud console, go to the **VPC networks** page.
[Go to VPC networks](https://console.cloud.google.com/networking/networks/list)
2. In the **Name** column, click **`vpc-fw-rules`**.
3. Click **Delete VPC network**.
4. In the **Delete a network** dialog, click **Delete**.
When you delete a VPC, its subnets are also deleted.
### gcloud
1. To delete the subnets of the **`vpc-fw-rules`** VPC
network, run the following command:
```
gcloud compute networks subnets delete subnet-fw-rules-client subnet-fw-rules-server \
--region=us-central1
```
When prompted, press Y to confirm and press Enter.
2. To delete the **`vpc-fw-rules`** VPC network, run the
following command:
```
gcloud compute networks delete vpc-fw-rules
```
When prompted, press Y to confirm, and then press Enter.