This document shows you how to use Cloud Scheduler to schedule and help you protect Filestore snapshots.
This document is intended for IT decision makers, backup administrators, and
disaster recovery (DR) administrators who want to learn about or create
scheduled Filestore snapshots.
## Objectives
- Configure Cloud Run functions and the JSON configuration file.
- Create a Cloud Scheduler job.
- Create and label scheduled Filestore snapshots.
- Monitor the snapshot creation process.
## Costs
In this document, you use the following billable components of Google Cloud:
- [Filestore](https://docs.cloud.google.com/filestore)
- [Cloud Scheduler](https://docs.cloud.google.com/scheduler)
- [Cloud Run functions](https://docs.cloud.google.com/functions)
- [App Engine](https://docs.cloud.google.com/appengine)
To generate a cost estimate based on your projected usage,
use the [pricing calculator](https://docs.cloud.google.com/products/calculator).
New Google Cloud users might be eligible for a [free trial](https://docs.cloud.google.com/free).
When you finish this tutorial, you can avoid continued billing by deleting the resources you created. For more information, see [Clean up](https://docs.cloud.google.com/filestore/docs/schedule-filestore-enterprise-snapshots.md.txt#clean-up).
## Before you begin
## Deployment model
The following diagram shows the deployment model that supports
Filestore snapshot Cloud Run functions.
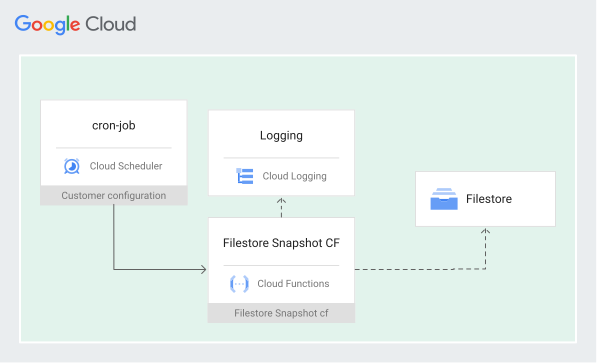
The Cloud Scheduler job coordinates with Cloud Run functions to
schedule and generate Filestore snapshots and log files. The
snapshots are available in the Filestore share.
## Known limitations
When you prepare to configure a snapshot scheduler for Filestore
instances, consider the following limitations:
- The function deletes only a single snapshot when needed, even if there are more scheduler snapshots than defined in the retention policy configuration file, or if the retention policy configuration file is updated to keep fewer snapshots than before.
- If you decrease the numerical value for `snapshots` in the JSON configuration file, the redundant snapshots from the instance are not automatically deleted. If you change the setting, you need to delete redundant snapshots manually.
- Because the limit for the snapshot ID is 75 characters, the retention policy name has a limit of 50 characters.
## Prepare your environment
In this section, you set up your environment variables, clone the repository,
and create the applications and files that you need for this tutorial.
### Set environment variables
- In Cloud Shell, enter the following command:
gcloud components update
- In Cloud Shell, create the following variables:
export PROJECT_ID=PROJECT_ID
export GCP_REGION=GCP_REGION
export APP_ENGINE_REGION=APP_ENGINE_REGION
export FUNCTION_NAME=FUNCTION_NAME
export SCHEDULER_NAME=SCHEDULER_NAME
export SCHEDULER_EXPRESSION="SCHEDULER_EXPRESSION"
export SCHEDULER_TZ=SCHEDULER_TZ
export SERVICE_ACCOUNT_NAME=SERVICE_ACCOUNT_NAME
Replace the following:
- `PROJECT_ID`: the Google Cloud project ID where you want to install the enterprise instance, Cloud Run function, and Cloud Scheduler.
- `GCP_REGION`: the Google Cloud region where you want to install the enterprise instance, Cloud Run function, and Cloud Scheduler.
- `APP_ENGINE_REGION`: a region from the App Engine locations list where you want to install App Engine. Consider the following requirements:
- A Google Cloud project can have only a single App Engine instance, and the App Engine region cannot be changed later.
- The Cloud Scheduler job and App Engine instance must reside in the same region.
- For example, if Cloud Scheduler resources use `us-central1`, use the App Engine equivalent `us-central`.
- App Engine applies a unique naming convention for some regions. For details, see [App Engine locations list](https://docs.cloud.google.com/appengine/docs/locations).
- `FUNCTION_NAME`: the name you want to give to the Cloud Run function.
- `SCHEDULER_NAME`: the name you want to give to the Cloud Scheduler.
- `SCHEDULER_EXPRESSION`: the Cloud Scheduler cron expression---for example, `10 0 * * *`. For more information, see [Configure cron job schedules](https://docs.cloud.google.com/scheduler/docs/configuring/cron-job-schedules.md.txt).
- `SCHEDULER_TZ`: your time zone for the Cloud Scheduler, in the name format from the [list of tz database time zones](https://wikipedia.org/wiki/List_of_tz_database_time_zones)---for example, `America/Los_Angeles`.
- `SERVICE_ACCOUNT_NAME`: the newly created service account name---for example, `scheduler-sa`.
### Create a service account
In this section, you create a dedicated service account, which lets you create
and manage the Cloud Run function and Cloud Scheduler job.
When you do this procedure, the service account requires the following
permissions:
- `file.instances.get`
- `file.snapshots.list`
- `file.snapshots.create`
- `file.operations.get`
- `file.snapshots.delete`
- `cloudfunctions.functions.invoke`
For more information, see [Filestore IAM permissions](https://docs.cloud.google.com/filestore/docs/iam.md.txt)
or [Cloud Run functions IAM permissions](https://docs.cloud.google.com/functions/docs/reference/iam/permissions.md.txt).
To create the service account, do the following:
1. In Cloud Shell, create a dedicated role for the snapshot
scheduler with the required permissions:
gcloud iam roles create snapshot_scheduler --project $PROJECT_ID --permissions file.instances.get,file.snapshots.list,file.snapshots.create,file.operations.get,file.snapshots.delete,logging.logEntries.create,cloudfunctions.functions.invoke --stage GA
2. Create the service account:
gcloud iam service-accounts create $SERVICE_ACCOUNT_NAME --project $PROJECT_ID
3. Bind the role to the service account:
gcloud projects add-iam-policy-binding $PROJECT_ID --member serviceAccount:$SERVICE_ACCOUNT_NAME@$PROJECT_ID.iam.gserviceaccount.com --role projects/$PROJECT_ID/roles/snapshot_scheduler
### Create a enterprise instance
1. If you haven't already created environment variables for a
enterprise instance you want to use, in
Cloud Shell, create the following variables:
export FILESTORE_INSTANCE_ID=FILESTORE_INSTANCE_ID
export FILESTORE_SHARE_NAME=SHARE_NAME
export FILESTORE_SHARE_SIZE=NUMERIC_IN_GB
export NETWORK_NAME=VPC_NAME
Replace the following:
- `FILESTORE_INSTANCE_ID`: the enterprise instance name
- `SHARE_NAME`: the enterprise instance share name
- `NUMERIC_IN_GB`: the enterprise instance share size, a number between 1024 and 10240, in increments of 256
- `VPC_NAME`: the VPC network name where you want to install the enterprise instance
2. If you don't have one already, create a Filestore instance:
gcloud filestore instances create $FILESTORE_INSTANCE_ID --network name=$NETWORK_NAME --file-share=capacity=$FILESTORE_SHARE_SIZE,name=$FILESTORE_SHARE_NAME --tier ZONAL --project=$PROJECT_ID --location=$GCP_REGION
For more information, see
[Creating instances](https://docs.cloud.google.com/filestore/docs/creating-instances.md.txt#gcloud).
### Create an App Engine
In this section, you create an App Engine for your
Google Cloud project. This lets you create a Cloud Scheduler job
later in this tutorial.
A Google Cloud project can have only a single App Engine, and the
region cannot be changed later.
- If you don't already have one, in Cloud Shell, create an
App Engine:
gcloud app create --region=$APP_ENGINE_REGION --project=$PROJECT_ID
### Create the JSON configuration file
The JSON configuration file can have up to eight Filestore
instances, due to a Cloud Run functions limitation. If you have more than
eight Filestore instances to schedule snapshots for, use additional
Cloud Scheduler jobs.
- In Cloud Shell, create a new file named `request.json`, and
edit the content according to your environment:
{
"retention_policy": "RETENTION_NAME",
"instances": [
{"instance_path": "projects/PROJECT_ID/locations/GCP_REGION/instances/FILESTORE_INSTANCE_ID/",
"snapshots": NUMBER_OF_SNAPSHOTS
}
]
}
Replace the following:
- `RETENTION_NAME`: the name for your snapshot retention type, which becomes part of the snapshot name---for example, `daily`.
- `NUMBER_OF_SNAPSHOTS`: the number of snapshots.
## Clone the repository
Clone the lab repository, and then enter the directory:
1. In Cloud Shell, clone the lab repository:
git clone https://github.com/GoogleCloudPlatform/Filestore-Snapshot-Scheduler
The output is similar to the following:
Cloning into Filestore-Snapshot-Scheduler
2. Enter the directory:
cd Filestore-Snapshot-Scheduler
## Create the Cloud Run function
In Cloud Shell, create the Cloud Run function solution:
gcloud functions deploy $FUNCTION_NAME --region $GCP_REGION --runtime=python39 --trigger-http --source scheduler/ --timeout 540 --service-account $SERVICE_ACCOUNT_NAME@$PROJECT_ID.iam.gserviceaccount.com --entry-point main --project $PROJECT_ID
For example:
gcloud functions deploy scheduler_func --region us-central1 --runtime=python39 --trigger-http --source scheduler/ --timeout 540 --service-account scheduler-sa@project1.iam.gserviceaccount.com --entry-point main --project project1
## Create a Cloud Scheduler job
The Cloud Scheduler job must be in a region equivalent to the
App Engine region.
In Cloud Shell, create a Cloud Scheduler job with one or more
schedulers on the same Filestore instance:
gcloud scheduler jobs create http $SCHEDULER_NAME --schedule "$SCHEDULER_EXPRESSION" --uri "https://$GCP_REGION-$PROJECT_ID.cloudfunctions.net/$FUNCTION_NAME" --http-method POST --message-body-from-file ../request.json --oidc-service-account-email $SERVICE_ACCOUNT_NAME@$PROJECT_ID.iam.gserviceaccount.com --time-zone $SCHEDULER_TZ --project $PROJECT_ID
In the following example, the daily scheduler runs at 8:00 PM:
gcloud scheduler jobs create http daily_scheduler --schedule "0 20 * * *" --uri "https://us-central1-project1.cloudfunctions.net/scheduler_func" --http-method POST --message-body-from-file ../request.json --oidc-service-account-email scheduler-sa@project1.iam.gserviceaccount.com --time-zone America/Los_angeles --project project1
## Validate the scheduled Filestore snapshots
1. In the Google Cloud console, go to the **Cloud scheduler** page.
[Go to Cloud scheduler](https://console.cloud.google.com/cloudscheduler)
2. In the row for the job that you created, click
**Actions** \> **Force a job run**.
3. Click **Refresh**.
- If the job runs successfully, the **Last run result** column shows a timestamp of the last successful job.
- If the job fails, do the following:
1. Go to the **Cloud functions** page.
[Go to Cloud functions](https://console.cloud.google.com/functions)
2. In the row of the function you created, click
**Actions** \> **View logs**.
3. Look for an error message and troubleshoot accordingly.
4. In the Google Cloud console, go to the **Filestore instances** page.
5. In the **Instances** list, select your instance and ensure it has a
snapshot with the following name format:
sched-RETENTION_NAME-DATE-TIME
For example, `sched-daily-20220315-120640`.
## Clean up
## Clean up
To avoid incurring charges to your Cloud Platform account for the resources
used in this tutorial, delete the project that contains the resources.
### Delete the project
> [!CAUTION]
> **Caution** : Deleting a project has the following effects:
>
> - **Everything in the project is deleted.** If you used an existing project for the tasks in this document, when you delete it, you also delete any other work you've done in the project.
> - **Custom project IDs are lost.** When you created this project, you might have created a custom project ID that you want to use in the future. To preserve the URLs that use the project ID, such as an `appspot.com` URL, delete selected resources inside the project instead of deleting the whole project.
>
>
> If you plan to explore multiple architectures, tutorials, or quickstarts, reusing projects
> can help you avoid exceeding project quota limits.
1. In the Google Cloud console, go to the **Manage resources** page.
[Go to Manage resources](https://console.cloud.google.com/iam-admin/projects)
2. In the project list, select the project that you want to delete, and then click **Delete**.
3. In the dialog, type the project ID, and then click **Shut down** to delete the project.
## What's next
- Learn more about [Filestore snapshots](https://docs.cloud.google.com/filestore/docs/snapshots.md.txt).
- Learn more about [Filestore backups](https://docs.cloud.google.com/filestore/docs/backups.md.txt).
- Explore reference architectures, diagrams, and best practices about Google Cloud. Take a look at our [Cloud Architecture Center](https://docs.cloud.google.com/architecture).