This tutorial shows you how to use Eventarc to build a processing
pipeline that schedules queries to a public BigQuery dataset, generates
charts based on the data, and shares links to the charts through email.
## Objectives
In this tutorial, you will build and deploy three Cloud Run
services that allow unauthenticated access and that receive events using Eventarc:
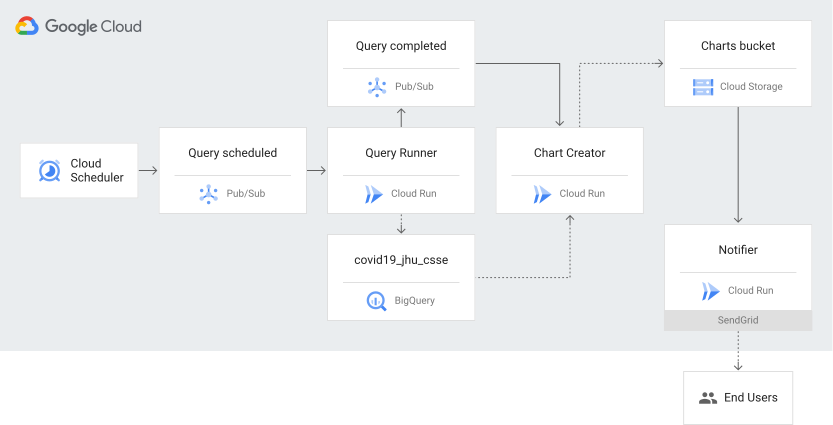
1. **Query Runner**---Triggered when Cloud Scheduler jobs publish a message to a Pub/Sub topic, this service uses the BigQuery API to retrieve data from a public COVID-19 dataset, and saves the results in a new BigQuery table.
2. **Chart Creator** ---Triggered when the Query Runner service publishes a message to a Pub/Sub topic, this service generates charts using the Python plotting library, [Matplotlib](https://matplotlib.org/), and saves the charts to a Cloud Storage bucket.
3. **Notifier** ---Triggered by audit logs when the Chart Creator service stores a chart in a Cloud Storage bucket, this service uses the email service, [SendGrid](https://sendgrid.com/), to send links to the charts to an email address.
The following diagram shows the high-level architecture:
> [!NOTE]
> **Note:** All Cloud Run services are deployed privately by default, which means that they can't be accessed without providing authentication credentials in the request. For projects with [domain restricted sharing organization policies](https://docs.cloud.google.com/resource-manager/docs/organization-policy/restricting-domains), use an authenticated Cloud Run target service rather than one that allows [public access](https://docs.cloud.google.com/run/docs/authenticating/public.md.txt).
## Costs
In this document, you use the following billable components of Google Cloud:
- [Artifact Registry](https://docs.cloud.google.com/artifact-registry)
- [BigQuery](https://docs.cloud.google.com/bigquery)
- [Cloud Build](https://docs.cloud.google.com/build)
- [Cloud Run](https://docs.cloud.google.com/run)
- [Cloud Scheduler](https://docs.cloud.google.com/scheduler)
- [Cloud Storage](https://docs.cloud.google.com/storage)
- [Eventarc](https://docs.cloud.google.com/eventarc)
- [Pub/Sub](https://docs.cloud.google.com/pubsub)
To generate a cost estimate based on your projected usage,
use the [pricing calculator](https://docs.cloud.google.com/products/calculator).
New Google Cloud users might be eligible for a [free trial](https://docs.cloud.google.com/free).
## Before you begin
Security constraints defined by your organization might prevent you from completing the
following steps. For troubleshooting information, see
[Develop applications in a constrained Google Cloud environment](https://docs.cloud.google.com/resource-manager/docs/organization-policy/develop-apps-constrained-environment).
1. For Cloud Storage, enable audit logging for the `ADMIN_READ`, `DATA_WRITE`, and `DATA_READ` data access types.
1. Read the Identity and Access Management (IAM) policy associated with your Google Cloud project, folder, or organization and store it in a temporary file:
```
gcloud projects get-iam-policy PROJECT_ID > /tmp/policy.yaml
```
2. In a text editor, open `/tmp/policy.yaml`, and add or change *only* the audit log configuration in the `auditConfigs` section:
> [!CAUTION]
> **Caution:** You must preserve the `bindings:` and `etag:` sections without changes. Changing parts of your policy not related to audit logging might make your Google Cloud project inaccessible.
```yaml
auditConfigs:
- auditLogConfigs:
- logType: ADMIN_READ
- logType: DATA_WRITE
- logType: DATA_READ
service: storage.googleapis.com
bindings:
- members:
[...]
etag: BwW_bHKTV5U=
version: 1
```
3. Write your new IAM policy:
```
gcloud projects set-iam-policy PROJECT_ID /tmp/policy.yaml
```
If the preceding command reports a conflict with another change, then
repeat these steps, starting with reading the IAM policy. For
more information, see
[Configure Data Access audit logs with the API](https://docs.cloud.google.com/logging/docs/audit/configure-data-access.md.txt#config-api).
2. Grant the `eventarc.eventReceiver` role to the Compute Engine service account:
```bash
export PROJECT_NUMBER="$(gcloud projects describe $(gcloud config get-value project) --format='value(projectNumber)')"
gcloud projects add-iam-policy-binding $(gcloud config get-value project) \
--member=serviceAccount:${PROJECT_NUMBER}-compute@developer.gserviceaccount.com \
--role='roles/eventarc.eventReceiver'
```
3. If you enabled the Pub/Sub service account on or before April 8, 2021, grant the `iam.serviceAccountTokenCreator` role to the Pub/Sub service account:
```bash
gcloud projects add-iam-policy-binding $(gcloud config get-value project) \
--member="serviceAccount:service-${PROJECT_NUMBER}@gcp-sa-pubsub.iam.gserviceaccount.com"\
--role='roles/iam.serviceAccountTokenCreator'
```
4. Set the defaults used in this tutorial:
```bash
export REGION=REGION
gcloud config set run/region ${REGION}
gcloud config set run/platform managed
gcloud config set eventarc/location ${REGION}
```
Replace `REGION` with the supported Eventarc
[location](https://docs.cloud.google.com/eventarc/docs/locations.md.txt) of your choice.
## Create a SendGrid API key
SendGrid is a cloud-based email provider that lets you send email without
having to maintain email servers.
1. [Sign in to SendGrid](https://sendgrid.com) and go to **Settings \> API Keys**.
2. Click **Create API Key**.
3. Select the permissions for the key. At a minimum, the key must have **Mail Send** permissions to send email.
4. Name your key and to create the key, click **Save**.
5. SendGrid generates a new key. This is the **only** copy of the key, so make sure that you copy the key and save it for later.
## Create an Artifact Registry standard repository
Create an Artifact Registry standard repository to store your Docker container
image:
```bash
gcloud artifacts repositories create REPOSITORY \
--repository-format=docker \
--location=$REGION
```
Replace `REPOSITORY` with a unique name for the
repository.
## Create a Cloud Storage bucket
Create a unique Cloud Storage bucket to save the charts. Make sure
that the bucket and the charts are publicly available, and in the same region
as your Cloud Run service:
```bash
export BUCKET="$(gcloud config get-value core/project)-charts"
gcloud storage buckets create gs://${BUCKET} --location=$(gcloud config get-value run/region)
gcloud storage buckets update gs://${BUCKET} --uniform-bucket-level-access
gcloud storage buckets add-iam-policy-binding gs://${BUCKET} --member=allUsers --role=roles/storage.objectViewer
```
## Deploy the Notifier service
Deploy a Cloud Run service that receives Chart Creator
events and uses SendGrid to email links to the generated charts.
1. Clone the GitHub repository and change to the `notifier/python` directory:
```bash
git clone https://github.com/GoogleCloudPlatform/eventarc-samples
cd eventarc-samples/processing-pipelines/bigquery/notifier/python/
```
2. Build and push the container image:
```bash
export SERVICE_NAME=notifier
docker build -t $REGION-docker.pkg.dev/$(gcloud config get-value project)/REPOSITORY/${SERVICE_NAME}:v1 .
docker push $REGION-docker.pkg.dev/$(gcloud config get-value project)/REPOSITORY/${SERVICE_NAME}:v1
```
3. Deploy the container image to Cloud Run, passing in an address
to send emails to, and the SendGrid API key:
```bash
export TO_EMAILS=EMAIL_ADDRESS
export SENDGRID_API_KEY=YOUR_SENDGRID_API_KEY
gcloud run deploy ${SERVICE_NAME} \
--image $REGION-docker.pkg.dev/$(gcloud config get-value project)/REPOSITORY/${SERVICE_NAME}:v1 \
--update-env-vars TO_EMAILS=${TO_EMAILS},SENDGRID_API_KEY=${SENDGRID_API_KEY},BUCKET=${BUCKET} \
--allow-unauthenticated
```
Replace the following:
- `EMAIL_ADDRESS` with an email address to send the links to the generated charts
- `YOUR_SENDGRID_API_KEY` with the SendGrid API key you noted previously
When you see the service URL, the deployment is complete.
> [!NOTE]
> **Note:** It can take a few minutes before permissions are propagated to the service and before you can create a trigger.
### Create a trigger for the Notifier service
The Eventarc trigger for the Notifier service deployed on
Cloud Run filters for Cloud Storage audit logs where
the `methodName` is `storage.objects.create`.
1. Create the trigger:
```bash
gcloud eventarc triggers create trigger-${SERVICE_NAME} \
--destination-run-service=${SERVICE_NAME} \
--destination-run-region=${REGION} \
--event-filters="type=google.cloud.audit.log.v1.written" \
--event-filters="serviceName=storage.googleapis.com" \
--event-filters="methodName=storage.objects.create" \
--service-account=${PROJECT_NUMBER}-compute@developer.gserviceaccount.com
```
This creates a trigger called `trigger-notifier`.
## Deploy the Chart Creator service
Deploy a Cloud Run service that receives Query Runner
events, retrieves data from a BigQuery table for a specific
country, and then generates a chart, using Matplotlib, from the data. The chart
is uploaded to a Cloud Storage bucket.
1. Change to the `chart-creator/python` directory:
```bash
cd ../../chart-creator/python
```
2. Build and push the container image:
```bash
export SERVICE_NAME=chart-creator
docker build -t $REGION-docker.pkg.dev/$(gcloud config get-value project)/REPOSITORY/${SERVICE_NAME}:v1 .
docker push $REGION-docker.pkg.dev/$(gcloud config get-value project)/REPOSITORY/${SERVICE_NAME}:v1
```
3. Deploy the container image to Cloud Run, passing in `BUCKET`:
```bash
gcloud run deploy ${SERVICE_NAME} \
--image $REGION-docker.pkg.dev/$(gcloud config get-value project)/REPOSITORY/${SERVICE_NAME}:v1 \
--update-env-vars BUCKET=${BUCKET} \
--allow-unauthenticated
```
When you see the service URL, the deployment is complete.
### Create a trigger for the Chart Creator service
The Eventarc trigger for the Chart Creator service deployed on
Cloud Run filters for messages published to a Pub/Sub
topic.
1. Create the trigger:
```bash
gcloud eventarc triggers create trigger-${SERVICE_NAME} \
--destination-run-service=${SERVICE_NAME} \
--destination-run-region=${REGION} \
--event-filters="type=google.cloud.pubsub.topic.v1.messagePublished"
```
This creates a trigger called `trigger-chart-creator`.
2. Set the Pub/Sub topic environment variable.
```bash
export TOPIC_QUERY_COMPLETED=$(basename $(gcloud eventarc triggers describe trigger-${SERVICE_NAME} --format='value(transport.pubsub.topic)'))
```
## Deploy the Query Runner service
Deploy a Cloud Run service that receives Cloud Scheduler
events, retrieves data from a public COVID-19 dataset, and saves the results in
a new BigQuery table.
1. Change to the `processing-pipelines` directory:
```bash
cd ../../..
```
2. Build and push the container image:
```bash
export SERVICE_NAME=query-runner
docker build -t $REGION-docker.pkg.dev/$(gcloud config get-value project)/REPOSITORY/${SERVICE_NAME}:v1 -f Dockerfile .
docker push $REGION-docker.pkg.dev/$(gcloud config get-value project)/REPOSITORY/${SERVICE_NAME}:v1
```
3. Deploy the container image to Cloud Run, passing in `PROJECT_ID`
and `TOPIC_QUERY_COMPLETED`:
```bash
gcloud run deploy ${SERVICE_NAME} \
--image $REGION-docker.pkg.dev/$(gcloud config get-value project)/REPOSITORY/${SERVICE_NAME}:v1 \
--update-env-vars PROJECT_ID=$(gcloud config get-value project),TOPIC_ID=${TOPIC_QUERY_COMPLETED} \
--allow-unauthenticated
```
When you see the service URL, the deployment is complete.
### Create a trigger for the Query Runner service
The Eventarc trigger for the Query Runner service deployed on
Cloud Run filters for messages published to a Pub/Sub
topic.
1. Create the trigger:
```bash
gcloud eventarc triggers create trigger-${SERVICE_NAME} \
--destination-run-service=${SERVICE_NAME} \
--destination-run-region=${REGION} \
--event-filters="type=google.cloud.pubsub.topic.v1.messagePublished"
```
This creates a trigger called `trigger-query-runner`.
2. Set an environment variable for the Pub/Sub topic.
```bash
export TOPIC_QUERY_SCHEDULED=$(gcloud eventarc triggers describe trigger-${SERVICE_NAME} --format='value(transport.pubsub.topic)')
```
## Schedule the jobs
The processing pipeline is triggered by two Cloud Scheduler jobs.
1. Create an App Engine app which is required by Cloud Scheduler
and specify an appropriate [location](https://docs.cloud.google.com/appengine/docs/locations):
```bash
export APP_ENGINE_LOCATION=LOCATION
gcloud app create --region=${APP_ENGINE_LOCATION}
```
2. Create two Cloud Scheduler jobs that publish to a Pub/Sub
topic once per day:
```bash
gcloud scheduler jobs create pubsub cre-scheduler-uk \
--schedule="0 16 * * *" \
--topic=${TOPIC_QUERY_SCHEDULED} \
--message-body="United Kingdom"
```
```bash
gcloud scheduler jobs create pubsub cre-scheduler-cy \
--schedule="0 17 * * *" \
--topic=${TOPIC_QUERY_SCHEDULED} \
--message-body="Cyprus"
```
The schedule is specified in [unix-cron format](https://docs.cloud.google.com/scheduler/docs/configuring/cron-job-schedules.md.txt).
For example, `0 16 * * *` means that the jobs runs at 16:00 (4 PM) UTC every
day.
## Run the pipeline
1. First, confirm that all the triggers were successfully created:
```bash
gcloud eventarc triggers list
```
> [!NOTE]
> **Note:** It can take up to two minutes for triggers to be fully functional.
The output should be similar to the following:
NAME: trigger-chart-creator
TYPE: google.cloud.pubsub.topic.v1.messagePublished
DESTINATION: Cloud Run service: chart-creator
ACTIVE: Yes
LOCATION: us-central1
NAME: trigger-notifier
TYPE: google.cloud.audit.log.v1.written
DESTINATION: Cloud Run service: notifier
ACTIVE: Yes
LOCATION: us-central1
NAME: trigger-query-runner
TYPE: google.cloud.pubsub.topic.v1.messagePublished
DESTINATION: Cloud Run service: query-runner
ACTIVE: Yes
LOCATION: us-central1
2. Retrieve the Cloud Scheduler job IDs:
```bash
gcloud scheduler jobs list
```
The output should be similar to the following:
ID LOCATION SCHEDULE (TZ) TARGET_TYPE STATE
cre-scheduler-cy us-central1 0 17 * * * (Etc/UTC) Pub/Sub ENABLED
cre-scheduler-uk us-central1 0 16 * * * (Etc/UTC) Pub/Sub ENABLED
3. Although the jobs are scheduled to run daily at 4 and 5 PM, you can also run
the Cloud Scheduler jobs manually:
```bash
gcloud scheduler jobs run cre-scheduler-cy
gcloud scheduler jobs run cre-scheduler-uk
```
4. After a few minutes, confirm that there are two charts in the Cloud Storage
bucket:
```bash
gcloud storage ls gs://${BUCKET}
```
The output should be similar to the following:
```
gs://BUCKET/chart-cyprus.png
gs://BUCKET/chart-unitedkingdom.png
```
Congratulations! You should also receive two emails with links to the charts.
## Clean up
If you created a new project for this tutorial, delete the project. If you used
an existing project and want to keep it without the changes added
in this tutorial, [delete the resources created for the tutorial](https://docs.cloud.google.com/eventarc/standard/docs/run/bigquery.md.txt#delete-resources).
> [!CAUTION]
> **Caution** : Deleting a project has the following effects:
>
> - **Everything in the project is deleted.** If you used an existing project for the tasks in this document, when you delete it, you also delete any other work you've done in the project.
> - **Custom project IDs are lost.** When you created this project, you might have created a custom project ID that you want to use in the future. To preserve the URLs that use the project ID, such as an `appspot.com` URL, delete selected resources inside the project instead of deleting the whole project.
>
>
> If you plan to explore multiple architectures, tutorials, or quickstarts, reusing projects
> can help you avoid exceeding project quota limits.
1. Delete a Google Cloud project:
```
gcloud projects delete PROJECT_ID
```
### Delete tutorial resources
1. Delete any Cloud Run services you deployed in this tutorial:
```bash
gcloud run services delete SERVICE_NAME
```
Where `SERVICE_NAME` is your chosen service name.
You can also delete Cloud Run services from the
[Google Cloud console](https://console.cloud.google.com/run).
2. Remove any Google Cloud CLI default configurations you added during the
tutorial setup.
```bash
gcloud config unset project
gcloud config unset run/region
gcloud config unset run/platform
gcloud config unset eventarc/location
```
3. Delete any Eventarc triggers you created in this tutorial:
```
gcloud eventarc triggers delete TRIGGER_NAME
```
Replace `TRIGGER_NAME` with the name of your trigger.
4. Delete the images from Artifact Registry.
```bash
gcloud artifacts docker images delete $REGION-docker.pkg.dev/$(gcloud config get-value project)/REPOSITORY/notifier:v1
gcloud artifacts docker images delete $REGION-docker.pkg.dev/$(gcloud config get-value project)/REPOSITORY/chart-creator:v1
gcloud artifacts docker images delete $REGION-docker.pkg.dev/$(gcloud config get-value project)/REPOSITORY/query-runner:v1
```
5. Delete the bucket, along with all the objects within the bucket:
```
gcloud storage rm --recursive gs://${BUCKET}/
```
6. Delete the Cloud Scheduler jobs:
```bash
gcloud scheduler jobs delete cre-scheduler-cy
gcloud scheduler jobs delete cre-scheduler-uk
```
## What's next
- [Learn more about Eventarc](https://docs.cloud.google.com/eventarc/standard/docs/overview.md.txt)
- [Learn more about Cloud Run](https://docs.cloud.google.com/run/docs/overview/what-is-cloud-run.md.txt)