# Set up Endpoints OpenAPI for standard environment with ESPv2
This page shows you how to set up Cloud Endpoints for
[App Engine](https://docs.cloud.google.com/appengine/docs.md.txt).
Endpoints uses the
[Extensible Service Proxy V2 (ESPv2)](https://docs.cloud.google.com/endpoints/docs/openapi/glossary.md.txt#extensible_service_proxy_v2)
as an
[API gateway](https://wikipedia.org/wiki/API_management).
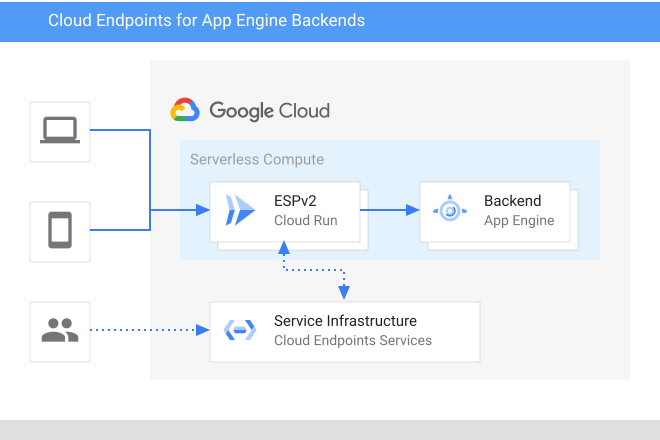
To provide API management for App Engine, you deploy the prebuilt
ESPv2 container to
[Cloud Run](https://docs.cloud.google.com/run/docs.md.txt).
You then secure your app by using
[Identity Aware Proxy (Identity-Aware Proxy (IAP))](https://docs.cloud.google.com/iap)
so that only ESPv2 can invoke it.
With this set up,
ESPv2 intercepts all requests to your app and performs any
necessary checks (such as authentication) before invoking the app.
When the app responds, ESPv2 gathers and reports telemetry,
as shown in the following figure.
You can view metrics for your app on the **Endpoints** \> **Services** page
in the Google Cloud console.
For an overview of Cloud Endpoints,
see [About Endpoints](https://docs.cloud.google.com/endpoints/docs/openapi/about-cloud-endpoints.md.txt)
and [Endpoints architecture](https://docs.cloud.google.com/endpoints/docs/openapi/architecture-overview.md.txt).
## Migrating to ESPv2
Previous releases of Endpoints supported the use of the [Extensible Service Proxy (ESP)](https://docs.cloud.google.com/endpoints/docs/openapi/glossary.md.txt#extensible_service_proxy) with Cloud Run.
If you have existing APIs that you want to migrate to ESPv2,
see [Migrate to Extensible Service Proxy V2](https://docs.cloud.google.com/endpoints/docs/openapi/migrate-to-esp-v2.md.txt) for more.
## Task List
Use the following task list as you work through the tutorial. **All
tasks are required for Endpoints to manage your app.**
1. Create a Google Cloud project, and if you haven't deployed your own App Engine, deploy a sample backend app. See [Before you begin](https://docs.cloud.google.com/endpoints/docs/openapi/set-up-app-engine-standard-environment-espv2.md.txt#before-you-begin).
2. Configure IAP to secure your app. See [Configure IAP](https://docs.cloud.google.com/endpoints/docs/openapi/set-up-app-engine-standard-environment-espv2.md.txt#configure_iap).
3. Reserve a Cloud Run hostname for the ESPv2 service. See [Reserving a Cloud Run hostname](https://docs.cloud.google.com/endpoints/docs/openapi/set-up-app-engine-standard-environment-espv2.md.txt#reserve_hostname).
4. Create an [OpenAPI document](https://docs.cloud.google.com/endpoints/docs/openapi/glossary.md.txt#open_api_doc) that describes your API, and configure the routes to your App Engine. See [Configuring Endpoints](https://docs.cloud.google.com/endpoints/docs/openapi/set-up-app-engine-standard-environment-espv2.md.txt#endpoints_configure).
5. Deploy the OpenAPI document to create a managed service. See [Deploying the Endpoints configuration](https://docs.cloud.google.com/endpoints/docs/openapi/set-up-app-engine-standard-environment-espv2.md.txt#deploy_configuration).
6. Build a new ESPv2 Docker image with your Endpoints service configuration. See [Building a new ESPv2 image](https://docs.cloud.google.com/endpoints/docs/openapi/set-up-app-engine-standard-environment-espv2.md.txt#configure_esp).
7. Deploy the ESPv2 container onto Cloud Run. Then grant ESPv2 the Identity and Access Management (IAM) permission to invoke your service. See [Deploying the ESPv2 container](https://docs.cloud.google.com/endpoints/docs/openapi/set-up-app-engine-standard-environment-espv2.md.txt#deploy_esp).
8. Invoke the app. See [Sending a request to the API](https://docs.cloud.google.com/endpoints/docs/openapi/set-up-app-engine-standard-environment-espv2.md.txt#send_request).
9. Track activity to your apps. See [Tracking API activity](https://docs.cloud.google.com/endpoints/docs/openapi/set-up-app-engine-standard-environment-espv2.md.txt#track_api).
10. Avoid incurring charges to your Google Cloud account. See [Clean up](https://docs.cloud.google.com/endpoints/docs/openapi/set-up-app-engine-standard-environment-espv2.md.txt#clean-up).
## Costs
In this document, you use the following billable components of Google Cloud:
- [App Engine](https://docs.cloud.google.com/appengine/pricing)
- [Cloud Run](https://docs.cloud.google.com/run/pricing)
- [Endpoints](https://docs.cloud.google.com/endpoints/pricing)
To generate a cost estimate based on your projected usage,
use the [pricing calculator](https://docs.cloud.google.com/products/calculator).
New Google Cloud users might be eligible for a [free trial](https://docs.cloud.google.com/free).
When you finish the tasks that are described in this document, you can avoid
continued billing by deleting the resources that you created. For more information, see
[Clean up](https://docs.cloud.google.com/endpoints/docs/openapi/set-up-app-engine-standard-environment-espv2.md.txt#clean-up).
## Before you begin
To get set up:
1. In the Google Cloud console, go to the **Manage resources** page
and create a project.
[Go to the Manage resources page](https://console.cloud.google.com/cloud-resource-manager)
2. Make sure that billing is enabled for your project.
[Learn how to enable billing](https://docs.cloud.google.com/billing/docs/how-to/modify-project.md.txt)
3. Make a note of the project ID because it is needed later. On the rest of this
page, this project ID is referred to as
ESPv2_PROJECT_ID.
4. Make a note of the
[project number](https://docs.cloud.google.com/resource-manager/docs/creating-managing-projects.md.txt#identifying_projects)
because it is needed later. On the rest of this page, this project number is
referred to as ESPv2_PROJECT_NUMBER.
5. Download and install the Google Cloud CLI.
[Download the gcloud CLI](https://docs.cloud.google.com/sdk/docs/quickstarts)
6. If you haven't deployed your own backend App Engine, follow the steps in
the [App Engine Quickstart](https://docs.cloud.google.com/appengine/docs/standard/python3/create-app).
Make a note of the region and project ID where your apps
are deployed. On the rest of this page, this project ID is referred to as
APP_PROJECT_ID.
## Configure IAP to secure your app
In order to secure your App Engine app, you must use the
[Identity Aware Proxy (IAP)](https://docs.cloud.google.com/iap) to ensure that requests are authenticated.
Follow the steps to [Enable IAP](https://docs.cloud.google.com/iap/docs/authenticate-users-google-accounts.md.txt#enabling_iap),
and ensure that you are able to sign in to your application.
Additionally, when configuring the OAuth client, make note of the OAuth
`client_id`, which is referred to as IAP_CLIENT_ID in this
tutorial.
## Reserving a Cloud Run hostname
You must reserve a Cloud Run hostname for the ESPv2
service in order to [configure](https://docs.cloud.google.com/endpoints/docs/openapi/set-up-app-engine-standard-environment-espv2.md.txt#endpoints_configure)
the OpenAPI document or gRPC service configuration.
To reserve a hostname, you will deploy a sample container to Cloud Run,
and use a portion of the generated URL as the hostname. Later, you will
[deploy](https://docs.cloud.google.com/endpoints/docs/openapi/set-up-app-engine-standard-environment-espv2.md.txt#deploy_esp) the ESPv2 container onto the same
sample Cloud Run service.
> [!NOTE]
> **Note:** Each ESPv2 Cloud Run service can only be associated with one OpenAPI document or gRPC service configuration. Reserve a new Cloud Run hostname for each document.
1. Make sure that gcloud CLI is authorized to access your data and services.
1. Log in.
```
gcloud auth login
```
2. On the new browser tab that opens, choose an account that has the **Editor** or **Owner** role in the Google Cloud project that you created for deploying ESPv2 to Cloud Run.
2. Set the region.
```
gcloud config set run/region us-central1
```
3. Deploy the sample image `gcr.io/cloudrun/hello` to Cloud Run. Replace ESPv2_CLOUD_RUN_SERVICE_NAME with the name that you want to use for the service.
```
gcloud run deploy ESPv2_CLOUD_RUN_SERVICE_NAME \
--image="gcr.io/cloudrun/hello" \
--allow-unauthenticated \
--platform managed \
--project=ESPv2_PROJECT_ID
```
On successful completion, the command displays a message similar to the
following:
```
Service [ESPv2_CLOUD_RUN_SERVICE_NAME] revision [ESPv2_CLOUD_RUN_SERVICE_NAME-REVISION_NUM] has been deployed and is serving traffic at ESPv2_CLOUD_RUN_SERVICE_URL
```
For example, if you set ESPv2_CLOUD_RUN_SERVICE_NAME to `gateway`:
```
Service [gateway] revision [gateway-00001] has been deployed and is serving traffic at https://gateway-12345-uc.a.run.app
```
In this example:
- ESPv2_CLOUD_RUN_SERVICE_URL is the service URL `https://gateway-12345-uc.a.run.app`
- ESPv2_CLOUD_RUN_HOSTNAME is the hostname `gateway-12345-uc.a.run.app`.
4. Make a note of ESPv2_CLOUD_RUN_SERVICE_NAME and ESPv2_CLOUD_RUN_HOSTNAME. You later deploy ESPv2 onto the ESPv2_CLOUD_RUN_SERVICE_NAME Cloud Run service. You specify ESPv2_CLOUD_RUN_HOSTNAME in the `host` field of your OpenAPI document.
## Configuring Endpoints
You must have an OpenAPI document based on either
OpenAPI 2.0 or OpenAPI 3.x
that describes the
[surface](https://docs.cloud.google.com/endpoints/docs/openapi/glossary.md.txt#surface)
of your apps and any authentication requirements. To learn more, see [Supported OpenAPI versions](https://docs.cloud.google.com/endpoints/docs/openapi/openapi-overview.md.txt#supported-openapi-versions).
You also need to add a
Google-specific field that contains the URL for each app so that
ESPv2 has the information it needs to invoke an app. If you
are new to OpenAPI, see
[OpenAPI overview](https://docs.cloud.google.com/endpoints/docs/openapi/openapi-overview.md.txt)
for more information.
1. Create a text file called `openapi-appengine.yaml`. For convenience, this page refers to the OpenAPI document by that filename, but you can name it something else if you prefer.
2. Your App Engine backend app is defined in the `openapi-appengine.yaml` file, either in an `x-google-backend` definition (for OpenAPI 2.0) or an `x-google-api-management` definition (for OpenAPI 3.x). For example:
### OpenAPI 2.0
```yaml
swagger: '2.0'
info:
title: Cloud Endpoints + App Engine
description: Sample API on Cloud Endpoints with an App Engine backend
version: 1.0.0
host: CLOUD_RUN_HOSTNAME
schemes:
- https
produces:
- application/json
x-google-backend:
address: https://APP_PROJECT_ID.REGION.r.appspot.com
jwt_audience: IAP_CLIENT_ID
protocol: h2
paths:
/:
get:
summary: Greet a user
operationId: hello
responses:
'200':
description: A successful response
schema:
type: string
```
### OpenAPI 3.x
```yaml
openapi: 3.0.4
info:
title: Cloud Endpoints + App Engine
description: Sample API on Cloud Endpoints with an App Engine backend
version: 1.0.0
servers:
- url: https://CLOUD_RUN_HOSTNAME
x-google-endpoint: {}
# Define reusable components in x-google-api-management
x-google-api-management:
backends:
appengine_backend:
address: https://APP_PROJECT_ID.REGION.r.appspot.com
jwtAudience: IAP_CLIENT_ID
protocol: h2
# Apply the backend configuration by referencing it by name. Set at the root so this applies to all operations unless overridden.
x-google-backend: appengine_backend
paths:
/:
get:
summary: Greet a user
operationId: hello
responses:
'200':
description: A successful response
content:
application/json:
schema:
type: string
```
Indentation is important for yaml format. For example the `host` or the `servers` field must be at the same level as `info`.
3. In the `address` field, replace APP_PROJECT_ID with your Google Cloud project ID, REGION with the Google Cloud region where you deployed App Engine, and IAP_CLIENT_ID with the OAuth Client ID you created when you set up IAP.
4. Specify the hostname for your service. The value required depends on which version of the OpenAPI spec you are using.
### OpenAPI 2.0
In the `host` field, specify CLOUD_RUN_HOSTNAME,
the hostname portion of the URL that was reserved in
[Reserving a Cloud Run hostname](https://docs.cloud.google.com/endpoints/docs/openapi/set-up-app-engine-standard-environment-espv2.md.txt#reserve_hostname).
Don't include the protocol identifier, `https://`. For example:
```
swagger: '2.0'
info:
title: Cloud Endpoints + App Engine
description: Sample API on Cloud Endpoints with an App Engine backend
version: 1.0.0
host: gateway-12345-uc.a.run.app
```
### OpenAPI 3.x
In the `url` field of the `servers` object, specify the full URL,
including the protocol identifier `https://` and CLOUD_RUN_HOSTNAME,
the hostname portion of the URL that was reserved in
[Reserving a Cloud Run hostname](https://docs.cloud.google.com/endpoints/docs/openapi/set-up-app-engine-standard-environment-espv2.md.txt#reserve_hostname). For example:
```
openapi: 3.0.4
info:
title: Cloud Endpoints + App Engine
description: Sample API on Cloud Endpoints with an App Engine backend
version: 1.0.0
servers:
- url: https://gateway-12345-uc.a.run.app
x-google-endpoint: {}
```
5. Note the value of the `title` property in the `openapi-appengine.yaml` file:
```
title: Cloud Endpoints + App Engine
```
The value of the `title` property becomes the name of the Endpoints service
after you deploy the configuration.
6. Save your OpenAPI document.
For information about the fields in the OpenAPI document that
Endpoints requires, see
[Configuring Endpoints](https://docs.cloud.google.com/endpoints/docs/openapi/configure-endpoints.md.txt).
## Deploying the Endpoints configuration
To deploy the Endpoints configuration, you use the
[`gcloud endpoints services deploy`](https://docs.cloud.google.com/sdk/gcloud/reference/endpoints/services/deploy)
command. This command uses
[Service Management](https://docs.cloud.google.com/service-infrastructure/docs/manage-config.md.txt) to create a
managed service.
To deploy the Endpoints configuration:
1. Make sure you are in the directory that contains your OpenAPI document.
2. Upload the configuration and create a managed service.
```
gcloud endpoints services deploy openapi-appengine.yaml \
--project ESPv2_PROJECT_ID
```
This creates a new Endpoints service with the name that you
specified as the hostname in your OpenAPI document. The service is configured according to your OpenAPI document.
As it is creating and configuring the service, Service Management outputs
information to the terminal. When the deployment completes, a message similar to
the following is displayed:
```
Service Configuration [CONFIG_ID] uploaded for service [CLOUD_RUN_HOSTNAME]
```
CONFIG_ID is the unique Endpoints service configuration
ID created by the deployment. For example:
```
Service Configuration [2019-02-01r0] uploaded for service [gateway-12345-uc.a.run.app]
```
The service configuration ID consists of a date stamp
followed by a revision number. If you deploy `openapi-appengine.yaml`
again on the same day, the revision number is incremented in the service configuration ID.
You can view the service configuration and the
[deployment history](https://docs.cloud.google.com/endpoints/docs/openapi/config-file-compare.md.txt)
on the **Endpoints \> Services** page in the Google Cloud console.
If you get an error message, see
[Troubleshooting Endpoints configuration deployment](https://docs.cloud.google.com/endpoints/docs/openapi/troubleshoot-config-deployment.md.txt).
### Checking required services
At a minimum, Endpoints and ESP require the following Google services to be enabled:
| Name | Title |
|---|---|
| `servicemanagement.googleapis.com` | Service Management API |
| `servicecontrol.googleapis.com` | Service Control API |
In most cases, the `gcloud endpoints services deploy` command enables these
required services. However, the `gcloud` command completes successfully but
doesn't enable the required services in the following circumstances:
- If you used a third-party application such as Terraform, and you don't
include these services.
- You deployed the Endpoints configuration to an existing
Google Cloud project in which these services were explicitly disabled.
Use the following command to confirm that the required services are enabled:
```
gcloud services list
```
If you do not see the required services listed, enable them:
gcloud services enable servicemanagement.googleapis.com
gcloud services enable servicecontrol.googleapis.com
Also enable your Endpoints service:
```
gcloud services enable ENDPOINTS_SERVICE_NAME
```
To determine the ENDPOINTS_SERVICE_NAME you can either:
- After deploying the Endpoints configuration, go to the **Endpoints** page in the Cloud console. The list of possible ENDPOINTS_SERVICE_NAME are shown under the **Service name** column.
- For OpenAPI, the ENDPOINTS_SERVICE_NAME is what you specified in the `host` field of your OpenAPI spec. For gRPC, the ENDPOINTS_SERVICE_NAME is what you specified in the `name` field of your gRPC Endpoints configuration.
For more information about the `gcloud` commands, see
[`gcloud` services](https://docs.cloud.google.com/sdk/gcloud/reference/services).
## Building a new ESPv2 image
Build the Endpoints service config into a new ESPv2
docker image. You will later deploy this image onto the reserved
Cloud Run service.
> [!NOTE]
> **Note:**
>
> This step is required.
>
> The service config must be built into a new docker image because Cloud Run
> is a *scale-to-zero* service. That means when there is no traffic,
> all instances are deleted. When traffic increases, new instances are created on-demand.
> This type of service instance creation is also called *cold start* .
> See the Cloud Run [Concurrency](https://docs.cloud.google.com/run/docs/about-concurrency.md.txt) documentation for more.
>
> If the docker image did not have the service config built into it, Cloud Run
> would have to make two API calls to Google ServiceManagement at cold start.
> These calls count against your Google ServiceManagement API quota.
>
> By building the service config into the ESPv2 docker image,
> you remove the two API calls and avoid impacting the quota count for the Google ServiceManagement service.
> This step also speeds up the new service instance creation and reduces the latency
> for the requests waiting for the new instance.
>
> You must re-run this entire step and redeploy the new container:
>
> - Every time you modify and redeploy the Endpoints service configuration. Otherwise, changes to the service configuration will not be propagated to ESPv2.
> - When a new version of ESPv2 is released. Otherwise, the older version of ESPv2 will remain deployed.
To build the service config into a new ESPv2 docker image:
1. Download this
[script](https://github.com/GoogleCloudPlatform/esp-v2/tree/master/docker/serverless/gcloud_build_image)
to your local machine where the gcloud CLI is installed.
> [!NOTE]
> **Note:**
>
> This script requires bash. If you are not using macOS/Linux,
> you can run it on [Cloud Shell](https://docs.cloud.google.com/shell/docs/launching-cloud-shell.md.txt),
> [Compute Engine](https://docs.cloud.google.com/compute), or Windows Subsystem for Linux.
2.
Run the script with the following command:
```bash
chmod +x gcloud_build_image
./gcloud_build_image -s ESPv2_CLOUD_RUN_HOSTNAME \
-c CONFIG_ID -p ESPv2_PROJECT_ID
```
> [!NOTE]
> **Note:**
>
> This script is designed to create a folder within the `/tmp` directory. Make sure you have write access for the `/tmp` directory when executing this script.
>
>
> If write access is not available for `/tmp` directory, you must modify the script to specify an alternative directory where you have the required access to create folders.
For ESPv2_CLOUD_RUN_HOSTNAME, specify the hostname of the URL that
you reserved above in
[Reserving a Cloud Run hostname](https://docs.cloud.google.com/endpoints/docs/openapi/set-up-app-engine-standard-environment-espv2.md.txt#reserve_hostname).
Don't include the protocol identifier, `https://`.
For example:
```bash
chmod +x gcloud_build_image
./gcloud_build_image -s gateway-12345-uc.a.run.app \
-c 2019-02-01r0 -p your-project-id
```
3. The script uses the `gcloud` command to download the service config, build the
service config into a new ESPv2 image, and upload the new image
to your project container registry. The script automatically uses the latest
release of ESPv2, denoted by the ESPv2_VERSION in the
output image name. The output image is uploaded to:
```
gcr.io/ESPv2_PROJECT_ID/endpoints-runtime-serverless:ESPv2_VERSION-ESPv2_CLOUD_RUN_HOSTNAME-CONFIG_ID
```
For example:
```
gcr.io/your-project-id/endpoints-runtime-serverless:2.14.0-gateway-12345-uc.a.run.app-2019-02-01r0"
```
> [!NOTE]
> **Note:**
>
> Pass the `-z` flag to the script to generate the image in a different
> [registry location](https://docs.cloud.google.com/artifact-registry/docs/pushing-and-pulling).
>
>
> For example, to push the generated ESPv2 image to a Euopean Union data center,
> pass `-z eu` to the script.
## Deploying the ESPv2 container
1. Deploy the ESPv2 Cloud Run service with the new image you built earlier.
Replace CLOUD_RUN_SERVICE_NAME with the same Cloud Run
service name you used when you originally reserved the hostname in [Reserving a Cloud Run hostname](https://docs.cloud.google.com/endpoints/docs/openapi/set-up-app-engine-standard-environment-espv2.md.txt#reserve_hostname):
```
gcloud run deploy CLOUD_RUN_SERVICE_NAME \
--image="gcr.io/ESPv2_PROJECT_ID/endpoints-runtime-serverless:ESPv2_VERSION-CLOUD_RUN_HOSTNAME-CONFIG_ID" \
--allow-unauthenticated \
--platform managed \
--project=ESPv2_PROJECT_ID
```
> [!NOTE]
> **Note:**
>
> If you want ESPv2 to manage access, use the
> `--allow-unauthenticated` flag to ensure that ESPv2
> verifies the JWT token. If the flag is not used, the JWT token is intercepted
> and verified by Cloud Run access control IAM server. Since the IAM and ESPv2 use the same Authorization header, they don't work together, make sure only use one of them. Recommend to use IAM instead of ESPv2 for managing access.
2. If you want to configure Endpoints to use additional
ESPv2 startup options, such as
[enabling CORS](https://docs.cloud.google.com/endpoints/docs/openapi/support-cors.md.txt),
you can pass the arguments in the `ESPv2_ARGS` environment variable:
```
gcloud run deploy CLOUD_RUN_SERVICE_NAME \
--image="gcr.io/ESPv2_PROJECT_ID/endpoints-runtime-serverless:ESPv2_VERSION-CLOUD_RUN_HOSTNAME-CONFIG_ID" \
--set-env-vars=ESPv2_ARGS=--cors_preset=basic \
--allow-unauthenticated \
--platform managed \
--project ESPv2_PROJECT_ID
```
For more information and examples on setting the `ESPv2_ARGS` environment variable,
including the list of available options and information on how to specify multiple options,
see [Extensible Service Proxy V2 flags](https://docs.cloud.google.com/endpoints/docs/openapi/specify-esp-v2-startup-options.md.txt).
3. Grant ESPv2 permission to invoke your IAP secured app. Run the following command for each service. In the following command:
- Replace APP_PROJECT_ID with the name of your App Engine project ID.
- Replace ESPv2_PROJECT_NUMBER with the project **number** of the project that you created for ESPv2. One way to find this is to go to the [IAM console](https://console.cloud.google.com/iam-admin/iam) and find the **Compute Engine default service account**, which is the service account used in the \`member\` flag.
```
gcloud projects add-iam-policy-binding APP_PROJECT_ID \
--member "serviceAccount:ESPv2_PROJECT_NUMBER-compute@developer.gserviceaccount.com" \
--role "roles/iap.httpsResourceAccessor"
```
For more information, see
[Managing Access using IAM](https://docs.cloud.google.com/run/docs/securing/managing-access.md.txt).
## Sending requests to the API
This section shows how to send requests to your API.
1. Create an environment variable for your Endpoints service
name. This is the name that you specified in the `host` field of your
OpenAPI document. For example:
- **Linux or macOS**:
`export ENDPOINTS_HOST=gateway-12345-uc.a.run.app`
- **Windows PowerShell**:
`$Env: ENDPOINTS_HOST="gateway-12345-uc.a.run.app"`
### Linux or Mac OS
Use `curl` to send an HTTP request by using the `ENDPOINTS_HOST` environment
variable you set in the previous step.
```
curl --request GET \
--header "content-type:application/json" \
"https://${ENDPOINTS_HOST}/"
```
### PowerShell
Use `Invoke-WebRequest` to send an HTTP request by using the `ENDPOINTS_HOST`
environment variable you set in the previous step.
```
(Invoke-WebRequest -Method GET `
-Headers @{"content-type"="application/json"} `
-URI "https://$Env:ENDPOINTS_HOST/").Content
```
In the previous example, the first two lines end in a backtick. When you paste the
example into PowerShell, make sure there isn't a space following the backticks.
For information about the options used in the example request, see [Invoke-WebRequest](https://docs.microsoft.com/en-us/powershell/module/microsoft.powershell.utility/invoke-webrequest?view=powershell-6) in the Microsoft
documentation.
### Third-party app
You can use a third-party application such as the Chrome browser
extension
[Postman](https://www.getpostman.com/)
request.
- Select `GET` as the HTTP verb.
- For the header, select the key `content-type` and the value `application/json`.
- Use the actual URL instead of the environment variable, for example:
https://gateway-12345-uc.a.run.app/
If you didn't get a successful response, see
[Troubleshooting Response Errors](https://docs.cloud.google.com/endpoints/docs/openapi/troubleshoot-response-errors.md.txt).
You just deployed and tested an API in Endpoints!
> [!NOTE]
> **Note** : If you want to let us know what you liked about this tutorial, feel free to provide feedback at the bottom of this page. Your feedback helps us improve these tutorials.
> If you got an error, join the [`google-cloud-endpoints`](https://groups.google.com/forum/#!forum/google-cloud-endpoints) Google group and let us know what went wrong. This group receives responses from other Endpoints users and from Google engineers, who monitor the group.
## Tracking API activity
1. View the activity graphs for your API on the **Endpoints** \> **Service**
page in the Google Cloud console.
[View Endpoints activity graphs](https://console.cloud.google.com/endpoints)
It may take a few moments for the request to be reflected in the graphs.
2. Look at the request logs for your API on the Logs Explorer page.
[View Endpoints request logs](https://console.cloud.google.com/logs/query)
## Clean up
To avoid incurring charges to your Google Cloud account for
the resources used on this page, follow these steps.
See
[Deleting an API and API instances](https://docs.cloud.google.com/endpoints/docs/openapi/deleting-an-api-and-instances.md.txt)
for information on stopping the services used by this tutorial.
## What's next
- [Learn more about Cloud Run](https://docs.cloud.google.com/run/docs/deploying.md.txt)
- [Learn more about deploying the Endpoints configuration](https://docs.cloud.google.com/endpoints/docs/openapi/deploy-endpoints-config.md.txt)
- [Share your API with another developer](https://docs.cloud.google.com/endpoints/docs/openapi/restricting-api-access-with-api-keys.md.txt#sharing_apis_protected_by_api_key)
- [Learn about authentication](https://docs.cloud.google.com/endpoints/docs/openapi/authentication-method.md.txt)
- [Learn about community support options](https://docs.cloud.google.com/endpoints/docs/community-support)