# Set up Cloud Endpoints gRPC for Cloud Run with ESPv2
This page shows you how to set up Cloud Endpoints for
[Cloud Run](https://docs.cloud.google.com/run/docs.md.txt) with a gRPC backend.
Endpoints uses the
[Extensible Service Proxy V2 (ESPv2)](https://docs.cloud.google.com/endpoints/docs/grpc/glossary.md.txt#extensible_service_proxy_v2)
as an [API gateway](https://wikipedia.org/wiki/API_management).
To provide API management for Cloud Run, you deploy the prebuilt
ESPv2 container to [Cloud Run](https://docs.cloud.google.com/run/docs.md.txt).
You then help secure your services by using
[Cloud Run IAM](https://docs.cloud.google.com/run/docs/securing/authenticating) so that ESPv2 can invoke them.
With this set up, ESPv2 intercepts all requests to your services and performs any
necessary checks (such as authentication) before invoking the service.
When the service responds, ESPv2 gathers and reports telemetry,
as shown in the figure below.
You can view metrics for your service on the **Endpoints** \> **Services** page
in the Google Cloud console.
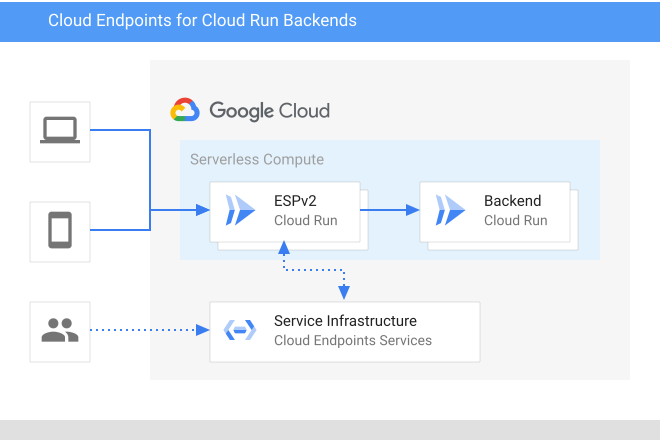
> [!NOTE]
> Note: In above graph, ESPv2 and the "backend" are deployed in two separate Cloud Run instances.
For an overview of Cloud Endpoints, see
[About Endpoints](https://docs.cloud.google.com/endpoints/docs/grpc/about-cloud-endpoints.md.txt)
and [Endpoints architecture](https://docs.cloud.google.com/endpoints/docs/grpc/architecture-overview.md.txt).
## Migrating to ESPv2
Previous releases of Cloud Endpoints did not support gRPC on Cloud Run with ESP. To use this feature, [migrate to Extensible Service Proxy V2](https://docs.cloud.google.com/endpoints/docs/grpc/migrate-to-esp-v2.md.txt).
## Task List
Use the following task list as you work through the tutorial. **All
tasks are required to complete this tutorial.**
1. Create a Google Cloud project, and if you haven't deployed your own Cloud Run, deploy a sample backend gRPC service. See [Before you begin](https://docs.cloud.google.com/endpoints/docs/grpc/set-up-cloud-run-espv2.md.txt#before-you-begin).
2. Reserve a Cloud Run hostname for the ESPv2 service. See [Reserving a Cloud Run hostname](https://docs.cloud.google.com/endpoints/docs/grpc/set-up-cloud-run-espv2.md.txt#reserve_hostname).
3. Create a [gRPC API configuration document](https://docs.cloud.google.com/endpoints/docs/grpc/glossary.md.txt#open_api_doc) that describes your API, and configure the routes to your Cloud Run. See [Configuring Endpoints](https://docs.cloud.google.com/endpoints/docs/grpc/set-up-cloud-run-espv2.md.txt#endpoints_configure).
4. Deploy the gRPC API configuration document to create a managed service. See [Deploying the Endpoints configuration](https://docs.cloud.google.com/endpoints/docs/grpc/set-up-cloud-run-espv2.md.txt#deploy_configuration).
5. Build a new ESPv2 Docker image with your Endpoints service configuration. See [Building a new ESPv2 image](https://docs.cloud.google.com/endpoints/docs/grpc/set-up-cloud-run-espv2.md.txt#configure_esp).
6. Deploy the ESPv2 container onto Cloud Run. Then grant ESPv2 the Identity and Access Management (IAM) permission to invoke your service. See [Deploying the ESPv2 container](https://docs.cloud.google.com/endpoints/docs/grpc/set-up-cloud-run-espv2.md.txt#deploy_esp).
7. Invoke a service. See [Sending a request to the API](https://docs.cloud.google.com/endpoints/docs/grpc/set-up-cloud-run-espv2.md.txt#send_request).
8. Track activity to your services. See [Tracking API activity](https://docs.cloud.google.com/endpoints/docs/grpc/set-up-cloud-run-espv2.md.txt#track_api).
9. Avoid incurring charges to your Google Cloud account. See [Clean up](https://docs.cloud.google.com/endpoints/docs/grpc/set-up-cloud-run-espv2.md.txt#clean-up).
## Costs
In this document, you use the following billable components of Google Cloud:
- [Cloud Run](https://docs.cloud.google.com/run/pricing)
- [Endpoints](https://docs.cloud.google.com/endpoints/pricing)
To generate a cost estimate based on your projected usage,
use the [pricing calculator](https://docs.cloud.google.com/products/calculator).
New Google Cloud users might be eligible for a [free trial](https://docs.cloud.google.com/free).
When you finish the tasks that are described in this document, you can avoid
continued billing by deleting the resources that you created. For more information, see
[Clean up](https://docs.cloud.google.com/endpoints/docs/grpc/set-up-cloud-run-espv2.md.txt#clean-up).
## Before you begin
To get set up:
1. In the Google Cloud console, go to the **Manage resources** page
and create a project.
[Go to the Manage resources page](https://console.cloud.google.com/cloud-resource-manager)
2. Make sure that billing is enabled for your project.
[Learn how to enable billing](https://docs.cloud.google.com/billing/docs/how-to/modify-project.md.txt)
3. Make a note of the project ID because it is needed later. On the rest of this
page, this project ID is referred to as
ESPv2_PROJECT_ID.
4. Make a note of the
[project number](https://docs.cloud.google.com/resource-manager/docs/creating-managing-projects.md.txt#identifying_projects)
because it is needed later. On the rest of this page, this project number is
referred to as ESPv2_PROJECT_NUMBER.
5. Download and install the Google Cloud CLI.
[Download the gcloud CLI](https://docs.cloud.google.com/sdk/docs/quickstarts)
6. Follow the steps in the
[gRPC Python quickstart](https://grpc.io/docs/languages/python/quickstart/) to install gRPC and the gRPC tools.
7. Deploy the **python-grpc-bookstore-server** example backend
gRPC Cloud Run service for use with this tutorial.
The gRPC service uses the following container image:
`gcr.io/endpointsv2/python-grpc-bookstore-server:2`
Follow the steps in [Quickstart: Deploy a Prebuilt Sample Container](https://docs.cloud.google.com/run/docs/quickstarts/deploy-container.md.txt)
to deploy the service. Make sure to replace the container image specified in that quickstart with `gcr.io/endpointsv2/python-grpc-bookstore-server:2`
Note of the region and project ID where your service
is deployed. On the rest of this page, this project ID is referred to as
BACKEND_PROJECT_ID. The name of the deployed Cloud Run service is
referred to as BACKEND_SERVICE_NAME. Its Cloud Run host name
is referred to as BACKEND_HOST_NAME.
## Reserving a Cloud Run hostname
You must reserve a Cloud Run hostname for the ESPv2
service in order to [configure](https://docs.cloud.google.com/endpoints/docs/grpc/set-up-cloud-run-espv2.md.txt#endpoints_configure)
the OpenAPI document or gRPC service configuration.
To reserve a hostname, you will deploy a sample container to Cloud Run,
and use a portion of the generated URL as the hostname. Later, you will
[deploy](https://docs.cloud.google.com/endpoints/docs/grpc/set-up-cloud-run-espv2.md.txt#deploy_esp) the ESPv2 container onto the same
sample Cloud Run service.
> [!NOTE]
> **Note:** Each ESPv2 Cloud Run service can only be associated with one OpenAPI document or gRPC service configuration. Reserve a new Cloud Run hostname for each document.
1. Make sure that gcloud CLI is authorized to access your data and services.
1. Log in.
```
gcloud auth login
```
2. On the new browser tab that opens, choose an account that has the **Editor** or **Owner** role in the Google Cloud project that you created for deploying ESPv2 to Cloud Run.
2. Set the region.
```
gcloud config set run/region us-central1
```
3. Deploy the sample image `gcr.io/cloudrun/hello` to Cloud Run. Replace ESPv2_CLOUD_RUN_SERVICE_NAME with the name that you want to use for the service.
```
gcloud run deploy ESPv2_CLOUD_RUN_SERVICE_NAME \
--image="gcr.io/cloudrun/hello" \
--allow-unauthenticated \
--platform managed \
--project=ESPv2_PROJECT_ID
```
On successful completion, the command displays a message similar to the
following:
```
Service [ESPv2_CLOUD_RUN_SERVICE_NAME] revision [ESPv2_CLOUD_RUN_SERVICE_NAME-REVISION_NUM] has been deployed and is serving traffic at ESPv2_CLOUD_RUN_SERVICE_URL
```
For example, if you set ESPv2_CLOUD_RUN_SERVICE_NAME to `gateway`:
```
Service [gateway] revision [gateway-00001] has been deployed and is serving traffic at https://gateway-12345-uc.a.run.app
```
In this example:
- ESPv2_CLOUD_RUN_SERVICE_URL is the service URL `https://gateway-12345-uc.a.run.app`
- ESPv2_CLOUD_RUN_HOSTNAME is the hostname `gateway-12345-uc.a.run.app`.
4. Make a note of ESPv2_CLOUD_RUN_SERVICE_NAME and ESPv2_CLOUD_RUN_HOSTNAME. You later deploy ESPv2 onto the ESPv2_CLOUD_RUN_SERVICE_NAME Cloud Run service. You specify ESPv2_CLOUD_RUN_HOSTNAME in the `host` field of your OpenAPI document.
## Configuring Endpoints
The [`bookstore-grpc`](https://github.com/GoogleCloudPlatform/python-docs-samples/tree/master/endpoints/bookstore-grpc-transcoding)
sample contains the files that you need to copy locally and configure.
1. Create a self-contained protobuf descriptor file from your service `.proto` file:
1. Save a copy of [`bookstore.proto`](https://raw.githubusercontent.com/GoogleCloudPlatform/python-docs-samples/master/endpoints/bookstore-grpc-transcoding/bookstore.proto) from the example repository to your current working directory. This file defines the Bookstore service's API.
2. Create the following directory under your working directory: `mkdir generated_pb2`
3. Create the descriptor file, `api_descriptor.pb`, by using the `protoc` protocol buffers compiler. Run the following command in the directory where you saved `bookstore.proto`:
```
python3 -m grpc_tools.protoc \
--include_imports \
--include_source_info \
--proto_path=. \
--descriptor_set_out=api_descriptor.pb \
--python_out=generated_pb2 \
--grpc_python_out=generated_pb2 \
bookstore.proto
```
In the preceding command, `--proto_path` is set to the current
working directory. In your gRPC build environment, if you use a different
directory for `.proto` input files, change `--proto_path` so the
compiler searches the directory where you saved `bookstore.proto`.
2. Create a text file called `api_config.yaml` in your current working directory (the same directory that contains `bookstore.proto`). For convenience, this page refers to the gRPC API configuration document by that file name, but you can name it something else if you prefer. Add the following contents to the file:
```
# The configuration schema is defined by the service.proto file.
# https://github.com/googleapis/googleapis/blob/master/google/api/service.proto
type: google.api.Service
config_version: 3
name: CLOUD_RUN_HOSTNAME
title: Cloud Endpoints + Cloud Run gRPC
apis:
- name: endpoints.examples.bookstore.Bookstore
usage:
rules:
# ListShelves methods can be called without an API Key.
- selector: endpoints.examples.bookstore.Bookstore.ListShelves
allow_unregistered_calls: true
backend:
rules:
- selector: "*"
address: grpcs://BACKEND_HOST_NAME
```
Indentation is important for yaml format. For example the `name` field must be at the same level as `type`.
3. In the `name` field, specify CLOUD_RUN_HOSTNAME,
the hostname portion of the URL that was reserved above in
[Reserving a Cloud Run hostname](https://docs.cloud.google.com/endpoints/docs/grpc/set-up-cloud-run-espv2.md.txt#reserve_hostname).
Don't include the protocol identifier, such as `https://` or `grpcs://`.
4. In the `address` field in the `backend.rules`
section, replace BACKEND_HOST_NAME with the actual gRPC Bookstore
Cloud Run service created in [Before you begin](https://docs.cloud.google.com/endpoints/docs/grpc/set-up-cloud-run-espv2.md.txt#before-you-begin).
> [!NOTE]
> **Note:** To use gRPC with TLS on Cloud Run, the `address` field must have the scheme grpcs:// instead of https://.
5. Note the value of the `title` property in the `api_config.yaml` file:
```
title: Cloud Endpoints + Cloud Run gRPC
```
The value of the `title` property becomes the name of the Endpoints service
after you deploy the configuration.
6. Save your gRPC API configuration document.
See [Configuring Endpoints](https://docs.cloud.google.com/endpoints/docs/grpc/configure-endpoints.md.txt)
for more information.
## Configure API key requirements
To control access to your API, you can configure Cloud Endpoints to require an API key. Clients calling your API must provide an API key associated with your project. See [Restricting API access with API keys](https://docs.cloud.google.com/endpoints/docs/openapi/restricting-api-access-with-api-keys.md.txt) for more information.
If you don't already have an API key associated with the Google Cloud project you are using in this quickstart, you can add one by following the steps at [Creating an API Key](https://cloud.google.com/docs/authentication/api-keys#creating_an_api_key).
To test API key enforcement using an API key associated with your Google Cloud project, follow these steps:
1. Enable API key support for your service. Enter the following command, where:
- CLOUD_RUN_HOSTNAME is the hostname component of the URL designated for the ESPv2 service on Cloud Run. It is used within the `host` field of the OpenAPI document to specify the location where the API is hosted.
```
gcloud services enable CLOUD_RUN_HOSTNAME
```
2. Open your project's gRPC service configuration file.
3. Add a `usage` section to the file.
4. To disable the API key requirement for all methods, add an `allow_unregistered_calls` rule with a wildcard selector (`"*"`) within the `usage` section.
```
usage:
rules:
# Allow all methods to be called without an API key.
- selector: "*"
allow_unregistered_calls: true
```
5. To disable the API key requirement for a specific method, set the `selector` to that method's fully qualified name instead of a wildcard.
```
usage:
rules:
# Allow the ListShelves method to be called without an API key.
- selector: "endpoints.examples.bookstore.Bookstore.ListShelves"
allow_unregistered_calls: true
```
6. After modifying the service configuration file, deploy the updated configuration to your Endpoints service.
### Calling an API using an API key
Calling an API varies, depending on whether you call from a gRPC client or an
HTTP client.
### gRPC clients
If a method requires an API key, gRPC clients need to pass the key value as
`x-api-key`
[metadata](http://www.grpc.io/docs/guides/concepts.html#metadata)
with their method call.
### Python
```python
def run(
host, port, api_key, auth_token, timeout, use_tls, servername_override, ca_path
```
### Java
```java
private static final class Interceptor implements ClientInterceptor {
private final String apiKey;
private final String authToken;
private static Logger LOGGER = Logger.getLogger("InfoLogging");
private static Metadata.Key API_KEY_HEADER =
Metadata.Key.of("x-api-key", Metadata.ASCII_STRING_MARSHALLER);
private static Metadata.Key AUTHORIZATION_HEADER =
Metadata.Key.of("authorization", Metadata.ASCII_STRING_MARSHALLER);
public Interceptor(String apiKey, String authToken) {
this.apiKey = apiKey;
this.authToken = authToken;
}
@Override
public ClientCall interceptCall(
MethodDescriptor method, CallOptions callOptions, Channel next) {
LOGGER.info("Intercepted " + method.getFullMethodName());
ClientCall call = next.newCall(method, callOptions);
call = new ForwardingClientCall.SimpleForwardingClientCall(call) {
@Override
public void start(Listener responseListener, Metadata headers) {
if (apiKey != null && !apiKey.isEmpty()) {
LOGGER.info("Attaching API Key: " + apiKey);
headers.put(API_KEY_HEADER, apiKey);
}
if (authToken != null && !authToken.isEmpty()) {
System.out.println("Attaching auth token");
headers.put(AUTHORIZATION_HEADER, "Bearer " + authToken);
}
super.start(responseListener, headers);
}
};
return call;
}
}
```
### Go
```go
func main() {
flag.Parse()
// Set up a connection to the server.
conn, err := grpc.Dial(*addr, grpc.WithInsecure())
if err != nil {
log.Fatalf("did not connect: %v", err)
}
defer conn.Close()
c := pb.NewGreeterClient(conn)
if *keyfile != "" {
log.Printf("Authenticating using Google service account key in %s", *keyfile)
keyBytes, err := ioutil.ReadFile(*keyfile)
if err != nil {
log.Fatalf("Unable to read service account key file %s: %v", *keyfile, err)
}
tokenSource, err := google.JWTAccessTokenSourceFromJSON(keyBytes, *audience)
if err != nil {
log.Fatalf("Error building JWT access token source: %v", err)
}
jwt, err := tokenSource.Token()
if err != nil {
log.Fatalf("Unable to generate JWT token: %v", err)
}
*token = jwt.AccessToken
// NOTE: the generated JWT token has a 1h TTL.
// Make sure to refresh the token before it expires by calling TokenSource.Token() for each outgoing requests.
// Calls to this particular implementation of TokenSource.Token() are cheap.
}
ctx := context.Background()
if *key != "" {
log.Printf("Using API key: %s", *key)
ctx = metadata.AppendToOutgoingContext(ctx, "x-api-key", *key)
}
if *token != "" {
log.Printf("Using authentication token: %s", *token)
ctx = metadata.AppendToOutgoingContext(ctx, "Authorization", fmt.Sprintf("Bearer %s", *token))
}
// Contact the server and print out its response.
name := defaultName
if len(flag.Args()) > 0 {
name = flag.Arg(0)
}
r, err := c.SayHello(ctx, &pb.HelloRequest{Name: name})
if err != nil {
log.Fatalf("could not greet: %v", err)
}
log.Printf("Greeting: %s", r.Message)
}
```
### Node.js
```javascript
const makeGrpcRequest = (JWT_AUTH_TOKEN, API_KEY, HOST, GREETEE) => {
// Uncomment these lines to set their values
// const JWT_AUTH_TOKEN = 'YOUR_JWT_AUTH_TOKEN';
// const API_KEY = 'YOUR_API_KEY';
// const HOST = 'localhost:50051'; // The IP address of your endpoints host
// const GREETEE = 'world';
// Import required libraries
const grpc = require('@grpc/grpc-js');
const protoLoader = require('@grpc/proto-loader');
const path = require('path');
// Load protobuf spec for an example API
const PROTO_PATH = path.join(__dirname, '/protos/helloworld.proto');
const packageDefinition = protoLoader.loadSync(PROTO_PATH, {
keepCase: true,
longs: String,
enums: String,
defaults: true,
oneofs: true,
});
const protoObj = grpc.loadPackageDefinition(packageDefinition).helloworld;
// Create a client for the protobuf spec
const client = new protoObj.Greeter(HOST, grpc.credentials.createInsecure());
// Build gRPC request
const metadata = new grpc.Metadata();
if (API_KEY) {
metadata.add('x-api-key', API_KEY);
} else if (JWT_AUTH_TOKEN) {
metadata.add('authorization', `Bearer ${JWT_AUTH_TOKEN}`);
}
// Execute gRPC request
client.sayHello({name: GREETEE}, metadata, (err, response) => {
if (err) {
console.error(err);
}
if (response) {
console.log(response.message);
}
});
};
```
### HTTP clients
If you are using the Cloud Endpoints for gRPC' HTTP transcoding feature, HTTP clients
can send the key as a query parameter in the same way they do for
[OpenAPI services](https://docs.cloud.google.com/endpoints/docs/openapi/restricting-api-access-with-api-keys.md.txt#calling_an_api_using_an_api_key).
## Deploying the Endpoints configuration
To deploy the Endpoints configuration, you use the
[`gcloud endpoints services deploy`](https://docs.cloud.google.com/sdk/gcloud/reference/endpoints/services/deploy)
command. This command uses
[Service Management](https://docs.cloud.google.com/service-infrastructure/docs/manage-config.md.txt)
to create a managed service.
1. Make sure you are in the directory where the `api_descriptor.pb` and `api_config.yaml` files are located.
2. Confirm that the default project that the `gcloud` command-line tool is currently using is the Google Cloud project that you want to deploy the Endpoints configuration to. Validate the project ID returned from the following command to make sure that the service doesn't get created in the wrong project.
```
gcloud config list project
```
If you need to change the default project, run the following command:
```
gcloud config set project YOUR_PROJECT_ID
```
3. Deploy the `proto descriptor` file and the configuration file by using the Google Cloud CLI:
```
gcloud endpoints services deploy api_descriptor.pb api_config.yaml
```
As it is creating and configuring the service, Service Management outputs
information to the terminal. When the deployment completes, a message similar to
the following is displayed:
```
Service Configuration [CONFIG_ID] uploaded for service [bookstore.endpoints.example-project.cloud.goog]
```
CONFIG_ID is the unique Endpoints service configuration
ID created by the deployment. For example:
```
Service Configuration [2017-02-13r0] uploaded for service [bookstore.endpoints.example-project.cloud.goog]
```
In the previous example, `2017-02-13r0` is the service
configuration ID and
`bookstore.endpoints.example-project.cloud.goog` is the
service name. The service configuration ID consists of a date stamp followed by
a revision number. If you deploy the Endpoints configuration
again on the same day, the revision number is incremented in the service
configuration ID.
### Checking required services
At a minimum, Endpoints and ESP require the following Google services to be enabled:
| Name | Title |
|---|---|
| `servicemanagement.googleapis.com` | Service Management API |
| `servicecontrol.googleapis.com` | Service Control API |
In most cases, the `gcloud endpoints services deploy` command enables these
required services. However, the `gcloud` command completes successfully but
doesn't enable the required services in the following circumstances:
- If you used a third-party application such as Terraform, and you don't
include these services.
- You deployed the Endpoints configuration to an existing
Google Cloud project in which these services were explicitly disabled.
Use the following command to confirm that the required services are enabled:
```
gcloud services list
```
If you do not see the required services listed, enable them:
gcloud services enable servicemanagement.googleapis.com
gcloud services enable servicecontrol.googleapis.com
Also enable your Endpoints service:
```
gcloud services enable ENDPOINTS_SERVICE_NAME
```
To determine the ENDPOINTS_SERVICE_NAME you can either:
- After deploying the Endpoints configuration, go to the **Endpoints** page in the Cloud console. The list of possible ENDPOINTS_SERVICE_NAME are shown under the **Service name** column.
- For OpenAPI, the ENDPOINTS_SERVICE_NAME is what you specified in the `host` field of your OpenAPI spec. For gRPC, the ENDPOINTS_SERVICE_NAME is what you specified in the `name` field of your gRPC Endpoints configuration.
For more information about the `gcloud` commands, see
[`gcloud` services](https://docs.cloud.google.com/sdk/gcloud/reference/services).
If you get an error message, see
[Troubleshooting Endpoints configuration deployment](https://docs.cloud.google.com/endpoints/docs/grpc/troubleshoot-config-deployment.md.txt).
See
[Deploying the Endpoints configuration](https://docs.cloud.google.com/endpoints/docs/grpc/deploy-endpoints-config.md.txt)
for additional information.
## Building a new ESPv2 image
Build the Endpoints service config into a new ESPv2
docker image. You will later deploy this image onto the reserved
Cloud Run service.
> [!NOTE]
> **Note:**
>
> This step is required.
>
> The service config must be built into a new docker image because Cloud Run
> is a *scale-to-zero* service. That means when there is no traffic,
> all instances are deleted. When traffic increases, new instances are created on-demand.
> This type of service instance creation is also called *cold start* .
> See the Cloud Run [Concurrency](https://docs.cloud.google.com/run/docs/about-concurrency.md.txt) documentation for more.
>
> If the docker image did not have the service config built into it, Cloud Run
> would have to make two API calls to Google ServiceManagement at cold start.
> These calls count against your Google ServiceManagement API quota.
>
> By building the service config into the ESPv2 docker image,
> you remove the two API calls and avoid impacting the quota count for the Google ServiceManagement service.
> This step also speeds up the new service instance creation and reduces the latency
> for the requests waiting for the new instance.
>
> You must re-run this entire step and redeploy the new container:
>
> - Every time you modify and redeploy the Endpoints service configuration. Otherwise, changes to the service configuration will not be propagated to ESPv2.
> - When a new version of ESPv2 is released. Otherwise, the older version of ESPv2 will remain deployed.
To build the service config into a new ESPv2 docker image:
1. Download this
[script](https://github.com/GoogleCloudPlatform/esp-v2/tree/master/docker/serverless/gcloud_build_image)
to your local machine where the gcloud CLI is installed.
> [!NOTE]
> **Note:**
>
> This script requires bash. If you are not using macOS/Linux,
> you can run it on [Cloud Shell](https://docs.cloud.google.com/shell/docs/launching-cloud-shell.md.txt),
> [Compute Engine](https://docs.cloud.google.com/compute), or Windows Subsystem for Linux.
2.
Run the script with the following command:
```bash
chmod +x gcloud_build_image
./gcloud_build_image -s ESPv2_CLOUD_RUN_HOSTNAME \
-c CONFIG_ID -p ESPv2_PROJECT_ID
```
> [!NOTE]
> **Note:**
>
> This script is designed to create a folder within the `/tmp` directory. Make sure you have write access for the `/tmp` directory when executing this script.
>
>
> If write access is not available for `/tmp` directory, you must modify the script to specify an alternative directory where you have the required access to create folders.
For ESPv2_CLOUD_RUN_HOSTNAME, specify the hostname of the URL that
you reserved above in
[Reserving a Cloud Run hostname](https://docs.cloud.google.com/endpoints/docs/grpc/set-up-cloud-run-espv2.md.txt#reserve_hostname).
Don't include the protocol identifier, `https://`.
For example:
```bash
chmod +x gcloud_build_image
./gcloud_build_image -s gateway-12345-uc.a.run.app \
-c 2019-02-01r0 -p your-project-id
```
3. The script uses the `gcloud` command to download the service config, build the
service config into a new ESPv2 image, and upload the new image
to your project container registry. The script automatically uses the latest
release of ESPv2, denoted by the ESPv2_VERSION in the
output image name. The output image is uploaded to:
```
gcr.io/ESPv2_PROJECT_ID/endpoints-runtime-serverless:ESPv2_VERSION-ESPv2_CLOUD_RUN_HOSTNAME-CONFIG_ID
```
For example:
```
gcr.io/your-project-id/endpoints-runtime-serverless:2.14.0-gateway-12345-uc.a.run.app-2019-02-01r0"
```
> [!NOTE]
> **Note:**
>
> Pass the `-z` flag to the script to generate the image in a different
> [registry location](https://docs.cloud.google.com/artifact-registry/docs/pushing-and-pulling).
>
>
> For example, to push the generated ESPv2 image to a Euopean Union data center,
> pass `-z eu` to the script.
## Deploying the ESPv2 container
1. Deploy the ESPv2 Cloud Run service with the new image you built above.
Replace CLOUD_RUN_SERVICE_NAME with the same Cloud Run
service name you used when you originally reserved the hostname
above in [Reserving a Cloud Run hostname](https://docs.cloud.google.com/endpoints/docs/grpc/set-up-cloud-run-espv2.md.txt#reserve_hostname):
```
gcloud run deploy CLOUD_RUN_SERVICE_NAME \
--image="gcr.io/ESPv2_PROJECT_ID/endpoints-runtime-serverless:ESPv2_VERSION-CLOUD_RUN_HOSTNAME-CONFIG_ID" \
--allow-unauthenticated \
--platform managed \
--project=ESPv2_PROJECT_ID
```
> [!NOTE]
> **Note:**
>
> If your gRPC service uses any streaming protocol, add the flag
> `--use-http2` to the `gcloud run deploy` command.
> Currently, this flag is only supported in `gcloud beta run`.
> Add this flag when deploying both ESPv2 and the gRPC
> backend Cloud Run services.
2. If you want to configure Endpoints to use additional
ESPv2 startup options, such as
[enabling CORS](https://docs.cloud.google.com/endpoints/docs/grpc/specify-esp-v2-startup-options.md.txt#adding_cors_support_to_esp),
you can pass the arguments in the `ESPv2_ARGS` environment variable:
```
gcloud run deploy CLOUD_RUN_SERVICE_NAME \
--image="gcr.io/ESPv2_PROJECT_ID/endpoints-runtime-serverless:ESPv2_VERSION-CLOUD_RUN_HOSTNAME-CONFIG_ID" \
--set-env-vars=ESPv2_ARGS=--cors_preset=basic \
--allow-unauthenticated \
--platform managed \
--project ESPv2_PROJECT_ID
```
For more information and examples on setting the `ESPv2_ARGS` environment variable,
including the list of available options and information on how to specify multiple options,
see [Extensible Service Proxy V2 flags](https://docs.cloud.google.com/endpoints/docs/grpc/specify-esp-v2-startup-options.md.txt).
3. Grant ESPv2 permission to invoke your Cloud Run services. Run the following command for each service. In the following command:
> [!NOTE]
> **Note:**
>
> This step is not needed if the ESPv2 Cloud Run service is deployed
> without using the flag `--service-account` and the backend service
> BACKEND_SERVICE_NAME is deployed in the
> ESPv2_PROJECT_NUMBER project.
- Replace BACKEND_SERVICE_NAME with the name of the Cloud Run service being invoked. If you are using the service created by deploying \`gcr.io/endpointsv2/python-grpc-bookstore-server:2\`, then use `python-grpc-bookstore-server` as this value.
- Replace ESPv2_PROJECT_NUMBER with the project **number** of the project that you created for ESPv2. One way to find this is to go to the [**IAM**](https://console.cloud.google.com/iam-admin/iam) page in the Google Cloud console and find the **Default compute service account**, which is the service account used in the \`member\` flag.
```
gcloud run services add-iam-policy-binding BACKEND_SERVICE_NAME \
--member "serviceAccount:ESPv2_PROJECT_NUMBER-compute@developer.gserviceaccount.com" \
--role "roles/run.invoker" \
--platform managed \
--project BACKEND_PROJECT_ID
```
For more information, see
[Managing access using IAM](https://docs.cloud.google.com/run/docs/securing/managing-access.md.txt).
## Sending requests to the API
To send requests to the sample API, you can use a sample gRPC client written in
Python.
1. Clone the git repo where the gRPC client code is hosted:
```
git clone https://github.com/GoogleCloudPlatform/python-docs-samples.git
```
2. Change your working directory:
```
cd python-docs-samples/endpoints/bookstore-grpc/
```
3. Install dependencies:
pip3 install virtualenv
virtualenv env
source env/bin/activate
pip3 install -r requirements.txt
4. Send a request to the sample API:
```
python3 bookstore_client.py --host CLOUD_RUN_HOSTNAME --port 443 --use_tls true
```
Specify the hostname of your ESPv2 Cloud Run service
in CLOUD_RUN_HOSTNAME, without the protocol identifier. For example:
```
python3 bookstore_client.py --host espv2-grpc-HASH-uc.a.run.app --port 443 --use_tls true
```
- Look at the activity graphs for your API in the
**Endpoints** \> **Services** page.
[Go to the Endpoints Services page](https://console.cloud.google.com/endpoints)
It may take a few moments for the request to be reflected in the graphs.
- Look at the request logs for your API in the Logs Explorer page.
[Go to the Logs Explorer page](https://console.cloud.google.com/logs/query)
If you don't get a successful response, see
[Troubleshooting response errors](https://docs.cloud.google.com/endpoints/docs/grpc/troubleshoot-response-errors.md.txt).
You just deployed and tested an API in Endpoints!
> [!NOTE]
> **Note** : If you want to let us know what you liked about this tutorial, feel free to provide feedback at the bottom of this page. Your feedback helps us improve these tutorials.
> If you got an error, join the [`google-cloud-endpoints`](https://groups.google.com/forum/#!forum/google-cloud-endpoints) Google group and let us know what went wrong. This group receives responses from other Endpoints users and from Google engineers, who monitor the group.
## Tracking API activity
1. View the activity graphs for your API on the **Endpoints** \> **Service**
page in the Google Cloud console.
[View Endpoints activity graphs](https://console.cloud.google.com/endpoints)
It may take a few moments for the request to be reflected in the graphs.
2. Look at the request logs for your API on the Logs Explorer page.
[View Endpoints request logs](https://console.cloud.google.com/logs/query)
## Clean up
To avoid incurring charges to your Google Cloud account for
the resources used on this page, follow these steps.
See
[Deleting an API and API instances](https://docs.cloud.google.com/endpoints/docs/grpc/deleting-an-api-and-instances.md.txt)
for information on stopping the services used by this tutorial.
## What's next
- [Learn more about Cloud Run](https://docs.cloud.google.com/run/docs/deploying.md.txt)
- [Learn more about deploying the Endpoints configuration](https://docs.cloud.google.com/endpoints/docs/grpc/deploy-endpoints-config.md.txt)
- [Share your API with another developer](https://docs.cloud.google.com/endpoints/docs/grpc/restricting-api-access-with-api-keys.md.txt#sharing_apis_protected_by_api_key)
- [Learn about authentication](https://docs.cloud.google.com/endpoints/docs/grpc/authentication-method.md.txt)
- [Transcoding HTTP/JSON to gRPC](https://docs.cloud.google.com/endpoints/docs/grpc/transcoding.md.txt)
- [Learn about community support options](https://docs.cloud.google.com/endpoints/docs/community-support)