This document shows how administrators can create access levels based on
device attributes (device-based access levels) using
[Access Context Manager](https://docs.cloud.google.com/access-context-manager/docs/overview.md.txt).
An [access level](https://docs.cloud.google.com/access-context-manager/docs/overview.md.txt#access-levels)
is a set of attributes that is used to permit access to resources based
on contextual information about the request. As an administrator, you can create
basic access levels or custom access levels by using the device attributes
collected by Endpoint Verification.
> [!NOTE]
> **Note:** Creating access levels by using device attributes is available in the paid subscription of Chrome Enterprise Premium. To upgrade to the paid subscription, [contact our sales team](https://go.chronicle.security/beyondcorp-enterprise-upgrade).
## Before you begin
- To complete the task on this page, you must have one of the following roles:
- Access Context Manager Admin (`roles/accesscontextmanager.policyAdmin`)
- Access Context Manager Editor (`roles/accesscontextmanager.policyEditor`)
- [Deploy Endpoint Verification](https://docs.cloud.google.com/endpoint-verification/docs/deploying-with-admin-console.md.txt).
- [Upgrade to the paid subscription of Chrome Enterprise Premium](https://go.chronicle.security/beyondcorp-enterprise-upgrade).
## Create an access level
### Console
1. In the Google Cloud console, go to the **Access Context Manager** page.
[Go to Access Context Manager](https://console.cloud.google.com/security/access-level)
2. If you're prompted, select your organization.
3. On the **Access Context Manager** page, click **Create access level**.
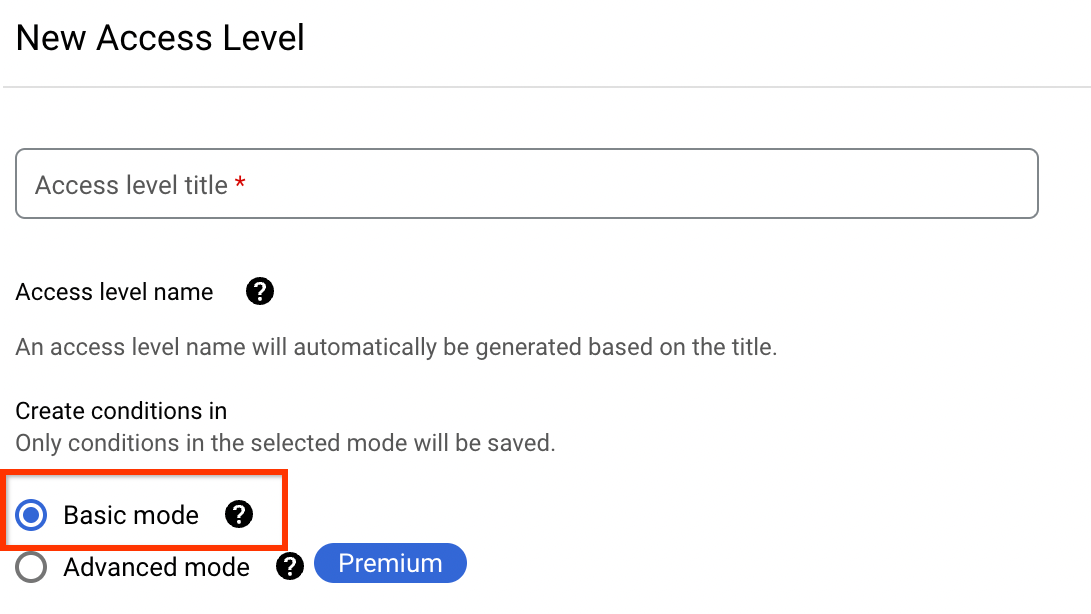
4. In the **New Access Level** pane, create a basic access level or a
custom access level. For instructions, expand the required section.
#### Create a basic access level
1. In the **Access level title** box, enter a title for
the access level.
The title must be at most 50 characters, start with a letter, and can
contain only numbers, letters, underscores, and spaces.
2. In the **Create Conditions in** section,
select **Basic mode**
.  
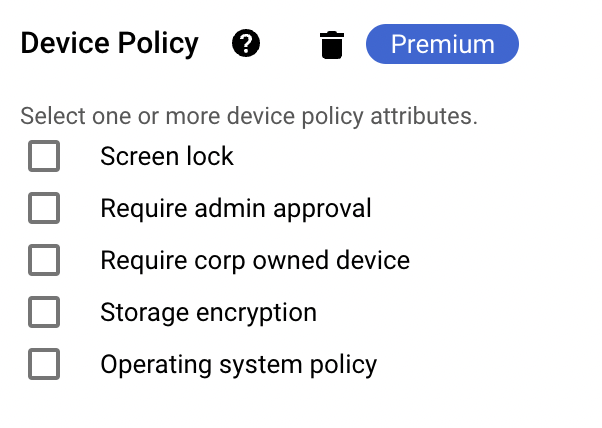
3. In the **Conditions** section, select device attributes:
1. Click **Device Policy**.
2. Select the required attributes.
For example, if you want to enforce admin approval on devices,
select **Require admin approval**.
4. Click **Save**.
The newly created access level is displayed on the
**Access Context Manager** page.
#### Create a custom access level
1. In the **Access level title** box, enter a title for
the access level.
The title must be at most 50 characters, start with a letter, and can
contain only numbers, letters, underscores, and spaces.
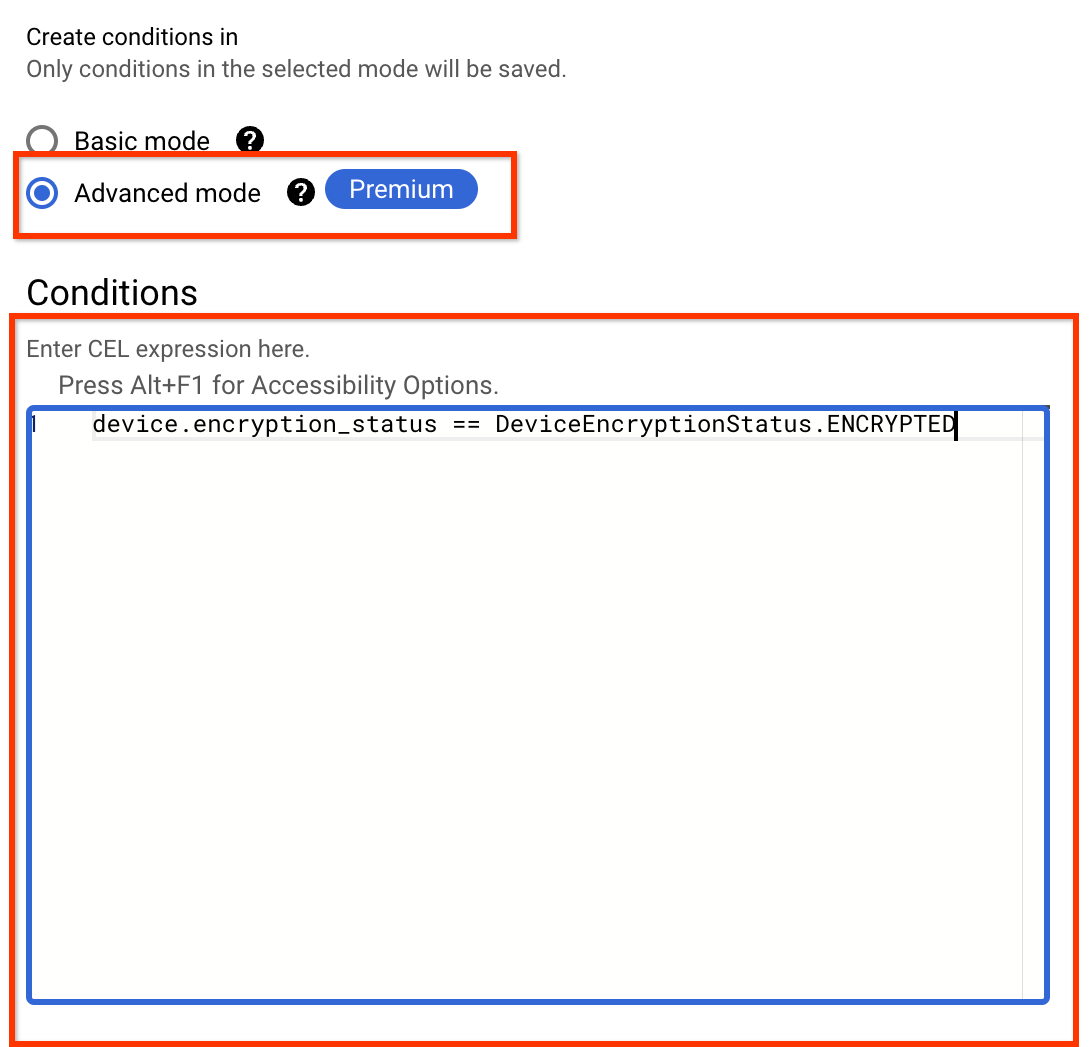
2. In the **Create Conditions in** section, select **Advanced mode**.
3. In the **Conditions** section, enter the expressions for
your custom access level. The condition must resolve to a single boolean
value.
To find the available device attributes for your CEL expression,
see the [device attributes](https://docs.cloud.google.com/endpoint-verification/docs/device-information.md.txt)
collected by Endpoint Verification.
The following CEL expression allows access only from the encrypted devices:
```console
device.encryption_status == DeviceEncryptionStatus.ENCRYPTED
```
For examples and more information about Common Expression Language
(CEL) support and custom access levels, see the
[Custom access level specification](https://docs.cloud.google.com/access-context-manager/docs/create-custom-access-level.md.txt).
4. Click **Save**.
The newly created access level is displayed on the
**Access Context Manager** page.
### gcloud CLI
To create access levels, use the [gcloud access-context-manager levels create](https://docs.cloud.google.com/sdk/gcloud/reference/access-context-manager/levels/create.md.txt) method.
1. Create a `.yaml` file.
- For a basic access level, specify device policy attributes for the
access level.
Example: To limit access to only users with encrypted device storage,
enter the following in the `.yaml` file.
```yaml
- devicePolicy:
allowedEncryptionStatuses
- ENCRYPTED
```
- For a custom access level, specify a CEL expression formatted as a
single key-value pair: `expression: "CEL_EXPRESSION"`
Example: To limit access to only users with encrypted device storage
and with the approved device status, enter the following in the
`.yaml` file.
```yaml
expression: "device.encryption_status == DeviceEncryptionStatus.ENCRYPTED && device.is_admin_approved_device"
```
For a list of device policy access level attributes and their YAML
format, see [Device policy attributes](https://docs.cloud.google.com/access-context-manager/docs/access-level-attributes.md.txt#device-policy).
For a comprehensive YAML file of all possible attributes, see
this [example access level YAML file](https://docs.cloud.google.com/access-context-manager/docs/example-yaml-file.md.txt).
To find the available device attributes for custom level specifications,
see [Device attributes collected by Endpoint Verification](https://docs.cloud.google.com/endpoint-verification/docs/device-information.md.txt).
2. Create the access level.
- For a basic access level, run the following command:
```bash
gcloud access-context-manager levels create ACCESS_LEVEL_NAME \
--title=TITLE \
--basic-level-spec=FILE_NAME.yaml\
--policy=POLICY_NAME
```
- For a custom access level, run the following command:
```bash
gcloud access-context-manager levels create ACCESS_LEVEL_NAME \
--title=TITLE \
--custom-level-spec=FILE_NAME.yaml\
--policy=POLICY_NAME
```
Where:
- ACCESS_LEVEL_NAME is the unique name for the access level.
It must have the following format: `accessPolicies/POLICY_ID/accessLevels/LEVEL_ID`.
- LEVEL_ID is a name for the access level.
The name must be at most 50 characters, start with a letter, and
can contain only numbers, letters, and underscores.
- TITLE is a human-readable title. It must be unique to the
policy.
- FILE_NAME is the name of the `.yaml` file. For
a basic access level, it contains device policy attributes. For a custom
access level, it contains a CEL expression formatted as a
single key-value pair: \`expression: "CEL_EXPRESSION".
- POLICY_NAME is the name of your organization's
access policy.
You see output similar to the following:
```
Create request issued for: NAME
Waiting for operation [accessPolicies/POLICY_NAME/accessLevels/NAME/create/1521594488380943] to complete...done.
Created level NAME.
```
### API
Create an access level by using the [accessPolicies.accessLevels.create](https://docs.cloud.google.com/access-context-manager/docs/reference/rest/v1/accessPolicies.accessLevels/create.md.txt)
method.
#### Create a basic access level
Before using any of the request data,
make the following replacements:
- POLICY_ID: the ID of your organization's access policy.
- LEVEL_ID: a name for the access level. The name must be at most 50 characters, start with a letter, and can contain only numbers, letters, and underscores.
- ACCESS_LEVEL_NAME: the unique name for the access level. It must have the following format: `accessPolicies/POLICY_ID/accessLevels/LEVEL_ID`.
- TITLE: a human-readable title. It must be unique to the policy.
- DESCRIPTION: a description of the access level and its use.
- CONDITION: a list of requirements for the access level to be granted.
HTTP method and URL:
```
POST https://accesscontextmanager.googleapis.com/v1/{parent=accessPolicies/POLICY_ID}/accessLevels
```
Request JSON body:
```
For basic access levels:
{
"name": ACCESS_LEVEL_NAME,
"title": TITLE,
"description": DESCRIPTION,
"basic": {
"conditions": [
{
CONDITION
}
],
}
},
}
```
To send your request, choose one of these options:
#### curl
> [!NOTE]
> **Note:** The following command assumes that you have logged in to the `gcloud` CLI with your user account by running [`gcloud init`](https://docs.cloud.google.com/sdk/gcloud/reference/init) or [`gcloud auth login`](https://docs.cloud.google.com/sdk/gcloud/reference/auth/login.md.txt) , or by using [Cloud Shell](https://docs.cloud.google.com/shell/docs.md.txt), which automatically logs you into the `gcloud` CLI . You can check the currently active account by running [`gcloud auth list`](https://docs.cloud.google.com/sdk/gcloud/reference/auth/list.md.txt).
Save the request body in a file named `request.json`,
and execute the following command:
```
curl -X POST \
-H "Authorization: Bearer $(gcloud auth print-access-token)" \
-H "Content-Type: application/json; charset=utf-8" \
-d @request.json \
"https://accesscontextmanager.googleapis.com/v1/{parent=accessPolicies/POLICY_ID}/accessLevels"
```
#### PowerShell
> [!NOTE]
> **Note:** The following command assumes that you have logged in to the `gcloud` CLI with your user account by running [`gcloud init`](https://docs.cloud.google.com/sdk/gcloud/reference/init) or [`gcloud auth login`](https://docs.cloud.google.com/sdk/gcloud/reference/auth/login.md.txt) . You can check the currently active account by running [`gcloud auth list`](https://docs.cloud.google.com/sdk/gcloud/reference/auth/list.md.txt).
Save the request body in a file named `request.json`,
and execute the following command:
```
$cred = gcloud auth print-access-token
$headers = @{ "Authorization" = "Bearer $cred" }
Invoke-WebRequest `
-Method POST `
-Headers $headers `
-ContentType: "application/json; charset=utf-8" `
-InFile request.json `
-Uri "https://accesscontextmanager.googleapis.com/v1/{parent=accessPolicies/POLICY_ID}/accessLevels" | Select-Object -Expand Content
```
You should receive a JSON response similar to the following:
```
{
"name": "operations/accessPolicies/84961948973/accessLevels/deviceEncrypted/create/1666896068847514",
"metadata": {
"@type": "type.googleapis.com/google.identity.accesscontextmanager.v1.AccessContextManagerOperationMetadata"
},
"done": true,
"response": {
"@type": "type.googleapis.com/google.identity.accesscontextmanager.v1.AccessLevel",
"name": "accessPolicies/84961948973/accessLevels/deviceEncrypted",
"title": "accessPolicies/84961948973/accessLevels/deviceEncrypted",
"basic": {
"conditions": [
{
"devicePolicy": {
"allowedEncryptionStatuses": [
"ENCRYPTED"
]
}
}
]
}
}
}
```
#### Create a custom access level
Before using any of the request data,
make the following replacements:
- POLICY_ID: the ID of your organization's access policy.
- LEVEL_ID: a name for the access level. The name must be at most 50 characters, start with a letter, and can contain only numbers, letters, and underscores.
- ACCESS_LEVEL_NAME: the unique name for the access level. It must have the following format: `accessPolicies/POLICY_ID/accessLevels/LEVEL_ID`.
- TITLE: a human-readable title. It must be unique to the policy.
- DESCRIPTION: a description of the access level and its use.
- CEL_EXPRESSION: A CEL expression evaluating to a boolean.
HTTP method and URL:
```
POST https://accesscontextmanager.googleapis.com/v1/{parent=accessPolicies/POLICY_ID}/accessLevels
```
Request JSON body:
```
{
"name": ACCESS_LEVEL_NAME,
"title": TITLE,
"description": DESCRIPTION,
"custom": {
"conditions": [
{
"expr": {
CEL_EXPRESSION
}
}
]
}
},
}
```
To send your request, choose one of these options:
#### curl
> [!NOTE]
> **Note:** The following command assumes that you have logged in to the `gcloud` CLI with your user account by running [`gcloud init`](https://docs.cloud.google.com/sdk/gcloud/reference/init) or [`gcloud auth login`](https://docs.cloud.google.com/sdk/gcloud/reference/auth/login.md.txt) , or by using [Cloud Shell](https://docs.cloud.google.com/shell/docs.md.txt), which automatically logs you into the `gcloud` CLI . You can check the currently active account by running [`gcloud auth list`](https://docs.cloud.google.com/sdk/gcloud/reference/auth/list.md.txt).
Save the request body in a file named `request.json`,
and execute the following command:
```
curl -X POST \
-H "Authorization: Bearer $(gcloud auth print-access-token)" \
-H "Content-Type: application/json; charset=utf-8" \
-d @request.json \
"https://accesscontextmanager.googleapis.com/v1/{parent=accessPolicies/POLICY_ID}/accessLevels"
```
#### PowerShell
> [!NOTE]
> **Note:** The following command assumes that you have logged in to the `gcloud` CLI with your user account by running [`gcloud init`](https://docs.cloud.google.com/sdk/gcloud/reference/init) or [`gcloud auth login`](https://docs.cloud.google.com/sdk/gcloud/reference/auth/login.md.txt) . You can check the currently active account by running [`gcloud auth list`](https://docs.cloud.google.com/sdk/gcloud/reference/auth/list.md.txt).
Save the request body in a file named `request.json`,
and execute the following command:
```
$cred = gcloud auth print-access-token
$headers = @{ "Authorization" = "Bearer $cred" }
Invoke-WebRequest `
-Method POST `
-Headers $headers `
-ContentType: "application/json; charset=utf-8" `
-InFile request.json `
-Uri "https://accesscontextmanager.googleapis.com/v1/{parent=accessPolicies/POLICY_ID}/accessLevels" | Select-Object -Expand Content
```
You should receive a JSON response similar to the following:
```
{
"name": "operations/accessPolicies/84961948973/accessLevels/sampleCustomAccessLevelName/create/1666936427127701",
"metadata": {
"@type": "type.googleapis.com/google.identity.accesscontextmanager.v1.AccessContextManagerOperationMetadata"
},
"done": true,
"response": {
"@type": "type.googleapis.com/google.identity.accesscontextmanager.v1.AccessLevel",
"name": "accessPolicies/84961948973/accessLevels/sampleCustomAccessLevelName",
"title": "accessPolicies/84961948973/accessLevels/sampleCustomAccessLevelTitle",
"custom": {
"expr": {
"expression": "device.encryption_status == DeviceEncryptionStatus.ENCRYPTED"
}
}
}
}
```
For more information about creating access levels with various conditions
and access level dependencies, see [Create a basic access level](https://cloud.google.com/access-context-manager/docs/create-basic-access-level).
## What's next
- [Assign device-based access levels](https://docs.cloud.google.com/endpoint-verification/docs/assign-device-based-access-level.md.txt)
- [Manage access levels](https://docs.cloud.google.com/access-context-manager/docs/manage-access-levels.md.txt)