
本教程介绍如何使用 GitHub Actions 工作流将使用 .NET的 ASP.NET 模型-视图-控制器 (MVC) Web 应用部署到 Google Kubernetes Engine (GKE)。
本教程适用于对 Microsoft .NET、GitHub Actions 和 GKE 有基本了解的开发者和 DevOps 工程师。您还需要一个 GitHub 账号才能执行本教程。
目标
将使用 .NET 6.0 并在 Linux 上运行的 ASP.NET Core Web 应用部署到 Google Kubernetes Engine。
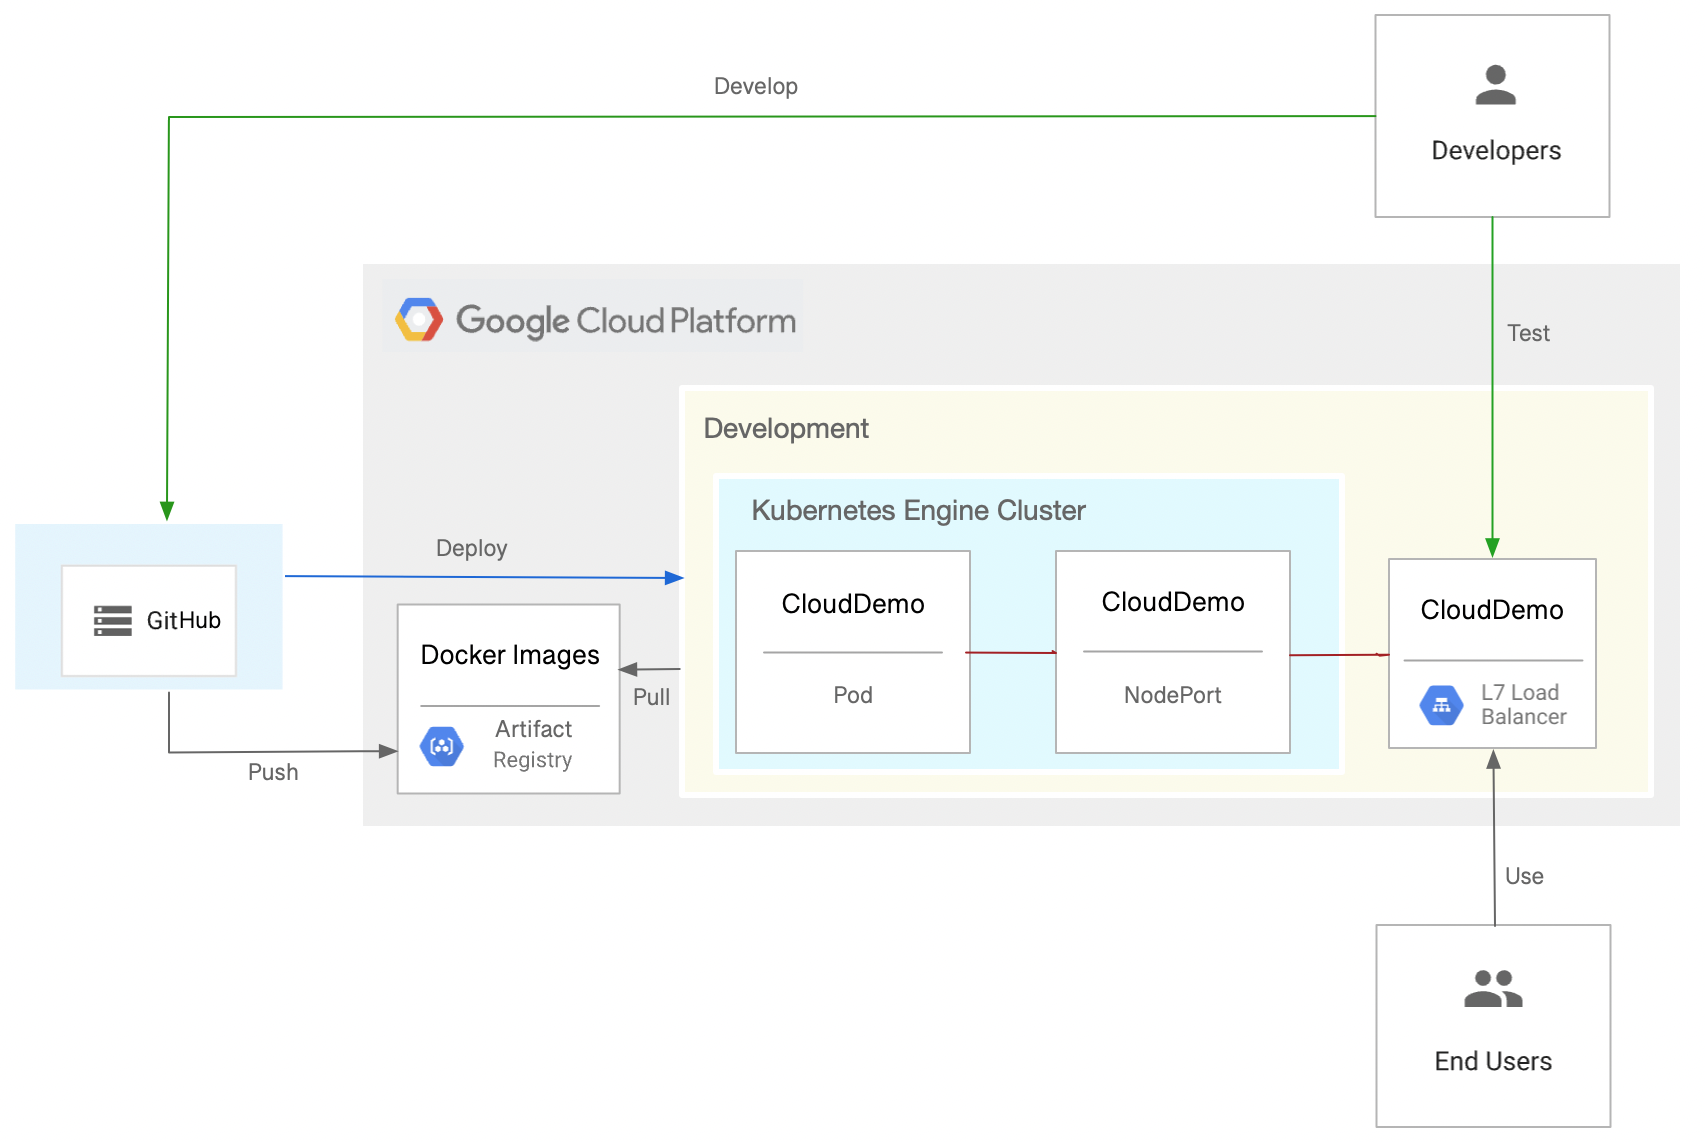
下图显示了用于将 ASP.NET MVC Web 应用部署到 Google Kubernetes Engine (GKE) 的 GitHub Actions 工作流。
本教程介绍了如何完成以下任务来实现目标:
- 创建一个 GitHub 代码库。
- 配置身份验证
- 部署 GKE 集群和 Artifact Registry 代码库
- 创建 GitHub Actions 工作流
费用
在本文档中,您将使用的以下收费组件: Google Cloud
您可使用 价格计算器 根据您的预计使用情况来估算费用。
完成本文档中描述的任务后,您可以通过删除所创建的资源来避免继续计费。如需了解详情,请参阅 清理。
准备工作
- 登录您的 Google Cloud 账号。如果您是 Google Cloud新手, 请创建一个账号来评估我们的产品在 实际场景中的表现。新客户还可获享 $300 赠金,用于 运行、测试和部署工作负载。
-
In the Google Cloud console, on the project selector page, select or create a Google Cloud project.
Roles required to select or create a project
- Select a project: Selecting a project doesn't require a specific IAM role—you can select any project that you've been granted a role on.
-
Create a project: To create a project, you need the Project Creator role
(
roles/resourcemanager.projectCreator), which contains theresourcemanager.projects.createpermission. Learn how to grant roles.
-
Verify that billing is enabled for your Google Cloud project.
Enable the Artifact Registry and Google Kubernetes Engine APIs.
Roles required to enable APIs
To enable APIs, you need the
serviceusage.services.enablepermission. If you created the project, then you likely already have this permission through the Owner role (roles/owner). Otherwise, you can get this permission through the Service Usage Admin role (roles/serviceusage.serviceUsageAdmin). Learn how to grant roles.-
In the Google Cloud console, on the project selector page, select or create a Google Cloud project.
Roles required to select or create a project
- Select a project: Selecting a project doesn't require a specific IAM role—you can select any project that you've been granted a role on.
-
Create a project: To create a project, you need the Project Creator role
(
roles/resourcemanager.projectCreator), which contains theresourcemanager.projects.createpermission. Learn how to grant roles.
-
Verify that billing is enabled for your Google Cloud project.
Enable the Artifact Registry and Google Kubernetes Engine APIs.
Roles required to enable APIs
To enable APIs, you need the
serviceusage.services.enablepermission. If you created the project, then you likely already have this permission through the Owner role (roles/owner). Otherwise, you can get this permission through the Service Usage Admin role (roles/serviceusage.serviceUsageAdmin). Learn how to grant roles.
创建 GitHub 代码库
在您的 GitHub 账号中创建 dotnet-docs-samples 代码库的分支。
此步骤是必需的,因为我们将使用 GitHub Actions 进行构建。
- 前往
dotnet-docs-samplesGitHub 代码库。 - 点击创建分支 。
在创建新分支 页面上,设置以下内容:
- 所有者 - 您的 GitHub 账号
- 代码库名称 -
dotnet-docs-samples
点击创建分支 。
配置身份验证
准备您的 Google Cloud 项目,以便 GitHub Actions 可以对项目中的资源进行身份验证和 访问。 Google Cloud
创建工作负载身份联合池和提供方
如需允许 GitHub Actions 对 GKE 进行身份验证 Google Cloud 和部署到 GKE,请使用工作负载身份联合。 通过使用工作负载身份联合,您可以避免为 GitHub Actions 工作负载存储和管理 服务账号密钥。
使用工作负载身份联合需要工作负载身份池和提供方。 我们建议您使用专用项目来管理工作负载身份池和提供方。 在本教程中,为简单起见,请在与 GKE 集群相同的项目中创建池和提供方:
打开 Google Cloud 控制台。
-
在 Google Cloud 控制台中,激活 Cloud Shell。
Cloud Shell 会话随即会在控制台的底部启动,并显示命令行提示符。 Google Cloud Cloud Shell 是一个已安装 Google Cloud CLI 且已为当前项目设置值的 Shell 环境 。该会话可能需要几秒钟时间来完成初始化。
创建新的工作负载身份池:
gcloud iam workload-identity-pools create github-actions \
    --location="global" \
    --description="GitHub Actions tutorial" \
    --display-name="GitHub Actions"
将 GitHub Actions 添加为工作负载身份池提供方:
gcloud iam workload-identity-pools providers create-oidc github-actions-oidc \
    --location="global" \
    --workload-identity-pool=github-actions \
    --issuer-uri="https://token.actions.githubusercontent.com/" \
    --attribute-mapping="google.subject=assertion.sub" \
    --attribute-condition="assertion.repository_owner=='ORGANIZATION'"
将
ORGANIZATION替换为您的 GitHub 组织名称。
创建服务帐号
在 Cloud Shell 中,创建一个服务帐号,GitHub Actions 可以使用该账号发布 Docker 映像并部署到 GKE:
SERVICE_ACCOUNT=$(gcloud iam service-accounts create github-actions-workflow \
  --display-name "GitHub Actions workflow" \
  --format "value(email)")
向该服务帐号授予 Artifact Registry 写入者角色 (
roles/artifactregistry.writer),以允许 GitHub Actions 推送到 Artifact Registry:gcloud projects add-iam-policy-binding $(gcloud config get-value core/project) \ --member serviceAccount:$SERVICE_ACCOUNT \ --role roles/artifactregistry.writer
向该服务帐号授予 Google Kubernetes Engine 开发者角色 (
roles/container.developer),以允许 GitHub Actions 推送到 Artifact Registry:gcloud projects add-iam-policy-binding $(gcloud config get-value core/project) \ --member serviceAccount:$SERVICE_ACCOUNT \ --role roles/container.developer
允许 GitHub Actions 工作流使用该服务帐号
允许 GitHub Actions 工作流模拟和使用该服务帐号:
初始化一个环境变量,其中包含 正文 由 GitHub Actions 工作流使用。正文类似于用户名,用于唯一标识 GitHub 代码库和分支:
SUBJECT=repo:
OWNER/dotnet-docs-samples:ref:refs/heads/main将
OWNER替换为您的 GitHub 用户名。向该正文授予模拟该服务帐号的权限:
PROJECT_NUMBER=$(gcloud projects describe $(gcloud config get-value core/project) --format='value(projectNumber)')

gcloud iam service-accounts add-iam-policy-binding $SERVICE_ACCOUNT \
  --role=roles/iam.workloadIdentityUser \
  --member="principal://iam.googleapis.com/projects/$PROJECT_NUMBER/locations/global/workloadIdentityPools/github-actions/subject/$SUBJECT"
部署 GKE 集群和 Artifact Registry 代码库
为 Docker 映像创建一个代码库:
gcloud artifacts repositories create clouddemo \
  --repository-format=docker \
  --location=us-central1
允许 Compute Engine 默认服务账号 访问该代码库:
gcloud projects add-iam-policy-binding $(gcloud config get-value core/project) \
  --member=serviceAccount:$PROJECT_NUMBER-compute@developer.gserviceaccount.com \
  --role=roles/artifactregistry.reader
创建集群:
gcloud container clusters create clouddemo-linux \
  --enable-ip-alias \
  --zone us-central1-a
此命令可能需要几分钟才能完成。
获取集群的项目名称和项目编号:
echo "Project ID: $(gcloud config get-value core/project)"
echo "Project Number: $(gcloud projects describe $(gcloud config get-value core/project) --format=value\(projectNumber\))"
您稍后需要用到这些值。
创建 GitHub Actions 工作流
您现可使用 GitHub Actions 来设置持续集成。对于推送到 Git 代码库的每个提交项,GitHub Actions 工作流都会构建代码并将构建工件打包到 Docker 容器中。随后,容器会被发布到 Artifact Registry。
该代码库已包含以下 Dockerfile:
该代码库还包含一个 Kubernetes 清单:
创建一个 GitHub Actions 工作流,以执行以下操作:
- 使用工作负载身份联合和 您之前创建的服务帐号对进行身份验证。 Google Cloud
- 构建 Docker 映像并将其部署到 Artifact Registry。
- 将 Docker 映像部署到 GKE。
如需创建 GitHub Actions 工作流,请执行以下操作:
- 在 GitHub 上,前往
dotnet-docs-samples代码库的分支。 - 依次点击添加文件 > 创建新文件 。
在为文件命名 文本字段中,输入以下名称:
.github/workflows/deploy-gke.yaml
将以下代码复制到该文件中:
name: Build and Deploy to GKE on: push: branches: - main env: PROJECT_ID:PROJECT_IDPROJECT_NUMBER:PROJECT_NUMBERCLUSTER: clouddemo-linux CLUSTER_ZONE: us-central1-a REPOSITORY: clouddemo REPOSITORY_REGION: us-central1 IMAGE: clouddemo jobs: build: runs-on: ubuntu-latest permissions: id-token: write contents: read steps: - name: Checkout uses: actions/checkout@v3 # # Authenticate to Google Cloud using workload identity federation # - id: 'auth' name: 'Obtain access token by using workload identity federation' uses: 'google-github-actions/auth@v0' with: create_credentials_file: true token_format: access_token workload_identity_provider: projects/${{ env.PROJECT_NUMBER }}/locations/global/workloadIdentityPools/github-actions/providers/github-actions-oidc service_account: github-actions-workflow@${{ env.PROJECT_ID }}.iam.gserviceaccount.com - name: Connect to Artifact Registry run: |- echo ${{ steps.auth.outputs.access_token }} | docker login -u oauth2accesstoken --password-stdin https://${{ env.REPOSITORY_REGION }}-docker.pkg.dev - name: Connect to GKE uses: google-github-actions/get-gke-credentials@v0 with: cluster_name: ${{ env.CLUSTER }} location: ${{ env.CLUSTER_ZONE }} # # Build the .NET code # - name: Build solution run: |- dotnet publish applications/clouddemo/netcore/CloudDemo.MvcCore.sln \ --configuration Release \ --framework net6.0 # # Build the Docker image and push it to Artifact Registry # - name: Create image tag run: echo "IMAGE_TAG=${{ env.REPOSITORY_REGION }}-docker.pkg.dev/${{ env.PROJECT_ID }}/${{ env.REPOSITORY }}/${{ env.IMAGE }}:$GITHUB_SHA" >> $GITHUB_ENV - name: Lock image version in deployment.yaml run: sed -i 's|CLOUDDEMO_IMAGE|${{ env.IMAGE_TAG }}|g' applications/clouddemo/netcore/deployment.yaml - name: Build Docker image run: docker build --tag "${{ env.IMAGE_TAG }}" applications/clouddemo/netcore - name: Publish Docker image to Google Artifact Registry run: docker push "${{ env.IMAGE_TAG }}" # # Deploy to GKE # - name: Deploy to GKE run: kubectl apply -f applications/clouddemo/netcore/deployment.yaml替换以下值:
PROJECT_ID:包含 GKE 集群的项目的项目 ID。PROJECT_NUMBER:包含 GKE 集群的项目的项目编号 。
在提交新文件 部分中,输入提交消息(例如
Add workflow),然后点击提交新文件 。在菜单中,点击 Actions ,然后等待工作流完成。
工作流可能需要几分钟才能完成。
在 Google Cloud 控制台中,刷新 Service 和 Ingress 页面。
前往 Ingress 选项卡。
找到 clouddemo 集群的 Ingress 服务,并等待其状态切换为正常 。这可能需要几分钟。
打开同一行的前端 列中的链接。负载均衡器需要几分钟才能使用,因此 CloudDemo 应用可能无法在第一时间加载。待负载均衡器准备就绪后,您会看到显示自定义标题的 CloudDemo 应用,而这次在生产集群中运行。
清理
完成本教程后,您可以清理您创建的资源,让它们停止使用配额,以免产生费用。以下部分介绍如何删除或关闭这些资源。
删除 GitHub 代码库
如需删除 GitHub 代码库,请参阅删除代码库。 删除代码库会导致所有源代码更改丢失。
删除项目
若要避免产生费用,最简单的方法是删除您为本教程创建的项目。
删除项目: Google Cloud
gcloud projects delete PROJECT_ID
后续步骤
- 在 Kubernetes 上部署、管理和扩缩容器化应用。
- 查看 Google Cloud Well-Architected Framework 中的最佳实践。
- 探索有关 Google Cloud 的参考架构、图表和最佳实践。 查看我们的 Cloud 架构中心。