Generative AI training and extraction lets you:
- Use zero-shot and few-shot technology to get a high performing model with little to no training data using the foundation model.
- Use fine-tuning to further boost accuracy as you provide more and more training data.
## Generative AI training methods
The training method you choose depends on the amount of documents you have available and the amount of effort available to put into training your model. There are three ways to train a generative AI model:
| **Training method** | Zero-shot | Few-shot | Fine-tuning |
|---|---|---|---|
| **Accuracy** | Medium | Medium-high | High |
| **Effort** | Low | Low | Medium |
| **Recommended number of training documents** | 0 | 5 to 10 | 10 to 50+ |
> [!NOTE]
> **Note:** You can expect reasonably good results with 10 to 50+ training examples, and performance can be further optimized by increasing the number of examples to hundreds or thousands, depending on the complexity and variation of the documents and extraction tasks.
## Custom extractor model versions
The following models are available for custom extractor. To change model
versions, see [Manage processor versions](https://docs.cloud.google.com/document-ai/docs/manage-processor-versions.md.txt).
Versions 1.4, 1.5 and 1.5 Pro support confidence scores.
| Model version | Description | Release channel | ML processing in US/EU | Fine-tuning in US/EU | Release date |
|---|---|---|---|---|---|
| `pretrained-foundation-model-v1.5-2025-05-05` | Production-ready candidate powered by Gemini 2.5 Flash LLM. Recommended for those who want to experiment with newer models. | Stable | Yes | US, EU | May 5, 2025 |
| `pretrained-foundation-model-v1.5-pro-2025-06-20` | Production-ready model powered by the Gemini 2.5 Pro LLM. Supports a quota of up to 30 pages per minute for online process requests. This model has improved quality compared to v1.5, and may have a higher latency. | Stable | Yes | No | June 20, 2025 |
| `pretrained-foundation-model-v1.5.1-2025-08-07` | Public preview model powered by the Gemini 2.5 Flash LLM. This model has the same features as v1.5, and has improved adaptive few-shot learning. | Release candidate | Yes | No | August 8, 2025 |
| `pretrained-foundation-model-v1.6-pro-2025-12-01` | Preview model powered by the Gemini 3 Pro LLM. > [!NOTE] > **Note:** This processor version uses the Vertex AI Gemini global endpoint and is not compliant with [Data Residency (DMZ)](https://docs.cloud.google.com/vertex-ai/generative-ai/docs/learn/data-residency) standards. For example, requests in US and EU endpoints might route to anywhere globally. | Release candidate | Yes | No | December 1, 2025 |
| `pretrained-foundation-model-v1.6-2026-01-13` | Preview model powered by the Gemini 3 Flash LLM. > [!NOTE] > **Note:** This processor version uses the Vertex AI Gemini global endpoint and is not compliant with [Data Residency (DMZ)](https://docs.cloud.google.com/vertex-ai/generative-ai/docs/learn/data-residency) standards. For example, requests in US and EU endpoints might route to anywhere globally. | Release candidate | Yes | No | January 13, 2026 |
| `pretrained-foundation-model-v3.1-lite-2026-07-15` | Preview model powered by the Gemini 3.1 Lite LLM. Supports Multi-Region Endpoints (mREPs) in the US and EU. > [!NOTE] > **Note:** CMEK is not fully supported in all regions and certain details are not encrypted. Support requires being allowlisted, contact your Google Cloud account team for more information. | Release candidate | Yes | Yes | September 21, 2026 |
| `pretrained-foundation-model-v3.5-2026-05-26` | Preview model powered by the Gemini 3.5 Flash LLM. | Release candidate | Yes | No | May 26, 2026 |
To change the processor version in your project, review [Managing processor
versions](https://docs.cloud.google.com/document-ai/docs/manage-processor-versions).
To make a Quota Increase Request (QIR) for the default processor quota, follow
the steps to
[request a quota adjustment](https://docs.cloud.google.com/docs/quotas/view-manage.md.txt#requesting_higher_quota).
## Initial setup
If not done so already, enable billing and the [Document AI APIs](https://docs.cloud.google.com/document-ai/docs/setup.md.txt).
## Build and evaluate a generative AI model
1. [Create a processor](https://docs.cloud.google.com/document-ai/docs/workbench/build-custom-processor#create_a_processor) and [define fields](https://docs.cloud.google.com/document-ai/docs/workbench/build-custom-processor#define_processor_fields) you want to extract following [best practices](https://docs.cloud.google.com/document-ai/docs/workbench/label-documents#name-fields), which is important because it impacts extraction quality.
- Go to **Workbench** \> **Custom extractor** \> **Create processor** \> **Assign a name**.

- Go to **Get started** \> **Create new field**.

> [!NOTE]
> **Note:** The field names with the foundation model can greatly affect model accuracy and performance. A descriptive name is recommended.
2. Import documents
- Import documents with [auto-labeling](https://docs.cloud.google.com/document-ai/docs/ce-with-genai.md.txt#auto-labeling) and assign documents to the training and test set.
- For zero-shot, only the schema is required. To evaluate the accuracy of the model, only a testing set is needed.
- For few-shot, we recommend five training documents.
- The number of needed testing documents depend on the use case. Generally, more testing documents is better.
- Confirm or edit the [labels in the document](https://docs.cloud.google.com/document-ai/docs/workbench/build-custom-processor#label_a_document).
3. Train model:
- Select the **Build** , then **Create new version**.
- Enter a name and select **Create**.

> [!NOTE]
> **Note:** Each fine-tuning may take hours to complete (depending on system load, not fine-tuning job size) and will time out at 72 hours. If fine-tuning completes under that time, it's considered working as intended.
> [!TIP]
> **Tip:** To reduce development cycle friction, schedule fine-tuning jobs to account for this time. For example, at end of day Friday or staggered days for different processors.
1. Evaluation:
- Go to **Evaluate \& test** , select the version you just trained, then select **View full evaluation**.

- You now see metrics such as [f1, precision, and recall](https://docs.cloud.google.com/document-ai/docs/workbench/evaluate#all-labels) for the entire document and each field.
- Decide if performance meets your production goals. If it does not then reevaluate training and testing sets.
2. Set a new version as default:
- Navigate to **Manage versions**.
- Select to expand the options, and then select **Set as default**.
> [!NOTE]
> **Note:** Verify the **Status** of the version is deployed. If it is not, select the deploy version first. You can now set the new version as the default.

Your model is now deployed. Documents sent to this processor use your custom version.
You can evaluate the [model's performance](https://docs.cloud.google.com/document-ai/docs/workbench/evaluate) to check if it requires further training.
## Evaluation reference
The evaluation engine can do both exact match or [fuzzy matching](https://docs.cloud.google.com/document-ai/docs/workbench/evaluate#fuzzy_matching).
For an exact match, the extracted value must exactly match the ground truth or is counted as a miss.
Fuzzy matching extractions that had slight differences such as capitalization
differences still count as a match. This can be changed at the **Evaluation** screen.

## Fine-tuning
With fine-tuning, you use hundreds or thousands of documents for your training.
1. Create a processor and define fields you want to extract following [best practices](https://docs.cloud.google.com/document-ai/docs/workbench/label-documents#name-fields), which is important because it impacts extraction quality.
> [!NOTE]
> **Note:** The field names with the foundation model can greatly affect model accuracy and performance. Be sure to give a descriptive name.
2. Import documents with auto-labeling, and assign documents to the training and test set.
3. Confirm or edit the [labels in the document](https://docs.cloud.google.com/document-ai/docs/workbench/build-custom-processor#label_a_document).
4. Train model.
- Select the **Build** tab, and select **Create New Version** in the **Fine-tuning** box.

> [!NOTE]
> **Note:** Fine-tuning will tune a foundation model, which is recommended, while **Train a custom model** will train a conventional non-Generative AI based model.
- Try out the default training parameters or values provided.
If the results are unsatisfactory, experiment with these advanced options:
- Training steps (between 1 and 400): Also known as epochs, training steps
control how often the weights are optimized on a batch of data during tuning.
- Too low indicates a risk that the training ends before convergence (under-fitting).
- Too high means the model might see the same batch of data multiple times during the training, which can lead to overfitting.
- Fewer steps leads to faster training time. Higher counts can help for documents with little template variation (and lower ones for those with more variation).
> [!TIP]
> **Tip:** Start with fewer steps. More steps lead to longer training time, and training runs might be delayed or canceled.
> [!NOTE]
> **Note:** The Google Cloud console supports 1 to 40 training steps. To set higher values, use the REST API.
- Learning rate multiplier (between 0.1 and 10): Controls how quickly the model
parameters are optimized on the training data. It roughly corresponds to the size of each training step.
- Low rates mean small changes in the model weights at each training step. If too low, the model might not converge to a stable solution.
- High rates indicate large changes, and too high can mean the model steps over the optimal solution and converges instead to a suboptimal solution.
- Training time is not affected by the choice of learning rate.
- Give a name, select the required base processor version, and select **Create**.

5. Evaluation: Go to **Evaluate \& test** , then select the version you just trained and select **View full evaluation**.

- You now see metrics such as [f1, precision, and recall](https://docs.cloud.google.com/document-ai/docs/workbench/evaluate#all-labels) for the entire document and each field.
- Decide if performance meets your production goals. If not, then further training documents might be required.
6. Set a new version as the default:
- Navigate to **Manage versions**.
- Select to expand the options, and select **Set as default**.

> [!NOTE]
> **Note:** Verify the status of the version is deployed. If it's not, then instead select **Deploy version**. You can now set the new version as the default when its status is changed to deployed.
Your model is now deployed and documents sent to this processor now use your custom version.
You want to evaluate the [model's performance](https://docs.cloud.google.com/document-ai/docs/workbench/evaluate) to check if it requires further training.
## Auto-labeling with the foundation model
The foundation model can accurately extract fields for a variety of document types,
but you can also provide additional training data to improve the accuracy of the model
for specific document structures.
Document AI uses the label names you define and previous annotations to make it
quicker and easier to label documents at scale with auto-labeling.
1. When you've created a custom processor, go to the **Get Started** tab.
2. Select **Create New Field**.
3. Give the label a descriptive, distinct name. Choose **Extract** for values
directly from the document or **Derive** for values inferred by the system.
This improves the foundation model's accuracy and performance.

4. For extraction accuracy and performance add a description (such as added context, insights, and prior knowledge for each entity) for the kinds of entities it should
pick up.
> [!NOTE]
> **Note:** Regardless of content structure or variations, rules promote reliable and consistent extractions. To guide the model and minimize confusion in the document, include property descriptions with location information and text patterns of the property values.

> [!NOTE]
> **Note:** It's possible to update the description. However, the change won't be propagated to custom processor version. A snapshot of the description is in the custom processor version.
5. Navigate to the **Build** tab, then select **Import Documents**.

6. Select the path of the documents and which set the documents should be imported into.
Check the auto-labeling option and select the foundation model.
7. In the **Build** tab, select **Manage Dataset**.
8. When you see your imported documents, select one of them.

The predictions from the model are now shown highlighted in purple.
1. Review each label predicted by the model, and verify it's correct.
2. If there are missing fields, add those as well.
> [!NOTE]
> **Note:** It's important that all fields are as accurate as possible, or model performance will suffer. More details on [labeling](https://docs.cloud.google.com/document-ai/docs/workbench/label-documents).

3. When the document has been reviewed, select **Mark as Labeled**. The document is now ready to be used by the model.
4. Make sure the document is in either the testing or training set.
## Three-level nesting
Custom Extractor now provides three levels of nesting. This feature provides better extraction for complex tables.
> [!NOTE]
> **Note:** Three levels of nesting is only supported if using generative AI ("Foundation") model types within the Custom Extractor. Extract, classify, and splitting models only support two levels of nesting.
You can determine the model type using the following API calls:
- [`processors.get`](https://docs.cloud.google.com/document-ai/docs/reference/rest/v1beta3/projects.locations.processors/get.md.txt)
- [`processorVersions.get`](https://docs.cloud.google.com/document-ai/docs/reference/rest/v1beta3/projects.locations.processors.processorVersions/get.md.txt)
The response of these is a [`ProcessorVersion`](https://docs.cloud.google.com/document-ai/docs/reference/rest/v1beta3/projects.locations.processors.processorVersions.md.txt#resource:-processorversion), which contains the `modelType` field in [v1beta3 preview](https://docs.cloud.google.com/document-ai/docs/reference/rest/v1beta3/projects.locations.processors.processorVersions.md.txt#modeltype).
### Procedure and example
We are using this sample:

1. Select **Get Started**, and then create a field:
- Create the top level.
- In this sample, the `officer_appointments` is used.
- Select **This is a parent label**.
- Select **Occurrence** : `Optional multiple`.


2. Select **Add child field**. The second level label can now be created:
- For this level label, create `officer`.
- Select **This is a parent label**.
- Select **Occurrence** : `Optional multiple`.


3. Select **Add child field** from second level `officer`. Create child labels for the third level of nesting.

4. When your schema is set, you can get predictions from documents with three levels of nesting using auto-labeling.


### Label cross-page nested entities
The `pretrained-foundation-model-v1.5-2025-05-05` processor supports three-level nesting across
pages.
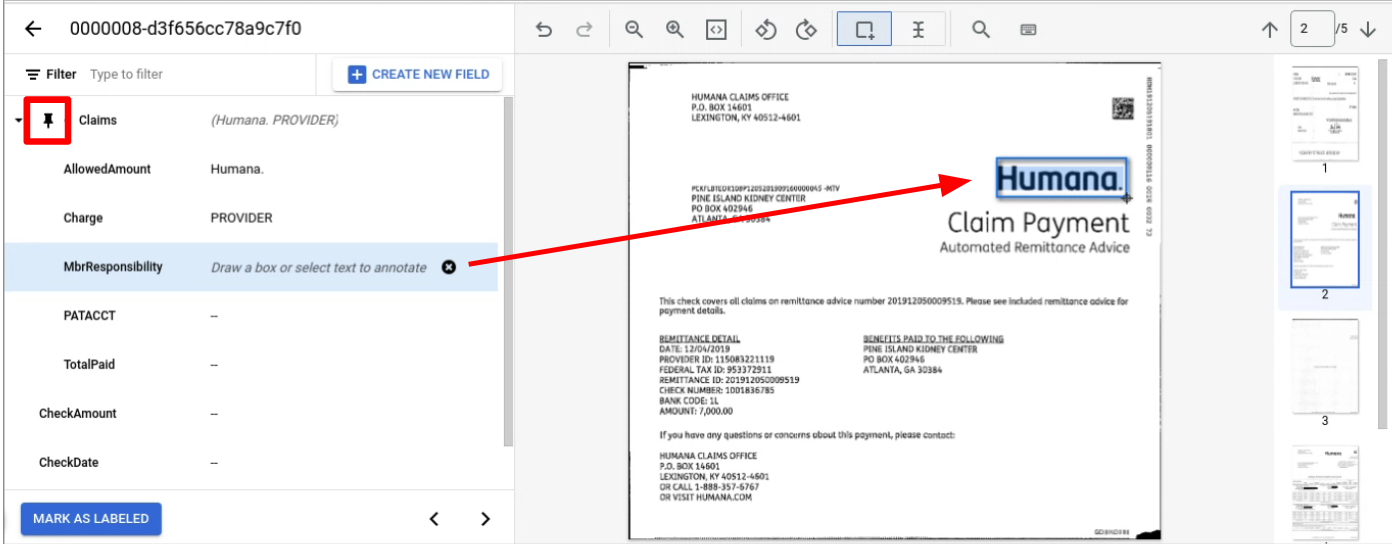
1. Label an entity normally across a page.
Note: The labeled entity will only be visible on the page where it's labeled,
with the navigation bar changing page to page. By pinning the parent entity,
this navigation bar persists.

2. Pin the parent entity with children you want to label across pages.
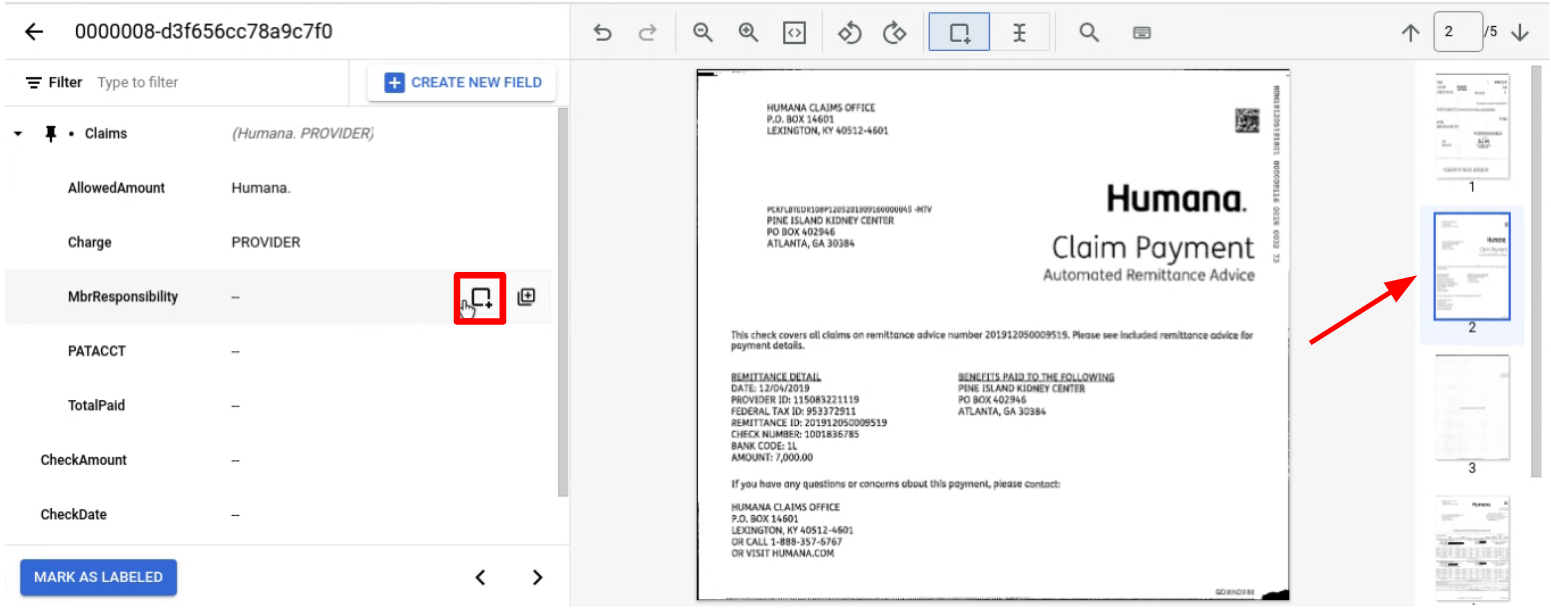
3. Navigate to the page with the child entity or entities to label.
> [!NOTE]
> **Note:** The parent entity can also be unpinned, leaving it visible on only the pages it was labeled before.
## Dataset configuration
A document dataset is required to train, up-train, or evaluate a processor version. Document AI processors learn from examples, just like humans. Dataset fuels processor stability in terms of performance.
### Train dataset
To improve the model and its accuracy, train a dataset on your documents. The model is made up of documents with ground-truth.
- For fine-tuning, you need a minimum of 50 training and 50 test documents to train a new model with version `pretrained-foundation-model-v1.5-2025-05-05`.
- For a few-shot, five documents is recommended.
- For zero-shot, only a schema is required.
> [!NOTE]
> Ground-truth is the correctly labeled data, as determined by humans.
### Test dataset
The test dataset is what the model uses to generate an F1 score (accuracy). It is made up of documents with ground-truth. To see how often the model is right, the ground truth is used to compare the model's predictions (extracted fields from the model) with the correct answers. The test dataset should have at least 50 documents for `pretrained-foundation-model-v1.5-2025-05-05`.
## Custom extractor with property descriptions
With property descriptions, you can train a model by describing what the labeled
fields are like. You can provide additional context and insights for each
entity. This allows the model to train by matching fields that fit the
description you provide and improve extraction accuracy. Property descriptions
can be specified for both parent and child entities.
Good examples of property descriptions include location information and text
patterns of the property values, which help disambiguate potential sources of
confusion in the document. Clear and precise property descriptions guide the
model with rules that promote more reliable and consistent extractions,
regardless of the specific document structure or content variations.
### Update document schema for a processor
For how to set the property descriptions, refer to [Update document schema](https://docs.cloud.google.com/document-ai/docs/create-dataset.md.txt#update_document_schema).
### Send a processing request with property descriptions
If the document schema already has descriptions set, you can send a process request
with the instructions at [Send a processing request](https://docs.cloud.google.com/document-ai/docs/reference/rest/v1beta3/projects.locations.processors.processorVersions.md.txt#documentschema).
### Fine-tune a processor with property descriptions
Before using any of the request data,
make the following replacements:
- LOCATION: your processor's [location](https://docs.cloud.google.com/document-ai/docs/regions.md.txt), for example:
- `us` - United States
- `eu` - European Union
- PROJECT_ID: Your Google Cloud project ID.
- PROCESSOR_ID: the ID of your custom processor.
- DISPLAY_NAME: Display name for the processor.
- PRETRAINED_PROCESSOR_VERSION: the processor version identifier. Refer to [Select a processor version](https://docs.cloud.google.com/document-ai/docs/manage-processor#select_a_processor_version) for more information. For example:
- `pretrained-TYPE-vX.X-YYYY-MM-DD`
- `stable`
- `rc`
- TRAIN_STEPS: Training steps for model fine-tuning.
- LEARN_RATE_MULTIPLIER: Learning rate multiplier for model finetuning.
- DOCUMENT_SCHEMA: Schema for the processor. Refer to [DocumentSchema representation](https://docs.cloud.google.com/document-ai/docs/reference/rest/v1beta3/projects.locations.processors.processorVersions.md.txt#documentschema).
HTTP method and URL:
```
POST https://LOCATION-documentai.googleapis.com/v1beta3/projects/PROJECT_ID/locations/LOCATION/processors/PROCESSOR_ID/processorVersions/PROCESSOR_VERSION:process
```
Request JSON body:
```
{
"rawDocument": {
"parent": "projects/PROJECT_ID/locations/LOCATION/processors/PROCESSOR_ID",
"processor_version": {
"name": "projects/PROJECT_ID/locations/LOCATION/processors/PROCESSOR_ID/processorVersions/DISPLAY_NAME",
"display_name": "DISPLAY_NAME",
"model_type": "MODEL_TYPE_GENERATIVE",
},
"base_processor_version": "projects/PROJECT_ID/locations/us/processors/PROCESSOR_ID/processorVersions/PRETRAINED_PROCESSOR_VERSION",
"foundation_model_tuning_options": {
"train_steps": TRAIN_STEPS,
"learning_rate_multiplier": LEARN_RATE_MULTIPLIER,
}
"document_schema": DOCUMENT_SCHEMA
}
}
```
To send your request, choose one of these options:
#### curl
> [!NOTE]
> **Note:**
>
> The following command assumes that you have logged in to
> the `gcloud` CLI with your user account by running
> [`gcloud init`](https://docs.cloud.google.com/sdk/gcloud/reference/init) or [`gcloud auth login`](https://docs.cloud.google.com/sdk/gcloud/reference/auth/login.md.txt) , or by using [Cloud Shell](https://docs.cloud.google.com/shell/docs.md.txt), which automatically logs you into the `gcloud` CLI . You can check the currently active account by running [`gcloud auth list`](https://docs.cloud.google.com/sdk/gcloud/reference/auth/list.md.txt).
Save the request body in a file named `request.json`,
and execute the following command:
```
curl -X POST \
-H "Authorization: Bearer $(gcloud auth print-access-token)" \
-H "Content-Type: application/json; charset=utf-8" \
-d @request.json \
"https://LOCATION-documentai.googleapis.com/v1beta3/projects/PROJECT_ID/locations/LOCATION/processors/PROCESSOR_ID/processorVersions/PROCESSOR_VERSION:process"
```
#### PowerShell
> [!NOTE]
> **Note:** The following command assumes that you have logged in to the `gcloud` CLI with your user account by running [`gcloud init`](https://docs.cloud.google.com/sdk/gcloud/reference/init) or [`gcloud auth login`](https://docs.cloud.google.com/sdk/gcloud/reference/auth/login.md.txt) . You can check the currently active account by running [`gcloud auth list`](https://docs.cloud.google.com/sdk/gcloud/reference/auth/list.md.txt).
Save the request body in a file named `request.json`,
and execute the following command:
```
$cred = gcloud auth print-access-token
$headers = @{ "Authorization" = "Bearer $cred" }
Invoke-WebRequest `
-Method POST `
-Headers $headers `
-ContentType: "application/json; charset=utf-8" `
-InFile request.json `
-Uri "https://LOCATION-documentai.googleapis.com/v1beta3/projects/PROJECT_ID/locations/LOCATION/processors/PROCESSOR_ID/processorVersions/PROCESSOR_VERSION:process" | Select-Object -Expand Content
```
### Custom extractor with signature detection
> [!WARNING]
>
> **Preview**
>
>
> This product is
>
> subject to the "Pre-GA Offerings Terms" in the General Service Terms section of the
> [Service Specific
> Terms](https://docs.cloud.google.com/terms/service-terms#1).
>
> Pre-GA products are available "as is" and might have limited support.
>
> For more information, see the
> [launch stage descriptions](https://cloud.google.com/products/#product-launch-stages).
[(Public preview)](https://cloud.google.com/products#product-launch-stages) Custom extractor supports
signature detection. This feature lets you detect the presence of
signatures in the documents. Signature detection is available only by using the
`derived` method type. You can specify a schema with the entity type `signature`
for such entities. The signature entities are derived using visual cues from
the document.
For examples and configuration instructions, click [Custom extractor with derived
field and signature detection](https://docs.cloud.google.com/document-ai/docs/ce-derived-signature).
### Custom extractor with derived fields
> [!WARNING]
>
> **Preview**
>
>
> This product is
>
> subject to the "Pre-GA Offerings Terms" in the General Service Terms section of the
> [Service Specific
> Terms](https://docs.cloud.google.com/terms/service-terms#1).
>
> Pre-GA products are available "as is" and might have limited support.
>
> For more information, see the
> [launch stage descriptions](https://cloud.google.com/products/#product-launch-stages).
The custom extractor supports derived fields. It lets you configure a field to be
populated through intelligent inference or generation based on document context,
rather than direct text extraction. You can employ this for use cases such as
deducing the country from an address, summarizing a document, counting items in
a table, or detecting if an ID is authentic, without requiring the value to be
explicitly present in the text.
For examples and configuration instructions, click [Custom extractor with derived
field and signature detection](https://docs.cloud.google.com/document-ai/docs/ce-derived-signature).
> [!IMPORTANT]
> **Important:** Derived fields are generated on a per-page basis. Read [derived field
> limitations](https://docs.cloud.google.com/document-ai/docs/ce-derived-signature#limitations) for more information.
## What's next
Learn about [Custom extractor with derived field and signature detection](https://docs.cloud.google.com/document-ai/docs/ce-derived-signature.md.txt).