


L'agente predefinito che hai creato nel passaggio precedente non può fornire dati dinamici come i saldi dei conti, perché tutto è codificato nell'agente. In questo passaggio del tutorial, creerai un webhook in grado di fornire dati dinamici all'agente. In questo tutorial, le funzioni Cloud Run vengono utilizzate per ospitare il webhook per la loro semplicità, ma esistono molti altri modi per ospitare un servizio webhook. L'esempio utilizza anche il linguaggio di programmazione Go, ma puoi utilizzare qualsiasi linguaggio supportato da Cloud Run Functions.
Crea la funzione
Le funzioni Cloud Run possono essere create con la console Google Cloud (visita la documentazione, apri la console). Per creare una funzione per questo tutorial:
È importante che l'agente Dialogflow e la funzione si trovino nello stesso progetto. Questo è il modo più semplice per consentire a Dialogflow di avere accesso sicuro alla tua funzione. Prima di creare la funzione, seleziona il progetto dalla Google Cloud console.
Apri la pagina della panoramica di Cloud Run Functions.
Fai clic su Crea funzione e imposta i seguenti campi:
- Ambiente: 1ª generazione
- Nome della funzione: tutorial-banking-webhook
- Regione: se hai specificato una regione per l'agente, utilizza la stessa regione.
- Tipo di trigger HTTP: HTTP
- URL: fai clic sul pulsante Copia qui e salva il valore. Questo URL ti servirà per configurare il webhook.
- Autenticazione: richiedi autenticazione
- Richiedi HTTPS: selezionato
Fai clic su Salva.
Fai clic su Avanti (non sono necessarie impostazioni speciali di runtime, build, connessioni o sicurezza).
Imposta i seguenti campi:
- Runtime: seleziona l'ultimo runtime di Go.
- Codice sorgente: editor inline
- Entry point: HandleWebhookRequest
Sostituisci il codice con il seguente:
package estwh

import (
	"context"
	"encoding/json"
	"fmt"
	"log"
	"net/http"
	"os"
	"strings"

	"cloud.google.com/go/spanner"
  "google.golang.org/grpc/codes"
)

// client is a Spanner client, created only once to avoid creation
// for every request.
// See: https://cloud.google.com/functions/docs/concepts/go-runtime#one-time_initialization
var client *spanner.Client

func init() {
	// If using a database, these environment variables will be set.
	pid := os.Getenv("PROJECT_ID")
	iid := os.Getenv("SPANNER_INSTANCE_ID")
	did := os.Getenv("SPANNER_DATABASE_ID")
	if pid != "" && iid != "" && did != "" {
		db := fmt.Sprintf("projects/%s/instances/%s/databases/%s",
			pid, iid, did)
		log.Printf("Creating Spanner client for %s", db)
		var err error
		// Use the background context when creating the client,
		// but use the request context for calls to the client.
		// See: https://cloud.google.com/functions/docs/concepts/go-runtime#contextcontext
		client, err = spanner.NewClient(context.Background(), db)
		if err != nil {
			log.Fatalf("spanner.NewClient: %v", err)
		}
	}
}

type queryResult struct {
	Action     string         `json:"action"`
	Parameters map[string]any `json:"parameters"`
}

type text struct {
	Text []string `json:"text"`
}

type message struct {
	Text text `json:"text"`
}

// webhookRequest is used to unmarshal a WebhookRequest JSON object. Note that
// not all members need to be defined--just those that you need to process.
// As an alternative, you could use the types provided by
// the Dialogflow protocol buffers:
// https://godoc.org/google.golang.org/genproto/googleapis/cloud/dialogflow/v2#WebhookRequest
type webhookRequest struct {
	Session     string      `json:"session"`
	ResponseID  string      `json:"responseId"`
	QueryResult queryResult `json:"queryResult"`
}

// webhookResponse is used to marshal a WebhookResponse JSON object. Note that
// not all members need to be defined--just those that you need to process.
// As an alternative, you could use the types provided by
// the Dialogflow protocol buffers:
// https://godoc.org/google.golang.org/genproto/googleapis/cloud/dialogflow/v2#WebhookResponse
type webhookResponse struct {
	FulfillmentMessages []message `json:"fulfillmentMessages"`
}

// accountBalanceCheck handles the similar named action
func accountBalanceCheck(ctx context.Context, request webhookRequest) (
	webhookResponse, error) {
	account := request.QueryResult.Parameters["account"].(string)
	account = strings.ToLower(account)
	var table string
	if account == "savings account" {
		table = "Savings"
	} else {
		table = "Checking"
	}
	s := "Your balance is $0"
	if client != nil {
		// A Spanner client exists, so access the database.
		// See: https://pkg.go.dev/cloud.google.com/go/spanner#ReadOnlyTransaction.ReadRow
		row, err := client.Single().ReadRow(ctx,
			table,
			spanner.Key{1}, // The account ID
			[]string{"Balance"})
		if err != nil {
			if spanner.ErrCode(err) == codes.NotFound {
				log.Printf("Account %d not found", 1)
			} else {
				return webhookResponse{}, err
			}
		} else {
			// A row was returned, so check the value
			var balance int64
			err := row.Column(0, &balance)
			if err != nil {
				return webhookResponse{}, err
			}
			s = fmt.Sprintf("Your balance is $%.2f", float64(balance)/100.0)
		}
	}
	response := webhookResponse{
		FulfillmentMessages: []message{
			{
				Text: text{
					Text: []string{s},
				},
			},
		},
	}
	return response, nil
}

// Define a type for handler functions.
type handlerFn func(ctx context.Context, request webhookRequest) (
	webhookResponse, error)

// Create a map from action to handler function.
var handlers map[string]handlerFn = map[string]handlerFn{
	"account.balance.check": accountBalanceCheck,
}

// handleError handles internal errors.
func handleError(w http.ResponseWriter, err error) {
	log.Printf("ERROR: %v", err)
	http.Error(w,
		fmt.Sprintf("ERROR: %v", err),
		http.StatusInternalServerError)
}

// HandleWebhookRequest handles WebhookRequest and sends the WebhookResponse.
func HandleWebhookRequest(w http.ResponseWriter, r *http.Request) {
	var request webhookRequest
	var response webhookResponse
	var err error

	// Read input JSON
	if err = json.NewDecoder(r.Body).Decode(&request); err != nil {
		handleError(w, err)
		return
	}
	log.Printf("Request: %+v", request)

	// Get the action from the request, and call the corresponding
	// function that handles that action.
	action := request.QueryResult.Action
	if fn, ok := handlers[action]; ok {
		response, err = fn(r.Context(), request)
	} else {
		err = fmt.Errorf("Unknown action: %s", action)
	}
	if err != nil {
		handleError(w, err)
		return
	}
	log.Printf("Response: %+v", response)

	// Send response
	if err = json.NewEncoder(w).Encode(&response); err != nil {
		handleError(w, err)
		return
	}
}
Fai clic su Esegui il deployment.
Attendi finché l'indicatore di stato non mostra che il deployment della funzione è stato eseguito correttamente. Durante l'attesa, esamina il codice che hai appena eseguito il deployment.
Configura il webhook per l'agente
Ora che il webhook esiste come servizio, devi associarlo all'agente. Questa operazione viene eseguita tramite il fulfillment. Per attivare e gestire il fulfillment per l'agente:
- Vai alla console di Dialogflow ES.
- Seleziona l'agente predefinito che hai appena creato.
- Seleziona Fulfillment nel menu della barra laterale a sinistra.
- Imposta il campo Webhook su Attivato.
- Fornisci l'URL che hai copiato in precedenza. Lascia vuoti tutti gli altri campi.
- Fai clic su Salva nella parte inferiore della pagina.
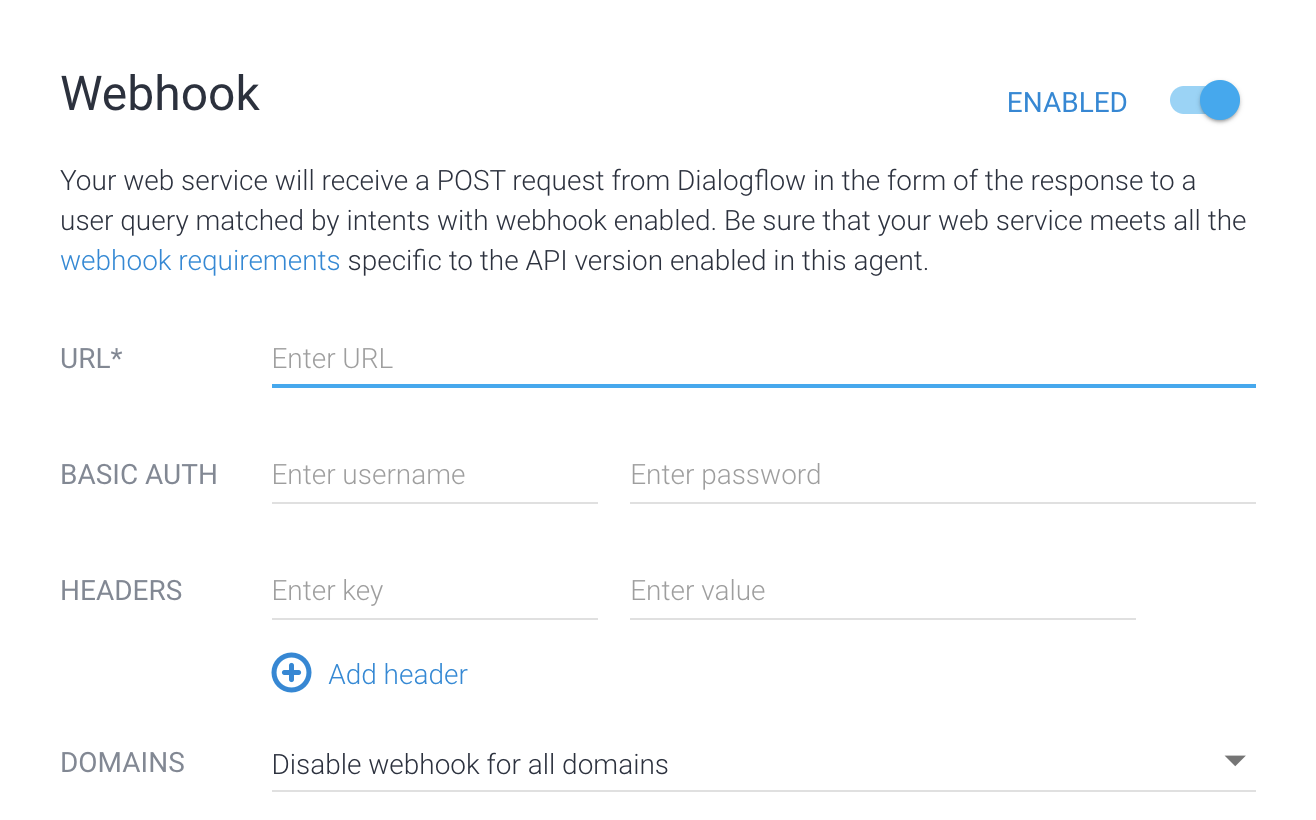
Ora che il fulfillment è attivato per l'agente, devi attivarlo per un intent:
- Seleziona Intent nel menu della barra laterale a sinistra.
- Seleziona l'intent account.balance.check.
- Scorri verso il basso fino alla sezione Fulfillment.
- Imposta su on l'opzione Abilita chiamata webhook per questo intent.
- Fai clic su Salva.
Prova l'agente
L'agente è ora pronto per essere provato. Fai clic sul pulsante Testa agente per aprire il simulatore. Prova a fare la seguente conversazione con l'agente:
| Turno di conversazione | Tu | Agente |
|---|---|---|
| 1 | Ciao | Ciao, grazie per aver scelto ACME Bank. |
| 2 | Voglio conoscere il saldo del mio conto | Per quale conto vuoi conoscere il saldo: risparmio o corrente? |
| 3 | Corrente | Ecco il tuo ultimo saldo: 0,00 $ |
Nel turno di conversazione n. 3, hai fornito "corrente" come tipo di conto. L'intent account.balance.check ha un parametro denominato account. Questo parametro è impostato su "corrente" in questa conversazione. L'intent ha anche un valore di azione "account.balance.check". Viene chiamato il servizio webhook e vengono passati i valori dei parametri e delle azioni.
Se esamini il codice del webhook riportato sopra, vedrai che questa azione attiva la chiamata di una funzione con nome simile. La funzione determina il saldo del conto. La funzione verifica se sono impostate variabili di ambiente specifiche con informazioni per la connessione al database. Se queste variabili di ambiente non sono impostate, la funzione utilizza un saldo del conto codificato. Nei passaggi successivi, modificherai l'ambiente della funzione in modo che recuperi i dati da un database.
Risoluzione dei problemi
Il codice del webhook include istruzioni di logging. Se riscontri problemi, prova a visualizzare i log della funzione.
Ulteriori informazioni
Per ulteriori informazioni sui passaggi precedenti, consulta: