


כדי להשתמש בניהול מלאי במערכת ייצור, צריך להטמיע ולפרוס שירות webhook. כדי לטפל בביצוע ההזמנה, שירות ה-webhook צריך לקבל בקשות JSON ולהחזיר תגובות JSON כמו שמתואר במדריך הזה. במסמך הסקירה הכללית על מילוי הזמנות מפורט תהליך העיבוד של מילוי הזמנות ושל webhook.
דרישות לגבי שירות webhook
שירות ה-webhook צריך לעמוד בדרישות הבאות:
- טיפול בבקשות HTTPS. אין תמיכה ב-HTTP. אם אתם מארחים את שירות ה-webhook שלכם Google Cloud בפתרון Compute או Serverless Computing, תוכלו לעיין במסמכי המוצר כדי לקבל מידע על הצגה באמצעות HTTPS. אפשרויות אירוח אחרות מפורטות במאמר קבלת אישור SSL לדומיין.
- מוודאים שכתובת ה-URL של שירות ה-webhook נגישה לכולם.
- טיפול בבקשות POST עם תוכן
WebhookRequestבפורמט JSON. - תגובה לבקשות
WebhookRequestעם תוכןWebhookResponseבפורמט JSON.
אימות
| X | פריט |
|---|---|
| שם משתמש וסיסמה להתחברות | בהגדרות של webhook, אפשר לציין ערכים אופציונליים של שם משתמש וסיסמה להתחברות. אם מספקים את הכותרת, Dialogflow מוסיף כותרת HTTP של הרשאה לבקשות ל-webhook. הכותרת הזו היא מהסוג הבא: "authorization: Basic <base 64 encoding of the string username:password>". |
| כותרות אימות | בהגדרות של webhook, אפשר לציין צמדים אופציונליים של מפתח/ערך בכותרת HTTP. אם מציינים כותרות HTTP, Dialogflow מוסיף אותן לבקשות ל-webhook. מקובל לספק זוג אחד עם מפתח של authorization. |
| אימות מובנה בפונקציות Cloud Run | כשמשתמשים בפונקציות של Cloud Run, אפשר להשתמש באימות המובנה. כדי להשתמש בסוג האימות הזה, לא צריך לספק שם משתמש, סיסמה או כותרות הרשאה. אם תספקו את אחד מהשדות האלה, לא נשתמש בהם לאימות המובנה. |
| טוקנים של זהות שירות | אפשר להשתמש באסימונים של זהות בשירות לצורך אימות. אם לא מספקים שם משתמש להתחברות, סיסמה להתחברות או כותרת עם מפתח של authorization, מערכת Dialogflow מניחה באופן אוטומטי שצריך להשתמש באסימוני זהות של שירות ומוסיפה כותרת HTTP של הרשאה לבקשות של webhook. הכותרת הזו היא מהסוג הבא: "authorization: Bearer <identity token>". |
| אימות TLS בו-זמני (mTLS) | מידע נוסף זמין במאמר בנושא אימות TLS בו-זמני (mTLS). |
בקשת webhook
כשמזוהה כוונה שהוגדרה לביצוע, מערכת Dialogflow שולחת בקשת webhook מסוג HTTPS POST לשירות ה-webhook שלכם. גוף הבקשה הזו הוא אובייקט JSON עם מידע על הכוונה התואמת.
בנוסף לשאילתה של משתמש הקצה, הרבה שילובים שולחים גם מידע על משתמש הקצה. לדוגמה, מזהה שמזהה את המשתמש באופן ייחודי. אפשר לגשת למידע הזה באמצעות השדה originalDetectIntentRequest בבקשת התגובה לפעולה מאתר אחר, שמכיל את המידע שנשלח מפלטפורמת השילוב.
מידע נוסף מופיע בWebhookRequestמאמרי העזרה.
דוגמה לבקשה:
{
  "responseId": "response-id",
  "session": "projects/project-id/agent/sessions/session-id",
  "queryResult": {
    "queryText": "End-user expression",
    "parameters": {
      "param-name": "param-value"
    },
    "allRequiredParamsPresent": true,
    "fulfillmentText": "Response configured for matched intent",
    "fulfillmentMessages": [
      {
        "text": {
          "text": [
            "Response configured for matched intent"
          ]
        }
      }
    ],
    "outputContexts": [
      {
        "name": "projects/project-id/agent/sessions/session-id/contexts/context-name",
        "lifespanCount": 5,
        "parameters": {
          "param-name": "param-value"
        }
      }
    ],
    "intent": {
      "name": "projects/project-id/agent/intents/intent-id",
      "displayName": "matched-intent-name"
    },
    "intentDetectionConfidence": 1,
    "diagnosticInfo": {},
    "languageCode": "en"
  },
  "originalDetectIntentRequest": {}
}
תגובה לפעולה מאתר אחר (webhook)
אחרי שמתקבלת בקשה ב-webhook, צריך לשלוח תגובה. גוף התגובה הוא אובייקט JSON שמכיל את הפרטים הבאים:
- התגובה ש-Dialogflow מחזיר למשתמש הקצה.
- עדכונים להקשרים הפעילים בשיחה.
- אירוע המשך להפעלת התאמה לכוונת המשתמש.
- payload בהתאמה אישית שיישלח אל השילוב או אל הלקוח לזיהוי כוונות.
ההגבלות הבאות חלות על התשובה:
- הגיבו בתוך 10 שניות לבקשות של Google Assistant או בתוך 5 שניות לבקשות של אפליקציות אחרות. אחרת, הבקשה תפוג.
- גודל התשובה צריך להיות 64KiB או פחות.
מידע נוסף מופיע בWebhookResponseמאמרי העזרה.
תשובה בהודעת טקסט
זוהי דוגמה לתשובה בטקסט:
{
  "fulfillmentMessages": [
    {
      "text": {
        "text": [
          "Text response from webhook"
        ]
      }
    }
  ]
}
תשובה בכרטיס
דוגמה לתגובה של כרטיס:
{
  "fulfillmentMessages": [
    {
      "card": {
        "title": "card title",
        "subtitle": "card text",
        "imageUri": "https://example.com/images/example.png",
        "buttons": [
          {
            "text": "button text",
            "postback": "https://example.com/path/for/end-user/to/follow"
          }
        ]
      }
    }
  ]
}
תשובה מ-Google Assistant
הדוגמה הבאה היא של תשובה של Google Assistant:
{
  "payload": {
    "google": {
      "expectUserResponse": true,
      "richResponse": {
        "items": [
          {
            "simpleResponse": {
              "textToSpeech": "this is a Google Assistant response"
            }
          }
        ]
      }
    }
  }
}
הקשר
הדוגמה הבאה מגדירה הקשר של פלט:
{
  "fulfillmentMessages": [
    {
      "text": {
        "text": [
          "Text response from webhook"
        ]
      }
    }
  ],
  "outputContexts": [
    {
      "name": "projects/project-id/agent/sessions/session-id/contexts/context-name",
      "lifespanCount": 5,
      "parameters": {
        "param-name": "param-value"
      }
    }
  ]
}
אירוע
הדוגמה הבאה מציגה הפעלה של אירוע בהתאמה אישית:
{
  "followupEventInput": {
    "name": "event-name",
    "languageCode": "en-US",
    "parameters": {
      "param-name": "param-value"
    }
  }
}
ישות סשן
דוגמה להגדרת ישויות של סשן:
{
  "fulfillmentMessages": [
    {
      "text": {
        "text": [
          "Choose apple or orange"
        ]
      }
    }
  ],
  "sessionEntityTypes":[
    {
      "name":"projects/project-id/agent/sessions/session-id/entityTypes/fruit",
      "entities":[
        {
          "value":"APPLE_KEY",
          "synonyms":[
            "apple",
            "green apple",
            "crabapple"
          ]
        },
        {
          "value":"ORANGE_KEY",
          "synonyms":[
            "orange"
          ]
        }
      ],
      "entityOverrideMode":"ENTITY_OVERRIDE_MODE_OVERRIDE"
    }
  ]
}
מטען ייעודי (payload) בהתאמה אישית
הדוגמה הבאה מציגה מטען ייעודי (payload) בהתאמה אישית:
{
  "fulfillmentMessages": [
    {
      "payload": {
        "facebook": { // for Facebook Messenger integration
          "attachment": {
            "type": "",
            "payload": {}
          }
        },
        "slack": { // for Slack integration
          "text": "",
          "attachments": []
        },
        "richContent": [ // for Dialogflow Messenger integration
          [
            {
              "type": "image",
              "rawUrl": "https://example.com/images/logo.png",
              "accessibilityText": "Example logo"
            }
          ]
        ],
        // custom integration payload here
      }
    }
  ]
}
הפעלה וניהול של מילוי הזמנות
כדי להפעיל ולנהל את תהליך השלמת ההזמנה של הסוכן באמצעות המסוף:
- עוברים אל מסוף Dialogflow ES.
- בוחרים נציג תמיכה.
- בתפריט הצדדי, בוחרים באפשרות ניהול הזמנות.
- מעבירים את המתג של השדה Webhook למצב Enabled (מופעל).
- ממלאים את הפרטים של שירות ה-webhook בטופס. אם ה-webhook לא דורש אימות, משאירים את שדות האימות ריקים.
- לוחצים על Save.
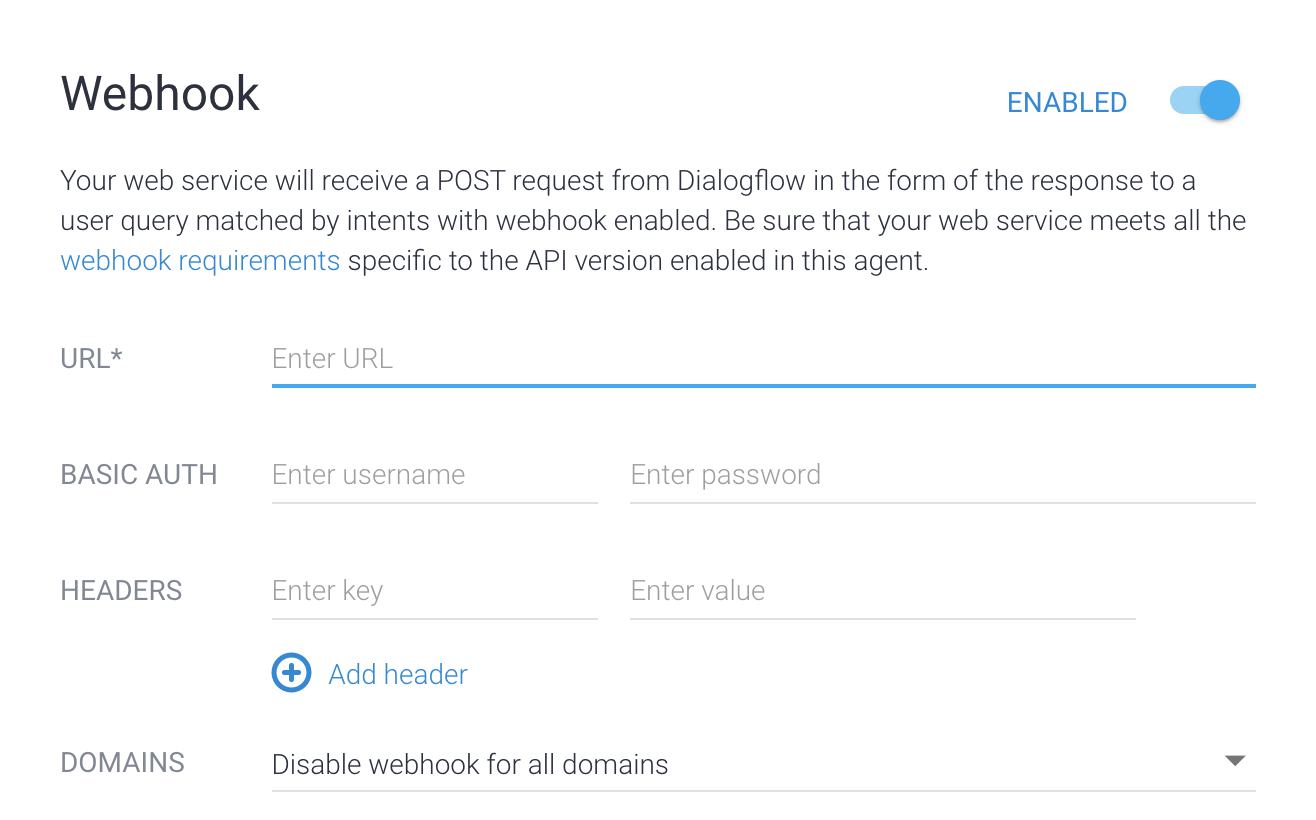
כדי להפעיל ולנהל את הביצוע של הסוכן באמצעות ה-API, אפשר לעיין בהפניית הסוכן. ה-methods getFulfillment ו-updateFulfillment מאפשרות לכם לנהל את הגדרות השלמת ההזמנה.
כדי להפעיל את התכונה 'ביצוע הזמנה' עבור כוונת משתמש באמצעות המסוף:
- בתפריט הצדדי הימני, לוחצים על כוונות.
- בוחרים כוונה.
- עוברים לקטע הזמנות.
- מעבירים את המתג הפעלת קריאת webhook לכוונת המשתמש הזו למצב מופעל.
- לוחצים על Save.
כדי להפעיל את התכונה 'ביצוע בקשות' עבור כוונת משתמש באמצעות ה-API, צריך לעיין בהפניית הכוונות ולהגדיר את השדה webhookState לערך WEBHOOK_STATE_ENABLED.
שגיאות ב-webhook
אם שירות ה-webhook נתקל בשגיאה, הוא צריך להחזיר אחד מקודי הסטטוס הבאים של HTTP:
400: בקשה שגויה401: לא מורשה403: הגישה אסורה404: לא נמצא-
500: שגיאת שרת פנימית -
503: השירות לא זמין
בכל אחת מהסיטואציות הבאות של שגיאות, Dialogflow מגיב למשתמש הקצה בתשובה המובנית שהוגדרה לכוונת התאמה:
- הזמן הקצוב לתפוגה של התגובה עבר.
- התקבל קוד סטטוס של שגיאה.
- התגובה לא תקינה.
- שירות ה-webhook לא זמין.
בנוסף, אם קריאה ל-API של זיהוי כוונות מפעילה את ההתאמה לכוונות, השדה status בתשובה של זיהוי הכוונות מכיל את פרטי השגיאה של ה-webhook. לדוגמה:
"status": {
    "code": 206,
    "message": "Webhook call failed. <details of the error...>"
}
ניסיונות חוזרים אוטומטיים
Dialogflow ES כולל מנגנונים פנימיים שמנסים שוב באופן אוטומטי שגיאות מסוימות של webhook כדי לשפר את העמידות. המערכת מנסה לבצע שוב רק שגיאות לא סופיות, כמו שגיאות שקשורות לזמן קצוב לתפוגה או לחיבור.
כדי לצמצם את הסיכוי לשיחות כפולות:
- הגדרת ספי תפוגה ארוכים יותר של Webhook.
- תומכים באידמפוטנטיות בלוגיקה של ה-webhook או מסירים כפילויות בבקשות.
שימוש בפונקציות Cloud Run
יש כמה דרכים להשתמש בפונקציות Cloud Run לביצוע הזמנות. העורך הישיר של Dialogflow משולב עם פונקציות Cloud Run. כשמשתמשים בעורך המובנה כדי ליצור ולערוך את קוד ה-webhook, Dialogflow יוצר חיבור מאובטח ל-Cloud Function.
אפשר גם להשתמש בפונקציה של Cloud Functions שלא נוצרה באמצעות העורך המוטבע. אם הפונקציה של Cloud Functions נמצאת באותו פרויקט כמו הסוכן, הסוכן יכול לקרוא ל-webhook בלי צורך בהגדרה מיוחדת.
עם זאת, צריך להגדיר את השילוב הזה באופן ידני בשני המקרים הבאים:
- חשבון השירות של סוכן השירות של Dialogflow עם הכתובת הבאה צריך להיות קיים בפרויקט של הסוכן:
service-agent-project-number@gcp-sa-dialogflow.iam.gserviceaccount.com
- יוצרים סוכן חדש לפרויקט.
- מריצים את הפקודה הבאה:
gcloud beta services identity create --service=dialogflow.googleapis.com --project=agent-project-id
- אם פונקציית ה-webhook נמצאת בפרויקט אחר מהסוכן, צריך להקצות את תפקיד IAM הפעלת Cloud Functions לחשבון השירות Dialogflow Service Agent בפרויקט של הפונקציה.
טוקנים של זהות שירות
כש-Dialogflow קורא ל-webhook, הוא מספק אסימון זהות של Google עם הבקשה. כל webhook יכול לאמת את האסימון באמצעות ספריות לקוח של Google או ספריות קוד פתוח כמו github.com/googleapis/google-auth-library-nodejs.
לדוגמה, אפשר לאמת את email של אסימון המזהה באופן הבא:
service-agent-project-number@gcp-sa-dialogflow.iam.gserviceaccount.com
דוגמאות
בדוגמאות הבאות אפשר לראות איך מקבלים WebhookRequest ושולחים WebhookResponse. בדוגמאות האלה נעשה שימוש בכוונות שנוצרו במדריך למתחילים.
Go
כדי לבצע אימות ב-Dialogflow CX, צריך להגדיר את Application Default Credentials. מידע נוסף זמין במאמר הגדרת אימות לסביבת פיתוח מקומית.
import (
	"encoding/json"
	"fmt"
	"log"
	"net/http"
)

type intent struct {
	DisplayName string `json:"displayName"`
}

type queryResult struct {
	Intent intent `json:"intent"`
}

type text struct {
	Text []string `json:"text"`
}

type message struct {
	Text text `json:"text"`
}

// webhookRequest is used to unmarshal a WebhookRequest JSON object. Note that
// not all members need to be defined--just those that you need to process.
// As an alternative, you could use the types provided by
// the Dialogflow protocol buffers:
// https://godoc.org/google.golang.org/genproto/googleapis/cloud/dialogflow/v2#WebhookRequest
type webhookRequest struct {
	Session     string      `json:"session"`
	ResponseID  string      `json:"responseId"`
	QueryResult queryResult `json:"queryResult"`
}

// webhookResponse is used to marshal a WebhookResponse JSON object. Note that
// not all members need to be defined--just those that you need to process.
// As an alternative, you could use the types provided by
// the Dialogflow protocol buffers:
// https://godoc.org/google.golang.org/genproto/googleapis/cloud/dialogflow/v2#WebhookResponse
type webhookResponse struct {
	FulfillmentMessages []message `json:"fulfillmentMessages"`
}

// welcome creates a response for the welcome intent.
func welcome(request webhookRequest) (webhookResponse, error) {
	response := webhookResponse{
		FulfillmentMessages: []message{
			{
				Text: text{
					Text: []string{"Welcome from Dialogflow Go Webhook"},
				},
			},
		},
	}
	return response, nil
}

// getAgentName creates a response for the get-agent-name intent.
func getAgentName(request webhookRequest) (webhookResponse, error) {
	response := webhookResponse{
		FulfillmentMessages: []message{
			{
				Text: text{
					Text: []string{"My name is Dialogflow Go Webhook"},
				},
			},
		},
	}
	return response, nil
}

// handleError handles internal errors.
func handleError(w http.ResponseWriter, err error) {
	w.WriteHeader(http.StatusInternalServerError)
	fmt.Fprintf(w, "ERROR: %v", err)
}

// HandleWebhookRequest handles WebhookRequest and sends the WebhookResponse.
func HandleWebhookRequest(w http.ResponseWriter, r *http.Request) {
	var request webhookRequest
	var response webhookResponse
	var err error

	// Read input JSON
	if err = json.NewDecoder(r.Body).Decode(&request); err != nil {
		handleError(w, err)
		return
	}
	log.Printf("Request: %+v", request)

	// Call intent handler
	switch intent := request.QueryResult.Intent.DisplayName; intent {
	case "Default Welcome Intent":
		response, err = welcome(request)
	case "get-agent-name":
		response, err = getAgentName(request)
	default:
		err = fmt.Errorf("Unknown intent: %s", intent)
	}
	if err != nil {
		handleError(w, err)
		return
	}
	log.Printf("Response: %+v", response)

	// Send response
	if err = json.NewEncoder(w).Encode(&response); err != nil {
		handleError(w, err)
		return
	}
}
Java
כדי לבצע אימות ב-Dialogflow CX, צריך להגדיר את Application Default Credentials. מידע נוסף זמין במאמר הגדרת אימות לסביבת פיתוח מקומית.
Node.js
כדי לבצע אימות ב-Dialogflow CX, צריך להגדיר את Application Default Credentials. מידע נוסף זמין במאמר הגדרת אימות לסביבת פיתוח מקומית.
Python
כדי לבצע אימות ב-Dialogflow CX, צריך להגדיר את Application Default Credentials. מידע נוסף זמין במאמר הגדרת אימות לסביבת פיתוח מקומית.