

To use fulfillment in a production system, you must implement and deploy a webhook service. To handle fulfillment, your webhook service must accept JSON requests and return JSON responses as specified in this guide. The detailed processing flow for fulfillment and webhooks is described in the Fulfillment overview document.
Webhook service requirements
Your webhook service must meet the following requirements:
- Handle HTTPS requests. HTTP is not supported. If you host your webhook service on Google Cloud using a Compute or Serverless Computing solution, see the product documentation for serving with HTTPS. For other hosting options, see Get an SSL certificate for your domain.
- Ensure the webhook service URL is publicly accessible.
- Handle POST requests with a JSON
WebhookRequestbody. - Respond to
WebhookRequestrequests with a JSONWebhookResponsebody.
Authentication
| X | Item |
|---|---|
| Login username and password | For webhook settings, you can specify optional login username and password values. If supplied, Dialogflow adds an authorization HTTP header to webhook requests. This header is of the form: "authorization: Basic <base 64 encoding of the string username:password>". |
| Authentication headers | For webhook settings, you can specify optional HTTP header key-value pairs. If supplied, Dialogflow adds these HTTP headers to webhook requests. It is common to provide a single pair with a key of authorization. |
| Cloud Run functions built-in authentication | You can use the built-in authentication when using Cloud Run functions. To use this type of authentication, don't supply username, password, or authorization headers. If you supply any of these fields, they won't be used for the built-in authentication. |
| Service identity tokens | You can use service identity tokens for authentication. If you don't supply login username, login password, or a header with a key of authorization, Dialogflow automatically assumes that service identity tokens should be used and adds an authorization HTTP header to webhook requests. This header is of the form: "authorization: Bearer <identity token>". |
| Mutual TLS authentication | See the Mutual TLS authentication documentation. |
Webhook request
When an intent configured for fulfillment is matched, Dialogflow sends an HTTPS POST webhook request to your webhook service. The body of this request is a JSON object with information about the matched intent.
In addition to the end-user query, many integrations also send information
about the end-user. For example, an ID that uniquely identifies the user. This
information can be accessed using the originalDetectIntentRequest field in the
webhook request, which contains the information sent from the integration
platform.
To learn more, see the
WebhookRequest
reference documentation.
The following is a sample request:
{
  "responseId": "response-id",
  "session": "projects/project-id/agent/sessions/session-id",
  "queryResult": {
    "queryText": "End-user expression",
    "parameters": {
      "param-name": "param-value"
    },
    "allRequiredParamsPresent": true,
    "fulfillmentText": "Response configured for matched intent",
    "fulfillmentMessages": [
      {
        "text": {
          "text": [
            "Response configured for matched intent"
          ]
        }
      }
    ],
    "outputContexts": [
      {
        "name": "projects/project-id/agent/sessions/session-id/contexts/context-name",
        "lifespanCount": 5,
        "parameters": {
          "param-name": "param-value"
        }
      }
    ],
    "intent": {
      "name": "projects/project-id/agent/intents/intent-id",
      "displayName": "matched-intent-name"
    },
    "intentDetectionConfidence": 1,
    "diagnosticInfo": {},
    "languageCode": "en"
  },
  "originalDetectIntentRequest": {}
}
Webhook response
After your webhook receives a request, it must send a response. The body of this response is a JSON object that contains the following information:
- The response that Dialogflow returns to the end-user.
- Updates to contexts active for the conversation.
- A follow-up event to trigger an intent match.
- A custom payload to be sent to the integration or detect intent client.
The following limitations apply to your response:
- Respond within 10 seconds for Google Assistant applications or 5 seconds for other applications; otherwise, the request times out.
- Keep the response size to 64 KiB or less.
To learn more, see the
WebhookResponse
reference documentation.
Text response
The following is an example of a text response:
{
  "fulfillmentMessages": [
    {
      "text": {
        "text": [
          "Text response from webhook"
        ]
      }
    }
  ]
}
Card response
The following is an example of a card response:
{
  "fulfillmentMessages": [
    {
      "card": {
        "title": "card title",
        "subtitle": "card text",
        "imageUri": "https://example.com/images/example.png",
        "buttons": [
          {
            "text": "button text",
            "postback": "https://example.com/path/for/end-user/to/follow"
          }
        ]
      }
    }
  ]
}
Google Assistant response
The following is an example of a Google Assistant response:
{
  "payload": {
    "google": {
      "expectUserResponse": true,
      "richResponse": {
        "items": [
          {
            "simpleResponse": {
              "textToSpeech": "this is a Google Assistant response"
            }
          }
        ]
      }
    }
  }
}
Context
The following is an example that sets output context:
{
  "fulfillmentMessages": [
    {
      "text": {
        "text": [
          "Text response from webhook"
        ]
      }
    }
  ],
  "outputContexts": [
    {
      "name": "projects/project-id/agent/sessions/session-id/contexts/context-name",
      "lifespanCount": 5,
      "parameters": {
        "param-name": "param-value"
      }
    }
  ]
}
Event
The following is an example that invokes a custom event:
{
  "followupEventInput": {
    "name": "event-name",
    "languageCode": "en-US",
    "parameters": {
      "param-name": "param-value"
    }
  }
}
Session entity
The following is an example that sets a session entity:
{
  "fulfillmentMessages": [
    {
      "text": {
        "text": [
          "Choose apple or orange"
        ]
      }
    }
  ],
  "sessionEntityTypes":[
    {
      "name":"projects/project-id/agent/sessions/session-id/entityTypes/fruit",
      "entities":[
        {
          "value":"APPLE_KEY",
          "synonyms":[
            "apple",
            "green apple",
            "crabapple"
          ]
        },
        {
          "value":"ORANGE_KEY",
          "synonyms":[
            "orange"
          ]
        }
      ],
      "entityOverrideMode":"ENTITY_OVERRIDE_MODE_OVERRIDE"
    }
  ]
}
Custom payload
The following is an example that provides a custom payload:
{
  "fulfillmentMessages": [
    {
      "payload": {
        "facebook": { // for Facebook Messenger integration
          "attachment": {
            "type": "",
            "payload": {}
          }
        },
        "slack": { // for Slack integration
          "text": "",
          "attachments": []
        },
        "richContent": [ // for Dialogflow Messenger integration
          [
            {
              "type": "image",
              "rawUrl": "https://example.com/images/logo.png",
              "accessibilityText": "Example logo"
            }
          ]
        ],
        // custom integration payload here
      }
    }
  ]
}
Enable and manage fulfillment
To enable and manage fulfillment for your agent with the console:
- Go to the Dialogflow ES console.
- Select an agent.
- Select Fulfillment in the sidebar menu.
- Toggle the Webhook field to Enabled.
- Provide the details for your webhook service in the form. If your webhook doesn't require authentication, leave the authentication fields blank.
- Click Save.
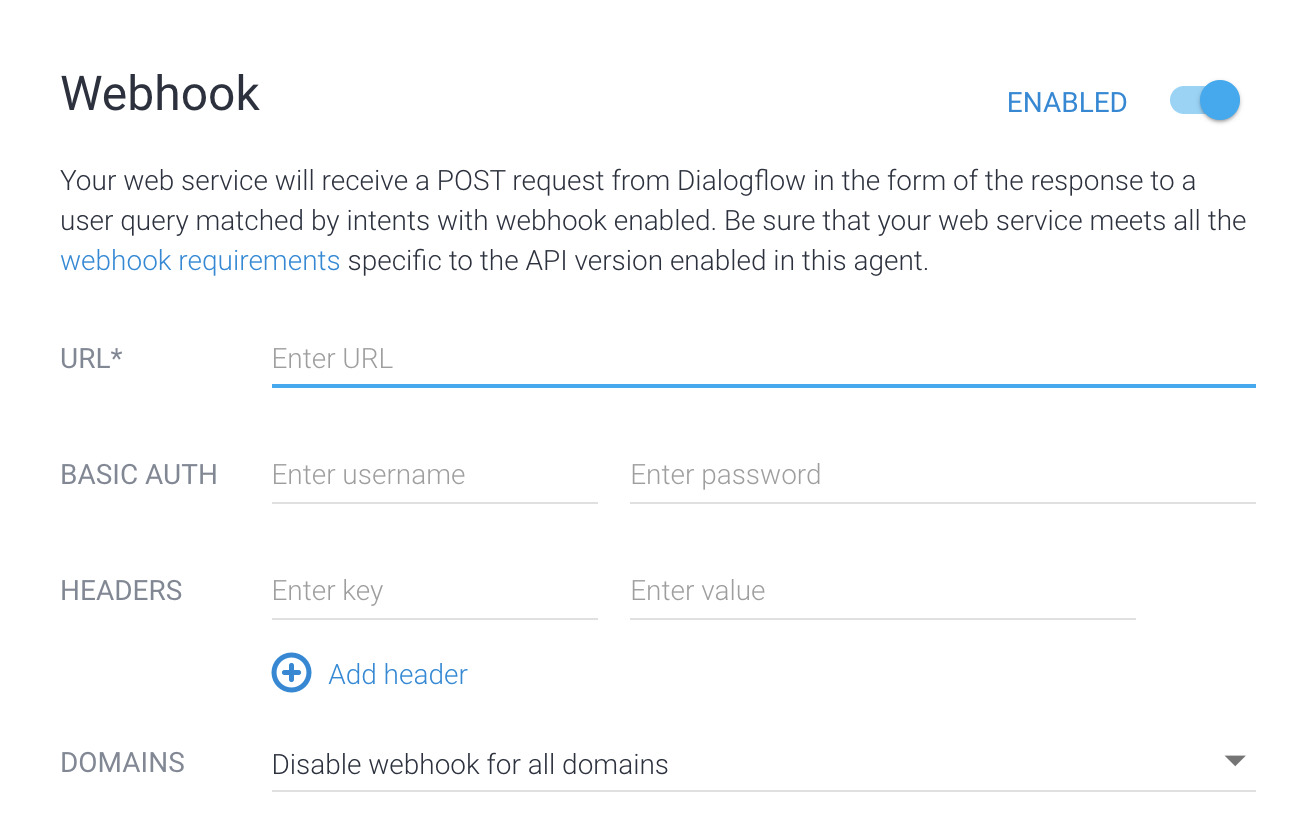
To enable and manage fulfillment for your agent with the API, see the
agent reference. The
getFulfillment and updateFulfillment methods let you manage fulfillment
settings.
To enable fulfillment for an intent with the console:
- Select Intents in the left sidebar menu.
- Select an intent.
- Go to the Fulfillment section.
- Toggle Enable webhook call for this intent to On.
- Click Save.
To enable fulfillment for an intent with the API, see the
intents reference and set the
webhookState field to WEBHOOK_STATE_ENABLED.
Webhook errors
If your webhook service encounters an error, it should return one of the following HTTP status codes:
400: Bad request401: Unauthorized403: Forbidden404: Not found500: Internal server error503: Service unavailable
In any of the following error situations, Dialogflow responds to the end user with the built-in response configured for the matched intent:
- The response timeout was exceeded.
- An error status code was received.
- The response is invalid.
- The webhook service is unavailable.
In addition, if a detect intent API call
triggers the intent match, the status field in the detect intent response
contains the webhook error information. For example:
"status": {
    "code": 206,
    "message": "Webhook call failed. <details of the error...>"
}
Automatic retries
Dialogflow ES includes internal mechanisms that automatically retry on certain webhook errors to improve robustness. Only non-terminal errors are retried, such as timeout or connection errors.
To reduce the likelihood of duplicated calls:
- Set longer webhook timeout thresholds.
- Support idempotency in your webhook logic or deduplicate requests.
Using Cloud Run functions
You can use Cloud Run functions for fulfillment in several ways. The Dialogflow inline editor integrates with Cloud Run functions. When you use the inline editor to create and edit your webhook code, Dialogflow establishes a secure connection to your Cloud Function.
You can also use a Cloud Function not created by the inline editor. If the Cloud Function resides in the same project as your agent, your agent can call your webhook without needing any special configuration.
However, you must manually set up this integration in the following two situations:
- The Dialogflow Service Agent
service account
with the following address must exist for your agent project:
service-agent-project-number@gcp-sa-dialogflow.iam.gserviceaccount.com
- Create a new agent for the project.
- Execute the following command:
gcloud beta services identity create --service=dialogflow.googleapis.com --project=agent-project-id
- If your webhook function resides in a different project than the agent, you must provide the Cloud Functions Invoker IAM role to the Dialogflow Service Agent service account in your function's project.
Service identity tokens
When Dialogflow calls a webhook, it provides a
Google identity token
with the request. Any webhook can optionally validate the token using Google
client libraries or open-source libraries like
github.com/googleapis/google-auth-library-nodejs.
For example, you can verify the email of the ID token as:
service-agent-project-number@gcp-sa-dialogflow.iam.gserviceaccount.com
Samples
The following samples show how to receive a WebhookRequest and send a
WebhookResponse. These samples use intents created in the
quickstart.
Go
To authenticate to Dialogflow CX, set up Application Default Credentials. For more information, see Set up authentication for a local development environment.
import (
	"encoding/json"
	"fmt"
	"log"
	"net/http"
)

type intent struct {
	DisplayName string `json:"displayName"`
}

type queryResult struct {
	Intent intent `json:"intent"`
}

type text struct {
	Text []string `json:"text"`
}

type message struct {
	Text text `json:"text"`
}

// webhookRequest is used to unmarshal a WebhookRequest JSON object. Note that
// not all members need to be defined--just those that you need to process.
// As an alternative, you could use the types provided by
// the Dialogflow protocol buffers:
// https://godoc.org/google.golang.org/genproto/googleapis/cloud/dialogflow/v2#WebhookRequest
type webhookRequest struct {
	Session     string      `json:"session"`
	ResponseID  string      `json:"responseId"`
	QueryResult queryResult `json:"queryResult"`
}

// webhookResponse is used to marshal a WebhookResponse JSON object. Note that
// not all members need to be defined--just those that you need to process.
// As an alternative, you could use the types provided by
// the Dialogflow protocol buffers:
// https://godoc.org/google.golang.org/genproto/googleapis/cloud/dialogflow/v2#WebhookResponse
type webhookResponse struct {
	FulfillmentMessages []message `json:"fulfillmentMessages"`
}

// welcome creates a response for the welcome intent.
func welcome(request webhookRequest) (webhookResponse, error) {
	response := webhookResponse{
		FulfillmentMessages: []message{
			{
				Text: text{
					Text: []string{"Welcome from Dialogflow Go Webhook"},
				},
			},
		},
	}
	return response, nil
}

// getAgentName creates a response for the get-agent-name intent.
func getAgentName(request webhookRequest) (webhookResponse, error) {
	response := webhookResponse{
		FulfillmentMessages: []message{
			{
				Text: text{
					Text: []string{"My name is Dialogflow Go Webhook"},
				},
			},
		},
	}
	return response, nil
}

// handleError handles internal errors.
func handleError(w http.ResponseWriter, err error) {
	w.WriteHeader(http.StatusInternalServerError)
	fmt.Fprintf(w, "ERROR: %v", err)
}

// HandleWebhookRequest handles WebhookRequest and sends the WebhookResponse.
func HandleWebhookRequest(w http.ResponseWriter, r *http.Request) {
	var request webhookRequest
	var response webhookResponse
	var err error

	// Read input JSON
	if err = json.NewDecoder(r.Body).Decode(&request); err != nil {
		handleError(w, err)
		return
	}
	log.Printf("Request: %+v", request)

	// Call intent handler
	switch intent := request.QueryResult.Intent.DisplayName; intent {
	case "Default Welcome Intent":
		response, err = welcome(request)
	case "get-agent-name":
		response, err = getAgentName(request)
	default:
		err = fmt.Errorf("Unknown intent: %s", intent)
	}
	if err != nil {
		handleError(w, err)
		return
	}
	log.Printf("Response: %+v", response)

	// Send response
	if err = json.NewEncoder(w).Encode(&response); err != nil {
		handleError(w, err)
		return
	}
}
Java
To authenticate to Dialogflow CX, set up Application Default Credentials. For more information, see Set up authentication for a local development environment.
Node.js
To authenticate to Dialogflow CX, set up Application Default Credentials. For more information, see Set up authentication for a local development environment.
Python
To authenticate to Dialogflow CX, set up Application Default Credentials. For more information, see Set up authentication for a local development environment.