This integration provides a customizable chat dialog for your
[agent](https://docs.cloud.google.com/dialogflow/cx/docs/concept/agent) that you can embed in your website.
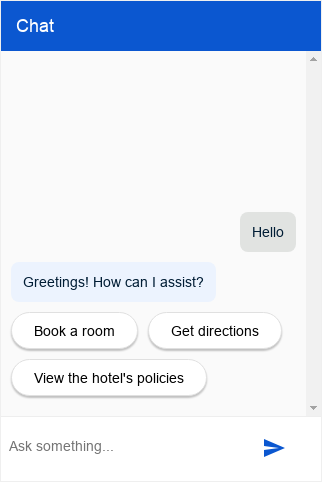
![Dialogflow CX Messenger interface](https://docs.cloud.google.com/static/dialogflow/cx/docs/images/dialogflow-messenger.png)

## Setup

This integration lets you provide either authenticated or unauthenticated
end-user agent query access.

### Unauthenticated setup


> [!NOTE]
> **Note:** Make sure [billing is enabled](https://docs.cloud.google.com/dialogflow/cx/docs/quick/setup#billing) on your project before testing the integration.

To set up unauthenticated access to your Dialogflow CX Messenger agent:

1. Go to the [Dialogflow CX console](https://dialogflow.cloud.google.com/cx/projects).
2. Choose your Google Cloud project.
3. Select your agent.
4. Select the **Manage** tab.
5. Click **Integrations** in the left sidebar menu.
6. Click **Connect** on **Dialogflow CX Messenger**.
7. A configuration dialog opens.
8. If the integration was previously setup for this agent, you will see embeddable HTML code. Regardless of whether you want what authenticated or unauthenticated, click the **Disable...** button at the bottom of the dialog, so you can reconfigure the settings in the next step.
9. Select an **Environment**.
10. Select **Unauthenticated API**.
11. Select a style.
12. Optionally restrict domain access.
13. Click **Enable the unauthenticated API**.
14. The dialog will show the embeddable HTML code that can be embedded on your website. Copy this code.
15. Click **Done**.

<br />

### Authenticated setup


To set up authenticated access to your Dialogflow CX Messenger agent:

1. Go to the [Dialogflow CX console](https://dialogflow.cloud.google.com/cx/projects).
2. Choose your Google Cloud project.
3. Select your agent.
4. Select the **Manage** tab.
5. Click **Integrations** in the left sidebar menu.
6. Click **Connect** on **Dialogflow CX Messenger**.
7. A configuration dialog opens.
8. If the integration was previously setup for this agent, you will see embeddable HTML code. Regardless of whether you want what authenticated or unauthenticated, click the **Disable...** button at the bottom of the dialog, so you can reconfigure the settings in the next step.
9. Select an **Environment**.
10. Select **Authorized API**.
11. Select a style.
12. Optionally restrict domain access.
13. Click **Enable the authorized API**.
14. The dialog will show the embeddable HTML code that can be embedded on your website. Copy this code.
15. Click **Done**.
16. Set up the OAuth client:
    1. [Create an OAuth consent screen](https://developers.google.com/workspace/guides/configure-oauth-consent) for your organization. Add `https://www.googleapis.com/auth/cloud-platform` as a required scope.
    2. [Create an OAuth 2.0 Client ID](https://developers.google.com/workspace/guides/create-credentials#oauth-client-id). Under **Authorized JavaScript origins** , specify the HTTP origins that are allowed to host and query your agent. For example, `https://your-company.com`.
    3. [Provide end-users with permission to query your agent](https://docs.cloud.google.com/dialogflow/cx/docs/concept/access-control). Add each of your end-users or a [group](https://docs.cloud.google.com/iam/docs/groups-in-cloud-console) as a principal with the [**Dialogflow API Client**](https://docs.cloud.google.com/dialogflow/cx/docs/concept/access-control#iam-roles) and [**Service Usage Consumer**](https://docs.cloud.google.com/iam/docs/roles-permissions/serviceusage#serviceusage.serviceUsageConsumer) roles.

> [!NOTE]
> **Note:** The first time an end-user uses the authenticated integration, they are asked to select which scopes to allow. They must allow the Cloud API.

<br />

## Embed


Paste the embed code you copied above in a webpage on your website.
The `<script>` and `<df-messenger>` HTML elements
should be in the `<body>` element of your page.

If you are using an authenticated integration,
set the `oauth-client-id` attribute for `<df-messenger>`
to your Oauth client id. And if you want to use end-users' identities for [tool
authentication](https://docs.cloud.google.com/dialogflow/cx/docs/concept/playbook/tool#openapi_tool_api_authentication),
set the `access-token-name` attribute with any name you like.
Then use Bearer Token with value `$session.params.ACCESS_TOKEN_NAME`
for tool authentication.

Update any other attributes that require updating.

To allow for responsive layouts,
also add the following to your `<head>` element:

    <meta name="viewport" content="width=device-width, initial-scale=1">

<br />

## Customization

You can apply many
[HTML customizations](https://docs.cloud.google.com/dialogflow/cx/docs/concept/integration/dialogflow-messenger/html)
and
[CSS customizations](https://docs.cloud.google.com/dialogflow/cx/docs/concept/integration/dialogflow-messenger/css)
to affect the appearance and behavior of the chat dialog.

## JavaScript

There are many
[JavaScript events](https://docs.cloud.google.com/dialogflow/cx/docs/concept/integration/dialogflow-messenger/javascript-events)
and
[JavaScript functions](https://docs.cloud.google.com/dialogflow/cx/docs/concept/integration/dialogflow-messenger/javascript-functions)
that you can use to interact with the chat dialog.

## Example

The following example shows HTML customization, CSS customization, and
JavaScript event handling:

    <!DOCTYPE html>
    <html>
    <head>
      <meta charset="utf-8">
      <meta http-equiv="Cache-Control" content="no-cache, no-store, must-revalidate" />
      <meta http-equiv="Pragma" content="no-cache" />
      <meta http-equiv="Expires" content="0" />
      <title>My chat</title>
      <style>
        df-messenger {
          /*
           * Customize as required. df-messenger will fill the
           * space that is provided.
          */
          position: absolute;
          right: 0;
          top: 0;
          bottom: 0;
          width: 320px;
        }
      </style>
      <script src="https://www.gstatic.com/dialogflow-console/fast/df-messenger/prod/v1/df-messenger.js"></script>
    </head>
    <body>
    <df-messenger
        location="global" <!-- TODO: update agent location as needed -->
        project-id="my-project-id" <!-- TODO: update project ID -->
        agent-id="my-agent-id" <!-- TODO: update agent ID -->
        language-code="en" <!-- TODO: update agent language as needed -->
    >
      <df-messenger-chat
          chat-title="Agent Name" <!-- TODO: update dialog title as needed -->
      ></df-messenger-chat>
    </df-messenger>

    <script>
      // An example of handling events: Navigate to the first suggested URL.
      document.addEventListener('df-url-suggested', (event) => {
        if (Array.isArray(event.detail.suggestedUrls) &&
          event.detail.suggestedUrls.length) {
          window.location.href = event.detail.suggestedUrls[0];
      }
    });
    </script>
    </body>
    </html>

## Fulfillment

You can use many
[fulfillment response types](https://docs.cloud.google.com/dialogflow/cx/docs/concept/integration/dialogflow-messenger/fulfillment)
for agent responses.

## Answer Feedback

If [answer feedback](https://docs.cloud.google.com/dialogflow/cx/docs/concept/answer-feedback#enable_feedback)
is enabled, by default the chat dialog adds thumbs up
and thumbs down
buttons to the user interface.
During the conversation, you can click these buttons to provide feedback on the
agent responses. If you click thumbs down, you can optionally provide a reason
for the negative feedback.

### Custom Feedback component

To specify a custom feedback element, you must define a new
[custom element](https://developer.mozilla.org/en-US/docs/Web/API/Web_components/Using_custom_elements)
on the website. To submit the feedback, the element must emit a
`df-custom-submit-feedback-clicked` event. The contained `detail` field must be
a string.

    class CustomFeedbackElement extends HTMLElement {
      constructor() {
        super();
        // It is not strictly required but recommended to contain the custom
        // element in a shadow root.
        this.renderRoot = this.attachShadow({mode: 'open'});
      }

      // Web component Lifecycle method.
      connectedCallback() {
        const wrapper = document.createElement('div');

        // Build the component as required.
        const button = document.createElement('button');
        button.innerText = 'Submit';
        button.addEventListener('click', () => {
          this._onSubmitClick();
        });
        wrapper.appendChild(button);

        this.renderRoot.appendChild(wrapper);
      }

      // Called when Submit button is clicked.
      _onSubmitClick() {
        const event = new CustomEvent("df-custom-submit-feedback-clicked", {
          // `detail` may be any string,
          // this will be sent to the backend to be stored.
          detail: JSON.stringify({
            "usefulness": 2,
            "accuracy": 3,
          }),
          // Required to propagate up the DOM tree
          // https://developer.mozilla.org/en-US/docs/Web/API/Event/bubbles
          bubbles: true,
          // Required to propagate across ShadowDOM
          // https://developer.mozilla.org/en-US/docs/Web/API/Event/composed
          composed: true,
       });
       this.dispatchEvent(event);
      }
    }

    (function() {
      // Registers the element. This name must be "df-external-custom-feedback".
      customElements.define('df-external-custom-feedback', CustomFeedbackElement);
    })();

## Debugging

To test your agent with Dialogflow CX Messenger locally:

- Embed the Dialogflow CX Messenger element in a page as described above.
- Start a local HTTP server for that page with a specific port.
- Open that page at `http://localhost:port_number`.