> [!NOTE]
> **Note:** NVIDIA T4 and P4 GPUs are deprecated on Dataflow and will reach End of Life on August 1, 2027. To avoid pipeline failures, migrate your workloads to the G2 (NVIDIA L4) VM family. For more information, see [Use the NVIDIA® L4 GPU type](https://docs.cloud.google.com/dataflow/docs/gpu/use-l4-gpus) and [Compute Engine feature deprecations](https://docs.cloud.google.com/compute/docs/deprecations).
This page explains how to run an Apache Beam pipeline on
Dataflow with GPUs. Jobs that use GPUs incur charges as specified
in the Dataflow
[pricing page](https://cloud.google.com/dataflow/pricing).
For more information about using GPUs with Dataflow, see
[Dataflow support for GPUs](https://docs.cloud.google.com/dataflow/docs/gpu/gpu-support). For
more information about the developer workflow for building pipelines using GPUs,
see [About GPUs with Dataflow](https://docs.cloud.google.com/dataflow/docs/gpu/develop-with-gpus).
## Use Apache Beam notebooks
If you already have a pipeline that you want to run with GPUs on
Dataflow, you can skip this section.
Apache Beam notebooks offer a convenient way to prototype and iteratively
develop your pipeline with GPUs without setting up a development environment. To
get started, read the
[Developing with Apache Beam notebooks](https://docs.cloud.google.com/dataflow/docs/guides/interactive-pipeline-development)
guide, launch an Apache Beam notebooks instance, and follow the example notebook
**Use GPUs with Apache Beam**.
## Provision GPU quota
GPU devices are subject to the quota availability of your Google Cloud project.
[Request GPU quota](https://docs.cloud.google.com/compute/resource-usage#gpu_quota) in the region of your choice.
## Install GPU drivers
To install NVIDIA drivers on the Dataflow
workers, append `install-nvidia-driver` to the
[`worker_accelerator` service option](https://docs.cloud.google.com/dataflow/docs/reference/service-options).
When you specify the `install-nvidia-driver` option,
Dataflow installs NVIDIA drivers onto the Dataflow workers by using
the [cos-extensions](https://docs.cloud.google.com/container-optimized-os/docs/how-to/run-gpus#install)
utility provided by Container-Optimized OS. By specifying `install-nvidia-driver`,
you agree to accept the NVIDIA license agreement.
Dataflow supports adding a version to the `install-nvidia-driver`
option as `install-nvidia-driver:VERSION`. The following versions are
supported:
- default
- latest
If no version is provided, then it's equivalent to
`install-nvidia-driver:default`. If an unrecognized version is provided, then
GPU driver installation fails.
Binaries and libraries provided by the NVIDIA driver installer are mounted into
the container that runs pipeline user code at `/usr/local/nvidia/`.
The [GPU driver version](https://docs.cloud.google.com/container-optimized-os/docs/how-to/run-gpus#identify-driver)
for both `default` and `latest` versions depends on the
Container-Optimized OS version used by Dataflow. To find the
GPU driver version for a given Dataflow job, in the
[Dataflow Step Logs](https://docs.cloud.google.com/dataflow/docs/guides/logging)
of your job, search for `GPU driver`.
When checking Dataflow logs after driver installation, you may
notice a line like:
| NVIDIA-SMI 535.261.03 Driver Version: 535.261.03 CUDA Version: 12.2 |
The "CUDA Version" in this case is the driver CUDA version, which is different
than the runtime CUDA version installed in the
[custom](https://docs.cloud.google.com/dataflow/docs/gpu/use-gpus#custom-container) or [existing](https://docs.cloud.google.com/dataflow/docs/gpu/use-gpus#existing-image) container image. If
this driver version is greater than or equal to the runtime version, no further
steps need to be taken. If it's an earlier version, then you will need to follow
the
[NVIDIA CUDA compatibility docs](https://docs.nvidia.com/deploy/cuda-compatibility/why-cuda-compatibility.html#why-cuda-compatibility)
when creating your container image.
> [!CAUTION]
> **Caution:** Don't install GPU drivers in your custom container images, because those drivers might conflict with the driver version used by Dataflow.
## Build a custom container image
To interact with the GPUs, you might need additional NVIDIA software, such as
[GPU-accelerated libraries](https://developer.nvidia.com/gpu-accelerated-libraries)
and the [CUDA Toolkit](https://developer.nvidia.com/cuda-toolkit).
Supply these libraries in the Docker container running user code.
To customize the container image, supply an image that fulfills the
Apache Beam SDK container image contract and has the necessary GPU
libraries.
To provide a custom container image, use
[Dataflow Portable Runner](https://docs.cloud.google.com/dataflow/docs/portable-runner) and supply the
container image by using the `sdk_container_image` pipeline option.
If you're using Apache Beam version 2.29.0 or earlier, use the
`worker_harness_container_image` pipeline option. For more information, see
[Use custom containers](https://docs.cloud.google.com/dataflow/docs/guides/using-custom-containers).
To build a custom container image, use one of the following two approaches:
- [Use an existing image configured for GPU usage](https://docs.cloud.google.com/dataflow/docs/gpu/use-gpus#existing-image)
- [Use an Apache Beam container image](https://docs.cloud.google.com/dataflow/docs/gpu/use-gpus#container-image)
### Use an existing image configured for GPU usage
You can build a Docker image that fulfills the Apache Beam SDK container
contract from an existing base image that is preconfigured for GPU usage. For
example,
[TensorFlow Docker images](https://www.tensorflow.org/install/docker),
and
[NVIDIA container images](https://ngc.nvidia.com/catalog/containers/)
are preconfigured for GPU usage.
A sample Dockerfile that builds on the TensorFlow Docker image with
Python 3.6 looks like the following example:
ARG BASE=tensorflow/tensorflow:2.5.0-gpu
FROM $BASE
# Check that the chosen base image provides the expected version of Python interpreter.
ARG PY_VERSION=3.6
RUN [[ $PY_VERSION == `python -c 'import sys; print("%s.%s" % sys.version_info[0:2])'` ]] \
|| { echo "Could not find Python interpreter or Python version is different from ${PY_VERSION}"; exit 1; }
RUN pip install --upgrade pip \
&& pip install --no-cache-dir apache-beam[gcp]==2.29.0 \
# Verify that there are no conflicting dependencies.
&& pip check
# Copy the Apache Beam worker dependencies from the Beam Python 3.6 SDK image.
COPY --from=apache/beam_python3.6_sdk:2.29.0 /opt/apache/beam /opt/apache/beam
# Apache Beam worker expects pip at /usr/local/bin/pip by default.
# Some images have pip in a different location. If necessary, make a symlink.
# This line can be omitted in Beam 2.30.0 and later versions.
RUN [[ `which pip` == "/usr/local/bin/pip" ]] || ln -s `which pip` /usr/local/bin/pip
# Set the entrypoint to Apache Beam SDK worker launcher.
ENTRYPOINT [ "/opt/apache/beam/boot" ]
When you use
[TensorFlow Docker images](https://www.tensorflow.org/install/docker), use
TensorFlow 2.5.0 or later. Earlier TensorFlow
Docker images install the `tensorflow-gpu` package instead of the `tensorflow`
package. The distinction is not important after TensorFlow 2.1.0
release, but several downstream packages, such as `tfx`, require the
`tensorflow` package.
Large container sizes slow down the worker startup time. This performance change
might occur when you use containers like
[Deep Learning Containers](https://docs.cloud.google.com/deep-learning-containers/docs/choosing-container).
#### Install a specific Python version
If you have strict requirements for the Python version, you can build your image
from an NVIDIA base image that has the necessary GPU libraries. Then, install
the Python interpreter.
The following example demonstrates how to select an NVIDIA image that doesn't
include the Python interpreter from the
[CUDA container image catalog](https://ngc.nvidia.com/catalog/containers/nvidia:cuda). Adjust the
example to install the needed version of Python 3 and pip. The example uses
TensorFlow. Therefore, when choosing an image, the CUDA and cuDNN versions in
the base image satisfy the
[requirements for the TensorFlow version](https://www.tensorflow.org/install/source#gpu).
A sample Dockerfile looks like the following:
# Select an NVIDIA base image with needed GPU stack from https://ngc.nvidia.com/catalog/containers/nvidia:cuda
FROM nvidia/cuda:11.0.3-cudnn8-runtime-ubuntu20.04
RUN \
# Add Deadsnakes repository that has a variety of Python packages for Ubuntu.
# See: https://launchpad.net/~deadsnakes/+archive/ubuntu/ppa
apt-key adv --keyserver keyserver.ubuntu.com --recv-keys F23C5A6CF475977595C89F51BA6932366A755776 \
&& echo "deb http://ppa.launchpad.net/deadsnakes/ppa/ubuntu focal main" >> /etc/apt/sources.list.d/custom.list \
&& echo "deb-src http://ppa.launchpad.net/deadsnakes/ppa/ubuntu focal main" >> /etc/apt/sources.list.d/custom.list \
&& apt-get update \
&& apt-get install -y curl \
python3.8 \
# With python3.8 package, distutils need to be installed separately.
python3-distutils \
&& rm -rf /var/lib/apt/lists/* \
&& update-alternatives --install /usr/bin/python python /usr/bin/python3.8 10 \
&& curl https://bootstrap.pypa.io/get-pip.py | python \
&& pip install --upgrade pip \
# Install Apache Beam and Python packages that will interact with GPUs.
&& pip install --no-cache-dir apache-beam[gcp]==2.29.0 tensorflow==2.4.0 \
# Verify that there are no conflicting dependencies.
&& pip check
# Copy the Apache Beam worker dependencies from the Beam Python 3.8 SDK image.
COPY --from=apache/beam_python3.8_sdk:2.29.0 /opt/apache/beam /opt/apache/beam
# Set the entrypoint to Apache Beam SDK worker launcher.
ENTRYPOINT [ "/opt/apache/beam/boot" ]
On some OS distributions, it might be difficult to install specific Python
versions by using the OS package manager. In this case, install the Python
interpreter with tools like Miniconda or `pyenv`.
A sample Dockerfile looks like the following:
FROM nvidia/cuda:11.0.3-cudnn8-runtime-ubuntu20.04
# The Python version of the Dockerfile must match the Python version you use
# to launch the Dataflow job.
ARG PYTHON_VERSION=3.8
# Update PATH so we find our new Conda and Python installations.
ENV PATH=/opt/python/bin:/opt/conda/bin:$PATH
RUN apt-get update \
&& apt-get install -y wget \
&& rm -rf /var/lib/apt/lists/* \
# The NVIDIA image doesn't come with Python pre-installed.
# We use Miniconda to install the Python version of our choice.
&& wget -q https://repo.anaconda.com/miniconda/Miniconda3-latest-Linux-x86_64.sh \
&& bash Miniconda3-latest-Linux-x86_64.sh -b -p /opt/conda \
&& rm Miniconda3-latest-Linux-x86_64.sh \
# Create a new Python environment with needed version, and install pip.
&& conda create -y -p /opt/python python=$PYTHON_VERSION pip \
# Remove unused Conda packages, install necessary Python packages using pip
# to avoid mixing packages from pip and Conda.
&& conda clean -y --all --force-pkgs-dirs \
&& pip install --upgrade pip \
# Install Apache Beam and Python packages that will interact with GPUs.
&& pip install --no-cache-dir apache-beam[gcp]==2.29.0 tensorflow==2.4.0 \
# Verify that there are no conflicting dependencies.
&& pip check \
# Apache Beam worker expects pip at /usr/local/bin/pip by default.
# You can omit this line when using Beam 2.30.0 and later versions.
&& ln -s $(which pip) /usr/local/bin/pip
# Copy the Apache Beam worker dependencies from the Apache Beam SDK for Python 3.8 image.
COPY --from=apache/beam_python3.8_sdk:2.29.0 /opt/apache/beam /opt/apache/beam
# Set the entrypoint to Apache Beam SDK worker launcher.
ENTRYPOINT [ "/opt/apache/beam/boot" ]
> [!CAUTION]
> **Caution:** We recommend that you install all Python packages in custom container images using `pip install` and not use `conda install`. Installing Python packages from both pip and Conda repositories might cause interoperability issues, especially for Python packages that include compiled code. In addition, Apache Beam does not fully support Conda environments. For more information, see [Using Pip in a Conda Environment](https://www.anaconda.com/blog/using-pip-in-a-conda-environment).
### Use an Apache Beam container image
You can configure a container image for GPU usage without using preconfigured
images. This approach is only recommended when preconfigured images don't work
for you. To set up your own container image, you need to select compatible
libraries and configure their execution environment.
A sample Dockerfile looks like the following:
FROM apache/beam_python3.7_sdk:2.24.0
ENV INSTALLER_DIR="/tmp/installer_dir"
# The base image has TensorFlow 2.2.0, which requires CUDA 10.1 and cuDNN 7.6.
# You can download cuDNN from NVIDIA website
# https://developer.nvidia.com/cudnn
COPY cudnn-10.1-linux-x64-v7.6.0.64.tgz $INSTALLER_DIR/cudnn.tgz
RUN \
# Download CUDA toolkit.
wget -q -O $INSTALLER_DIR/cuda.run https://developer.download.nvidia.com/compute/cuda/10.1/Prod/local_installers/cuda_10.1.243_418.87.00_linux.run && \
# Install CUDA toolkit. Print logs upon failure.
sh $INSTALLER_DIR/cuda.run --toolkit --silent || (egrep '^\[ERROR\]' /var/log/cuda-installer.log && exit 1) && \
# Install cuDNN.
mkdir $INSTALLER_DIR/cudnn && \
tar xvfz $INSTALLER_DIR/cudnn.tgz -C $INSTALLER_DIR/cudnn && \
cp $INSTALLER_DIR/cudnn/cuda/include/cudnn*.h /usr/local/cuda/include && \
cp $INSTALLER_DIR/cudnn/cuda/lib64/libcudnn* /usr/local/cuda/lib64 && \
chmod a+r /usr/local/cuda/include/cudnn*.h /usr/local/cuda/lib64/libcudnn* && \
rm -rf $INSTALLER_DIR
# A volume with GPU drivers will be mounted at runtime at /usr/local/nvidia.
ENV LD_LIBRARY_PATH=$LD_LIBRARY_PATH:/usr/local/nvidia/lib64:/usr/local/cuda/lib64
Driver libraries in `/usr/local/nvidia/lib64` must be discoverable in the
container as shared libraries. To make the driver libraries discoverable,
configure the `LD_LIBRARY_PATH` environment variable.
If you use TensorFlow, you must choose a compatible combination
of CUDA Toolkit and cuDNN versions. For more information, read
[Software requirements](https://www.tensorflow.org/install/gpu#software_requirements) and
[Tested build configurations](https://www.tensorflow.org/install/source#tested_build_configurations).
## Select the type and number of GPUs for Dataflow workers
To configure the type and number of GPUs to attach to Dataflow
workers, use the
[`worker_accelerator` service option](https://docs.cloud.google.com/dataflow/docs/reference/service-options).
Select the type and number of
GPUs based on your use case and how you plan to use the GPUs in your
pipeline.
For a list of GPU types that are supported with Dataflow, see
[Dataflow support for GPUs](https://docs.cloud.google.com/dataflow/docs/gpu/gpu-support#availability).
## Run your job with GPUs
The considerations for running a Dataflow job with GPUs include
the following:
- Because GPU containers are typically large, to avoid
[running out of disk space](https://docs.cloud.google.com/dataflow/docs/guides/common-errors#no-space-left), do the following:
- Increase the default [boot disk size](https://docs.cloud.google.com/dataflow/docs/reference/pipeline-options#worker-level_options) to 50 gigabytes or more.
- Consider how many processes concurrently use the same GPU on a worker VM.
Then, decide whether you want to limit the GPU to a single process or let
multiple processes use the GPU.
- If one Apache Beam SDK process can use most of the available GPU memory, for example by loading a large model onto a GPU, you might want to configure workers to use a single process by setting the pipeline option `--experiments=no_use_multiple_sdk_containers`. Alternatively, use workers with one vCPU by using a [custom machine type](https://docs.cloud.google.com/compute/docs/instances/creating-instance-with-custom-machine-type), such as `n1-custom-1-NUMBER_OF_MB` or `n1-custom-1-NUMBER_OF_MB-ext`, for [extended memory](https://docs.cloud.google.com/compute/docs/instances/creating-instance-with-custom-machine-type#extendedmemory). For more information, see [Use a machine type with more memory per vCPU](https://docs.cloud.google.com/dataflow/docs/guides/troubleshoot-oom#memory-per-vcpu).
- If the GPU is shared by multiple processes, enable concurrent processing on a shared GPU by using the [NVIDIA Multi-Processing Service (MPS)](https://docs.cloud.google.com/dataflow/docs/gpu/use-nvidia-mps).
For background information, see
[GPUs and worker parallelism](https://docs.cloud.google.com/dataflow/docs/gpu/develop-with-gpus#parallelism).
> [!CAUTION]
> **Caution:** The Apache Beam version and Python interpreter minor version in the pipeline launch environment and in your container image must be the same. Verify the versions in your local environment. Alternatively, start the pipeline from the container created from your image or create a Flex template that launches the pipeline using your custom image. For more information, see:
>
> - [Use custom containers in Dataflow](https://docs.cloud.google.com/dataflow/docs/guides/using-custom-containers)
> - [Use Flex Templates to package a pipeline](https://docs.cloud.google.com/dataflow/docs/guides/templates/configuring-flex-templates#use_custom_container_images)
To run a Dataflow job with GPUs, use the following command.
To use [right fitting](https://docs.cloud.google.com/dataflow/docs/guides/right-fitting), instead of using the
[`worker_accelerator` service option](https://docs.cloud.google.com/dataflow/docs/reference/service-options),
use the
[`accelerator` resource hint](https://docs.cloud.google.com/dataflow/docs/guides/right-fitting#available_resource_hints).
### Python
> [!NOTE]
> **Note:** If you're using **Apache Beam SDK 2.74 or later** , use the updated flag `--experiments=enable_portable_runner` to enable the Portable Runner.
python PIPELINE \
--runner="DataflowRunner" \
--project="PROJECT" \
--temp_location="gs://BUCKET/tmp" \
--region="REGION" \
--worker_harness_container_image="IMAGE" \
--disk_size_gb="DISK_SIZE_GB" \
--dataflow_service_options="worker_accelerator=type:GPU_TYPE;count:GPU_COUNT;install-nvidia-driver" \
--experiments="use_runner_v2"
Replace the following:
- PIPELINE: your pipeline source code file
- PROJECT: the Google Cloud project name
- BUCKET: the Cloud Storage bucket
- REGION: a Dataflow region, for example, `us-central1`. Select a \`REGION\` that has zones that [support the `GPU_TYPE`](https://docs.cloud.google.com/dataflow/docs/gpu/gpu-support#availability). Dataflow automatically assigns workers to a zone with GPUs in this region.
- IMAGE: the Artifact Registry path for your Docker image
- DISK_SIZE_GB: Size of the boot disk for each worker VM, for example, `50`
- GPU_TYPE: an available [GPU type](https://docs.cloud.google.com/dataflow/docs/gpu/gpu-support#availability), for example, `nvidia-l4`.
- GPU_COUNT: number of GPUs to attach to each worker VM, for example, `1`
## Verify your Dataflow job
To confirm that the job uses worker VMs with GPUs, follow these steps:
1. Verify that Dataflow workers for the job have started.
2. While a job is running, find a worker VM associated with the job.
1. In the **Search Products and Resources** prompt, paste the **Job ID**.
2. Select the Compute Engine VM instance associated with the job.
You can also find a list of all running instances in the Compute Engine
console.
1. In the Google Cloud console, go to the **VM instances** page.
[Go to VM instances](https://console.cloud.google.com/compute/instances)
2. Click **VM instance details**.
3. Verify that the details page has a **GPUs** section and that your GPUs are
attached.
If your job didn't launch with GPUs, check that the `worker_accelerator` service
option is configured properly and visible in the Dataflow
monitoring interface in **`dataflow_service_options`**. The order of tokens in
the accelerator metadata is important.
For example, a `dataflow_service_options` pipeline option in the
Dataflow monitoring interface might look like the following:
['worker_accelerator=type:nvidia-l4;count:1;install-nvidia-driver', ...]
## View GPU utilization
To see GPU utilization on the worker VMs, follow these steps:
1. In the Google Cloud console, go to **Monitoring** or use the following button:
[Go to Monitoring](https://console.cloud.google.com/monitoring)
2. In the Monitoring navigation pane, click
**Metrics Explorer**.
3. For **Resource Type** , specify `Dataflow Job`. For the metric,
specify `GPU utilization` or `GPU memory utilization`, depending on which
metric you want to monitor.
For more information, see [Metrics Explorer](https://docs.cloud.google.com/monitoring/charts/metrics-explorer).
## Enable NVIDIA Multi-Processing Service
On Python pipelines that run on workers with more than one vCPU, you can improve
concurrency for GPU operations by enabling the NVIDIA Multi-Process Service
(MPS). For more information and steps to use MPS, see
[Improve performance on a shared GPU by using NVIDIA MPS](https://docs.cloud.google.com/dataflow/docs/gpu/use-nvidia-mps).
## Optional: Configure a provisioning model
You can improve the ability to get access to GPU resources by configuring a [provisioning model](https://docs.cloud.google.com/compute/docs/instances/provisioning-models) for your pipeline.
The following provisioning models are supported by Dataflow: standard and flex-start.
### Standard provisioning
Standard provisioning is the default provisioning model for all Dataflow jobs with GPUs. Instances that use accelerator resources are created immediately based on resource availability.
You don't have to configure anything to use the standard provisioning model.
If GPUs are not immediately available in the zone or region you run your Dataflow job in, your job may fail to start. For more information, see
[Job fails immediately at startup](https://docs.cloud.google.com/dataflow/docs/gpu/troubleshoot-gpus#job-fails-startup).
### Flex-start provisioning
> [!WARNING]
>
> **Preview
> --- Flex-start provisioning model**
>
>
> This feature is
>
> subject to the "Pre-GA Offerings Terms" in the General Service Terms section of the
> [Service Specific
> Terms](https://docs.cloud.google.com/terms/service-terms#1).
>
> Pre-GA features are available "as is" and might have limited support.
>
> For more information, see the
> [launch stage descriptions](https://cloud.google.com/products/#product-launch-stages).
> [!NOTE]
> **Note:** The following considerations apply to this Preview offering:
>
> - Jobs that use flex-start provisioning incur GPU charges as specified in the Dataflow [pricing page](https://cloud.google.com/dataflow/pricing).
With the flex-start provisioning model, instances and accelerator resources are scheduled for provisioning and fulfilled based on resource availability. You can use the flex-start provisioning model to increase your chances of obtaining GPUs.
To use the flex-start provisioning model, append `provisioning_model:FLEX_START` to the
[`worker_accelerator` service option](https://docs.cloud.google.com/dataflow/docs/reference/service-options). For example:
worker_accelerator=type:nvidia-l4;count:1;install-nvidia-driver:latest;provisioning_model:FLEX_START
Jobs with flex-start enabled are submitted for execution but are executed only when the required resources become available. To verify that flex-start provisioning has been enabled, look in the [job-message](https://docs.cloud.google.com/dataflow/docs/guides/logging#log-types) log for the following log entry:
> FLEX_START is enabled for job JOB_ID
To determine if the job has begun execution, view the autoscaling graph in the job metrics page:
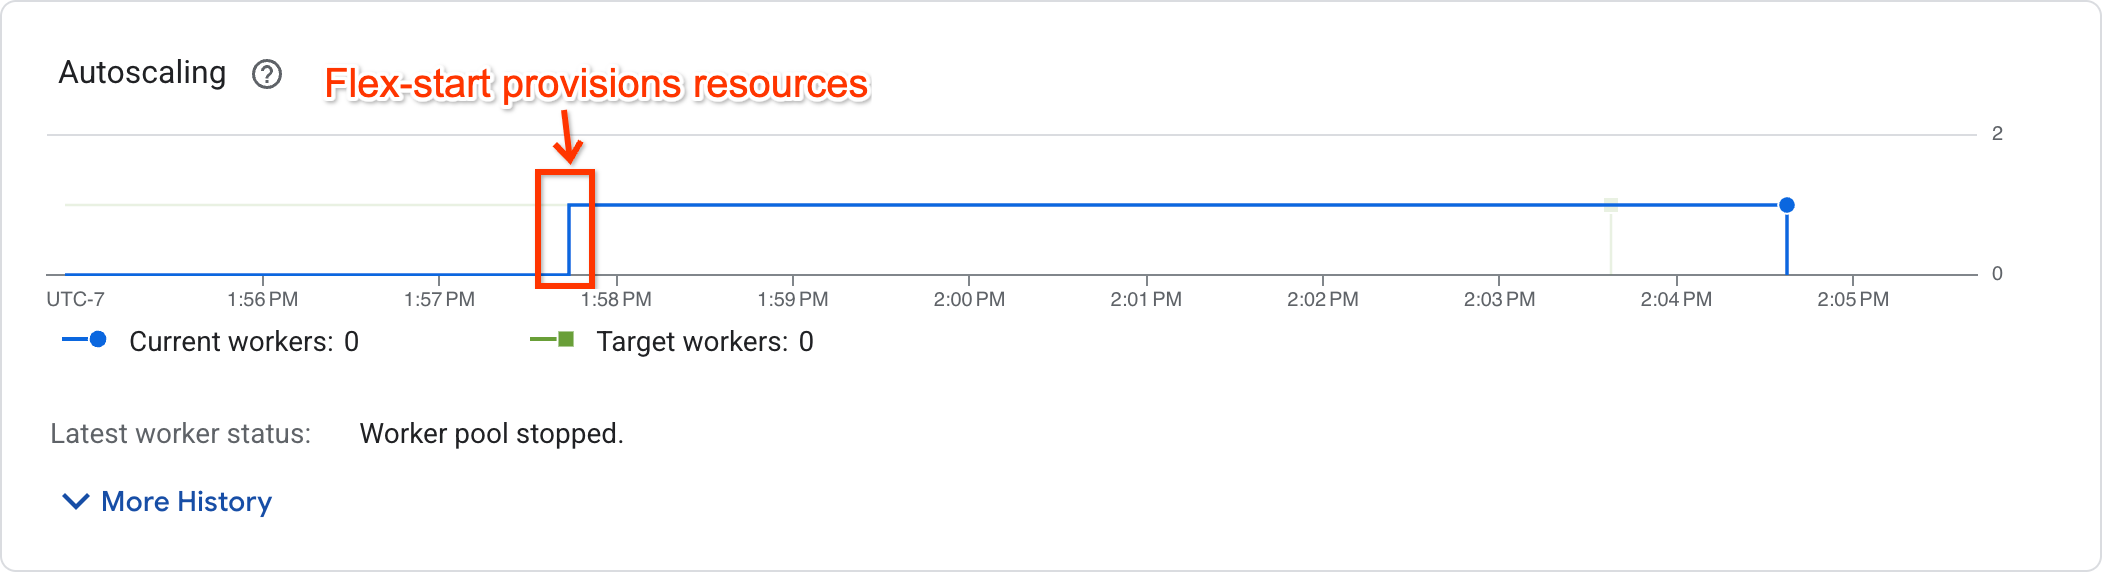
Jobs that have begun execution will show a nonzero worker count whereas jobs that are waiting for resources will have zero worker count.
#### Support and limitations
- Flex-start is supported only on Batch pipelines. Streaming pipelines aren't supported.
- Worker VMs provisioned using the flex-start provisioning model have a maximum runtime of seven days. After this period, Worker VMs with accelerators are preempted. Dataflow will attempt to reprovision resources. If resources can't be reprovisioned, the pipeline will fail.
- Flex-start will attempt to provision resources for up to 1 hour after job submission. If it's unable to provision resources after 1 hour, the job will fail.
- Flex-start consumes the preemptible quota. If your project lacks preemptible quota, then the standard quota is consumed. For more information, see [Preemptible quotas](https://docs.cloud.google.com/compute/resource-usage#preemptible-quotas).
- If a worker zone configuration isn't provided, Dataflow will choose a single zone to create all the resources in based on hardware support, current resource and quota availability, and matching reservations. This zone could be different from the zone where the service resources for the job are located.
- [Horizontal autoscaling](https://docs.cloud.google.com/dataflow/docs/horizontal-autoscaling) isn't supported. To use more than one worker, set the `--num_workers` pipeline option.
- [TPUs](https://docs.cloud.google.com/dataflow/docs/tpu/tpu-support) aren't supported.
- [Right fitting](https://docs.cloud.google.com/dataflow/docs/guides/right-fitting) isn't supported.
### Troubleshooting Flex-start
If your job fails 1 hour after submission with the error:
The Dataflow job appears to be stuck because no worker activity has been seen in the last 1h.
Go to the **Quotas** page in the Google Cloud console to ensure that your project has sufficient `PREEMPTIBLE_GPU_TYPE_GPUS` quota in your job's configured region.
If there was sufficient quota in your project, then flex-start was unable to provision resources in 1 hour. Consider launching the pipeline in a different zone, or with a different accelerator type.
## Use GPUs with Dataflow Prime
[Dataflow Prime](https://docs.cloud.google.com/dataflow/docs/guides/enable-dataflow-prime) lets you
request accelerators for a specific step of your pipeline. To use GPUs with
Dataflow Prime, don't use the `--dataflow-service_options=worker_accelerator`
pipeline option. Instead, request the GPUs with the `accelerator` resource hint.
For more information, see
[Use resource hints](https://docs.cloud.google.com/dataflow/docs/guides/right-fitting#use_resource_hints).
## Troubleshoot your Dataflow job
If you run into problems running your Dataflow job with GPUs, see
[Troubleshoot your Dataflow GPU job](https://docs.cloud.google.com/dataflow/docs/gpu/troubleshoot-gpus).
## What's next
- Learn more about [GPU support on Dataflow](https://docs.cloud.google.com/dataflow/docs/gpu/gpu-support).
- Run your machine learning inference pipeline with the [NVIDIA L4 GPU type](https://docs.cloud.google.com/dataflow/docs/gpu/use-l4-gpus).
- Work through [Processing Landsat satellite images with GPUs](https://docs.cloud.google.com/dataflow/docs/tutorials/satellite-images-gpus).