Drilling is a powerful tool that lets you view more information and context about data in a single chart. Drilling lets you discover new levels of detail about a data point, see other related and contextual information, and take action based on the information you find.
For example, suppose you want to view session data both by country and by city. Rather than viewing two charts in your report, you can reference a single chart that has drill actions enabled.
This document provides an overview of how to use drill actions in charts and includes use cases and examples. For more information about setting up drill actions, view the [Add drill actions to charts](https://docs.cloud.google.com/data-studio/add-drill-actions-to-charts) page.
## Access drill actions on table charts
> [!IMPORTANT]
> **Important:** If any of these drill action options don't appear, they have not been turned on for a chart. You can turn the options on if you have **Edit** access for the chart; otherwise, you will need to ask a user who has this access to turn on these options for you.
>
>
>
> **Drill Through** links are available only for dimensions on [table charts](https://docs.cloud.google.com/data-studio/table-reference).
You can access drill actions in a chart's **Drill Actions** menu. To access the drill actions that are on the **Drill Actions** menu, follow these steps:
1. Hold the pointer over a dimension value in the table chart. For example, a user can hover over the value "California" for a table chart with a state name dimension called **DestStateName**.
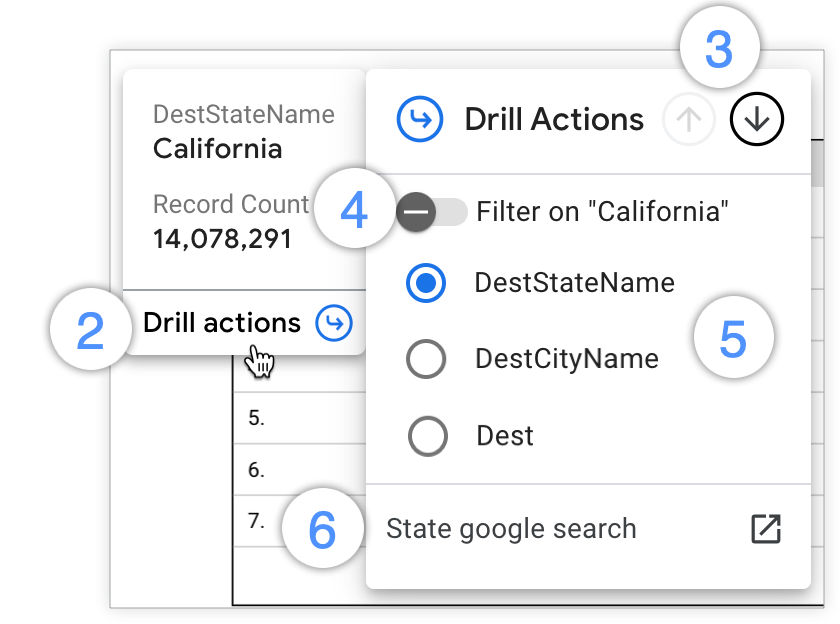
2. Click **Drill actions** on the tooltip to open the **Drill Actions** menu.
Once you open the **Drill Actions** menu, you can drill in several ways:
3. Click the upward-facing **Drill Up** arrow to drill up and the downward-facing **Drill Down** arrow in the **Drill Actions** menu header to change the granularity of the chart's data.
4. Turn on the **Filter on** switch to drill down into a specific value that you want to learn more about.
5. Select the available dimensions that are listed in the **Drill Actions** menu to drill down, drill up, or swap dimensions.
6. Click the links that appear at the bottom of the **Drill Actions** menu to navigate to external related resources.
### Drill down, drill up, and swap dimensions on table charts
You can drill down into a dimension and swap it for a more granular dimension on a table chart. To drill down into your data and swap a dimension with a more granular dimension, follow these steps:
1. View or **[edit your report](https://docs.cloud.google.com/data-studio/edit-a-report).**
2. Choose a table chart that has drill-down capabilities.
3. Hover your cursor over a dimension value in the chart to view the tooltip.
4. Click **Drill actions** at the bottom of the tooltip to open the **Drill Actions** menu.
5. At the top of the **Drill Actions** menu, click the downward-facing **Drill Down** arrow. Alternatively, select a dimension from the **Drill Actions** dimension list.
6. Click outside of the **Drill Actions** menu to save your selection and view the chart results.
7. You can drill back up on a table chart and swap it with a less granular dimension by selecting the upward-facing **Drill Up** arrow at the top of the **Drill Actions** menu. Alternatively, you can select a less granular dimension from the **Drill Actions** dimension list.
To restore the chart to the default (highest) drill down level, you can hover your cursor over the chart and select the **Reset** arrow  in the chart's header. Alternatively, select the **Reset** option from the chart's three-dot **More** menu.This will also reset any filters or manual sorting that you've applied to the chart.
#### Example: Drill down to see all cities
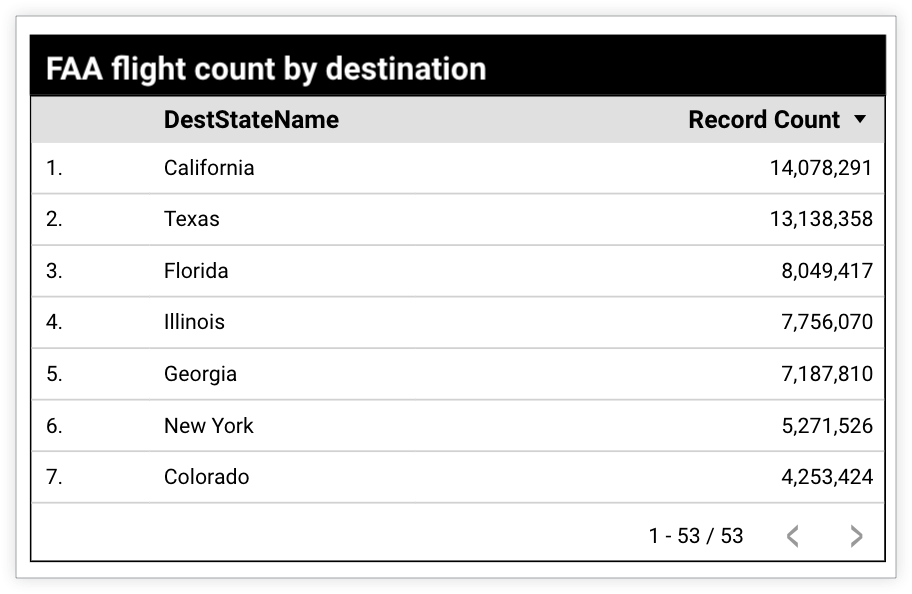
Suppose you have a table chart that displays FAA flight count by destination state. The chart has a drill-down hierarchy that is defined with the **DestStateName** (state), **DestCityName** (city), and **Dest** (airport code) dimensions. A user wants to view the flight **Record Count** broken down by city instead of state. The user can swap the state dimension with city data by drilling down.
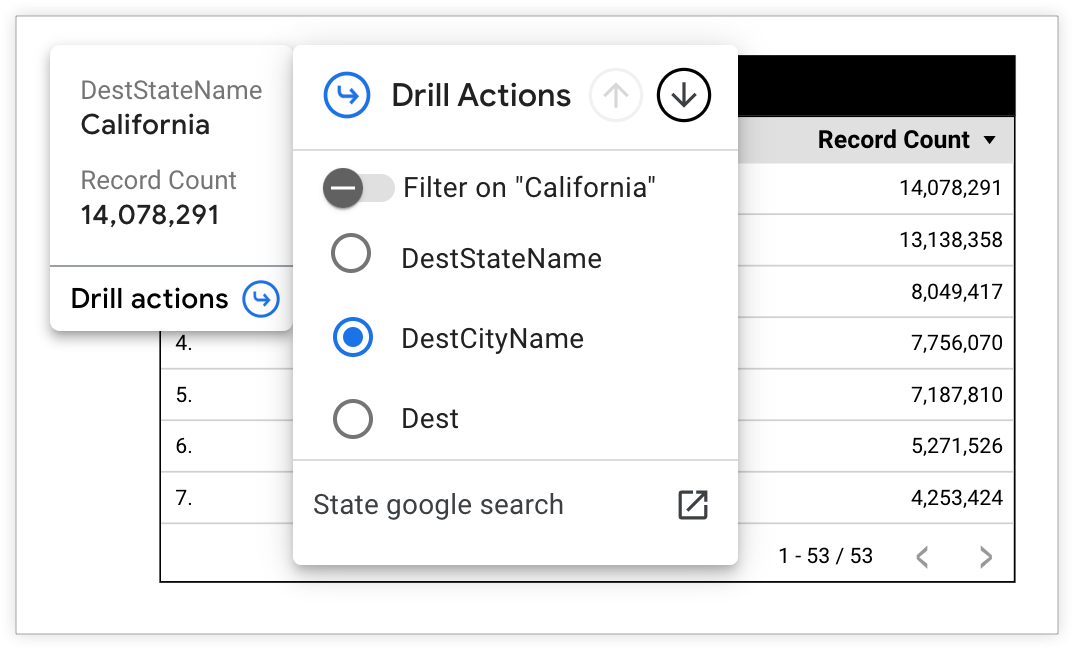
The user hovers their cursor over "California" in the results table to open the **Drill Actions** menu. They select **DestCityName** from the list of drill fields.
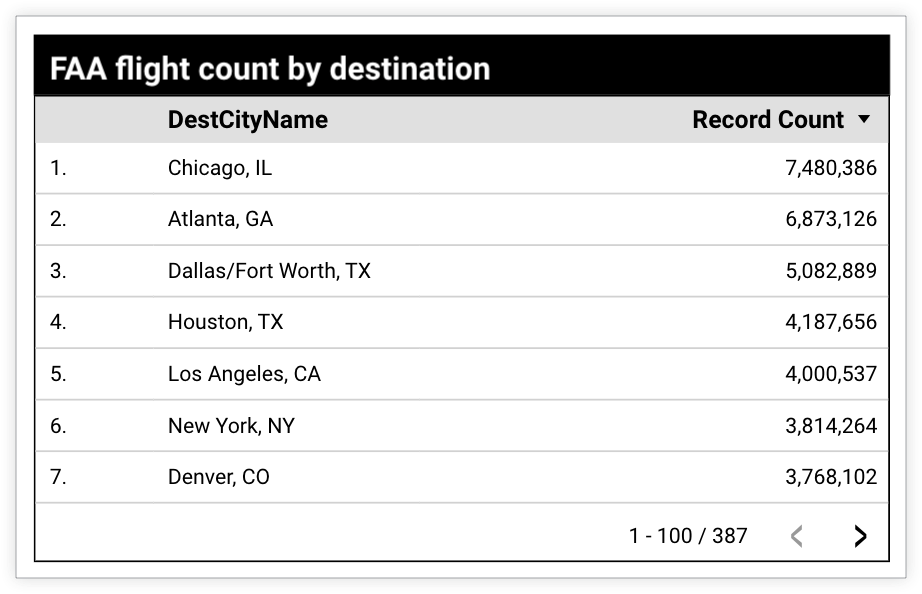
The table chart now displays flight **Record Count** by **DestCityName**, regardless of what state the city is located in.
### Drill down into specific values on table charts
In addition to drilling down or swapping dimensions to view data by more granular dimensions, you can drill into an individual data point to learn more about the value.
To drill down into a selected value in a table chart, follow these steps:
1. View or **[edit your report](https://docs.cloud.google.com/data-studio/edit-a-report).**
2. Choose a table chart that has drill-down capabilities.
3. Hover your cursor over the dimension value that you want to drill into to view the tooltip.
4. Click **Drill actions** at the bottom of the tooltip to open the **Drill Actions** menu.
5. Turn on the **Filter on** switch.
6. Click the downward-facing **Drill Down** arrow at the top of the **Drill Actions** menu. Alternatively, select a dimension from the **Drill Actions** dimension list.
7. Click outside of the **Drill Actions** menu to save your selection and view the chart results.
8. You can drill back up on a table chart by selecting the upward-facing **Drill Up** arrow at the top of the **Drill Actions** menu. Alternatively, you can select a less granular dimension from the **Drill Actions** dimension list.
To restore the chart to the default (highest) drill-down level, you can hold your cursor over the chart and select the **Reset** arrow  in the chart's header. This will also reset any filters or manual sorting that you've applied to the chart.
#### Example: Drill down to see cities in a specific state
Suppose you have a table chart that displays FAA flight count by destination state. The chart has a drill-down hierarchy defined with the **DestStateName** (state), **DestCityName** (city) and **Dest** (airport code) dimensions. A user wants to view the flight **Record Count** broken down by cities that are in the state of California.
The user can view flight **Record Count** for cities in California by drilling down.

The user hovers their cursor over "California" in the results table to open the **Drill Actions** menu. They turn on the **Filter on "California"** switch and then select **DestCityName** from the list of drill fields.
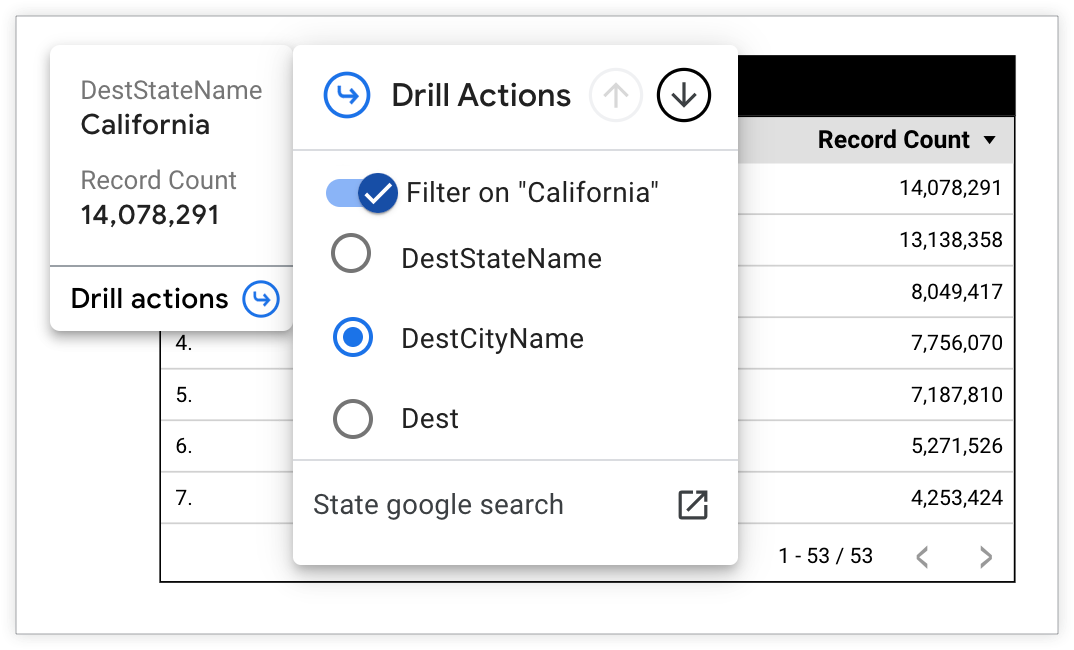
The table chart will display flight **Record Count** by **DestCityName** for cities that are in the state of California.
## Access drill actions on other chart types
> [!IMPORTANT]
> **Important:** If any of these drill action options don't appear, they have not been turned on for a chart. You can turn the options on if you have **Edit** access for the chart; otherwise, you will need to ask a user who has this access to turn on these options for you.
>
>
>
> **Drill Through** links are available only for dimensions on [table charts](https://docs.cloud.google.com/data-studio/table-reference).
You can drill up or drill down on chart types other than table charts by using one of these options:
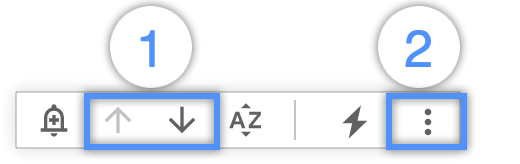
1. The **Drill** **U** **p** and **Drill Down** arrows that appear in a chart's header when you hover your cursor over a chart\\
2. The **Drill Up** or **Drill Down** options in the three-dot **More** menu that appear in a chart's header when you hover your cursor over a chart
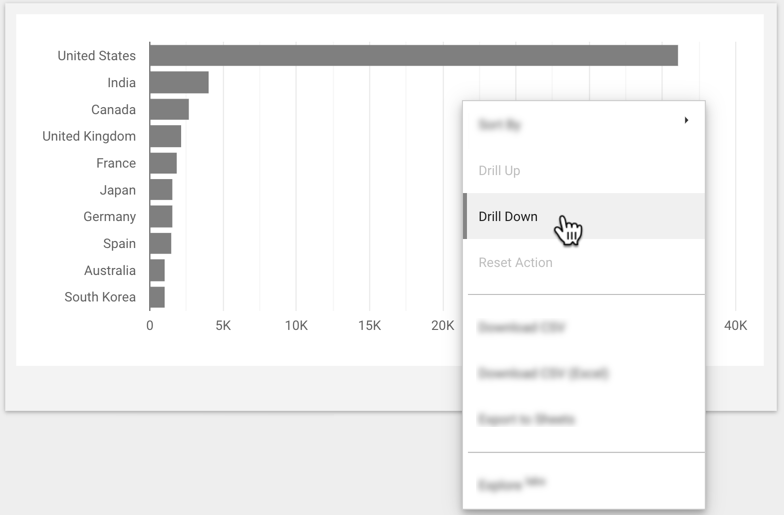
Alternatively, **Drill up** or **Drill down** options are available when a you right-click on a chart.
### Drill down, drill up, and swap dimensions on other chart types
You can drill down into a dimension and swap it for a more granular dimension. To drill down into your data and swap a dimension with a more granular dimension:
1. View or **[edit your report](https://docs.cloud.google.com/data-studio/edit-a-report).**
2. Choose a chart that has drill-down capabilities.
3. Right-click the chart and click **Drill Down** . Alternatively, you can hover your cursor over the chart and either select **Drill Down** from the three-dot **More** menu or click the downward-facing arrow that appears in the chart's header.
4. You can drill back up on a chart by right-clicking the chart and selecting the **Drill Up** option. Alternatively, you can hover your cursor over the chart and either select **Drill Up** from the three-dot **More** menu or click the upward-facing **Drill Up** arrow that appears in the chart's header.
To restore the chart to the default (highest) drill-down level, right-click the chart and then select the **Reset action** option. Alternatively, you can hover your cursor over the chart and select the **Reset** arrow  in the chart's header. This will also reset any filters or manual sorting you've applied to the chart.
> [!IMPORTANT]
> **Important:** The options for **Drill Down** or **Drill Up** will be not be selectable if drilling up or down is not available. For example, if you have drilled up as far in the hierarchy as is defined, you won't be able to select **Drill Up** or the upward-facing **Drill Up** arrow.
#### Example: Drill down to see all cities
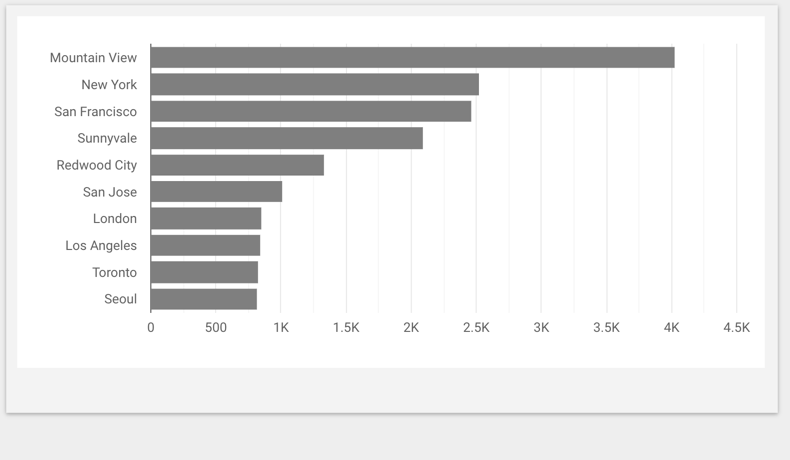
Suppose you have a bar chart that displays **Sessions** by **Country** . The chart has a drill-down hierarchy defined for the **Country** and **City** dimensions. A user wants to view the **Sessions** data broken down by **City** instead of **Country** . The user can swap the **Country** dimension with **City** dimension by drilling down.
The user right-clicks the chart and selects **Drill Down** from the menu options.
The bar chart now displays **Sessions** by **City**, regardless of what country the city is located in.
### Drill down into specific values on other chart types
In addition to drilling down or swapping dimensions to view data by more granular dimensions,, you can drill into an individual data point to learn more about the value.
To drill down into a selected value, follow these steps:
1. View or edit your report.
2. Choose a chart that has drill-down capabilities.
3. Select a value (for example, Canada).
4. Right-click the chart and then click **Drill Down** . Alternatively, you can hover your cursor over the chart and either select **Drill Down** from the three-dot **More** menu or click the downward-facing arrow that appears in the chart's header.
5. You can drill back up on a chart by right-clicking the chart then selecting the **Drill Up** option. Alternatively, you can hover your cursor over the chart and either select **Drill Up** from the three-dot **More** menu or click the upward-facing **Drill Up** arrow that appears in the chart's header.
To restore the chart to the default (highest) drill-down level, right-click the chart and then select the **Reset action** option. Alternatively, you can hover your cursor over the chart and select the **Reset** arrow in the chart's header. This will also reset any filters or manual sorting you've applied to the chart.
> [!IMPORTANT]
> **Important:** The options for **Drill Down** or **Drill Up** will be not be selectable if drilling up or down is not available. For example, if you have drilled up as far in the hierarchy as is defined, you won't be able to select **Drill Up** or the upward-facing **Drill Up** arrow.
#### Example: Drill down to see cities in a specific country
Suppose you have a bar chart that displays **Sessions** by **Country** . The chart has a drill-down hierarchy defined for the **Country** and **City** dimensions. A user wants to view the **Sessions** data broken down by **City** for cities that are located in Canada. The user can view **City** data for Canadian cities by drilling down.
To view data for cities in Canada, the user clicks the value for Canada in the bar chart and then right-clicks the chart to select **Drill Down** from the menu options.
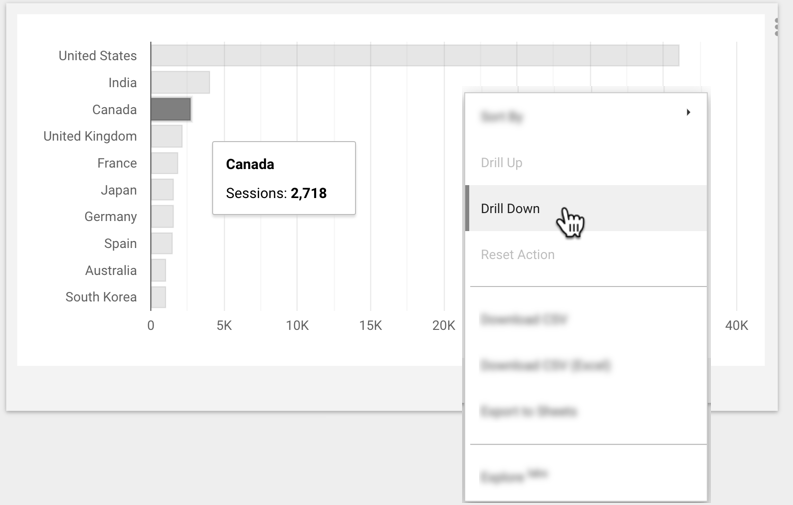
The bar chart will display **Sessions** broken down by **City** for cities that are located in Canada.