The **Group** calculated field type lets you create ad hoc custom groups for dimensions without needing to develop `CASE WHEN` expressions in calculated fields or logic in SQL.
This can be helpful when you want to assign fixed labels or category names to values that match specific conditions, for example, by grouping specific states or countries into regions or order costs into categories.
This page provides an overview of how to perform the following tasks:
- [Create a custom group in your data source](https://docs.cloud.google.com/data-studio/create-a-custom-group#create-a-custom-group-in-your-data-source)
- [Edit a custom group in your data source](https://docs.cloud.google.com/data-studio/create-a-custom-group#edit-a-custom-group-in-your-data-source)
- [Create a chart-specific custom group](https://docs.cloud.google.com/data-studio/create-a-custom-group#create-a-chart-specific-custom-group)
- [Edit a chart-specific custom group](https://docs.cloud.google.com/data-studio/create-a-custom-group#edit-a-chart-specific-custom-group)
- [Reuse a chart-specific custom group](https://docs.cloud.google.com/data-studio/create-a-custom-group#reuse-a-chart-specific-custom-group)
For more information about custom groups, see the [Related resources](https://docs.cloud.google.com/data-studio/create-a-custom-group#related-resources) section on this page and the [Create a custom group](https://docs.cloud.google.com/data-studio/about-calculated-fields) example on the [About calculated fields](https://docs.cloud.google.com/data-studio/about-calculated-fields) page.
## Create a custom group in your data source
> You must have edit rights to the data source to create and edit calculated fields.
Custom groups that are created in data sources are available in any report that uses that data source. To create a custom group in a data source, follow these steps:
1. [Edit the data source](https://docs.cloud.google.com/data-studio/edit-a-data-source).
2. Click  **ADD A FIELD**.
3. Select **Add group.**
4. From the **Selected field to group by** drop-down menu, select an existing field to group by.
5. Specify a name in the **New field name** field.
- This name is the default name that appears in your reports. You can change this name for individual charts by editing the name in the dimension picker.
- The field name must be unique.
- You can't use a reserved keyword as the field name.
6. Edit the default ID that is provided in the **New field ID** field, as desired. This ID is used by Data Studio to identify a field as an alternative to the field name.
7. Define the criteria for each group.
- In the **Group Name** field, specify a label for the first group of values.
- Select **Include** or **Exclude** from the **Include or Exclude** drop-down menu. This option specifies whether the group will include or exclude the condition criteria that you create in the next step.
- Select a condition from the **Condition** drop-down menu.
- Specify the values for the condition in the **Group values** field.
> If you select the `IN` function, press the **Enter** key (PC) or **Return** key (Mac) to input each value.
- To add more groups for that dimension, click the **Add group** button, and repeat the previous steps to set the group condition.
> [!IMPORTANT]
> **Important:** A maximum of 195 total groups can be created for each **Group** calculated field.
- Optionally, select the **Group remaining values** **as a new group** checkbox to create a category for grouping all other values that do not satisfy any group conditions.
In the **Group name for remaining values** field, specify a label.
8. Click **Save**.
### Create a custom bin in your data source from a report
Alternatively, you can create a custom group in your data source from a report by following these steps:
1. Create or [edit your report](https://docs.cloud.google.com/data-studio/edit-a-report).
2. Click  **Add Data** in the **Data** panel.
3. Select **Add group**.
4. From the **Selected field to group by** drop-down menu, select an existing field to group by.
5. Specify a name in the **New field name** field.
- This name is the default name that appears in your reports. You can change this name for individual charts by editing the name in the dimension picker.
- The field name must be unique.
- You can't use a reserved keyword as the field name.
6. Edit the default ID that is provided in the **New field ID** field, as desired. This ID is used by Data Studio to identify a field as an alternative to the field name.
7. Define the criteria for each group.
- In the **Group Name** field, specify a label for the first group of values.
- Select **Include** or **Exclude** from the **Include or Exclude** drop-down menu. This specifies whether the group will include or exclude the condition criteria that you create in the next step.
- Select a condition from the **Condition** drop-down menu.
- Specify the values for the condition in the **Group values** field.
> If you select the `IN` function, press the **Enter** key (PC) or **Return** key (Mac) to input each value.
- To add more groups for that dimension, click the **Add group** button, and repeat the previous steps to set the group condition.
> [!IMPORTANT]
> **Important:** A maximum of 195 total groups can be created for each **Group** calculated field.
- Optionally, select the **Group remaining values** **as a new group** checkbox to create a category for grouping all other values that do not satisfy any group conditions.
In the **Group name for remaining values** field, specify a label.
8. Click **Save**.
> Learn more about [what you can do with calculated fields](https://docs.cloud.google.com/data-studio/about-calculated-fields) and the difference between calculated fields that are [created in a data source versus chart-specific calculated fields](https://docs.cloud.google.com/data-studio/about-calculated-fields).
See the [Create a custom group](https://docs.cloud.google.com/data-studio/about-calculated-fields) example on the [About calculated fields](https://docs.cloud.google.com/data-studio/about-calculated-fields) page.
## Edit a custom group in your data source
> You must have edit rights to the data source to create and edit calculated fields.
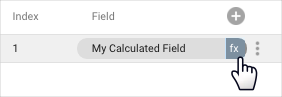
Custom groups and calculated fields appear in the data source with an **fx** symbol. To edit the formula, click **fx** next to the field name. This action opens the formula editor, where you can adjust the field as needed.
## Create a chart-specific custom group
> [Field Editing in Reports](https://docs.cloud.google.com/data-studio/edit-fields-in-your-reports) must be enabled in the data source.
>
> You must have edit rights to the report to create and edit calculated fields.
>
> You can't reference other chart-specific calculated fields.
Chart-specific custom groups exist only in the chart in which you create them.
To create a chart-specific custom group, follow these steps:
1. Create or [edit your report](https://docs.cloud.google.com/data-studio/edit-a-report).
2. [Add a new chart](https://docs.cloud.google.com/data-studio/add-charts-and-controls-to-your-report) or select an existing chart.
3. In the **Setup** tab of the **Properties** panel, click **+ Add dimension**.
4. At the bottom of the field list, click **+** **ADD GROUP**.
5. From the **Selected field to group by** drop-down menu, select an existing field to group by.
6. Specify a name in the **New field name** field.
- This name is the default name that appears in your reports. You can change this name for individual charts by editing the name in the dimension picker.
- The field name must be unique.
- You can't use a reserved keyword as the field name.
7. Define the criteria for each group.
- In the **Group Name** field, specify a label for the first group of values.
- Select **Include** or **Exclude** from the **Include or Exclude** drop-down menu. This specifies whether the group will include or exclude the condition criteria that you create in the next step.
- Select a condition from the **Condition** drop-down menu.
- Specify the values for the condition in the **Group values** field.
> If you select the `IN` function, press the **Enter** key (PC) or **Return** key (Mac) to input each value.
- To add more groups for that dimension, click the **Add group** button, and repeat the previous steps to set the group condition.
> [!IMPORTANT]
> **Important:** A maximum of 195 total groups can be created for each **Group** calculated field.
- Optionally, select the **Group remaining values** **as a new group** checkbox to create a category for grouping all other values that do not satisfy any group conditions.
In the **Group name for remaining values** field, specify a label.
8. Click **Save**.
> Learn more about [what you can do with calculated fields](https://docs.cloud.google.com/data-studio/about-calculated-fields) and the difference between calculated fields that are [created in a data source versus chart-specific calculated fields](https://docs.cloud.google.com/data-studio/about-calculated-fields).
## Edit a chart-specific custom group
> You must have edit rights to the report to create and edit calculated fields.
Chart-specific calculated fields appear in the chart **Properties** panel on the **Setup** tab.
When you hover your cursor over the field type next to the field name, an **fx** symbol will appear. To edit the formula, click **fx.** This brings up the formula editor, where you can adjust the field as needed.
## Reuse a chart-specific custom group
Chart-specific calculated fields exist only in the chart in which you create them. You can't directly reuse a chart-specific calculated field nor reference it in other calculated fields.
However, you can copy a chart that contains chart-specific calculated fields. The copy will contain any calculated fields that were defined in the original. You can then edit the fields as needed in the new chart.
## Related resources
- [About calculated fields](https://docs.cloud.google.com/data-studio/about-calculated-fields)
- [Create a custom group example](https://docs.cloud.google.com/data-studio/about-calculated-fields)
- [Add, edit, and troubleshoot calculated fields](https://docs.cloud.google.com/data-studio/add-edit-and-troubleshoot-calculated-fields)
- [Edit fields](https://docs.cloud.google.com/data-studio/edit-fields-in-your-reports)