# Use Salesforce batch source plugin to analyze leads data in BigQuery
Learn how to use the Salesforce batch source plugin in Cloud Data Fusion
to analyze leads data in BigQuery.
*** ** * ** ***
To follow step-by-step guidance for this task directly in the
Google Cloud console, click **Guide me**:
[Guide me](https://console.cloud.google.com/freetrial?redirectPath=/?walkthrough_id%3Ddata-fusion--connect-salesforce-to-bq)
*** ** * ** ***
## Scenario
Consider a marketing manager planning a highly targeted Email
marketing campaign to promote a new product. You have a list of leads in
Salesforce Sales Cloud. Before creating a targeted campaign, to understand your
target audience better, you want to use the Salesforce batch source plugin
in Cloud Data Fusion to extract specific leads data.
## Before you begin
1.
Enable the Cloud Data Fusion, BigQuery, Cloud Storage, and Dataproc APIs, if any are not already enabled.
**Roles required to enable APIs**
To enable APIs, you need the `serviceusage.services.enable` permission. If you
created the project, then you likely already have this permission through the
Owner role (`roles/owner`). Otherwise, you can get this permission through the
Service Usage Admin role (`roles/serviceusage.serviceUsageAdmin`).
[Learn how to grant roles](https://docs.cloud.google.com/iam/docs/granting-changing-revoking-access).
[Enable the APIs](https://console.cloud.google.com/apis/enableflow?apiid=datafusion.googleapis.com,bigquery.googleapis.com,storage.googleapis.com,dataproc.googleapis.com)
2. [Create a Cloud Data Fusion instance](https://docs.cloud.google.com/data-fusion/docs/how-to/create-instance).
3. Configure a connection to the Salesforce API by [creating a Salesforce
Connected App for Cloud Data Fusion](https://docs.cloud.google.com/data-fusion/docs/how-to/create-salesforce-app-for-plugin).
## Manage permissions
Create and assign the required custom roles and permissions.
### Create a custom role and add permissions
1. In the Google Cloud console, go to the **Roles** page:
[Go to Roles](https://console.cloud.google.com/iam-admin/roles)
2. Click **Create role**.
3. In the **Title** field, enter `Custom Role-Tutorial`.
4. Click **Add permissions**.
5. In the **Add permissions** window, select the following permissions and click
**Add**:
- `bigquery.datasets.create`
- `bigquery.jobs.create`
- `storage.buckets.create`
6. Click **Create**.
### Assign custom role to the default Compute Engine service account
1. Go to the Cloud Data Fusion **Instances** page:
[Go to instances](https://console.cloud.google.com/data-fusion)
2. Click the name of your instance.
3. Make a note of the default Compute Engine service account. The instance
details page contains this information.
The format of the Cloud Data Fusion default Compute Engine service
account name is
`CUSTOMER_PROJECT_NUMBER-compute@developer.gserviceaccount.com`.
4. Go to the **IAM** page:
[Go to IAM](https://console.cloud.google.com/iam-admin/iam)
5. In the **Filer** bar, enter the name of your default Compute Engine service
account.
6. For your default Compute Engine service account, click
**Edit**.
7. Click **Add another role**.
8. In the **Select a role** field, select **Custom Role-Tutorial**.
9. Click **Save**.
## Configure the Cloud Data Fusion Salesforce batch source plugin
1. Go to the Cloud Data Fusion **Instances** page:
[Go to instances](https://console.cloud.google.com/data-fusion)
2. For your instance, click **View instance**. The Cloud Data Fusion web interface
opens.
3. Go to the **Studio** page.
4. Click **Hub**.
5. In the search bar, enter `Salesforce`.
6. Click **Salesforce plugins** and then click **Deploy**.
7. In the **Salesforce plugins deploy** window, click **Finish**.
When the deployment completes, a dialog is displayed with success message.
8. In that dialog, click **Create a pipeline**.
The Cloud Data Fusion Studio page is displayed.
9. Select **Data pipeline - batch** as the type of your
data pipeline.
10. In the **Source** menu, and click **Salesforce**.
11. Go to the **Salesforce** node and click
**Properties**. This opens the Salesforce plugin properties page.
12. In the **Reference name** field, enter a name for your source. For
example, `Leads_generated`.
13. In the **Connection** section, click the **Use connection** toggle.
14. Click **Browse connections** . The **Browse connections** window opens.
15. Click **Add connection** and select **Salesforce**.
16. In the **Create a Salesforce connection** window, click the **Configuration**
tab and do the following:
1. In the **Name** field, enter a name to identify your connection---for
example, `Salesforce_connection`.
2. In the **Credentials** section, enter the following details of your
Salesforce account:
- **User name**
- **Password**
- **Consumer key**
- **Consumer secret**
- **Security token**
3. Click **Test connection**. If the entered details are correct, the test
succeeds with a message "Successfully connected".
4. Click **Create**.
5. Select **Salesforce_connection** and go back to Salesforce plugin
properties page.
## Extract data from the Salesforce batch source plugin
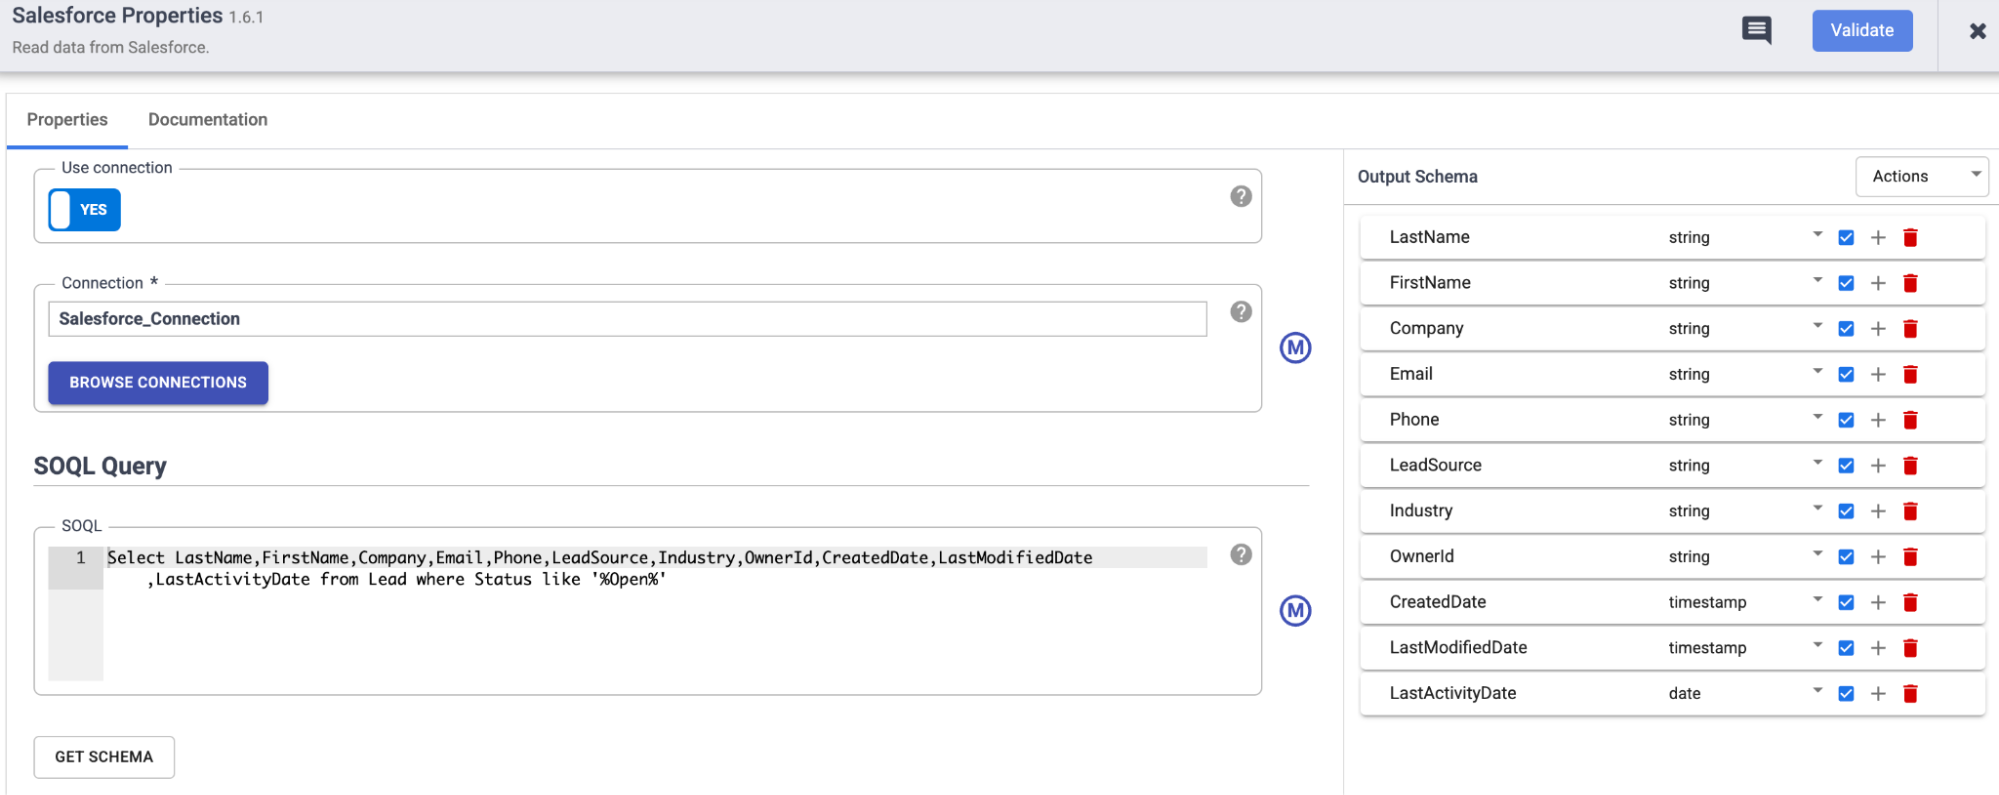
1. On the Salesforce plugin properties page, in the **SOQL query** section,
enter the following query:
Select LastName,FirstName,Company,Email,Phone,LeadSource,Industry,OwnerId,CreatedDate,LastModifiedDate,LastActivityDate from Lead where Status like '%Open%'
This query fetches the details of a potential lead required to run a campaign
from the sObject `Lead`.
> [!IMPORTANT]
> **Important:** Follow your organization policies on handling private data within the fields extracted earlier. For more information on redacting private data in Cloud Data Fusion pipelines, see [Redacting confidential data](https://docs.cloud.google.com/data-fusion/docs/tutorials/redacting-confidential-data).
2. To determine the validity of the object schema, click **Get schema**.
3. To filter the records for a specific date or time for running the campaign,
use the following fields:
- **Last modified after**
- **Last modified before**
- **Duration**
- **Offset**
## Transform data using Wrangler plugin
Use the Wrangler plugin in Cloud Data Fusion to clean and enrich your data:
1. Go back to the **Studio** page.
2. In the **Transform** menu, and click **Wrangler**.
3. Connect the Wrangler to the Salesforce batch source plugin.
4. Go to the **Wrangler** plugin, and click **Properties**.
This opens the Wrangler plugin properties page.
5. Ensure that the **Input schema** is populated.
6. Click **Wrangle**.
7. In the **Connections** pane, select a valid connection.
8. Select the sObject you want to transform---for example, `Lead`.
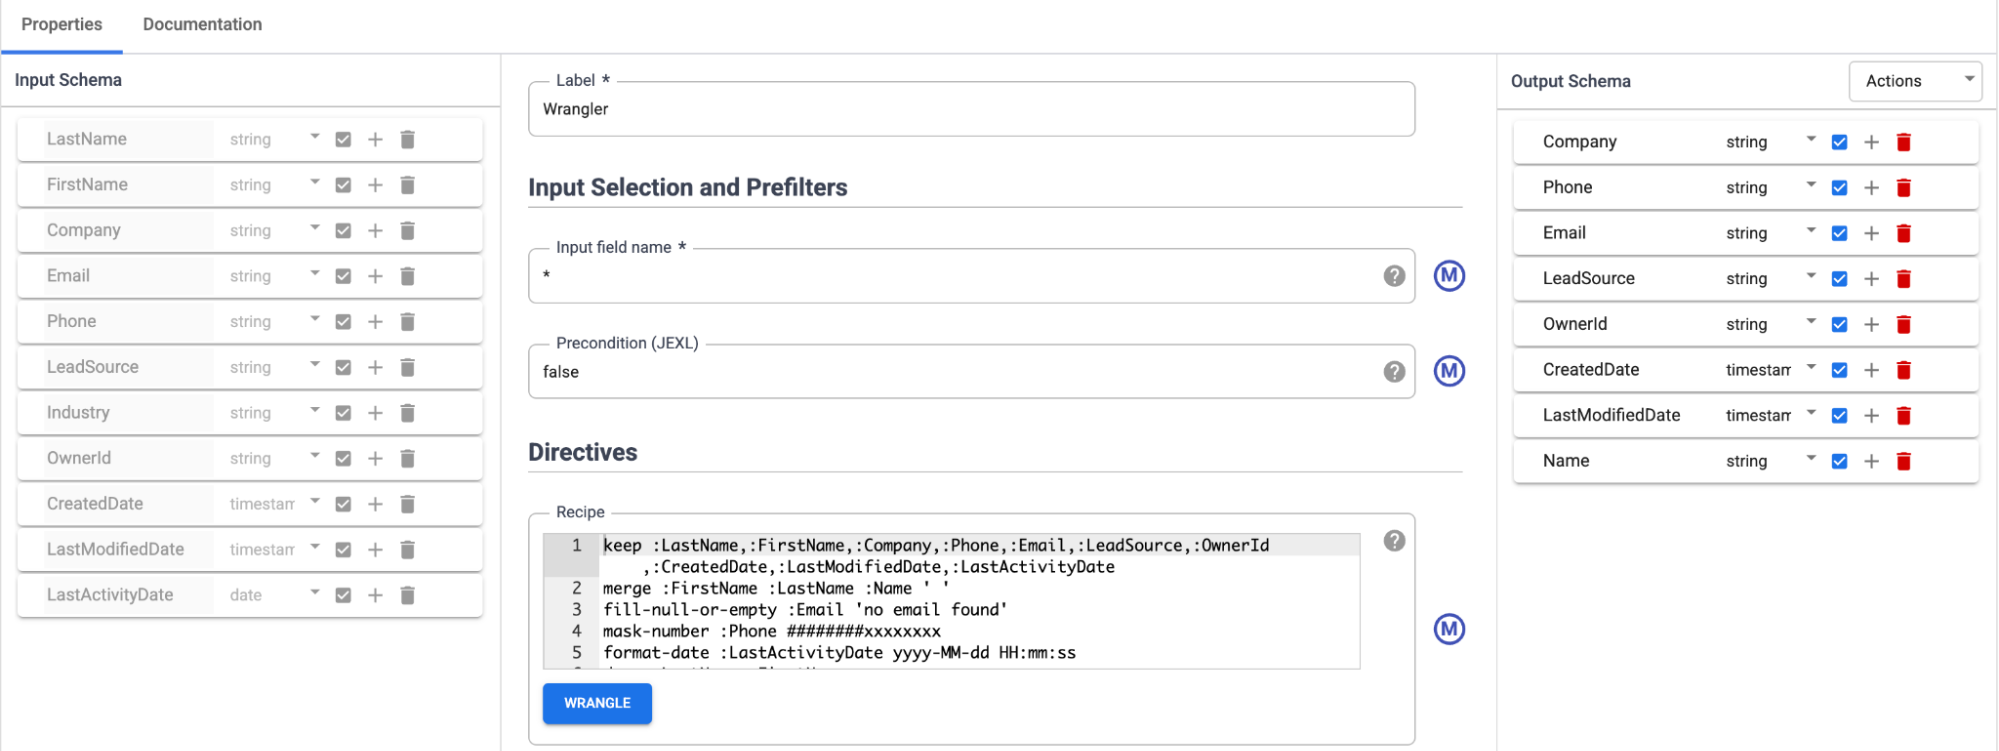
9. Transform the data with the required directives:
keep :LastName,:FirstName,:Company,:Phone,:Email,:LeadSource,:OwnerId,
:CreatedDate,:LastModifiedDate,:LastActivityDatemerge :FirstName :LastName :Name ' '
fill-null-or-empty :Email 'no email found'
mask-number :Phone ########xxxxxxxx
format-date :LastActivityDate yyyy-MM-dd HH:mm:ss
drop :LastName,:FirstName
## Load data into BigQuery
1. Go back to the **Studio** page.
2. In the **Sink** menu, and click **BigQuery**.
3. Go to the **BigQuery** node, and click **Properties**.
This opens the BigQuery plugin properties page.
4. In the **Basic** section, in the **Reference name** field, enter a name
to identify this sink. For example, `Leads_generated`.
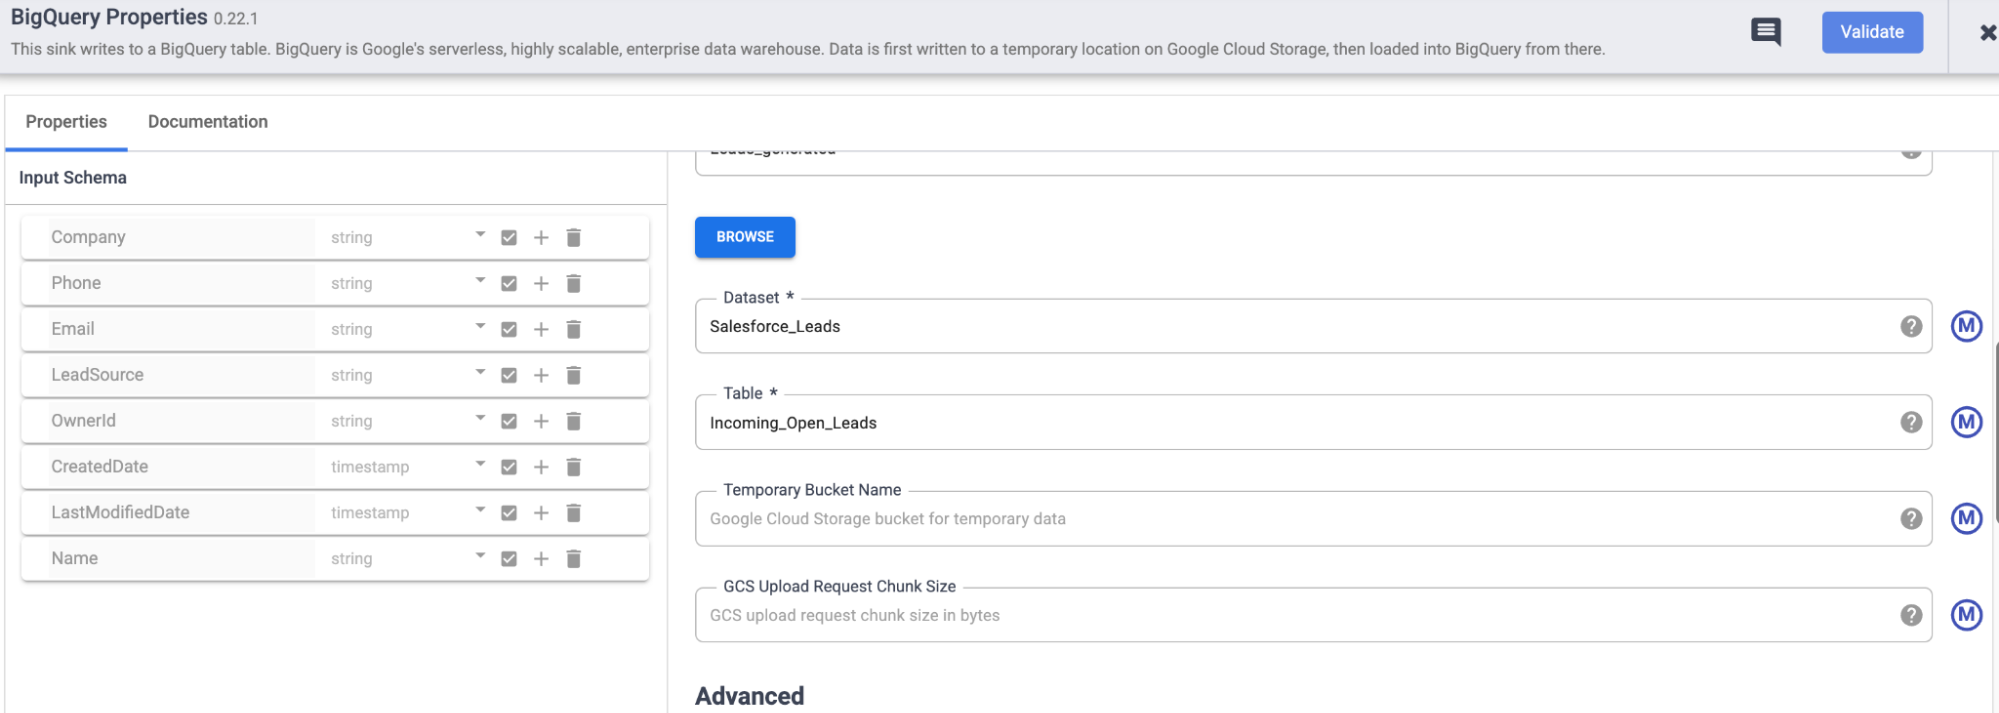
5. In the **Dataset** field, enter the dataset the table belongs to. For
example, `Salesforce_Leads`.
6. In the **Table** field, enter the table in which the extracted records need
to be stored. For example, `Incoming_Open_Leads`.
7. To validate the plugin, click **Validate**.
## Deploy, schedule, and run the pipeline
1. To deploy the pipeline, click **Deploy**.
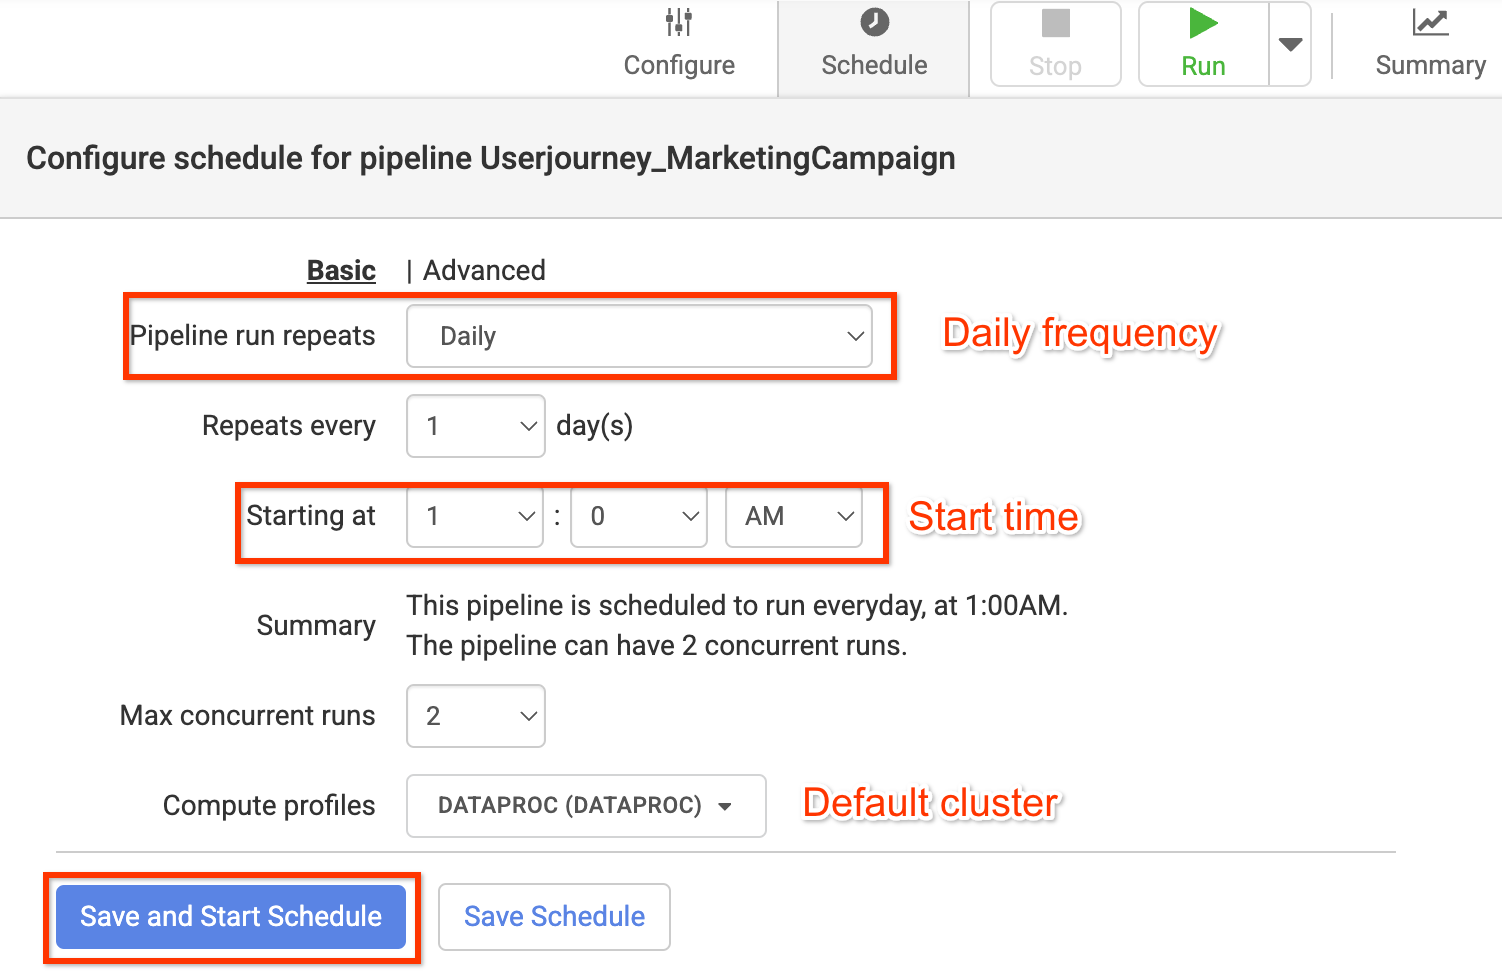
2. To set up an appropriate refresh schedule using schedulers, follow these steps:
1. Click **Schedule**.
2. Enter the following details:
- **Pipeline run repeats**
- **Repeats every**
- **Starting at**
- **Max concurrent runs**
- **Compute profiles**
3. Click **Save and start schedule**.
> [!NOTE]
> **Note:** By default, a full refresh for data extensions occurs once every 24 hours. In a setup, the `hourly` schedule frequency refers to how often the Salesforce batch source plugin looks for incremental data from Salesforce Sales Cloud.
3. To run the pipeline, click **Run**.
## Verify the data extraction and ingestion
1. In the Google Cloud console, go to the **BigQuery** page:
[Go to BigQuery](https://console.cloud.google.com/bigquery)
2. Search for the dataset `Salesforce_Leads` and the table name
`Incoming_Open_Leads` to view the extracted records.
3. To run the query, click **Query**.
Analyse the leads data to understand your audience better and to deliver
tailored campaigns at scale.
## Clean up
To avoid incurring charges to your Google Cloud account for
the resources used on this page, follow these steps.
### Delete the Cloud Data Fusion instance
Follow these instructions to
[delete your Cloud Data Fusion instance](https://docs.cloud.google.com/data-fusion/docs/how-to/delete-instance).
### Delete the project
The easiest way to eliminate billing is to delete the project that you
created for the tutorial.
To delete the project:
> [!CAUTION]
> **Caution** : Deleting a project has the following effects:
>
> - **Everything in the project is deleted.** If you used an existing project for the tasks in this document, when you delete it, you also delete any other work you've done in the project.
> - **Custom project IDs are lost.** When you created this project, you might have created a custom project ID that you want to use in the future. To preserve the URLs that use the project ID, such as an `appspot.com` URL, delete selected resources inside the project instead of deleting the whole project.
>
>
> If you plan to explore multiple architectures, tutorials, or quickstarts, reusing projects
> can help you avoid exceeding project quota limits.
1. In the Google Cloud console, go to the **Manage resources** page.
[Go to Manage resources](https://console.cloud.google.com/iam-admin/projects)
2. In the project list, select the project that you want to delete, and then click **Delete**.
3. In the dialog, type the project ID, and then click **Shut down** to delete the project.
## What's next
- [Explore the Cloud Data Fusion plugins](https://docs.cloud.google.com/data-fusion/plugins).