This section describes how to configure SSO using OneLogin for
use enterprise-wide OneLogin credentials to sign into Contact Center AI Platform (CCAI Platform) and the
agent adapter. OneLogin SSO uses the Security Assertion Markup Language (SAML)
authentication protocol.
## Before you begin
To configure SSO using OneLogin, be sure you have the following:
- A OneLogin account
- An SSO URL
- An entity ID
- An email mapping field, usually Name ID
- A SAML certificate (in Base64)
- CCAI Platform administrator credentials
## Configure OneLogin for SSO
To configure OneLogin, follow these steps:
- In the CCAI Platform portal, invite a user and ensure the user is also
invited to the OneLogin app with the same email address.
- Ensure you have a OneLogin Admin account:
[](https://www.onelogin.com/)
- Create a SAML application for CCAI Platform, but first ensure you are in the
administration portal by clicking **Administration**.
1. Click **Applications \> Applications**.
2. Click **Add App**.
3. Search for *saml*.
4. Select the **SAML Custom Connector (Advanced)**, or another SAML app
you want to use.
5. Click **Configuration**.
6. Set end points.
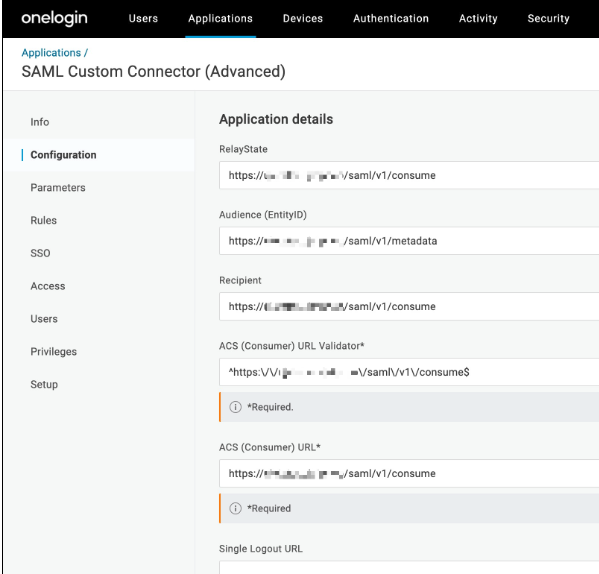
7. Click **Save**.
8. Open the **SSO** page from the menu.
9. Select the preferred **SAML Signature Algorithm**.
10. Copy the Issuer URL and the SAML 2.0 Endpoint (HTTP) in OneLogin and
save for later use.
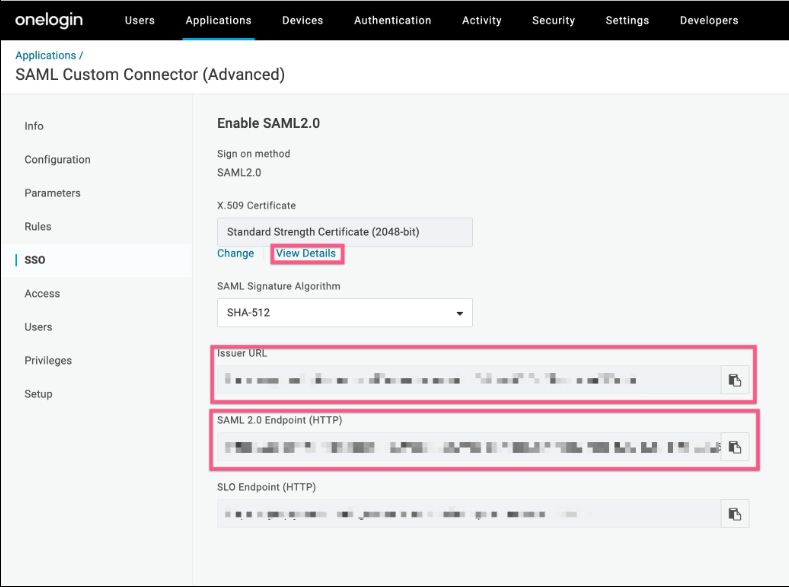
11. Click **View details**.
12. Copy the X.509 Certificate and save for later use.
13. Navigate to **User \> Users**.
14. Select a user.
> [!NOTE]
> **Note:** The user's email address must exist in the CCAI Platform portal user's list.
15. Click **Applications**.
16. Click the **+** icon to add the **SAML Custom Connector (Advanced)**
application.
## Configure your CCAI Platform instance for SSO
To configure SSO for your CCAI Platform instance, follow these steps:
1. In the Google Cloud console, go to the project selector dashboard and select the project that contains your instance.
[Project selector dashboard](https://console.cloud.google.com/projectselector2/home/dashboard)
2. In the navigation menu, click **CCAI Platform** .
[CCAI Platform instances](https://console.cloud.google.com/contact-center-ai-platform)
The **CCAI Platform instances** page displays.
3. In the **Name** column, click the instance that you want to configure SSO for.
4. On the **CCAI Platform instance Detail** page, click **Edit**.
5. For the login method, select **SAML**.
6. In the **Single sign-on URL** field, enter your SSO URL.
7. In the **Entity ID** field, enter your entity ID.
8. In the **Email field mapping** field, enter a text string such as `Email name` or `Name ID`. This is used as a label for the email name field on the SSO sign-in page.
9. In the **Authentication contexts** field, select the authentication context that you want. If your IdP configuration doesn't require the authentication context to be specified, then leave this field empty. For more information, see [Authentication context](https://docs.cloud.google.com/contact-center/ccai-platform/docs/authentication-context).
10. In the **Certificate** field, enter your SAML certificate. Be sure to include `---BEGIN CERTIFICATE---` and `---END CERTIFICATE---` from the certificate.
11. Click **Save**.
## Verify SSO authentication
To verify SSO authentication, follow these steps:
1. Go to the agent adapter in your customer relationship management (CRM)
application.
2. Click **Login with company SSO**. A sign-in page displays.
3. Sign in with your OneLogin credentials.