This guide walks you through the initial setup to connect your Contact Center AI Platform
and MS Dynamics platforms.
Once integrated, your agents can log into Contact Center AI Platform and accept calls and
chats directly within their Dynamics dashboard. As interactions happen, Dynamics
automatically creates and logs new customers and cases, keeping all your
interaction data searchable and reportable in one place.
## Prerequisites
Before starting this integration, make sure you have the following:
- Administrator access to your MS Dynamics environment with privileges to import connectors in Solutions Management.
- Access to the Microsoft Azure Portal (for Microsoft Entra ID app registration using Azure services).
- Access to the Power Apps interface.
- Access to the Contact Center AI Platform Admin Portal.
- The UJET Connector zip file --- The latest managed package [`UJETConnector_1_2_0_0_managed-dynamics.zip`](https://s3.us-west-2.amazonaws.com/externals.ujet.co/packages/UJETConnector_1_2_0_0_managed-dynamics.zip)
- A sufficient time window for agent adapter downtime during installation (approximately 10 minutes).
> [!NOTE]
> **Estimated time:** The full integration setup takes approximately 30--45 minutes to complete.
This page assumes you have already identified your environment, or set up a new
environment for this portal space.
The connector installed to Microsoft Dynamics allows agents to take calls and
chats directly within a Dynamics dashboard.
## Microsoft Dynamics integration checklist
The following checklist outlines the steps involved in setting up your Microsoft
Dynamics integration.
1. Install the CCAI Platform solution into your environment.
2. Configure the CCAI Platform solution `IFrameUrl`.
3. Check domain based controls.
4. Create New Azure app registration
1. Add a platform configuration.
2. Configure API permissions
3. Create new certificates and secrets.
5. Set up application users for this environment
6. Set values in the administrator portal to connect to your Microsoft Dynamics
instance.
7. Proceed to optional steps.
## Install or update the Connector
The Contact Center AI Platform-managed package contains the connector. The connector
installed to Microsoft Dynamics enables agents to take calls and chats directly
in a Microsoft Dynamics dashboard.
**Two ways to access Solutions Management**: Depending on your Dynamics UI, you can
reach Solutions through either of these paths:
- Legacy UI: In MS Dynamics, go to **Service** \> **Solutions**.
- Modern Power Apps UI: Use the top-right cogwheel to navigate to **Advanced
Settings** , click the caret next to **Settings** to open the
drop-down, then select **Solutions**.
Both paths lead to the same Solutions Management list. Use whichever is
available in your environment.
1. Navigate to **Solutions** using one of the paths described.
2. Click **Import**. A side panel (Add a Solution) will appear.
3. Click **Browse** and select the Connector zip file (`UJETConnector_1_2_0_0_managed-dynamics.zip`).
4. Click **Import**. The details of the connector package should now appear. If
the details appear correctly, proceed to the next step. If not, recheck
that the correct file was selected.
5. Click **Next**. Follow the on-screen steps to finish importing. No specific
options are required for upgrading the Connector.
> [!NOTE]
> **Note:** Installation takes 5--10 minutes. The Connector won't be stable during this time.
6. Once finished, refresh the agent page to confirm the updated connector is
displayed.
7. Locate the Connector entry in the Solutions list and confirm it is installed
correctly. This can be verified from the UJET Connector
Settings Manager (see the next section).
**Result**: The connector is installed and ready for use.
## Configure the Connector URL
Package 1.2.0.0 introduces a configuration manager application into the
Contact Center AI Platform solution. After installing package v1_2_0_0, the new
application is accessible to the integrator system builder.
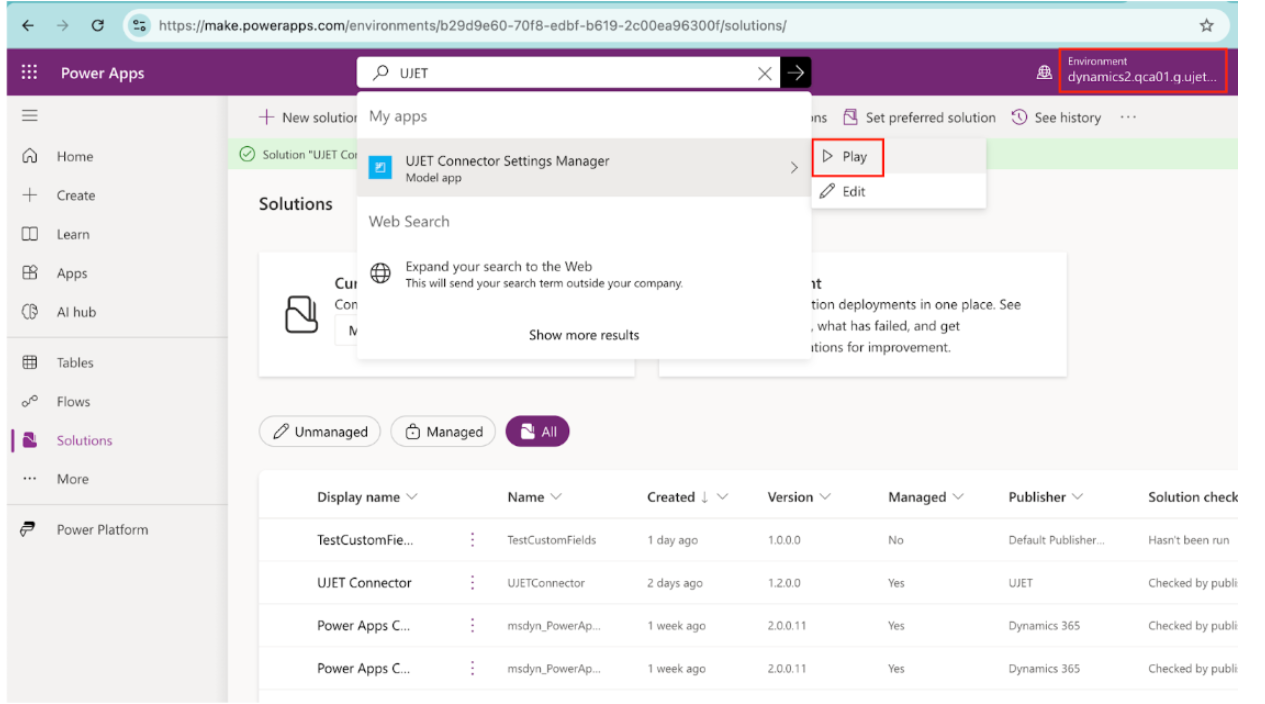
1. In the search bar, find the **UJET Connector Settings
Manager** , and then click **Play**. This will open the application and
display the UJET Connector Settings table, which houses the
configuration for the iframed adapter.
2. For new installations, a new entry needs to be added to the settings table.
Click **New** to add a new `IFrameUrl` setting.

3. A new page opens to add an IFrameUrl. There are two fields present:
**Name** and **Value**. Use the next sample values to help with configuration.
> [!IMPORTANT]
> **Important:** The **Name** field must be exactly `IFrameUrl`. If this value is incorrect, the adapter won't be configured correctly.
1. **Name** : `IFrameUrl`
2. **Value** :
https://INSTANCE_SUBDOMAIN.ENVIRONMENT_DOMAIN
For example: `https://mycompany.us.ccaiplatform.com` - where `mycompany` is your
instance subdomain and `us.ccaiplatform.com` is your environment domain.
4. Click **Save** . A new entry appears in your **Settings** table. The
`IFrameUrl` configuration is now complete.
## Add domain-based access control for the agent adapter
Domain-based access control maintains security while also allowing you to define
and control which domains can display the agent adapter.
> [!WARNING]
> - Domain-based access control lets you define and control which domains can display the Agent Adapter. This is a crucial implementation step.
> - Be sure to add all necessary domains in the developer settings as per the guidelines provided. Failure to do so may result in the adapter breaking.
> - Adding domains in the Developer Settings may cause a temporary disruption in the adapter's functionality. For this reason, Google recommends performing this task during a time when call volume is low or during a scheduled maintenance window.
> - If you have any questions or need assistance with implementation, contact Support.
### Add your domains in developer settings
> [!NOTE]
> **Note:** Once added it can take up to a minute for changes to the list of domains to take effect.
To add domains in developer settings, follow these steps:
1. Go to **Developer Settings** \> **Agent Adapter - Domain Based Access
Control**.
2. Enter each domain on a new line. The format is `*.domain`---for example,
`*.mycompany.com`.
#### Specify a domain
> [!WARNING]
> **Warning:** If no domains are specified, access is granted to all domains.
The format for specifying a domain for an instance can be any valid domain name,
and it can include a wildcard (**\***) to match an arbitrary number of
subdomains. The wildcard must be placed at the beginning of the domain, and it
matches any subdomains.
Additionally, the user has the option to specify a protocol and a port using the
syntax `://:`.
- The port may be a wildcard, but the protocol cannot be a wildcard.
- If a protocol is specified, it matches only that protocol and all other protocols won't be able to display the adapter. For example, `https://some.example.domain.com` won't match `http://some.example.domain.com` or `mail://some.example.domain.com`.
#### CRM-specific domains
Use the following domain naming conventions when entering your CRM domain.
> [!IMPORTANT]
> **Important:** If you don't include all of these domains for a specific CRM, the agent adapter immediately breaks.
Each CRM's embedded UI loads from specific domains. For example, the Dynamics
agent adapter loads from `*.crm.dynamics.com`. You must allowlist all the
domains your CRM uses, as listed in the following table:
| CRM | Required domains |
| Salesforce | - `*.visualforce.com` - `*.force.com` - `*.salesforce.com` |
| Zendesk | - `*.zdusercontent.com` - `*.zendesk.com` |
| Microsoft Dynamics | `*.crm.dynamics.com` |
| Kustomer | `*.kustomerapp.com` |
|---|---|
## Azure app registration (OAuth client)
This section describes how to create an Azure app registration for Microsoft
Dynamics.
### Create a new application registration in Azure
1. In the Microsoft Azure Portal, go to **Azure services** \> **App
registrations**.
> [!NOTE]
> **Note:** **App registrations** is the portal entry point for managing Microsoft Entra ID application registrations. In the Azure Portal UI, it appears under Azure services on the portal home page. You can also find it by searching for *App registrations* in the portal search bar.
2. Select **New application registration** . The **Register an application**
page appears.
3. Fill in the required fields:
- In the **Name** field, enter the URL of your CCAI Platform
environment without the
`https://`. For example--- `yourcompany.domain.co.`
- For the **Supported account types** section, click **Accounts in the
Organizational Directory Only**.
4. Click **Register**. The application is now registered.
### Authentication settings
This section describes how to configure authentication settings in the Microsoft Azure portal
#### Add a platform configuration
To add a platform configuration in the Microsoft Azure portal, follow these steps:
1. After creating the registered App, go to **Authentication** and enter your
callback URL in the **Redirect URI** field --- for example,
`https://yourcompany.domain.co/v1/dynamics/oauth_callback`.
2. Click the checkbox for **ID tokens**.
#### Create new certificates and secrets
To create new certificates and secrets in the Microsoft Azure portal, follow these
steps:
1. Go to **Certificates \& secrets** to create a new key in the **Add a client
secret** panel. Then, in the **Description** field:
1. Enter a description such as API KEY.
2. In the **Expires** section, click the longest available time period
allowed by your security team.
**Note**: This has to be regenerated after the expired time has been
reached.
2. Click **Add**. Copy the secret value immediately --- you won't be able
to view it again after leaving this page.
#### Add API permissions
To add API permissions in the Microsoft Azure portal, follow these steps:
1. Go to **Manage \> API permissions** and click **Add a permission**.
2. Click **Dynamics CRM**.
3. Select **Delegated permissions**.
4. Check the box for **user_impersonation** and select **Add permissions**.
5. Back in **API permissions** , select **Add a permission** again.
6. Select **Microsoft Graph**.
7. Select **Application permissions**.
8. Add the following Application permissions: **Application.ReadWrite.All** ,
**Directory.Read.All** , and **User.Read.All** . Select **Add permissions**.
9. Back in **API permissions** , select **Add a permission** once more.
10. Select **Microsoft Graph** , then select **Delegated permissions**.
11. Add **User.Read** (if it is not already present). Select **Add
permissions**.
12. Back in the **API permissions** overview, click **Grant admin consent for
\[your organization name\]** and **confirm** in the dialog. Verify the
**Status** column shows **Granted** for **\[your organization name\]** for
all of the following permissions:

|---|---|---|
| **API** | **Permission** | **Type** |
| Dynamics CRM | `user_impersonation` | Delegated |
| Microsoft Graph | `Application.ReadWrite.All` | Application |
| Microsoft Graph | `Directory.Read.All` | Application |
| Microsoft Graph | `User.Read` | Delegated |
| Microsoft Graph | `User.Read.All` | Application |
## Set up application users for your environment
To set up application users for your environment in Microsoft Dynamics, follow
these steps:
1. Choose your environment and click **Settings**.

2. Click **Application Users**.
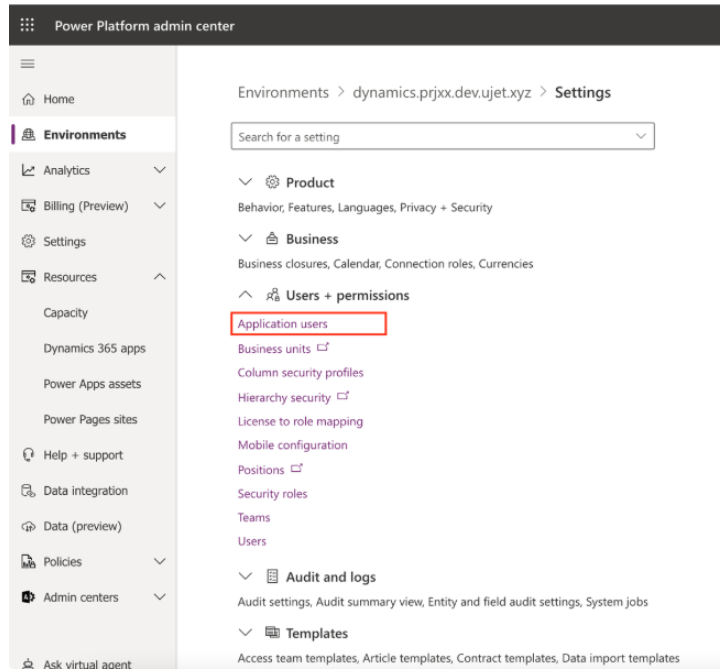
3. Click **Setup app user**.
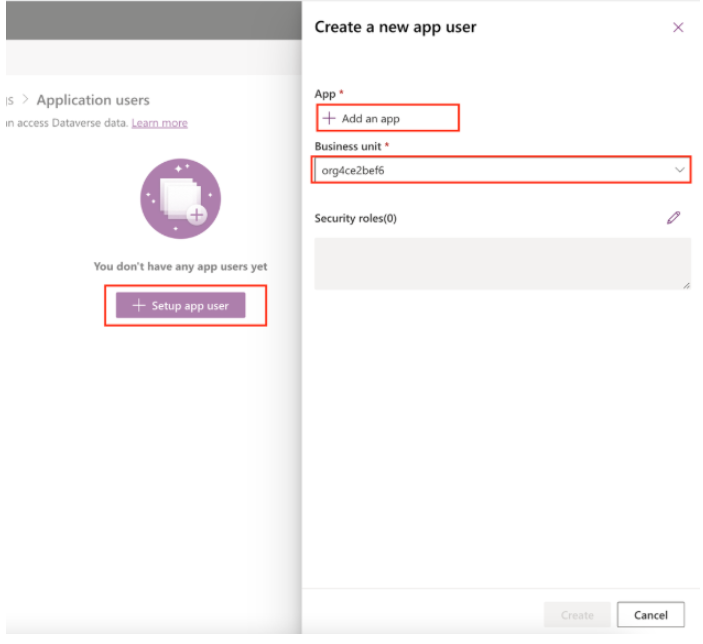
1. In the **App** field, choose an existing app and click **Add**.
2. Click the **Business Unit** field, and then click a business unit.
3. Add the following security roles:
1. **Service Reader**
2. **Service Writer**
4. Click **Create**.
## Input your values in the CCAI Platform portal
> [!IMPORTANT]
> **Important:** If you edit your CRM settings to point to a new CRM instance, it is recommended to redo the setup process and reconfigure all settings.
1. Go to **Settings** \> **Developer Settings**.
2. Scroll to **CRM** \> **Agent Platform**.
3. Select **MS Dynamics** and enter the values for the following:
> [!NOTE]
> **Note:** Ensure all of these fields are correct before saving.
| Field | Value | Where to find it |
| Active Directory Application ID | Application (Client) ID | In the Microsoft Azure Portal, go to **App registrations** \> your app \> **Overview**. |
| Update Active Directory Application Key Password | Client secret value | Created in the preceding **Certificates \& secrets** step. Must be copied immediately after creation. |
| Active Directory tenant | Directory (Tenant) ID | In the Microsoft Azure Portal, go to **App registrations** \> your app \> **Overview** . *(Note: "Active Directory" in this label refers to what Microsoft now calls Microsoft Entra ID.)* |
| Dynamics domain | URL of your Microsoft Dynamics environment | Found on the environment overview page in Power Platform administration center |
|---|---|---|

4. Select **Save**.
## Test custom field mapping
This section uses `MyCustomField` as a walkthrough example for adding and mapping
a custom field.
> [!NOTE]
> **Note:** If you already have an existing `TestCustomFields` solution, skip to step 2.
### Create a new custom field in a solution component
To set up custom field mapping, follow these steps in Microsoft Dynamics.
> [!NOTE]
> **Note:** Access solutions using one of the methods described in the preceding [*Install or update the Connector*](https://docs.cloud.google.com/contact-center/ccai-platform/docs/ms-dynamics-crm#install-update-connector) section. The path shown here (**Sales** \> **Settings** \> **Solutions**) may vary depending on your Dynamics UI.
1. Create a new custom field in a solution component:
1. Go to **Sales \> Settings \> Solutions**.
2. At the top of the **All Solutions** page, click **New**.
3. Enter **TestCustomFields** as the Display Name.
4. Click **Save and Close**.
5. Click your existing solution component
2. Go to **Components \> Entities \> Add Existing**.
3. Click the **Contact** solution component.
4. Click **OK** to view the Contact solution component details. The solution
component System Form dialog appears.
5. Click the entity assets that you want to include in the solution.
1. Include entity metadata.
2. Add **All Assets**.
For this example, click **Include entity metadata**.

6. Click **Finish**.
7. Go to **Components \> Entities \> Contact \> Fields**.
8. Click **New**.
9. A new field name populates in the Name field. Copy the field name for later
use:
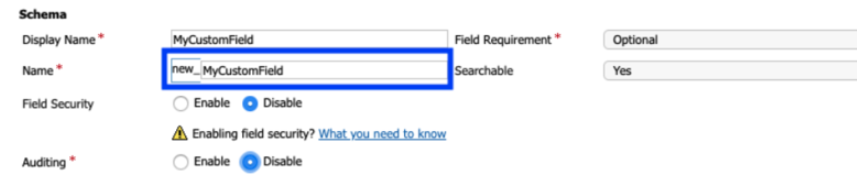
10. Click **Save and Close**.
### Edit form to display the custom field
The following example focuses on the contact solution component that was
previously configured.
To edit the form to display the custom field, follow these steps in Microsoft
Dynamics:
1. Open a contact and click **Form**.
2. Open the **Field Explorer** and filter by **Custom Fields**.

3. Double-click **MyCustomField**.
4. Click **Save** , and then click **Publish** to add the new field to the form.
5. Refresh the browser to check that the form displays in the contact screen.
6. Confirm that **MyCustomField** is in the form.
7. Enter the identified value in the **MyCustomField** field.
8. Click **Save**.
### Set up custom field mapping in the Contact Center AI Platform portal
To set up custom field mapping in the Contact Center AI Platform portal, follow these
steps:
1. In the CCAI Platform portal, click **Settings \> Developer Settings** .
If you don't see the **Settings** menu, click **Menu**.
2. Go to **Custom Field Mapping** and click the box.
3. Under **CRM field to use in lookup** , click the custom field created earlier
(**new_mycustomfield**).
### Populate the account and customer fields in a custom case form
The default action within Microsoft Dynamics is to fill in the customer
information exclusively when a case is created. Updating this setting allows the
contact field to be populated with the customer information from a case at the
same time.
1. In the CCAI Platform portal, click **Settings \> Developer Settings** .
If you don't see the **Settings** menu, click **Menu**.
2. Go to **CRM \> Account Lookup**.
3. Click **Contact** under **Object Type**.
4. Select the **Use Custom Parameter Matching** checkbox.
5. Once checked, a table with the fields **Contact Field Key** and **Case Field
Key** will appear, along with options to add, edit or delete as required.
Switching between object types clears the table unless the fields are saved.
- This lets the **Contact** field on the case object, and the **Customer**
field with the **Account** associated with the **Contact** (if there is
one), to be updated simultaneously.
- The CRM ticket updates when the checkbox **Use Custom Parameter
Matching** is checked and **Parameters Configuration** is valid,
otherwise it will revert to default logic to update the CRM. If all
parameters are configured correctly they will all update. If any
parameters are configured incorrectly, only the correctly configured
parameters will update.
## Test USER segment DAP
> [!NOTE]
> **Note:** A Direct Access Point must be created to complete the following steps. For more information, see [Direct Access Points](https://docs.cloud.google.com/contact-center/ccai-platform/docs/dap).
To test a DAP, follow these steps:
1. In the CCAI Platform portal, click **Settings \> Queue** . If you don't
see the **Settings** menu, click
**Menu**.
2. Choose your preferred Social Channel
3. In the **Settings** panel, go to **Access point** and click the **edit
icon** beside the access point to update.
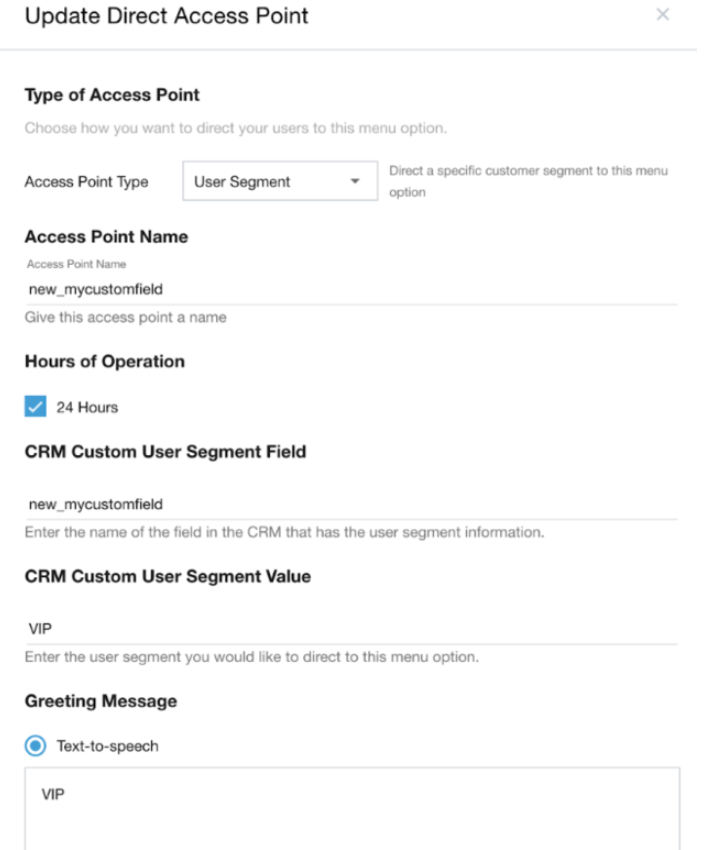
4. In the **CRM Custom User Segment Field** , enter the name of the field in the
CRM that contains the user segment information ---for example,
`new_mycustomfield`.
5. Select **Update**.
## Troubleshooting
This section describes common issues and their resolutions.
### Agent adapter not visible
If the agent adapter isn't visible after making administrator configuration
changes, agents should:
- Right-click over the agent adapter area.
- Select **Reload Frame**.
This forces the adapter to reload with the latest configuration.
### Common issues
| Symptom | Possible cause | Resolution |
|---|---|---|
| Adapter breaks immediately after setup | Missing CRM-specific domains in domain based access control | Verify all required domains are added (see [**CRM-specific domains**](https://docs.cloud.google.com/contact-center/ccai-platform/docs/ms-dynamics-crm#crm-specific-domains) above). For MS Dynamics, ensure `*.crm.dynamics.com` is included. |
| Adapter not loading after domain changes | Domain propagation delay | Wait up to one minute for changes to take effect. Try the **Reload Frame** action described earlier. |
| OAuth authentication failure | Incorrect Application ID, Key Password, or Tenant ID | Double-check values in **Settings \> Developer Settings \> CRM \> Agent Platform**. Ensure the client secret hasn't expired. |
| API permissions errors | Admin consent not granted or missing permissions | Go to **API permissions** in the Microsoft Azure Portal and confirm all five permissions are present and administrator consent is granted (see the [**permissions summary table**](https://docs.cloud.google.com/contact-center/ccai-platform/docs/ms-dynamics-crm#authentication-settings) in Authentication settings). |
| Connector unstable during installation | Installation in progress | Installation takes 5--10 minutes. Wait for it to complete, then refresh the agent page. |
| Client secret expired | Secret reached its configured expiration date | Generate a new client secret in **Certificates \& secrets** , copy the value immediately, and update the **Key Password** field in the CCAI Platform portal. |
For additional help, contact **CCAI Platform Support**.