This page explains how to use the Android SDK.
## Access the example app
To download the Android example app, click [Android example
app](https://externals.ujet.co/packages/ujet-android-sdk-example.zip).
To create an example app using the Android mobile SDK, you need the following:
- CCAI Platform portal Company Key and Company Secret.
- Android 5.0 (API level 21, Lollipop) or later.
- Firebase Cloud Messaging or Google Cloud Messaging for the push
notification.
- App migrated to AndroidX.
## Twilio SDK upgrade requirements
Requires Twilio SDK to be following specific versions if the Android SDK
is integrated using our package directly, otherwise this can be ignored.
// Twilio VoIP SDK
api 'com.twilio:voice-android:6.1.1'
// Twilio Conversations SDK
api 'com.twilio:conversations-android:3.1.0'
In addition, Proguard rules are already included in the Android SDK to ensure
that the Twilio Programmable Voice library is not removed by ProGuard
and can be used to troubleshoot in case ProGuard accidentally removes
the library.
-keep class com.twilio.** { *; }
-keep class tvo.webrtc.** { *; }
-dontwarn tvo.webrtc.**
-keep class com.twilio.voice.** { *; }
-keepattributes InnerClasses
To support latest Twilio versions, starting with the Android SDK version
0.34.0, SDK is no longer binary compatible with applications that target
Java 7. In order to use this and future releases, developers must
upgrade their applications to target Java 8. See the following code example:
android {
compileOptions {
sourceCompatibility 1.8
targetCompatibility 1.8
}
}
## Get company key and company secret
1. Sign into the Admin Portal using Admin credentials.
2. Go to **Settings \> Developer Settings \> Company Key \& Secret Code**.
3. Retrieve the **Company Key** and **Company Secret Code**.
## Installation
Add the Android SDK repository to your Gradle setting for the root
project.
### build.gradle (Project)
allprojects {
repositories {
google()
jcenter()
maven {
url "https://sdk.ujet.co/android/"
}
}
}
### build.gradle (module: app)
dependencies {
// Replace x.y.z with latest version of CCAI Platform SDK
def ujetSdkVersion = "x.y.z"
implementation "co.ujet.android:ujet-android:$ujetSdkVersion"
// CCAI Platform supports co-browse for Web SDK version 0.46.0 or
// higher.
// To use co-browse, declare the following dependency.
implementation "co.ujet.android:cobrowse:$ujetVersion"
}
> [!NOTE]
> **Note:** If you're using a Java version older than 11.0.2 and are unable to build our SDK, upgrade to 11.0.2+ to resolve the issue.
## Setup company settings
Enter your company settings as metadata in AndroidManifest.xml file.
### **AndroidManifest.xml**
// ...
// ...
### strings.xml
YOUR_SUBDOMAIN
YOUR_COMPANY_KEY
YOUR_COMPANY_NAME
## JWT Signing
An end user information must be signed as JWT in your server for
security purposes.
The example app contains APIManager for testing and you need to put
UJET_COMPANY_SECRET in mock/APIManager.java. APIManager must implement a
method that initiates async call to sign JWT auth token that returns the
token.
In production, you must implement the signing process on your server.
public class APIManager {
public static final String UJET_COMPANY_SECRET = "Please input your UJET_COMPANY_SECRET from Ujet developer admin page";
// ...
}
## Initialize SDK
Initialize the SDK in Android Application class `onCreate` method.
> [!CAUTION]
> **Caution:** Make sure that `Ujet.init()` is called in `Application.onCreate()` because the Android SDK can be launched even if the host app is not running by the push notification and SMS link. If `Ujet.init()` is not called and the Android SDK is launched, the Android SDK won't work properly and might cause a crash.
public class ExampleApplication extends Application implements UjetRequestListener {
@Override
public void onCreate() {
super.onCreate();
Ujet.init(this);
}
// ...
}
## End-user authentication
The end user is the consumer who contacts your customer support team
through the application.
In order to authenticate the end user in the application, we introduce a
JWT signing mechanism.
The Android SDK asks to sign the payload when it needs authentication.
If the signing is successful, the application exchanges the signed JWT
to the end user's auth token.
In `ExampleApplication` you should implement the `UjetRequestListener`
interface for signing the auth token and for custom data.
public class ExampleApplication extends Application implements UjetRequestListener {
@Override
public void onCreate() {
super.onCreate();
Ujet.init(this);
}
@Override
public void onSignPayloadRequest(Map payload, UjetPayloadType ujetPayloadType, UjetTokenCallback tokenCallback) {
if (ujetPayloadType == UjetPayloadType.AuthToken) {
// In production, you should implement this on your server.
// The server must implement a method that initiates an asynchronous call
to sign and return a JWT auth token.
APIManager.getHttpManager()
.getAuthToken(payload, UjetPayloadType.AuthToken, new UjetTokenCallback() {
@Override
public void onSuccess(@Nullable final String authToken) {
tokenCallback.onToken(authToken);
}
@Override
public void onFailure(@Nullable final String authToken) {
tokenCallback.onError();
}
});
}
}
}
For more information, see [end user authentication](https://docs.cloud.google.com/contact-center/ccai-platform/docs/sdk-end-user-auth).
## Set up push notifications
This section outlines how to enable mobile push notifications.
### Prepare Firebase
You should prepare a Firebase project.
If you already have your project, you can use your own and skip this
process.
1. Create a Firebase project in the [Firebase console](https://console.firebase.google.com/).
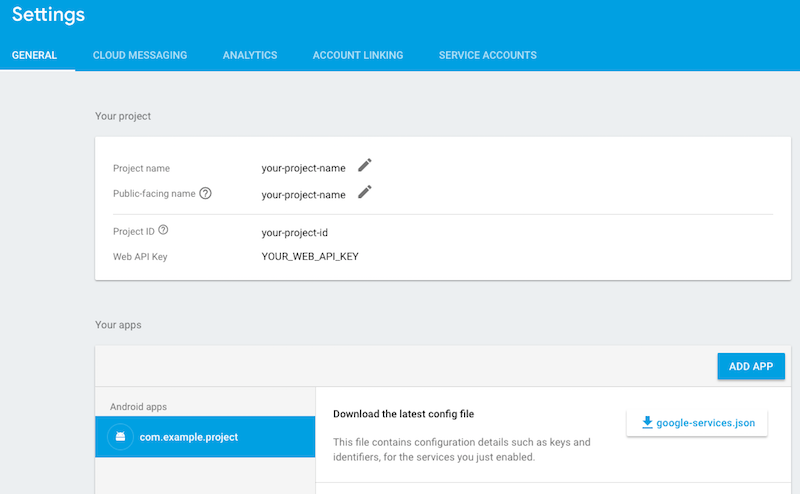
2. Download google-services.json from Settings \> GENERAL in Firebase console.
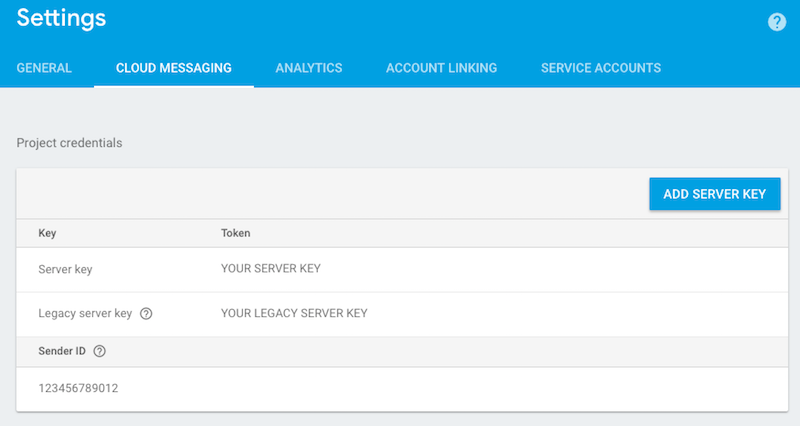
1. Get the Server Key from Settings \> CLOUD MESSAGING in Firebase console.
### Add a service account key
You need to add a service account key to your mobile app to receive push
notifications. To get a service account key, see [Authenticate with a service account](https://firebase.google.com/docs/app-distribution/authenticate-service-account?platform=android).
> [!CAUTION]
> **Caution:** Follow Google's [best practices for managing service account keys](https://docs.cloud.google.com/iam/docs/best-practices-for-managing-service-account-keys).
To add a service account key to your mobile app, follow these steps:
1. In the CCAI Platform portal, click **Settings \> Developer Settings** .
If you don't see the **Settings** menu, click **Menu**.
2. Go to the **Mobile Apps** pane.
3. Click **Edit** next to your
app. The **Edit Mobile App** dialog appears.
4. In the **Service Account Field** , enter your service account key,
and then click **Save**.
### Android client setup
1. Copy `google-services.json` into your app directory, for example,
`PROJECT_ROOT/app/google-services.json`.
2. Get the `FCM` token using the following code:
FirebaseMessaging.getInstance().getToken()
.addOnCompleteListener(task -> {
if (!task.isSuccessful() || task.getResult() == null) {
Log.w("FCM", "Couldn't get FCM token");
return;
}
String token = task.getResult();
Log.i("FCM", "FCM token: " + token);
});
`FirebaseMessagingService` is called, which is registered in Manifest if the
token is refreshed. For more information, see [Set up a Firebase Cloud
Messaging client app on Android](https://firebase.google.com/docs/cloud-messaging/android/client).
public class YourFirebaseMessagingService extends FirebaseMessagingService {
/**
* There are two scenarios when onNewToken is called:
* 1) When a new token is generated on initial app startup
* 2) Whenever an existing token is changed
* Under #2, there are three scenarios when the existing token is changed:
* A) App is restored to a new device
* B) User uninstalls/re-installs the app
* C) User clears app data
*/
@Override
public void onNewToken(String token) {
Log.i("FCM", "FCM token updated: " + token);
}
}
3. Implement `UjetRequestListener.onRequestPushToken` in your Application
class. `UjetRequestListener.onRequestPushToken` should return the `FCM/GCM`
token.
public class YourApplication extends Application implements UjetRequestListener {
/**
* Return your FCM/GCM token
*/
@Override
public String onRequestPushToken() {
return yourToken(); // As shown in the previous step, you can get your token using FirebaseMessaging.getInstance().getToken().addOnCompleteListener(task -> { })
}
}
4. Handle the push notification. If you want Contact Center AI Platform
(CCAI Platform) to handle processing its own push messages, you can
pass the data directly to `UjetPushHandler.handle()`.
- The application only processes messages with the `ujet_noti_type` (or
`noti_type`, for backwards compatibility) field set.
- Otherwise, you can choose to only send messages with `ujet_noti_type` to
`UjetPushHandler.handle()` for processing.
The following is an example of a push notification message:
{
"call_id" : 12345,
"ujet_noti_type" : "connect_call",
"noti_type" : "connect_call",
"call_type" : "ScheduledCall",
"fail_reason" : "none",
"fail_details" : "none"
}
#### Handle FCM message
public class YourFirebaseMessagingService extends FirebaseMessagingService {
private UjetPushHandler ujetPushHandler;
@Override
public void onCreate() {
super.onCreate();
this.ujetPushHandler = new UjetPushHandler(this);
}
@Override
public void onMessageReceived(RemoteMessage remoteMessage) {
if (ujetPushHandler.handle(remoteMessage)) {
// Handled by CCAI Platform
} else {
// Handle your push notification message in here
}
}
}
#### Handle GCM message
public class YourGcmListenerService extends GcmListenerService {
private UjetPushHandler ujetPushHandler;
@Override
public void onCreate() {
super.onCreate();
this.ujetPushHandler = new UjetPushHandler(this);
}
@Override
public void onMessageReceived(String s, Bundle bundle) {
if (ujetPushHandler.handle(bundle)) {
// Handled by CCAI Platform
} else {
// Handle your message
}
}
}
#### Handle GCM message in GcmReceiver (Old way)
public class YourGcmReceiver extends WakefulBroadcastReceiver {
private UjetPushHandler ujetPushHandler;
@Override
public void onReceive(Context context, Intent intent) {
ujetPushHandler = new UjetPushHandler(context);
if (ujetPushHandler.handle(intent.getExtras())) {
// Handled by CCAI Platform
} else {
// Handle your message
}
}
}
## Start the application
> [!NOTE]
> **Note:** All previous start methods are deprecated and replaced with `Ujet.start(@NonNull UjetStartOptions)`. You can set parameters using `UjetStartOptions.Builder()` while starting the application.
Add the following line where you want to start the application (without
any parameters):
Ujet.start(new UjetStartOptions.Builder().build());
You can also start the Android SDK without the splash screen.
UjetStartOptions ujetStartOptions = new UjetStartOptions.Builder()
.setSkipSplashEnabled(true)
.build();
Ujet.start(ujetStartOptions);
You can also start the Android SDK from a specific point in the menu
with this key using a Direct Access Point:
String menuKey = "MENU_KEY";
UjetStartOptions ujetStartOptions = new UjetStartOptions.Builder()
.setMenuKey(menuKey)
.build();
Ujet.start(ujetStartOptions);
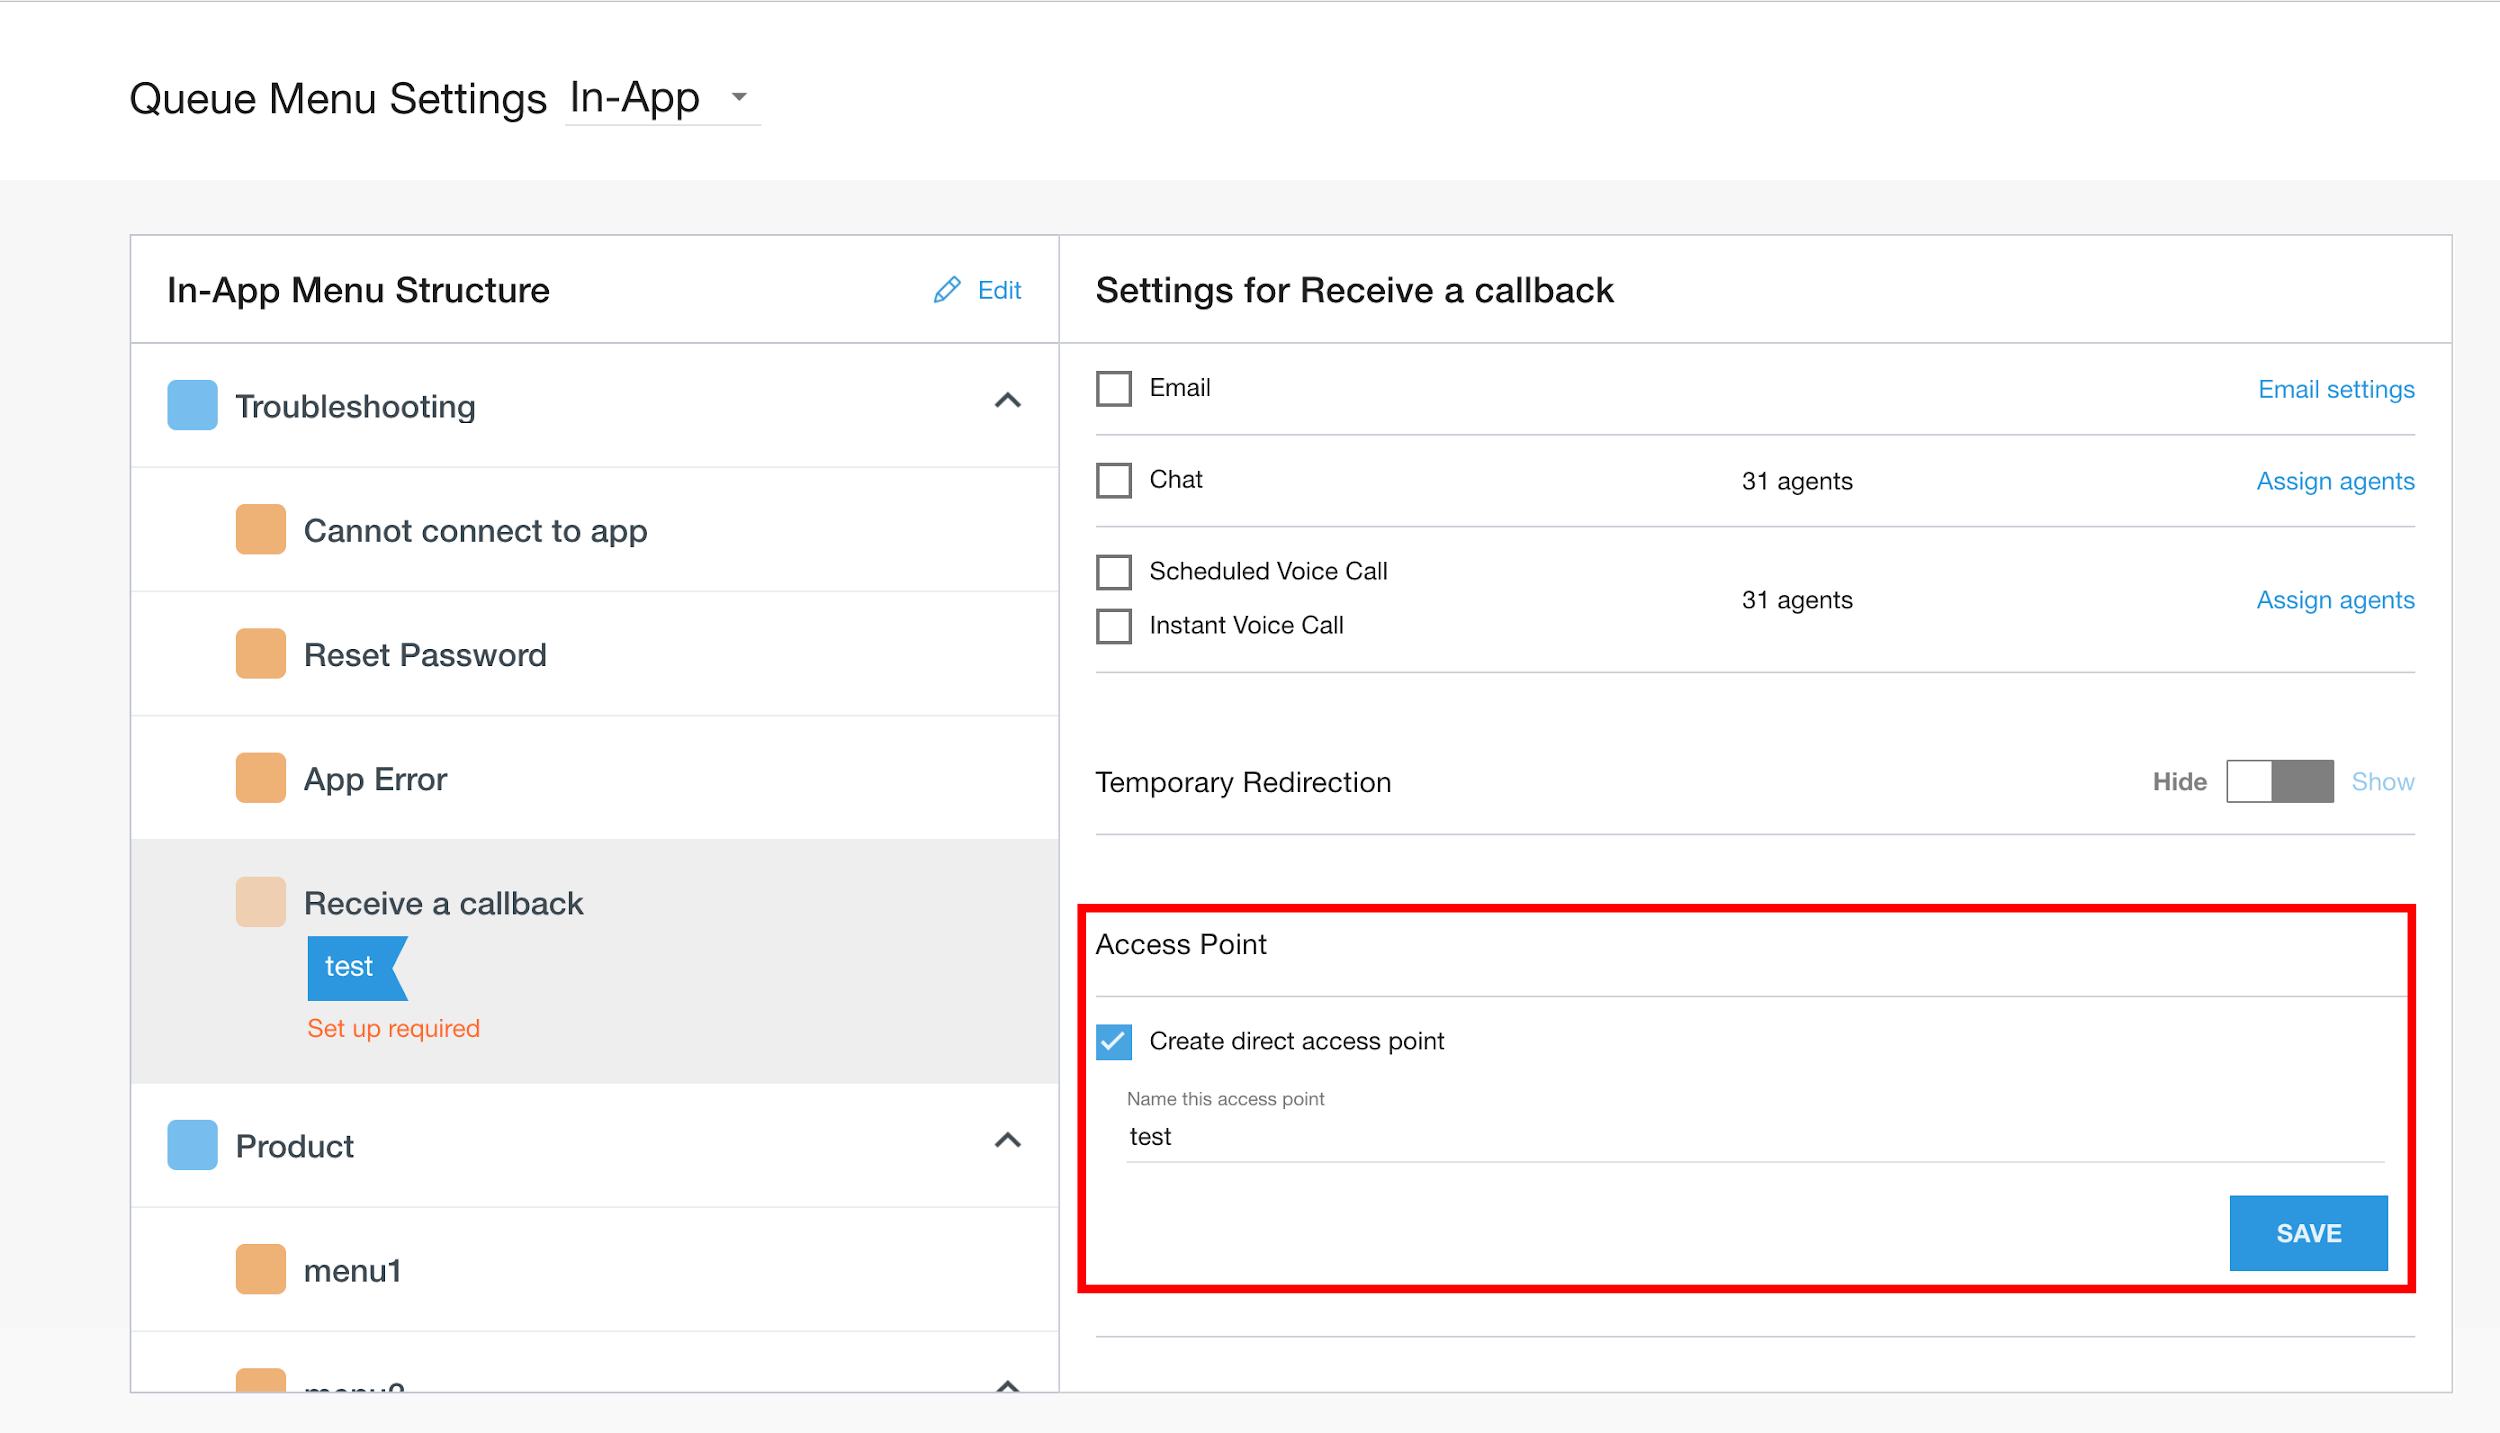
The `menuKey` can be created with a Direct Access Point in the CCAI Platform portal
(with Admin role).
1. Go to **Settings \> Queue**.
2. Select any queue from the menu structure.
3. Check **Create direct access point**.
4. Enter key in the text form.
5. Click **Save**.
You can also start the Android SDK with a specific ticket ID to pass it
to the CRM. This ticket ID will be opened when a chat or call is connected.
String ticketId = "TICKET_ID";
UjetStartOptions ujetStartOptions = new UjetStartOptions.Builder()
.setTicketId(ticketId)
.build();
Ujet.start(ujetStartOptions);
## SDK configuration
You can configure several options before starting the Android SDK. See the
`UjetOption` class. The Fallback Phone Number and Network Sensitivity options
described in the following table only work when the **Enable PSTN Fallback**
toggle is on in the CCAI Platform portal at **Settings \> Developer Settings \>
MMA \> Edit** . When the **Enable PSTN Fallback** toggle is off, we don't fallback
to PSTN. CCAI Platform uses default network sensitivity (0.85) for
checking network connections.
| Option | Description | Value | Default value |
|---|---|---|---|
| Log Level | Log level to be printed in Logcat. | Integer. Same with Log level for Android Log. (Min: 2, Max: 7) | `5` (Log.Warn) |
| Default Language | The default language code. | String. An ISO 639 language code. (e.g. en for English) | `null` |
| Fallback Phone Number | The phone number is used as the fallback when the internet is not available or the representative phone number for the company doesn't exist from Admin portal. | String. Phone number. | `null` |
| Uncaught Exception Handler Enabled | Enable the uncaught exception handler. If `true`, the app handles all uncaught SDK exceptions at runtime by using `Thread.setDefaultUncaughtExceptionHandler`. However, if the same exception occurs twice, the app crashes. | Boolean. | `true` |
| Network Sensitivity | The sensitivity for checking the network state. | Double between `0` and `1`, where `0` is the least sensitive and `1` is the most sensitive. A value of `1` will always fall back to a PSTN call. If used, we recommend starting out with a value of `.97`. The value from the Portal under **Settings \> Developer Settings \> Mobile Apps \> Fallback** phone number threshold overrides this value. | `0.85` |
| Dark Mode Enabled | Enable the dark mode theme. If `true`, the SDK applies a dark mode theme when the user turns on dark mode, and otherwise ignores the action. | Boolean. | `false` |
| Single Channel Enabled | Config option to either show or bypass channel selection screen for a single channel. If `true`, the SDK shows a single channel selection screen instead of automatically selecting the channel even if only one channel is enabled in the menu queue. | Boolean. | `false` |
| Auto Minimize Call View | Config option to automatically minimize the initial call screen UI by default or wait for the user to minimize it. | Boolean. | `false` |
| Agent Icon Border Enabled | Config option to show or remove a circular border around the agent icon. | Boolean. | `false` |
| Static Font Size In Picker View | Config option to automatically adjust or disable the picker item text size. | Boolean. | `false` |
| Hide Media Attachment In Chat | Config option to show or hide the media attachment icon in chat UI. | Boolean. | `false` |
| Ignore `READ_PHONE_STATE` Permission | If set to `true` then the SDK doesn't request the `READ_PHONE_STATE` permission. If you don't want to use in-app IVR calls, set this flag to `true` to avoid requesting this permission and also your application needs to explicitly remove `android.permission.READ_PHONE_STATE` permission for CCAI Platform SDK. Note that we don't recommend setting this to `true`, because this permission is required for in-app IVR calls to work. | Boolean | `false` |
| Cobrowse.io License Key (if applicable) | Config option to set up the `Cobrowse.io` library. You can find your Cobrowse License Key by signing in to `https://cobrowse.io/dashboard/settings` and going to the **License Key** section. | String | `null` |
| Custom chat header title | Config option to customize chat header title text in the chat UI. | String | `null` |
| Customize chat UI quick replies | Config option to customize virtual agent quick replies in chat UI. Virtual agent quick replies are grouped together by default but if you want to display them individually, you can use this config option to set QuickReplyButtonsStyle.INDIVIDUAL | UjetStylesOptions | `QuickReplyButtonsStyle.GROUPED` |
| Customize chat UI various attributes | Config option to customize various attributes such as the font, background color, icon, etc. | UjetStylesOptions | `null` |
| Hide status bar | Config option to show or hide the status bar. If the value is true then the SDK will hide the status bar. | Boolean | `false` |
| Set loading spinner drawable res | Config option to customize the loading spinner view throughout the app. If it's not available or null then we use the default loading view. | Integer | `null` |
| Landscape orientation disabled | Disable the landscape orientation. If the value is true, then the landscape orientation isn't applied. | Boolean | `false` |
| Hide start new conversation inline button in chat | Config option to show or hide the start new conversation inline button in the chat UI. | Boolean | `false` |
| Show CSAT skip button | Config option to show or hide the skip button in the CSAT dialog | Boolean | `false` |
| Block chat termination by end-user | Config option to show or hide the end chat button in the chat UI | Boolean | `false` |
| Hide download chat transcript | Show or hide the download chat transcript button in the chat actions menu and in the chat user interface. If you add a space to the `ujet_common_hide` string, the `Hide` text disappears and only the back arrow appears. | Integer. Values: `0` = Show everywhere `1` = Hide from the options menu `2` = Hide from the post chat screen `3` = Hide from both the options menu and the post chat screen. | `0` `UjetOption.setBlockChatTerminationByEndUser` |
| Turn off push notifications at the global level | Setting `UjetOption.setPushNotificationsAllowed` to `false` bypasses all push notification dependencies and prevents push notifications from reaching end-users. | Boolean | `true` |
| Hide **Next availability** | Show or hide the **Next availability** message on the after-hours [chat check-in](https://docs.cloud.google.com/contact-center/ccai-platform/docs/chat-check-in) screen. | Boolean | `false` |
| Hide **Start over** | Show or hide the **Start over** button on the after-hours [chat check-in](https://docs.cloud.google.com/contact-center/ccai-platform/docs/chat-check-in) screen. | Boolean | `false` |
UjetOption ujetOption = new UjetOption.Builder()
.setLogLevel(Log.INFO)
.setDefaultLanguage("en")
.setFallbackPhoneNumber("+18001112222")
.setUncaughtExceptionHandlerEnabled(false)
.setNetworkSensitivity(0)
.setDarkModeEnabled(true)
.setShowSingleChannelEnabled(true)
.setAutoMinimizeCallView(true)
.setShowAgentIconBorderEnabled(true)
.setStaticFontSizeInPickerView(true)
.setHideMediaAttachmentInChat(true)
.setIgnoreReadPhoneStatePermission(true)
.setCobrowseLicenseKey("COBROWSE_IO_LICENSE_KEY_HERE")
.setCobrowseURL("COBROWSE_IO_API_URL_HERE")
.setCustomChatHeaderTitle("CHAT_HEADER_TITLE_TEXT")
.setUjetStylesOptions(
new UjetStylesOptions.Builder()
.setChatQuickReplyButtonsStyle(QuickReplyButtonsStyle.INDIVIDUAL)
.setChatStyles(new ChatStyles(...)) // See `Content Cards Theme` item
.build() )
.setBlockChatTerminationByEndUser(true)
.setHideStatusBar(true)
.setLoadingSpinnerDrawableRes(R.drawable.RESOURCE_NAME)
.setLandscapeOrientationDisabled(true)
.setShowCsatSkipButton(false)
.setHideDownloadChatTranscript(0) // 0 to 3. 0 = Show everywhere, 1 = Hide from the options menu, 2 = Hide from the post chat screen, 3 = Hide from both the options menu and the post chat screen.
.setPushNotificationsAllowed(true)
.setHideNextAvailability(true)
.setHideStartOver(true)
.build();
//The following customizes various attributes in chat UI
ChatStyles chatStyles = new ChatStyles();
chatStyles.setBackButton(new BackButtonStyle(false, "ujet_agent_sample")); //customizes back button styles
chatStyles.setHeader(...); //customizes chat header styles
chatStyles.setAgentMessageBubbles(...); //customizes agent messages styles
chatStyles.setConsumerMessageBubbles(...); //customizes consumer messages styles
chatStyles.setSystemMessages(...); //customizes system messages styles
chatStyles.setEndChatButton(...); //customizes end chat button styles
chatStyles.setTimeStamps(...); //customizes timestamp styles
chatStyles.setUserInputBar(...); //customizes user input bar styles
UjetOption ujetOption = new UjetOption.Builder()
.setUjetStylesOptions(
new UjetStylesOptions.Builder()
.setChatStyles(chatStyles)
.build()
)
//The following customizes various attributes in chat UI using json file. Store json file in assets folder
//and create a method to read json file contents and convert it into json string.
String chatStylesFromJson = parseJsonContentsFromAssetsFolder();
UjetOption ujetOption = new UjetOption.Builder()
.setUjetStylesOptions(
new UjetStylesOptions.Builder()
.setChatStyles(chatStylesFromJson)
.build()
)
## App permissions
The app requires the following permissions and requests these permissions of user when required.
| Permission | Description |
|---|---|
| CAMERA | Used for smart action to take photos and record videos |
| MICROPHONE | Allows app to use VoIP call through Twilio |
| STORAGE | Allows app to save photos and videos |
## Language preference
The Android SDK will use the following priority order to determine the
language.
1. Language selected from the splash screen within the app.
2. Default language selected using `UjetOptions`. You can set the default
language using `setDefaultLanguage("en")` in `UjetOptions`. See
Default Language in the SDK configuration section for more details.
3. Device language selected in the device (using **Settings \> General \>
Language**) will be used, when it is supported by the app.
4. Closest dialect of device language will be used when the app does
not support the device language but supports its closest parent
dialect. For example, if the user selected Spanish Cuba as the
language in the device and the app does not support Spanish Cuba but
supports parent dialect Spanish, then Spanish language will be used.
5. English will be used as the default language, when the device language is not
supported by the app.
## Preferred channel
The Preferred Channel parameter lets you to route consumers directly to a
specific channel. The end-user then skips the channel selection step and
directly initiates contact through the channel specified in the Preferred Channel
parameter.
`UjetStartOptions.preferredChannel`
Ujet.start(new)
UjetStartOptions.Builder().setPreferredChannel
(UjetPreferredChannel.UjetPreferredChannelChat).build());
## Event Notifications
You can optionally set `UjetEventListener` to receive application event notifications.
Available event types and descriptions are listed here.
Ujet.setUjetEventListener(new UjetEventListener() {
@Override
public void onEvent(UjetEventType eventType, HashMap eventData) {
// eventType specifies the event type and eventData holds the data related to the event.
// You can parse the eventData and here we are just logging the event type and event data.
Log.i("CCAI Platform Event Type", eventType.getValue());
StringBuilder builder = new StringBuilder();
for (Map.Entry entry : eventData.entrySet()) {
builder.append(entry.getKey()).append(" : ").append(entry.getValue()).append("\n");
}
Log.i("CCAI Platform Event Data", builder.toString());
}
});
| Event type | Description | Data included in event |
|---|---|---|
| `EmailClicked` | Triggers when the end-user clicks the email channel. | Queue menu data |
| `EmailSubmitted` | Triggers when the end-user sends an email. | Queue menu data, email submitted data |
| `SessionPaused` | Triggers when the end-user minimizes a chat or call session. | Session data |
| `SessionResumed` | Triggers when the end-user switches back to a chat or call session from the background. | Session data |
| `SessionCreated` | Triggers when a chat or call session is created. | Queue menu data, session created data |
| `SessionEnded` | Triggers when a chat or call session is ended. | Queue menu data, session created data, session ended data |
| `SdkTerminated` | Triggers when the SDK is closed, including when it's closed unexpectedly. | SDK terminated data |
| `ContentCardClicked` | Triggers when a content card is clicked. | Content-card clicked data |
| `ContentCardButtonClicked` | Triggers when a content card button is clicked. | Content-card button clicked data |
| `QuickReplyClicked` | Triggers when a quick reply is clicked. | Quick reply clicked data |
| `MessageLinkClicked` | Triggers when a link is clicked. | Message link clicked data |
Queue menu data
| Key | Type | Description |
|---|---|---|
| `event_name` | String | Contains event name. Example, "Email Clicked". |
| `application` | String | Contains application name. Example, "Android". |
| `app_id` | String | Contains app identifier which is same as Context.getPackageName(). |
| `app_version` | String | Contains app version name and version code. Example, "0.32.0 (123)". |
| `sdk_version` | String | Contains the SDK version. Example, "0.32.0". |
| `timestamp` | String | Contains timestamp in UTC (in yyyy-MM-dd'T'HH:mm:ss'Z' format). |
| `device_model` | String | Contains user device model. Example, "Google Pixel". |
| `device_version` | String | Contains user device version. Example, "10, Q, SDK 29". |
| `company` | String | Contains company name. Example, "Company". |
| `menu_name` | String | Contains name of the leaf node (user last menu selection). Example, "Sub Menu". |
| `menu_id` | String | Contains id of the leaf node (user last menu selection). Example, "123". |
| `menu_path` | String | Contains the full sequence of menus selected by user. Example, "Parent / Child / Sub Menu". |
| `menu_key` | String | Contains DAP key and it is optional. Example, "special_user_menu". |
Email submitted data
| Key | Type | Description |
|---|---|---|
| `has_attachments` | Boolean | Returns True if email has any attachments, False otherwise. |
Session data
| Key | Type | Description |
|---|---|---|
| `event_name` | String | Contains event name. Example, "Email Clicked". |
| `type` | String | Contains session type. Example, "chat" or "call". |
| `timestamp` | String | Contains timestamp in UTC (in yyyy-MM-dd'T'HH:mm:ss'Z' format). |
Session created data
| Key | Type | Description |
|---|---|---|
| `session_id` | String | Contains session id. Example, "100". |
| `type` | String | Contains session type. Example, "chat" or "call". |
| `end_user_identifier` | String | Contains end user identifier. Example, "John". |
| `messages_end_user` | String | Contains end user messages count and only included for chat session. Example, "3". |
| `messages_agent` | String | Contains agent messages count and only included for chat session. Example, "3". |
Session ended data
| Key | Type | Description |
|---|---|---|
| `agent_name` | String | Contains agent name. Example, "John". |
| `ended_by` | String | Contains who ended the session details. Possible values are "agent" (when agent ends the session) or "end_user" (when end user ends the session) or "timeout" (when chat is timed out) or "dismissed" (when chat is dismissed). |
| `duration` | String | Contains session duration in seconds and only included for call session. Example, "30 seconds". |
SDK terminated data
| Key | Type | Description |
|---|---|---|
| `event_name` | String | Contains event name. Example, "Email Clicked". |
Content card clicked data
| Key | Type | Description |
|---|---|---|
| `title` | string | The card title. |
| `title` | string | The card title. |
| `subtitle` | string | The card subtitle. |
| `body` | string | The description of the content card. |
| `link` | string | A web page link or a deeplink. The SDK uses the OS capabilities to open it. |
| `event_params` | dictionary | A dictionary containing extra information about the click event. The SDK uses this. |
Content card button clicked data
| Key | Type | Description |
|---|---|---|
| `title` | string | The card title. |
| `title` | string | The card title. |
| `link` | string | A web page link or a deeplink. The SDK uses the OS capabilities to open it. |
| `event_params` | dictionary | A dictionary containing extra information about the click event. The SDK uses this. |
Quick reply clicked data
| Key | Type | Description |
|---|---|---|
| `title` | string | The card title. |
| `title` | string | The card title. |
| `link` | string | A web page link or a deeplink. The SDK uses the OS capabilities to open it. |
| `event_params` | dictionary | A dictionary containing extra information about the click event. The SDK uses this. |
Message link clicked data
| Key | Type | Description |
|---|---|---|
| `event_name` | String | Contains the event name---for example, "Message Link Clicked". |
| `link` | String | A web page link or a deep link. The SDK uses the OS capabilities to open it. |
## Send custom data to your CRM
Custom data can be sent to support agents and will appear in the support
ticket for the incoming call/chat.
There are two methods to send custom data:
- **Signed method**: Predefined data signing with JWT.
- **Unsigned method**: Predefined data with plain JSON (not recommended).
### Using the signed method to send custom data
To send custom data using the signed method, implement a signing
method.
First, retrieve custom data to your host app then send them to your server for
signing. On your server, you can add additional data by using a defined form.
Sign them with your company secret, and then return them by JWT.
public class ExampleApplication extends Application implements UjetRequestListener {
@Override
public void onCreate() {
super.onCreate();
Ujet.init(this);
}
@Override
public void onSignPayloadRequest(Map payload, UjetPayloadType ujetPayloadType, UjetTokenCallback tokenCallback) {
// ...
if (ujetPayloadType == UjetPayloadType.CustomData) {
/**
* These codes are for providing signed custom data.
* Add some data from app, and add more sensitive data from server and sign it.
*/
UjetCustomData appCustomData = new UjetCustomData();
appCustomData.put("model", "Model", "MODEL1234");
appCustomData.put("customer_id", "Customer ID", 12345);
appCustomData.put("temperature", "Temperature", 70.5f);
appCustomData.put("purchase_date", "Purchase Date", new Date());
appCustomData.put("battery", "Battery", "52%");
appCustomData.put("location", "Location", "San Francisco, CA, United States");
appCustomData.putURL("dashboard_url", "Dashboard URL", "https://internal.dashboard.com/12345");
payload.put("custom_data", appCustomData.getData());
tokenCallback.onToken(APIManager.getHttpManager().getSignedCustomData(payload));
}
// ...
}
}
### Using unsigned method to send custom data
> [!CAUTION]
> **Caution:** This method is not recommended, as it creates a potential vulnerability which could open your application to a man-in-the-middle attack. If you choose to use this method, you are responsible for the security exposure and potential damage that might occur.
Google recommends that you to use the signed method to send custom data in your
application. For more information, see [Using the signed method to send custom
data](https://docs.cloud.google.com/contact-center/ccai-platform/docs/android-sdk-guide#using-signed-method-to-send-custom-data).
You can send unsigned data by starting the Android SDK with start options to set
custom data using `UjetStartOptions.Builder#setUnsignedCustomData` and
`UjetTokenCallback` should call `onToken(null)`.
HashMap jsonData = new HashMap<>();
// Convert json string into hashmap object and store it in jsonData
UjetCustomData customData = new UjetCustomData();
customData.putObject("external_chat_transfer", jsonData); // Use `external_chat_transfer` key to send chat transcript data
UjetStartOptions ujetStartOptions = new UjetStartOptions.Builder()
.setUnsignedCustomData(customData)
.build();
Ujet.start(ujetStartOptions);
### Using unsigned custom data to send external chat transcript
You can send the external chat transcript to CCAI Platform using
unsigned custom data when it's started. Use
`UjetCustomData.putObject("external_chat_transfer", hashMapObject)` to set the
transcript data in JSON format as follows:
HashMap jsonData = new HashMap<>();
// Convert json string into hashmap object and store it in jsonData
UjetCustomData customData = new UjetCustomData();
customData.putObject("external_chat_transfer", jsonData); // Use `external_chat_transfer` key to send chat transcript data
UjetStartOptions ujetStartOptions = new UjetStartOptions.Builder()
.setUnsignedCustomData(customData)
.build();
Ujet.start(ujetStartOptions);
JSON format:
- `greeting_override`: string
- `agent`: dictionary
- `name`: string
- `avatar`: string \[url of agent avatar, optional\]
- `transcript`: array
- `sender`: string \["end_user" or "agent"\]
- `timestamp`: string \[ie "2021-03-15 12:00:00Z"\]
- `content`: array
- `type`: string \[one of text, media\]
- `text`: string \[required for text type\]
- `media`: dictionary \[required for media type\]
- `type`: string \[one of image, video\]
- `url`: string \[public URL pointing at media file\]
JSON example:
{
"greeting_override": "Please hold while we connect you with a human agent.",
"agent": {
"name": "Name",
"avatar": "avatar url"
},
"transcript": [
{
"sender": "agent",
"timestamp": "2021-03-15 12:00:15Z",
"content": [
{
"type": "text",
"text": "**Suggestions shown:**\n\n* Help with batch or delivery\n* Help with metrics or order feedback\n* Help with Instant Cashout"
}
]
},
{
"sender": "end_user",
"timestamp": "2021-03-15 12:00:16Z",
"content": [
{
"type": "text",
"text": "Help with batch or delivery"
}
]
}
]
}
You can use Markdown on the text type. The following formats are supported:
- Bold
- Italics
- Underline
- Line breaks
- Bullet list
- Numbered list
- Links
### Custom data format
This section shows the format of the custom data that can be passed in
the JWT.
#### JSON encoded to JWT
The JSON should include iat and exp to validate JWT. The object of
the custom data is the value of the `custom_data` key.
{
"iat" : 1537399656,
"exp" : 1537400256,
"custom_data" : {
"location" : {
"label" : "Location",
"value" : "1000 Stockton St, San Francisco, CA, United States",
"type" : "string"
},
"dashboard_url" : {
"label" : "Dashboard URL",
"value" : "http://(company_name)/dashboard/device_user_ID",
"type" : "url"
},
"contact_date" : {
"label" : "Contact Date",
"value" : 1537399655992,
"type" : "date"
},
"membership_number" : {
"label" : "Membership Number",
"value" : 62303,
"type" : "number"
},
"model" : {
"label" : "Model",
"value" : "iPhone",
"type" : "string"
},
"os_version" : {
"label" : "OS Version",
"value" : "12.0",
"type" : "string"
},
"last_transaction_id" : {
"label" : "Last Transaction ID",
"value" : "243324DE-01A1-4F71-BABC-3572B77AC487",
"type" : "string"
},
"battery" : {
"label" : "Battery",
"value" : "-100%",
"type" : "string"
},
"bluetooth" : {
"label" : "Bluetooth",
"value" : "Bluetooth not supported",
"type" : "string"
},
"wifi" : {
"label" : "Wi-Fi",
"value" : "Wi-Fi not connected",
"type" : "string"
},
"ssn" : {
"invisible_to_agent" : true,
"label" : "Social Security Number",
"value" : "102-186-1837",
"type" : "string"
}
}
}
The key is a unique identifier for the data. The type is the type of the
value.
- `string`
- JSON string
- `number`
- integer, float
- `date`
- UTC Unix timestamp format with 13 digits. (contains milliseconds)
- `url`
- HTTP URL format
The label is the display name on the CRM page.
### Prevent the display of custom data
You can use the `invisible_to_agent` property with a custom data object to
prevent signed or unsigned custom data from being displayed in the agent
adapter. In the previous example, the end-user's social security number is not
shown in the agent adapter because `"invisible_to_agent" : true` is included in
the `ssn` object.
> [!NOTE]
> **Note:** The `invisible_to_agent` property does not prevent [reserved
> data properties](https://docs.cloud.google.com/contact-center/ccai-platform/docs/ios-sdk-guide#reserved-data-properties-ios-sdk) from displaying in the agent adapter.
When you include the `"invisible_to_agent" : true` property with a custom data object,
you can expect the following behavior:
- The custom data is included in the [session metadata
file](https://docs.cloud.google.com/contact-center/ccai-platform/docs/crm-session-metadata).
- The custom data is not included in CRM records.
For more information, see [View
session data in the agent adapter](https://docs.cloud.google.com/contact-center/ccai-platform/docs/session-data-agent-adapter).
### Reserved data properties
You can send reserved data properties to Contact Center AI Platform (CCAI Platform) as signed custom data when a
session begins. For more information, see [Send
reserved data properties](https://docs.cloud.google.com/contact-center/ccai-platform/docs/send-reserved-data-properties).
The following is an example of reserved data properties in custom data:
```
{
"custom_data": {
"reserved_verified_customer": {
"label": "Verified Customer",
"value": false,
"type": "boolean"
},
"reserved_bad_actor": {
"label": "Bad Actor",
"value": false,
"type": "boolean"
},
"reserved_repeat_customer": {
"label": "Repeat Customer",
"value": false,
"type": "boolean"
}
}
}
```
Set each value to `true` or `false`.
- `reserved_verified_customer`: `true` if you consider this end-user to be a legitimate customer.
- `reserved_bad_actor`: `true` if you consider this end-user to potentially be a bad actor.
- `reserved_repeat_customer`: `true` if you have determined that this end-user has contacted your contact center before.
## Fallback
You can use `UjetErrorListener` for the fallback of unexpected errors. If
you don't set this listener or return false, the Android SDK will
handle the error.
The Android SDK will redirect users to the dialer with a fallback number
only when Enable PSTN Fallback toggle is **ON** in the at **Settings \>
Developer Settings \> MMA \> Edit pop-up**, exit the SDK otherwise.
| Error Type | Error Code | Trigger |
|---|---|---|
| NETWORK_ERROR | 1 | The network is not available. Note that this error is not triggered when network is not available during chat or call or rate screen. |
| AUTHENTICATION_ERROR | 100 | An unexpected error occurred during the authentication. |
| AUTHENTICATION_JWT_ERROR | 101 | An unexpected error occurred during the JWT validation (e.g. parsing error). |
| VOIP_CONNECTION_ERROR | 1000 | Failed to establish a connection to the VoIP provider. It is handled through the callback of VoIP SDK. |
| VOIP_LIBRARY_NOT_FOUND | 1001 | A call is expected to be connected using a VoIP provider but one couldn't be found. This could happen when a developer integrated the wrong SDK or didn't add VoIP provider library in their dependencies. |
| CHAT_LIBRARY_NOT_FOUND | 1100 | Occurs when couldn't find chat library. This could happen when a developer integrated the wrong SDK or didn't add Twilio Chat library in their dependencies. |
Ujet.setUjetEventListener(new UjetEventListener() {
@Override
public void onEvent(UjetEventType eventType, HashMap eventData) {
// eventType specifies the event type and eventData holds the data related to the event.
// You can parse the eventData and here we are just logging the event type and event data.
Log.i("CCAI Platform Event Type", eventType.getValue());
StringBuilder builder = new StringBuilder();
for (Map.Entry entry : eventData.entrySet()) {
builder.append(entry.getKey()).append(" : ").append(entry.getValue()).append("\n");
}
Log.i("CCAI Platform Event Data", builder.toString());
}
});
## Deep linking
If you want to use smart actions for an IVR (PSTN) call, you need to set
up deep linking in your project.
Deep linking format is a unique URI such as:
ujet:// /smartchannel.
Also, you have to set this link or any URL which will redirect to this
link in Admin Portal (**Settings \> Operation Management \> Enable Send
SMS to Download App)**.
You will need to add an intent filter that contains the deep link in
your manifest.
## Live chat resiliency
To improve the uptime of live chat, configure live chat resiliency. This adds a
secondary fallback messaging media layer that is used if the primary media
layer fails.
To add this capability, add the following dependency to your module-level
`build.gradle` file:
dependencies {
implementation "co.ujet.android:chat_blue:VERSION"
}
Replace VERSION with the latest version of the UJET SDK.
## Incoming call behavior changes
Beginning with *Android 10 version devices*, incoming call will not be
received directly to end users when host app is in the background.
Instead, we use notifications to alert users to incoming call (even when
phone is locked) giving them the option to accept or decline the call.
We show the same notifications when host app in background and locked
the screen before incoming call is arrived. This behavior change is to
comply with Google's recent restrictions to start activities when app
is in background. Behavior is not affected when host app in foreground
or running on lower than Android 10 version devices.
## Customize SDK session
This section outlines how the SDK can be further customized.
### Check for an existing session
Before starting a session, use the described method to check if there is any
existing or in progress session. And, if it exists then you can prompt
the end user to resume or cancel it.
This is especially important when a user is changed.
if (Ujet.getStatus() != UjetStatus.None) {
// Display alert to cancel login or resume existing session
}
### Disconnect the session
Refer to the method if you want to disconnect any session in
progress.
Before using this method, ensure to check if such a session exists using
Ujet.getStatus(). If you want to perform an action(s) after the SDK
disconnects the session, for example, showing a message or closing the
app, then you can use response callback `onFinished()` as covered in the next
section, otherwise set callback to null.
Ujet.disconnect(new UjetResponseCallback() {
@Override
public void onFinished() {
// `onFinished()` is triggered after CCAI Platform disconnects the session.
finish(); // Finishes the activity.
}
});
### Clear end user data from cache
You are responsible for clearing the cache when end user related data
has been updated or changed from your app. For example, if the end user
has signed out, then invoke the method to remove the cache for
that user so that a new session is initiated for the new end user upon
the next start of SDK.
Ujet.clearUserData();
### Hide the SDK
You can hide the SDK using the `Ujet.hideSDK()` method. This is useful when the
SDK interferes with your app user interface, for example. Initialize the SDK
using `Ujet.init()` before calling this method. `Ujet.init()` returns `true` if
the SDK is hidden successfully, and `false` otherwise. After hiding the SDK, you
can start it again using the `Ujet.start()` method.
The following example hides the SDK:
Ujet.hideSDK();
## Configure external deflection link icons
Customize the icon in the External Deflection Link channel by uploading the icon
into a drawable folder of your app and ensure you use the same icon name while
creating the external deflection link in the CCAI Platform portal at **Settings \>
Chat \> External Deflection Links \> View links \> Add Deflection Link.**
If the icon name in the CCAI Platform portal doesn't match the icon uploaded
into the app then the Android SDK will uses the default icon.
## Configure the surveys *Thank You* icon
You can customize or override the icon in survey thank you page by uploading an
icon into the drawable folder of your app and use the filename
`ujet_survey_thank_you_icon` as icon name.
## UI and string customization
This section explains how to customize strings, content cards, themes, and chat
headers.
### Strings
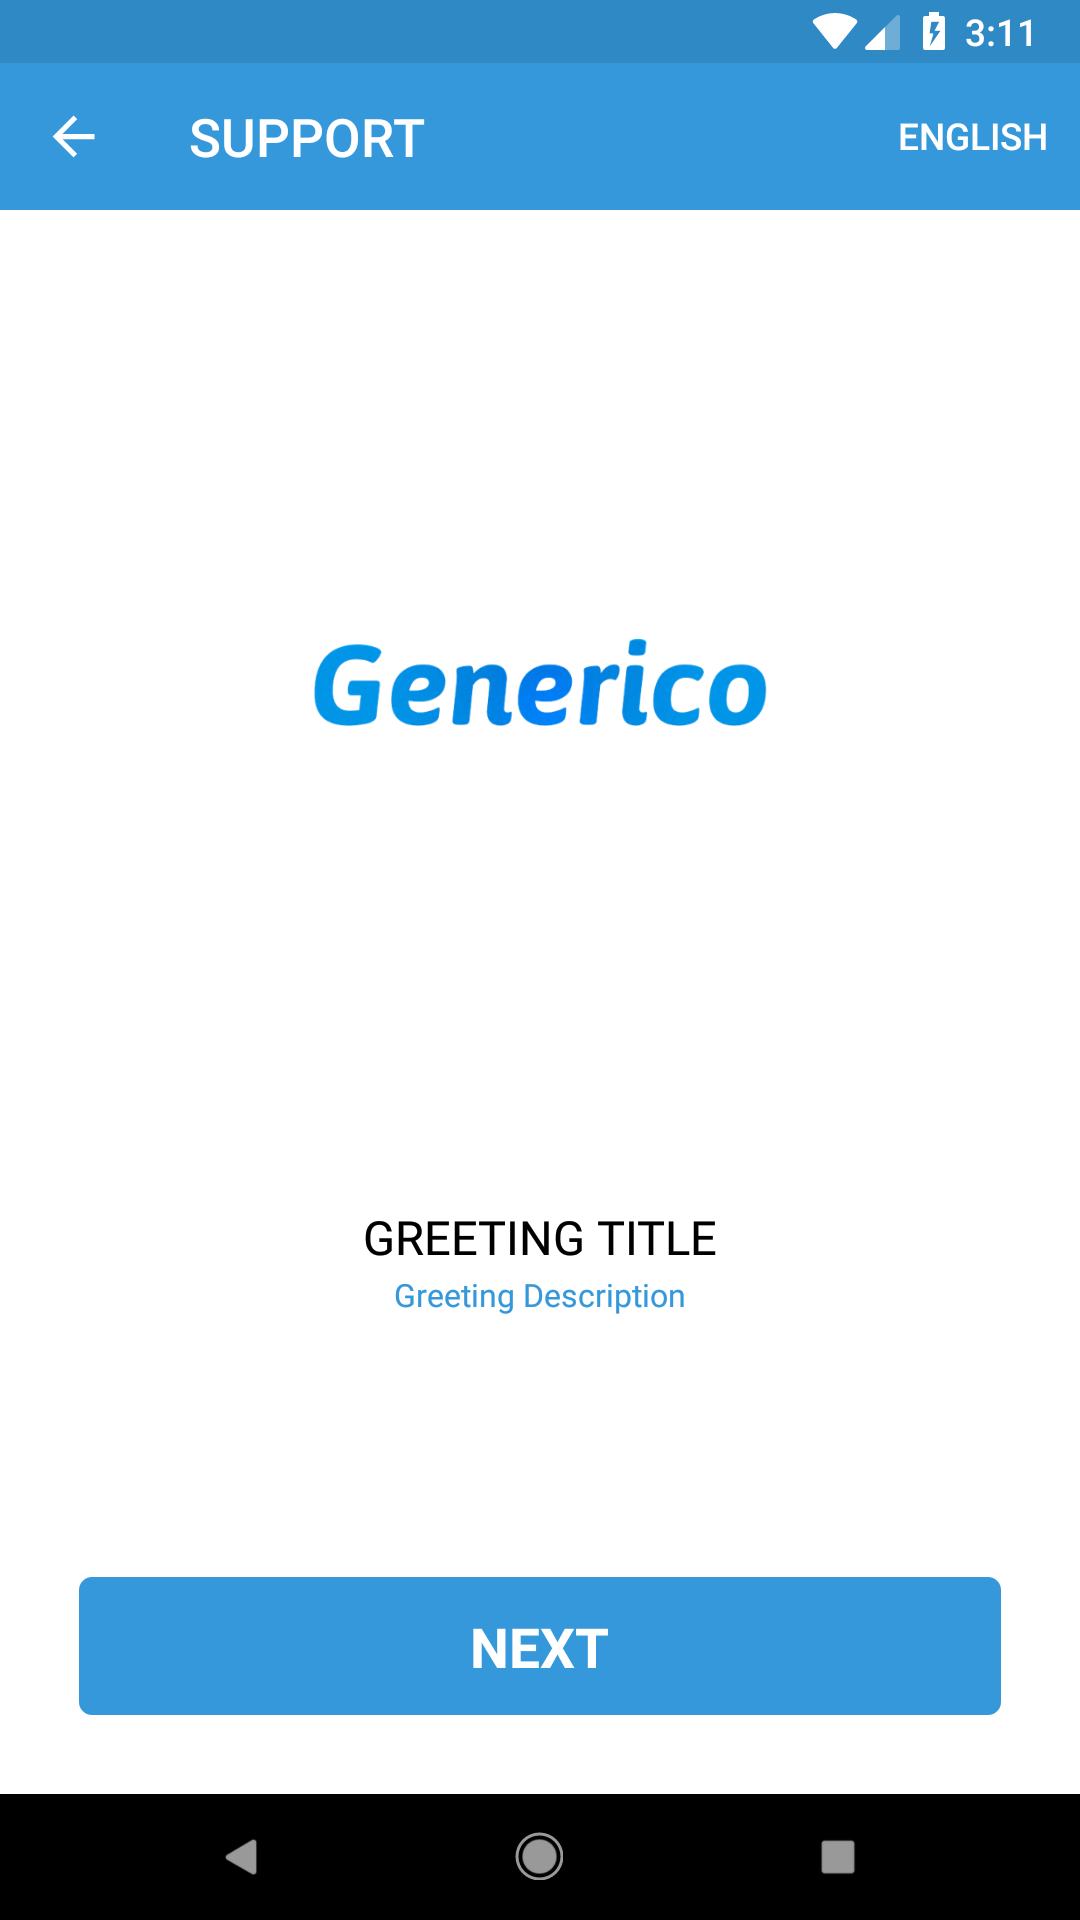
You can customize strings used in the application by overriding keys for
each string in strings.xml.
Customer Support
runs on UJET
### Text size customization
Customize title, description and picker text size used in the
application by overriding following keys in dimens.xml.
Customizable text sizes are outlined:
10sp
10sp
10sp
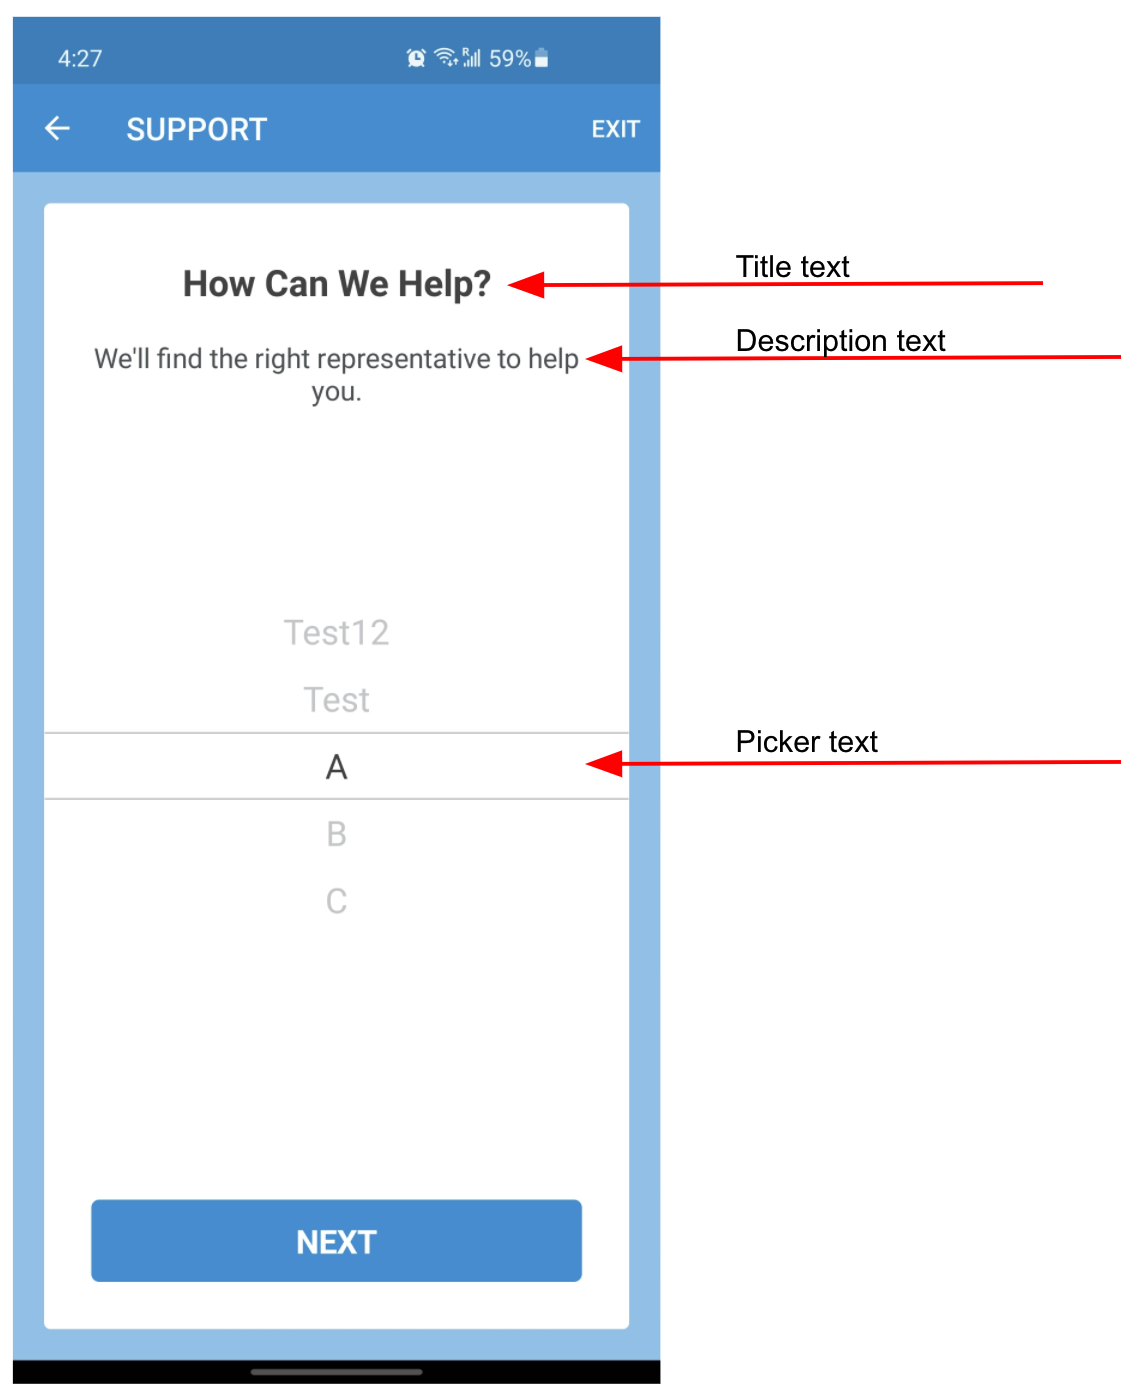
### Theme
Customize the theme and background with the following steps. Step 1 is for theme
and step 2 is for background.
1. Customize the theme by overriding keys for each style item in
style.xml. For example,
2. You can customize background color in the application by overriding
keys for each style item in style.xml. Customizable background color
is shown in the screenshot.
### Customize the chat header title
There are options available to customize the chat header title text in chat
in your UI.
You can customize the chat header title text by using the following options:
- @color/chatHeaderTextLightMode
- @color/chatHeaderTextDarkMode
- 16sp
- bold
You can customize Virtual Agent quick replies in the chat UI by using the
following options:
- @color/chatQuickReplyButtonBackgroundLightMode
- @color/chatQuickReplyButtonBackgroundDarkMode
- @color/chatQuickReplyButtonPressedBackgroundLightMode
- @color/chatQuickReplyButtonPressedBackgroundDarkMode
- @color/chatQuickReplyButtonTextLightMode
- @color/chatQuickReplyButtonTextDarkMode
- @color/chatQuickReplyButtonPressedTextLightMode
- @color/chatQuickReplyButtonPressedTextDarkMode
- @color/chatQuickReplyButtonStrokeLightMode
- @color/chatQuickReplyButtonStrokeDarkMode
- Kreon-Regular.ttf
- 3dp
- 3dp
- 0dp
- 10dp
- 1dp
- right
### Content cards
You can add customization for content cards along with chat customization. You
can do this either by using the JSON file (refer to the `content_card property`
in the `app/src/main/assets/json/ujet_styles.json` file) or by using the
`ContentCardStyle` class.
ChatStyles(
...
contentCard = ContentCardStyle(
backgroundColor = "color_reference",
cornerRadius = 8,
font = FontStyle(
colorReference = "color_reference",
size = 16,
style = "bold|italic",
family = "Roboto-Black.ttf",
),
border = BorderStyle(
color = "color_reference",
width = 2,
),
title = TextStyle(
FontStyle(
colorReference = "color_reference",
size = 18,
style = "bold|italic",
family = "Roboto-Black.ttf",
)
),
subtitle = TextStyle(
FontStyle(
colorReference = "color_reference",
size = 16,
style = "bold|italic",
family = "Roboto-Black.ttf",
)
),
body = TextStyle(
FontStyle(
colorReference = "color_reference",
size = 16,
style = "bold|italic",
family = "Roboto-Black.ttf",
)
)
)
)
### Web form theme
You can customize the web form card along with chat customization. You can
do this either by using the JSON file (refer to the `form_card` property in
the `app/src/main/assets/json/ujet_styles.json` file) or by using the
`FormCardStyle` class.
ChatStyles(
...
formCard = FormCardStyle(
backgroundColor = "color_reference",
cornerRadius = 8,
font = FontStyle(
colorReference = "color_reference",
size = 16,
style = "bold|italic",
family = "Roboto-Black.ttf",
),
border = BorderStyle(
color = "color_reference",
width = 2,
),
title = TextStyle(
FontStyle(
colorReference = "color_reference",
size = 18,
style = "bold|italic",
family = "Roboto-Black.ttf",
)
),
subtitle = TextStyle(
FontStyle(
colorReference = "color_reference",
size = 16,
style = "bold|italic",
family = "Roboto-Black.ttf",
)
),
image = ImageStyle (
height = 94,
),
)
)
#### Surveys
You can change the icon on the survey thank you page by uploading an icon to
your app's drawable folder.
Make sure you use `ujet_survey_thank_you_icon` as the icon name.
## Customize the screen share consent dialog
To customize the screen share consent dialog, implement the
`CoBrowseAlertProvider` abstract class. You can use `DialogFragment` or
`AlertDialog` to implement the custom consent dialog.
- If you use `DialogFragment`, include two buttons, one for accepting and one
for denying the consent. Pass a custom `DialogFragment` instance to the
`dialogInstance` callback.
- If you use `AlertDialog`, don't pass the `DialogFragment` instance to the
`dialogInstance` callback.
After obtaining consent, pass it to the SDK by invoking the `consentStatus`
callback and passing the boolean value accordingly.
Use the following code sample to implement the custom consent dialog:
class CoBrowseAlertProviderImpl : CoBrowseAlertProvider() {
// You should only implement the cobrowse consent dialog methods that you want to customize and replace the default UI.
override fun showCoBrowseSessionActivationRequestDialog(context: Context, dialogInstance: (DialogFragment) -> Unit, consentStatus: (Boolean) -> Unit) {
// Using DialogFragment for customization
val dialog = ConsentDialog.newInstance(
title = context.getString(co.ujet.android.R.string.ujet_cobrowse_session_request_alert_title),
message = context.getString(co.ujet.android.R.string.ujet_cobrowse_session_request_alert_message),
positiveButton = context.getString(co.ujet.android.R.string.ujet_cobrowse_session_request_alert_button_allow),
negativeButton = context.getString(co.ujet.android.R.string.ujet_cobrowse_session_request_alert_button_deny),
cancelable = false,
onNegativeClick = { consentStatus(false) }, // Pass consent value
onPositiveClick = { consentStatus(true) }
)
// Pass DialogFragment instance
dialogInstance(dialog)
// Using AlertDialog for customization, if you use AlertDialog instead of DialogFragment then you don't need to call `dialogInstance(dialog)`, just pass consent value using `consentStatus()`
val alertDialog = AlertDialog.Builder(context).apply {
setTitle("Co-Browse Session Request") // Set dialog title
setMessage("Allow the agent to co-browse with you?") // Set dialog message
setPositiveButton("Allow"){dialogInterface, _ ->
// Pass consent
consentStatus(true)
}
setNegativeButton("Deny"){dialogInterface, _ ->
// Pass consent
consentStatus(false)
}
}.create()
alertDialog.show()
}
override fun showCoBrowseSessionRemoteControlRequestDialog(context: Context, dialogInstance: (DialogFragment) -> Unit, consentStatus: (Boolean) -> Unit) {
// Same as showCoBrowseSessionActivationRequestDialog
}
override fun showCoBrowseSessionFullDeviceRequestDialog(context: Context, dialogInstance: (DialogFragment) -> Unit, consentStatus: (Boolean) -> Unit) {
// Same as showCoBrowseSessionActivationRequestDialog
}
override fun showCoBrowseConfirmationDialog(context: Context, dialogInstance: (DialogFragment) -> Unit, consentStatus: (Boolean) -> Unit) {
// Same as showCoBrowseSessionActivationRequestDialog
}
override fun showStopCoBrowseConfirmationDialog(context: Context, dialogInstance: (DialogFragment) -> Unit, consentStatus: (Boolean) -> Unit) {
// Same as showCoBrowseSessionActivationRequestDialog
}
}
// A generic DialogFragment class
class ConsentDialog : DialogFragment() {
override fun onCreateDialog(savedInstanceState: Bundle?): Dialog {
// Implement your custom dialog UI here
}
}
Pass this implementation to the SDK using the following API:
Ujet.setCoBrowseAlertProvider(CoBrowseAlertProviderImpl())
## Configure web forms
To configure a web form, implement the `ujetWebFormDidReceive` method of the
`UjetWebFormListener` interface. This method receives an event (a
`FormMessageReceived` map) as a parameter, containing form-related information.
The event includes the following JSON structure:
{
"type": "form_message_received",
"smart_action_id": 1,
"external_form_id": "external_foobar",
"signature": "4868a7e1dcb5..."
}
### Handle the event
To handle the event, follow these steps:
1. Extract the relevant information from the event map (`smart_action_id`, `external_form_id`, and `signature`).
2. Generate a form URI and a signature for the form data.
3. Pass the form data to the SDK as a `FormDataEvent` map using `callback.onEvent(formDataEvent)`.
4. If an error occurs during URI or signature generation, invoke the error callback using `callback.onError()`.
The map (`FormDataEvent`) passed to the SDK should have the following structure:
{
"type": "form_data",
"signature": "4868a7e1dcb5...",
"data": {
"external_form_id": "form_id",
"smart_action_id": 1,
"uri": "foobar"
}
}
The signature (`HMAC-SHA256`) must be generated using the data, signed with a shared secret key. The object keys of data must be alphabetically ordered prior to generating signatures and the same data should be sent to the SDK.
The following code sample shows how to implement the web form listener:
class UjetWebFormListenerImpl : UjetWebFormListener {
override fun ujetWebFormDidReceive(event: Map, callback: UjetWebFormCallback) {
try {
// Extract required fields from the event
val smartActionId = event["smart_action_id"]
val externalFormId = event["external_form_id"]
val signature = event["signature"]
// Simulate form URI generation (replace with actual implementation)
val formUri = "generated_form_uri"
// Prepare the data map, key should be alphabetically ordered
val data = mapOf(
"external_form_id" to externalFormId,
"smart_action_id" to smartActionId,
"uri" to formUri
)
// Generate the signature using `data`
val generatedSignature = "generated_signature"
// Create the FormDataEvent map
val formDataEvent = mapOf(
"type" to "form_data",
"signature" to generatedSignature,
"data" to data
)
// Pass the FormDataEvent to the SDK
callback.onEvent(formDataEvent)
} catch (e: Throwable) {
// If any error occurs, invoke the error callback
callback.onError()
}
}
}
Pass this implementation to the SDK using the following API:
Ujet.setUjetWebFormListener(UjetWebFormListenerImpl())
## Troubleshooting
### Starting a new chat took longer than 30 seconds
Check if you are responding to a delegate method of custom data. You should
return valid custom data upon request or just return null with a callback.
Use the following code for reference.
@Override
public void onSignPayloadRequest(Map payload, UjetPayloadType ujetPayloadType, UjetTokenCallback tokenCallback) {
if (ujetPayloadType == UjetPayloadType.CustomData) {
tokenCallback.onToken(null);
}
}
### Policy declaration explanation
If you receive a notification in the Google Play console asking you to declare
a policy for the services or permissions used by the Android SDK, use one of the
following explanations.
#### Declare foreground services used by the Android SDK
> Google introduced foreground service types in Android 14 and mandated it to
> specify while starting foreground services, according to
> https://developer.android.com/about/versions/14/changes/fgs-types-required#remote-messaging.
> The Contact Center AI Platform (CCAI Platform) Android SDK uses foreground services to initiate chat and call, so we used
> FOREGROUND_SERVICE_REMOTE_MESSAGING service type for chat as we are dealing
> with text messages and FOREGROUND_SERVICE_MICROPHONE service type for call.
> Without these service types the SDK will crash while initiating chat or call
> starting from Android 14 version devices.
#### Declare full screen intent permission used by the Android SDK
> USE_FULL_SCREEN_INTENT permission is required to show incoming call push
> notification when device is locked. It alerts the end user and displays the
> incoming call notification in full screen (this is how in-built
> phone app notifies the incoming call to the end user).
## Support Android 15
To support Android 15, follow these steps:
1. Set `compileSdkVersion = 35` and `targetSdkVersion = 35` in your
`build.gradle(:app)`.
2. Ensure that your project Android Gradle Plugin (AGP) version is 8.5.1 or
later. For more information, see [Update the packaging of your shared
libraries](https://developer.android.com/guide/practices/page-sizes#update-packaging).
3. Install the Java Development Kit (JDK) version 17 or later to
build Android projects using AGP 8.0 or later. For more information, see
[JDK 17 required to run AGP 8.0](https://developer.android.com/build/releases/past-releases/agp-8-0-0-release-notes#jdk-17-agp).