This tutorial shows how to create a virtual Linux workstation running Ubuntu 22.04
with a
[virtual display](https://docs.cloud.google.com/compute/docs/instances/enable-instance-virtual-display).
A virtual display device is useful when applications on your virtual machine (VM)
instances require a display device, but don't require the full power or cost of
a
[GPU](https://docs.cloud.google.com/compute/docs/gpus).
For information about other types of virtual workstations, including Windows,
see
[About creating a virtual workstation](https://docs.cloud.google.com/compute/docs/virtual-workstation).
> [!NOTE]
> **Note:** This solution is not suitable for graphically intensive applications that require hardware graphics acceleration. For information about the types of virtual workstations that you can create on Google Cloud, see [Creating a virtual workstation](https://docs.cloud.google.com/compute/docs/virtual-workstation).
After you create the virtual workstation, you learn how to remotely access it
using
[HP Anyware](https://anyware.hp.com/)
(formerly Teradici CAS), using
[PC-over-IP (PCoIP®)](https://h20195.www2.hp.com/v2/GetDocument.aspx?docname=4AA8-3293ENW)
technology, a remote desktop protocol widely used in the media and
entertainment, game development, architecture, and engineering industries. PCoIP
offers features essential to these types of workloads, such as color accuracy,
support for multiple monitors, lossless display, and tablet pressure sensitivity.
This tutorial assumes you are familiar with the Linux command line.
## Objectives
- Create a Compute Engine VM. This VM serves as the foundation for a virtual workstation.
- Install HP Anyware software on the virtual workstation.
- Connect to the virtual workstation using a PCoIP software client.
> [!NOTE]
> **Note:** This tutorial does not include advanced security features such as fine-grained SSH key management, certificate issuance, or multi-factor authentication (MFA). A full deployment requires a [connection broker](https://wikipedia.org/wiki/Connection_broker) and [domain controller](https://wikipedia.org/wiki/Domain_controller_(Windows)), which help enable a stronger security profile for connecting to virtual workstations.
## Costs
This tutorial uses the following billable components of
Google Cloud:
- [Compute Engine](https://cloud.google.com/compute/pricing)
You can use the
[pricing calculator](https://cloud.google.com/products/calculator/estimate-preview/CiQwYjBjNTRjNC1hZWFhLTQyZjQtOGZlNi1mMjgyMjg5YTM3N2MQAQ==)
to generate a cost estimate based on your projected usage.
The resources that make up the virtual workstation and the factors that affect
cost in this tutorial are:
- 4 vCPUs, 16 GB RAM [E2 standard machine type](https://docs.cloud.google.com/compute/vm-instance-pricing#general-purpose_machine_type_family)
- 20-GB SSD [balanced boot disk](https://docs.cloud.google.com/compute/disks-image-pricing#persistentdisk)
- [Internet outbound data transfer costs](https://docs.cloud.google.com/vpc/network-pricing#internet_egress)
Internet data transfer represents data that streams from your virtual workstation to
your local display client and is billed at
[internet outbound data transfer costs](https://docs.cloud.google.com/vpc/network-pricing#internet_egress).
Variables that affect data transfer during a PCoIP session are bandwidth, screen
resolution, number of display monitors, applications used, and the type of
activity on each monitor. The HP Anyware
[Session Planning Guide](https://www.teradici.com/web-help/pcoip_session_planning/current/)
can help you understand different workload requirements.
> [!NOTE]
> **Note:** Costs differ depending on region and connection method. These estimated costs are based on connection over the public internet, with resources located in the `us-central1` region (Iowa).
## Before you begin
This tutorial uses the Google Cloud CLI, which you can run from a
[Cloud Shell](https://docs.cloud.google.com/shell/docs/starting-cloud-shell)
instance launched from the
[](https://console.cloud.google.com/)[Google Cloud console](https://console.cloud.google.com/).
If you want to use gcloud CLI on your local workstation, install the
[Google Cloud CLI](https://docs.cloud.google.com/sdk/docs).
The tutorial shows you how to run commands in Cloud Shell; if you
use the gcloud CLI on your workstation, adjust the instructions
accordingly.
In addition, make sure you have the following:
- A [Google Chrome](https://www.google.com/chrome/) browser to access the Google Cloud console.
- The latest [PCoIP Client software](https://anyware.hp.com/find/product/hp-anyware) for Windows, Mac, or Linux to access the virtual workstation.
- An account on [help.teradici.com](https://help.teradici.com/) to download the HP Anyware software. Account registration is free.
- An HP Anyware software license. You can [request a trial license](https://reinvent.hp.com/Anyware-Demo), or contact your HP representative and ask for a trial registration code to use for this virtual workstation.
## Architecture
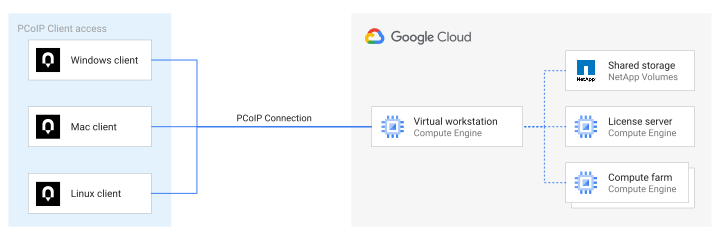
The following diagram shows the components that are used in this tutorial to
deploy a single virtual workstation. Optional components shown in the diagram
include different ways to connect to your virtual workstation, shared storage,
an additional VM for serving third-party licenses, and additional
infrastructure representing a render or compute farm.
## Choose a region
An important factor when you deploy a virtual workstation is the latency between
your location and the VM you create. The lower the latency, the better the
experience. Therefore, you want to place your VM in a region and zone
that's geographically closest to you.
## Create the virtual workstation
In Cloud Shell, create the Compute Engine virtual workstation instance:
```
gcloud compute instances create VM_NAME \
--zone=ZONE \
--machine-type=e2-standard-4 \
--enable-display-device \
--image-project=ubuntu-os-cloud \
--image-family=ubuntu-2204-lts \
--boot-disk-size=20 \
--boot-disk-type=pd-balanced \
--network=default
```
Replace the following:
- `VM_NAME`: a name for your VM instance.
- `ZONE`: the zone that's geographically closest to you. An important factor when you deploy a virtual workstation is the latency between your location and the VM you create. The lower the latency, the better the experience. For information about the geographical location of zones, see [Available regions and zones](https://docs.cloud.google.com/compute/docs/regions-zones#available).
After the virtual workstation is created, the VM status is displayed. The
output looks similar to the following:
```
NAME: test-workstation
ZONE: us-west1-b
MACHINE_TYPE: e2-standard-4
PREEMPTIBLE:
INTERNAL_IP: 10.138.XX.XXX
EXTERNAL_IP: XX.XXX.XXX.XXX
STATUS: RUNNING
```
Note the external IP address, you need it later in the tutorial.
## Sign in to your virtual workstation
After you create the virtual workstation, you sign in to the machine so that you
can configure it.
1. Connect to the virtual workstation using the following command:
```
gcloud compute ssh VM_NAME
```
2. Set your account password. Logging into a virtual workstation using the PCoIP
software client requires a user password.
```
sudo passwd `whoami`
```
When you're prompted, enter a password. You will use this password later
in the tutorial to log on to your virtual workstation with the HP Anyware
PCoIP Client.
## Install the desktop environment
The default Google Cloud Ubuntu 22.04 image is a minimal installation of
Ubuntu. Install a desktop environment to run your virtual workstation as a graphical
workstation. For this tutorial, you install the KDE Plasma Desktop.
1. Update the software repositories by running the following command:
```
sudo apt update
```
2. Install the desktop environment:
```
sudo apt -y install kubuntu-desktop
```
3. Reboot the workstation:
```
sudo reboot
```
Your connection to the virtual workstation closes.
## Install HP Anyware software
HP Anyware software provides an agent that runs on your virtual workstation,
delivering the desktop to your hardware or software client.
> [!NOTE]
> **Note:** Installation may differ if you choose a different Linux distribution. For more information, see [HP Anyware Standard Agent for Linux Installation Guide](https://www.teradici.com/web-help/pcoip_agent/standard_agent/linux/current/admin-guide/installing/installing/).
1. When the virtual workstation has restarted, in Cloud Shell,
reconnect to the virtual workstation:
```
gcloud compute ssh VM_NAME
```
2. Add the Teradici software repository:
```
curl -1sLf \
https://dl.anyware.hp.com/TOKEN/pcoip-agent/cfg/setup/bash.deb.sh \
| sudo -E distro=ubuntu codename=jammy bash
```
Replace the following:
- `TOKEN` is the download token you can retrieve from the [HP Anyware Standard Agent for Linux](https://docs.teradici.com/find/product/hp-anyware) page under **Downloads and scripts**.
3. Update the software repositories:
```
sudo apt update
```
4. Optional: Install USB dependencies, if you need to support USB devices other
than keyboards, mice, and pointer devices.
> [!NOTE]
> **Note:** If you skip this step, USB redirection is disabled. That means you can't use bridged USB devices.
```
sudo apt -y install usb-vhci-dkms
```
5. Install the HP Anyware software:
```
sudo apt -y install pcoip-agent-standard
```
## Register the Anyware Standard Agent
To use the Anyware Standard Agent, you must have an HP Anyware license.
1. In Cloud Shell, activate your HP Anyware software license:
```
pcoip-register-host --registration-code=REGISTRATION-CODE
```
Replace `REGISTRATION-CODE` with
the code provided to you
by HP Teradici in the form `ABCDEFGHIJKL@0123-4567-89AB-CDEF`.
2. Reboot the virtual workstation:
```
sudo reboot
```
## Create a firewall rule
The PCoIP client communicates with your virtual workstation using several ports.
You must set firewall rules that allow traffic to your virtual
workstation.
- In Cloud Shell (not on the virtual workstation), create a firewall
rule that opens the required ports:
```
gcloud compute firewall-rules create allow-pcoip \
--action=ALLOW \
--rules=tcp:443,tcp:4172,udp:4172 \
--source-ranges=0.0.0.0/0
```
> [!NOTE]
> **Note:** This firewall rule allows traffic from anywhere on the internet to access your VM instance. Always follow [best practices for firewall rules](https://docs.cloud.google.com/firewall/docs/firewalls#best_practices_for_firewall_rules) to restrict traffic to your instance.
## Sign in to your virtual workstation using the PCoIP client
1. On your local computer, go to the **PCoIP Clients** section
on the [HP Anyware support page](https://anyware.hp.com/find/product/hp-anyware),
and then download, install, and launch
the PCoIP Software Client application for your operating system.
2. In the **Host Address or Registration Code** field, enter the external
IP address of your virtual workstation. If you want, you can enter a name for
the connection.
> [!NOTE]
> **Note:** By default, PCoIP traffic is encrypted using AES-256. However, HP Anyware Software uses a self-signed certificate that's issued by Teradici. This might trigger a verification warning when you connect. You can remove this warning by creating and installing your own [custom security certificates](https://www.teradici.com//web-help/pcoip_agent/graphics_agent/windows/current/security/creating-custom-certs/). Or, you can suppress the warning by changing the [client security mode](https://www.teradici.com/web-help/pcoip_client/mac/current/security/software_client_security_modes/) for your client OS. For the purposes of this tutorial, you can ignore this warning by clicking **Connect Insecurely** in the dialog.
3. When you are connected, authenticate by entering the username and
password that you created earlier for the virtual workstation.
In a few seconds, your Linux desktop appears.
## Test your virtual workstation
After you've deployed your virtual workstation, you can test performance and
interactivity using a number of tools:
- Use [Google Chrome](https://www.google.com/chrome/) to browse your favorite sites or play [YouTube](https://www.youtube.com/) videos.
- Learn more about the [PCoIP Standard Agent for Linux](https://www.teradici.com/web-help/pcoip_agent/standard_agent/linux/current/admin-guide/configuring/configuring/).
- Install applications and test their behavior and performance.
You can also learn more about
[PCoIP performance optimization](https://www.teradici.com/web-help/pcoip_session_planning/current/optimization/performance-optimization/)
based on your workload.
## Clean up
To avoid incurring charges to your Google Cloud account for the resources used in this
tutorial, either delete the project that contains the resources, or keep the project and
delete the individual resources.
### Stop your virtual workstation
Stopped virtual workstations incur
[costs for persistent disk](https://docs.cloud.google.com/persistent-disk)
usage, but they can be restarted at any time. To stop your virtual workstation,
run the following command:
```
gcloud compute instances stop VM_NAME
```
### Delete all the components
1. [Delete the virtual workstation](https://docs.cloud.google.com/compute/docs/instances/stopping-or-deleting-an-instance#delete_an_instance).
2. [Delete the firewall rule](https://docs.cloud.google.com/vpc/docs/using-firewalls#deleting_firewall_rules).
### Delete the project
> [!CAUTION]
> **Caution** : Deleting a project has the following effects:
>
> - **Everything in the project is deleted.** If you used an existing project for the tasks in this document, when you delete it, you also delete any other work you've done in the project.
> - **Custom project IDs are lost.** When you created this project, you might have created a custom project ID that you want to use in the future. To preserve the URLs that use the project ID, such as an `appspot.com` URL, delete selected resources inside the project instead of deleting the whole project.
1. In the Google Cloud console, go to the **Manage resources** page.
[Go to Manage resources](https://console.cloud.google.com/iam-admin/projects)
2. In the project list, select the project that you want to delete, and then click **Delete**.
3. In the dialog, type the project ID, and then click **Shut down** to delete the project.
## What's next
- Learn how to [create a virtual Windows workstation](https://docs.cloud.google.com/compute/docs/virtual-workstation/windows).
- Learn more about [HP Anyware software](https://www.hp.com/us-en/services/workforce-solutions/workforce-computing/digital-workspaces.html).
- Learn more about how [PCoIP](https://h20195.www2.hp.com/v2/GetDocument.aspx?docname=4AA8-3293ENW) differs from other remote desktop software.