This tutorial shows how to use HammerDB to perform load testing on a
Compute Engine SQL Server instance. You can learn how to install
a SQL Server instance by using the following tutorials:
- [Creating SQL Server instances](https://docs.cloud.google.com/compute/docs/instances/sql-server/creating-sql-server-instances)
- [Creating a high-performance SQL Server instance](https://docs.cloud.google.com/compute/docs/tutorials/creating-high-performance-sql-server-instance)
There are a number of load-testing tools available. Some are free and open
source, while others require licenses.
[HammerDB](http://www.hammerdb.com)
is an open source tool that generally works well to
demonstrate the performance of your SQL Server database. This tutorial covers
the basic steps to use HammerDB, but there are other tools available, and you
should select the tools that align best to your specific workloads.
## Objectives
This tutorial covers the following objectives:
- Configuring SQL Server for load testing
- Installing and running HammerDB
- Collecting runtime statistics
- Running the Transaction Processing Benchmark derived from the TPC "C" specification (TPROC-C) load test
## Costs
In addition to any existing SQL Server instances running on
Compute Engine, this
tutorial uses billable components of Google Cloud, including:
- Compute Engine
- Windows Server
The [Pricing Calculator](https://cloud.google.com/products/calculator/#id=7411bcbb-3399-46bf-9dd0-9642361cd988) can generate a cost
estimate based on your projected usage. The provided link shows the cost
estimate for the products used in this tutorial, which can average 16 dollars
(US) per day.
New Google Cloud users might be eligible for a [free trial](https://console.cloud.google.com/freetrial).
## Before you begin
1. If you aren't using Windows on your local machine, install a third-party Remote Desktop Protocol (RDP) client. For more information, see [Microsoft Remote Desktop clients](https://docs.microsoft.com/windows-server/remote/remote-desktop-services/clients/remote-desktop-clients).
## Configuring the SQL Server instance for load testing
Before you start, you should double check that your Windows [firewall
rules](https://msdn.microsoft.com/en-us/library/cc646023.aspx)
are set up to allow traffic from the IP address of the new Windows instance you
created. Then, create a new database for TPCC load testing and configure a user
account using the following steps:
1. Right-click the **Databases** folder in SQL Server Management Studio, and then choose **New Database**.
2. Name the new database "TPCC".
3. Set the initial size of the data file to 190,000 MB and the log file to 65,000 MB.
4. Set the **Autogrowth** limits to higher values by clicking the ellipsis
buttons, as shown in the following screenshot:

5. Set the data file to grow by 64 MB to unlimited size.
6. Set the log file to disable auto-growth.
7. Click **OK**.
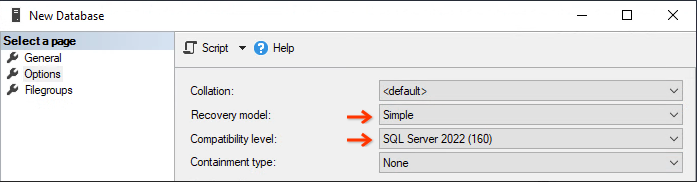
8. In the **New Database** dialog, in the left pane, choose the **Options**
page.
9. Set **Compatibility level** to **SQL Server 2022 (160)**.
10. Set the **Recovery model** to **Simple**, so that the loading doesn't fill up
the transaction logs.
11. Click **OK** to create the TPCC database, which can take a few minutes to
complete.
12. The preconfigured SQL Server image comes with only Windows Authentication
enabled, so you will need to enable mixed mode authentication within SSMS, by
following
[this guide](https://msdn.microsoft.com/en-us/library/ms188670(v=sql.120).aspx).
13. [Follow these steps](https://msdn.microsoft.com/en-us/library/aa337562.aspx)
to create a new SQL Server user account on your database server that has the
DBOwner permission. Name the account "loaduser" and give it a secure
password.
14. Take note of your SQL Server internal IP address by using the
`Get-NetIPAddress` commandlet, because it's important for performance and security
to use the internal IP.
## Installing HammerDB
You can run HammerDB directly on your SQL Server instance. However, for a more
accurate test, create a new Windows instance and test the SQL Server instance
remotely.
> [!NOTE]
> **Note:** You might need to disable [Internet Explorer Enhanced Security
> Configuration](https://learn.microsoft.com/en-us/troubleshoot/developer/browsers/security-privacy/enhanced-security-configuration-faq) before downloading files to your Windows Server instance.
### Creating an instance
Follow these steps to create a new Compute Engine instance:
1. In the Google Cloud console, go to the **Create an instance** page.
[Go to Create an instance](https://console.cloud.google.com/compute/instancesAdd)
2. For **Name** , enter `hammerdb-instance`.
3. In the **Machine configuration** section, select the
machine type with at least half the number of CPUs as your database
instance.
4. In the **Boot disk** section, click **Change**, and then do the following:
1. On the **Public images** tab, choose a Windows Server operating system.
2. In the **Version** list, click **Windows Server 2022 Datacenter**.
3. In the **Boot disk type** list, select **Standard persistent disk**.
4. To confirm your boot disk options, click **Select**.
5. To create and start the VM, click **Create**.
### Installing the software
When it's ready, use an RDP client to connect to your new Windows Server instance
and install the following software:
- [ODBC Driver 18 for SQL Server](https://learn.microsoft.com/en-us/sql/connect/odbc/download-odbc-driver-for-sql-server?view=sql-server-ver15)
- [HammerDB for Windows 64-bit](http://www.hammerdb.com/download.html)
## Running HammerDB
After you install HammerDB, run the `hammerdb.bat` file. HammberDB does
not show up in the Start menu's applications list. Use the following command
to run HammerDB:
> [!NOTE]
> **Note:** In this tutorial we've used HammerDB 4.10. If you are using a later version some options may have changed.
C:\Program Files\HammerDB-VERSION\hammerdb.bat
Replace `VERSION` with the version of the installed
HammerDB.
### Creating the connection and schema
When the application is running, the first step is to configure the connection
to build the schema.
1. Double-click **SQL Server** in the **Benchmark** panel.
2. Select **TPROC-C** . From the [HammerDB site](https://www.hammerdb.com/docs/ch03s02.html): TPROC-C is the OLTP workload implemented in HammerDB derived from the TPROC-C specification with modification to make running HammerDB straightforward and cost-effective on any of the supported database environments. The HammerDB TPROC-C workload is an open source workload derived from the TPROC-C Benchmark Standard and as such is not comparable to published TPROC-C results, as the results comply with a subset rather than the full TPROC-C Benchmark Standard. The name for the HammerDB workload TPROC-C means "Transaction Processing Benchmark derived from the TPC "C" specification".
3. Click **OK**
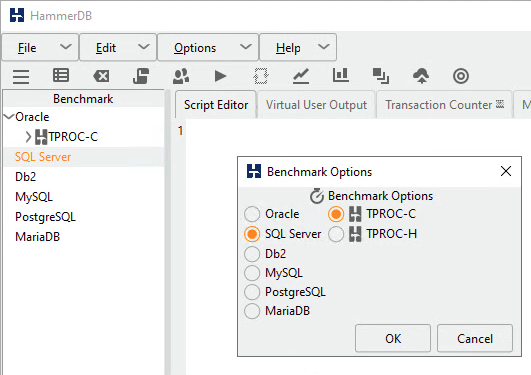
4. Click **Schema** and then double-click **Options**.
5. Fill out the form using your IP address, username, and password as shown in the following image:
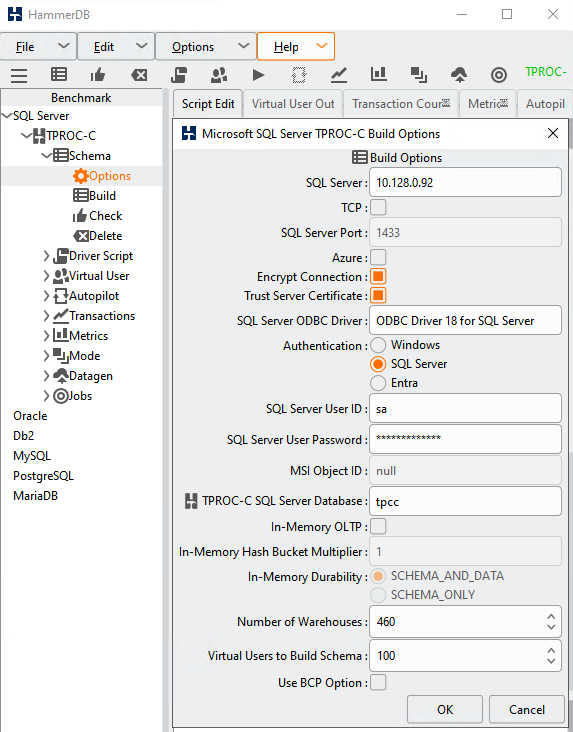
6. Set the **SQL Server ODBC Driver** to OBDC Driver 18 for SQL Server
7. In this case, the **Number of Warehouses** (the scale) is set to 460, but
you can choose a different value. Some guidelines suggest 10 to 100 warehouses
per CPU. For this tutorial, set this value to 10 times the number of cores:
160 for a 16-core instance.
8. For **Virtual Users to Build Schema**, choose a number that is between 1- and
2-times the number of client vCPUs. You can click the grey bar next to the
slider to increment the number.
9. Clear the **Use BPC Option**
10. Click **OK**
11. Double-click the **Build** option below the **Schema Build** section to
create the schema and load the tables. When that completes, click the red
flash light icon in the top center of the screen to destroy the virtual user
and move to the next step.
> [!NOTE]
> **Note:** If the build fails due to the SQL Server ODBC Driver, open the ODBC Data Sources application in Windows and check the available ODBC drivers under the Drivers tab.
If you created your database with the `Simple` recovery model, you might
want to change it back to `Full` at this point to get a more accurate test of a
production scenario. This change doesn't take effect until after you take a
full or differential backup to trigger the start of the new log chain.
> [!IMPORTANT]
> **Important:** If you plan to run multiple tests, [make a full backup of your new
> TPROC-C database](https://msdn.microsoft.com/en-us/library/ms187510(v=sql.120).aspx#SSMSProcedure), so that you can restore it later. Backing up can save you time compared to creating the database again by using the tool. If you revert the database to a Full recovery model, you should backup the transaction logs to clear them out after each test.
### Creating the driver script
HammerDB uses the driver script to orchestrate the flow of SQL
statements to the database to generate the required load.
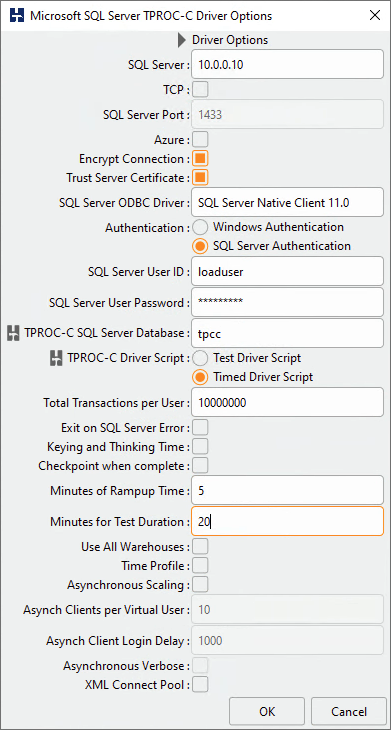
1. In the **Benchmark** panel, expand the **Driver Script** section and double-click **Options**.
2. Verify the settings match what you used in the **Schema Build** dialog.
3. Choose **Timed Driver Script**.
4. The **Checkpoint when complete** option forces the database to write everything to disk at the end of the test, so check this only if you plan on running multiple tests in a row.
5. To ensure a thorough test, set **Minutes of Rampup Time** to 5 and **Minutes for Test Duration** to 20.
6. Click **OK** to exit the dialog.
7. Double-click **Load** in the **Driver Script** section of the **Benchmark** panel to activate the driver script.
### Creating virtual users
Creating a realistic load typically requires running scripts as multiple
different users. Create some virtual users for the test.
1. Expand the **Virtual Users** section and double-click **Options**.
2. If you set your warehouse count (scale) to 160, then set the **Virtual Users** to 16, because the TPROC-C guidelines recommend a 10x ratio to prevent row locking. Select the **Show Output** checkbox to enable error messages in the console.
3. Click **OK**
## Collecting runtime statistics
HammerDB and SQL Server don't easily collect detailed runtime statistics for
you. Although the statistics are available deep within SQL Server, they need to
be captured and calculated on a regular basis. If you do not already have a
procedure or tool to help capture this data, you can use the procedure in this
section to capture some useful metrics during your testing. The results will be
written to a CSV file in the Windows `temp` directory. You can copy the data to
a Google Sheet using the **Paste Special** \> **Paste CSV** option.
To use this procedure, you first must temporarily enable
**OLE Automation Procedures** to write the file to disk.
Remember to disable it after testing:
```
sp_configure 'show advanced options', 1;
GO
RECONFIGURE;
GO
sp_configure 'Ole Automation Procedures', 1;
GO
RECONFIGURE;
GO
```
> [!NOTE]
> **Note:** Although this procedure is very small, it can affect the total throughput reported by a fraction of a percent.
Here's the code to create the `sp_write_performance_counters` procedure in SQL
Server Management Studio. Before starting the load test, you will execute this
procedure in Management Studio.:
```
USE [master]
GO
SET ANSI_NULLS ON
GO
SET QUOTED_IDENTIFIER ON
GO
/***
LogFile path has to be in a directory that SQL Server can Write To.
*/
CREATE PROCEDURE [dbo].[sp_write_performance_counters] @LogFile varchar (2000) = 'C:\\WINDOWS\\TEMP\\sqlPerf.log', @SecondsToRun int =1600, @RunIntervalSeconds int = 2
AS
BEGIN
--File writing variables
DECLARE @OACreate INT, @OAFile INT, @FileName VARCHAR(2000), @RowText VARCHAR(500), @Loops int, @LoopCounter int, @WaitForSeconds varchar (10)
--Variables to save last counter values
DECLARE @LastTPS BIGINT, @LastLRS BIGINT, @LastLTS BIGINT, @LastLWS BIGINT, @LastNDS BIGINT, @LastAWT BIGINT, @LastAWT_Base BIGINT, @LastALWT BIGINT, @LastALWT_Base BIGINT
--Variables to save current counter values
DECLARE @TPS BIGINT, @Active BIGINT, @SCM BIGINT, @LRS BIGINT, @LTS BIGINT, @LWS BIGINT, @NDS BIGINT, @AWT BIGINT, @AWT_Base BIGINT, @ALWT BIGINT, @ALWT_Base BIGINT, @ALWT_DIV BIGINT, @AWT_DIV BIGINT
SELECT @Loops = case when (@SecondsToRun % @RunIntervalSeconds) > 5 then @SecondsToRun / @RunIntervalSeconds + 1 else @SecondsToRun / @RunIntervalSeconds end
SET @LoopCounter = 0
SELECT @WaitForSeconds = CONVERT(varchar, DATEADD(s, @RunIntervalSeconds , 0), 114)
SELECT @FileName = @LogFile + FORMAT ( GETDATE(), '-MM-dd-yyyy_m', 'en-US' ) + '.txt'
--Create the File Handler and Open the File
EXECUTE sp_OACreate 'Scripting.FileSystemObject', @OACreate OUT
EXECUTE sp_OAMethod @OACreate, 'OpenTextFile', @OAFile OUT, @FileName, 2, True, -2
--Write the Header
EXECUTE sp_OAMethod @OAFile, 'WriteLine', NULL,'Transactions/sec, Active Transactions, SQL Cache Memory (KB), Lock Requests/sec, Lock Timeouts/sec, Lock Waits/sec, Number of Deadlocks/sec, Average Wait Time (ms), Average Latch Wait Time (ms)'
--Collect Initial Sample Values
SET ANSI_WARNINGS OFF
SELECT
@LastTPS= max(case when counter_name = 'Transactions/sec' then cntr_value end),
@LastLRS = max(case when counter_name = 'Lock Requests/sec' then cntr_value end),
@LastLTS = max(case when counter_name = 'Lock Timeouts/sec' then cntr_value end),
@LastLWS = max(case when counter_name = 'Lock Waits/sec' then cntr_value end),
@LastNDS = max(case when counter_name = 'Number of Deadlocks/sec' then cntr_value end),
@LastAWT = max(case when counter_name = 'Average Wait Time (ms)' then cntr_value end),
@LastAWT_Base = max(case when counter_name = 'Average Wait Time base' then cntr_value end),
@LastALWT = max(case when counter_name = 'Average Latch Wait Time (ms)' then cntr_value end),
@LastALWT_Base = max(case when counter_name = 'Average Latch Wait Time base' then cntr_value end)
FROM sys.dm_os_performance_counters
WHERE counter_name IN (
'Transactions/sec',
'Lock Requests/sec',
'Lock Timeouts/sec',
'Lock Waits/sec',
'Number of Deadlocks/sec',
'Average Wait Time (ms)',
'Average Wait Time base',
'Average Latch Wait Time (ms)',
'Average Latch Wait Time base') AND instance_name IN( '_Total' ,'')
SET ANSI_WARNINGS ON
WHILE @LoopCounter <= @Loops
BEGIN
WAITFOR DELAY @WaitForSeconds
SET ANSI_WARNINGS OFF
SELECT
@TPS= max(case when counter_name = 'Transactions/sec' then cntr_value end) ,
@Active = max(case when counter_name = 'Active Transactions' then cntr_value end) ,
@SCM = max(case when counter_name = 'SQL Cache Memory (KB)' then cntr_value end) ,
@LRS = max(case when counter_name = 'Lock Requests/sec' then cntr_value end) ,
@LTS = max(case when counter_name = 'Lock Timeouts/sec' then cntr_value end) ,
@LWS = max(case when counter_name = 'Lock Waits/sec' then cntr_value end) ,
@NDS = max(case when counter_name = 'Number of Deadlocks/sec' then cntr_value end) ,
@AWT = max(case when counter_name = 'Average Wait Time (ms)' then cntr_value end) ,
@AWT_Base = max(case when counter_name = 'Average Wait Time base' then cntr_value end) ,
@ALWT = max(case when counter_name = 'Average Latch Wait Time (ms)' then cntr_value end) ,
@ALWT_Base = max(case when counter_name = 'Average Latch Wait Time base' then cntr_value end)
FROM sys.dm_os_performance_counters
WHERE counter_name IN (
'Transactions/sec',
'Active Transactions',
'SQL Cache Memory (KB)',
'Lock Requests/sec',
'Lock Timeouts/sec',
'Lock Waits/sec',
'Number of Deadlocks/sec',
'Average Wait Time (ms)',
'Average Wait Time base',
'Average Latch Wait Time (ms)',
'Average Latch Wait Time base') AND instance_name IN( '_Total' ,'')
SET ANSI_WARNINGS ON
SELECT @AWT_DIV = case when (@AWT_Base - @LastAWT_Base) > 0 then (@AWT_Base - @LastAWT_Base) else 1 end ,
@ALWT_DIV = case when (@ALWT_Base - @LastALWT_Base) > 0 then (@ALWT_Base - @LastALWT_Base) else 1 end
SELECT @RowText = '' + convert(varchar, (@TPS - @LastTPS)/@RunIntervalSeconds) + ', ' +
convert(varchar, @Active) + ', ' +
convert(varchar, @SCM) + ', ' +
convert(varchar, (@LRS - @LastLRS)/@RunIntervalSeconds) + ', ' +
convert(varchar, (@LTS - @LastLTS)/@RunIntervalSeconds) + ', ' +
convert(varchar, (@LWS - @LastLWS)/@RunIntervalSeconds) + ', ' +
convert(varchar, (@NDS - @LastNDS)/@RunIntervalSeconds) + ', ' +
convert(varchar, (@AWT - @LastAWT)/@AWT_DIV) + ', ' +
convert(varchar, (@ALWT - @LastALWT)/@ALWT_DIV)
SELECT @LastTPS = @TPS,
@LastLRS = @LRS,
@LastLTS = @LTS,
@LastLWS = @LWS,
@LastNDS = @NDS,
@LastAWT = @AWT,
@LastAWT_Base = @AWT_Base,
@LastALWT = @ALWT,
@LastALWT_Base = @ALWT_Base
EXECUTE sp_OAMethod @OAFile, 'WriteLine', Null, @RowText
SET @LoopCounter = @LoopCounter + 1
END
--CLEAN UP
EXECUTE sp_OADestroy @OAFile
EXECUTE sp_OADestroy @OACreate
print 'Completed Logging Performance Metrics to file: ' + @FileName
END
GO
```
## Running the TPROC-C load test
In SQL Server Management Studio, execute the collection procedure using the
following script:
```
Use master
Go
exec dbo.sp_write_performance_counters
```
On the Compute Engine instance where you installed HammerDB, start
the test in the HammerDB application:
1. In the **Benchmark** panel, under **Virtual Users** double-click **Create** to create the virtual users, which will activate the **Virtual User Output** tab.
2. Double-click **Run** just below the **Create** option to kick off the test.
3. When the test completes you will see the Transactions Per Minute (TPM) calculation in the **Virtual User Output** tab.
4. You can find the results from your collection procedure in the `c:\Windows\temp` directory.
5. Save all of these values to a Google Sheet and use them to compare multiple test runs.
## Clean up
After you finish the tutorial, you can clean up the resources that you created so that they
stop using quota and incurring charges. The following sections describe how to delete or turn off
these resources.
### Deleting the project
The easiest way to eliminate billing is to delete the project that you
created for the tutorial.
To delete the project:
> [!CAUTION]
> **Caution** : Deleting a project has the following effects:
>
> - **Everything in the project is deleted.** If you used an existing project for the tasks in this document, when you delete it, you also delete any other work you've done in the project.
> - **Custom project IDs are lost.** When you created this project, you might have created a custom project ID that you want to use in the future. To preserve the URLs that use the project ID, such as an `appspot.com` URL, delete selected resources inside the project instead of deleting the whole project.
>
>
> If you plan to explore multiple architectures, tutorials, or quickstarts, reusing projects
> can help you avoid exceeding project quota limits.
1. In the Google Cloud console, go to the **Manage resources** page.
[Go to Manage resources](https://console.cloud.google.com/iam-admin/projects)
2. In the project list, select the project that you want to delete, and then click **Delete**.
3. In the dialog, type the project ID, and then click **Shut down** to delete the project.
### Deleting instances
To delete a Compute Engine instance:
1. In the Google Cloud console, go to the **VM instances** page.
[Go to VM instances](https://console.cloud.google.com/compute/instances)
2. Select the checkbox for the instance that you want to delete.
3. To delete the instance, click **More actions** , click **Delete**, and then follow the instructions.
## What's next
- Review the [SQL Server
best practices guide](https://docs.cloud.google.com/compute/docs/instances/sql-server/best-practices).
- Explore reference architectures, diagrams, and best practices about Google Cloud. Take a look at our [Cloud Architecture Center](https://docs.cloud.google.com/architecture).