This tutorial describes how to use an [external Application Load Balancer](https://docs.cloud.google.com/load-balancing/docs/https) to distribute traffic to
[Microsoft Internet Information Services (IIS) web servers](https://www.iis.net/)
running on Compute Engine VMs that are provisioned in different [regions](https://docs.cloud.google.com/compute/docs/zones).
## Objective
This tutorial shows you how to load balance traffic for the site `www.example.com`
and ensure that:
- Incoming requests are routed to the closest region.
- If an instance fails or reaches its capacity, the load balancer routes requests to other responsive instances in the same or a different region.
The configuration for this scenario uses an external Application Load Balancer that
takes requests through a single global IP address. This
IP address can route each incoming request by connection
type---that is, HTTP or HTTPS. For HTTPS requests, the load balancer
implements SSL/TLS encryption between the client sending the
request and the load balancer.
The following diagram shows the load balancer architecture:
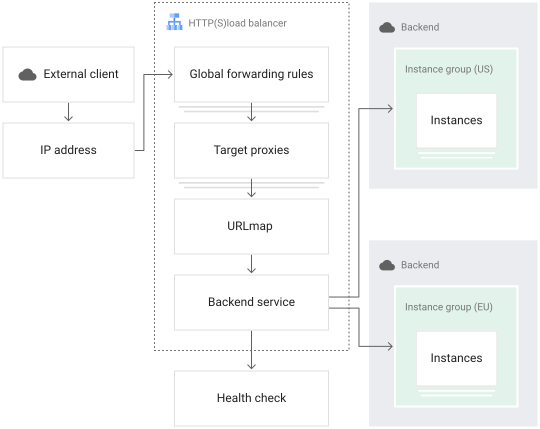
Note that the load balancer includes several components for maximum
configurability. For a description of what each component does, see the
[External Application Load Balancer overview](https://docs.cloud.google.com/load-balancing/docs/https).
This tutorial shows you how to complete the following tasks to reach your objective:
- Set up the backend instances.
- Create and configure the load balancing service.
- Send traffic to the backends.
- Restrict access to the backends.
- Simulate an outage.
## Costs
In this document, you use the following billable components of Google Cloud:
- Compute Engine virtual machine (VM) instances
- Compute Engine persistent disks
- Optional: Google-managed SSL certificate
- Windows Server 2016 machine images
To generate a cost estimate based on your projected usage,
use the [pricing calculator](https://docs.cloud.google.com/products/calculator).
New Google Cloud users might be eligible for a [free trial](https://docs.cloud.google.com/free).
When you finish the tasks that are described in this document, you can avoid
continued billing by deleting the resources that you created. For more information, see
[Clean up](https://docs.cloud.google.com/compute/docs/tutorials/http-load-balancing-iis#clean-up).
## Before you begin
Alternatively, you can use Cloud Shell on [Google Cloud console](https://console.cloud.google.com/) to interact with Google Cloud, in which case you don't have to install the Google Cloud CLI.
1. Install a Remote Desktop Protocol (RDP) client. For more information, see [Microsoft Remote Desktop clients](https://docs.microsoft.com/windows-server/remote/remote-desktop-services/clients/remote-desktop-clients). If you already have an RDP client installed, you can skip this task.
2. Decide the zones and regions where the you want to provision your resources. The architecture diagram shows resources deployed in the different zones in the US and EU regions. This is just for reference. You can deploy your resources in any regions/zones of your choice.
3. Optional: Read and understand the [External Application Load Balancer overview](https://docs.cloud.google.com/load-balancing/docs/https).
## Set up your backend instances
In this section, you create two backend services in different
regions. Each backend service includes two backend instances,
each running a Microsoft IIS web server on Windows Server 2016. To avoid
laborious manual configuration of each server, create a disk
image from one server instance, and then use this image to create your
other server instances.
### Create and configure a Compute Engine instance
To create the instance to use as a source image:
From Google Cloud Marketplace, launch an instance of Windows Server 2016 running
Microsoft IIS on Compute Engine in a zone of your choice, and set up
firewall rules to allow external HTTP, HTTPS, and RDP traffic to your source image
instance:
1. In the Google Cloud console, go to the **ASP.NET Framework** Cloud Marketplace page.
[Go to Cloud Marketplace](https://docs.cloud.google.com/console/marketplace/details/click-to-deploy-images/aspnet)
2. Click **Launch**.
3. In the **Deployment name** field, enter **src-img**.
4. In the **Zone** field, select a zone that you want to deploy the image in.
5. In the **Windows Server OS Version** field, select **2016**.
6. In the **Networking - Firewall** section, select only the following options:
- **Allow HTTP traffic**
- **Allow HTTPS traffic**
- **Allow RDP traffic**
7. Accept the terms of service and click **Deploy**.
8. Wait for the Compute Engine instance to be created.
### Configure your source image instance
To configure your new source image instance, create a new Windows user on the
source image instance and establish an RDP connection:
1. In the Google Cloud console, go to the **VM instances** page.
[Go to VM instances](https://console.cloud.google.com/compute/instances)
2. Click the name of your source image instance (`src-img`).
3. Click **Set Windows password**.
4. In the **Set new Windows password** dialog, add your username and
click **Set** to create the user account on your instance.
5. Copy the provided password and close the dialog.
6. Click the **RDP** dropdown and select the **Download the RDP file** option to
download the RDP file for your instance. Use this file to connect to the
instance using an RDP client. For more information, see [Microsoft Remote Desktop clients](https://docs.microsoft.com/windows-server/remote/remote-desktop-services/clients/remote-desktop-clients).
After you establish an RDP connection with your source image instance,
add a default homepage in the IIS default web directory:
1. On your source image instance, open PowerShell as an administrator.
2. Create a new homepage in the default IIS web directory `C:\inetpub\wwwroot`:
```
Echo 'Hello World!
' > C:\inetpub\wwwroot\index.html
```
### Verify that your source image instance can serve content
In the Google Cloud console, go to the **VM instances** page.
[Go to VM instances](https://console.cloud.google.com/compute/instances)
Click the external IP address of your instance to verify that it is serving
the homepage you created earlier.
### Create a reusable Windows Server 2016 image from your source image instance
After verifying that your source image instance is properly configured
and able to serve content, create a reusable disk image from the instance's
root persistent disk:
1. On your source image instance, open PowerShell as an administrator.
2. Run the following command to prepare your system for
cloning:
```
GCESysprep
```
When the `GCESysprep` operation completes, you are automatically disconnected
from your RDP session.
3. On your local machine, run the following command to delete your source
instance while retaining its root persistent disk:
```
gcloud compute instances delete src-img \
--keep-disks=boot \
--zone=INSTANCE_ZONE
```
Replace `INSTANCE_ZONE` with the zone of your source
instance.
4. After the instance is deleted, create a new image from the
root persistent disk you retained:
```
gcloud compute images create win-be-img \
--source-disk=src-img \
--source-disk-zone=IMAGE_ZONE
```
Replace `IMAGE_ZONE` with the zone that you want to
create your source image in.
### Create an instance template using your source image
Use the disk image from your configured Windows server as the source image for
an
[instance template](https://docs.cloud.google.com/compute/docs/instance-templates).
Later, you'll configure two
[managed instance groups](https://docs.cloud.google.com/compute/docs/instance-groups)
to use this template for new instances.
On your local machine, run the following command to create an instance template
that uses `win-be-img` as the source image and `rdp-tag` and `www-tag` as
instance tags:
```
gcloud compute instance-templates create win-be-tmpl \
--tags=rdp-tag,www-tag \
--image=win-be-img
```
### Create a managed instance group for each region
In each region, create managed instance groups. After you create each
instance group, the group automatically populates with two identical
instances based on the instance template you defined earlier. Later,
you'll configure your load balancer to treat these instance groups
as backend targets.
To create your managed instance groups:
1. On your local machine, run the following command to create a new
managed instance group in the zone that you created the image in and
automatically populate it with two identical instances:
```
gcloud compute instance-groups managed create MANAGED_INSTANCE_GROUP_NAME_1 \
--base-instance-name=BASE_INSTANCE_NAME_1 \
--size=2 \
--zone=ZONE_1 \
--template=win-be-tmpl
```
Replace the following:
- `MANAGED_INSTANCE_GROUP_NAME_1`: your managed instance's name
- `BASE_INSTANCE_NAME_1`: your base instance's name
- `ZONE_1`: the zone that you want to deploy your managed instance in
2. Create a managed instance group in the second zone:
```
gcloud compute instance-groups managed create MANAGED_INSTANCE_GROUP_NAME_2 \
--base-instance-name=BASE_INSTANCE_NAME_2 \
--size=2 \
--zone=ZONE_2 \
--template=win-be-tmpl
```
Replace the following:
- `MANAGED_INSTANCE_GROUP_NAME_2`: your managed instance's name
- `BASE_INSTANCE_NAME_2`: your base instance's name
- `ZONE_2`: the zone that you want to deploy your managed instance in
### Verify that your backend instances are running
1. In the Google Cloud console, go to the **VM instances** page.
[Go to VM instances](https://console.cloud.google.com/compute/instances)
2. Click the external IP address of each backend to verify that the backend is serving
the homepage you created earlier.
> [!NOTE]
> **Note:** Windows instances can take a few minutes to deploy completely.
## Create and configure your load balancing service
The Compute Engine load balancing service includes several
components. In this section, you'll create these components and
connect them together.
1. On your local machine, run the following command to create a
new health check. Your load balancer uses this check
to check the responsiveness of your backend instances:
```
gcloud compute http-health-checks create basic-check
```
2. Create a [backend service](https://docs.cloud.google.com/compute/docs/reference/latest/backendServices):
```
gcloud compute backend-services create BACKEND_SERVICE_NAME \
--protocol=HTTP \
--http-health-checks=basic-check \
--global
```
Replace `BACKEND_SERVICE_NAME` with a name for the backend service.
3. Add your instance groups as backend targets for your backend service:
```
gcloud compute backend-services add-backend BACKEND_SERVICE_NAME \
--instance-group=MANAGED_INSTANCE_GROUP_NAME_1 \
--instance-group-zone=ZONE_1
gcloud compute backend-services add-backend BACKEND_SERVICE_NAME \
--instance-group=MANAGED_INSTANCE_GROUP_NAME_2 \
--instance-group-zone=ZONE_2
```
4. Create a default URL map that directs all incoming requests
to all of your instances:
```
gcloud compute url-maps create lb-map \
--default-service=BACKEND_SERVICE_NAME
```
5. Create an SSL certificate resource. Your load balancer uses this
resource to encrypt and decrypt traffic.
If you already have a private key and an SSL certificate from a
certificate authority, you can use them to create a new `SSLCertificate`
resource by running the following command. Otherwise, you can create and use a
[Google-managed SSL certificate](https://docs.cloud.google.com/load-balancing/docs/ssl-certificates/google-managed-certs) or a [self-signed certificate](https://docs.cloud.google.com/load-balancing/docs/ssl-certificates/self-managed-certs)
for testing. For more information, see
[SSL certificates](https://docs.cloud.google.com/load-balancing/docs/ssl-certificates#gettingakeyandcertificate).
> [!NOTE]
> **Note:** Skip this step if you choose to use a Google-managed or a self-signed SSL certificate.
Run the following command to create your SSL certificate resource:
```
gcloud compute ssl-certificates create www-cert \
--certificate CRT_FILE_PATH \
--private-key KEY_FILE_PATH
```
Replace the following:
- `CRT_FILE_PATH`: your certificate's local file path
- `KEY_FILE_PATH`: your private key's file path
6. Create target HTTP and HTTPS proxies to route requests to your URL map.
The proxy is the portion of the load balancer that holds the SSL
certificate for HTTPS load balancing, so you also load your
certificate in this step:
```
gcloud compute target-http-proxies create http-lb-proxy \
--url-map=lb-map
gcloud compute target-https-proxies create https-lb-proxy \
--url-map lb-map \
--ssl-certificate SSL_CERT
```
Replace SSL_CERT based on the following:
- If you've created an SSLCertificate resource with your SSL certificate and private key, then replace `SSL_CERT` with **www-cert**.
- If you're using a Google-managed or a self-signed SSL certificate, then replace `SSL_CERT` with the name of your certificate.
7. For your load balancer to reliably receive traffic, you need to assign a
global static IP address to the load balancer's global forwarding rule.
To create a global static IP address resource, run the following command:
```
gcloud compute addresses create lb-ip \
--global \
--network-tier=PREMIUM
```
Take note of the IP address.
8. Create two global forwarding rules to handle incoming HTTP and HTTPS
requests. Each forwarding rule sends traffic to one of the target
proxies you created depending on the IP address, IP protocol, and
port specified.
- For a global external Application Load Balancer, use the gcloud CLI command with `load-balancing-scheme=EXTERNAL_MANAGED`. This setting offers [advanced traffic
management capability](https://docs.cloud.google.com/load-balancing/docs/https/traffic-management-global).
- For an classic Application Load Balancer, use `load-balancing-scheme=EXTERNAL`.
```
gcloud compute forwarding-rules create http-fwd-rule \
--load-balancing-scheme=LOAD_BALANCING_SCHEME \
--network-tier=PREMIUM \
--address=lb-ip \
--global \
--target-http-proxy=http-lb-proxy \
--ports=80
gcloud compute forwarding-rules create https-fwd-rule \
--load-balancing-scheme=LOAD_BALANCING_SCHEME \
--network-tier=PREMIUM \
--address=lb-ip \
--global \
--target-https-proxy=https-lb-proxy \
--ports=443
```
After you create the global forwarding rules, it can take several minutes
for your configuration to propagate. To check the progress of the
propagation, you can either monitor your configuration in the
[Google Cloud console](https://console.cloud.google.com/) or run the following command on your local machine:
```
gcloud compute backend-services get-health BACKEND_SERVICE_NAME
```
## Send traffic to your backends
Now that you've configured your load balancing service, you can start sending
traffic to the forwarding rule and watch the traffic be dispersed to different
instances.
Send traffic to your backends as follows:
1. In the Google Cloud console, go to the **Load balancing** page.
[Go to Load balancing](https://console.cloud.google.com/net-services/loadbalancing/loadBalancers/list)
2. Select the **Frontends** tab.
3. To see your default homepage, click the IP addresses in the
**Address** column.
> [!NOTE]
> **Note:** If you used a self-signed certificate for testing, your browser displays a warning and you must manually accept the certificate.
## Restrict access to your backends
After you have verified that everything is working as intended, modify
your firewall rules so that HTTP or HTTPS traffic can only come from your load
balancing service:
1. In the Google Cloud console, go to the **Firewall** page.
[Go to Firewall](https://console.cloud.google.com/net-security/firewall-manager/firewall-policies/list)
2. Click the name of the firewall rule that permits external access to port
`tcp:80`.
3. Click **Edit** to edit the firewall rule.
4. In the **Source IPv4 ranges** field, remove the value `0.0.0.0/0` and
enter **130.211.0.0/22** .
This restricts the firewall rule's allowed source IPs to the range
`130.211.0.0/22`, which is the HTTPS load balancing health check IP range.
5. Click **Save**.
6. In the Google Cloud console, go to the **VM instances** page.
[Go to VM instances](https://console.cloud.google.com/compute/instances)
7. Click the external IP address of each instance to verify that the instance is now inaccessible.
## Simulate an outage
To see how a load is balanced among the responsive instances, you can simulate an
outage for one or more instances in a region.
To stop an instance from receiving additional requests:
1. Establish an RDP connection to the instance.
2. On the instance, open PowerShell as an administrator.
3. Run the following command to create a new firewall rule on the
instance. This command blocks the health check traffic from the
health checker and prevents all new HTTP connections from the
load balancer to the instance:
```
netsh advfirewall firewall add rule name="Outage Test" protocol=tcp dir=in localport=80 action=block remoteip=130.211.0.0/22
```
4. On your local machine, run the following command to verify that the
instance now reports an `UNHEALTHY` status:
```
gcloud compute backend-services get-health BACKEND_SERVICE_NAME
```
5. After the instance starts reporting an `UNHEALTHY` status, send
a request to your load balancer. Only the responsive instances should
respond.
6. After you've finished simulating an outage, you can restore your
instance's connectivity by deleting the firewall rule. After opening
PowerShell as an administrator on the unresponsive instance, run the
following command to delete the rule:
```
netsh advfirewall firewall delete rule name="Outage Test"
```
## Clean up
After you finish the tutorial, you can clean up the resources that you created so that they
stop using quota and incurring charges. The following sections describe how to delete or turn off
these resources.
### Delete the project
The easiest way to eliminate billing is to delete the project that you created
for the tutorial.
> [!CAUTION]
> **Caution** : Deleting a project has the following effects:
>
> - **Everything in the project is deleted.** If you used an existing project for the tasks in this document, when you delete it, you also delete any other work you've done in the project.
> - **Custom project IDs are lost.** When you created this project, you might have created a custom project ID that you want to use in the future. To preserve the URLs that use the project ID, such as an `appspot.com` URL, delete selected resources inside the project instead of deleting the whole project.
>
>
> If you plan to explore multiple architectures, tutorials, or quickstarts, reusing projects
> can help you avoid exceeding project quota limits.
1. Delete a Google Cloud project:
```
gcloud projects delete PROJECT_ID
```
### Delete individual resources
You'll need to individually delete all the resources created for the project
(images, instance templates, instance groups, health checks, backend services,
URL map, http proxy, addresses, forwarding rules). You can't delete the VM
instances until you run the following commands.
Run the following commands on your local machine to delete the resources created
for the tutorial:
1. Delete the HTTP/S forwarding rules:
```
gcloud compute forwarding-rules delete https-fwd-rule --global
```
```
gcloud compute forwarding-rules delete http-fwd-rule --global
```
2. Delete the global static IP address:
```
gcloud compute addresses delete lb-ip --global
```
3. Delete the HTTP/S proxies:
```
gcloud compute target-https-proxies delete https-lb-proxy
```
```
gcloud compute target-http-proxies delete http-lb-proxy
```
4. Delete the SSL certificate:
```
gcloud compute ssl-certificates delete SSL_CERT
```
5. Delete the URL map:
```
gcloud compute url-maps delete lb-map
```
6. Delete the backend service:
```
gcloud compute backend-services delete BACKEND_SERVICE_NAME --global
```
7. Delete the HTTP health check:
```
gcloud compute http-health-checks delete basic-check
```
8. Delete the managed instance groups:
```
gcloud compute instance-groups managed delete MANAGED_INSTANCE_GROUP_NAME_1 --zone=ZONE_1
```
```
gcloud compute instance-groups managed delete MANAGED_INSTANCE_GROUP_NAME_2 --zone=ZONE_2
```
9. Delete the instance template:
```
gcloud compute instance-templates delete win-be-tmpl
```
10. Delete the image:
```bash
gcloud compute images delete IMAGE_NAME
```
11. Delete the disk:
```bash
gcloud compute disks delete DISK_NAME
```
## What's next
- Work through the [deploying load-balanced IIS web servers tutorial](https://docs.cloud.google.com/architecture/deploy-load-balanced-iis-web-servers).
- Review the best practices in the [Google Cloud Well-Architected Framework](https://docs.cloud.google.com/architecture/framework).
- Explore reference architectures, diagrams, and best practices about Google Cloud. Take a look at our [Cloud Architecture Center](https://docs.cloud.google.com/architecture).