This tutorial explains how to use load balancing with a regional managed
instance group to redirect traffic away from busy or unavailable VM instances,
allowing you to provide high availability even during a zonal outage.
A [regional managed instance group](https://docs.cloud.google.com/compute/docs/instance-groups/distributing-instances-with-regional-instance-groups)
distributes an application on multiple instances across multiple zones. A
[global load balancer](https://docs.cloud.google.com/load-balancing/docs/load-balancing-overview)
directs traffic across multiple regions via a single IP address.
By using both of these services to distribute your application
across multiple zones, you can help ensure that your application is
available even in extreme cases, like a zonal disruption.
Load balancers can be used to direct a variety of traffic types. This
tutorial shows you how to create a global load balancer
that directs external HTTP traffic, but much of the content of this tutorial is
still relevant to other types of load balancers. To learn about other types of
traffic that can be directed with a load balancer, see
[Types of Cloud Load Balancing](https://docs.cloud.google.com/load-balancing/docs/load-balancing-overview#types-of-cloud-load-balancing).
This tutorial includes detailed steps for launching a web application on a
regional managed instance group, configuring network access, creating a
load balancer for directing traffic to the web application, and observing the
load balancer by simulating a zonal outage. Depending on your experience with
these features, this tutorial takes about 45 minutes to complete.
## Objectives
- Launch a demo web application on a regional managed instance group.
- Configure a global load balancer that directs HTTP traffic across multiple zones.
- Observe the effects of the load balancer by simulating a zonal outage.
## Costs
In this document, you use the following billable components of Google Cloud:
- Compute Engine
To generate a cost estimate based on your projected usage,
use the [pricing calculator](https://docs.cloud.google.com/products/calculator).
New Google Cloud users might be eligible for a [free trial](https://docs.cloud.google.com/free).
## Before you begin
## Application architecture
The application includes the following Compute Engine components:
- [VPC network](https://docs.cloud.google.com/vpc/docs/overview#vpc_networks): a virtual network within Google Cloud that can provide global connectivity using its own routes and firewall rules.
- [Firewall rule](https://docs.cloud.google.com/vpc/docs/firewalls): a Google Cloud firewall lets you allow or deny traffic to your instances.
- [Instance template](https://docs.cloud.google.com/compute/docs/instance-templates): a template used to create each VM instance in the managed instance group.
- [Regional managed instance group](https://docs.cloud.google.com/compute/docs/instance-groups#managed_instance_groups): a group of VM instances running the same application across multiple zones.
- [Global static external IP address](https://docs.cloud.google.com/compute/docs/ip-addresses#externaladdresses): a static IP address that is accessible on external networks and can be attached to a global resource.
- [Global load balancer](https://docs.cloud.google.com/load-balancing/docs/load-balancing-overview#global_versus_regional_load_balancing): a load balancer that allows backend instances to be distributed across multiple regions. Use a global load balancer when your users need access to the same applications and content, and you want to provide access using a single anycast IP address.
- [Health check](https://docs.cloud.google.com/load-balancing/docs/health-check-concepts): a policy used by the load balancer to evaluate the responsiveness of the application on each VM instance.
## Launching the web application
This tutorial uses a web application that is stored on GitHub. If you would
like learn more about how the application was implemented, see the
[GoogleCloudPlatform/python-docs-samples](https://github.com/GoogleCloudPlatform/python-docs-samples/tree/master/compute/managed-instances/demo)
repository on GitHub.
Launch the web application on every VM in an instance group by including a
startup script in an instance template. Additionally, run the instance group in
a dedicated VPC network to keep this tutorial's firewall rules from interfering
with any existing resources running in your project.
### Create a VPC network
Using a VPC network protects existing resources in your project from being
affected by the resources that you will create for this tutorial.
A VPC network is also required to
[restrict incoming traffic](https://docs.cloud.google.com/compute/docs/tutorials/high-availability-load-balancing#restricting_incoming_traffic) so that it must
go through the load balancer.
Create a VPC network to encapsulate the firewall rules for the demo web
application:
1. In the Google Cloud console, go to the **VPC networks** page.
[Go to VPC networks](https://console.cloud.google.com/networking/networks)
2. Click **Create VPC Network**.
3. Under **Name** , enter `web-app-vpc`.
4. Set **Subnet creation mode** to **Custom**.
5. Create a new subnet as follows:
1. In the **Subnets** section, set the **Name** field, enter `web-app-vpc-subnet`.
2. In the **Region** drop-down, select **us-central1**.
3. Make sure that the **IP stack type** option is set to **IPv4**.
4. In the **Primary IPv4 range** section, enter the IPv4 range `10.2.0.0/24`.
6. At the bottom of the page, click **Create**.
Wait until the VPC network is created before continuing.
### Create a firewall rule
After the VPC network is created, set up a firewall rule to allow
HTTP traffic to the VPC network:
> [!NOTE]
> **Note:** This example creates an ingress allow VPC firewall rule of which the target is all instances in the network. For production applications, consider using a more specific target. You can also use rules in a global network firewall policy, regional network firewall policy, or hierarchical firewall policy. For more information, see [Firewall policies](https://docs.cloud.google.com/firewall/docs/firewall-policies-overview) and [best practices for network security](https://docs.cloud.google.com/architecture/best-practices-vpc-design#network_security).
1. In the Google Cloud console, go to the **Firewalls** page.
[Go to Firewalls](https://console.cloud.google.com/net-security/firewall-manager/firewall-policies/list)
2. Click **Create firewall rule**.
3. In the **Name** field, enter `allow-web-app-http`.
4. Set **Network** to `web-app-vpc`.
5. Make sure that the following options are set as given:
- **Direction of traffic** option is set to **Ingress**.
- **Action on match** option is set to **Allow**.
6. In the **Targets** drop-down, select **All instances in the network**.
7. Set **Source filter** to `IPv4 ranges`.
8. In the **Source IP ranges** field, enter `130.211.0.0/22, 35.191.0.0/16` to allow for load balancer health checks.
> [!NOTE]
> **Note:** Health check probes for the load balancer come from addresses in the ranges `130.211.0.0/22` and `35.191.0.0/16`. For this tutorial, your health check uses the HTTP protocol, so the firewall rule should allow connections to port 80. For more information on firewall rules for health checks, see [Probe IP ranges and firewall rules](https://docs.cloud.google.com/load-balancing/docs/health-check-concepts#ip-ranges).
9. Under **Protocols and ports**, do the following:
1. Select **Specified protocols and ports**.
2. Select **TCP**.
3. In the **Ports** field, enter `80` to [allow access for HTTP traffic](https://docs.cloud.google.com/load-balancing/docs/https/setting-up-https).
10. Click **Create**.
### Create an instance template
Create a template that you will use to create a group of VM instances. Each
instance created from the template launches a demo web application by using
a startup script.
1. In the Google Cloud console, go to the **Instance templates** page.
[Go to Instance templates](https://console.cloud.google.com/compute/instanceTemplates)
2. Click **Create instance template**.
3. Under **Name** , enter `load-balancing-web-app-template`.
4. Under **Machine configuration** , set the **Machine type** to `e2-medium`.
5. Click the **Advanced options** section to expand.
6. Click the **Networking** section and do the following:
1. In the **Network interfaces** section, delete any existing network interfaces by clicking the icon next to them.
2. Click **Add a network interface** , and then select the `web-app-vpc` network. This forces each instance created with this template to run on the previously created network.
3. In the **Subnetwork** drop-down, select `web-app-vpc-subnet`.
4. Click **Done**.
7. Click the **Management** section and do the following:
1. In the **Automation** section, enter the following startup script:
```bash
apt-get update
apt-get -y install git python3-pip python3-venv
git clone https://github.com/GoogleCloudPlatform/python-docs-samples.git
python3 -m venv venv
./venv/bin/pip3 install -Ur ./python-docs-samples/compute/managed-instances/demo/requirements.txt
./venv/bin/pip3 install gunicorn
./venv/bin/gunicorn --bind 0.0.0.0:80 app:app --daemon --chdir ./python-docs-samples/compute/managed-instances/demo
```
The script gets, installs, and launches the web application when a VM
instance starts up.
8. Leave the default values for the other options.
9. Click **Create**.
Wait until the template is created before continuing.
### Create a regional managed instance group
To run the web application, use the instance template to create a regional
managed instance group:
1. In the Google Cloud console, go to the **Instance groups** page.
[Go to Instance groups](https://console.cloud.google.com/compute/instanceGroups/)
2. Click **Create instance group**.
3. For **Name** , enter `load-balancing-web-app-group`.
4. For **Instance template** , select `load-balancing-web-app-template`.
5. Set **Number of instances** to `6`. If this field is disabled, turn off
autoscaling first.
To turn off autoscaling, go to the **Autoscaling** section. In the
**Autoscaling mode** drop-down, select **Off: do not autoscale**.
> [!NOTE]
> **Pro Tip:**
> When creating a regional managed instance group, Compute Engine
> recommends that you provision enough instances so that, if all of the
> instances in any one zone are unavailable, the remaining instances
> still meet the minimum number of instances that you require.
> However, provisioning more instances than you need might incur additional
> costs. For more information, see
> [How to increase availability by overprovisioning](https://docs.cloud.google.com/compute/docs/instance-groups/regional-migs#overprovision).
6. For **Location** , select **Multiple zones**.
> [!NOTE]
> **Pro Tip:** To ensure your application is
> available during extreme events, like zonal outages,
> Compute Engine recommends that you
> [distribute your application across multiple zones](https://docs.cloud.google.com/compute/docs/instance-groups/distributing-instances-with-regional-instance-groups).
7. For **Region** , select **us-central1**.
8. For **Zones**, select the following zones from the drop-down list:
- **us-central1-b**
- **us-central1-c**
- **us-central1-f**
9. Leave the default values for the other options.
10. Click **Create** . This redirects you back to the
**Instance groups** page.
You might need to wait a few minutes until all of the instances in the
group are running.
## Configuring the load balancer
To use a load balancer to direct traffic to your web application, you must reserve
an external IP address to receive all incoming traffic. Then, create a load
balancer that accepts traffic from that IP address and redirects that
traffic to the instance group.
### Reserve a static IP address
Use a
[global static external IP address](https://docs.cloud.google.com/compute/docs/ip-addresses#externaladdresses)
to provide the load balancer with a single point of entry for receiving all
user traffic. Compute Engine preserves static IP addresses even if
you change or delete any affiliated Google Cloud resources. This allows
the web application to always have the same entry point, even if other parts of
the web application might change.
1. In the Google Cloud console, go to the **IP addresses** page.
[Go to IP addresses](https://console.cloud.google.com/addresses/list/)
2. Click **Reserve external static IP address**.
3. In the **Name** field, enter `web-app-ipv4`.
4. Set **IP version** to **IPv4**.
5. Set **Type** to **Global**.
6. Click **Reserve**.
### Create a load balancer
This section explains the steps required to create a global load
balancer that directs HTTP traffic.
This load balancer uses a frontend to receive incoming traffic and a backend to
distribute this traffic to healthy instances. Because the load balancer is
made of multiple components, this task is divided into five parts:
- Select the load balancer type
- Name the load balancer
- Configure the frontend
- Configure the backend
- Review and finalize
Complete all the parts to create the load balancer.
> [!NOTE]
> **Note:** For simplicity, this tutorial uses an HTTP load balancer. To learn how to support HTTPS and HTTP/2, see [Creating content-based HTTP(S) load balancing](https://docs.cloud.google.com/load-balancing/docs/https/content-based-example). For other types of traffic, see [Choosing a load balancer](https://docs.cloud.google.com/load-balancing/docs/choosing-load-balancer).
#### Select the load balancer type
1. In the Google Cloud console, go to the **Load balancing** page.
[Go to Load balancing](https://console.cloud.google.com/net-services/loadbalancing/list)
2. Click **Create load balancer**.
3. For **Type of load balancer** , select **Application Load Balancer
(HTTP/HTTPS)** and click **Next**.
4. For **Public facing or internal** , select **Public facing
(external)** and click **Next**.
5. For **Global or single region deployment** , select **Best for global
workloads** and click **Next**.
6. For **Load balancer generation** , select **Global external
Application Load Balancer** and click **Next**.
7. Click **Configure**.
#### Name the load balancer
1. In the left panel, for **Load balancer name** , enter `web-app-load-balancer`.
#### Configure the frontend
1. On the **Frontend configuration** page, under **Name** , enter `web-app-ipv4-frontend`.
2. Set the **Protocol** to `HTTP`.
3. Set the **IP version** to `IPv4`.
4. Set the **IP address** to `web-app-ipv4`.
5. Set the **Port** to `80`.
6. Click **Done** to create the frontend.
#### Configure the backend
1. In the left panel, click **Backend configuration**.
2. Click **Backend services \& backend buckets** drop-down to open a menu, and then click **Create a backend service**.
3. In the new window, for the **Name** of the backend service, enter `web-app-backend`.
4. In the **Backends** section, do the following:
1. Set **Instance group** to `load-balancing-web-app-group`.
2. Set **Port numbers** to `80`. This [allows HTTP traffic](https://docs.cloud.google.com/load-balancing/docs/https/setting-up-https) between the load balancer and the instance group.
3. Under **Balancing mode** , select **Utilization**.
4. Click **Done**.
5. Create the health check for the backend of the load balancer as follows:
> [!NOTE]
> **Pro Tip:**
> Health checks are used for both load balancing and
> [autohealing](https://docs.cloud.google.com/compute/docs/instance-groups#autohealing),
> but for different purposes:
> - Health checks for load balancing are used for detecting unresponsive instances and directing traffic away from them.
> - Health checks for autohealing are used for detecting and recreating failed instances.
>
> Use separate health checks for load balancing and for autohealing. Using
> the same health check for these services would remove the
> distinction between unresponsive instances and failed instances, causing
> unnecessary latency and/or unavailability for your users. For more
> information, see
> [Health check concepts](https://docs.cloud.google.com/load-balancing/docs/health-check-concepts).
1. Click the **Health check** drop-down, and then click **Create a health check**. A new window opens.
2. In the new window under **Name** , enter `web-app-load-balancer-check`.
3. Set the **Protocol** to **HTTP**.
4. Under **Port** , enter `80`.
5. For this tutorial, set the **Request path** to `/health`, which is a path that the demo web application is set up to respond to.
6. Set the following **Health criteria**:
1. Set **Check interval** to `3` seconds. This defines the amount of time from the start of one probe to the start of the next one.
2. Set **Timeout** to `3` seconds. This defines the amount of time that Google Cloud waits for a response to a probe. Its value must be less than or equal to the check interval.
3. Set **Healthy Threshold** to `2` consecutive successes. This defines the number of sequential probes that must succeed in order for the instance to be considered healthy.
4. Set **Unhealthy Threshold** to `2`consecutive failures. This defines the number of sequential probes that must fail in order for the instance to be considered unhealthy.
> [!NOTE]
> **Pro Tip:**
> For information about refining the **Check interval**
> and **Timeout** values for your own application, see
> [How health checks work](https://docs.cloud.google.com/load-balancing/docs/health-check-concepts#probes).
> For detailed information about optimizing and measuring
> latency, see
> [Optimizing Application Latency with Load Balancing](https://docs.cloud.google.com/load-balancing/docs/tutorials/optimize-app-latency)
7. Click **Create** to create the health check.
6. Leave the default values for the other options.
7. Click **Create** to create the backend service.
#### Review and finalize
Verify your load balancing settings before creating the load balancer:
1. In the left panel of the **Create global external Application Load Balancer** page, click **Review and finalize**.
2. On the **Review and finalize** page, verify that **Frontend** uses an IP
address with a **Protocol** of `HTTP`.
3. On the same page, verify the following **Backend** settings:
- The **Backend service** is `web-app-backend`.
- The **Endpoint protocol** is `HTTP`.
- The **Health check** is `web-app-load-balancer-check`.
- The **Instance group** is `load-balancing-web-app-group`.
4. Click **Create** to finish creating the load balancer.
You might need to wait a few minutes for the load balancer to finish being created.
### Test the load Balancer
Verify that you can connect to the web application by using the load balancer
as follows:
1. In the Google Cloud console, go to the **Load balancing** page.
[Go to Load balancing](https://console.cloud.google.com/networking/loadbalancing/list)
2. In the **Name** column, click `web-app-load-balancer` to expand the load
balancer you just created.
3. To connect to the web-app using the external static IP
addresses, do the following:
1. In the **Frontend** section, copy the IP address shown in the **IP:Port** column.
2. Open a new browser tab and paste the IP address into the address bar.
This should display the demo web application:
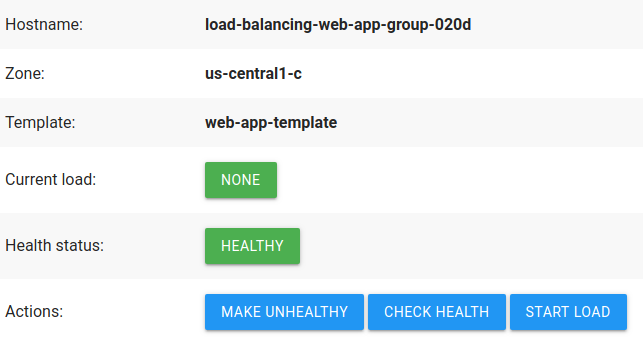
Notice that, whenever you refresh the page, the load balancer connects
to different instances in different zones. This happens because you are
not connecting to an instance directly; you are connecting to
the load balancer, which selects the instance you are redirected to.
When you are done, close the browser tab for the demo web application.
## Simulating a zonal outage
You can observe the functionality of the load balancer by simulating the
widespread unavailability of a zonal outage. This simulation works by forcing
all of the instances located in a specified zone to report an unhealthy status
on the `/health` request path. When these instances report an unhealthy status,
they fail the load balancing health check, prompting the load balancer to
stop directing traffic to these instances.
1. Monitor which zones the load balancer is directing traffic to.
1. In the Google Cloud console, go to **Cloud Shell**.
[Open Cloud Shell](https://console.cloud.google.com/?cloudshell=true)
Cloud Shell opens in a pane of the
Google Cloud console. It can
take a few seconds for the session to initialize.
> [!NOTE]
> **Pro Tip:** You can open
> Cloud Shell from any Google Cloud console page
> by using the
> **Activate Cloud Shell** button.
2. Save the static external IP address of your load balancer as follows:
1. Get the external IP address from the frontend forwarding rule of the
load balancer by entering the following command in your terminal:
```bash
gcloud compute forwarding-rules describe web-app-ipv4-frontend --global
```
The output looks as follows. Copy the
`EXTERNAl_IP_ADDRESS` from the output.
```bash
IPAddress: EXTERNAl_IP_ADDRESS
...
```
2. Create a local bash variable:
```bash
export LOAD_BALANCER_IP=EXTERNAl_IP_ADDRESS
```
Replace `EXTERNAl_IP_ADDRESS` with the
external IP address that you copied.
3. To monitor which zones the load balancer is directing traffic to, run
the following bash script:
```bash
while true
do
BODY=$(curl -s "$LOAD_BALANCER_IP")
NAME=$(echo -n "$BODY" | grep "load-balancing-web-app-group" | perl -pe 's/.+?load-balancing-web-app-group-(.+?)<.+/\1/')
ZONE=$(echo -n "$BODY" | grep "us-" | perl -pe 's/.+?(us-.+?)<.+/\1/')
echo $ZONE
sleep 2 # Wait for 2 seconds
done
```
This script continuously attempts to connect to the web application by
using the IP address for the frontend of the load balancer, and outputs
which zone the web application is running from for each connection.
The resulting output should include zones `us-central1-b`,
`us-central1-c`, and `us-central1-f`:
```bash
us-central1-f
us-central1-b
us-central1-c
us-central1-f
us-central1-f
us-central1-c
us-central1-f
us-central1-c
us-central1-c
```
Keep this terminal open.
> [!NOTE]
> **Note:** This monitor should run continuously. But, you can stop it at any time by pressing `Control+C` in the terminal.
2. While your monitor is running, begin simulating the zonal outage.
1. In Cloud Shell, [open a second terminal session](https://docs.cloud.google.com/shell/docs/starting-cloud-shell#opening_multiple_sessions) by clicking the **Add** button.
2. Create a local bash variable for the project ID:
```bash
export PROJECT_ID=PROJECT_ID
```
where `PROJECT_ID` is the project ID for your current project, which
is displayed on each new line in the Cloud Shell:
```bash
user@cloudshell:~ (PROJECT_ID)$
```
3. Create a local bash variable for the zone that you want to disable. To
simulate a failure of zone `us-central1-f`, use the following command:
```bash
export DISABLE_ZONE=us-central1-f
```
Then, run the following bash script. This script causes the
demo web application instances in the disabled zone to output
unhealthy responses to the load balancer health check. Unhealthy
responses prompt the load balancer to direct traffic away from
these instances.
```bash
export MACHINES=$(gcloud --project=$PROJECT_ID compute instances list --filter="zone:($DISABLE_ZONE)" --format="csv(name,networkInterfaces[0].accessConfigs[0].natIP)" | grep "load-balancing-web-app-group")
for i in $MACHINES;
do
NAME=$(echo "$i" | cut -f1 -d,)
IP=$(echo "$i" | cut -f2 -d,)
echo "Simulating zonal failure for zone $DISABLE_ZONE, instance $NAME"
curl -q -s "http://$IP/makeUnhealthy" >/dev/null --retry 2
done
```
After a short delay, the load balancer stops directing traffic to
the unhealthy zones, so the output from the first terminal window stops
listing zone `us-central1-f`:
```bash
us-central1-c
us-central1-c
us-central1-c
us-central1-b
us-central1-b
us-central1-c
us-central1-b
us-central1-c
us-central1-c
```
This indicates that the load balancer is directing traffic
only to the healthy, responsive instances.
> [!NOTE]
> **Note:** Optionally, you can repeat this step to simulate failures of zones `us-central1-b` and `us-central1-c`.
Keep both terminals open.
4. In the second terminal, create a local bash variable for the zone that
you want to restore. To restore traffic to zone `us-central1-f`, use
the following command:
```bash
export ENABLE_ZONE=us-central1-f
```
Then, run the following bash script. This script causes the
demo web application instances in the enabled zone to output
healthy responses to the load balancer health check. Healthy responses
prompt the load balancer to begin distributing traffic back toward these
instances.
```bash
export MACHINES=$(gcloud --project=$PROJECT_ID compute instances list --filter="zone:($ENABLE_ZONE)" --format="csv(name,networkInterfaces[0].accessConfigs[0].natIP)" | grep "load-balancing-web-app-group")
for i in $MACHINES;
do
NAME=$(echo "$i" | cut -f1 -d,)
IP=$(echo "$i" | cut -f2 -d,)
echo "Simulating zonal restoration for zone $ENABLE_ZONE, instance $NAME"
curl -q -s "http://$IP/makeHealthy" >/dev/null --retry 2
done
```
After a few minutes, the output from the first terminal window
gradually lists zone `us-central1-f`again:
```bash
us-central1-b
us-central1-b
us-central1-c
us-central1-f
us-central1-c
us-central1-c
us-central1-b
us-central1-c
us-central1-f
```
This indicates that the load balancer is directing incoming traffic
to all zones again.
> [!NOTE]
> **Note:** If you also disabled zone `us-central1-b` or zone `us-central1-c`, you can repeat this step to restore traffic to them.
Close both terminals when you have finished.
## Clean up
After you finish the tutorial, you can clean up the resources that you created so that they
stop using quota and incurring charges. The following sections describe how to delete or turn off
these resources.
If you created a separate project for this tutorial, delete the entire project.
Otherwise, if the project has resources that you want to keep, only delete the
resources created in this tutorial.
### Deleting the project
> [!CAUTION]
> **Caution** : Deleting a project has the following effects:
>
> - **Everything in the project is deleted.** If you used an existing project for the tasks in this document, when you delete it, you also delete any other work you've done in the project.
> - **Custom project IDs are lost.** When you created this project, you might have created a custom project ID that you want to use in the future. To preserve the URLs that use the project ID, such as an `appspot.com` URL, delete selected resources inside the project instead of deleting the whole project.
>
>
> If you plan to explore multiple architectures, tutorials, or quickstarts, reusing projects
> can help you avoid exceeding project quota limits.
1. In the Google Cloud console, go to the **Manage resources** page.
[Go to Manage resources](https://console.cloud.google.com/iam-admin/projects)
2. In the project list, select the project that you want to delete, and then click **Delete**.
3. In the dialog, type the project ID, and then click **Shut down** to delete the project.
### Deleting specific resources
The following sections describe how to delete the specific resources that you
created during this tutorial.
#### Deleting the load balancer
1. In the Google Cloud console, go to the **Load balancing** page.
[Go to Load balancing](https://console.cloud.google.com/networking/loadbalancing/list)
2. Click the checkbox next to `web-app-load-balancer`.
3. Click **Delete**
at the top of the page.
4. In the new window, select all checkboxes. Then, click **Delete load balancer
and selected resources** to confirm the deletion.
#### Deleting the static external IP address
Wait until the load balancer is deleted before deleting the static external IP
address.
1. In the Google Cloud console, go to the **External IP addresses** page.
[Go to External IP addresses](https://console.cloud.google.com/addresses/list/)
2. Click the checkbox next to `web-app-ipv4`.
3. Click **Release static address**
at the top of the page. In the new window, click **Release** to
confirm the release.
#### Deleting the instance group
Wait until the load balancer is deleted before
deleting the instance group.
1. In the Google Cloud console, go to the **Instance groups** page.
[Go to Instance groups](https://console.cloud.google.com/compute/instanceGroups/list)
2. Select the checkbox for your `load-balancing-web-app-group` instance group.
3. To delete the instance group, click **Delete**.
#### Deleting the instance template
You must finish deleting the instance group before deleting the instance
template. You cannot delete an instance template if a managed instance group
is using it.
1. In the Google Cloud console, go to the **Instance Templates** page.
[Go to Instance templates](https://console.cloud.google.com/compute/instanceTemplates)
2. Click the checkbox next to `load-balancing-web-app-template`.
3. Click **Delete**
at the top of the page. In the new window, click **Delete** to
confirm the deletion.
#### Deleting the VPC network
You must finish deleting the instance group before deleting the VPC
network. You cannot delete a VPC network if other resources still uses it.
1. In the Google Cloud console, go to the **VPC networks** page.
[Go to VPC networks](https://console.cloud.google.com/networking/networks)
2. Click `web-app-vpc`.
3. Click **Delete VPC network** at
the top of the page. In the new window, click **Delete** to confirm the
deletion.
## What's next
- Try another tutorial:
- [Using autohealing for highly available applications](https://docs.cloud.google.com/compute/docs/tutorials/high-availability-autohealing).
- [Using autoscaling for highly scalable applications](https://docs.cloud.google.com/compute/docs/tutorials/high-scalability-autoscaling).
- Learn more about [Managed Instance Groups](https://docs.cloud.google.com/compute/docs/instance-groups).
- Learn more about [Load Balancing](https://docs.cloud.google.com/load-balancing/docs/load-balancing-overview).
- Learn more about [Optimizing Application Latency with Load Balancing](https://docs.cloud.google.com/load-balancing/docs/tutorials/optimize-app-latency).
- Learn more about [Designing Robust Systems](https://docs.cloud.google.com/compute/docs/tutorials/robustsystems).
- Learn more about [Building Scalable and Resilient Web Applications on Google Cloud](https://docs.cloud.google.com/solutions/scalable-and-resilient-apps).