If you bring your own licenses for operating systems such as Windows Server,
contractual obligations might require you to monitor and report how many VM instances,
physical servers, and physical CPU cores you're using these licenses on.
This article describes how you can use the open-source tool License Tracker to
monitor the number of VM instances, physical servers, and physical CPU cores you're
using, and how you can visualize the results by using Data Studio.
The License Tracker tool works by analyzing Compute Engine audit logs to determine
*placements* for each VM instance. A placement describes the time period during
which a VM instance is running on a specific physical server. Each time a VM is
migrated from one physical server to another marks the end of one placement and
starts another.
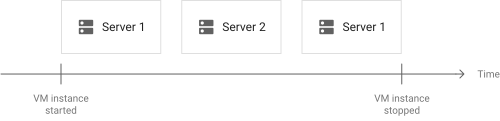
As an example, consider a VM instance that is started and, several months later,
stopped again. At some point during its runtime, the VM is automatically migrated
from `Server 1` to `Server 2` and later back to `Server 1` again. This history
corresponds to 3 placements:
When you run the License Tracker tool the first time, it analyzes Compute Engine
usage of the past 90 days and writes its result to BigQuery. On
subsequent runs, the tool analyzes the delta between the last run and the
current day, and updates the BigQuery dataset accordingly.
The License Tracker tool replaces the usage reporting feature provided by
[IAP Desktop](https://github.com/GoogleCloudPlatform/iap-desktop/releases/latest).
> [!IMPORTANT]
> **Important:** The License Tracker tool is a Google-developed and community-supported open source project that is hosted in the [GoogleCloudPlatform/gce-license-tracker](https://github.com/GoogleCloudPlatform/gce-license-tracker) repo on GitHub. The tool is governed solely by the [Apache License 2.0](https://github.com/GoogleCloudPlatform/gce-license-tracker/blob/master/LICENSE.txt) and not by any other terms or conditions. It is distributed as is, without warranties of any kind.
## Costs
This guide uses billable components of Google Cloud, including:
- [Cloud Run](https://cloud.google.com/run/pricing)
- [BigQuery](https://cloud.google.com/bigquery/pricing)
Use the [pricing calculator](https://cloud.google.com/products/calculator/)
to generate a cost estimate based on your projected usage.
## Deploy the License Tracker tool
This section describes how to set up Cloud Run and Cloud Scheduler to automatically
run the License Tracker tool once a day.
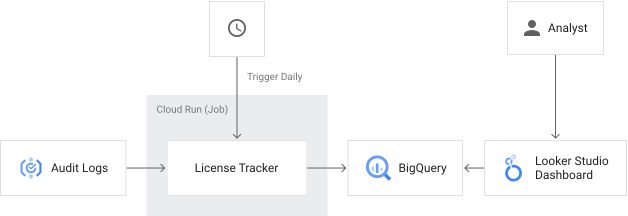
The following diagram illustrates the solution described in this article:
- The License Tracker tool is deployed on Cloud Run and configured to analyze the logs of one or more projects.
- Once a day, Cloud Scheduler triggers the Cloud Run job, causing the License Tracker tool to update a BigQuery dataset.
- A Data Studio dashboard visualizes the data from BigQuery and makes it available to users.
### Create a project
To set up Cloud Run and Cloud Scheduler, create a new project:
### Deploy the application
You now deploy the License Tracker tool to Cloud Run:
1. In the Google Cloud console, open
[Cloud Shell](https://docs.cloud.google.com/shell/docs/starting-cloud-shell)
by clicking the
**Activate Cloud Shell** 
button.
[Go to the Google Cloud console](https://console.cloud.google.com/)
2. Set an environment variable to contain your
[project ID](https://docs.cloud.google.com/resource-manager/docs/creating-managing-projects):
```
gcloud config set project PROJECT_ID
```
Replace PROJECT_ID with the ID of your project.
3. Set the Cloud Run region to deploy to:
```
gcloud config set run/region REGION
```
Replace REGION with a region that [supports Cloud Run and
Cloud Scheduler](https://cloud.google.com/about/locations#products-available-by-location).
4. Create a service account for the tool:
```
SERVICE_ACCOUNT=$(gcloud iam service-accounts create license-tracker \
--display-name "License Tracker" \
--format "value(email)")
```
5. Allow the service to create and access a BigQuery dataset and to
start Cloud Run jobs in the same project:
```
gcloud projects add-iam-policy-binding $(gcloud config get-value core/project) \
--member "serviceAccount:$SERVICE_ACCOUNT" \
--role "roles/bigquery.admin"
gcloud projects add-iam-policy-binding $(gcloud config get-value core/project) \
--member "serviceAccount:$SERVICE_ACCOUNT" \
--role "roles/run.invoker"
```
6. Allow Cloud Build [to perform Cloud Run deployments](https://docs.cloud.google.com/build/docs/deploying-builds/deploy-cloud-run#continuous-iam)
and manage Cloud Scheduler jobs:
```
PROJECT_NUMBER=$(gcloud projects describe $(gcloud config get-value core/project) --format='value(projectNumber)')
gcloud iam service-accounts add-iam-policy-binding $SERVICE_ACCOUNT \
--member "serviceAccount:$PROJECT_NUMBER@cloudbuild.gserviceaccount.com" \
--role "roles/iam.serviceAccountUser"
gcloud projects add-iam-policy-binding $(gcloud config get-value core/project) \
--member "serviceAccount:$PROJECT_NUMBER@cloudbuild.gserviceaccount.com" \
--role "roles/run.developer"
gcloud projects add-iam-policy-binding $(gcloud config get-value core/project) \
--member "serviceAccount:$PROJECT_NUMBER@cloudbuild.gserviceaccount.com" \
--role "roles/cloudscheduler.admin"
```
7. Clone the [GitHub repository](https://github.com/GoogleCloudPlatform/gce-license-tracker)
and switch to the `latest` branch:
```
git clone https://github.com/GoogleCloudPlatform/gce-license-tracker.git
cd gce-license-tracker
git checkout latest
```
8. Submit a build to Cloud Build:
```
gcloud builds submit . --substitutions=_REGION=$(gcloud config get-value run/region)
```
The build deploys the License Tracker application to Cloud Run
and configures Cloud Scheduler to trigger the job once a day.
The build takes about 3 minutes to complete.
### Select projects to analyze
The License Tracker tool analyzes all Google Cloud projects for which all
of the following conditions apply:
- The Compute Engine API is enabled.
- The project grants *Compute Viewer* (`roles/compute.viewer`) and *Logs Viewer* (`roles/logging.viewer`) access to the tool's service account.
To include a project, folder, or an entire organization in the analysis, do the following:
### Project
```
SCOPE_ID=RESOURCE_PROJECT_ID
SCOPE_TYPE=projects
gcloud projects add-iam-policy-binding $SCOPE_ID \
--member "serviceAccount:$SERVICE_ACCOUNT" \
--role "roles/compute.viewer" \
--condition None
gcloud projects add-iam-policy-binding $SCOPE_ID \
--member "serviceAccount:$SERVICE_ACCOUNT" \
--role "roles/logging.viewer" \
--condition None
```
Replace RESOURCE_PROJECT_ID with the ID of the Google Cloud
project that you want the License Tracker tool to analyze.
### Folder
```
SCOPE_ID=RESOURCE_FOLDER_ID
SCOPE_TYPE=folders
gcloud resource-manager folders add-iam-policy-binding $SCOPE_ID \
--member "serviceAccount:$SERVICE_ACCOUNT" \
--role "roles/compute.viewer" \
--condition None
gcloud resource-manager folders add-iam-policy-binding $SCOPE_ID \
--member "serviceAccount:$SERVICE_ACCOUNT" \
--role "roles/logging.viewer" \
--condition None
```
Replace RESOURCE_FOLDER_ID with the ID of the folder that contains
the projects that you want the License Tracker tool to analyze.
### Organization
```
SCOPE_ID=ORGANIZATION_ID
SCOPE_TYPE=organizations
gcloud organizations add-iam-policy-binding $SCOPE_ID \
--member "serviceAccount:$SERVICE_ACCOUNT" \
--role "roles/compute.viewer" \
--condition None
gcloud organizations add-iam-policy-binding $SCOPE_ID \
--member "serviceAccount:$SERVICE_ACCOUNT" \
--role "roles/logging.viewer" \
--condition None
```
Replace ORGANIZATION_ID with the [ID of your organization](https://docs.cloud.google.com/resource-manager/docs/creating-managing-organization#retrieving_your_organization_id).
> [!NOTE]
> **Note:** If one of the projects you want to analyze uses VPC service controls, then the License Tracker tool might not be allowed to access resources in this project. To grant the License Tracker tool access, include its project in the same perimeter or configure an appropriate [ingress policy](https://docs.cloud.google.com/vpc-service-controls/docs/ingress-egress-rules).
### Start the initial analysis
You can now start an initial analysis:
1. In the Google Cloud console, go to **Cloud Run \> Jobs**.
[Go to Cloud Run jobs](https://console.cloud.google.com/run/jobs/)
2. Select the **license-tracker** job to open the job details.
3. Click **Execute**.
Depending on the number and size of projects that you selected, the initial
analysis might take several hours to complete.
When the job completes, your project contains a BigQuery dataset named
`license_usage`.
4. Optionally, view logs in Cloud Logging:
[Go to Logging](https://console.cloud.google.com/logs/query;query=resource.labels.job_name%3D%22license-tracker%22)
## Create a dashboard
You now create a Data Studio dashboard by creating a copy of a sample dashboard:
1. Copy the dashboard's data sources:
1. [Nodes](https://lookerstudio.google.com/datasources/45f5aff8-3fb7-45c2-a232-37e4883ac8f4)
2. [Licensed nodes](https://lookerstudio.google.com/datasources/3ab0e73a-d008-4948-aeaa-015ee0c0e263)
3. [Nodes histogram](https://lookerstudio.google.com/datasources/42fe310d-f9a9-483e-8537-e9b89001a9f3)
4. [Instances histogram](https://lookerstudio.google.com/datasources/ecf4b4dd-94f4-4038-bd72-38369f2e9509)
For each of the data source, do the following:
1. Click the link above to open the data source.
2. Click **Make a copy of this data source**.
3. Click **Copy data source**.
4. If you're promoted to connect the dashboard to BigQuery, click **Authorize**.
5. Optionally, click the header and rename the datasource.
6. In the list of billing projects, select the project that you used to deploy the License Tracker tool.
7. Click **Reconnect**.
8. In the **Apply connection changes** dialog box, select **Apply**.
2. Copy the dashboard:
1. Open the [sample dashboard](https://lookerstudio.google.com/reporting/ba0a1f0c-2e4c-4021-86cf-0cba52a5bfb5).
The dashboard isn't connected to a datasource, so it doesn't show any data.
2. Click **... \> Make a copy**
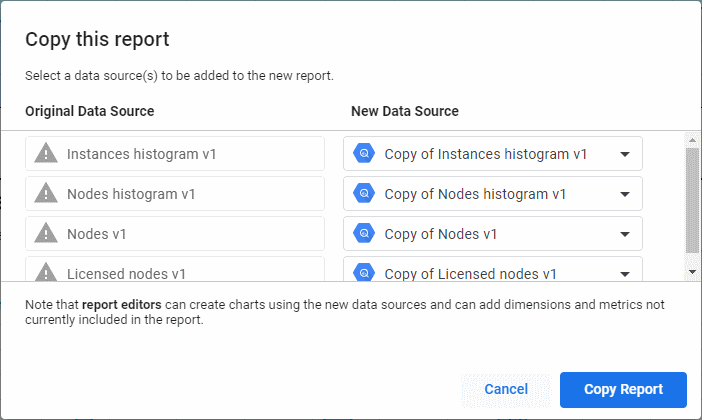
3. In the **Copy this report** dialog, select your copies of the data sources:
4. Click **Copy report**.
The dashboard now shows the data from your BigQuery dataset.
### Grant other users access to the dashboard
The dashboard's data sources are configured to use [the viewer's credentials](https://support.google.com/looker-studio/answer/6371135#zippy=%2Cin-this-article%2Cviewers-credentials) to access BigQuery. To grant another user access to the dashboard,
you must:
1. [Share the dashboard](https://support.google.com/looker-studio/answer/7459147) and grant the user permission to view the report.
2. Grant the *BigQuery Data Viewer* (`roles/bigquery.dataViewer`) and *BigQuery Job User* (`roles/bigquery.jobUser`) roles to the user. You can grant these roles [at the dataset or project level](https://docs.cloud.google.com/bigquery/docs/access-control#dataset_level).
### Customize the dashboard
You can customize the dashboard by [using the Data Studio report editor](https://support.google.com/looker-studio/answer/9207624) to modify existing charts
or to add additional charts.
All charts in the sample dashboard are based on the `placements` view in the
BigQuery dataset. This view contains all placements across all projects and uses the following schema:
| Column | Data type | Description |
|---|---|---|
| instance_id | INTEGER | Instance ID |
| instance_name | STRING | Name of instance |
| instance_zone | STRING | Zone ID of instance |
| instance_project_id | STRING | Project ID of instance |
| tenancy | STRING | `S` if running on sole-tenant node, `F` otherwise |
| node_type | STRING | Sole-tenant [node type](https://docs.cloud.google.com/compute/docs/nodes/sole-tenant-nodes#node_types) |
| node_project_id | STRING | Project ID of the node; this value might differ from `instance_project_id` in case of shared sole-tenant nodes |
| server_id | STRING | Unique ID of physical server |
| operating_system_family | STRING | `WIN`, `LINUX`, or `null` if unrecognized |
| license | STRING | [License string](https://docs.cloud.google.com/compute/docs/licenses/about) used by image |
| license_type | STRING | `BYOL`, `SPLA`, or `null` if unrecognized |
| machine_type | STRING | Machine type of instance |
| memory_mb | INTEGER | Amount of RAM (in MB) allocated to instance |
| vcpu_count | INTEGER | Number of vCPUs allocated to instance |
| vcpu_min_allocated | INTEGER | Minimum number of vCPUs allocated to instance; this value might differ from `vcpu_count` when you're overcommitting CPUs on sole-tenant VMs |
| maintenance_policy | STRING | Maintenance policy for instance |
| start_date | TIMESTAMP | Beginning of placement |
| end_date | TIMESTAMP | End of placement |
You can use the `placement` view when customizing existing charts or adding your
own charts to the dashboard.
## Upgrade the License Tracker tool
This section describes how you can upgrade an existing deployment of the
License Tracker tool to use a newer version of the application, or to use a
different configuration.
1. In the Google Cloud console, open
[Cloud Shell](https://docs.cloud.google.com/shell/docs/starting-cloud-shell)
by clicking the
**Activate Cloud Shell** 
button.
[Go to the Google Cloud console](https://console.cloud.google.com/)
2. Set an environment variable to contain your
[project ID](https://docs.cloud.google.com/resource-manager/docs/creating-managing-projects):
```
gcloud config set project PROJECT_ID
```
Replace PROJECT_ID with the ID of the project that contains
your existing deployment.
3. Select the Cloud Run region of your existing deployment:
```
gcloud config set run/region REGION
```
4. Clone the [GitHub repository](https://github.com/GoogleCloudPlatform/gce-license-tracker)
and switch to the `latest` branch:
```
git clone https://github.com/GoogleCloudPlatform/gce-license-tracker.git
cd gce-license-tracker
git checkout latest
```
5. Submit a build to Cloud Build:
```
gcloud builds submit . --substitutions=_REGION=$(gcloud config get-value run/region)
```
The build updates your existing deployment and takes about 3 minutes to complete.