Microsoft SQL Server [Always On availability groups](https://docs.microsoft.com/en-us/sql/database-engine/availability-groups/windows/overview-of-always-on-availability-groups-sql-server) let you replicate databases across multiple SQL Server Enterprise instances.
Similar to [SQL Server Failover Cluster Instances](https://docs.cloud.google.com/compute/docs/instances/sql-server/configure-failover-cluster-instance),
Always On availability groups use Windows Server Failover Clustering (WSFC) to
implement high availability. However, the two features differ in the following
ways:
| | Always On availability groups | Failover cluster instances |
|---|---|---|
| Scope of fail-over | Group of databases | Instance |
| Storage | Not shared | Shared |
For a more detailed comparison, see [Comparison of failover cluster instances and availability groups](https://docs.microsoft.com/en-us/sql/database-engine/availability-groups/windows/failover-clustering-and-always-on-availability-groups-sql-server#comparison-of-failover-cluster-instances-and-availability-groups).
Always On availability groups support [multiple availability modes](https://docs.microsoft.com/en-us/sql/database-engine/availability-groups/windows/availability-modes-always-on-availability-groups#SupportedAvModes).
This tutorial shows how you can deploy Always On availability groups in
*synchronous commit mode* to implement high availability for one or more databases.
In the setup, you will create three VM instances. Two VM instances, `node-1` and
`node-2` serve as cluster nodes and run SQL Server.
A third VM instance, `witness`, is used to achieve a
[quorum](https://learn.microsoft.com/en-us/sql/sql-server/failover-clusters/windows/wsfc-quorum-modes-and-voting-configuration-sql-server)
in a failover scenario.
The three VM instances are distributed over three zones and share a common subnet.
Using a SQL Server Always On availability group, an example database, `bookshelf`,
is synchronously replicated across the two SQL Server instances.
In an on-premises Windows cluster environment,
[Address Resolution Protocol (ARP) announcements](https://en.wikipedia.org/wiki/Address_Resolution_Protocol#ARP_announcements)
trigger
[IP address failover](https://learn.microsoft.com/en-us/troubleshoot/windows-server/virtualization/mac-address-changes-for-virtual-server).
Google Cloud, however, disregards ARP announcements. Consequently, you must implement one of the following two options: using an internal load balancer and a distributed network name (DNN).
The article assumes that you have already deployed Active Directory on Google Cloud
and that you have basic knowledge of SQL Server, Active Directory, and Compute Engine.
For more information about Active Directory on Google Cloud,
see section [Before you begin](https://docs.cloud.google.com/compute/docs/instances/sql-server/configure-availability-dnn#before-you-begin).
Using a SQL Server Always On availability group, an example database, `bookshelf`,
is synchronously replicated across the two SQL Server instances. A distributed
network name (DNN) listener in front of the cluster provides a single endpoint
for SQL Server clients.
For more information about DNN, see
[Configure a DNN listener for an availability group](https://learn.microsoft.com/en-us/azure/azure-sql/virtual-machines/windows/availability-group-distributed-network-name-dnn-listener-configure).
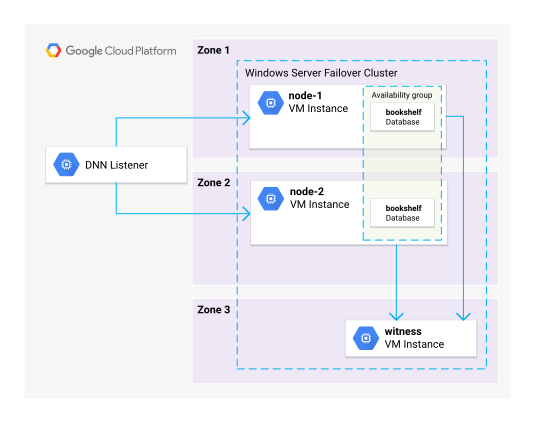
This diagram includes the following:
- Two VM instances in the same region and different zones for the failover cluster called `node-1` and `node-2`. One hosts the primary replica of the SQL Server database while the other node hosts the secondary replica.
- A third VM called `witness` serves as a file share witness to provide a tie-breaking vote and achieve a quorum for failover.
- A DNN listener in front of the cluster provides a single endpoint for SQL Server clients.
## Objectives
- [Deploy a WSFC comprising two SQL Server VM instances, and a third VM instance
that acts as a file share witness](https://docs.cloud.google.com/compute/docs/instances/sql-server/configure-availability-dnn#deploying_the_failover_cluster).
- [Create an availability group with synchronous commit](https://docs.cloud.google.com/compute/docs/instances/sql-server/configure-availability-dnn#creating_an_availability_group).
- Configure a [distributed network name (DNN)](https://docs.cloud.google.com/compute/docs/instances/sql-server/configure-availability-dnn#configure_a_dnn_listener_for_the_availability_group) to route traffic to your availability group with SQL Server
- [Verify that the setup is working by simulating a failover](https://docs.cloud.google.com/compute/docs/instances/sql-server/configure-availability-dnn#test_the_failover).
## Costs
This tutorial uses billable components of Google Cloud,
including:
- [Compute Engine](https://cloud.google.com/compute/vm-instance-pricing)
Use the [pricing calculator](https://cloud.google.com/products/calculator/)
to generate a cost estimate based on your projected usage.
## Before you begin
To complete the tasks in this tutorial, ensure the following:
1. You have an Active Directory domain with at least one domain controller. You can create an [Active Directory domain using Managed Microsoft AD](https://docs.cloud.google.com/managed-microsoft-ad/docs/create-domain). Alternatively, you can deploy a [custom Active Directory environment on Compute Engine](https://docs.cloud.google.com/solutions/deploy-fault-tolerant-active-directory-environment) and set up a [private DNS forwarding zone](https://docs.cloud.google.com/compute/docs/instances/windows/best-practices#use_cloud_dns_private_forwarding_zones) that forwards DNS queries to your domain controllers.
2. You have an Active Directory user that has permission to join computers to the domain and can sign in by using RDP. If you're using Managed Microsoft AD, you can use the `setupadmin` user. For more information about Active Directory user account provisioning, see [Active Directory user account provisioning](https://cloud.google.com/architecture/identity/federating-gcp-with-active-directory-synchronizing-user-accounts)
3. A Google Cloud project and a Virtual Private Cloud (VPC) with connectivity to your Active Directory domain controllers.
4. A subnet to use for the Windows Server Failover Cluster VM instances.
When you finish this tutorial, you can avoid continued billing by deleting the resources you created. For more information, see [Cleaning up](https://docs.cloud.google.com/compute/docs/instances/sql-server/configure-availability-dnn#clean-up).
## Prepare your project and network
To deploy your SQL Server Always On availability groups, you must prepare your
Google Cloud project and VPC for the deployment. The following sections discuss
how you can do this in detail.
### Configure your project and region
To prepare your Google Cloud project for the deployment of SQL Server Always On
availability groups, do the following:
1. In the Google Cloud console, open
[Cloud Shell](https://docs.cloud.google.com/shell/docs/starting-cloud-shell)
by clicking the
**Activate Cloud Shell** 
button.
[Go to the Google Cloud console](https://console.cloud.google.com/)
2. Initialize the following variables.
VPC_NAME=VPC_NAME
SUBNET_NAME=SUBNET_NAME
Replace the following:
- `VPC_NAME`: name of your VPC
- `SUBNET_NAME`: name of your subnet
3. Set your default [project ID](https://docs.cloud.google.com/resource-manager/docs/creating-managing-projects).
gcloud config set project PROJECT_ID
Replace `PROJECT_ID` with the ID of your Google Cloud project.
4. Set your default region.
gcloud config set compute/region REGION
Replace `REGION` with the ID of the
[region](https://docs.cloud.google.com/docs/geography-and-regions#regions_and_zones)
you want to deploy in.
### Create firewall rules
To allow clients to connect to the SQL Server and the communication between the
cluster nodes you need to create several firewall rules. You can use
[network tags](https://docs.cloud.google.com/vpc/docs/add-remove-network-tags)
to simplify the creation of these firewall rules, as follows:
- The two cluster nodes are annotated with the `wsfc-node` tag.
- All servers (including the `witness`) are annotated with the `wsfc` tag.
To create firewall rules that use these network tags, use the following steps:
1. Return to your existing Cloud Shell session.
2. Create firewall rules to allow traffic between cluster nodes.
```
SUBNET_CIDR=$(gcloud compute networks subnets describe $SUBNET_NAME --format=value\('ipCidrRange'\))
gcloud compute firewall-rules create allow-all-between-wsfc-nodes \
--direction=INGRESS \
--action=allow \
--rules=tcp,udp,icmp \
--enable-logging \
--source-tags=wsfc \
--target-tags=wsfc \
--network=$VPC_NAME \
--priority 10000
gcloud compute firewall-rules create allow-sql-to-wsfc-nodes \
--direction=INGRESS \
--action=allow \
--rules=tcp:1433 \
--enable-logging \
--source-ranges=$SUBNET_CIDR \
--target-tags=wsfc-node \
--network=$VPC_NAME \
--priority 10000
```
> [!NOTE]
> **Note:** Depending on how you've deployed the Active Directory, you might need to create additional firewall rules to allow servers to join the domain. For more information, see [Accessing Managed Microsoft AD from within your VPC](https://docs.cloud.google.com/managed-microsoft-ad/docs/firewalls#accessing_from_within_your_vpc).
### Create VM instances
Create and deploy two VM instances for the failover cluster. At any point in time,
one of these VMs hosts the primary replica of the SQL Server database
while the other node hosts the secondary replica. The two VM instances must:
- have failover clustering and SQL Server installed.
- have [Compute Engine WSFC support](https://github.com/GoogleCloudPlatform/guest-agent#windows-failover-cluster-support) enabled.
You use a [SQL Server premium image](https://docs.cloud.google.com/compute/docs/images/os-details#sql_server)
which has SQL Server 2022 preinstalled.
> [!NOTE]
> **Note:** If you plan to bring your own licenses for SQL Server by using the [License Mobility](https://docs.cloud.google.com/compute/docs/instances/windows/ms-licensing) program, select Windows Server base images for these nodes and install SQL Server using your own product keys.
To provide a tie-breaking vote and achieve a quorum for the failover scenario,
deploy a third VM that serves as a
[file share witness](https://docs.microsoft.com/en-us/windows-server/failover-clustering/manage-cluster-quorum#quorum-configuration-options)
using the following steps:
1. Return to your existing Cloud Shell session.
2. Create a [specialized script](https://docs.cloud.google.com/compute/docs/startupscript#providing_a_startup_script_for_windows_instances)
for the WSFC nodes. This script installs the necessary Windows features and
creates firewall rules for WSFC and SQL Server.
```
cat << "EOF" > specialize-node.ps1
$ErrorActionPreference = "stop"
# Install required Windows features
Install-WindowsFeature Failover-Clustering -IncludeManagementTools
Install-WindowsFeature RSAT-AD-PowerShell
# Open firewall for WSFC
netsh advfirewall firewall add rule name="Allow WSFC health check" dir=in action=allow protocol=TCP localport=59998
# Open firewall for SQL Server
netsh advfirewall firewall add rule name="Allow SQL Server" dir=in action=allow protocol=TCP localport=1433
# Open firewall for SQL Server replication
netsh advfirewall firewall add rule name="Allow SQL Server replication" dir=in action=allow protocol=TCP localport=5022
# Format data disk
Get-Disk |
Where partitionstyle -eq 'RAW' |
Initialize-Disk -PartitionStyle MBR -PassThru |
New-Partition -AssignDriveLetter -UseMaximumSize |
Format-Volume -FileSystem NTFS -NewFileSystemLabel 'Data' -Confirm:$false
# Create data and log folders for SQL Server
md d:\Data
md d:\Logs
EOF
```
3. Create the VM instances. On the two cluster nodes, attach a data disk and
set the `enable-wsfc` metadata key to `true`. This action enables [Windows Server
Failover Clustering](https://docs.cloud.google.com/compute/docs/images/guest-agent-functions#windows-failover)
and configures a local listener on the default port (59998).
REGION=$(gcloud config get-value compute/region)
ZONE1=ZONE1
ZONE2=ZONE2
ZONE3=ZONE3
PD_SIZE=200
MACHINE_TYPE=n2-standard-8
gcloud compute instances create node-1 \
--zone $ZONE1 \
--machine-type $MACHINE_TYPE \
--subnet $SUBNET_NAME \
--image-family sql-ent-2022-win-2022 \
--image-project windows-sql-cloud \
--tags wsfc,wsfc-node \
--boot-disk-size 50 \
--boot-disk-type pd-ssd \
--boot-disk-device-name "node-1" \
--create-disk=name=node-1-datadisk,size=$PD_SIZE,type=pd-ssd,auto-delete=no \
--metadata enable-wsfc=true \
--metadata-from-file=sysprep-specialize-script-ps1=specialize-node.ps1
gcloud compute instances create node-2 \
--zone $ZONE2 \
--machine-type $MACHINE_TYPE \
--subnet $SUBNET_NAME \
--image-family sql-ent-2022-win-2022 \
--image-project windows-sql-cloud \
--tags wsfc,wsfc-node \
--boot-disk-size 50 \
--boot-disk-type pd-ssd \
--boot-disk-device-name "node-2" \
--create-disk=name=node-2-datadisk,size=$PD_SIZE,type=pd-ssd,auto-delete=no \
--metadata enable-wsfc=true \
--metadata-from-file=sysprep-specialize-script-ps1=specialize-node.ps1
gcloud compute instances create "witness" \
--zone $ZONE3 \
--machine-type e2-medium \
--subnet $SUBNET_NAME \
--image-family=windows-2022 \
--image-project=windows-cloud \
--tags wsfc \
--boot-disk-size 50 \
--boot-disk-type pd-ssd \
--metadata sysprep-specialize-script-ps1="add-windowsfeature FS-FileServer"
Replace ZONE1, ZONE2, ZONE3 based on
the zones you are using.
> [!NOTE]
> **Note:** Depending on your [performance requirements](https://docs.cloud.google.com/compute/docs/disks/performance#optimize_disk_performance), consider using a machine type larger than `n2-standard-8` for the WSFC nodes. Consider [disabling Simultaneous multithreading (SMT)](https://docs.cloud.google.com/compute/docs/instances/set-threads-per-core) for potential savings on licensing costs.
> [!NOTE]
> **Note:** For the purpose of this tutorial, and to fit within the default regional SSD Persistent Disk quota, the size of the disks attached to each VM is smaller than it would be in a production environment. For better performance and to accommodate a larger database, increase the size of each disk.
4. To join the three VM instances to Active Directory, do the following for each of
the three VM instances:
1. Monitor the initialization process of the VM by viewing its serial port output.
gcloud compute instances tail-serial-port-output NAME
Replace `NAME` with the name of the VM instance.
Wait for a few minutes until you see the output `Instance setup finished`,
then press Ctrl+C. At this point, the VM instance is ready to be used.
2. [Create a username and password](https://docs.cloud.google.com/compute/docs/instances/windows/creating-passwords-for-windows-instances)
for the VM instance.
3. [Connect to the VM by using Remote Desktop](https://docs.cloud.google.com/compute/docs/instances/connecting-to-windows)
and sign in using the username and password created in the previous step.
4. Right-click the **Start** button (or press **Win+X** ) and click **Windows PowerShell (Admin)**.
> [!NOTE]
> **Note:** In this guide, we used Powershell 5.1.
5. Confirm the elevation prompt by clicking **Yes**.
6. Join the computer to your Active Directory domain and restart.
Add-Computer -Domain DOMAIN -Restart
Replace `DOMAIN` with the DNS name of your Active Directory domain.
7. Enter the credentials of an account that has permissions to join a VM to
the domain
Wait for the VM to restart. You have now joined the VM instance to the
Active Directory.
## Deploying the failover cluster
You can now use the VM instances to deploy a Windows Server Failover Cluster and SQL
Server. The following sections discuss how you can do this in detail.
### Preparing SQL Server
Create a new user account in Active Directory for SQL Server using the following
steps.
1. Connect to `node-1` [by using Remote Desktop](https://docs.cloud.google.com/compute/docs/instances/connecting-to-windows). Sign in with your domain user account.
2. Right-click the **Start** button (or press **Win+X** ) and click **Windows PowerShell (Admin)**.
3. Confirm the elevation prompt by clicking **Yes**.
4. Create a domain user account for SQL server and the SQL agent and assign
a password:
```
$Credential = Get-Credential -UserName sql_server -Message 'Enter password'
New-ADUser `
-Name "sql_server" `
-Description "SQL Admin account." `
-AccountPassword $Credential.Password `
-Enabled $true -PasswordNeverExpires $true
```
> [!NOTE]
> **Note:** If you use Managed AD, append `-Path "OU=Cloud,DC=example,DC=org"` to the command to create the user in the `Cloud` organizational units (OU). Ensure that the value of the path is the output of the following command: `Get-ADOrganizationalUnit -Filter "Name -eq 'Cloud'" | Select-Object -ExpandProperty DistinguishedName`
To configure SQL Server, perform the following steps on both `node-1` and
`node-2`, use the following steps:
1. Open **SQL Server Configuration Manager**.
2. In the navigation pane, select **SQL Server Services**.
3. In the list of services, right-click **SQL Server (MSSQLSERVER)** and select **Properties**.
4. Under **Log on as**, change the account as follows:
- **Account name:** `DOMAIN\sql_server` where `DOMAIN` is the NetBIOS name of your Active Directory domain.
- **Password:** Enter the password you chose previously.
5. Click **OK**.
6. When prompted to restart SQL Server, select **Yes**.
SQL Server now runs under a domain user account.
> [!WARNING]
> **Warning:** Make sure you've completed the previous configuration steps on both VM instances, otherwise setting up the Always On availability group will fail.
### Create file shares
Create two file shares on the VM instance `witness` so that it can
store SQL Server backups and act as a file share witness:
1. Connect to `witness` by [using Remote Desktop](https://docs.cloud.google.com/compute/docs/instances/connecting-to-windows). Sign in with your domain user account.
2. Right-click the **Start** button (or press **Win+X** ) and click **Windows PowerShell (Admin)**.
3. Confirm the elevation prompt by clicking **Yes**.
4. Create a witness file share and grant yourself and the two cluster nodes
access to the file share.
```
New-Item "C:\QWitness" –type directory
icacls C:\QWitness\ /grant 'node-1$:(OI)(CI)(M)'
icacls C:\QWitness\ /grant 'node-2$:(OI)(CI)(M)'
New-SmbShare `
-Name QWitness `
-Path "C:\QWitness" `
-Description "SQL File Share Witness" `
-FullAccess $env:username,node-1$,node-2$
```
5. Create another file share to store backups and grant SQL Server full access:
```
New-Item "C:\Backup" –type directory
New-SmbShare `
-Name Backup `
-Path "C:\Backup" `
-Description "SQL Backup" `
-FullAccess $env:USERDOMAIN\sql_server
```
### Create the failover cluster
To create the failover cluster, use the following steps:
1. Return to the Remote Desktop session on `node-1`.
2. Right-click the **Start** button (or press **Win+X** ) and click **Windows PowerShell (Admin)**.
3. Confirm the elevation prompt by clicking **Yes**.
4. Create a new cluster.
```
New-Cluster `
-Name sql-cluster `
-Node node-1,node-2 `
-NoStorage `
-ManagementPointNetworkType Distributed
```
> [!NOTE]
> **Note:** When *computer objects* are created outside the container `Computers` (in an OU), the permission `Create Computer objects` must be delegated to the cluster's computer account in the OU.
5. Return to the PowerShell session on `witness` and grant the virtual
computer object of the cluster permission to access the file share.
```
icacls C:\QWitness\ /grant 'sql-cluster$:(OI)(CI)(M)'
Grant-SmbShareAccess `
-Name QWitness `
-AccountName 'sql-cluster$' `
-AccessRight Full `
-Force
```
6. Return to the PowerShell session on `node-1` and configure the cluster
to use the file share on `witness` as a cluster quorum.
```
Set-ClusterQuorum -FileShareWitness \\witness\QWitness
```
7. Verify that the cluster was created successfully.
```
Test-Cluster
```
You might see some warnings that can be safely ignored:
```
WARNING: System Configuration - Validate All Drivers Signed: The test reported some warnings..
WARNING: Network - Validate Network Communication: The test reported some warnings..
WARNING:
Test Result:
HadUnselectedTests, ClusterConditionallyApproved
Testing has completed for the tests you selected. You should review the warnings in the Report. A cluster solution is
supported by Microsoft only if you run all cluster validation tests, and all tests succeed (with or without warnings).
```
You can also launch the Failover Cluster Manager MMC snap-in to review the
cluster's health by running `cluadmin.msc`.
8. If you're using Managed AD, add the computer account used by the Windows cluster
to the **Cloud Service Domain Join Accounts** group so that it can join
computers to the domain.
```
Add-ADGroupMember `
-Identity "Cloud Service Domain Join Accounts" `
-Members sql-cluster$
```
9. Enable Always On availability groups on both nodes.
```
Enable-SqlAlwaysOn -ServerInstance node-1 -Force
Enable-SqlAlwaysOn -ServerInstance node-2 -Force
```
> [!NOTE]
> **Note:** To get a single cluster endpoint for administrative purposes and managing cluster resources, you can use the DNS Name of the cluster returned by running the `Resolve-DnsName -Name sql-cluster` Powershell command.
## Creating an availability group
You now create a sample database `bookshelf`, include it in a new availability
group named `bookshelf-ag` and configure high availability.
### Creating a database
Create a new database. For the purpose of this tutorial, the database doesn't
need to contain any data.
1. Return to the Remote Desktop session on `node-1`.
2. Open the **SQL Server Management Studio**.
3. In the **Connect to server** dialog, verify the server name is set to `node-1` and select **Connect**.
4. In the menu, select **File \> New \> Query with current connection**.
5. Paste the following SQL script into the editor:
```
-- Create a sample database
CREATE DATABASE bookshelf ON PRIMARY (
NAME = 'bookshelf',
FILENAME='d:\Data\bookshelf.mdf',
SIZE = 256MB,
MAXSIZE = UNLIMITED,
FILEGROWTH = 256MB)
LOG ON (
NAME = 'bookshelf_log',
FILENAME='d:\Logs\bookshelf.ldf',
SIZE = 256MB,
MAXSIZE = UNLIMITED,
FILEGROWTH = 256MB)
GO
USE [bookshelf]
SET ANSI_NULLS ON
SET QUOTED_IDENTIFIER ON
GO
-- Create sample table
CREATE TABLE [dbo].[Books] (
[Id] [bigint] IDENTITY(1,1) NOT NULL,
[Title] [nvarchar](max) NOT NULL,
[Author] [nvarchar](max) NULL,
[PublishedDate] [datetime] NULL,
[ImageUrl] [nvarchar](max) NULL,
[Description] [nvarchar](max) NULL,
[CreatedById] [nvarchar](max) NULL,
CONSTRAINT [PK_dbo.Books] PRIMARY KEY CLUSTERED ([Id] ASC) WITH (
PAD_INDEX = OFF,
STATISTICS_NORECOMPUTE = OFF,
IGNORE_DUP_KEY = OFF,
ALLOW_ROW_LOCKS = ON,
ALLOW_PAGE_LOCKS = ON) ON [PRIMARY]
) ON [PRIMARY] TEXTIMAGE_ON [PRIMARY]
GO
-- Create a backup
EXEC dbo.sp_changedbowner @loginame = 'sa', @map = false;
ALTER DATABASE [bookshelf] SET RECOVERY FULL;
GO
BACKUP DATABASE bookshelf to disk = '\\witness\Backup\bookshelf.bak' WITH INIT
GO
```
The script creates a new database with a single table and performs an
initial backup to `witness`.
6. Select **Execute** to run the SQL script.
### Configure high availability
You can now configure high availability for the availability group using either
T-SQL or Server Management Studio.
### Using T-SQL
To configure high availability for the availability group using T-SQL, use the
following steps:
1. Connect to `node-1` and then execute the following script to create the
`bookshelf-ag` availability group.
CREATE LOGIN [NET_DOMAIN\sql_server] FROM WINDOWS;
GO
USE [bookshelf];
CREATE USER [NET_DOMAIN\sql_server] FOR LOGIN [NET_DOMAIN\sql_server];
GO
USE [master];
CREATE ENDPOINT bookshelf_endpoint
STATE=STARTED
AS TCP (LISTENER_PORT=5022)
FOR DATABASE_MIRRORING (ROLE=ALL);
GO
GRANT CONNECT ON ENDPOINT::[bookshelf_endpoint] TO [NET_DOMAIN\sql_server]
GO
> [!NOTE]
> **Note:** In the `NET_DOMAIN\sql_server` login and user, `NET_DOMAIN` is the NetBIOS name of your Active Directory domain.
2. Connect to `node-2` and execute the following script.
CREATE LOGIN [NET_DOMAIN\sql_server] FROM WINDOWS;
GO
CREATE ENDPOINT bookshelf_endpoint
STATE=STARTED
AS TCP (LISTENER_PORT=5022)
FOR DATABASE_MIRRORING (ROLE=ALL);
GO
GRANT CONNECT ON ENDPOINT::[bookshelf_endpoint] TO [NET_DOMAIN\sql_server]
GO
> [!NOTE]
> **Note:** In the `NET_DOMAIN\sql_server` login and user, `NET_DOMAIN` is the NetBIOS name of your Active Directory domain.
3. On `node-1` and then execute the following script to create the `bookshelf-ag`
availability group.
```
USE master;
GO
CREATE AVAILABILITY GROUP [bookshelf-ag]
WITH (AUTOMATED_BACKUP_PREFERENCE = SECONDARY,
CLUSTER_TYPE = WSFC,
DB_FAILOVER = ON
)
FOR DATABASE [bookshelf]
REPLICA ON
N'node-1' WITH (
ENDPOINT_URL = 'TCP://node-1:5022',
AVAILABILITY_MODE = SYNCHRONOUS_COMMIT,
FAILOVER_MODE = AUTOMATIC,
BACKUP_PRIORITY = 50,
SEEDING_MODE = AUTOMATIC,
SECONDARY_ROLE(ALLOW_CONNECTIONS = NO)
),
N'node-2' WITH (
ENDPOINT_URL = 'TCP://node-2:5022',
AVAILABILITY_MODE = SYNCHRONOUS_COMMIT,
FAILOVER_MODE = AUTOMATIC,
BACKUP_PRIORITY = 50,
SEEDING_MODE = AUTOMATIC,
SECONDARY_ROLE(ALLOW_CONNECTIONS = NO)
);
GO
```
4. Connect to `node-2` and then execute the following script to join the
secondary replica to the availability group and enable automatic seeding.
```
USE master;
GO
ALTER AVAILABILITY GROUP [bookshelf-ag] JOIN;
ALTER AVAILABILITY GROUP [bookshelf-ag] GRANT CREATE ANY DATABASE;
```
5. Check the status of the availability group.
```
SELECT * FROM sys.dm_hadr_availability_group_states;
GO
```
You should see `synchronization_health_desc` as `HEALTHY`.
### Using SQL Server Management Studio
To configure high availability for the availability group using SQL Server
Management Studio, use the following steps:
1. In the **Object Explorer** window, right-click **Always On High Availability** and then select **New Availability Group Wizard**.
2. On the **Specify Options** page, set the availability group name to `bookshelf-ag`, then select **Next**.
3. On the **Select Databases** page, select the `bookshelf` database, then select **Next**.
4. On the **Specify Replicas** page, select the **Replicas** tab.
1. Select **Add replica**.
2. In the **Connect to server** dialog, enter the server name `node-2` and
select **Connect**.
The list of availability replicas now contains SQL Server instances,
`node-1` and `node-2`.
3. Set the **Availability mode** to **Synchronous commit** for both instances.
4. Set **Automatic failover** to **Enabled** for both instances.
5. Select **Next**.
5. On the **Select Data Synchronization** page, select **Automatic Seeding**.
6. On the **Validation** page, verify that all checks are successful. You can
ignore the availability group listener check.
7. On the **Summary** page, select **Finish**.
8. On the **Results** page, select **Close**.
### Configure a DNN listener for the availability group
A DNN listener serves as a single endpoint for SQL Server clients. To configure
a DNN listener, use the following steps:
1. Return to the PowerShell session on `node-1`.
2. Execute the following script to create a DNN listener.
$Ag='bookshelf-ag'
$Port='DNN_PORT'
$Dns='DNN_NAME'
# create the DNN resource with the port as the resource name
Add-ClusterResource -Name $Port -ResourceType "Distributed Network Name" -Group $Ag
# set the DNS name of the DNN resource
Get-ClusterResource -Name $Port | Set-ClusterParameter -Name DnsName -Value $Dns
# start the DNN resource
Start-ClusterResource -Name $Port
# add the Dependency from availability group resource to the DNN resource
Set-ClusterResourceDependency -Resource $Ag -Dependency "[$Port]"
# restart the availability group resource
Stop-ClusterResource -Name $Ag
Start-ClusterResource -Name $Ag
Replace `DNN_PORT` with the DNN listener port. The DNN listener port must be configured with a unique port. For more information, see [Port considerations](https://learn.microsoft.com/en-us/azure/azure-sql/virtual-machines/windows/availability-group-distributed-network-name-dnn-listener-configure?view=azuresql#port-considerations).
Replace `DNN_NAME` with the DNN listener name.
3. Create firewall rules for DNN listener port on both `node-1` and `node-2`.
netsh advfirewall firewall add rule name="Allow DNN listener" dir=in action=allow protocol=TCP localport=DNN_PORT
## Test the failover
You are now ready to test if the failover works as expected:
1. Return to the PowerShell session on `witness`.
2. Run the following script.
while ($True){
$Conn = New-Object System.Data.SqlClient.SqlConnection
$Conn.ConnectionString = "Server=DNN_NAME,DNN_PORT;Integrated Security=true;Initial Catalog=master"
$Conn.Open()
$Cmd = New-Object System.Data.SqlClient.SqlCommand
$Cmd.Connection = $Conn
$Cmd.CommandText = "SELECT SERVERPROPERTY('ServerName')"
$Adapter = New-Object System.Data.SqlClient.SqlDataAdapter $Cmd
$Data = New-Object System.Data.DataSet
$Adapter.Fill($Data) | Out-Null
$Data.Tables[0] + (Get-Date -Format "MM/dd/yyyy HH:mm:ss")
Start-Sleep -Seconds 2
}
Replace `DNN_NAME` with the DNN listener name and `DNN_PORT` with the DNN listener port.
Every 2 seconds, the script connects to SQL Server by using the availability
group listener, and queries the server name.
Leave the script running.
3. Return to the Remote Desktop session on `node-1` to trigger a failover.
1. In **SQL Server Management Studio** , navigate to **Always On
High Availability \> Availability Groups \> bookshelf-ag (Primary)** and right-click the node.
2. Select **Failover**.
3. On the **Select new primary replica** page, verify that `node-2` is selected as new primary replica and that the **Failover readiness** column indicates `No data loss`. Then select **Next**.
4. On the **Connect to replica** page, select **Connect**.
5. In the **Connect to server** dialog, verify that the server name is `node-2` and click **Connect**.
6. Select **Next** and then **Finish**.
7. On the **Results** page, verify that the failover was successful.
4. Return to the PowerShell session on `witness`.
5. Observe the output of the running script and notice that the server name
changes from `node-1` to `node-2` as a result of the failover.
6. Stop the script by pressing `Ctrl+C`.
## Clean up
After you finish the tutorial, you can clean up the resources that you created so that they
stop using quota and incurring charges. The following sections describe how to delete or turn off
these resources.
### Deleting the project
The easiest way to eliminate billing is to delete the project that you
created for the tutorial.
To delete the project:
> [!CAUTION]
> **Caution** : Deleting a project has the following effects:
>
> - **Everything in the project is deleted.** If you used an existing project for the tasks in this document, when you delete it, you also delete any other work you've done in the project.
> - **Custom project IDs are lost.** When you created this project, you might have created a custom project ID that you want to use in the future. To preserve the URLs that use the project ID, such as an `appspot.com` URL, delete selected resources inside the project instead of deleting the whole project.
>
>
> If you plan to explore multiple architectures, tutorials, or quickstarts, reusing projects
> can help you avoid exceeding project quota limits.
1. In the Google Cloud console, go to the **Manage resources** page.
[Go to Manage resources](https://console.cloud.google.com/iam-admin/projects)
2. In the project list, select the project that you want to delete, and then click **Delete**.
3. In the dialog, type the project ID, and then click **Shut down** to delete the project.
## What's next
- Learn how you can [configure a SQL Server failover cluster instance that uses Storage Spaces Direct](https://docs.cloud.google.com/compute/docs/instances/sql-server/configure-failover-cluster-instance).
- Learn how you can [configure a SQL Server failover cluster instance that uses Persistent Disk in multi-writer mode](https://docs.cloud.google.com/compute/docs/instances/sql-server/configure-failover-cluster-instance-pd-multi-writer).