This tutorial walks you through the process of deploying a MySQL 5.6 database to
Google Cloud by using Distributed Replicated Block Device (DRBD)
and Compute Engine. DRBD is a distributed replicated storage system for
the Linux platform.
This tutorial is useful if you are a sysadmin, developer, engineer, database
admin, or DevOps engineer. You might want to manage your own MySQL instance
instead of using the managed service for several reasons, including:
- You're using cross-region instances of MySQL.
- You need to set parameters that are not available in the managed version of MySQL.
- You want to optimize performance in ways that are not settable in the managed version.
DRBD provides replication at the block device level. That means you don't have
to configure replication in MySQL itself, and you get immediate DRBD
benefits---for example, support for read load balancing and secure connections.
The tutorial uses the following:
- [Compute Engine](https://docs.cloud.google.com/compute/docs)
- [Corosync Cluster Engine](https://corosync.github.io/corosync/)
- [Debian 9](https://www.debian.org/releases/stable/)
- [DRBD](https://www.linbit.com/linbit-software-download-page-for-linstor-and-drbd-linux-driver/)
- [MySQL 5.6](https://dev.mysql.com/downloads/mysql/5.6.html)
- [Pacemaker](https://wiki.clusterlabs.org/wiki/Pacemaker)
- [Ubuntu 16](http://releases.ubuntu.com/16.04/)
No advanced knowledge is required in order to use these resources, although this
document does reference advanced capabilities like MySQL clustering, DRBD
configuration, and Linux resource management.
## Architecture
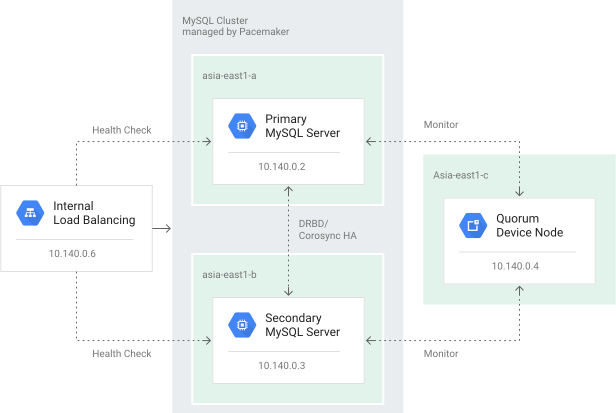
Pacemaker is a cluster resource manager. Corosync is a cluster communication
and participation package, that's used by Pacemaker. In this tutorial, you use
DRBD to replicate the MySQL disk from the primary instance to the standby
instance. In order for clients to connect to the MySQL cluster, you also deploy
an internal load balancer.
You deploy a Pacemaker-managed cluster of three compute instances. You install
MySQL on two of the instances, which serve as your primary and standby
instances. The third instance serves as a quorum device.
In a cluster, each node votes for the node that should be the active node---that
is, the one that runs MySQL. In a two-node cluster, it takes only one vote to
determine the active node. In such a case, the cluster behavior might lead to
[split-brain](https://wikipedia.org/wiki/Split-brain_(computing))
issues or downtime. Split-brain issues occur when both nodes take control
because only one vote is needed in a two-node scenario. Downtime occurs
when the node that shuts down is the one configured to always be the primary in
case of connectivity loss. If the two nodes lose connectivity with each other,
there's a risk that more than one cluster node assumes it's the active node.
Adding a quorum device prevents this situation. A quorum device serves as an
arbiter, where its only job is to cast a vote. This way, in a situation where
the `database1` and `database2` instances cannot communicate, this quorum device
node can communicate with one of the two instances and a majority can still be
reached.
The following diagram shows the architecture of the system described here.
## Objectives
- Create the cluster instances.
- Install MySQL and DRBD on two of the instances.
- Configure DRBD replication.
- Install Pacemaker on the instances.
- Configure Pacemaker clustering on the instances.
- Create an instance and configure it as a quorum device.
- Test failover.
## Costs
Use the
[pricing calculator](https://cloud.google.com/products/calculator/#id=411d8ca1-210f-4f2c-babd-34c6af2b5538)
to generate a cost estimate based on your projected usage.
## Before you begin
In this tutorial, you enter commands using Cloud Shell unless otherwise
noted.
When you finish the tasks that are described in this document, you can avoid
continued billing by deleting the resources that you created. For more information, see
[Clean up](https://docs.cloud.google.com/compute/docs/instances/mysql/deploying-highly-available-mysql-cluster-with-drbd-on-compute-engine#clean-up).
## Getting set up
In this section, you set up a service account, create environment variables,
and reserve IP addresses.
### Set up a service account for the cluster instances
1. Open Cloud Shell:
[OPEN Cloud Shell](https://console.cloud.google.com/?cloudshell=true)
2. Create the service account:
gcloud iam service-accounts create mysql-instance \
--display-name "mysql-instance"
3. Attach the roles needed for this tutorial to the service account:
gcloud projects add-iam-policy-binding ${DEVSHELL_PROJECT_ID} \
--member=serviceAccount:mysql-instance@${DEVSHELL_PROJECT_ID}.iam.gserviceaccount.com \
--role=roles/compute.instanceAdmin.v1
gcloud projects add-iam-policy-binding ${DEVSHELL_PROJECT_ID} \
--member=serviceAccount:mysql-instance@${DEVSHELL_PROJECT_ID}.iam.gserviceaccount.com \
--role=roles/compute.viewer
gcloud projects add-iam-policy-binding ${DEVSHELL_PROJECT_ID} \
--member=serviceAccount:mysql-instance@${DEVSHELL_PROJECT_ID}.iam.gserviceaccount.com \
--role=roles/iam.serviceAccountUser
### Create Cloud Shell environment variables
1. Create a file with the required environment variables for this tutorial:
cat < ~/.mysqldrbdrc
# Cluster instance names
DATABASE1_INSTANCE_NAME=database1
DATABASE2_INSTANCE_NAME=database2
QUORUM_INSTANCE_NAME=qdevice
CLIENT_INSTANCE_NAME=mysql-client
# Cluster IP addresses
DATABASE1_INSTANCE_IP="10.140.0.2"
DATABASE2_INSTANCE_IP="10.140.0.3"
QUORUM_INSTANCE_IP="10.140.0.4"
ILB_IP="10.140.0.6"
# Cluster zones and region
DATABASE1_INSTANCE_ZONE="asia-east1-a"
DATABASE2_INSTANCE_ZONE="asia-east1-b"
QUORUM_INSTANCE_ZONE="asia-east1-c"
CLIENT_INSTANCE_ZONE="asia-east1-c"
CLUSTER_REGION="asia-east1"
EOF
2. Load the environment variables in the current session and set
Cloud Shell to automatically load the variables on future sign-ins:
source ~/.mysqldrbdrc
grep -q -F "source ~/.mysqldrbdrc" ~/.bashrc || echo "source ~/.mysqldrbdrc" >> ~/.bashrc
### Reserve IP addresses
- In Cloud Shell, reserve an internal IP address for each of the
three cluster nodes:
gcloud compute addresses create ${DATABASE1_INSTANCE_NAME} ${DATABASE2_INSTANCE_NAME} ${QUORUM_INSTANCE_NAME} \
--region=${CLUSTER_REGION} \
--addresses "${DATABASE1_INSTANCE_IP},${DATABASE2_INSTANCE_IP},${QUORUM_INSTANCE_IP}" \
--subnet=default
## Creating the Compute Engine instances
In the following steps, the cluster instances use Debian 9 and the client
instances use Ubuntu 16.
1. In Cloud Shell, create a MySQL instance named `database1` in
zone `asia-east1-a`:
gcloud compute instances create ${DATABASE1_INSTANCE_NAME} \
--zone=${DATABASE1_INSTANCE_ZONE} \
--machine-type=n1-standard-2 \
--network-tier=PREMIUM \
--maintenance-policy=MIGRATE \
--image-family=debian-9 \
--image-project=debian-cloud \
--boot-disk-size=50GB \
--boot-disk-type=pd-standard \
--boot-disk-device-name=${DATABASE1_INSTANCE_NAME} \
--create-disk=mode=rw,size=300,type=pd-standard,name=disk-1 \
--private-network-ip=${DATABASE1_INSTANCE_NAME} \
--tags=mysql --service-account=mysql-instance@${DEVSHELL_PROJECT_ID}.iam.gserviceaccount.com \
--scopes="https://www.googleapis.com/auth/compute,https://www.googleapis.com/auth/servicecontrol,https://www.googleapis.com/auth/service.management.readonly" \
--metadata="DATABASE1_INSTANCE_IP=${DATABASE1_INSTANCE_IP},DATABASE2_INSTANCE_IP=${DATABASE2_INSTANCE_IP},DATABASE1_INSTANCE_NAME=${DATABASE1_INSTANCE_NAME},DATABASE2_INSTANCE_NAME=${DATABASE2_INSTANCE_NAME},QUORUM_INSTANCE_NAME=${QUORUM_INSTANCE_NAME},DATABASE1_INSTANCE_ZONE=${DATABASE1_INSTANCE_ZONE},DATABASE2_INSTANCE_ZONE=${DATABASE2_INSTANCE_ZONE}"
2. Create a MySQL instance named `database2` in zone `asia-east1-b`:
gcloud compute instances create ${DATABASE2_INSTANCE_NAME} \
--zone=${DATABASE2_INSTANCE_ZONE} \
--machine-type=n1-standard-2 \
--network-tier=PREMIUM \
--maintenance-policy=MIGRATE \
--image-family=debian-9 \
--image-project=debian-cloud \
--boot-disk-size=50GB \
--boot-disk-type=pd-standard \
--boot-disk-device-name=${DATABASE2_INSTANCE_NAME} \
--create-disk=mode=rw,size=300,type=pd-standard,name=disk-2 \
--private-network-ip=${DATABASE2_INSTANCE_NAME} \
--tags=mysql \
--service-account=mysql-instance@${DEVSHELL_PROJECT_ID}.iam.gserviceaccount.com \
--scopes="https://www.googleapis.com/auth/compute,https://www.googleapis.com/auth/servicecontrol,https://www.googleapis.com/auth/service.management.readonly" \
--metadata="DATABASE1_INSTANCE_IP=${DATABASE1_INSTANCE_IP},DATABASE2_INSTANCE_IP=${DATABASE2_INSTANCE_IP},DATABASE1_INSTANCE_NAME=${DATABASE1_INSTANCE_NAME},DATABASE2_INSTANCE_NAME=${DATABASE2_INSTANCE_NAME},QUORUM_INSTANCE_NAME=${QUORUM_INSTANCE_NAME},DATABASE1_INSTANCE_ZONE=${DATABASE1_INSTANCE_ZONE},DATABASE2_INSTANCE_ZONE=${DATABASE2_INSTANCE_ZONE}"
3. Create a quorum node for use by Pacemaker in zone `asia-east1-c`:
gcloud compute instances create ${QUORUM_INSTANCE_NAME} \
--zone=${QUORUM_INSTANCE_ZONE} \
--machine-type=n1-standard-1 \
--network-tier=PREMIUM \
--maintenance-policy=MIGRATE \
--image-family=debian-9 \
--image-project=debian-cloud \
--boot-disk-size=10GB \
--boot-disk-type=pd-standard \
--boot-disk-device-name=${QUORUM_INSTANCE_NAME} \
--private-network-ip=${QUORUM_INSTANCE_NAME}
4. Create a MySQL client instance:
gcloud compute instances create ${CLIENT_INSTANCE_NAME} \
--image-family=ubuntu-1604-lts \
--image-project=ubuntu-os-cloud \
--tags=mysql-client \
--zone=${CLIENT_INSTANCE_ZONE} \
--boot-disk-size=10GB \
--metadata="ILB_IP=${ILB_IP}"
## Installing and configuring DRBD
In this section, you install and configure the DRBD packages on the `database1`
and `database2` instances, and then initiate DRBD replication from `database1`
to `database2`.
### Configure DRBD on database1
1. In the Google Cloud console, go to the **VM instances** page:
[VM INSTANCES PAGE](https://console.cloud.google.com/compute/instances)
2. In the `database1` instance row, click **SSH** to connect to the instance.
> [!NOTE]
> **Note:** Throughout this tutorial, you connect to various instances. Repeat the preceding two steps to connect to each instance in the Google Cloud console by using SSH.
3. Create a file to retrieve and store instance metadata in environment
variables:
sudo bash -c cat < ~/.varsrc
DATABASE1_INSTANCE_IP=$(curl -s "http://metadata.google.internal/computeMetadata/v1/instance/attributes/DATABASE1_INSTANCE_IP" -H "Metadata-Flavor: Google")
DATABASE2_INSTANCE_IP=$(curl -s "http://metadata.google.internal/computeMetadata/v1/instance/attributes/DATABASE2_INSTANCE_IP" -H "Metadata-Flavor: Google")
DATABASE1_INSTANCE_NAME=$(curl -s "http://metadata.google.internal/computeMetadata/v1/instance/attributes/DATABASE1_INSTANCE_NAME" -H "Metadata-Flavor: Google")
DATABASE2_INSTANCE_NAME=$(curl -s "http://metadata.google.internal/computeMetadata/v1/instance/attributes/DATABASE2_INSTANCE_NAME" -H "Metadata-Flavor: Google")
DATABASE2_INSTANCE_ZONE=$(curl -s "http://metadata.google.internal/computeMetadata/v1/instance/attributes/DATABASE2_INSTANCE_ZONE" -H "Metadata-Flavor: Google")
DATABASE1_INSTANCE_ZONE=$(curl -s "http://metadata.google.internal/computeMetadata/v1/instance/attributes/DATABASE1_INSTANCE_ZONE" -H "Metadata-Flavor: Google")
QUORUM_INSTANCE_NAME=$(curl -s "http://metadata.google.internal/computeMetadata/v1/instance/attributes/QUORUM_INSTANCE_NAME" -H "Metadata-Flavor: Google")
EOF
4. Load the metadata variables from file:
source ~/.varsrc
5. Format the data disk:
sudo bash -c "mkfs.ext4 -m 0 -F -E \
lazy_itable_init=0,lazy_journal_init=0,discard /dev/sdb"
For a detailed description of `mkfs.ext4` options, see
[the mkfs.ext4 manpage](https://linux.die.net/man/8/mkfs.ext4).
6. Install DRBD:
sudo apt -y install drbd8-utils
7. Create the DRBD configuration file:
sudo bash -c 'cat < /etc/drbd.d/global_common.conf
global {
usage-count no;
}
common {
protocol C;
}
EOF'
8. Create a DRBD resource file:
sudo bash -c "cat < /etc/drbd.d/r0.res
resource r0 {
meta-disk internal;
device /dev/drbd0;
net {
allow-two-primaries no;
after-sb-0pri discard-zero-changes;
after-sb-1pri discard-secondary;
after-sb-2pri disconnect;
rr-conflict disconnect;
}
on database1 {
disk /dev/sdb;
address 10.140.0.2:7789;
}
on database2 {
disk /dev/sdb;
address 10.140.0.3:7789;
}
}
EOF"
9. Load the DRBD kernel module:
sudo modprobe drbd
10. Clear the contents of the `/dev/sdb` disk:
sudo dd if=/dev/zero of=/dev/sdb bs=1k count=1024
11. Create the DRBD resource `r0`:
sudo drbdadm create-md r0
12. Bring up DRBD:
sudo drbdadm up r0
13. Disable DRBD when the system starts, letting the cluster resource
management software bring up all necessary services in order:
sudo update-rc.d drbd disable
### Configure DRBD on database2
You now install and configure the DRBD packages on the `database2` instance.
1. Connect to the `database2` instance through SSH.
2. Create a `.varsrc` file to retrieve and store instance metadata in
environment variables:
sudo bash -c cat < ~/.varsrc
DATABASE1_INSTANCE_IP=$(curl -s "http://metadata.google.internal/computeMetadata/v1/instance/attributes/DATABASE1_INSTANCE_IP" -H "Metadata-Flavor: Google")
DATABASE2_INSTANCE_IP=$(curl -s "http://metadata.google.internal/computeMetadata/v1/instance/attributes/DATABASE2_INSTANCE_IP" -H "Metadata-Flavor: Google")
DATABASE1_INSTANCE_NAME=$(curl -s "http://metadata.google.internal/computeMetadata/v1/instance/attributes/DATABASE1_INSTANCE_NAME" -H "Metadata-Flavor: Google")
DATABASE2_INSTANCE_NAME=$(curl -s "http://metadata.google.internal/computeMetadata/v1/instance/attributes/DATABASE2_INSTANCE_NAME" -H "Metadata-Flavor: Google")
DATABASE2_INSTANCE_ZONE=$(curl -s "http://metadata.google.internal/computeMetadata/v1/instance/attributes/DATABASE2_INSTANCE_ZONE" -H "Metadata-Flavor: Google")
DATABASE1_INSTANCE_ZONE=$(curl -s "http://metadata.google.internal/computeMetadata/v1/instance/attributes/DATABASE1_INSTANCE_ZONE" -H "Metadata-Flavor: Google")
QUORUM_INSTANCE_NAME=$(curl -s "http://metadata.google.internal/computeMetadata/v1/instance/attributes/QUORUM_INSTANCE_NAME" -H "Metadata-Flavor: Google")
EOF
3. Load the metadata variables from the file:
source ~/.varsrc
4. Format the data disk:
sudo bash -c "mkfs.ext4 -m 0 -F -E lazy_itable_init=0,lazy_journal_init=0,discard /dev/sdb"
5. Install the DRBD packages:
sudo apt -y install drbd8-utils
6. Create the DRBD configuration file:
sudo bash -c 'cat < /etc/drbd.d/global_common.conf
global {
usage-count no;
}
common {
protocol C;
}
EOF'
7. Create a DRBD resource file:
sudo bash -c "cat < /etc/drbd.d/r0.res
resource r0 {
meta-disk internal;
device /dev/drbd0;
net {
allow-two-primaries no;
after-sb-0pri discard-zero-changes;
after-sb-1pri discard-secondary;
after-sb-2pri disconnect;
rr-conflict disconnect;
}
on ${DATABASE1_INSTANCE_NAME} {
disk /dev/sdb;
address ${DATABASE1_INSTANCE_IP}:7789;
}
on ${DATABASE2_INSTANCE_NAME} {
disk /dev/sdb;
address ${DATABASE2_INSTANCE_IP}:7789;
}
}
EOF"
8. Load the DRBD kernel module:
sudo modprobe drbd
9. Clear out the `/dev/sdb` disk:
sudo dd if=/dev/zero of=/dev/sdb bs=1k count=1024
10. Create the DRBD resource `r0`:
sudo drbdadm create-md r0
11. Bring up DRBD:
sudo drbdadm up r0
12. Disable DRBD when the system starts, letting the cluster resource
management software bring up all necessary services in order:
sudo update-rc.d drbd disable
### Initiate DRBD replication from database1 to database2
1. Connect to the `database1` instance through SSH.
2. Overwrite all `r0` resources on the primary node:
sudo drbdadm -- --overwrite-data-of-peer primary r0
sudo mkfs.ext4 -m 0 -F -E lazy_itable_init=0,lazy_journal_init=0,discard /dev/drbd0
3. Verify the status of DRBD:
sudo cat /proc/drbd | grep ============
The output looks like this:
```
[===================>] sync'ed:100.0% (208/307188)M
```
> [!NOTE]
> **Note:** It might take a few minutes for synchronization to reach 100.0%.
4. Mount `/dev/drbd` to `/srv`:
sudo mount -o discard,defaults /dev/drbd0 /srv
## Installing MySQL and Pacemaker
In this section, you install MySQL and Pacemaker on each instance.
### Install MySQL on database1
1. Connect to the `database1` instance through SSH.
2. Update the APT repository with the MySQL 5.6 package definitions:
sudo bash -c 'cat < /etc/apt/sources.list.d/mysql.list
deb http://repo.mysql.com/apt/debian/ stretch mysql-5.6\ndeb-src http://repo.mysql.com/apt/debian/ stretch mysql-5.6
EOF'
3. Add the GPG keys to the APT `repository.srv` file:
wget -O /tmp/RPM-GPG-KEY-mysql https://repo.mysql.com/RPM-GPG-KEY-mysql
sudo apt-key add /tmp/RPM-GPG-KEY-mysql
4. Update the package list:
sudo apt update
5. Install the MySQL server:
sudo apt -y install mysql-server
When prompted for a password, enter `DRBDha2`.
6. Stop the MySQL server:
sudo /etc/init.d/mysql stop
7. Create the MySQL configuration file:
sudo bash -c 'cat < /etc/mysql/mysql.conf.d/my.cnf
[mysqld]
bind-address = 0.0.0.0 # You may want to listen at localhost at the beginning
datadir = /var/lib/mysql
tmpdir = /srv/tmp
user = mysql
EOF'
8. Create a temporary directory for the MySQL server (configured in
`mysql.conf`):
sudo mkdir /srv/tmp
sudo chmod 1777 /srv/tmp
9. Move all MySQL data into the DRBD directory `/srv/mysql`:
sudo mv /var/lib/mysql /srv/mysql
10. Link `/var/lib/mysql` to `/srv/mysql` under the DRBD replicated
storage volume:
sudo ln -s /srv/mysql /var/lib/mysql
11. Change the `/srv/mysql` owner to a `mysql` process:
sudo chown -R mysql:mysql /srv/mysql
12. Remove `InnoDB` initial data to make sure the disk is as clean as possible:
sudo bash -c "cd /srv/mysql && rm ibdata1 && rm ib_logfile*"
[InnoDB](https://dev.mysql.com/doc/refman/5.6/en/innodb-introduction.html)
is a storage engine for the MySQL database management system.
13. Start MySQL:
sudo /etc/init.d/mysql start
14. Grant access to root user for remote connections in order to test the
deployment later:
mysql -uroot -pDRBDha2 -e "GRANT ALL PRIVILEGES ON *.* TO 'root'@'%' IDENTIFIED BY 'DRBDha2' WITH GRANT OPTION;"
15. Disable automatic MySQL startup, which cluster resource management
takes care of:
sudo update-rc.d -f mysql disable
### Install Pacemaker on database1
1. Load the metadata variables from the `.varsrc` file that you created
earlier:
source ~/.varsrc
2. Stop the MySQL server:
sudo /etc/init.d/mysql stop
3. Install Pacemaker:
sudo apt -y install pcs
4. Enable `pcsd`, `corosync`, and `pacemaker` at system start on the
primary instance:
sudo update-rc.d -f pcsd enable
sudo update-rc.d -f corosync enable
sudo update-rc.d -f pacemaker enable
5. Configure `corosync` to start before `pacemaker`:
sudo update-rc.d corosync defaults 20 20
sudo update-rc.d pacemaker defaults 30 10
6. Set the cluster user password to `haCLUSTER3` for authentication:
sudo bash -c "echo hacluster:haCLUSTER3 | chpasswd"
7. Run the `corosync-keygen` script to generate a 128-bit cluster
authorization key and write it into`/etc/corosync/authkey`:
sudo corosync-keygen -l
8. Copy `authkey` to the `database2` instance. When prompted for a
passphrase, press `Enter`:
sudo chmod 444 /etc/corosync/authkey
gcloud beta compute scp /etc/corosync/authkey ${DATABASE2_INSTANCE_NAME}:~/authkey --zone=${DATABASE2_INSTANCE_ZONE} --internal-ip
sudo chmod 400 /etc/corosync/authkey
9. Create a Corosync cluster configuration file:
sudo bash -c "cat < /etc/corosync/corosync.conf
totem {
version: 2
cluster_name: mysql_cluster
transport: udpu
interface {
ringnumber: 0
Bindnetaddr: ${DATABASE1_INSTANCE_IP}
broadcast: yes
mcastport: 5405
}
}
quorum {
provider: corosync_votequorum
two_node: 1
}
nodelist {
node {
ring0_addr: ${DATABASE1_INSTANCE_NAME}
name: ${DATABASE1_INSTANCE_NAME}
nodeid: 1
}
node {
ring0_addr: ${DATABASE2_INSTANCE_NAME}
name: ${DATABASE2_INSTANCE_NAME}
nodeid: 2
}
}
logging {
to_logfile: yes
logfile: /var/log/corosync/corosync.log
timestamp: on
}
EOF"
The `totem` section configures the Totem protocol for reliable
communication. Corosync uses this communication to control cluster
membership, and it specifies how the cluster members should communicate
with each other.
The important settings in the setup are as follows:
- `transport`: Specifies unicast mode (udpu).
- `Bindnetaddr`: Specifies the network address to which Corosync binds.
- `nodelist`: Defines the nodes in the cluster, and how they can be reached---in this case, the `database1` and `database2` nodes.
- `quorum`/`two_node`: By default, in a two-node cluster, no node will acquire a quorum. You can override this by specifying the value "1" for `two_node` in the `quorum` section.
This setup lets you configure the cluster and prepare it for later when
you add a third node that will be a quorum device.
10. Create the service directory for `corosync`:
sudo mkdir -p /etc/corosync/service.d
11. Configure `corosync` to be aware of Pacemaker:
sudo bash -c 'cat < /etc/corosync/service.d/pcmk
service {
name: pacemaker
ver: 1
}
EOF'
12. Enable the `corosync` service by default:
sudo bash -c 'cat < /etc/default/corosync
# Path to corosync.conf
COROSYNC_MAIN_CONFIG_FILE=/etc/corosync/corosync.conf
# Path to authfile
COROSYNC_TOTEM_AUTHKEY_FILE=/etc/corosync/authkey
# Enable service by default
START=yes
EOF'
13. Restart the `corosync` and `pacemaker` services:
sudo service corosync restart
sudo service pacemaker restart
14. Install the Corosync quorum device package:
sudo apt -y install corosync-qdevice
15. Install a shell script to handle DRBD failure events:
sudo bash -c 'cat << 'EOF' > /var/lib/pacemaker/drbd_cleanup.sh
#!/bin/sh
if [ -z \$CRM_alert_version ]; then
echo "\$0 must be run by Pacemaker version 1.1.15 or later"
exit 0
fi
tstamp="\$CRM_alert_timestamp: "
case \$CRM_alert_kind in
resource)
if [ \${CRM_alert_interval} = "0" ]; then
CRM_alert_interval=""
else
CRM_alert_interval=" (\${CRM_alert_interval})"
fi
if [ \${CRM_alert_target_rc} = "0" ]; then
CRM_alert_target_rc=""
else
CRM_alert_target_rc=" (target: \${CRM_alert_target_rc})"
fi
case \${CRM_alert_desc} in
Cancelled) ;;
*)
echo "\${tstamp}Resource operation "\${CRM_alert_task}\${CRM_alert_interval}" for "\${CRM_alert_rsc}" on "\${CRM_alert_node}": \${CRM_alert_desc}\${CRM_alert_target_rc}" >> "\${CRM_alert_recipient}"
if [ "\${CRM_alert_task}" = "stop" ] && [ "\${CRM_alert_desc}" = "Timed Out" ]; then
echo "Executing recovering..." >> "\${CRM_alert_recipient}"
pcs resource cleanup \${CRM_alert_rsc}
fi
;;
esac
;;
*)
echo "\${tstamp}Unhandled \$CRM_alert_kind alert" >> "\${CRM_alert_recipient}"
env | grep CRM_alert >> "\${CRM_alert_recipient}"
;;
esac
EOF'
sudo chmod 0755 /var/lib/pacemaker/drbd_cleanup.sh
sudo touch /var/log/pacemaker_drbd_file.log
sudo chown hacluster:haclient /var/log/pacemaker_drbd_file.log
### Install MySQL on database2
1. Connect to the `database2` instance through SSH.
2. Update the APT repository with the MySQL 5.6 package:
sudo bash -c 'cat < /etc/apt/sources.list.d/mysql.list
deb http://repo.mysql.com/apt/debian/ stretch mysql-5.6\ndeb-src http://repo.mysql.com/apt/debian/ stretch mysql-5.6
EOF'
3. Add the GPG keys to the APT repository:
wget -O /tmp/RPM-GPG-KEY-mysql https://repo.mysql.com/RPM-GPG-KEY-mysql
sudo apt-key add /tmp/RPM-GPG-KEY-mysql
4. Update the package list:
sudo apt update
5. Install the MySQL server:
sudo apt -y install mysql-server
When prompted for a password, enter `DRBDha2`.
6. Stop the MySQL server:
sudo /etc/init.d/mysql stop
7. Create the MySQL configuration file:
sudo bash -c 'cat < /etc/mysql/mysql.conf.d/my.cnf
[mysqld]
bind-address = 0.0.0.0 # You may want to listen at localhost at the beginning
datadir = /var/lib/mysql
tmpdir = /srv/tmp
user = mysql
EOF'
8. Remove data under `/var/lib/mysql` and add a symbolic link to the mount
point target for the replicated DRBD volume. The DRBD volume (`/dev/drbd0`)
will be mounted at `/srv` only when a failover occurs.
sudo rm -rf /var/lib/mysql
sudo ln -s /srv/mysql /var/lib/mysql
> [!NOTE]
> **Note:** At this point, the `/srv` directory is not mounted, but the symbolic link will be valid when the cluster fails over.
9. Disable automatic MySQL startup, which cluster resource management
takes care of:
sudo update-rc.d -f mysql disable
### Install Pacemaker on database2
1. Load the metadata variables from the `.varsrc` file:
source ~/.varsrc
2. Install Pacemaker:
sudo apt -y install pcs
3. Move the Corosync `authkey` file that you copied before to
`/etc/corosync/`:
sudo mv ~/authkey /etc/corosync/
sudo chown root: /etc/corosync/authkey
sudo chmod 400 /etc/corosync/authkey
4. Enable `pcsd`, `corosync`, and `pacemaker` at system start on the
standby instance:
sudo update-rc.d -f pcsd enable
sudo update-rc.d -f corosync enable
sudo update-rc.d -f pacemaker enable
5. Configure `corosync` to start before `pacemaker`:
sudo update-rc.d corosync defaults 20 20
sudo update-rc.d pacemaker defaults 30 10
6. Set the cluster user password for authentication. The password is the
same one (`haCLUSTER3`) you used for the `database1` instance.
sudo bash -c "echo hacluster:haCLUSTER3 | chpasswd"
7. Create the `corosync` configuration file:
sudo bash -c "cat < /etc/corosync/corosync.conf
totem {
version: 2
cluster_name: mysql_cluster
transport: udpu
interface {
ringnumber: 0
Bindnetaddr: ${DATABASE2_INSTANCE_IP}
broadcast: yes
mcastport: 5405
}
}
quorum {
provider: corosync_votequorum
two_node: 1
}
nodelist {
node {
ring0_addr: ${DATABASE1_INSTANCE_NAME}
name: ${DATABASE1_INSTANCE_NAME}
nodeid: 1
}
node {
ring0_addr: ${DATABASE2_INSTANCE_NAME}
name: ${DATABASE2_INSTANCE_NAME}
nodeid: 2
}
}
logging {
to_logfile: yes
logfile: /var/log/corosync/corosync.log
timestamp: on
}
EOF"
8. Create the Corosync service directory:
sudo mkdir /etc/corosync/service.d
9. Configure `corosync` to be aware of Pacemaker:
sudo bash -c 'cat < /etc/corosync/service.d/pcmk
service {
name: pacemaker
ver: 1
}
EOF'
10. Enable the `corosync` service by default:
sudo bash -c 'cat < /etc/default/corosync
# Path to corosync.conf
COROSYNC_MAIN_CONFIG_FILE=/etc/corosync/corosync.conf
# Path to authfile
COROSYNC_TOTEM_AUTHKEY_FILE=/etc/corosync/authkey
# Enable service by default
START=yes
EOF'
11. Restart the `corosync` and `pacemaker` services:
sudo service corosync restart
sudo service pacemaker restart
12. Install the Corosync quorum device package:
sudo apt -y install corosync-qdevice
13. Install a shell script to handle DRBD failure events:
sudo bash -c 'cat << 'EOF' > /var/lib/pacemaker/drbd_cleanup.sh
#!/bin/sh
if [ -z \$CRM_alert_version ]; then
echo "\$0 must be run by Pacemaker version 1.1.15 or later"
exit 0
fi
tstamp="\$CRM_alert_timestamp: "
case \$CRM_alert_kind in
resource)
if [ \${CRM_alert_interval} = "0" ]; then
CRM_alert_interval=""
else
CRM_alert_interval=" (\${CRM_alert_interval})"
fi
if [ \${CRM_alert_target_rc} = "0" ]; then
CRM_alert_target_rc=""
else
CRM_alert_target_rc=" (target: \${CRM_alert_target_rc})"
fi
case \${CRM_alert_desc} in
Cancelled) ;;
*)
echo "\${tstamp}Resource operation "\${CRM_alert_task}\${CRM_alert_interval}" for "\${CRM_alert_rsc}" on "\${CRM_alert_node}": \${CRM_alert_desc}\${CRM_alert_target_rc}" >> "\${CRM_alert_recipient}"
if [ "\${CRM_alert_task}" = "stop" ] && [ "\${CRM_alert_desc}" = "Timed Out" ]; then
echo "Executing recovering..." >> "\${CRM_alert_recipient}"
pcs resource cleanup \${CRM_alert_rsc}
fi
;;
esac
;;
*)
echo "\${tstamp}Unhandled \$CRM_alert_kind alert" >> "\${CRM_alert_recipient}"
env | grep CRM_alert >> "\${CRM_alert_recipient}"
;;
esac
EOF'
sudo chmod 0755 /var/lib/pacemaker/drbd_cleanup.sh
sudo touch /var/log/pacemaker_drbd_file.log
sudo chown hacluster:haclient /var/log/pacemaker_drbd_file.log
14. Check the Corosync cluster status:
sudo corosync-cmapctl | grep "members...ip"
The output looks like this:
```
runtime.totem.pg.mrp.srp.members.1.ip (str) = r(0) ip(10.140.0.2)
runtime.totem.pg.mrp.srp.members.2.ip (str) = r(0) ip(10.140.0.3)
```
## Starting the cluster
1. Connect to the `database2` instance through SSH.
2. Load the metadata variables from the `.varsrc` file:
source ~/.varsrc
3. Authenticate against the cluster nodes:
sudo pcs cluster auth --name mysql_cluster ${DATABASE1_INSTANCE_NAME} ${DATABASE2_INSTANCE_NAME} -u hacluster -p haCLUSTER3
4. Start the cluster:
sudo pcs cluster start --all
5. Verify the cluster status:
sudo pcs status
The output looks like this:
```
Cluster name: mysql_cluster
WARNING: no stonith devices and stonith-enabled is not false
Stack: corosync
Current DC: database2 (version 1.1.16-94ff4df) - partition with quorum
Last updated: Sat Nov 3 07:24:53 2018
Last change: Sat Nov 3 07:17:17 2018 by hacluster via crmd on database2
2 nodes configured
0 resources configured
Online: [ database1 database2 ]
No resources
Daemon Status:
corosync: active/enabled
pacemaker: active/enabled
pcsd: active/enabled
```
## Configuring Pacemaker to manage cluster resources
Next, you configure Pacemaker with the DRBD, disk, MySQL, and quorum
resources.
1. Connect to the `database1` instance through SSH.
2. Use the Pacemaker `pcs` utility to queue several changes into a file and
later push those changes to the Cluster Information Base (CIB) atomically:
sudo pcs cluster cib clust_cfg
3. Disable
[STONITH](https://wikipedia.org/wiki/STONITH),
because you'll deploy the quorum device later:
sudo pcs -f clust_cfg property set stonith-enabled=false
4. Disable the quorum-related settings. You'll set up the quorum device
node later.
sudo pcs -f clust_cfg property set no-quorum-policy=stop
5. Prevent Pacemaker from moving back resources after a recovery:
sudo pcs -f clust_cfg resource defaults resource-stickiness=200
6. Create the DRBD resource in the cluster:
sudo pcs -f clust_cfg resource create mysql_drbd ocf:linbit:drbd \
drbd_resource=r0 \
op monitor role=Master interval=110 timeout=30 \
op monitor role=Slave interval=120 timeout=30 \
op start timeout=120 \
op stop timeout=60
7. Make sure that only one primary role is assigned to the DRBD resource:
sudo pcs -f clust_cfg resource master primary_mysql mysql_drbd \
master-max=1 master-node-max=1 \
clone-max=2 clone-node-max=1 \
notify=true
8. Create the file system resource to mount the DRBD disk:
sudo pcs -f clust_cfg resource create mystore_FS Filesystem \
device="/dev/drbd0" \
directory="/srv" \
fstype="ext4"
9. Configure the cluster to colocate the DRBD resource with the disk
resource on the same VM:
sudo pcs -f clust_cfg constraint colocation add mystore_FS with primary_mysql INFINITY with-rsc-role=Master
10. Configure the cluster to bring up the disk resource only after the DRBD
primary is promoted:
sudo pcs -f clust_cfg constraint order promote primary_mysql then start mystore_FS
11. Create a MySQL service:
sudo pcs -f clust_cfg resource create mysql_service ocf:heartbeat:mysql \
binary="/usr/bin/mysqld_safe" \
config="/etc/mysql/my.cnf" \
datadir="/var/lib/mysql" \
pid="/var/run/mysqld/mysql.pid" \
socket="/var/run/mysqld/mysql.sock" \
additional_parameters="--bind-address=0.0.0.0" \
op start timeout=60s \
op stop timeout=60s \
op monitor interval=20s timeout=30s
12. Configure the cluster to colocate the MySQL resource with the disk
resource on the same VM:
sudo pcs -f clust_cfg constraint colocation add mysql_service with mystore_FS INFINITY
13. Ensure that the DRBD file system precedes the MySQL service in the
startup order:
sudo pcs -f clust_cfg constraint order mystore_FS then mysql_service
14. Create the alert agent, and add the patch to the log file as its recipient:
sudo pcs -f clust_cfg alert create id=drbd_cleanup_file description="Monitor DRBD events and perform post cleanup" path=/var/lib/pacemaker/drbd_cleanup.sh
sudo pcs -f clust_cfg alert recipient add drbd_cleanup_file id=logfile value=/var/log/pacemaker_drbd_file.log
15. Commit the changes to the cluster:
sudo pcs cluster cib-push clust_cfg
16. Verify that all the resources are online:
sudo pcs status
The output looks like this:
```
Online: [ database1 database2 ]
Full list of resources:
Master/Slave Set: primary_mysql [mysql_drbd]
Masters: [ database1 ]
Slaves: [ database2 ]
mystore_FS (ocf::heartbeat:Filesystem): Started database1
mysql_service (ocf::heartbeat:mysql): Started database1
```
## Configuring a quorum device
1. Connect to the `qdevice` instance through SSH.
2. Install `pcs` and `corosync-qnetd`:
sudo apt update && sudo apt -y install pcs corosync-qnetd
3. Start the Pacemaker or Corosync configuration system daemon (`pcsd`*)*
service and enable it on system start:
sudo service pcsd start
sudo update-rc.d pcsd enable
4. Set the cluster user password (`haCLUSTER3`) for authentication:
sudo bash -c "echo hacluster:haCLUSTER3 | chpasswd"
5. Check the quorum device status:
sudo pcs qdevice status net --full
The output looks like this:
```
QNetd address: *:5403
TLS: Supported (client certificate required)
Connected clients: 0
Connected clusters: 0
Maximum send/receive size: 32768/32768 bytes
```
### Configure the quorum device settings on database1
1. Connect to the `database1` node through SSH.
2. Load the metadata variables from the `.varsrc` file:
source ~/.varsrc
3. Authenticate the quorum device node for the cluster:
sudo pcs cluster auth --name mysql_cluster ${QUORUM_INSTANCE_NAME} -u hacluster -p haCLUSTER3
4. Add the quorum device to the cluster. Use the
[`ffsplit` algorithm](https://manpages.debian.org/testing/corosync-qdevice/corosync-qdevice.8.en.html#MODEL_NET_ALGORITHMS),
which ensures that the active node will be decided based on 50% of the
votes or more:
sudo pcs quorum device add model net host=${QUORUM_INSTANCE_NAME} algorithm=ffsplit
> [!NOTE]
> **Note:** You might see error messages indicating that `corosync-qdevice` failed to enable on `database1` and `database2`. Ignore those errors for now.
5. Add the quorum setting to `corosync.conf`:
sudo bash -c "cat < /etc/corosync/corosync.conf
totem {
version: 2
cluster_name: mysql_cluster
transport: udpu
interface {
ringnumber: 0
Bindnetaddr: ${DATABASE1_INSTANCE_IP}
broadcast: yes
mcastport: 5405
}
}
quorum {
provider: corosync_votequorum
device {
votes: 1
model: net
net {
tls: on
host: ${QUORUM_INSTANCE_NAME}
algorithm: ffsplit
}
}
}
nodelist {
node {
ring0_addr: ${DATABASE1_INSTANCE_NAME}
name: ${DATABASE1_INSTANCE_NAME}
nodeid: 1
}
node {
ring0_addr: ${DATABASE2_INSTANCE_NAME}
name: ${DATABASE2_INSTANCE_NAME}
nodeid: 2
}
}
logging {
to_logfile: yes
logfile: /var/log/corosync/corosync.log
timestamp: on
}
EOF"
6. Restart the `corosync` service to reload the new quorum device setting:
sudo service corosync restart
7. Start the `corosync` quorum device daemon and bring it up at system start:
sudo service corosync-qdevice start
sudo update-rc.d corosync-qdevice defaults
### Configure the quorum device settings on database2
1. Connect to the `database2` node through SSH.
2. Load the metadata variables from the `.varsrc` file:
source ~/.varsrc
3. Add a quorum setting to `corosync.conf`:
sudo bash -c "cat < /etc/corosync/corosync.conf
totem {
version: 2
cluster_name: mysql_cluster
transport: udpu
interface {
ringnumber: 0
Bindnetaddr: ${DATABASE2_INSTANCE_IP}
broadcast: yes
mcastport: 5405
}
}
quorum {
provider: corosync_votequorum
device {
votes: 1
model: net
net {
tls: on
host: ${QUORUM_INSTANCE_NAME}
algorithm: ffsplit
}
}
}
nodelist {
node {
ring0_addr: ${DATABASE1_INSTANCE_NAME}
name: ${DATABASE1_INSTANCE_NAME}
nodeid: 1
}
node {
ring0_addr: ${DATABASE2_INSTANCE_NAME}
name: ${DATABASE2_INSTANCE_NAME}
nodeid: 2
}
}
logging {
to_logfile: yes
logfile: /var/log/corosync/corosync.log
timestamp: on
}
EOF"
4. Restart the `corosync` service to reload the new quorum device setting:
sudo service corosync restart
5. Start the Corosync quorum device daemon and configure it to bring it up at
system start:
sudo service corosync-qdevice start
sudo update-rc.d corosync-qdevice defaults
## Verifying the cluster status
The next step is to verify that the cluster resources are online.
1. Connect to the `database1` instance through SSH.
2. Verify the cluster status:
sudo pcs status
The output looks like this:
```
Cluster name: mysql_cluster
Stack: corosync
Current DC: database1 (version 1.1.16-94ff4df) - partition with quorum
Last updated: Sun Nov 4 01:49:18 2018
Last change: Sat Nov 3 15:48:21 2018 by root via cibadmin on database1
2 nodes configured
4 resources configured
Online: [ database1 database2 ]
Full list of resources:
Master/Slave Set: primary_mysql [mysql_drbd]
Masters: [ database1 ]
Slaves: [ database2 ]
mystore_FS (ocf::heartbeat:Filesystem): Started database1
mysql_service (ocf::heartbeat:mysql): Started database1
Daemon Status:
corosync: active/enabled
pacemaker: active/enabled
pcsd: active/enabled
```
3. Show the quorum status:
sudo pcs quorum status
The output looks like this:
```
Quorum information
---
Date: Sun Nov 4 01:48:25 2018
Quorum provider: corosync_votequorum
Nodes: 2
Node ID: 1
Ring ID: 1/24
Quorate: Yes
Votequorum information
---
Expected votes: 3
Highest expected: 3
Total votes: 3
Quorum: 2
Flags: Quorate Qdevice
Membership information
---
Nodeid Votes Qdevice Name
1 1 A,V,NMW database1 (local)
2 1 A,V,NMW database2
0 1 Qdevice
```
4. Show the quorum device status:
sudo pcs quorum device status
The output looks like this:
```
Qdevice information
---
Model: Net
Node ID: 1
Configured node list:
0 Node ID = 1
1 Node ID = 2
Membership node list: 1, 2
Qdevice-net information
---
Cluster name: mysql_cluster
QNetd host: qdevice:5403
Algorithm: Fifty-Fifty split
Tie-breaker: Node with lowest node ID
State: Connected
```
## Configuring an internal load balancer as the cluster IP
1. Open Cloud Shell:
[OPEN Cloud Shell](https://console.cloud.google.com/?cloudshell=true)
2. Create an unmanaged instance group and add the `database1` instance to it:
gcloud compute instance-groups unmanaged create ${DATABASE1_INSTANCE_NAME}-instance-group \
--zone=${DATABASE1_INSTANCE_ZONE} \
--description="${DATABASE1_INSTANCE_NAME} unmanaged instance group"
gcloud compute instance-groups unmanaged add-instances ${DATABASE1_INSTANCE_NAME}-instance-group \
--zone=${DATABASE1_INSTANCE_ZONE} \
--instances=${DATABASE1_INSTANCE_NAME}
3. Create an unmanaged instance group and add the `database2` instance to it:
gcloud compute instance-groups unmanaged create ${DATABASE2_INSTANCE_NAME}-instance-group \
--zone=${DATABASE2_INSTANCE_ZONE} \
--description="${DATABASE2_INSTANCE_NAME} unmanaged instance group"
gcloud compute instance-groups unmanaged add-instances ${DATABASE2_INSTANCE_NAME}-instance-group \
--zone=${DATABASE2_INSTANCE_ZONE} \
--instances=${DATABASE2_INSTANCE_NAME}
4. Create a health check for `port 3306`:
gcloud compute health-checks create tcp mysql-backend-healthcheck \
--port 3306
5. Create a regional internal backend service:
gcloud compute backend-services create mysql-ilb \
--load-balancing-scheme internal \
--region ${CLUSTER_REGION} \
--health-checks mysql-backend-healthcheck \
--protocol tcp
6. Add the two instance groups as backends to the backend service:
gcloud compute backend-services add-backend mysql-ilb \
--instance-group ${DATABASE1_INSTANCE_NAME}-instance-group \
--instance-group-zone ${DATABASE1_INSTANCE_ZONE} \
--region ${CLUSTER_REGION}
gcloud compute backend-services add-backend mysql-ilb \
--instance-group ${DATABASE2_INSTANCE_NAME}-instance-group \
--instance-group-zone ${DATABASE2_INSTANCE_ZONE} \
--region ${CLUSTER_REGION}
7. Create a forwarding rule for the load balancer:
gcloud compute forwarding-rules create mysql-ilb-forwarding-rule \
--load-balancing-scheme internal \
--ports 3306 \
--network default \
--subnet default \
--region ${CLUSTER_REGION} \
--address ${ILB_IP} \
--backend-service mysql-ilb
8. Create a firewall rule to allow an internal load balancer health check:
gcloud compute firewall-rules create allow-ilb-healthcheck \
--direction=INGRESS --network=default \
--action=ALLOW --rules=tcp:3306 \
--source-ranges=130.211.0.0/22,35.191.0.0/16 --target-tags=mysql
9. To check the status of your load balancer, go to the **Load balancing**
page in the Google Cloud console.
[OPEN THE LOAD BALANCING PAGE](https://console.cloud.google.com/net-services/loadbalancing/loadBalancers/list)
10. Click `mysql-ilb`:
> [!NOTE]
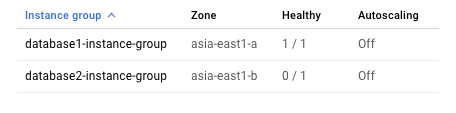
> **Note:** it might take a couple of minutes before the instance becomes healthy.
Because the cluster allows only one instance to run MySQL at any given
time, only one instance is healthy from the internal load balancer's
perspective.
## Connecting to the cluster from the MySQL client
1. Connect to the `mysql-client` instance through SSH.
2. Update the package definitions:
sudo apt-get update
3. Install the MySQL client:
sudo apt-get install -y mysql-client
4. Create a script file that creates and populates a table with sample data:
cat < db_creation.sql
CREATE DATABASE source_db;
use source_db;
CREATE TABLE source_table
(
id BIGINT NOT NULL AUTO_INCREMENT,
timestamp timestamp NOT NULL DEFAULT CURRENT_TIMESTAMP,
event_data float DEFAULT NULL,
PRIMARY KEY (id)
);
DELIMITER $$
CREATE PROCEDURE simulate_data()
BEGIN
DECLARE i INT DEFAULT 0;
WHILE i < 100 DO
INSERT INTO source_table (event_data) VALUES (ROUND(RAND()*15000,2));
SET i = i + 1;
END WHILE;
END$$
DELIMITER ;
CALL simulate_data()
EOF
5. Create the table:
ILB_IP=$(curl -s "http://metadata.google.internal/computeMetadata/v1/instance/attributes/ILB_IP" -H "Metadata-Flavor: Google")
mysql -u root -pDRBDha2 "-h${ILB_IP}" < db_creation.sql
## Testing the cluster
To test the HA capability of the deployed cluster, you can perform the
following tests:
- Shut down the `database1` instance to test whether the primary database can fail over to the `database2` instance.
- Start the `database1` instance to see if `database1` can successfully rejoin the cluster.
- Shut down the `database2` instance to test whether the primary database can fail over to the `database1` instance.
- Start the `database2` instance to see whether `database2` can successfully rejoin the cluster and whether `database1` instance still keeps the primary role.
- Create a network partition between `database1` and `database2` to simulate a split-brain issue.
*** ** * ** ***
1. Open Cloud Shell:
[OPEN Cloud Shell](https://console.cloud.google.com/?cloudshell=true)
2. Stop the `database1` instance:
gcloud compute instances stop ${DATABASE1_INSTANCE_NAME} \
--zone=${DATABASE1_INSTANCE_ZONE}
3. Check the status of the cluster:
gcloud compute ssh ${DATABASE2_INSTANCE_NAME} \
--zone=${DATABASE2_INSTANCE_ZONE} \
--command="sudo pcs status"
The output looks like the following. Verify that the configuration changes
you made took place:
```
2 nodes configured
4 resources configured
Online: [ database2 ]
OFFLINE: [ database1 ]
Full list of resources:
Master/Slave Set: primary_mysql [mysql_drbd]
Masters: [ database2 ]
Stopped: [ database1 ]
mystore_FS (ocf::heartbeat:Filesystem): Started database2
mysql_service (ocf::heartbeat:mysql): Started database2
Daemon Status:
corosync: active/enabled
pacemaker: active/enabled
pcsd: active/enabled
```
4. Start the `database1` instance:
gcloud compute instances start ${DATABASE1_INSTANCE_NAME} \
--zone=${DATABASE1_INSTANCE_ZONE}
5. Check the status of the cluster:
gcloud compute ssh ${DATABASE1_INSTANCE_NAME} \
--zone=${DATABASE1_INSTANCE_ZONE} \
--command="sudo pcs status"
The output looks like this:
```
2 nodes configured
4 resources configured
Online: [ database1 database2 ]
Full list of resources:
Master/Slave Set: primary_mysql [mysql_drbd]
Masters: [ database2 ]
Slaves: [ database1 ]
mystore_FS (ocf::heartbeat:Filesystem): Started database2
mysql_service (ocf::heartbeat:mysql): Started database2
Daemon Status:
corosync: active/enabled
pacemaker: active/enabled
pcsd: active/enabled
```
6. Stop the `database2` instance:
gcloud compute instances stop ${DATABASE2_INSTANCE_NAME} \
--zone=${DATABASE2_INSTANCE_ZONE}
7. Check the status of the cluster:
gcloud compute ssh ${DATABASE1_INSTANCE_NAME} \
--zone=${DATABASE1_INSTANCE_ZONE} \
--command="sudo pcs status"
The output looks like this:
```
2 nodes configured
4 resources configured
Online: [ database1 ]
OFFLINE: [ database2 ]
Full list of resources:
Master/Slave Set: primary_mysql [mysql_drbd]
Masters: [ database1 ]
Stopped: [ database2 ]
mystore_FS (ocf::heartbeat:Filesystem): Started database1
mysql_service (ocf::heartbeat:mysql): Started database1
Daemon Status:
corosync: active/enabled
pacemaker: active/enabled
pcsd: active/enabled
```
8. Start the `database2` instance:
gcloud compute instances start ${DATABASE2_INSTANCE_NAME} \
--zone=${DATABASE2_INSTANCE_ZONE}
9. Check the status of the cluster:
gcloud compute ssh ${DATABASE1_INSTANCE_NAME} \
--zone=${DATABASE1_INSTANCE_ZONE} \
--command="sudo pcs status"
The output looks like this:
```
2 nodes configured
4 resources configured
Online: [ database1 database2 ]
Full list of resources:
Master/Slave Set: primary_mysql [mysql_drbd]
Masters: [ database1 ]
Slaves: [ database2 ]
mystore_FS (ocf::heartbeat:Filesystem): Started database1
mysql_service (ocf::heartbeat:mysql): Started database1
Daemon Status:
corosync: active/enabled
pacemaker: active/enabled
pcsd: active/enabled
```
10. Create a network partition between `database1` and `database2`:
gcloud compute firewall-rules create block-comms \
--description="no MySQL communications" \
--action=DENY \
--rules=all \
--source-tags=mysql \
--target-tags=mysql \
--priority=800
11. After a couple of minutes, check the status of the cluster. Note how
`database1` keeps its primary role, because the quorum policy is the lowest
ID node first under network partition situation. In the meantime, the
`database2` MySQL service is stopped. This quorum mechanism avoids the
split-brain issue when the network partition occurs.
gcloud compute ssh ${DATABASE1_INSTANCE_NAME} \
--zone=${DATABASE1_INSTANCE_ZONE} \
--command="sudo pcs status"
The output looks like this:
```
2 nodes configured
4 resources configured
Online: [ database1 ]
OFFLINE: [ database2 ]
Full list of resources:
Master/Slave Set: primary_mysql [mysql_drbd]
Masters: [ database1 ]
Stopped: [ database2 ]
mystore_FS (ocf::heartbeat:Filesystem): Started database1
mysql_service (ocf::heartbeat:mysql): Started database1
```
12. Delete the network firewall rule to remove the network partition.
(Press `Y` when prompted.)
gcloud compute firewall-rules delete block-comms
13. Verify that the cluster status is back to normal:
gcloud compute ssh ${DATABASE1_INSTANCE_NAME} \
--zone=${DATABASE1_INSTANCE_ZONE} \
--command="sudo pcs status"
The output looks like this:
```
2 nodes configured
4 resources configured
Online: [ database1 database2 ]
Full list of resources:
Master/Slave Set: primary_mysql [mysql_drbd]
Masters: [ database1 ]
Slaves: [ database2 ]
mystore_FS (ocf::heartbeat:Filesystem): Started database1
mysql_service (ocf::heartbeat:mysql): Started database1
```
**Note** : You might see timeout errors in the
following output. It's just an informational log from Pacemaker that doesn't
affect any DB functionality. You can clean this error log by running the
following command: `sudo pcs resource cleanup`.
```
Failed Actions:
* mysql_drbd_monitor_0 on database2 'unknown error' (1): call=66, status=Timed Out, exitreason='none',
last-rc-change='Wed Mar 13 05:13:43 2019', queued=0ms, exec=30002ms
```
14. Connect to the `mysql-client` instance through SSH.
15. In your shell, query the table you created previously:
ILB_IP=$(curl -s "http://metadata.google.internal/computeMetadata/v1/instance/attributes/ILB_IP" -H "Metadata-Flavor: Google")
mysql -uroot "-h${ILB_IP}" -pDRBDha2 -e "select * from source_db.source_table LIMIT 10"
The output should list 10 records of the following form, verifying the data
consistency in the cluster:
```
+---+---+---+
| id | timestamp | event_data |
+---+---+---+
| 1 | 2018-11-27 21:00:09 | 1279.06 |
| 2 | 2018-11-27 21:00:09 | 4292.64 |
| 3 | 2018-11-27 21:00:09 | 2626.01 |
| 4 | 2018-11-27 21:00:09 | 252.13 |
| 5 | 2018-11-27 21:00:09 | 8382.64 |
| 6 | 2018-11-27 21:00:09 | 11156.8 |
| 7 | 2018-11-27 21:00:09 | 636.1 |
| 8 | 2018-11-27 21:00:09 | 14710.1 |
| 9 | 2018-11-27 21:00:09 | 11642.1 |
| 10 | 2018-11-27 21:00:09 | 14080.3 |
+---+---+---+
```
## Failover sequence
If the primary node in the cluster goes down, the failover sequence looks like
this:
1. Both the quorum device and the standby node lose connectivity with the primary node.
2. The quorum device votes for the standby node, and the standby node votes for itself.
3. Quorum is acquired by the standby node.
4. The standby node is promoted to primary.
5. The new primary node does the following:
1. Promotes DRBD to primary
2. Mounts the MySQL data disk from DRBD
3. Starts MySQL
4. Becomes healthy for the load balancer
6. The load balancer starts sending traffic to the new primary node.
## Clean up
### Delete the project
> [!CAUTION]
> **Caution** : Deleting a project has the following effects:
>
> - **Everything in the project is deleted.** If you used an existing project for the tasks in this document, when you delete it, you also delete any other work you've done in the project.
> - **Custom project IDs are lost.** When you created this project, you might have created a custom project ID that you want to use in the future. To preserve the URLs that use the project ID, such as an `appspot.com` URL, delete selected resources inside the project instead of deleting the whole project.
1. In the Google Cloud console, go to the **Manage resources** page.
[Go to Manage resources](https://console.cloud.google.com/iam-admin/projects)
2. In the project list, select the project that you want to delete, and then click **Delete**.
3. In the dialog, type the project ID, and then click **Shut down** to delete the project.
## What's next
- Read more about [DRBD](https://docs.linbit.com/).
- Read more about [Pacemaker](https://wiki.clusterlabs.org/wiki/Pacemaker).
- Read more about [Corosync Cluster Engine](https://corosync.github.io/corosync/).
- For more advanced MySQL server 5.6 settings, see [MySQL server administration manual](https://dev.mysql.com/doc/refman/5.6/en/mysqld-server.html).
- If you want to set up remote access to MySQL, see [How to set up remote access to MySQL on Compute Engine](https://docs.cloud.google.com/solutions/mysql-remote-access).
- For more information about MySQL, see the [official MySQL documentation](https://dev.mysql.com/doc/).
- Explore reference architectures, diagrams, and best practices about Google Cloud. Take a look at our [Cloud Architecture Center](https://docs.cloud.google.com/architecture).