This tutorial shows two ways to clone a
[MySQL database](https://wikipedia.org/wiki/MySQL)
running on Compute Engine. One method uses
[persistent disk snapshots](https://docs.cloud.google.com/compute/docs/disks/create-snapshots).
The other method uses native MySQL export and import, transferring the
export file using
[Cloud Storage](https://docs.cloud.google.com/storage).
Cloud Storage is the Google Cloud object storage service. It offers
a straightforward, security-enhanced, durable, and highly available way to store
files.
Cloning is the process of copying a database onto another server. The
copy is independent of the source database and is preserved as a point-in-time
snapshot. You can use a cloned database for various purposes without putting a
load on the production server or risking the integrity of production data. Some
of these purposes include the following:
- Performing analytical queries.
- Load testing or integration testing of your apps.
- Extracting data for populating data warehouses.
- Running experiments on the data.
Each cloning method described in this tutorial has advantages and
disadvantages. The ideal method for you depends on your situation. The following
table highlights some key issues.
| **Issue** | **Method 1: Disk snapshots** | **Method 2: Export and import using Cloud Storage** |
|---|---|---|
| Additional disk space required on MySQL instances | No additional disk space required | Additional space required for storing the export file when creating and restoring |
| Additional load on source MySQL instances during cloning | No additional load | Additional load on CPU and I/O when creating and uploading the export file |
| Duration of cloning | Relatively fast for large databases | Relatively slow for large databases |
| Can clone from MySQL instances external to Google Cloud | No | Yes |
| Complexity | A complex sequence of commands for attaching cloned disks | A relatively straightforward set of commands for cloning |
| Can leverage existing backup systems | Yes, if backup system uses Google Cloud disk snapshots | Yes, if backup system exports files to Cloud Storage |
| Granularity of cloning | Can clone only entire disks | Can clone only the specified database |
| Data consistency | Consistent at point of snapshot | Consistent at point of export |
| Can use Cloud SQL as source | No | Yes, if the same version is used |
| Can use Cloud SQL as destination | No | Yes |
This tutorial assumes you're familiar with the Linux command line and MySQL
database administration.
## Objectives
- Learn how to run a MySQL database on Google Cloud.
- Learn how to create a demo database on a secondary disk.
- Learn how to clone a MySQL database using [Compute Engine disk snapshots](https://docs.cloud.google.com/compute/docs/disks/create-snapshots).
- Learn how to clone a MySQL database by transferring an export file using Cloud Storage.
- Learn how to clone a MySQL database to Cloud SQL by transferring an export file using Cloud Storage.
## Costs
In this document, you use the following billable components of Google Cloud:
- [Compute Engine](https://docs.cloud.google.com/compute/pricing)
- [Cloud Storage](https://docs.cloud.google.com/storage/pricing)
- [Cloud SQL](https://docs.cloud.google.com/sql/docs/mysql/pricing)
To generate a cost estimate based on your projected usage,
use the [pricing calculator](https://docs.cloud.google.com/products/calculator).
New Google Cloud users might be eligible for a [free trial](https://docs.cloud.google.com/free).
When you finish the tasks that are described in this document, you can avoid
continued billing by deleting the resources that you created. For more information, see
[Clean up](https://docs.cloud.google.com/compute/docs/instances/mysql/cloning-a-mysql-database-on-compute-engine#clean-up).
## Before you begin
1. Enable the Compute Engine API.
[Enable the API](https://console.cloud.google.com/apis/enableflow?apiid=compute.googleapis.com)
## Setting up the environment
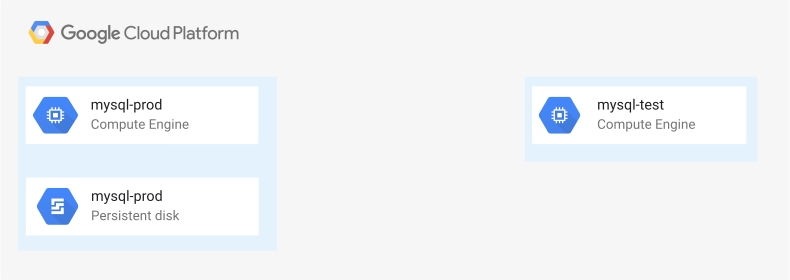
To complete this tutorial, you need to set up your computing environment with
the following:
- A MySQL instance on Compute Engine (named `mysql-prod`) to represent your production database server.
- An additional disk (named `mysql-prod-data`) that's attached to your production server for storing your production database.
- A copy of the [`Employees` database](https://dev.mysql.com/doc/employee/en/) imported into `mysql-prod` to simulate the production database that you want to clone.
- A MySQL instance on Compute Engine (named `mysql-test`) to represent your testing database server. You clone your database onto this server.
The following diagram illustrates this architecture.
### Create the production VM instance
To simulate a production environment, you set up a Compute Engine VM
instance running MySQL on Debian Linux.
The VM instance for this tutorial uses two disks: a 50 GB disk for the OS and
user accounts, and a 100 GB disk for database storage.
In Compute Engine, using separate disks offers no
[performance](https://docs.cloud.google.com/compute/docs/disks#pdspecs)
benefits. Disk performance is determined by the total storage capacity of all
disks attached to an instance and by the total number of vCPUs on your VM instance.
Therefore, the database and log file can reside on the same disk.
> [!NOTE]
> **Note:** For simplicity in this tutorial, you give the VM instances' default service account full access to all Cloud APIs. In a production environment, it's best to grant access only to required Cloud APIs, or to use a specific service account with limited access.
1. Open Cloud Shell.
[Open Cloud Shell](https://console.cloud.google.com/welcome?cloudshell=true)
2. Set your preferred zone:
ZONE=us-east1-b
REGION=us-east1
gcloud config set compute/zone "${ZONE}"
3. Create a Compute Engine instance:
gcloud compute instances create mysql-prod \
--machine-type=n1-standard-2 \
--scopes=cloud-platform \
--boot-disk-size=50GB \
--boot-disk-device-name=mysql-prod \
--create-disk="mode=rw,size=100,type=pd-standard,name=mysql-prod-data,device-name=mysql-prod-data"
This command grants the instance full access to Google Cloud APIs,
creates a 100 GB secondary disk, and attaches the disk to the instance.
Ignore the disk performance warning because you don't need high performance
for this tutorial.
### Set up the additional disk
The second disk attached to the production instance is for storing your
production database. This disk is blank, so you need to partition, format, and
mount it.
1. In the Google Cloud console, go to the **VM instances** page.
[Go to the VM instances page](https://console.cloud.google.com/compute/instances)
2. Make sure a green check mark
is displayed next to
the name of your `mysql-prod` instance, indicating that the instance is
ready.
3. Click the **SSH** button next to the `mysql-prod` instance. The browser
opens a terminal connection to the instance.
4. In the terminal window, display a list of disks attached to your instance:
lsblk
The output is the following:
```
NAME MAJ:MIN RM SIZE RO TYPE MOUNTPOINT
sda 8:0 0 50G 0 disk
└─sda1 8:1 0 50G 0 part /
sdb 8:16 0 100G 0 disk
```
The disk named `sdb` (100 GB) is your data disk.
5. Format the `sdb` disk and create a single partition with an ext4 file system:
sudo mkfs.ext4 -m 0 -F -E lazy_itable_init=0,lazy_journal_init=0,discard \
/dev/sdb
6. Create the MySQL data directory to be the mount point for the data
disk:
sudo mkdir -p /var/lib/mysql
7. To automatically mount the disk at the mount point you created, add an entry
to the `/etc/fstab` file:
echo "UUID=`sudo blkid -s UUID -o value /dev/sdb` /var/lib/mysql ext4 discard,defaults,nofail 0 2" \
| sudo tee -a /etc/fstab
8. Mount the disk:
sudo mount -av
9. Remove all files from the data disk so that it's free to be used by MySQL
as a data directory:
sudo rm -rf /var/lib/mysql/*
### Install the MySQL server
You need to download and install MySQL Community Edition. The MySQL
data directory is created on the additional disk.
1. In the SSH session connected to `mysql-prod`, download and install the
MySQL configuration package:
wget http://repo.mysql.com/mysql-apt-config_0.8.13-1_all.deb
sudo dpkg -i mysql-apt-config_0.8.13-1_all.deb
2. When you're prompted, select the **MySQL Server \& Cluster option** , and
then select **mysql-5.7**.
3. In the list, select the **Ok** option to complete the configuration of the
package.
4. Refresh the repository cache and install the mysql-community packages:
sudo apt-get update
sudo apt-get install -y mysql-community-server mysql-community-client
5. When you're warned that the data directory already exists, select **Ok**.
6. When you're prompted to provide a root password, create and enter a
password. Note the password or store it temporarily in a safe place.
### Download and install the sample database
1. In the SSH session connected to the `mysql-prod` instance, install git:
sudo apt-get install -y git
2. Clone the [GitHub repository](https://github.com/datacharmer/test_db)
containing the `Employees` database scripts:
git clone https://github.com/datacharmer/test_db.git
3. Change directory to the directory for the `Employees` database script:
cd test_db
4. Run the `Employees` database creation script:
mysql -u root -p -q < employees.sql
When you're prompted, enter the root password that you created earlier.
5. To verify the sample database is functional, you can run a query that counts
the number of rows in the `employees` table:
mysql -u root -p -e "select count(*) from employees.employees;"
When you're prompted, enter the root password that you created earlier.
The output is the following:
```
+---+
| count(*) |
+---+
| 300024 |
+---+
```
### Create the test VM instance
In this section, you create a MySQL VM instance named `mysql-test` as the
destination for the cloned database. The configuration of this instance is
identical to the production instance. However, you don't create a second data
disk; instead, you attach the data disk later in this tutorial.
1. Open Cloud Shell.
[Open Cloud Shell](https://console.cloud.google.com/welcome?cloudshell=true)
2. Create the test MySQL instance:
gcloud compute instances create mysql-test \
--machine-type=n1-standard-2 \
--scopes=cloud-platform \
--boot-disk-size=50GB \
--boot-disk-device-name=mysql-test
You can ignore the disk performance warning because you don't need high
performance for this tutorial.
### Install the MySQL server on the test VM instance
You also need to download and install MySQL Community Edition onto
the `mysql-test` VM instance.
1. In the SSH session connected to `mysql-test`, download and install the
MySQL configuration package:
wget http://repo.mysql.com/mysql-apt-config_0.8.13-1_all.deb
sudo dpkg -i mysql-apt-config_0.8.13-1_all.deb
2. When you're prompted, select the **MySQL Server \& Cluster option** , and
then select **mysql-5.7**.
3. In the list, select the **Ok** option to complete the configuration of the
package.
4. Refresh the repository cache and install the mysql-community packages:
sudo apt-get update
sudo apt-get install -y mysql-community-server mysql-community-client
5. When you're prompted to provide a root password, create and enter a
password. Note the password or store it temporarily in a safe place.
## Cloning the database using Compute Engine disk snapshots
One way to clone a MySQL database running on Compute Engine is to
store the database on a separate data disk and use persistent disk snapshots to
create a clone of that disk.
[Persistent disk snapshots](https://docs.cloud.google.com/compute/docs/disks/create-snapshots)
let you get a point-in-time copy of on-disk data. Scheduling disk snapshots is
one way to automatically back up your data.
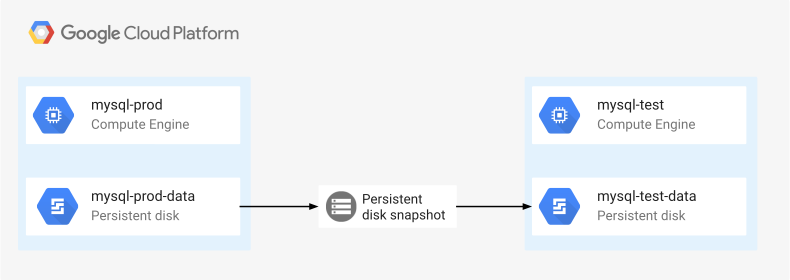
In this section of the tutorial, you do the following:
- Take a snapshot of the production server's data disk.
- Create a new disk from the snapshot.
- Mount the new disk onto the test server.
- Restart the MySQL server on the test instance so that the server uses the new disk as a data disk.
The following diagram shows how a database is cloned by using disk snapshots.
> [!NOTE]
> **Note:** For simplicity in this tutorial, you create the production and test VM instances in the same project. In a production environment, it's likely these instances would be in separate projects. Disk snapshots can be shared between projects using the [Google Cloud CLI or API](https://docs.cloud.google.com/compute/docs/images/sharing-images-across-projects).
### Create the disk snapshot
1. Open Cloud Shell.
[Open Cloud Shell](https://console.cloud.google.com/welcome?cloudshell=true)
2. Create a snapshot of your data disk in the same zone as the VM instance:
gcloud compute disks snapshot mysql-prod-data \
--snapshot-names=mysql-prod-data-snapshot \
--zone="${ZONE}"
After a few minutes, your snapshot is created.
### Attach the disk snapshot to the test instance
You need to create a new data disk from the snapshot you created and then attach
it to the `mysql-test` instance.
1. Open Cloud Shell.
[Open Cloud Shell](https://console.cloud.google.com/welcome?cloudshell=true)
2. Create a new persistent disk by using the snapshot of the production disk
for its contents:
gcloud beta compute disks create mysql-test-data \
--size=100GB \
--source-snapshot=mysql-prod-data-snapshot \
--zone="${ZONE}"
3. Attach the new disk to your `mysql-test` instance with read-write
permissions:
gcloud compute instances attach-disk mysql-test \
--disk=mysql-test-data --mode=rw
### Mount the new data disk in Linux
To use the cloned data disk as the MySQL data directory, you need to stop the
MySQL instance and mount the disk.
1. In the SSH session connected to `mysql-test`, stop the MySQL service:
sudo service mysql stop
2. In the terminal window, display a list of disks attached to your instance:
lsblk
The output is the following:
```
NAME MAJ:MIN RM SIZE RO TYPE MOUNTPOINT
sda 8:0 0 50G 0 disk
└─sda1 8:1 0 50G 0 part /
sdb 8:16 0 100G 0 disk
```
The disk named `sdb` (100 GB) is your data disk.
3. Mount the MySQL data disk onto the MySQL data directory:
sudo mount -o discard,defaults /dev/sdb /var/lib/mysql
Mounting this disk hides any MySQL configuration files and tablespaces,
replacing them with the contents of the disk.
With this command, the disk is temporarily mounted and is not remounted on
system boot. If you want to mount the disk on system boot, create an `fstab`
entry. For more information, see
[Set up the additional disk](https://docs.cloud.google.com/compute/docs/instances/mysql/cloning-a-mysql-database-on-compute-engine#set_up_the_additional_disk)
earlier in this tutorial.
> [!NOTE]
> **Note:** For this tutorial, the `mysql-prod` and `mysql-test` instances use the same Unix user ID for the `mysql` user. Different user IDs might be used in a production environment. If the user IDs differ, you need to change the owner to `mysql` on all the files and directories in the data disk by running the following command: `chown -hR mysql.mysql /var/lib/mysql`
### Start MySQL in the test instance
1. In the SSH session connected to `mysql-test`, start the MySQL service:
sudo service mysql start
2. To verify that the cloned database is functional, run a query
that counts the number of rows in the `employees` table:
mysql -u root -p -e "select count(*) from employees.employees;"
When you're prompted, enter the root password of the `mysql-prod` database
server. The production instance root password is required because the entire
MySQL data directory is a clone of the data directory of the `mysql-prod`
instance, so all the databases, database users, and their passwords are
copied.
```
+---+
| count(*) |
+---+
| 300024 |
+---+
```
The number of rows is the same as on the `mysql-prod` instance.
Now that you have seen how to clone a database using persistent disk snapshots,
you might want to try cloning a database by using export and import. To
complete the tutorial for this second approach, you must unmount the cloned
disk.
### Unmount the cloned disk
To unmount the cloned disk that you created by using disk snapshots, perform the
following steps:
1. In the SSH session connected to your `mysql-test` instance, stop the MySQL
service:
sudo service mysql stop
2. Unmount the cloned data disk from the MySQL data directory:
sudo umount /var/lib/mysql
3. Restart the MySQL service:
sudo service mysql start
## Cloning using export and import
A second method of cloning a MySQL database running on
Compute Engine is to use MySQL's built-in export (using `mysqldump`) and
import. With this approach, you transfer the export file by using
Cloud Storage.
This section of the tutorial uses resources that you created in the
[Cloning the database using Compute Engine disk snapshots](https://docs.cloud.google.com/compute/docs/instances/mysql/cloning-a-mysql-database-on-compute-engine#cloning_the_database_using_compute_engine_disk_snapshots)
section of this tutorial. If you didn't complete that section, you must do so
before continuing.
In this section of the tutorial, you do the following:
- Create a Cloud Storage bucket.
- Export the database on the production instance, writing it to Cloud Storage.
- Import the export file into the test instance, reading it from Cloud Storage.
The following diagram shows how a database is cloned by transferring an export
using Cloud Storage.
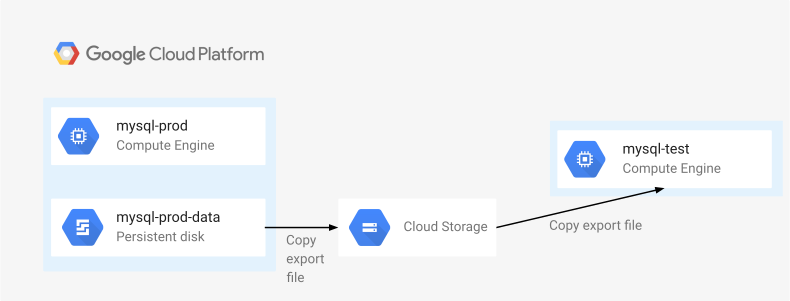
Because systems outside of Google Cloud can be given access to
Cloud Storage, you can use this approach to clone databases from
external MySQL instances.
### Create a Cloud Storage bucket
You need to create a Cloud Storage bucket that stores the export files
while you transfer them from the `mysql-prod` instance to the `mysql-test`
instance.
1. Open Cloud Shell.
[Open Cloud Shell](https://console.cloud.google.com/welcome?cloudshell=true)
2. Create a Cloud Storage bucket in the same region as your VM
instances:
gcloud storage buckets create "gs://$(gcloud config get-value project)-bucket" --location="${REGION}"
### Export the database
In your production environment, you might already make backups using `mysqldump`
export files. You can use these backups as a base for cloning your database.
In this tutorial, you make a new export file by using `mysqldump`, which doesn't
impact any existing full or incremental backup schedules.
- In the SSH session connected to the `mysql-prod` instance, export the
`Employees` database, streaming it into a Cloud Storage
object in the bucket that you created earlier:
mysqldump --user=root -p --default-character-set=utf8mb4 --add-drop-database --verbose --hex_blob \
--databases employees |\
gcloud storage cp - "gs://$(gcloud config get-value project)-bucket/employees-dump.sql"
When you're prompted, enter the root password of the `mysql-prod` database server.
You use the `utf8mb4` character set in the export to avoid any character
encoding issues.
The `--add-drop-database` option is used so that `DROP DATABASE` and `CREATE
DATABASE` statements are included in the export.
### Import the exported file
1. In the SSH session connected to the `mysql-test` instance, stream the
exported file from your Cloud Storage bucket into the `mysql`
command-line application:
gcloud storage cat "gs://$(gcloud config get-value project)-bucket/employees-dump.sql" |\
mysql --user=root -p --default-character-set=utf8mb4
When you're prompted, enter the root password of the `mysql-test` database server.
You use the `utf8mb4` character set in the import to avoid any character
encoding issues.
2. To verify that the cloned database is functional, run a query
that counts the number of rows in the `employees` table:
mysql -u root -p -e "select count(*) from employees.employees;"
When you're prompted, enter the root password of the `mysql-test` database server.
```
+---+
| count(*) |
+---+
| 300024 |
+---+
```
The number of rows is the same as on the `mysql-prod` instance.
## Using Cloud SQL as the cloning destination
If your destination database is hosted on Cloud SQL, and the origin
database is on Compute Engine, then the only supported mechanism for cloning is
by exporting the database to Cloud Storage, and then importing the
database into Cloud SQL.
As
[explained in the documentation for Cloud SQL](https://docs.cloud.google.com/sql/docs/mysql/import-export/creating-sqldump-csv),
Cloud SQL can only import the exported file when it does not contain any
triggers, stored procedures, views, or functions.
If your database relies on any of these elements, you must exclude them from the
export by using the `--skip-triggers` and `--ignore-table [VIEW_NAME]` command-line
arguments, and then manually recreate them after importing.
### Create a Cloud SQL for MySQL instance
1. Open Cloud Shell.
[Open Cloud Shell](https://console.cloud.google.com/welcome?cloudshell=true)
2. Create a Cloud SQL for MySQL instance running the same database
version as your `mysql-prod` instance:
gcloud sql instances create mysql-cloudsql \
--tier=db-n1-standard-2 --region=${REGION} --database-version MYSQL_5_7
After a few minutes, your Cloud SQL database is created.
3. Reset the root user password to a known value:
gcloud sql users set-password root \
--host=% --instance=mysql-cloudsql --prompt-for-password
When you're prompted to provide a root password, create and enter a
password. Note the password or store it temporarily in a safe place.
### Export the database
To export the database in a format suitable for importing into
Cloud SQL, you need to exclude any views in the database.
1. In the SSH session connected to the `mysql-prod` instance, set an environment
variable containing a set of command-line arguments for the `mysqldump`
command so that it ignores the views in the `Employees` database:
DATABASE_NAME=employees
IGNORE_TABLES_ARGS="`mysql -u root -p -s -s -e \"
SELECT CONCAT('--ignore-table ${DATABASE_NAME}.',TABLE_NAME)
FROM information_schema.TABLES
WHERE TABLE_TYPE LIKE 'VIEW' AND TABLE_SCHEMA = '${DATABASE_NAME}';
\"`"
When you're prompted, enter the root password of the `mysql-prod` database server.
2. View the variable contents to verify that they were set correctly:
echo "${IGNORE_TABLES_ARGS}"
```
--ignore-table employees.current_dept_emp
--ignore-table employees.dept_emp_latest_date
```
3. Export the `Employees` database, excluding triggers and views, streaming it
directly into a Cloud Storage object in the bucket that you created
earlier:
mysqldump --user=root -p --default-character-set=utf8mb4 --add-drop-database --verbose \
--hex-blob --skip-triggers --set-gtid-purged=OFF \
$IGNORE_TABLES_ARGS \
--databases employees |\
gcloud storage cp - "gs://$(gcloud config get-value project)-bucket/employees-cloudsql-import.sql"
When you're prompted, enter the root password of the `mysql-prod` database server.
### Update object permissions
The correct permissions need to be set on both the Cloud Storage bucket
and the export object so that the Cloud SQL service account is able to read them.
These permissions are set automatically when you use the Google Cloud console to
import the object, or they can be set by using `gcloud` commands.
1. Open Cloud Shell.
[Open Cloud Shell](https://console.cloud.google.com/welcome?cloudshell=true)
2. Set an environment variable containing the address of the service account of your
Cloud SQL instance:
CLOUDSQL_SA="$(gcloud sql instances describe mysql-cloudsql --format='get(serviceAccountEmailAddress)')"
3. Add the service account to the bucket Identity and Access Management (IAM) policy as a
reader and writer:
gcloud storage buckets add-iam-policy-binding "gs://$(gcloud config get-value project)-bucket/" \
--member=user:"${CLOUDSQL_SA}" --role=roles/storage.objectUser
### Import the exported database
1. Open Cloud Shell.
[Open Cloud Shell](https://console.cloud.google.com/welcome?cloudshell=true)
2. Import the exported file into your Cloud SQL instance:
gcloud sql import sql mysql-cloudsql \
"gs://$(gcloud config get-value project)-bucket/employees-cloudsql-import.sql"
When prompted, enter `y`.
3. To verify that the cloned database is functional, run a query
that counts the number of rows in the `employees` table:
echo "select count(*) from employees.employees;" |\
gcloud sql connect mysql-cloudsql --user=root
When prompted, enter the root password of the `mysql-cloudsql` database server.
The output is the following:
```
Connecting to database with SQL user [root].Enter password:
count(*)
300024
```
The number of rows is the same as on the `mysql-prod` instance.
> [!NOTE]
> **Note:** The imported database doesn't contain any triggers, stored procedures, views, or functions from the original database. If these are required, you must recreate them manually.
## Additional information for production systems
The following categories provide additional best practices for your production
systems.
### Using disk snapshots
For physical backups (such as disk snapshots), the MySQL documentation
[recommends](https://dev.mysql.com/doc/refman/5.7/en/backup-methods.html)
that you pause writes to the database before you take a snapshot. You do this by
using the
[`FLUSH TABLES WITH READ LOCK`](https://dev.mysql.com/doc/refman/5.7/en/flush.html#flush-tables-with-read-lock)
command. When the snapshot is complete, you can use `UNLOCK TABLES`
to restart writes.
For databases that use InnoDB tables, we recommend that you take the snapshot
directly without first executing the `FLUSH TABLES WITH READ LOCK` command. This
allows the database to stay running without any ill effects, but the snapshot
might be in an inconsistent state. However, if this occurs, the InnoDB engine
can rebuild the tables to a consistent state when the clone starts up.
For databases that use MyISAM tables, executing the `FLUSH TABLES WITH READ LOCK`
command blocks all writes to the tables, making your database read-only
until you run the `UNLOCK TABLES` command.
If you take a snapshot *without* first flushing and locking the tables, there is
a risk that the newly cloned database will contain inconsistent data, or will be
corrupted.
Therefore, to get a consistent snapshot on databases using MyISAM tables, we
recommend that you run `FLUSH TABLES WITH READ LOCK` on a read replica and
take a snapshot of that replica so that the performance of the primary (master)
database is not affected.
### Using the mysqldump command
In order to create an export file that's consistent with the source database,
the `mysqldump` command locks all the tables during the export operation. This
means that writes to the database are blocked while the database is being exported.
We therefore recommend that you run the `mysqldump` command against a read
replica of the primary database so that the primary is not blocked.
## Clean up
To avoid incurring charges to your Google Cloud account for the
resources used in this tutorial, you can delete the Google Cloud project
that you created for this tutorial.
> [!CAUTION]
> **Caution** : Deleting a project has the following effects:
>
> - **Everything in the project is deleted.** If you used an existing project for the tasks in this document, when you delete it, you also delete any other work you've done in the project.
> - **Custom project IDs are lost.** When you created this project, you might have created a custom project ID that you want to use in the future. To preserve the URLs that use the project ID, such as an `appspot.com` URL, delete selected resources inside the project instead of deleting the whole project.
>
>
> If you plan to explore multiple architectures, tutorials, or quickstarts, reusing projects
> can help you avoid exceeding project quota limits.
1. In the Google Cloud console, go to the **Manage resources** page.
[Go to Manage resources](https://console.cloud.google.com/iam-admin/projects)
2. In the project list, select the project that you want to delete, and then click **Delete**.
3. In the dialog, type the project ID, and then click **Shut down** to delete the project.
## What's next
- Learn how to [monitor your slow queries in MySQL with Cloud Monitoring](https://cloud.google.com/architecture/security-log-analytics).
-
Explore reference architectures, diagrams, and best practices about Google Cloud.
Take a look at our
[Cloud Architecture Center](https://docs.cloud.google.com/architecture).