If you need to move your Compute Engine boot disk data
outside of your Compute Engine project, you can export a boot disk
image to Cloud Storage as a `tar.gz` file. If you need to
create a persistent disk image to use when you create new persistent disks on
Compute Engine, read
[Creating a custom image](https://docs.cloud.google.com/compute/docs/images/create-delete-deprecate-private-images#creating_a_custom_image).
You can backup or share a custom image by exporting the image to
Cloud Storage. This method is ideal for sharing individual images
with projects that don't have access to your images. Alternatively, you can
share images by granting the
[Compute Engine image user role](https://docs.cloud.google.com/compute/docs/images/sharing-images-across-projects)
on the image or on the project that contains it.
> [!NOTE]
> **Note:** You are not permitted to export Windows Server images using Google-provided licenses for use outside of Google Cloud.
The following diagram shows some typical workflows for the creation and reuse
of a custom image.
[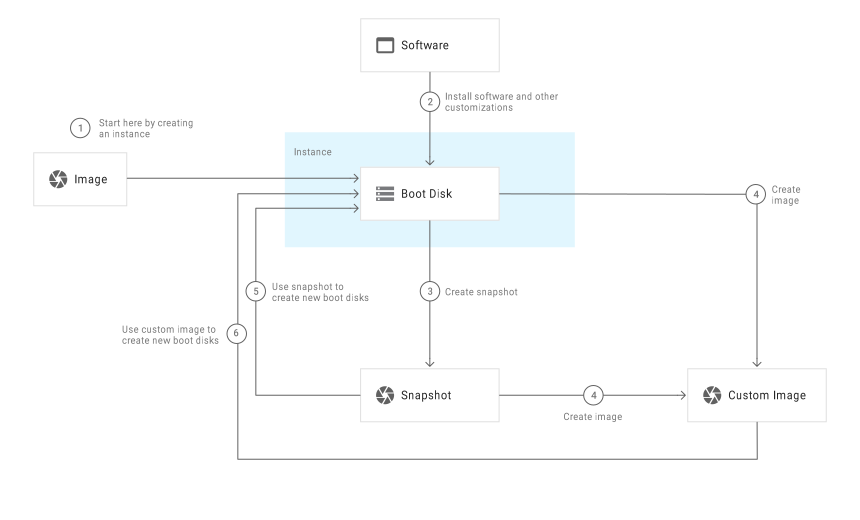](https://docs.cloud.google.com/compute/images/create-use-custom-image.svg) Figure 1. Examples of creation and reuse of custom images
## Before you begin
- Read the [images](https://docs.cloud.google.com/compute/docs/images) page.
- If the project that you want to export the image from has a [trusted image
policy](https://docs.cloud.google.com/compute/docs/images/restricting-image-access) defined, add `projects/compute-image-import` to the allowed list of publishers.
- To find out how to meet requirements before exporting images, see [Prerequisites for importing and exporting VM images](https://docs.cloud.google.com/compute/docs/import/requirements-export-import-images).
- If you haven't already, set up [authentication](https://docs.cloud.google.com/compute/docs/authentication). Authentication verifies your identity for access to Google Cloud services and APIs. To run code or samples from a local development environment, you can authenticate to Compute Engine by selecting one of the following options:
Select the tab for how you plan to use the samples on this page:
### Console
When you use the Google Cloud console to access Google Cloud services and
APIs, you don't need to set up authentication.
### gcloud
1.
[Install](https://docs.cloud.google.com/sdk/docs/install) the Google Cloud CLI.
After installation,
[initialize](https://docs.cloud.google.com/sdk/docs/initializing) the Google Cloud CLI by running the following command:
```bash
gcloud init
```
If you're using an external identity provider (IdP), you must first
[sign in to the gcloud CLI with your federated identity](https://docs.cloud.google.com/iam/docs/workforce-log-in-gcloud).
> [!NOTE]
> **Note:** If you installed the gcloud CLI previously, make sure you have the latest version by running `gcloud components update`.
2. [Set a default region and zone](https://docs.cloud.google.com/compute/docs/gcloud-compute#set_default_zone_and_region_in_your_local_client).
### REST
To use the REST API samples on this page in a local development environment, you use the
credentials you provide to the gcloud CLI.
1. [Install](https://docs.cloud.google.com/sdk/docs/install) the Google Cloud CLI.
2. If you're using an external identity provider (IdP), you must first [sign in to the gcloud CLI with your federated identity](https://docs.cloud.google.com/iam/docs/workforce-log-in-gcloud).
For more information, see
[Authenticate for using REST](https://docs.cloud.google.com/docs/authentication/rest)
in the Google Cloud authentication documentation.
## Limitations and restrictions
The following limitations are applicable to the image export process.
### General limitations
You can't export [public images provided by
Google](https://docs.cloud.google.com/compute/docs/images#os-compute-support). You can only export images
that you previously created or imported.
When you export an image, a session is created on the machine that you are
exporting the image from. This session needs to remain active until the export
process is complete. If the session terminates before the export process is
complete, or if the job fails, ephemeral resources such as temporary disks,
VM instances, or storage buckets might not get deleted. In this case, you must
delete these ephemeral resources manually.
A Cloud Storage bucket called `${PROJECT}-daisy-bkt-${REGION}` is
created for ephemeral resources created during the export process in the
same region or multi-region as the target bucket. To manage the lifecycle of these
resources, see [Object lifecycle management](https://docs.cloud.google.com/storage/docs/lifecycle).
The export process uses Cloud Build to export an image. A Cloud Build session lasts for a maximum of 24 hours. If your image is very large and it needs more than 24 hours to be exported, you can [export the image manually](https://docs.cloud.google.com/compute/docs/images/export-image#create-export-manually).
### VPC Service Controls limitations
For projects that are protected
with [VPC Service Controls](https://docs.cloud.google.com/vpc-service-controls/docs/overview), use one of
the following methods:
- Export from the same project where the image resides.
Note: You must add an egress rule to the
`compute-image-import` (number `71462206840`) project.
To follow the principle of least privilege, we recommend that you only allow
the `artifactregistry.googleapis.com` service with the following
methods: `artifactregistry.repositories.downloadArtifacts`,
`artifactregistry.tags.get`, `artifactregistry.tags.list`,
and `artifactregistry.versions.get`.
- Export the image [manually](https://docs.cloud.google.com/compute/docs/images/export-image#create-export-manually).
> [!NOTE]
> **Note:** Compute Engine does not support exporting an image from a different project inside the service perimeter of VPC Service Controls.
## Export an image with a single command
> [!NOTE]
> **Note:** Exporting an image requires that a Compute Engine service account be enabled in your project. If the default Compute Engine service account is disabled, or if you want to use a custom Compute Engine service account, see [Exporting an image from a project using a custom Compute Engine service account](https://docs.cloud.google.com/compute/docs/images/export-image#custom-service-account).
### Export an image to Cloud Storage
You can export your images using either the
[Google Cloud console](https://console.cloud.google.com/), the
[Google Cloud CLI](https://docs.cloud.google.com/compute/docs/gcloud-compute), or
[REST](https://docs.cloud.google.com/build/docs/api/reference/rest).
### Console
1. In the Google Cloud console, go to the **Images** page.
[Go to Images](https://console.cloud.google.com/compute/images)
2. Click the name of the image that you want to export to go to the image
details page.
3. From the image details page, click **Export** to open the **Export
Image** page.
4. From the **Export image** page, choose the **Export format** of the
image.
5. Choose the Cloud Storage location to export your image to by clicking
**Browse**.
6. Choose an existing Cloud Storage location to export your image. Or,
follow the directions to create a new Cloud Storage bucket, and then
enter a name for the new Cloud Storage bucket.
7. Once you choose a Cloud Storage, choose a filename for the exported
image. You can use the default filename, or you can choose your own
filename.
8. After choosing a Cloud Storage, and entering a filename for the
image, click **Select**.
9. From the **Export image** page, click **Export** . After choosing
**Export** , the Google Cloud console displays the **Image export
history** , where you can view the image export process. For additional
details about the image export process, click the **Cloud Build ID** to go
to the **Image export details** page where you can view and download the
image export log.
10. Go to the **Storage** page to access your exported image.
[Go to Storage](https://console.cloud.google.com/storage/browser)
### gcloud
The preferred way to export an image to Cloud Storage is to
use the [`gcloud compute images export`](https://docs.cloud.google.com/sdk/gcloud/reference/compute/images/export)
command. This command uses [Daisy](https://github.com/GoogleCloudPlatform/compute-image-import/tree/main/daisy)
to chain together the multiple steps that are required to export an image.
> [!NOTE]
> **Note:** The export process creates several resources in your project. If the export process fails, then you may have to manually delete all the resources created in your project. For more information, see [export workflow](https://github.com/GoogleCloudPlatform/compute-image-import/blob/main/daisy_workflows/export/image_export_ext.wf.json).
The [`gcloud compute images export`](https://docs.cloud.google.com/sdk/gcloud/reference/compute/images/export)
command assumes that you have already [created an image](https://docs.cloud.google.com/compute/docs/images/create-delete-deprecate-private-images#creating_a_custom_image)---for
example, with the [`gcloud compute images create`](https://docs.cloud.google.com/sdk/gcloud/reference/beta/compute/images/create)
command.
Using the Google Cloud CLI, run:
```
gcloud compute images export \
--destination-uri DESTINATION_URI \
--image IMAGE_NAME
```
Replace the following:
- `DESTINATION_URI`: the Cloud Storage URI destination for the exported image file.
- `IMAGE_NAME`: the name of the disk image to export.
By default, images are exported in the Compute Engine format,
which is a `disk.raw` file that is tarred and gzipped. To export images in
other formats supported by the QEMU disk image utility, you can use the
`--export-format` flag. Valid formats include `vmdk`, `vhdx`, `vpc`, `vdi`,
and `qcow2`.
**Example**
For example, the following command exports an image named `my-image` from
`my-project` to a Cloud Storage bucket named `my-bucket`. By
default, the image is exported as a `disk.raw file` and is compressed into
the `tar.gz` file format.
```
gcloud compute images export \
--destination-uri gs://my-bucket/my-image.tar.gz \
--image my-image \
--project my-project
```
For flags, see the
[`gcloud compute images export`](https://docs.cloud.google.com/sdk/gcloud/reference/compute/images/export)
reference documentation.
### REST
Send a `POST` request to the Cloud Build API.
> [!NOTE]
> **Note:** Two `timeout` values are required. Default values for these are provided in the following sample requests. These default values work in most scenarios. However, if you need to adjust these values, ensure that the Cloud Build timeout is at least 3% greater than the timeout specified for the arguments (`args`) section.
```
POST https://cloudbuild.googleapis.com/v1/projects/PROJECT_ID/builds
{
"timeout": "7200s",
"steps":[
{
"args":[
"-timeout=7000s",
"-source_image=SOURCE_IMAGE",
"-client_id=api",
"-format=IMAGE_FORMAT",
"-destination_uri=DESTINATION_URI"
],
"name":"gcr.io/compute-image-import/gce_vm_image_export:release",
"env":[
"BUILD_ID=$BUILD_ID"
]
}
],
"tags":[
"gce-daisy",
"gce-daisy-image-export"
]
}
```
Replace the following:
- `PROJECT_ID`: the project ID for the project that contains the image that you want to export.
- `SOURCE_IMAGE`: the name of the image to be exported.
- `IMAGE_FORMAT`: the format of the exported image. Valid formats include `vmdk`, `vhdx`, `vpc`, `vdi`, and `qcow2`.
- `DESTINATION_URI`: the Cloud Storage URI location that you want to export the image file to. For example, `gs://my-bucket/my-exported-image.vmdk`.
For additional `args` values that can be provided, see the optional
flags section of the
[VM image export GitHub page](https://github.com/GoogleCloudPlatform/compute-image-import/tree/main/cli_tools/gce_vm_image_export#optional-flags).
**Example response**
The following sample response resembles the output that is returned:
```
{
"name": "operations/build/myproject-12345/operation-1578608233418",
"metadata": {
"@type": "type.googleapis.com/google.devtools.cloudbuild.v1.BuildOperationMetadata",
"build": {
"id": "3a2055bc-ccbd-4101-9434-d376b88b8940",
"status": "QUEUED",
"createTime": "2019-10-02T18:59:13.393492020Z",
"steps": [
{
"name": "gcr.io/compute-image-import/gce_vm_image_export:release",
"env": [
"BUILD_ID=3a2055bc-ccbd-4101-9434-d376b88b8940"
],
"args": [
"-timeout=7056s",
"-source_image=my-image",
"-client_id=api",
"-format=vmdk",
"-destination_uri=gs://my-bucket/my-exported-image.vmdk"
]
}
],
"timeout": "7200s",
"projectId": "myproject-12345",
"logsBucket": "gs://123456.cloudbuild-logs.googleusercontent.com",
"options": {
"logging": "LEGACY"
},
"logUrl": "https://console.cloud.google.com/cloud-build/builds/3a2055bc-ccbd-4101-9434-d376b88b8940?project=123456"
}
}
```
There are a couple ways you can monitor your build:
- Run a [projects.builds.get](https://docs.cloud.google.com/build/docs/api/reference/rest/v1/projects.builds/get) request using the returned `build-id`.
- Review the logs hosted at the provided `logUrl`.
### Export an image from a project using a custom Compute Engine service account
During an image export, a temporary virtual machine (VM) instance is created in your
project. The image export tool on this temporary VM must be authenticated.
A [service account](https://docs.cloud.google.com/compute/docs/access/service-accounts) is an identity that is
attached to a VM. Service account access tokens can be accessed through
the [instance metadata](https://docs.cloud.google.com/compute/docs/storing-retrieving-metadata)
server and used to authenticate the image export tool on the VM.
By default, the export process uses the project's
[default Compute Engine Service Agent](https://docs.cloud.google.com/compute/docs/access/service-accounts#compute_engine_service_account).
However, if the default Compute Engine service account is disabled in
your project or if you want to use a custom Compute Engine service account,
then you need to create a service account and specify it for the export process.
You can export your images using either the
[Google Cloud CLI](https://docs.cloud.google.com/compute/docs/gcloud-compute), or
[REST](https://docs.cloud.google.com/build/docs/api/reference/rest).
### gcloud
1. Create a service account and assign the minimum roles. For more information
about creating service accounts, see
[Creating and managing service accounts](https://docs.cloud.google.com/iam/docs/creating-managing-service-accounts).
At minimum, the specified Compute Engine service account needs to have the
following roles assigned:
- `roles/compute.storageAdmin`
- `roles/storage.objectAdmin`
- `roles/storage.admin`
For more information, see [Grant required roles to the
Compute Engine service account](https://docs.cloud.google.com/compute/docs/import/requirements-export-import-images#required-roles-compute-sa).
2. Use the [`gcloud compute images export` command](https://docs.cloud.google.com/sdk/gcloud/reference/compute/images/export)
to export the image.
```
gcloud compute images export \
--destination-uri DESTINATION_URI \
--image IMAGE_NAME \
--compute-service-account SERVICE_ACCOUNT_EMAIL
```
Replace the following:
- `DESTINATION_URI`: the Cloud Storage URI destination for the exported image file.
- `IMAGE_NAME`: the name of the disk image to export.
- `SERVICE_ACCOUNT_EMAIL`: the email address associated with the Compute Engine service account created in the previous step.
**Example**
For example, the following command exports an image named `my-image` from
`my-project` to a Cloud Storage bucket named `my-bucket` with a
service account that has the email
`image-export-service-account@proj-12345.iam.gserviceaccount.com`. By
default, the image is exported as a `disk.raw` file and is compressed into
the `tar.gz` file format.
```
gcloud compute images export \
--destination-uri gs://my-bucket/my-image.tar.gz \
--image my-image \
--project my-project \
--compute-service-account image-export-service-account@proj-12345.iam.gserviceaccount.com
```
For flags, see the
[`gcloud compute images export`](https://docs.cloud.google.com/sdk/gcloud/reference/compute/images/export)
reference documentation.
### REST
1. Create a service account and assign the minimum roles. For more information
about creating service accounts, see
[Creating and managing service accounts](https://docs.cloud.google.com/iam/docs/creating-managing-service-accounts).
At minimum, the specified Compute Engine service account needs to have the
following roles assigned:
- `roles/compute.storageAdmin`
- `roles/storage.objectAdmin`
- `roles/storage.admin`
For more information, see [Grant required roles to the Compute Engine service account](https://docs.cloud.google.com/compute/docs/import/requirements-export-import-images#required-roles-compute-sa).
2. In the API, create a `POST` request to the Cloud Build API.
> [!NOTE]
> **Note:** Two `timeout` values are required. Default values for these are provided in the following sample requests. These default values work in most scenarios. However, if you need to adjust these values, ensure that the Cloud Build timeout is at least 3% greater than the timeout specified for the arguments (`args`) section.
```
POST https://cloudbuild.googleapis.com/v1/projects/PROJECT_ID/builds
{
"timeout": "7200s",
"steps":[
{
"args":[
"-timeout=7000s",
"-source_image=SOURCE_IMAGE",
"-client_id=api",
"-format=IMAGE_FORMAT",
"-destination_uri=DESTINATION_URI",
"-compute_service_account=SERVICE_ACCOUNT_EMAIL"
],
"name":"gcr.io/compute-image-import/gce_vm_image_export:release",
"env":[
"BUILD_ID=$BUILD_ID"
]
}
],
"tags":[
"gce-daisy",
"gce-daisy-image-export"
]
}
```
Replace the following:
- `PROJECT_ID`: the project ID for the project that contains the image that you want to export.
- `SOURCE_IMAGE`: the name of the image to be exported.
- `IMAGE_FORMAT`: the format of the exported image. Valid formats include `vmdk`, `vhdx`, `vpc`, `vdi`, and `qcow2`.
- `DESTINATION_URI`: the Cloud Storage URI location that you want to export the image file to. For example, `gs://my-bucket/my-exported-image.vmdk`.
- `SERVICE_ACCOUNT_EMAIL`: the email address associated with the Compute Engine service account created in the previous step.
For additional `args` values that can be provided, see the optional
flags section of the
[VM image export GitHub page](https://github.com/GoogleCloudPlatform/compute-image-import/tree/main/cli_tools/gce_vm_image_export#optional-flags).
### Export an image using Shared VPC
Before you export an image that uses a shared VPC, you must
add the `compute.networkUser` role to the Cloud Build service account
in the project from where you export images. The service account used for
Cloud Build depends on whether you used [Cloud Build on the project before May 2024](https://docs.cloud.google.com/build/docs/cloud-build-service-account-updates). If yes, the legacy Cloud Build
service account is used for future builds. Otherwise, the default
Compute Engine service account is used.
For more information, see
[Grant required roles to the Cloud Build service account](https://docs.cloud.google.com/compute/docs/import/requirements-export-import-images#required-roles-cloud-build-sa).
You can export your image using either the
[Google Cloud CLI](https://docs.cloud.google.com/compute/docs/gcloud-compute), or the
[REST](https://docs.cloud.google.com/build/docs/api/reference/rest).
### gcloud
Use the [`gcloud compute images export` command](https://docs.cloud.google.com/sdk/gcloud/reference/compute/images/export)
to export your image.
```
gcloud compute images export \
--image IMAGE_NAME \
--destination-uri DESTINATION_URI \
--project PROJECT_ID \
--network NETWORK \
--subnet SUBNET \
--zone ZONE
```
Replace the following:
- `IMAGE_NAME`: the name of the image to export.
- `DESTINATION_URI`: the Cloud Storage URI location that you want to export the image file to.
- `PROJECT_ID`: ID of the project where the image is located.
- `NETWORK`: the full path to a [Shared VPC network](https://docs.cloud.google.com/vpc/docs/shared-vpc#shared_vpc_networks). For example, `projects/HOST_PROJECT_ID/global/networks/VPC_NETWORK_NAME`.
- `SUBNET`: Optional. The full path to a
[Shared VPC subnetwork](https://docs.cloud.google.com/vpc/docs/shared-vpc#shared_vpc_networks).
For example,
`projects/HOST_PROJECT_ID/regions/REGION/subnetworks/SUBNET_NAME`.
> [!NOTE]
> **Note:** `HOST_PROJECT_ID` is the ID of the project where the shared VPC is located.
Specifying this mode depends on the VPC network mode.
- If the VPC network uses legacy mode, don't specify a subnet.
- If the VPC network uses auto mode, specifying the subnet is optional.
- If the VPC network uses custom mode, then this field must be specified.
- `ZONE`: Optional. The zone to use for the export.
This zone must match the region of the subnet. For example, if the
`SUBNET` is in the `us-west1` region, the export
zone must be one of the following: `us-west1-a`, `us-west1-b` or `us-west1-c`.
If you specified a `SUBNET`, you must also specify
the zone.
For example, the following command exports an image named `example-image` from
`my-project` to a Cloud Storage bucket named `my-bucket`. In this
example the Virtual Private Cloud network (`my-shared-vp`) uses a custom subnet
(`my-custom-subnet`).
By default, the image is exported as a `disk.raw` file and is compressed into
the `tar.gz` file format.
**Sample command**
```
gcloud compute images export \
--image example-image \
--destination-uri gs://my-bucket/my-image.tar.gz \
--project my-project \
--network projects/my-vpc-project/global/networks/my-shared-vpc \
--subnet projects/my-vpc-project/regions/us-west1/subnetworks/my-custom-subnet \
--zone us-west1-c
```
### REST
1. Add the image to
[Cloud Storage](https://docs.cloud.google.com/storage/docs/uploading-objects).
2. In the API, create a `POST` request to the Cloud Build API.
> [!NOTE]
> **Note:** Two `timeout` values are required. Default values for these are provided in the following sample requests. These default values work in most scenarios. However, if you need to adjust these values, ensure that the Cloud Build timeout is at least 3% greater than the timeout specified for the arguments (`args`) section.
```
POST https://cloudbuild.googleapis.com/v1/projects/PROJECT_ID/builds
{
"timeout": "7200s",
"steps":[
{
"args":[
"-timeout=7000s",
"-source_image=SOURCE_IMAGE",
"-client_id=api",
"-format=IMAGE_FORMAT",
"-destination_uri=DESTINATION_URI",
"-network=NETWORK",
"-subnet=SUBNET",
"-zone=ZONE"
],
"name":"gcr.io/compute-image-import/gce_vm_image_export:release",
"env":[
"BUILD_ID=$BUILD_ID"
]
}
],
"tags":[
"gce-daisy",
"gce-daisy-image-export"
]
}
```
Replace the following:
- `PROJECT_ID`: the project ID for the project that contains the image that you want to export.
- `SOURCE_IMAGE`: the name of the image to be exported.
- `IMAGE_FORMAT`: the format of the exported image. Valid formats include `vmdk`, `vhdx`, `vpc`, `vdi`, and `qcow2`.
- `DESTINATION_URI`: the Cloud Storage URI location that you want to export the image file to. For example, `gs://my-bucket/my-exported-image.vmdk`.
- `NETWORK`: the full path to a [shared VPC network](https://docs.cloud.google.com/vpc/docs/shared-vpc#shared_vpc_networks). For example, `projects/HOST_PROJECT_ID/global/networks/VPC_NETWORK_NAME`.
- `SUBNET`: the full path to a
[Shared VPC subnetwork](https://docs.cloud.google.com/vpc/docs/shared-vpc#shared_vpc_networks).
For example,
`projects/HOST_PROJECT_ID/regions/REGION/subnetworks/SUBNET_NAME`.
> [!NOTE]
> **Note:** `HOST_PROJECT_ID` is the ID of the project where the shared VPC is located.
Specifying this mode depends on the VPC network mode.
- If the VPC network uses legacy mode, do not specify a subnet.
- If the VPC network uses auto mode, specifying the subnet is optional.
- If the VPC network uses custom mode, then this field must be specified.
- `ZONE`: the zone to use for the export.
This zone must match the region of the subnet. For example, if the
`SUBNET` is in the `us-west1` region, the export
zone must be one of the following: `us-west1-a`, `us-west1-b` or `us-west1-c`.
In most cases specifying a zone is optional. If `SUBNET`
is specified, zone must be specified.
For additional `args` values that can be provided, see the optional
flags section of the
[VM image export GitHub page](https://github.com/GoogleCloudPlatform/compute-image-import/tree/main/cli_tools/gce_vm_image_export#optional-flags).
## Create and export an image manually
If the `gcloud compute images create` and `gcloud compute images export`
commands do not meet your requirements, you can create and export an image
manually from a Compute Engine instance. This process has discrete
steps to first create an image and then export an image.
In the following example, note the created disk is called **image-disk**.
To create and export an image:
1. Optional: [Stop the instance](https://docs.cloud.google.com/compute/docs/instances/stop-start-instance#stopping_an_instance)
that the disk is attached to before you create the snapshot. Stopping
the instance ensures the integrity of the disk contents in the snapshot.
2. Create a snapshot of the disk. Name the snapshot `image-snapshot`.
```
gcloud compute disks snapshot DISK_NAME \
--snapshot-names image-snapshot
```
Replace `DISK_NAME` with the name of the disk that
you want to use to create the snapshot. You can find the name of the disk
by [listing disks](https://docs.cloud.google.com/sdk/gcloud/reference/compute/disks/list).
3. Use the `image-snapshot` snapshot to create a new disk named `image-disk`
by running the following command:
```
gcloud compute disks create image-disk \
--source-snapshot image-snapshot
```
4. Create a temporary disk named `temporary-disk` to hold your `tar` file, and
specify the `SIZE` of the disk to be at least
50% larger than the image disk.
You can detach and delete the disk afterwards.
```
gcloud compute disks create temporary-disk \
--size SIZE
```
where `SIZE` is the size, in gigabytes or terabytes,
of the temporary disk. For example, specify `100GB` to create a
100-gigabyte disk.
5. Create an instance and enable `storage-rw` scope on the instance. Also,
attach the `image-disk` and the `temporary-disk` to the instance as
secondary disks with specific `device-name` attributes. Replace
`VM_NAME` with the name of the instance
to create.
```
gcloud compute instances create VM_NAME \
--scopes storage-rw \
--disk name=image-disk,device-name=image-disk \
--disk name=temporary-disk,device-name=temporary-disk
```
Note that you're passing in service account scopes so that you can
upload your file to Cloud Storage in later steps.
Review the details about
[starting a new instance](https://docs.cloud.google.com/compute/docs/instances/creating-and-starting-an-instance)
if necessary.
6. [Connect to your instance](https://docs.cloud.google.com/compute/docs/instances/connecting-to-instance).
Replace `VM_NAME` with the name of the instance
to connect to.
```
gcloud compute ssh VM_NAME
```
7. Format and mount the temporary disk. Formatting the disk deletes the
contents of the temporary disk.
```
sudo mkdir /mnt/tmp
```
```
sudo mkfs.ext4 -F /dev/disk/by-id/google-temporary-disk
```
```
sudo mount -o discard,defaults /dev/disk/by-id/google-temporary-disk /mnt/tmp
```
8. Optional: Mount the image disk and make additional
changes before you create the `tar` file. For example, you might want to
delete any existing files from the `/home` directory if you do not want
them to be part of your image. Mount the disk partitions that you need to
modify, modify the files on the disk that you need to change, and then
unmount the disk when you are done.
1. Create a directory where you can mount your disk or partition.
```
sudo mkdir /mnt/image-disk
```
2. Use the `ls` command to determine which disk or disk partition you need
to mount.
```
ls /dev/disk/by-id/
```
The command prints a list of disk IDs and partitions. For example,
the following disk has a partition table with one partition. The
`google-image-disk` ID points to the full disk from which you want to
create an image. The `google-image-disk-part1` ID points to the first
partition on this disk. Mount the partition if you need to make changes
to the disk, then create the image from the full disk.
```
google-image-disk
google-image-disk-part1
```
3. Mount the disk or the partition. If your disk has a partition table,
mount the individual partitions for your disk. For example, mount
`google-image-disk-part1`.
```
sudo mount /dev/disk/by-id/google-image-disk-part1 /mnt/image-disk
```
Alternatively, if your disk is raw formatted with no partition table,
mount the full `google-image-disk` disk.
```
sudo mount /dev/disk/by-id/google-image-disk /mnt/image-disk
```
4. Modify the files in the `/mnt/image-disk` directory to configure the
files on the disk. As an example, you might remove the
`/mnt/image-disk/home/[USER]/.ssh/authorized_keys` file to protect your
SSH keys from being shared.
5. After you have finished modifying files, unmount the disk.
```
sudo umount /mnt/image-disk/
```
9. Create a `tar` file of your image.
When you finish customizing the files on the image disk, create a raw
disk file on your temporary disk. The name of the raw disk image must
be 'disk.raw':
```
sudo dd if=/dev/disk/by-id/google-image-disk of=/mnt/tmp/disk.raw bs=4096
```
Then create the `tar.gz` file:
```
cd /mnt/tmp
```
```
sudo tar czvf myimage.tar.gz disk.raw
```
This command creates an image of the instance in the following location:
```
/mnt/tmp/myimage.tar.gz
```
10. Upload the image into Cloud Storage.
To upload the `tar` file to Cloud Storage, use the
[Google Cloud CLI](https://docs.cloud.google.com/sdk/gcloud/reference/storage) that comes
preinstalled on your instance.
1. Create a bucket using the gcloud CLI.
Make sure to review the
[bucket and object naming guidelines](https://docs.cloud.google.com/storage/docs/bucketnaming)
before you create your bucket. Then, create your bucket using the
following command. Replace `BUCKET_NAME` with the
name of the bucket to create.
```
me@example-instance:~$
gcloud storage buckets create gs://BUCKET_NAME
```
2. Copy your file to your new bucket. Replace
`BUCKET_NAME`
with the name of the bucket to copy the file to.
```
me@example-instance:~$
gcloud storage cp /mnt/tmp/myimage.tar.gz gs://BUCKET_NAME
```
You have exported your file into Cloud Storage. You can now share
the image with other people, or use the `tar` file to add a new image to a
Google Cloud console project.
## What's next
- [Share images using the image user role](https://docs.cloud.google.com/compute/docs/images/sharing-images-across-projects).
- Learn about the [import methods](https://docs.cloud.google.com/compute/docs/import) available for Compute Engine.