Deploy an high performance computing (HPC) cluster on Google Cloud to optimize
[Simcenter STAR CCM+
workloads](https://www.siemens.com/en-gb/products/simcenter/fluids-thermal-simulation/star-ccm/).
This setup helps you accelerate computational fluid dynamics (CFD) analyses, and
it enables faster design iteration and quicker results for complex simulations.
In this tutorial, you use Cluster Toolkit, an open-source solution that
simplifies provisioning infrastructure for HPC. Before
you begin, ensure that you have [set up
Cluster Toolkit](https://docs.cloud.google.com/cluster-toolkit/docs/setup/configure-environment) in
your environment.
## Objectives
In this tutorial, you learn how to complete the following task:
1. Use Cluster Toolkit to create a cluster that's suitable for running
Simcenter STAR-CCM+. Two blueprints are provided for the deployment of the
cluster as follows:
- [`community/examples/tutorial-starccm-slurm.yaml`](https://github.com/GoogleCloudPlatform/cluster-toolkit/blob/v1.23.0/community/examples/tutorial-starccm-slurm.yaml): this blueprint uses [Slurm](https://slurm.schedmd.com/overview.html), which is a cluster management and job scheduling system that is used in many HPC centers. We recommend that you use this option as Slurm makes it easier to manage your jobs.
[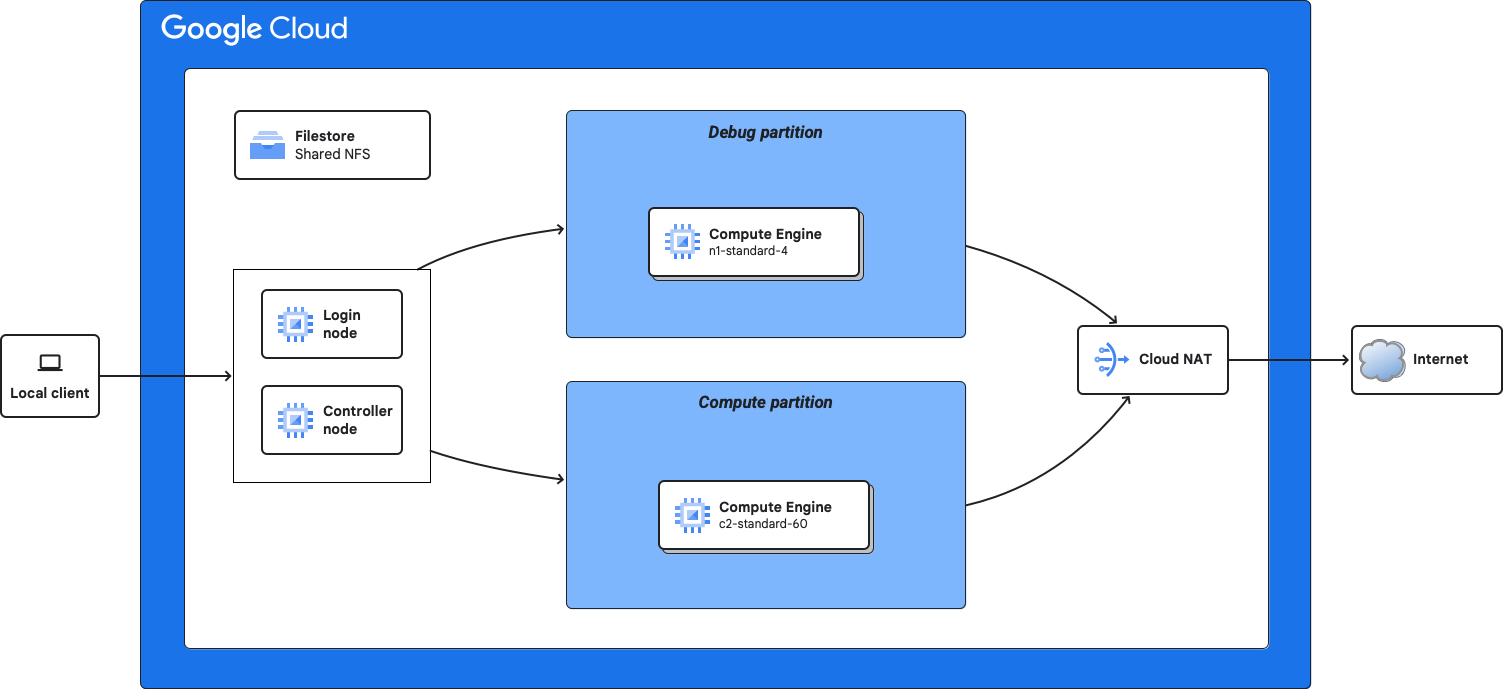](https://docs.cloud.google.com/cluster-toolkit/images/hpc_slurm.png) Figure 1. Architecture diagram for an HPC cluster that uses Slurm
- [`community/examples/tutorial-starccm.yaml`](https://github.com/GoogleCloudPlatform/cluster-toolkit/blob/v1.23.0/community/examples/tutorial-starccm.yaml): this blueprint sets up an environment with four Compute Engine instances, but it doesn't include a scheduler.
2. Install Simcenter STAR-CCM+
3. Run Simcenter STAR-CCM+
## Costs
> [!IMPORTANT]
> **Important:** In this document, you use the following billable components of Google Cloud:
>
> - Compute Engine
> - Filestore
> - Cloud Storage
>
> To generate a cost estimate based on your projected usage, use the [pricing calculator](https://docs.cloud.google.com/products/calculator).
## Before you begin
> [!IMPORTANT]
> **Important:** If you use [Cloud Shell](https://docs.cloud.google.com/shell/docs/launching-cloud-shell), the Cluster Toolkit dependencies are already pre-installed. If you are using an alternative to Cloud Shell, such as using a workstation that is running Linux or macOS, you must follow the instructions in [Install
> dependencies](https://docs.cloud.google.com/cluster-toolkit/docs/setup/install-dependencies).
- Set up [Cluster Toolkit](https://docs.cloud.google.com/cluster-toolkit/docs/setup/configure-environment).
- Get an installation file and input file for Simcenter STAR-CCM+. These
files must be obtained directly from Siemens.
- For the installation file, *Version 17.02 or later is recommended* .
If using the version 17.02 install package it will have the following
package name: `STAR-CCM+17.02.007_01_linux-x86_64.tar.gz`.
- For the input file, we recommend the automobile simulation workload:
`lemans_poly_17m.amg.sim`.
- Review the [best practices](https://docs.cloud.google.com/cluster-toolkit/docs/tutorials/best-practices).
## Open your CLI
In the Google Cloud console, activate Cloud Shell.
[Activate Cloud Shell](https://console.cloud.google.com/?cloudshell=true)
At the bottom of the Google Cloud console, a
[Cloud Shell](https://docs.cloud.google.com/shell/docs/how-cloud-shell-works)
session starts and displays a command-line prompt. Cloud Shell is a shell environment
with the Google Cloud CLI
already installed and with values already set for
your current project. It can take a few seconds for the session to initialize.
## Deploy the HPC cluster
The following steps must be completed from the CLI.
1. Set a default region and zone in which to deploy your compute nodes.
```
gcloud config set compute/region REGION
gcloud config set compute/zone ZONE
```
Replace the following:
- `REGION`: your preferred [region](https://docs.cloud.google.com/compute/docs/regions-zones#available)
- `ZONE`: a zone within your preferred region
2. Define environment variables.
```
export DEPLOYMENT_NAME=DEPLOYMENT_NAME
export GOOGLE_CLOUD_PROJECT=`gcloud config list --format 'value(core.project)'`
export CLUSTER_REGION=`gcloud config list --format 'value(compute.region)'`
export CLUSTER_ZONE=`gcloud config list --format 'value(compute.zone)'`
```
Replace `DEPLOYMENT_NAME` with a name for your deployment.
3. Create the cluster deployment folder. This step varies depending on whether or
not you are using Slurm in your cluster. Complete one of the following options:
### With Slurm
This tutorial uses the
[`community/examples/tutorial-starccm-slurm.yaml`](https://github.com/GoogleCloudPlatform/cluster-toolkit/blob/v1.23.0/community/examples/tutorial-starccm-slurm.yaml)
cluster blueprint that is located in the Cluster Toolkit GitHub repository.
To create a deployment folder from the cluster blueprint,
run the [`gcluster create`
command](https://docs.cloud.google.com/cluster-toolkit/docs/reference/gcluster-create) from
Cloud Shell:
```
./gcluster create community/examples/tutorial-starccm-slurm.yaml \
--vars "deployment_name=${DEPLOYMENT_NAME}" \
--vars "project_id=${GOOGLE_CLOUD_PROJECT}" \
--vars "region=${CLUSTER_REGION}" \
--vars "zone=${CLUSTER_ZONE}"
```
This command creates the `DEPLOYMENT_NAME/` deployment
folder, which contains the Terraform needed to deploy your cluster.
### Without Slurm
This tutorial uses the
[`community/examples/tutorial-starccm.yaml`](https://github.com/GoogleCloudPlatform/cluster-toolkit/blob/v1.23.0/community/examples/tutorial-starccm.yaml)
cluster blueprint that is located in the Cluster Toolkit GitHub repository.
To create a deployment folder from the cluster blueprint,
run the following command from Cloud Shell:
```
./gcluster create community/examples/tutorial-starccm.yaml \
--vars "deployment_name=${DEPLOYMENT_NAME}" \
--vars "project_id=${GOOGLE_CLOUD_PROJECT}" \
--vars "region=${CLUSTER_REGION}" \
--vars "zone=${CLUSTER_ZONE}"
```
This command creates the `DEPLOYMENT_NAME/` deployment
folder, which contains the Terraform needed to deploy your cluster.
4. Use the [`gcluster deploy`
command](https://docs.cloud.google.com/cluster-toolkit/docs/reference/gcluster-deploy) to begin automatic
deployment of your cluster:
```
./gcluster deploy ${DEPLOYMENT_NAME}
```
5. `gcluster` reports the changes that Terraform is proposing to make for your
cluster. Optionally, you may review them by typing `d` and pressing **enter** .
To deploy the cluster, accept the proposed changes by typing `a` and pressing
**enter**.
```
Summary of proposed changes: Plan: 33 to add, 0 to change, 0 to destroy.
(D)isplay full proposed changes,
(A)pply proposed changes,
(S)top and exit,
(C)ontinue without applying
Please select an option [d,a,s,c]:
```
6. After accepting the changes, `gcluster` runs `terraform apply`
automatically. This takes approximately 5 minutes while it displays
progress. If the run is successful, the output is similar to the following:
```
Apply complete! Resources: 38 added, 0 changed, 0 destroyed.
```
You are now ready to submit jobs to your HPC cluster.
## Install Simcenter STAR-CCM+
From the CLI, upload both the installation file for Simcenter STAR-CCM+ and
the input file, that you got from Siemens, to Cloud Storage.
After you upload the files, the files can then be copied to the compute
instances in your cluster. Replace `BUCKET_NAME` with the
name of your Cloud Storage bucket. This bucket must be globally
unique, not just for your project.
1. Create a Cloud Storage bucket by using the Google Cloud CLI.
```
gcloud storage buckets create gs://BUCKET_NAME
```
2. Upload the install file to the Cloud Storage bucket from your
local storage.
```
gcloud storage cp STAR-CCM+17.02.007_01_linux-x86_64.tar.gz gs://BUCKET_NAME
```
3. Upload the input file.
```
gcloud storage cp lemans_poly_17m.amg.sim gs://BUCKET_NAME
```
## Connect to a compute instance
This step varies depending on whether or not you are using Slurm in your cluster.
Complete one of the following options:
### With Slurm
From the CLI, connect to the login node in your cluster.
To connect, run the
[`gcloud compute ssh` command](https://docs.cloud.google.com/sdk/gcloud/reference/compute/ssh).
```
gcloud compute ssh INSTANCE_NAME
```
Replace `INSTANCE_NAME` with the name of the compute
instance that has `login` in the name. The name is similar to the
following:
`DEPLOYMENT_NAME-login-xxxxx-001`
### Without Slurm
1. From the CLI, connect to any one of the compute instances in your
cluster. To connect, run the
[`gcloud compute ssh` command](https://docs.cloud.google.com/sdk/gcloud/reference/compute/ssh).
```
gcloud compute ssh INSTANCE_NAME
```
Replace `INSTANCE_NAME` with the name of the
compute instance that you want to connect to.
2. On the compute instance, create a `hosts.txt` file.
```
pdsh -N -w DEPLOYMENT_NAME-[0-3] hostname > ~/hosts.txt
```
## Configure the compute instance
From the compute instance, complete the following steps:
1. Copy the install and input files from Cloud Storage to the compute
instance by using the gcloud CLI.
```
gcloud storage cp gs://BUCKET_NAME/* .
```
2. After the transfer completes use tar to extract the contents of the files.
For example, if the install file is named `STAR-CCM+17.02.007_01_linux-x86_64.tar.gz`,
run the following command:
```
tar xvf STAR-CCM+17.02.007_01_linux-x86_64.tar.gz
```
In this example, the extracted archive creates a directory called`star-ccm+_17.02.007`.
3. Assign an environment variable with the install script name. The exact path
depends on the version of Simcenter STAR-CCM+.
```
export STAR_CCM_INSTALL=starccm+_17.02.007/STAR-CCM+17.02.007_01_linux-x86_64-2.17_gnu9.2.sh
```
4. Run the installer as follows:
```
sudo $STAR_CCM_INSTALL -i silent \
-DPRODUCTEXCELLENCEPROGRAM=0 \
-DINSTALLDIR=$HOME/apps \
-DINSTALLFLEX=false \
-DADDSYSTEMPATH=true \
-DNODOC=true
```
This runs silently and installs the code in your home directory `~/apps.`
## Prepare to run Simcenter STAR-CCM+
This step varies depending on whether or not you are using Slurm in
your cluster. Complete one of the following options:
### With Slurm
From the login instance, create a Slurm batch file by pasting the
following into the shell.
```
cat << EOF > starccm.sh
#!/bin/sh
#SBATCH --nodes=4
#SBATCH --ntasks-per-node=30
#SBATCH --mem-per-cpu=3G
#SBATCH --job-name=starccm
#SBATCH --error=job_err_%J.txt
#SBATCH --output=job_out_%J.txt
#SBATCH --partition=compute
export LICENSE_SERVER=1999@LICENSESERVER
export LICENSE_KEYS=LICENSEKEY
export LICENSE_FLAGS="-licpath \${LICENSE_SERVER} -power -podkey \${LICENSE_KEYS}"
export NUM_PROCESSES=120
export NUM_PRE_ITER=60
export NUM_ITER=20
export INPUT_FILE="\$HOME/lemans_poly_17m.amg.sim"
export STARCCM=~/apps/PATH_TO_CODE/star/bin/starccm+
cd \$HOME
export HOSTFILE="job_hosts_\${SLURM_JOB_ID}.txt"
scontrol show hostname \$SLURM_NODELIST > \${HOSTFILE}
\${STARCCM} \${LICENSE_FLAGS} -benchmark \
"-preits \${NUM_PRE_ITER} -nits \${NUM_ITER} -nps \${NUM_PROCESSES}" \
-mpi intel -mpiflags "-genv I_MPI_FABRICS shm:ofi -genv FI_PROVIDER tcp \
-genv I_MPI_PIN_PROCESSOR_LIST allcores" -cpubind -pio -np \${NUM_PROCESSES} \
-machinefile \${HOSTFILE} \${INPUT_FILE}
EOF
```
Replace the following:
- `LICENSEKEY`: the FlexLM key provided by Siemens
- `LICENSESERVER`: the server URL hosting your license
- `PATH_TO_CODE`: the path to version of the Simcenter StarCCM+ code you installed. For example: `17.02.007/STAR-CCM+17.02.007`
### Without Slurm
From the compute instance, complete the following steps:
1. Add the location of the Simcenter STAR-CCM+ executable to the `PATH`
variable.
```
export PATH="$HOME/apps/17.02.007/STAR-CCM+17.02.007/star/bin/:$PATH"
```
2. Set environment variables for the STAR-CCM+ license configurations. The
license configuration is dependent on your installation and is provided
by Siemens.
```
export LICENSE_SERVER=1999@flex.license.com
export LICENSE_KEYS=YOUR_LICENSE_KEY
export LICENSE_FLAGS="-licpath ${LICENSE_SERVER} -power -podkey ${LICENSE_KEYS}"
```
Replace `YOUR_LICENSE_KEY` with your license key.
3. Configure the job parameters.
```
export NUM_PROCESSES=120
export NUM_PRE_ITER=60
export NUM_ITER=20
export MACHINEFILE="$HOME/hosts.txt"
export RUNDIR=$HOME
export INPUT_FILE="$HOME/lemans_poly_17m.amg.sim"
```
4. Verify that the `host.txt file` and the input file
(`lemans_poly_17m.amg.sim)` are in your home directory.
## Run Simcenter STAR-CCM+
This step varies depending on whether or not you are using Slurm
in your cluster. Complete one of the following options:
### With Slurm
From the login instance, submit the batch script to Slurm on the HPC
cluster as follows:
```
sbatch starccm.sh
```
This will output something like:
```
Submitted batch job 4
```
To monitor the status of job, run the `squeue` command.
```
JOBID PARTITION NAME USER ST TIME NODES NODELIST(REASON)
4 compute starccm drj_gcp CF 0:48 4 starccmslu-compute-ghpc-[0-3]
```
When the job no longer appears in the queue, it is complete. The output is
generated
in an `job_out_#.txt` file. Where `#` is the number of the JOBID. In that
file, there should be output from the application.
### Without Slurm
From the compute instance, run Simcenter STAR-CCM+ as follows:
```
starccm+ ${LICENSE_FLAGS} -benchmark \
"-preits ${NUM_PRE_ITER} -nits ${NUM_ITER} -nps ${NUM_PROCESSES}" \
-mpi intel -mpiflags "-genv I_MPI_FABRICS shm:ofi -genv FI_PROVIDER tcp \
-genv I_MPI_PIN_PROCESSOR_LIST allcores" -cpubind -pio -np ${NUM_PROCESSES} \
-machinefile ${MACHINEFILE} ${INPUT_FILE}
```
This generates a long output listing to indicate simulation progress.
```
Iteration Continuity X-momentum Y-momentum Z-momentum Tke Sdr Cd Cl Vmag (m/s) Total Solver CPU Time (s) Total Solver Elapsed Time (s)
2 1.000000e+00 1.000000e+00 1.000000e+00 1.000000e+00 9.705605e-01 1.000000e+00 3.671660e+00 -5.423592e+00 1.074021e+03 2.970680e+03 3.103627e+01
3 2.331303e-01 1.000000e+00 7.333426e-01 8.118292e-01 1.000000e+00 6.399014e-01 8.217129e-01 -1.449110e+00 4.546574e+02 3.175950e+03 3.274697e+01
4 1.752827e-01 3.067447e-01 3.516874e-01 3.793376e-01 4.971905e-01 4.102950e-01 3.66
```
When the job is complete the final line of output is displayed with the
`CURRENT_DATE` replaced by today's date.
```
Benchmark::Output file name : lemans_poly_17m.amg-Intel_R_Xeon_R_CPU_3-10GHz-CURRENT_DATE.xml
Benchmark::HTML Report : lemans_poly_17m.amg-Intel_R_Xeon_R_CPU_3-10GHz-CURRENT_DATE_194930.html
```
The output files can then be downloaded from your cluster compute instances to
your local machine by using Google Cloud CLI.
```
gcloud compute scp your_login@your-vm-name:~/lemans_poly_17m.amg-Intel_R_Xeon_R_CPU_3-10GHz-CURRENT_DATE_194930.* .
```
## Clean up
To avoid incurring charges to your Google Cloud account for the resources used in this
tutorial, either delete the project that contains the resources, or keep the project and
delete the individual resources.
### Destroy the HPC cluster
To delete the terraform cluster, from the CLI, run the [`gcluster destroy`
command](https://docs.cloud.google.com/cluster-toolkit/docs/reference/gcluster-destroy):
```
./gcluster destroy ${DEPLOYMENT_NAME}
```
When complete you should see something like:
```
Destroy complete! Resources: xx destroyed.
```
### Delete the Cloud Storage bucket
To delete the bucket, use [`gcloud storage rm`](https://docs.cloud.google.com/sdk/gcloud/reference/storage/rm)
with the `--recursive` flag:
```
gcloud storage rm gs://BUCKET_NAME --recursive
```
Replace `BUCKET_NAME` with the name of your
Cloud Storage bucket.
If successful, the response looks like the following example:
```
Removing gs://my-bucket/...
```
### Delete the project
The easiest way to eliminate billing is to delete the project that you
created for the tutorial.
To delete the project:
> [!CAUTION]
> **Caution** : Deleting a project has the following effects:
>
> - **Everything in the project is deleted.** If you used an existing project for the tasks in this document, when you delete it, you also delete any other work you've done in the project.
> - **Custom project IDs are lost.** When you created this project, you might have created a custom project ID that you want to use in the future. To preserve the URLs that use the project ID, such as an `appspot.com` URL, delete selected resources inside the project instead of deleting the whole project.
>
>
> If you plan to explore multiple architectures, tutorials, or quickstarts, reusing projects
> can help you avoid exceeding project quota limits.
1. In the Google Cloud console, go to the **Manage resources** page.
[Go to Manage resources](https://console.cloud.google.com/iam-admin/projects)
2. In the project list, select the project that you want to delete, and then click **Delete**.
3. In the dialog, type the project ID, and then click **Shut down** to delete the project.