# Deploy an HPC cluster with Slurm
To efficiently manage and scale demanding computational workloads, you can deploy a high performance computing (HPC) cluster with Slurm in the Google Cloud console.
Slurm is an open-source workload manager that helps you allocate compute
resources, run jobs, and monitor performance across your cluster.
In this quickstart, you learn how to set up and manage your Slurm cluster for
high-performance tasks on Google Cloud.
*** ** * ** ***
To follow step-by-step guidance for this task directly in the
Google Cloud console, click **Guide me**:
[Guide me](https://console.cloud.google.com/getting-started?walkthrough_tutorial_id=cluster-toolkit--quickstart-slurm)
*** ** * ** ***
## Before you begin
## Costs
The cost of running this tutorial varies by section such as setting up the
tutorial or running jobs. You can calculate the cost by using the [pricing
calculator](https://cloud.google.com/products/calculator#id=50e2750e-4c10-4d07-962a-6ce19c2bb0d6).
### Tutorial only costs
- To estimate the cost for setting up this tutorial, use the following specifications:
- Filestore Basic SSD (standard) capacity per region: 2,560 GB
- Standard persistent disk: 50 GB `pd-standard` for the Slurm login node.
- Performance (SSD) persistent disks: 50 GB `pd-ssd` for the Slurm controller.
- 1 N2 instance: `n2-standard-4`
- 1 C2 instance: `c2-standard-4`
- To estimate the cost for running a job on the cluster, use the following
specifications:
- 3 N2 instances: `n2-standard-2`. These are created when the `srun -N 3 hostname` command is run and the cluster autoscales. Each of these instances has 50 GB of `pd-standard` disk attached. These instances are deleted automatically after one minute of inactivity.
### Costs for submitting additional jobs
The following resources are not used as a part of this tutorial but because
Slurm can autoscale compute nodes, the following resources might be created
if you submit additional jobs to the compute or debug partitions:
- Jobs submitted to the default debug partition:
- 4 N2 instances: `n2-standard-2`. Each of these instances has 50 GB of `pd-standard` disk attached.
- Jobs submitted to the compute partition:
- 20 C2 instances: `c2-standard-60`. Each of these instances has 50 GB of `pd-standard` disk attached.
[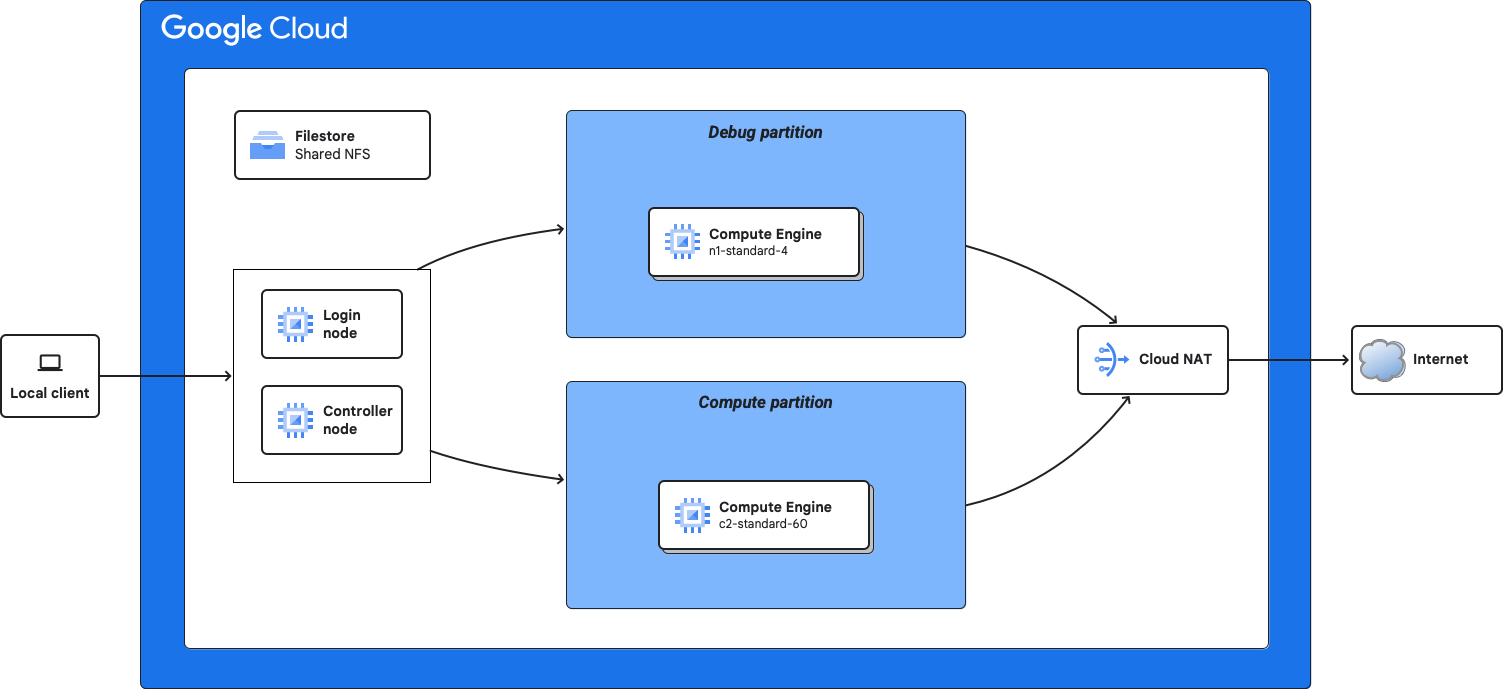](https://docs.cloud.google.com/cluster-toolkit/images/hpc_slurm.png) Figure 1. Architecture diagram for an HPC cluster that uses Slurm
## Launch Cloud Shell
In the Google Cloud console, activate Cloud Shell.
[Activate Cloud Shell](https://console.cloud.google.com/?cloudshell=true)
At the bottom of the Google Cloud console, a
[Cloud Shell](https://docs.cloud.google.com/shell/docs/how-cloud-shell-works.md.txt)
session starts and displays a command-line prompt. Cloud Shell is a shell environment
with the Google Cloud CLI
already installed and with values already set for
your current project. It can take a few seconds for the session to initialize.
> [!IMPORTANT]
> **Important:** If you use [Cloud Shell](https://docs.cloud.google.com/shell/docs/launching-cloud-shell.md.txt), the Cluster Toolkit dependencies are already pre-installed. If you are using an alternative to Cloud Shell, such as using a workstation that is running Linux or macOS, you must follow the instructions in [Install
> dependencies](https://docs.cloud.google.com/cluster-toolkit/docs/setup/install-dependencies).
## Ensure that the default Compute Engine service account is enabled
Cluster Toolkit requires that the default Compute Engine service account
is enabled in your project and that the Compute Instance Admin (v1) role
(`roles/compute.instanceAdmin.v1`) and the Service Account User role
(`roles/iam.serviceAccountUser`) are granted to the service account. Granting
these roles allows the Slurm controller to perform actions such as autoscaling.
From Cloud Shell, enable the default service account and grant the required roles:
1. Enable the default Compute Engine service account.
```
gcloud iam service-accounts enable \
--project=PROJECT_ID \
PROJECT_NUMBER-compute@developer.gserviceaccount.com
```
2. Grant the Compute Instance Admin (v1) role (`roles/compute.instanceAdmin.v1`)
and the Service Account User role (`roles/iam.serviceAccountUser`)
to the service account.
```
gcloud projects add-iam-policy-binding PROJECT_ID \
--member=serviceAccount:PROJECT_NUMBER-compute@developer.gserviceaccount.com \
--role=roles/compute.instanceAdmin.v1
gcloud projects add-iam-policy-binding PROJECT_ID \
--member=serviceAccount:PROJECT_NUMBER-compute@developer.gserviceaccount.com \
--role=roles/iam.serviceAccountUser
```
Replace the following:
- `PROJECT_ID`: your project ID
- `PROJECT_NUMBER`: the automatically generated unique
identifier for your project
For more information, see
[Identifying projects](https://docs.cloud.google.com/resource-manager/docs/creating-managing-projects.md.txt#identifying_projects).
## Install Cluster Toolkit
To install Cluster Toolkit, download and extract the prebuilt binary bundle for your platform. Both ZIP and tar (`.tgz`) archives are available.
1. Go to the [Cluster Toolkit releases page](https://github.com/GoogleCloudPlatform/cluster-toolkit/releases) on GitHub.
2. Download the bundle that matches your platform and architecture. The following options are available:
- `gcluster_bundle_linux_amd64.zip` or `gcluster_bundle_linux_amd64.tgz`
- `gcluster_bundle_linux_arm64.zip` or `gcluster_bundle_linux_arm64.tgz`
- `gcluster_bundle_mac_amd64.zip` or `gcluster_bundle_mac_amd64.tgz`
- `gcluster_bundle_mac_arm64.zip` or `gcluster_bundle_mac_arm64.tgz`
3. In your terminal, extract the bundle files to a new directory:
- If you downloaded a ZIP bundle, extract the files by using the
`unzip` command:
```
unzip BUNDLE_FILENAME -d cluster-toolkit
```
- If you downloaded a tar bundle, extract the files by using the
`tar` command:
```
mkdir -p cluster-toolkit
tar -xzf BUNDLE_FILENAME -C cluster-toolkit
```
Replace `BUNDLE_FILENAME` with the name of the bundle that you downloaded.
4. Go to the new directory:
```
cd cluster-toolkit
```
5. Verify the installation:
```
./gcluster --version
```
The output shows the current version of Cluster Toolkit that you are using.
## Create the cluster deployment folder
A cluster blueprint is a YAML file that defines the cluster. The [`gcluster`
command](https://docs.cloud.google.com/cluster-toolkit/docs/reference/gcluster) uses the cluster blueprint to
create a deployment folder. The deployment folder can then be used to deploy the
cluster.
This tutorial uses the
[`examples/hpc-slurm.yaml`](https://github.com/GoogleCloudPlatform/cluster-toolkit/blob/main/examples/hpc-slurm.yaml)
blueprint file from the [Cluster Toolkit GitHub
repository](https://github.com/GoogleCloudPlatform/cluster-toolkit/tree/main/examples).
From Cloud Shell, use the [`gcluster create`
command](https://docs.cloud.google.com/cluster-toolkit/docs/reference/gcluster-create) to create a deployment
folder from the cluster blueprint:
> [!TIP]
> **Tip:** Before creating the deployment folder, you can run `./gcluster explain examples/hpc-slurm.yaml` to inspect all customizable variables and required APIs. To include values from a [deployment file](https://docs.cloud.google.com/cluster-toolkit/docs/deploy/cluster-deployment-files.md.txt), add `-d deployment.yaml`.
```
./gcluster create examples/hpc-slurm.yaml \
-l ERROR --vars project_id=PROJECT_ID
```
Replace `PROJECT_ID` with your project ID.
This command creates the `hpc-slurm/` deployment folder, which
contains the Terraform needed to deploy your cluster.
The `-l ERROR` validator flag is also specified to prevent the creation
of the deployment folder if any of the
[validations](https://github.com/GoogleCloudPlatform/cluster-toolkit/blob/main/docs/blueprint-validation.md)
fail.
## Deploy the HPC cluster by using Terraform
To deploy the HPC cluster, complete the following steps:
1. Use the [`gcluster deploy`
command](https://docs.cloud.google.com/cluster-toolkit/docs/reference/gcluster-deploy) to begin automatic
deployment of your cluster:
```
./gcluster deploy hpc-slurm
```
2. `gcluster` reports the changes that Terraform is proposing to make for your
cluster. Optionally, you may review them by typing `d` and pressing **enter** .
To deploy the cluster, accept the proposed changes by typing `a` and pressing
**enter**.
```
Summary of proposed changes: Plan: 37 to add, 0 to change, 0 to destroy.
(D)isplay full proposed changes,
(A)pply proposed changes,
(S)top and exit,
(C)ontinue without applying
Please select an option [d,a,s,c]:
```
3. After accepting the changes, `gcluster` executes `terraform apply`
automatically. This takes approximately 5 minutes while it displays
progress. If the run is successful, the output is similar to the following:
```
Apply complete! Resources: 37 added, 0 changed, 0 destroyed.
```
## Run a job on the HPC cluster
After the cluster deploys, complete the following steps to
run a job:
1. Go to the **Compute Engine** \> **VM instances** page.
[Go to VM instances](https://console.cloud.google.com/compute/instances)
2. Connect to the `hpcslurm-login-*` compute instance using SSH-in-browser.
From the **Connect** column of the instance, click **SSH**.
After connecting to the compute instance, if you see the following message on
the terminal:
```console
Slurm is currently being
configured in the background
```
Wait a few minutes, disconnect and then re-connect to the instance.
3. From the command line of the compute instance, run the `hostname` command
using Slurm.
```
srun -N 3 hostname
```
This command creates three compute nodes for your HPC cluster. This may
take a minute while Slurm auto-scales to create the three nodes.
When the job finishes you should see an output similar to:
```
$ srun -N 3 hostname
hpcslurm-debug-ghpc-0
hpcslurm-debug-ghpc-1
hpcslurm-debug-ghpc-2
```
The auto-scaled nodes are automatically destroyed by the Slurm controller if
left idle for more than 60 seconds.
## Clean up
To avoid incurring charges to your Google Cloud account for
the resources used on this page, delete the Google Cloud project with the
resources.
### Destroy the HPC cluster
1. Go to the **VM instances** page and check that the compute nodes are deleted.
Compute nodes use the following naming convention: `hpcslurm-debug-ghpc-*`
If you see any of these nodes, wait several minutes for them to be automatically
deleted. This might take up to four minutes.
2. After the compute nodes are removed, use the [`gcluster destroy`
command](https://docs.cloud.google.com/cluster-toolkit/docs/reference/gcluster-destroy) to destroy the HPC
cluster from the Cloud Shell terminal:
```
./gcluster destroy hpc-slurm --auto-approve
```
When complete you should see something like:
```
Destroy complete! Resources: xx destroyed.
```
3. Go to the **VM instances** page and check that the compute instances are
deleted.
**Note**: If the destroy command is run before Slurm shuts down the auto-scale
nodes then the destroy command might fail. In this case, you can delete the
compute instances manually and rerun the destroy command.
### Delete the project
The easiest way to eliminate billing is to delete the project that you
created for the tutorial.
To delete the project:
> [!CAUTION]
> **Caution** : Deleting a project has the following effects:
>
> - **Everything in the project is deleted.** If you used an existing project for the tasks in this document, when you delete it, you also delete any other work you've done in the project.
> - **Custom project IDs are lost.** When you created this project, you might have created a custom project ID that you want to use in the future. To preserve the URLs that use the project ID, such as an `appspot.com` URL, delete selected resources inside the project instead of deleting the whole project.
>
>
> If you plan to explore multiple architectures, tutorials, or quickstarts, reusing projects
> can help you avoid exceeding project quota limits.
1. In the Google Cloud console, go to the **Manage resources** page.
[Go to Manage resources](https://console.cloud.google.com/iam-admin/projects)
2. In the project list, select the project that you want to delete, and then click **Delete**.
3. In the dialog, type the project ID, and then click **Shut down** to delete the project.
## What's next
Learn more about [cluster blueprints](https://docs.cloud.google.com/cluster-toolkit/docs/setup/cluster-blueprint.md.txt).