# Configure third-party identity
Supported in:
[Video](https://www.youtube.com/watch?v=hAuKA0bk2JM)
> [!NOTE]
> **Note:** The preceding video is intended to supplement the tasks covered in the following sections by using **Okta** with the **SAML** protocol as an example. The video is not an alternative to the documentation, which remains the **primary source of truth**.
This guide is for Google Security Operations administrators who want to authenticate
their workforce (users and groups) on Google SecOps by using a
third-party identity provider (IdP). This process is possible by leveraging
Google Cloud [Workforce Identity Federation](https://docs.cloud.google.com/iam/docs/workforce-identity-federation.md.txt).
Workforce Identity Federation supports any IdP that uses Security Assertion
Markup Language ([SAML 2.0](https://docs.oasis-open.org/security/saml/Post2.0/sstc-saml-tech-overview-2.0.html))
or OpenID Connect ([OIDC](https://openid.net/developers/how-connect-works/)),
such as Okta, Microsoft Entra ID, and Microsoft Active Directory Federation
Services (AD FS).
This document describes the high-level steps to set up authentication through a
SAML-based or OIDC-based IdP by using Workforce Identity Federation:
1. [Plan for your required resources](https://docs.cloud.google.com/chronicle/docs/onboard/configure-authentication.md.txt#plan_implementation). Decide on your workforce identity pool and provider details, and identify user attributes and groups needed to configure access to features in Google SecOps.
2. [Configure the third-party IdP application](https://docs.cloud.google.com/chronicle/docs/onboard/configure-authentication.md.txt#configure_idp). Create an IdP SAML or OIDC application to integrate with Workforce Identity Federation and Google SecOps.
3. [Configure Workforce Identity Federation](https://docs.cloud.google.com/chronicle/docs/onboard/configure-authentication.md.txt#config_wif). Configure your workforce identity pool and provider, and grant Google Cloud Identity and Access Management (IAM) roles to IdP groups and users.
4. [Configure single sign-on (SSO)](https://docs.cloud.google.com/chronicle/docs/onboard/configure-authentication.md.txt#config_sso_secops) using the newly created provider.
> [!NOTE]
> **Note:** Most steps in this document apply to both SAML and OIDC configurations. If you're configuring an OIDC-based IdP, follow the OIDC instructions in [Configure an OIDC application in your IdP](https://docs.cloud.google.com/chronicle/docs/onboard/configure-authentication.md.txt#configure_oidc_idp) and [Create an OIDC workforce identity pool provider](https://docs.cloud.google.com/chronicle/docs/onboard/configure-authentication.md.txt#create_oidc_provider), and complete the remaining sections in this document. For general OIDC provider setup details, see [Create an OIDC workforce pool provider](https://docs.cloud.google.com/iam/docs/configuring-workforce-identity-federation.md.txt#create-oidc-provider).
After completing these steps, you can sign in to Google SecOps with
your identity provider and manage user access through
[feature role-based access control (RBAC)](https://docs.cloud.google.com/chronicle/docs/onboard/configure-feature-access.md.txt)
using IAM.
## Common use cases
Google SecOps requires using Workforce Identity Federation as the
SSO broker for a varied set of use cases.
### Comply with strict security standards
- **Objective**: Meet strict regulatory standards for system and cloud access.
- **Value**: Helps conform to FedRAMP High (or higher) compliance requirements by securely brokering SSO.
### Manage enterprise access control
- **Objective**: Control feature and data access centrally across the organization.
- **Value**: Enables enterprise-level RBAC in Google SecOps by using IAM.
## Key terminology
- **Workforce pool:** A globally unique Google Cloud resource defined at the organization level that grants your workforce access to Google SecOps.
- **Workforce provider:** A sub-resource of the workforce identity pool that stores configuration details for a single external IdP.
- **Attribute mapping:** The process of translating assertion attributes provided by your IdP into Google Cloud attributes by using Common Expression Language (CEL).
- **Assertion Consumer Service (ACS) URL:** A specific URL (sometimes referred to as a single sign-on URL depending on the provider) used to configure a SAML application to communicate with Google SecOps.
- **Entity ID:** A globally unique identifier URL that identifies a specific application or service, such as Google SecOps, and configures the SAML application within your IdP.
## Process overview
Google SecOps supports Service Provider Initiated (SP-initiated)
SAML or OIDC SSO. With this capability, you navigate directly to
Google SecOps. Google SecOps issues a request
through IAM Workforce Identity Federation to the third-party IdP.
After the IdP authenticates the user identity, the user is returned to
Google SecOps with a SAML authentication assertion or an OIDC ID
token. Google Cloud Workforce Identity Federation acts as an
intermediary in the authentication flow.
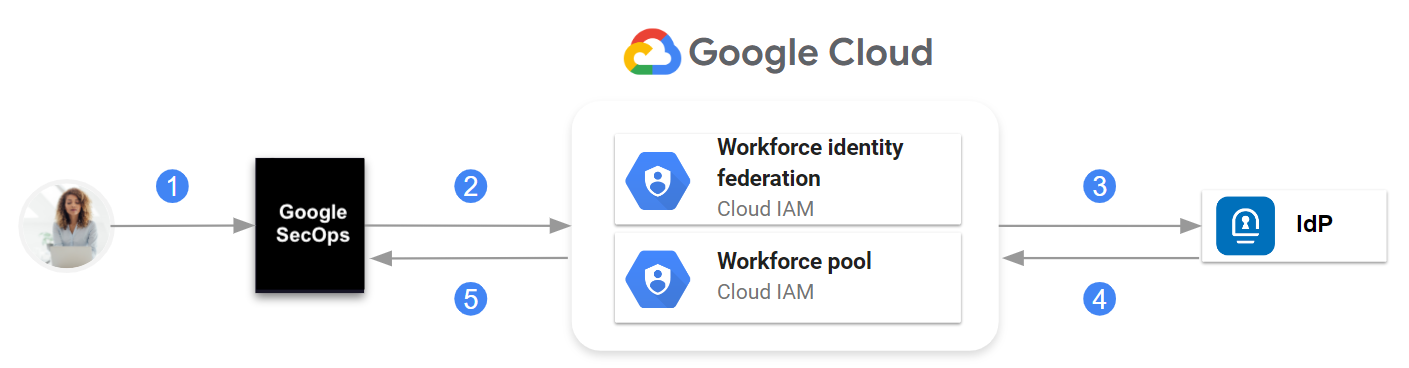
**Communication between Google SecOps, IAM Workforce Identity Federation, and IdP**
At a high level, the communication is as follows:
1. The user navigates to Google SecOps.
2. Google SecOps looks up IdP information in the Google Cloud workforce identity pool.
3. A request is sent to the IdP.
4. The SAML assertion or OIDC ID token is sent to the Google Cloud workforce identity pool.
5. If authentication is successful, Google SecOps receives only the SAML attributes or OIDC claims defined when you configured the workforce provider in the workforce identity pool.
As a Google SecOps administrator, you create groups in your identity provider,
configure the SAML or OIDC application to pass group membership information in the
assertion or ID token, and associate users and groups with Google SecOps
[predefined roles in IAM](https://docs.cloud.google.com/chronicle/docs/onboard/configure-feature-access.md.txt#predefined-roles)
or custom roles that you created.
> [!IMPORTANT]
> **Important:** IdP initiated login (initiating a login from your IdP dashboard) is not supported. Contact your Google SecOps representative to request this feature if your organization needs the capability.
## Before you begin
- Familiarize yourself with [Cloud Shell](https://docs.cloud.google.com/shell/docs/launching-cloud-shell.md.txt), the [`gcloud` command](https://docs.cloud.google.com/sdk/gcloud/reference.md.txt), and the Google Cloud console.
- [Configure a Google Cloud project for Google SecOps](https://docs.cloud.google.com/chronicle/docs/onboard/configure-cloud-project.md.txt) to set up a project that binds to Google SecOps.
- Review Google Cloud [Workforce Identity Federation](https://docs.cloud.google.com/iam/docs/workforce-identity-federation.md.txt).
- Make sure you have the permissions to perform the steps in this document. For information about required permissions for each phase of the onboarding process, see [Required roles](https://docs.cloud.google.com/chronicle/docs/onboard.md.txt#required-roles).
- Make sure your firewall or proxy allowlist includes the required Google SecOps, Workforce Identity Federation, and third-party IdP domains on TCP port `443`. For more information, see [Network access and domain allowlist](https://docs.cloud.google.com/chronicle/docs/log-in-to-ui.md.txt#network-access-and-domain-allowlist).
## Plan the implementation
This section describes the decisions you must make and information you
define before performing the steps in this document.
### Define the workforce identity pool and workforce provider
To set up authentication through an IdP, you need to configure
Workforce Identity Federation as an intermediary in the authentication flow.
Before you configure Workforce Identity Federation, define the following
Google Cloud resources:
- [Workforce pool](https://docs.cloud.google.com/iam/docs/workforce-identity-federation.md.txt#workforce-identity-pools): A workforce identity pool grants your workforce (such as employees) access to Google SecOps.
- [Workforce provider](https://docs.cloud.google.com/iam/docs/workforce-identity-federation.md.txt#workforce-identity-pool-providers): A sub-resource of the workforce identity pool that stores details about a single IdP.
> [!IMPORTANT]
> **Important:** At this stage, you're only defining the values for the key identifiers of your workforce pool and the workforce provider, *not creating* the resources. Make a note of these values, as you need them when you configure your [third-party IdP application](https://docs.cloud.google.com/chronicle/docs/onboard/configure-authentication.md.txt#configure_idp) and your [Workforce Identity Federation](https://docs.cloud.google.com/chronicle/docs/onboard/configure-authentication.md.txt#config_wif) later.
The relationship between workforce identity pool, workforce providers, and a
Google SecOps instance, identified by a single customer
subdomain, is as follows:
- A workforce identity pool is defined at the organization level.
- Each Google SecOps instance has a workforce identity pool configured and associated with it.
- A workforce identity pool can have multiple workforce providers.
- Each workforce provider integrates a third-party IdP with the workforce
identity pool.
> [!IMPORTANT]
> **Important:** IAM policies are bound to the workforce identity pool and not the workforce provider.
- The workforce identity pool must be dedicated to Google SecOps.
You can't share the pool that is created for Google SecOps for
other purposes.
- You *must* have the workforce identity pool in the same
Google Cloud organization that contains the project bound to
Google SecOps.
Following are the guidelines for defining the values for the key identifiers of
the workforce pool and the workforce provider:
- Workforce pool ID (`WORKFORCE_POOL_ID`): define a value that indicates the scope or purpose of the workforce identity pool. The value must meet the following requirements:
- Must be globally unique.
- Must use only lowercase characters \[a-z\], digit \[0-9\], and dashes \[-\].
- Must begin with a lowercase character \[a-z\].
- Must end with either a lowercase character \[a-z\] or digit \[0-9\].
- Can be between 4 to 61 characters in length.
- Workforce pool display name (`WORKFORCE_POOL_DISPLAY_NAME`): define a user-friendly name for the workforce identity pool.
- Workforce pool description (`WORKFORCE_POOL_DESCRIPTION`): define a detailed description of the workforce identity pool.
- Workforce provider ID (`WORKFORCE_PROVIDER_ID`): define a value that indicates the IdP it represents. The value must meet the following requirements:
- Must use only lowercase characters \[a-z\], digit \[0-9\], and dash \[-\].
- Can be between 4 to 32 characters in length.
- Workforce provider display name (`WORKFORCE_PROVIDER_DISPLAY_NAME`): define a user-friendly name for the workforce provider. It must be fewer than 32 characters long.
- Workforce provider description (`WORKFORCE_PROVIDER_DESCRIPTION`): define a detailed description of the workforce provider.
### Define user attributes and groups in the IdP
Before creating the SAML or OIDC application in the IdP, identify the user
attributes or OIDC claims and groups needed to configure access to features in
Google SecOps. The typical user attributes include the following:
- Subject
- Email
- First name
- Last name
- Display name
You need the information about user groups and attributes or OIDC claims
during the following phases of this process:
- When configuring the SAML or OIDC application, you create the groups defined
during planning. You configure the IdP application to pass group memberships
in the SAML assertion or OIDC ID token.
- When you create the workforce provider, you map SAML assertion attributes or
OIDC claims and groups to
[Google Cloud attributes](https://docs.cloud.google.com/iam/docs/workforce-identity-federation.md.txt#attribute-mappings).
This information is sent in the assertion or ID token as part of a user's
identity.
## Configure the IdP application
This section describes only the specific configuration needed in an IdP SAML or
OIDC application to integrate with Google Cloud
Workforce Identity Federation and Google SecOps. Consult your
IdP documentation for detailed steps.
### Configure a SAML application in your IdP
1. Create groups in your IdP, if not already created.
As a best practice, use groups rather than individual user accounts for
managing access to your Google SecOps instance. Google
recommends creating groups in your IdP that correspond directly to the default
Google SecOps roles.
Refer to the following example:
| Google SecOps role | IdP group (Suggested) |
|---|---|
| Chronicle API Admin | chronicle_secops_admins |
| Chronicle API Editor | chronicle_secops_editor |
| Chronicle API Viewer | chronicle_secops_viewer |
2. Create a new SAML application in your IdP.
3. Configure the application with the following:
1. Specify the Assertion Consumer Service (ACS) URL, which is also referred to as a single sign-on URL depending on the service provider.
```bash
https://auth.backstory.chronicle.security/signin-callback/locations/global/workforcePools/WORKFORCE_POOL_ID/providers/WORKFORCE_PROVIDER_ID
```
Replace the following:
- `WORKFORCE_POOL_ID`: the identifier you defined for the workforce identity pool.
- `WORKFORCE_PROVIDER_ID`: the identifier you defined for the workforce provider.
For value descriptions, see [Define the workforce identity pool and workforce provider](https://docs.cloud.google.com/chronicle/docs/onboard/configure-authentication.md.txt#plan_workforce_identity).
2. Specify the following Entity ID (also called, SP Entity ID).
```bash
https://iam.googleapis.com/locations/global/workforcePools/WORKFORCE_POOL_ID/providers/WORKFORCE_PROVIDER_ID
```
3. Configure the name identifier in your IdP to ensure that the `NameID` field
is returned in the SAML response.
You can set this to a value that supports your organization policies,
such as email address or username. Consult your IdP documentation for
information about configuring this value. For more information about this
requirement, see [Troubleshoot workforce identity federation](https://docs.cloud.google.com/iam/docs/troubleshooting-workforce-identity-federation.md.txt#saml-missing-nameid).
4. Add the attribute statements that let you pass user information from
the IdP to your application integrations. You defined the attributes when
you [planned the IdP implementation](https://docs.cloud.google.com/chronicle/docs/onboard/configure-authentication.md.txt#plan_idp).
For example, use the following table to map attributes in commonly used IdPs, such as Okta, Microsoft AD FS, or Entra ID:
| Attribute name | Okta value | AD FS / Entra ID (Source attribute) |
|---|---|---|
| `subject` | `user.email` | `user.mail` or `user.userprincipalname` |
| `emailaddress` | `user.email` | `user.mail` |
| `first_name` | `user.firstName` | `user.givenname` |
| `last_name` | `user.lastName` | `user.surname` |
| `display_name` | `user.displayName` | `user.displayname` |
| `groups` | Configured using a group filter in the IdP, such as **Matches regex** with `.*` | Taken from the group mapping in the IdP |
If you're configuring an Okta IdP application, ensure you select
**Unspecified** as the format when adding the attributes. Leave the namespace
blank when using Microsoft AD FS or Entra ID as your IdP.
> [!NOTE]
> **Note:** Passing a group attribute, such as `groups`, from your IdP is required to configure user and group access for features in both Google SecOps SOAR and SIEM, such as data RBAC and object RBAC.
5. Assign the appropriate groups and users to the application within your IdP.
These groups and users will be authorized to access Google SecOps.
> [!IMPORTANT]
> **Important:** Refer to your IdP documentation for detailed instructions on adding attributes and granting access for users and groups.
6. Download the application metadata XML file.
In the next section, you
use this metadata file when [configuring your workforce identity provider](https://docs.cloud.google.com/chronicle/docs/onboard/configure-authentication.md.txt#create_a_workforce_identity_provider).
If you use Google Cloud CLI, you need to upload this file from your local
system to your Google Cloud home directory
using [Cloud Shell](https://docs.cloud.google.com/shell/docs/using-cloud-shell.md.txt).
### Configure an OIDC application in your IdP
To configure an OIDC application in your IdP to integrate with
Workforce Identity Federation and Google SecOps, complete the
following steps:
1. If you haven't already created groups, create them in your IdP. As a best
practice, use groups rather than individual user accounts to manage access to
your Google SecOps instance.
2. Create a new OIDC application in your IdP and follow the IdP preparation
steps in
[Create an OIDC workforce pool provider](https://docs.cloud.google.com/iam/docs/configuring-workforce-identity-federation.md.txt#create-oidc-provider).
3. Configure the application with both of the following redirect URIs, which
some IdPs refer to as callback URLs or sign-in redirect URIs:
- **For Google SecOps sign-in**:
```bash
https://auth.backstory.chronicle.security/signin-callback/locations/global/workforcePools/WORKFORCE_POOL_ID/providers/WORKFORCE_PROVIDER_ID
```
- **For Workforce Identity Federation token and attribute mapping validation**:
```bash
https://auth.cloud.google/signin-callback/locations/global/workforcePools/WORKFORCE_POOL_ID/providers/WORKFORCE_PROVIDER_ID
```
Replace the following:
- `WORKFORCE_POOL_ID`: the identifier you defined for the workforce identity pool.
- `WORKFORCE_PROVIDER_ID`: the identifier you defined for the workforce provider.
For value descriptions, see
[Define the workforce identity pool and workforce provider](https://docs.cloud.google.com/chronicle/docs/onboard/configure-authentication.md.txt#plan_workforce_identity).
4. Select the grant type in your IdP application: either the recommended
authorization code flow or the implicit flow. If you use the implicit flow,
make sure the application is configured to return the ID token.
5. Configure your IdP application to return the `sub` claim and the user and
group claims that you identified when you
[planned the IdP implementation](https://docs.cloud.google.com/chronicle/docs/onboard/configure-authentication.md.txt#plan_idp).
For example, use the following table to map claims in commonly used IdPs,
such as Okta, Microsoft AD FS, or Entra ID:
| Claim name | Okta value | AD FS / Entra ID (Source attribute) |
|---|---|---|
| `sub` | `user.email` | `user.mail` or `user.userprincipalname` |
| `email` | `user.email` | `user.mail` |
| `given_name` | `user.firstName` | `user.givenname` |
| `family_name` | `user.lastName` | `user.surname` |
| `name` | `user.displayName` | `user.displayname` |
| `groups` | Configured using a group filter in the IdP, such as **Matches regex** with `.*` | Taken from the group mapping in the IdP |
If you're configuring either an Okta or Entra ID IdP application, make sure standard scopes
(such as `openid`, `profile`, and `email`) are granted to pass these
claims. If using Microsoft AD FS or Entra ID, configure the claim mappings
accordingly.
If your Okta OIDC application uses an org authorization server, you must also
pass `groups` as an additional scope when you create the
Workforce Identity Federation provider so that Okta returns the `groups`
claim. For more information, see
[Configure Workforce Identity Federation with Okta](https://docs.cloud.google.com/iam/docs/workforce-sign-in-okta.md.txt#create-okta-app).
> [!NOTE]
> **Note:** Passing a group claim, such as `groups`, from your IdP is required to configure user and group access for features in both Google SecOps SOAR and SIEM, such as data RBAC and object RBAC.
6. Assign the appropriate groups and users to the OIDC application in your IdP.
7. Record the following credentials from your IdP application to use when you
[create an OIDC workforce identity pool provider](https://docs.cloud.google.com/chronicle/docs/onboard/configure-authentication.md.txt#create_oidc_provider):
- **Authorization code flow**: client ID, issuer URI, and client secret.
- **Implicit flow**: client ID and issuer URI.
## Configure Workforce Identity Federation
This section describes only the specific steps needed to configure Workforce Identity Federation
with the IdP SAML or OIDC application that you created in the previous section.
For more information about managing workforce identity pools,
see [Manage workforce identity pool providers](https://docs.cloud.google.com/iam/docs/manage-workforce-identity-pools-providers.md.txt).
### Set the billing and quota project
1. Open the Google Cloud console as the user with the required permissions on the
Google SecOps-bound project. You identified or created this user earlier.
See the [Before you begin](https://docs.cloud.google.com/chronicle/docs/onboard/configure-authentication.md.txt#before_you_begin) section.
2. Launch a [Cloud Shell session](https://docs.cloud.google.com/shell/docs/launching-cloud-shell.md.txt).
3. Set the Google Cloud project that is billed and charged quota for
operations performed using the gcloud CLI. Use the following
`gcloud` command as an example:
```bash
gcloud config set billing/quota_project PROJECT_ID
```
Replace `PROJECT_ID` with the project ID of the
Google SecOps-bound project you created in
[Configure a Google Cloud project for Google SecOps](https://docs.cloud.google.com/chronicle/docs/onboard/configure-cloud-project.md.txt). For a
description of fields that identify a project, see
[Creating and managing projects](https://docs.cloud.google.com/resource-manager/docs/creating-managing-projects.md.txt).
For information about quotas, see the following documents:
- [Cloud Quotas overview](https://docs.cloud.google.com/docs/quotas/overview.md.txt)
- [Set the quota project](https://docs.cloud.google.com/docs/quotas/set-quota-project.md.txt)
If you encounter an error, see [Troubleshoot quota errors](https://docs.cloud.google.com/docs/quotas/troubleshoot.md.txt).
### Create and configure a workforce identity pool
You can configure a workforce identity pool to integrate with an external
identity provider (IdP) or with Google Workspace or Cloud Identity.
### Console
To create the workforce identity pool, do the following:
1. In the Google Cloud console, go to the **Workforce Identity Pools**
page:
[Go to Workforce Identity Pools](https://console.cloud.google.com/iam-admin/workforce-identity-pools?supportedpurview=organizationId)
2. Select the organization for your workforce identity pool. Workforce
identity pools are available across all projects and folders in an
organization.
3. Click **Create pool** and do the following:
1. In the **Name** field, enter the display name of the pool. The pool ID
is automatically derived from the name as you type, and it is
displayed under the **Name** field. You can update the pool ID by
clicking **Edit** next to the pool ID.
> [!NOTE]
> **Note:** For guidance on naming pools, see [Define the workforce identity pool and workforce provider](https://docs.cloud.google.com/chronicle/docs/onboard/configure-authentication.md.txt#plan_workforce_identity).
2. Optional: In **Description**, enter a description of the pool.
4. Click **Next**.
The workforce identity pool's session duration defaults to one hour. This
duration determines the validity of Google Cloud access tokens,
[Google Cloud Workforce Identity Federation console](https://docs.cloud.google.com/iam/docs/workforce-identity-federation.md.txt#console-federated),
and gcloud CLI sign-in sessions. You can
[update the pool](https://docs.cloud.google.com/chronicle/docs/onboard/configure-authentication.md.txt#modify_wif) to set a custom session duration between 15 minutes and 12 hours.
### gcloud
1. Create a workforce identity pool.
Use the following `gcloud` command as an example:
```bash
gcloud iam workforce-pools create WORKFORCE_POOL_ID\
--location="global" \
--organization=ORGANIZATION_ID \
--description="WORKFORCE_POOL_DESCRIPTION" \
--display-name="WORKFORCE_POOL_DISPLAY_NAME" \
--session-duration=SESSION_DURATION
```
> [!NOTE]
> **Note:** See [Plan the implementation](https://docs.cloud.google.com/chronicle/docs/onboard/configure-authentication.md.txt#plan_implementation) for value descriptions.
Replace the following:
- `WORKFORCE_POOL_ID`: the value that you defined for the workforce identity pool ID.
- `ORGANIZATION_ID`: the numeric organization ID.
- `WORKFORCE_POOL_DESCRIPTION`: an *optional* description of the workforce identity pool.
- `WORKFORCE_POOL_DISPLAY_NAME`: an *optional* user-friendly name for the workforce identity pool.
- `SESSION_DURATION`: an optional value for the session duration, expressed as a number appended with `s`---for example, `3600s`. This duration determines the validity of Google Cloud access tokens, [Google Cloud Workforce Identity Federation console](https://docs.cloud.google.com/iam/docs/workforce-identity-federation.md.txt#console-federated), and gcloud CLI sign-in sessions. You can [update the pool](https://docs.cloud.google.com/chronicle/docs/onboard/configure-authentication.md.txt#modify_wif) to set a custom session duration between 15 minutes and 12 hours.
To use Google Workspace or Cloud Identity to sign in to
Google SecOps, add the `--allowed-services domain=backstory.chronicle.security`
and `--disable-programmatic-signin` flags to the command.
```bash
gcloud iam workforce-pools create WORKFORCE_POOL_ID\
--location="global" \
--organization="ORGANIZATION_ID" \
--description="WORKFORCE_POOL_DESCRIPTION" \
--display-name="WORKFORCE_POOL_DISPLAY_NAME" \
--session-duration=SESSION_DURATION \
--allowed-services domain=backstory.chronicle.security \
--disable-programmatic-signin
```
> [!NOTE]
> **Note:** The preceding flags are not supported in the Google Cloud console.
This command creates a workforce identity pool that does not support
signing in to Google Cloud. To enable sign-in functionality, you need to
use the appropriate flags for each scenario.
2. If prompted to enable the Chronicle API, enter `Yes`.
### Create a workforce identity pool provider
A workforce identity pool provider describes a relationship between your
Google Cloud organization and your IdP. Choose the section that matches
your authentication protocol:
- [Create a SAML workforce identity pool provider](https://docs.cloud.google.com/chronicle/docs/onboard/configure-authentication.md.txt#create_saml_provider)
- [Create an OIDC workforce identity pool provider](https://docs.cloud.google.com/chronicle/docs/onboard/configure-authentication.md.txt#create_oidc_provider)
#### Create a SAML workforce identity pool provider
### Console
To configure the workforce identity pool provider, do the following:
1. In the Google Cloud console, go to the **Workforce Identity Pools** page:
[Go to Workforce Identity Pools](https://console.cloud.google.com/iam-admin/workforce-identity-pools)
2. In the **Workforce Identity Pools** table, select the pool for which you
want to create the provider.
3. In the **Providers** section, click **Add Provider**.
4. In **Select a Provider vendor**, select your IdP.
If your IdP isn't listed, select **Generic Identity Provider**.
5. In **Select an authentication protocol** , select **SAML**.
6. In the **Create a provider** section, do the following:
1. In **Name**, enter a name for the provider.
> [!NOTE]
> **Note:** For guidance on provider names, see [Define the workforce identity pool and workforce provider](https://docs.cloud.google.com/chronicle/docs/onboard/configure-authentication.md.txt#plan_workforce_identity).
2. Optional: In **Description**, enter a description for the provider.
3. In **IDP metadata file (XML)**, select the metadata
XML file that you generated earlier in this guide.
4. Make sure **Enable provider** is on.
5. Click **Continue**.
7. In the **Share your provider information** section, copy the URLs:
- Configure the first URL (`https://iam.googleapis.com/locations/global/workforcePools/WORKFORCE_POOL_ID/providers/WORKFORCE_PROVIDER_ID`) as the Entity ID in your IdP.
- The second URL (`https://auth.cloud.google/signin-callback/locations/global/workforcePools/WORKFORCE_POOL_ID/providers/WORKFORCE_PROVIDER_ID`) is used for Workforce Identity Federation token and mapping validation (using the **Debug IdP Token** feature). Make sure your IdP includes both this URL and the Google SecOps ACS sign-in URL (`https://auth.backstory.chronicle.security/signin-callback/locations/global/workforcePools/WORKFORCE_POOL_ID/providers/WORKFORCE_PROVIDER_ID`) that you configured in [Configure a SAML application in your IdP](https://docs.cloud.google.com/chronicle/docs/onboard/configure-authentication.md.txt#configure_saml_idp).
8. Click **Continue**.
9. In the **Configure provider** section, do the following:
1. In **Attribute mapping**, enter the mappings in the respective boxes. For example:
| Google X (where X is a number) | SAML X (where X is a number) |
|---|---|
| `google.subject` | `assertion.subject` |
| `google.groups` | `assertion.attributes.groups` |
| `google.display_name` | `assertion.attributes.display_name[0]` |
| `attribute.first_name` | `assertion.attributes.first_name[0]` |
| `attribute.last_name` | `assertion.attributes.last_name[0]` |
| `attribute.user_email` | `assertion.attributes.emailaddress[0]` |
> [!IMPORTANT]
> **Important:** At a minimum, you must map the `google.subject` attribute. To ensure that Google SecOps RBAC continues to function as expected, also include the `google.groups` attribute and map it to all groups used to define roles in Google SecOps.
If you are performing this configuration for Google Security Operations, which includes
Google Security Operations SIEM and Google SecOps SOAR, map the following
attributes required by Google SecOps SOAR:
- `attribute.first_name`
- `attribute.last_name`
- `attribute.user_email`
- `google.groups`
- `google.display_name`
> [!IMPORTANT]
> **Important:** In the group mapping, make sure to include IdP groups created for administrators who configure user and group access to SOAR-related features. For more information, see [Map users with third-party identity](https://docs.cloud.google.com/chronicle/docs/soar/admin-tasks/user-secops/map-users-in-the-secops-platform.md.txt).
2. Optional: If you selected **Microsoft Entra ID** as your IdP, you can increase the number of groups by doing the following:
1. Select **Use Extra Attributes**.
2. In the **Extra Attributes Issuer URI** field, enter the issuer URL.
3. In the **Extra Attributes Client ID** field, enter the client ID.
4. In the **Extra Attributes Client Secret** field, enter the client secret.
5. In the **Extra Attributes Type** list, select an attribute type for extra attributes.
6. In the **Extra Attributes Filter** field, enter a filter expression that is used when querying the Microsoft Graph API for groups.
3. Optional: To add an attribute condition, click **Add condition**
and enter a CEL expression representing an attribute condition. For
example, to limit the `ipaddr` attribute to a certain IP range, you
can set the condition `assertion.attributes.ipaddr.startsWith('98.11.12.')`.
This example condition ensures that only users with an IP address that
starts with `98.11.12.` can sign in using this workforce provider.
4. To turn on detailed audit logging, in **Detailed logging** , click the
**Enable attribute value audit logging** toggle.
10. To create the provider, click **Submit**.
### gcloud
To configure the workforce identity pool provider:
1. Upload the SAML application metadata file to your Cloud Shell home directory by clicking
**More** \>. Files can only
be uploaded to your home directory. For more options to transfer files
between Cloud Shell and your local workstation, see
[Upload and download files and folders from Cloud Shell](https://docs.cloud.google.com/shell/docs/uploading-and-downloading-files.md.txt#upload_and_downloading_files_and_folders).
2. Make a note of the directory path where you uploaded the SAML application metadata XML file
in Cloud Shell. You will need this path in the next step.
3. Create a workforce identity pool provider and specify the IdP details.
Use the following `gcloud` command as an example:
```bash
gcloud iam workforce-pools providers create-saml WORKFORCE_PROVIDER_ID \
--workforce-pool="WORKFORCE_POOL_ID" \
--location="global" \
--display-name="WORKFORCE_PROVIDER_DISPLAY_NAME" \
--description="WORKFORCE_PROVIDER_DESCRIPTION" \
--idp-metadata-path=PATH_TO_METADATA_XML \
--attribute-mapping="ATTRIBUTE_MAPPINGS"
```
See [Plan the implementation](https://docs.cloud.google.com/chronicle/docs/onboard/configure-authentication.md.txt#plan_implementation) for value descriptions.
Replace the following:
- `WORKFORCE_PROVIDER_ID`: the value you defined for the workforce provider ID.
- `WORKFORCE_POOL_ID`: the value you defined for the workforce identity pool ID.
- `WORKFORCE_PROVIDER_DISPLAY_NAME`: an *optional* user-friendly name for the workforce provider. It must be less than 32 characters long.
- `WORKFORCE_PROVIDER_DESCRIPTION`: an *optional* description of the workforce provider.
- `PATH_TO_METADATA_XML`: the Cloud Shell directory location of the application metadata XML file that you uploaded using Cloud Shell, for example: `/path/to/sso_metadata.xml`.
- `ATTRIBUTE_MAPPINGS`: definition of how to map assertion attributes to [Google Cloud attributes](https://docs.cloud.google.com/iam/docs/workforce-identity-federation.md.txt#attribute-mappings). [Common Expression Language](https://github.com/google/cel-spec/blob/master/doc/langdef.md) is used to interpret these mapping. For example:
google.subject=assertion.subject,google.display_name=assertion.attributes.name[0],google.groups=assertion.attributes.groups
The previous example maps the following attributes:
- `assertion.subject` to `google.subject`. This is a minimum requirement.
- `assertion.attributes.name[0]` to `google.display_name`.
- `assertion.attributes.groups` to the `google.groups` attribute.
> [!IMPORTANT]
> **Important:** At a minimum, you must map the `google.subject` attribute. To ensure that Google SecOps RBAC continues to function as expected, also include the `google.groups` attribute and map it to all groups used to define roles in Google SecOps.
If you are performing this configuration for Google Security Operations, which includes
Google Security Operations SIEM and Google SecOps SOAR, map the following
attributes required by Google SecOps SOAR:
- `attribute.first_name`
- `attribute.last_name`
- `attribute.user_email`
- `google.groups`
- `google.display_name`
So, the complete mapping is as follows:
google.subject=assertion.subject,google.groups=assertion.attributes.groups,attribute.first_name=assertion.attributes.first_name[0],attribute.last_name=assertion.attributes.last_name[0],attribute.user_email=assertion.attributes.emailaddress[0],google.display_name=assertion.attributes.display_name[0]
> [!IMPORTANT]
> **Important:** In the group mapping, make sure to include IdP groups created for administrators who configure user and group access to SOAR-related features.
For more information, see [Provisioning and mapping users for Google SecOps SOAR](https://docs.cloud.google.com/chronicle/docs/soar/admin-tasks/user-secops/map-users-in-the-secops-platform.md.txt).
When configuring your SAML application to pass group membership
information, common group attribute names include `groups`, `idpGroup`,
and `memberOf`. In your Workforce Identity Federation attribute mapping,
make sure the attribute name in
`assertion.attributes.ATTRIBUTE_NAME` matches the
exact, case-sensitive name configured in your IdP.
The following example maps multiple groups to the `google.groups` attribute:
google.groups="(has(assertion.attributes.idpGroup) ? assertion.attributes.idpGroup : []) + (has(assertion.attributes.groups) ? assertion.attributes.groups : []) + (has(assertion.attributes.memberOf) ? assertion.attributes.memberOf : [])"
The following example maps the group `http://schemas.xmlsoap.org/ws/2005/05/identity/claims/group` containing special characters to `google.groups`:
google.groups="assertion.attributes['http://schemas.xmlsoap.org/ws/2005/05/identity/claims/group']"
For more information about mapping attributes, see
[Attribute Mappings](https://docs.cloud.google.com/iam/docs/workforce-identity-federation.md.txt#attribute-mappings).
#### Create an OIDC workforce identity pool provider
To create an OIDC workforce identity pool provider using the
Google Cloud console or the gcloud CLI, complete the following
steps:
1. Follow the instructions in
[Create an OIDC workforce pool provider](https://docs.cloud.google.com/iam/docs/configuring-workforce-identity-federation.md.txt#create-oidc-provider)
to create the provider in your workforce identity pool.
2. When you configure the OIDC provider, apply the following
Google SecOps settings:
- **Redirect URIs** : Make sure your OIDC IdP application includes both the following redirect URIs, as described in
[Configure an OIDC application in your IdP](https://docs.cloud.google.com/chronicle/docs/onboard/configure-authentication.md.txt#configure_oidc_idp):
- Google SecOps sign-in redirect URI (`https://auth.backstory.chronicle.security/signin-callback/locations/global/workforcePools/WORKFORCE_POOL_ID/providers/WORKFORCE_PROVIDER_ID`)
- Workforce Identity Federation validation redirect URI (`https://auth.cloud.google/signin-callback/locations/global/workforcePools/WORKFORCE_POOL_ID/providers/WORKFORCE_PROVIDER_ID`)
- **Attribute mappings** : Map your OIDC claims to
[Google Cloud attributes](https://docs.cloud.google.com/iam/docs/workforce-identity-federation.md.txt#attribute-mappings)
using Common Expression Language (CEL). At a minimum, map
`google.subject` to `assertion.sub` and `google.groups` to
`assertion.groups` so that Google SecOps RBAC functions as
expected:
google.subject=assertion.sub,google.groups=assertion.groups
If you're configuring Google Security Operations, which includes
Google Security Operations SIEM and Google SecOps SOAR, also map the
attributes required by Google SecOps SOAR. For example:
google.subject=assertion.sub,google.groups=assertion.groups,attribute.first_name=assertion.given_name,attribute.last_name=assertion.family_name,attribute.user_email=assertion.email,google.display_name=assertion.name
> [!IMPORTANT]
> **Important:** In the group mapping, make sure you include the IdP groups created for administrators who configure user and group access to SOAR-related features. For more information, see [Map users with third-party identity](https://docs.cloud.google.com/chronicle/docs/soar/admin-tasks/user-secops/map-users-in-the-secops-platform.md.txt).
**Advanced group mapping examples**
When configuring your OIDC application to pass group membership information,
common group claim names include `groups`, `idpGroup`, and `memberOf`. In your
Workforce Identity Federation attribute mapping, make sure the claim name in
`assertion.CLAIM_NAME` matches the exact, case-sensitive
name configured in your IdP.
The following example maps multiple groups to the `google.groups` attribute:
google.groups="(has(assertion.idpGroup) ? assertion.idpGroup : []) + (has(assertion.groups) ? assertion.groups : []) + (has(assertion.memberOf) ? assertion.memberOf : [])"
The following example maps a group claim containing special characters (like a URI schema) to `google.groups`:
google.groups="assertion['http://schemas.xmlsoap.org/ws/2005/05/identity/claims/group']"
3. Optional: Create an attribute condition. If your multi-tenant IdP has a single issuer URI, you must use [attribute conditions](https://docs.cloud.google.com/iam/docs/workforce-identity-federation.md.txt#attribute-conditions) to ensure that access is restricted to the correct tenant. For example, you can limit sign-in to users with a specific role or email domain. For more information, see [Use attribute conditions when federating with multi-tenant identity providers](https://docs.cloud.google.com/iam/docs/workforce-identity-federation.md.txt#use-attribute-conditions-multitenant).
4. After you create the OIDC workforce provider, we recommend validating your token and attribute mappings using [Debug your IdP token](https://docs.cloud.google.com/chronicle/docs/onboard/configure-authentication.md.txt#debug-idp-token), and then continuing with
[Grant a role to enable sign in to Google SecOps](https://docs.cloud.google.com/chronicle/docs/onboard/configure-authentication.md.txt#grant-a-role-to-enable-sign-in-to-google-security-operations)
to complete the remaining sections in this document.
### Grant a role to enable sign in to Google SecOps
The following steps describe how to grant a specific role using IAM
so that groups and users in your workforce identity pool can sign in to
Google SecOps. Perform the configuration using
the Google SecOps-bound Google Cloud project you created earlier.
> [!NOTE]
> **Note:** If your IdP group names (as represented in your workforce identity pool) contain spaces, you must use the gcloud CLI to grant roles.
### Console
1. In the Google Cloud console, go to the **IAM** page.
[Go
to IAM](https://console.cloud.google.com/projectselector/iam-admin/iam?supportedpurview=project,folder,organizationId)
2. Select the Google SecOps-bound Google Cloud project.
3. On the **View by principals** tab, click **Grant
Access**.
4. In the **Add principals** section, enter a [principal identifier](https://docs.cloud.google.com/iam/docs/principal-identifiers.md.txt) in the **New principals** field.
For example:
- To add all identities managed using the workforce identity pool and
workforce provider you created previously, enter the following:
`principalSet://iam.googleapis.com/locations/global/workforcePools/WORKFORCE_POOL_ID`
- To add a specific group as a principal, enter the following:
`principalSet://iam.googleapis.com/locations/global/workforcePools/WORKFORCE_POOL_ID/group/GROUP_ID`
Replace the following:
- `WORKFORCE_POOL_ID`: the value you defined for the workforce identity pool ID.
- `GROUP_ID`: a group in the mapped `google.groups` claim. You must have this group created in your IdP.
5. In the **Assign roles** section, select or search for an applicable Chronicle API role, such as [Chronicle API Viewer (`roles/chronicle.viewer`)](https://docs.cloud.google.com/iam/docs/roles-permissions/chronicle.md.txt#chronicle.viewer).
> [!NOTE]
> **Note:** You can grant multiple roles to a principal.
6. Click **Save**.
7. Repeat steps 3 through 5 for every principal that you want to grant roles.
> [!IMPORTANT]
> **Important:** The preceding example doesn't configure authorization to Google SecOps features. Authorization to features is done using IAM for feature access control. For more information, see [Verifying or configuring Google Security Operations feature access control](https://docs.cloud.google.com/chronicle/docs/onboard/configure-authentication.md.txt#rbac).
### gcloud
1. Grant the [Chronicle API Viewer (`roles/chronicle.viewer`)](https://docs.cloud.google.com/iam/docs/roles-permissions/chronicle.md.txt#chronicle.viewer)
role to users or groups that should have access to the Google SecOps application.
> [!IMPORTANT]
> **Important:** The following examples don't configure authorization to Google SecOps features. Authorization to features is done using IAM for feature access control. For more information, see [Verifying or configuring Google Security Operations feature access control](https://docs.cloud.google.com/chronicle/docs/onboard/configure-authentication.md.txt#rbac).
- The following example grants the Chronicle API Viewer role to identities managed using the workforce identity pool and workforce provider you created previously.
```bash
gcloud projects add-iam-policy-binding PROJECT_ID \
--role roles/chronicle.viewer \
--member "principalSet://iam.googleapis.com/locations/global/workforcePools/WORKFORCE_POOL_ID/*"
```
Replace the following:
- `PROJECT_ID`: with the project ID of the Google SecOps-bound project you configured in [Configure a Google Cloud project for Google SecOps](https://docs.cloud.google.com/chronicle/docs/onboard/configure-cloud-project.md.txt). For a description of fields that identify a project, see [Creating and managing projects](https://docs.cloud.google.com/resource-manager/docs/creating-managing-projects.md.txt).
- `WORKFORCE_POOL_ID`: the value you defined for the workforce identity pool ID.
- To grant the Chronicle API Viewer role to a specific group, run the following command:
```bash
gcloud projects add-iam-policy-binding PROJECT_ID \
--role roles/chronicle.viewer \
--member "principalSet://iam.googleapis.com/locations/global/workforcePools/WORKFORCE_POOL_ID/group/GROUP_ID"
```
Replace `GROUP_ID`: a group in the mapped `google.groups` claim. You must have this group created in your IdP.
2. Configure additional IAM policies to meet your organization's requirements.
3. Required: To complete authentication and enable user access to the
Google SecOps platform, you need to configure user access
from the SOAR side of the Google SecOps. For more information, see
[Map users in the Google SecOps platform](https://docs.cloud.google.com/chronicle/docs/soar/admin-tasks/user-secops/map-users-in-the-secops-platform.md.txt).
Repeat the previous steps to grant other roles.
## Configure SSO to your Google SecOps instance
The final task of integrating your third-party IdP with Google SecOps
is configuring the SSO. After completing this step, users will be able to sign
in to Google SecOps by using their IdP credentials.
Following are the steps to configure SSO:
1. In the Google Cloud console, navigate to the **Security \> Google SecOps** page.
2. Click the **Single Sign-On** tab and then select **Workforce Identity Federation**.
3. From the list of available providers, select the Workforce Identity Federation provider you created in [Create a workforce identity pool provider](https://docs.cloud.google.com/chronicle/docs/onboard/configure-authentication.md.txt#create_a_workforce_identity_provider).
4. Optional: To test your SSO configuration, click **Test SSO Setup**. If the configuration is successful, you will be redirected to your IdP login screen.
5. Click **Save**.
## Manage the Workforce Identity Federation configuration
This section explains how to update your provider settings and verify that user
access levels are configured correctly.
### Verify or configure Google SecOps feature access control
If you configured Workforce Identity Federation with attributes or groups mapped
to the `google.groups` attribute, this information is passed to Google SecOps
so that you can configure RBAC to Google SecOps features.
If the Google SecOps instance has an existing RBAC configuration,
verify that the original configuration works as expected.
If you have not previously configured access control, see
[Configure feature access control using IAM](https://docs.cloud.google.com/chronicle/docs/onboard/configure-feature-access.md.txt)
for information about controlling access to features.
### Modify the Workforce Identity Federation configuration
If you need to update the workforce identity pool or workforce provider,
see [Manage workforce identity pool providers](https://docs.cloud.google.com/iam/docs/manage-workforce-identity-pools-providers.md.txt)
for information about updating the configuration.
The **Key management** section in [Create a SAML workforce pool provider](https://docs.cloud.google.com/iam/docs/configuring-workforce-identity-federation.md.txt#create-saml-provider)
describes how to update IdP signing keys, and then update the workforce provider
configuration with the latest application metadata XML file. For OIDC providers,
see [Update a provider](https://docs.cloud.google.com/iam/docs/manage-workforce-identity-pools-providers.md.txt#update-oidc-provider)
and [Manage OIDC JWKs](https://docs.cloud.google.com/iam/docs/manage-workforce-identity-pools-providers.md.txt#manage-oidc-keys).
### Console
To update a specific workforce pool:
1. Go to the **Workforce Identity Pools** page:
[Go to Workforce Identity Pools](https://console.cloud.google.com/iam-admin/workforce-identity-pools)
2. In the table, select the pool.
3. Update the pool parameters.
4. Click **Save Pool**.
To update a provider:
1. Go to the **Workforce Identity Pools** page:
[Go to Workforce Identity Pools](https://console.cloud.google.com/iam-admin/workforce-identity-pools)
2. In the table, select the pool for which you want to update the provider.
3. In the **Providers** table, click **Edit**.
4. Update the provider details.
5. To save the updated provider details, click **Save**.
### gcloud
The following is an example `gcloud` command that updates the workforce provider configuration:
```bash
gcloud iam workforce-pools providers update-saml WORKFORCE_PROVIDER_ID \
--workforce-pool=WORKFORCE_POOL_ID \
--location="global" \
--display-name="WORKFORCE_PROVIDER_DISPLAY_NAME" \
--description="WORKFORCE_PROVIDER_DESCRIPTION" \
--idp-metadata-path=PATH_TO_METADATA_XML \
--attribute-mapping="ATTRIBUTE_MAPPINGS"
```
Replace the following:
- `WORKFORCE_PROVIDER_ID`: the value you defined for the workforce provider ID.
- `WORKFORCE_POOL_ID`: the value you defined for the workforce identity pool ID.
- `WORKFORCE_PROVIDER_DISPLAY_NAME`: a user-friendly name for the workforce provider. The value must be less than 32 characters.
- `WORKFORCE_PROVIDER_DESCRIPTION`: the description of the workforce provider.
- `PATH_TO_METADATA_XML`: the location of the updated application metadata XML file, for example: `/path/to/sso_metadata_updated.xml`.
- `ATTRIBUTE_MAPPINGS`: the mapped assertion attributes to [Google Cloud attributes](https://docs.cloud.google.com/iam/docs/workforce-identity-federation.md.txt#attribute-mappings). For example:
`google.subject=assertion.subject,google.display_name=assertion.attributes.name[0],google.groups=assertion.attributes.memberOf`
> [!IMPORTANT]
> **Important:** When changing the configuration, make sure that you continue to map the `google.subject` attribute. To ensure that Google SecOps RBAC continues to function as expected, also map the `google.groups` attribute to all groups used to define roles in Google SecOps.
## Troubleshoot issues with configuration
If you encounter errors during this process, review
[Troubleshoot workforce identity federation](https://docs.cloud.google.com/iam/docs/troubleshooting-workforce-identity-federation.md.txt)
to resolve common issues. If your organization uses firewalls or web proxies,
verify that your network allowlist includes the required authentication and
Workforce Identity Federation domains, such as
`auth.backstory.chronicle.security`, `iam.googleapis.com`,
`accounts.google.com`, and regional
`accounts.google.ccTLD` domains. For more information, see
[Network access and domain allowlist](https://docs.cloud.google.com/chronicle/docs/log-in-to-ui.md.txt#network-access-and-domain-allowlist).
The following section provides information about common
problems encountered when performing the steps in this document.
If you still encounter issues, contact your Google SecOps representative
and provide your [Chrome Network Logs File](https://en.wikipedia.org/wiki/HAR_(file_format)).
### Command not found
- When [creating a workforce identity pool provider](https://docs.cloud.google.com/chronicle/docs/onboard/configure-authentication.md.txt#create_a_workforce_identity_provider) and specifying the IdP details,
you get the following error:
Error: bash: --attribute-mapping=google.subject=assertion.subject,
google.display_name=assertion.attributes.name[0],
google.groups=assertion.attributes.groups: command not found
Check that the `PATH_TO_METADATA_XML` is the location where you uploaded the
SAML application metadata XML file to your Cloud Shell home directory.
### The caller does not have permission
- When running the command `gcloud projects add-iam-policy-binding` to grant roles to users or groups, you get the following error:
ERROR: (gcloud.organizations.add-iam-policy-binding) User [ ] does not have
permission to access organizations instance [538073083963:getIamPolicy]
(or it may not exist): The caller does not have permission
Check that you have the required permissions. For more information, see
[Required roles](https://docs.cloud.google.com/chronicle/docs/onboard.md.txt#required-roles).
### Verification failure: missing session ID in the request
- When attempting to authenticate, you get the following error in the browser:
Verification failure: missing session ID in request
Check that the ACS and Entity ID base URLs are correct. For more information, see
[Configure the IdP application](https://docs.cloud.google.com/chronicle/docs/onboard/configure-authentication.md.txt#configure_idp).
### Debug your IdP token
You can use the **Debug IdP Token** feature in Workforce Identity Federation to
verify that your identity provider is passing the correct attributes and claims.
This is highly recommended before users attempt to sign in to
Google SecOps, as it can help prevent login and attribute mapping
errors.
To debug your token:
1. In the Google Cloud console, navigate to **Workforce Identity Federation**.
2. Select your pool and then select your provider.
3. Click **Debug IdP Token**.
> [!NOTE]
> **Note:** To use this feature, you must first add the Google Cloud redirect URL for token validation to your identity provider's configuration. This applies to both SAML and OIDC protocols.
For a detailed walkthrough on using this feature to validate your setup, see the
[Pre-migration validation guide](https://docs.cloud.google.com/chronicle/docs/soar/admin-tasks/advanced/soar-pre-validation.md.txt).
### Debug JWT larger than 4KB
> [!NOTE]
> **Note:** You can follow these steps as a precaution before users attempt to sign in to Google SecOps to prevent login errors. If users have already experienced login issues, you can return to these steps to resolve the problem.
If you encounter issues with Google SecOps sign in, make sure your JSON Web Tokens (JWTs) don't exceed the 4KB limit for Google SecOps. If a user receives an error stating "**Authentication JWT larger than 4KB. Reduce the group membership data sent from the IdP to resolve this error.**", follow these troubleshooting steps:
1. **Debug your token:** You can debug your token on the provider details page inside Workforce Identity Federation (by navigating to **Workforce Identity Federation \> Workforce Pools \> POOL_NAME \> PROVIDER_NAME** and clicking **Debug IdP Token** ). To use this feature, you must first add the Google Cloud URL to the redirect URLs of your identity provider. This applies to both SAML and OIDC protocols. For more information, see [Troubleshooting Workforce Identity Federation](https://docs.cloud.google.com/iam/docs/troubleshooting-workforce-identity-federation.md.txt#general-attribute-mapping-errors).
2. **Filter groups claims:** If your identity provider sends many groups unrelated to Google SecOps, filter the groups claim at your provider level. Configuring your external provider to send only the minimal set of groups required for Google SecOps reduces the size of the JWT and avoids authentication errors.
- **Example (Microsoft Entra ID):** You can use Microsoft Entra Group Filtering to send only a minimal set of relevant groups. In your Entra Enterprise Application under Single sign-on, edit the **Groups** claim to apply a filter (for example, using a Prefix match) so that only required groups are sent to Google SecOps. For more information, see [Microsoft Entra Group Filtering](https://learn.microsoft.com/en-us/entra/identity/hybrid/connect/how-to-connect-fed-group-claims#group-filtering).
## What's next
After completing the steps in this document, perform the following:
- Perform steps to [Link a Google SecOps instance to Google Cloud services](https://docs.cloud.google.com/chronicle/docs/onboard/link-chronicle-cloud.md.txt).
- If you have not yet set up audit logging, continue with
[enabling Google SecOps audit logging](https://docs.cloud.google.com/chronicle/docs/preview/audit-logging/audit-logging).
- If you are configuring for Google Security Operations, perform additional steps in
[Provision, authenticate, and map users in Google Security Operations](https://docs.cloud.google.com/chronicle/docs/soar/admin-tasks/user-secops/map-users-in-the-secops-platform.md.txt).
- To configure access to features, perform additional steps in [Configure feature access control using IAM](https://docs.cloud.google.com/chronicle/docs/onboard/configure-feature-access.md.txt)
and [Google SecOps permissions in IAM](https://docs.cloud.google.com/chronicle/docs/reference/feature-rbac-permissions-roles.md.txt).
**Need more help?** [Get answers from Community members and Google SecOps professionals.](https://security.googlecloudcommunity.com/)