# Understand search
Supported in:
This guide is for security analysts who want to query, correlate, and analyze security data across their enterprise within Google Security Operations using the **SIEM Search** page. The **SIEM Search** page serves as your central navigation hub across all supported data streams, and it integrates additional telemetry and posture sources. This guide contains instructions and explanations of all the basic functions and features of the **SIEM Search** page.
## Key terminology
- **Unified Data Model (UDM)**: A standardized data format used within Google SecOps to represent security events from various sources consistently.
- **Event** : An *event* is generated from a raw log source that is ingested into Google SecOps and processed by Google SecOps's [ingestion and normalization](https://docs.cloud.google.com/chronicle/docs/data-ingestion-flow) process. Multiple events can be generated from a single raw log source record. An event represents a set of security-relevant data points that are generated from that raw log. In the context of the **SIEM Search** page, events are normalized UDM event telemetry and raw log records matching your search query.
- **Alert** : In the context of the **SIEM Search** page, an *alert* is defined as a rule detection with alerting enabled. To learn more, see [running a rule against live data](https://docs.cloud.google.com/chronicle/docs/detection/run-rule-live-data.md.txt).
- **Raw logs**: Raw, unparsed log telemetry. The primary diagnostic objective is monitoring ingestion and parsing health.
- **Joins** : Joins correlate and combine raw data from multiple sources based on common field values. By linking related events, entities, and other data, you can investigate complex attack scenarios. You can search for *statistical joins* , which require a match section to aggregate results--or *data joins* , which retrieve the complete event or entity data and display them without any aggregation. For more information, see [Apply joins in search and dashboards](https://docs.cloud.google.com/chronicle/docs/investigation/search-joins.md.txt) and [Implement joins without a match section](https://docs.cloud.google.com/chronicle/docs/investigation/joins-without-match-section.md.txt).
- **Statistics** : UDM events with the results grouped for statistical analysis. For more information, see [Analyze search data with statistics](https://docs.cloud.google.com/chronicle/docs/investigation/statistics-aggregations-in-udm-search.md.txt).
- **Cases** and **case histories** : Security cases and historical case audit logs, which you can correlate with other security data. For more information, see [Search cases overview](https://docs.cloud.google.com/chronicle/docs/investigation/search-and-search-case-history.md.txt).
- **Entity Context Graph (ECG)** : A graph database within Google SecOps that stores stateful entity records (such as assets, users, and threat indicators) for correlation with security event logs. For more information, see [Entity Context Graph overview](https://docs.cloud.google.com/chronicle/docs/event-processing/entity-graph.md.txt).
- **Natural language query bar** : The bar at the top of the **SIEM Search** page, where you can enter a search statement using natural language.
- **Query editor** : The box on the **SIEM Search** page below the *natural language query bar*, where you manually construct queries and where the query code is displayed.
## Before you begin
You must have the standard Google SecOps Search [permissions and roles](https://docs.cloud.google.com/chronicle/docs/reference/feature-rbac-permissions-roles.md.txt#search) assigned to your user account to execute queries and view detection details.
For the following advanced search features, your user account or Identity and Access Management role must have additional granular permissions, depending on the feature used:
- Enriched or extended event details need `chronicle.events.fetchEnrichedEvent`.
- Saving searches and editing search views needs `chronicle.savedSearches.update` and `chronicle.searchViews.update`.
- Viewing log parsers and schema needs `chronicle.parsers.list` and `chronicle.parsers.get`.
- Searching Case History needs `chronicle.cases.get` and `chronicle.cases.list`.
- SQL search (specifically automatic query suggestions in the query editor) needs `chronicle.queries.suggestSql` when using custom IAM roles.
- Historical usage ranking for UDM field [auto-suggestions](https://docs.cloud.google.com/chronicle/docs/investigation/udm-search.md.txt#understand_suggestion_ranking) in the query editor needs `chronicle.instances.suggestQueryFields` when using custom IAM roles.
- Creating, sharing, modifying, and managing saved [custom column sets](https://docs.cloud.google.com/chronicle/docs/investigation/udm-search.md.txt#column-manager) across your organization needs all five of the following permissions: `chronicle.googleapis.com/savedColumnSets.create`, `chronicle.googleapis.com/savedColumnSets.update`, `chronicle.googleapis.com/savedColumnSets.delete`, `chronicle.googleapis.com/savedColumnSets.list`, and `chronicle.googleapis.com/savedColumnSets.get`.
## Open the Search page
To open the **SIEM Search** page, do the following:
1. [Log in to Google SecOps](https://docs.cloud.google.com/chronicle/docs/log-in-to-ui.md.txt).
2. On the navigation bar, click **Investigation** \> **SIEM Search**.
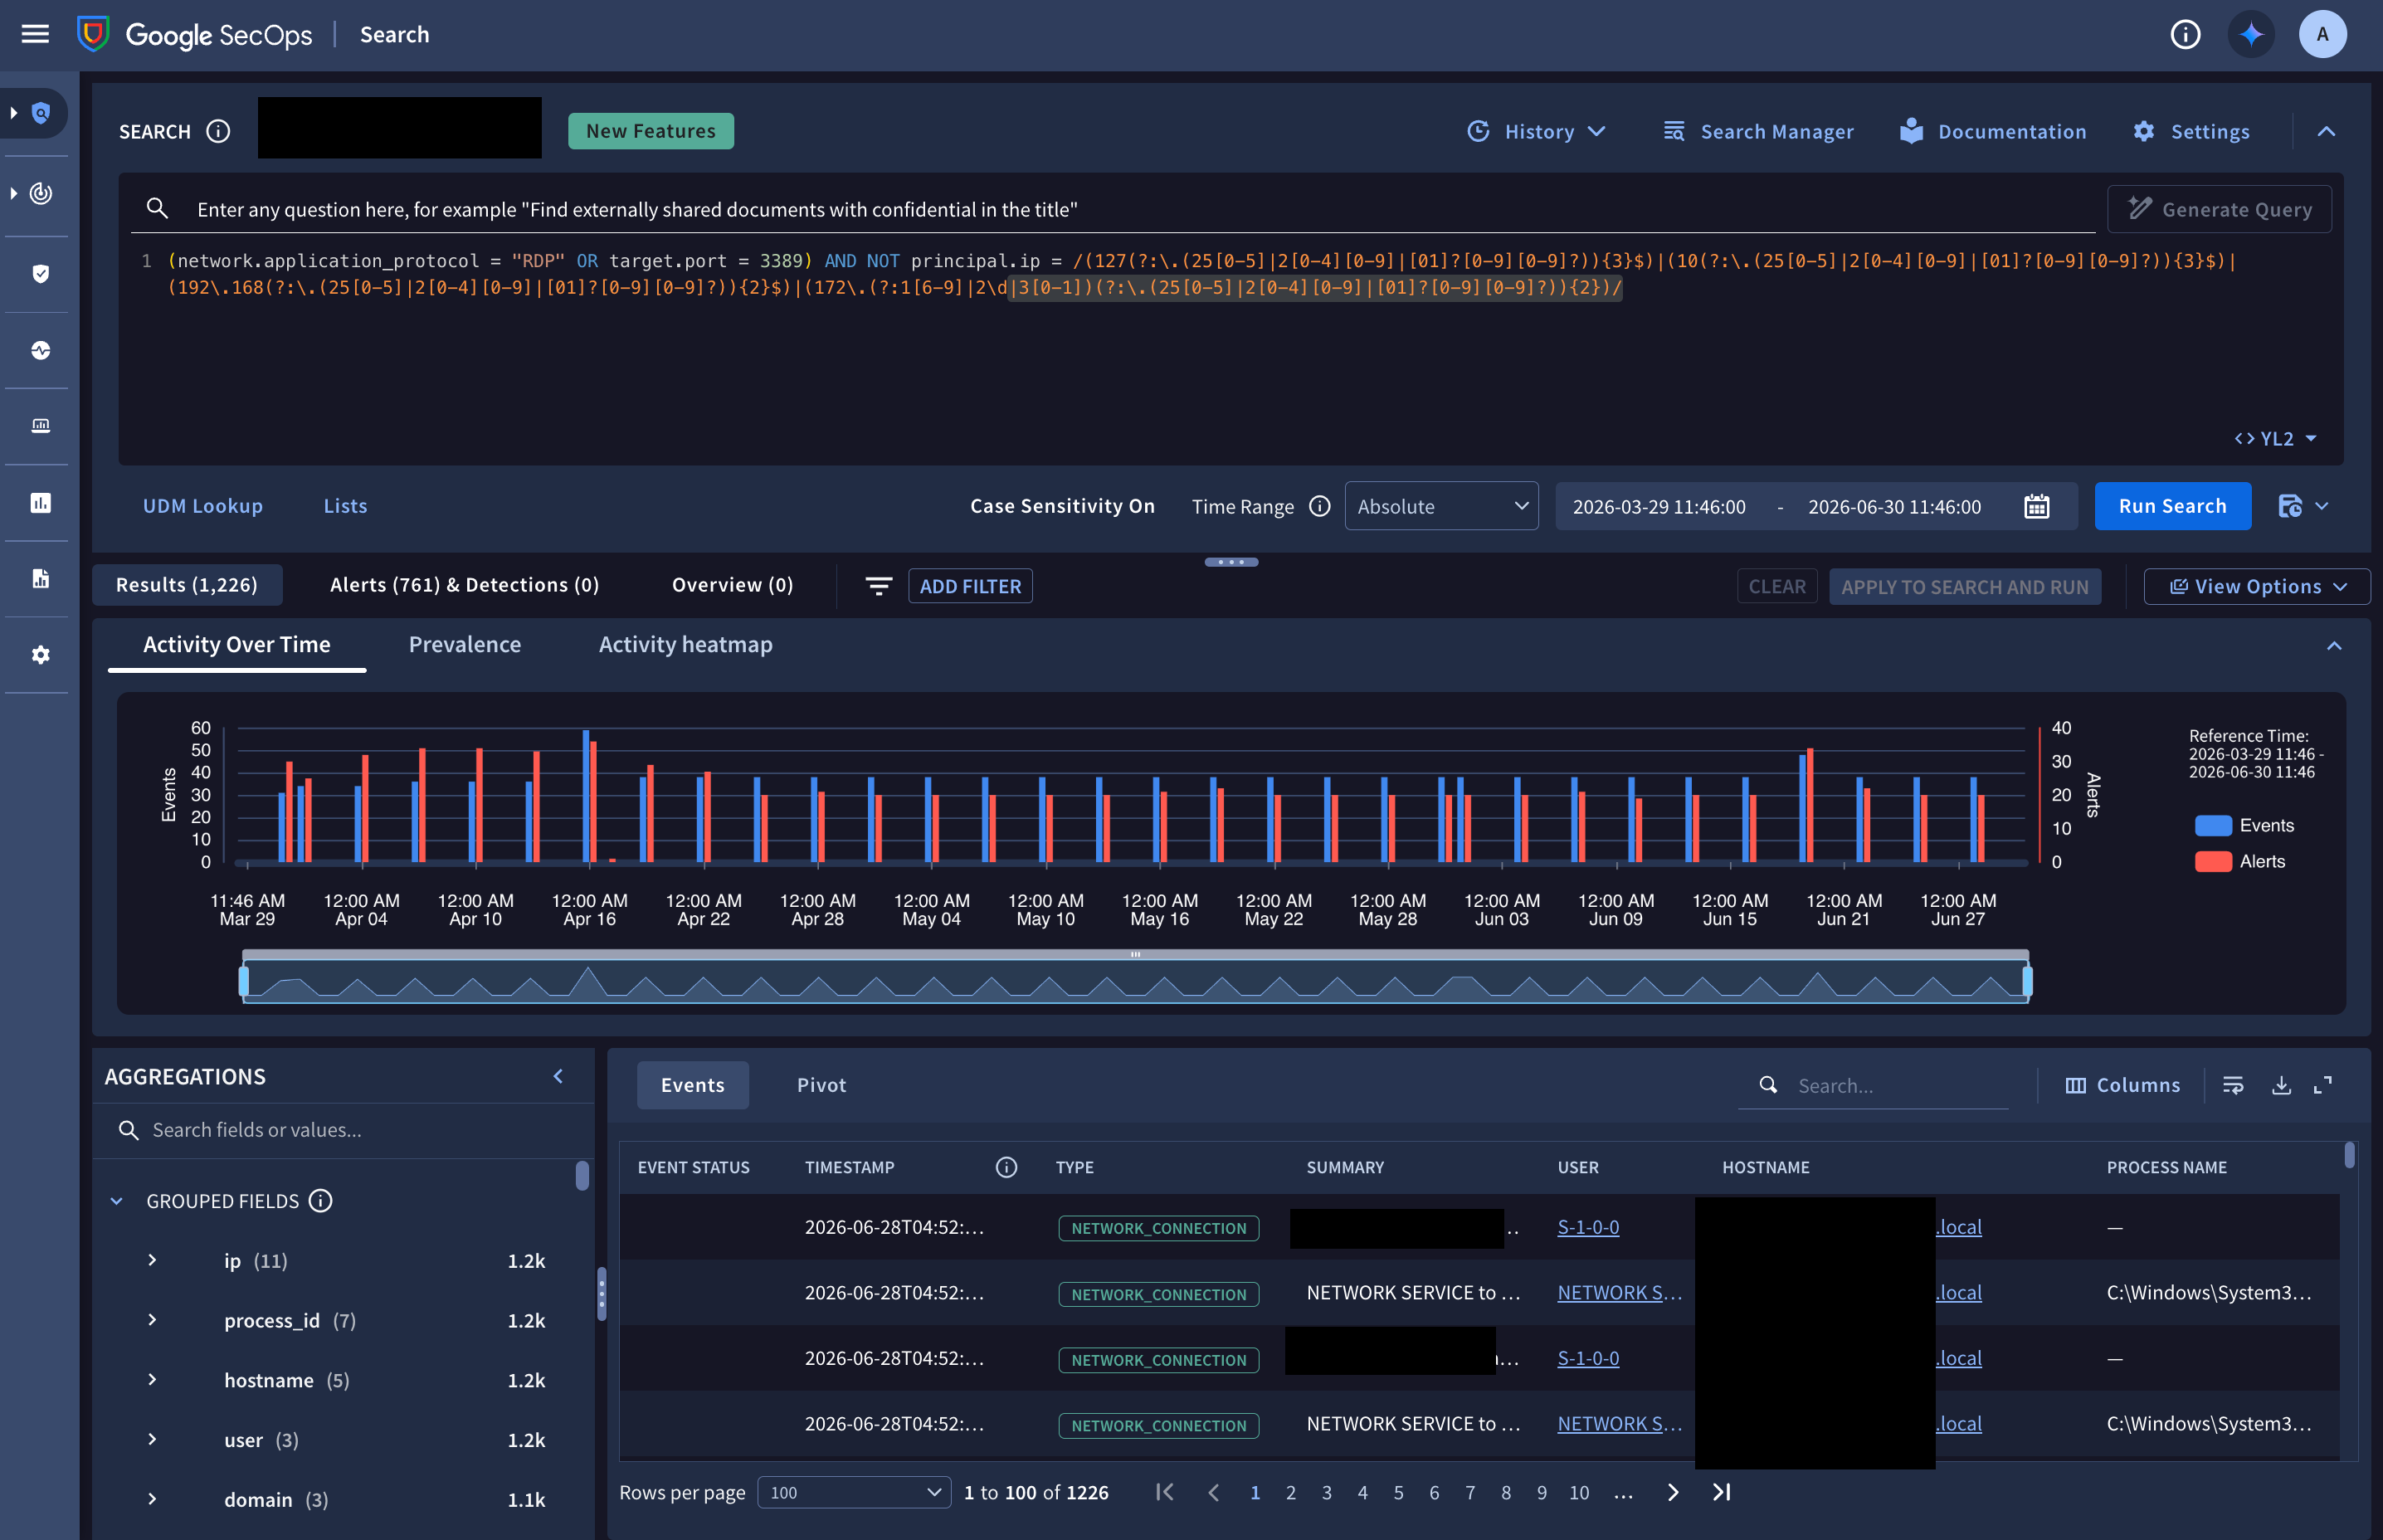
**Figure 1.** Example of the **SIEM Search** page used to explore event trends---in [**Advanced Mode**](https://docs.cloud.google.com/chronicle/docs/investigation/udm-search.md.txt#choose-search-execution-mode).
> [!NOTE]
> **Note:** On systems that use data RBAC, you can only see data that matches your scopes. For more information, see [data RBAC impact on Search](https://docs.cloud.google.com/chronicle/docs/administration/datarbac-impact.md.txt#search).
## Data RBAC scope enforcement
The Google SecOps Search engine strictly enforces [Role-Based Access Control (data RBAC) scope filtering](https://docs.cloud.google.com/chronicle/docs/administration/datarbac-impact.md.txt#search) across all tabs. You will only see UDM events, raw logs, alerts, detections, and cases that explicitly match the data scopes assigned to your user role.
## Configure general settings for the Search page
The general settings of the **SIEM Search** page are user-specific.
You can configure the following general settings for the **SIEM Search** page:
- [Specify the maximum number of search results](https://docs.cloud.google.com/chronicle/docs/investigation/udm-search.md.txt#max-search-results)
- [Choose the collapse behavior for the query editor](https://docs.cloud.google.com/chronicle/docs/investigation/udm-search.md.txt#CollapsequeryEditor)
### Specify the maximum number of search results
To specify the maximum number of search results, do the following:
1. On the **SIEM Search** page, click settings **Settings** , and select **Maximum Results**.
2. Select the **Max Results to Return** option. The options are `1k`, `30k`, `100k`, `1M`
and `custom` (which can take values between `1` and `1M`). The default value
is `30k`.
> [!TIP]
> **Tip:** Queries usually run faster when you choose a smaller result set size.
3. Click **Apply**.
### Choose the collapse behavior of the query editor
You can configure the query editor to collapse automatically after you run a search---to maximize the screen space available for viewing your search results. The **Default** setting leaves the query editor expanded after running a search.
To enable the auto-collapse feature, follow these steps:
1. On the **SIEM Search** page, click settings **Settings** , and select **Query Editor**.
2. In the **Query Editor** dialog, select **Auto-Collapse Query Editor**.
## Choose the search-execution mode
Google SecOps can execute a search in either of the following modes, which you can select in the query editor:
- **Basic Mode** : Use **Basic Mode** (the default mode) for fast event retrieval and query iteration.
- **Advanced Mode** : Use **Advanced Mode** for standard search workflows and for comprehensive multidimensional analysis.
The **SIEM Search** page displays fewer tabs and widgets in **Basic Mode** compared to **Advanced Mode** . If you run a search in **Basic Mode** and you identify suspicious events in the **Results** tab, you can switch to **Advanced Mode** and rerun the query to inspect timeline charts, activity heatmaps, prevalence scores, and correlated detections.
For more information about the two modes, see [Understand the search-execution modes](https://docs.cloud.google.com/chronicle/docs/investigation/udm-search.md.txt#search-execution-modes).
The following table describes recommended usage scenarios for **Basic Mode** and **Advanced Mode**:
| Scenario | Recommended mode | Rationale |
|---|---|---|
| Initial threat hunting and hypothesis testing | **Basic Mode** | Test indicator hypotheses across broad time windows without waiting for timeline histograms. |
| High-volume telemetry triage | **Basic Mode** | Query high-volume data sources (such as AWS VPC Flow, firewall, proxy, or Sysmon logs) with minimal latency. |
| Query formulation and filter tuning | **Basic Mode** | Iterate on UDM syntax, regular expressions, reference lists, and data table filters before running comprehensive audits. |
| Incident timeline reconstruction | **Advanced Mode** | Use the visual event distribution timeline and activity heatmaps to identify temporal bursts. |
| Indicator rarity and anomaly analysis | **Advanced Mode** | Inspect enterprise prevalence scores to evaluate whether an observed artifact is common or an outlier. |
| Detection validation | **Advanced Mode** | Verify whether specific events triggered correlated YARA-L 2.0 alerting rules. |
## Create a search query
The following sections describe how to create a search query.
You can create a search query using one of the following methods:
- [Enter your search statement in natural language](https://docs.cloud.google.com/chronicle/docs/investigation/udm-search.md.txt#generate-query-natural-language) and use Gemini to generate the query in the YARA-L 2.0 dialect. You must use English.
- [Manually construct your query in the query](https://docs.cloud.google.com/chronicle/docs/investigation/udm-search.md.txt#construct-query-manually) editor using either the YARA-L 2.0 or the SQL (GoogleSQL) dialect.
> [!NOTE]
> **Note:** A UDM search is limited to 100 UDM fields per single query. A UDM search expression consists of a *UDM field* to search, *an operator* , and a data value to search for. UDM queries are based on fields defined in the [UDM field dictionary reference](https://docs.cloud.google.com/chronicle/docs/unified-data-model/udm-field-list). You can browse and select these UDM fields using [auto-suggestions](https://docs.cloud.google.com/chronicle/docs/investigation/udm-search.md.txt#search_autosuggestions) or [**UDM Lookup**](https://docs.cloud.google.com/chronicle/docs/investigation/udm-search.md.txt#udm-lookup).
### Generate a query using natural language
To generate a query using natural language, complete the following steps:
1. On the **SIEM Search** page, click the search *natural language query bar* and enter a search statement in English.
The following statements are examples that might generate a useful search:
- *network connections from 10.5.4.3 to google.com*
- *failed user logins over the last 3 days*
- *emails with file attachments sent to john@example.com or jane@example.com*
- *all Cloud service accounts created yesterday*
- *outbound network traffic from 10.16.16.16 or 10.17.17.17*
- *all network connections to facebook.com or tiktok.com*
- *service accounts created in Google Cloud yesterday*
- *Windows executables modified between 8 AM and 1 PM on May 1, 2026*
- *all activity from winword.exe on lab-pc*
- *scheduled tasks created or modified on exchange01 during the last week*
- *email messages that contain PDF attachments*
- *emails sent by or sent from admin@acme.com on July 1*
- *any files with the hash 44d88612fea8a8f36de82e1278abb02f*
- *all activity associated with user "sam@acme.com"*
2. If the search statement includes a time-based term, the [**Time Range** parameters](https://docs.cloud.google.com/chronicle/docs/investigation/udm-search.md.txt#setDateTime) are automatically adjusted to match. For example, this would apply to searches with the following terms:
- *yesterday*
- *within the last 5 days*
- *on July 1, 2026*
3. Click **Generate Query** . If Gemini can interpret the search statement, Gemini generates a valid query in the [YARA-L 2.0](https://docs.cloud.google.com/chronicle/docs/yara-l/yara-l-overview) dialect and displays it in the query editor. If the search statement can't be interpreted, you see a message asking you to try asking in a different way. If the query expression is valid, the **Run Search** button becomes available.
4. Optional: Adjust the search time range using the [**Time Range** parameters](https://docs.cloud.google.com/chronicle/docs/investigation/udm-search.md.txt#setDateTime).
5. Optional: Modify the generated query in the query editor.
6. Select the [search-execution mode](https://docs.cloud.google.com/chronicle/docs/investigation/udm-search.md.txt#choose-search-execution-mode): **Basic Mode** or **Advanced Mode**.
7. Click **Run Search** . The [search results](https://docs.cloud.google.com/chronicle/docs/investigation/udm-search.md.txt#results-overview) are displayed.
8. Optional: Narrow the results by adding additional search filters manually or using the *natural language query bar* and run the search again.
### Construct a query manually in the query editor
For information about the different types of queries that the **SIEM Search** page supports and the syntax for constructing them, see the following documents:
- For details about the YARA-L 2.0 search syntax, see [Understand search syntax](https://docs.cloud.google.com/chronicle/docs/investigation/search-syntax-reference.md.txt).
- For information about constructing Join queries, see [Apply joins in search and dashboards](https://docs.cloud.google.com/chronicle/docs/investigation/search-joins.md.txt) and [Implement joins without a match section](https://docs.cloud.google.com/chronicle/docs/investigation/joins-without-match-section.md.txt).
- For information about constructing statistical (STATS) queries, see [Analyze search data with statistics](https://docs.cloud.google.com/chronicle/docs/investigation/statistics-aggregations-in-udm-search.md.txt).
- **Note** : When running a case-insensitive search (the default), string variables in the `match:` section are lowercased in the returned results. If you need to preserve original casing (for example, for Base64 strings), project the field in the `outcome:` section instead, or switch to a Case-Sensitive search. For more information, see [YARA-L known issues](https://docs.cloud.google.com/chronicle/docs/detection/yara-l-issues.md.txt#case-insensitive-search-string-match).
- For information about constructing Case History queries, see [Search cases and case history from the Search page](https://docs.cloud.google.com/chronicle/docs/investigation/search-and-search-case-history.md.txt).
- For information about projecting or excluding specific fields in query results, see [Control query output with `select` and `unselect`](https://docs.cloud.google.com/chronicle/docs/investigation/udm-search.md.txt#select-unselect) and [Control columns with select and unselect keywords](https://docs.cloud.google.com/chronicle/docs/investigation/select-unselect.md.txt).
To construct a query manually, complete the following steps:
1. On the **SIEM Search** page, click in the query editor.
2. Choose the query dialect:
- **YL2** (default): Use standard YARA-L 2.0 syntax for high-speed event hunting, entity filtering, and behavioral correlation.
- **SQL**: SQL (GoogleSQL) mode lets you execute BigQuery-compatible queries, build complex multi-table joins across UDM and Entity Context Graph (ECG), and perform advanced aggregations directly in the console.
3. Type your query in the query editor and take the following into consideration:
- **Automatic suggestion and completion** : As you type a query with the **YL2** option, the [automatic suggestion and completion feature](https://docs.cloud.google.com/chronicle/docs/investigation/udm-search.md.txt#search_autosuggestions) suggests valid fields based on your input.
- **UDM Lookup** : If you don't know the exact field name or value when writing a query, you can use [**UDM Lookup**](https://docs.cloud.google.com/chronicle/docs/investigation/udm-search.md.txt#udm-lookup) to help.
- **Syntax compilation errors**: If the query editor detects a syntax compilation error, it displays a red squiggly line directly beneath the problematic text. Hover over the underlined text to view the specific error description. The query editor highlights only one error at a time, which means that you must fix errors sequentially.
4. Set the time range for the query using the [**Time Range** parameters](https://docs.cloud.google.com/chronicle/docs/investigation/udm-search.md.txt#setDateTime).
5. Select the [search-execution mode](https://docs.cloud.google.com/chronicle/docs/investigation/udm-search.md.txt#choose-search-execution-mode): **Basic Mode** or **Advanced Mode**.
6. If the query expression is valid, click **Run Search** . The [search results](https://docs.cloud.google.com/chronicle/docs/investigation/udm-search.md.txt#results-overview) are displayed.
7. Optional: Narrow the results by adding additional search filters manually or using the console and run the search again.
> [!NOTE]
> **Note:** You can also construct a new query from within the [**Search Manager**](https://docs.cloud.google.com/chronicle/docs/investigation/udm-search.md.txt#search-manager) dialog. The same UDM-editing and automatic-suggestion and completion tools are also available there.
### Specify the time period for your search
Use the **Time Range** menu to specify the time period for your search.
The maximum time range of a search is always bounded by your tenant's log-retention configuration.
Maximum time ranges:
- **UDM**: 365 days.
- **RAW**: 365 days.
- **JOIN**: For inner joins: 90 days. For inner joins without a match condition: 14 days. For outer joins: 14 days.
- **STATS**: 90 days.
- **CASE** and **CASE HISTORY**: 90 days, bounded by case retention limits or a full case-history lifecycle.
- **ECG**: 365 days.
Google SecOps evaluates the configuration of your search query and applies the maximum time range based on the search type and the search conditions. (For example, a STATS query that includes an outer join will have a maximum time range that is smaller than a STATS query that doesn't include an outer join.)
To set the time range, do the following:
1. On the **SIEM Search** page, next to **Time Range**, from the list, select the mode:
- **Absolute**: Use an absolute time range to select a fixed start and end time.
- **Relative** : Use a relative time range to search backwards from the current time. The time when you click **Run Search** is set as the end time for your query.
2. If you selected **Absolute**, do the following:
1. Click calendar_month **calendar** to open the **Set Date and Time Range** dialog.
2. Do one of the following:
- To configure the time using one of the following methods, select the **Range** tab:
- **Use presets** : Select a preset range from the sidebar, such as **Last 3 Days** or **All Time** . **All Time** searches over your entire retention period.
- **Select dates**: Click a start date and an end date on the calendar.
- **Set times**: Select specific times using the time menus below the calendars.
- To specify a date and time range based on an event, click the **Event Time** tab, select a date on the calendar, and configure the timeframe:
- **Exact time** : Click the **Event** field to select or enter the specific time the event occurred.
- **Time buffer**: Select a predefined time range from the list.
3. Click **Apply**.
3. If you selected **Relative**, do the following:
1. Enter an integer in the text field.
2. Select a time unit from the menu: **Seconds** , **Minutes** , **Hours** , **Days** , **Weeks** , **Months** , or **Years**.
### Use auto-suggestions to build queries
When you write a query, the query editor provides automatic suggestions to help you build the query efficiently.
#### Navigate and select suggestions
As you type, a list appears with field suggestions matching your text, which include the following options:
- **Select a field** : Use the **Up** or **Down** arrow keys to navigate the list, and press **Enter** to select a field.
- **View metadata** : After you use the **Up** or **Down** arrow keys to highlight a suggestion, click chevron_right to view the field description.
- **Complete fields incrementally**: The editor suggests the immediate children of the current field and hides the typed prefix to save screen space. These suggestions are followed by all other matching fields in alphabetical order.
- **Complete operators and values** : After you select a field, the editor suggests valid operators (such as `=`, `!=`) based on the field's data type. For enumerated fields, the editor displays suggestions for all valid values (for example, `NETWORK_EVENT`) after you type an operator and a double quote (`"`).
#### Understand suggestion ranking
The query editor organizes suggestions into three distinct categories, in the
following order, to help you find relevant UDM fields:
1. **Recently and frequently used fields** : Displays up to the top seven matching
fields based on your active browser session and 30-day query usage history
across the **SIEM Search** , **Rules \& Detections** , and **Dashboards** pages.
Suggestions in this category are prioritized in the following order:
- **Recent browser history**: Fields you recently entered or selected in the query editor (up to the 100 most recent valid UDM fields). Matching fields appear first, ordered by how recently you used them. This list is saved in your browser's local storage across logins. Clearing your browser cache or switching browsers resets this history.
- **Historical usage (past 30 days)** : Fields extracted from queries you and
your organization ran over the past 30 days (including UDM searches,
dashboard queries, rule tests, and retrohunts). This usage data refreshes
every 8 hours. It is out of scope for data RBAC filtering because it serves
derived UDM schema field names rather than log events, and it isolates custom
labels and extracted fields (`additional.*`, `extracted.*`) to your tenant.
Historical usage follows a strict two-tier hierarchy:
1. **User-level usage**: Fields you used most frequently over the past 30 days, sorted by usage count in descending order.
2. **Tenant-level usage**: Fields used most frequently by all users across your tenant over the past 30 days, sorted by usage count in descending order. If a field already appears in your user-level usage list, its user-level rank takes precedence.
When filtering historical usage suggestions as you enter text, the editor
ranks matching fields by match quality before breaking ties using the usage
hierarchy:
1. **Exact match** : Matches the entire UDM field name (for example, `ip`).
2. **Exact token match** : Matches a complete segment of the field name (for
example, `principal.ip` or `target.ip` when you enter `ip`).
3. **Prefix match** : Matches the beginning of the field name.
4. **Token prefix match** : Matches the beginning of a segment within the
field name.
5. **Substring match** : Appears anywhere within the field name (for example,
`principal.hostname` when you enter `ip`, because `principal` contains
`ip`).
2. **Immediate children**: Displays the first-level child nodes of the current
field path in alphabetical order, excluding fields already listed in the top
usage suggestions.
3. **Global matches**: Displays all remaining matching UDM fields in alphabetical
order.
> [!NOTE]
> **Note:** Predefined Google SecOps [roles](https://docs.cloud.google.com/chronicle/docs/reference/feature-rbac-permissions-roles.md.txt#search) (`Admin`, `Editor`, `Viewer`, `Limited Viewer`, and `Restricted Data Access Viewer`) include the `chronicle.instances.suggestQueryFields` permission required to retrieve 30-day historical usage suggestions. If you use a custom IAM role, add `chronicle.instances.suggestQueryFields` to the role; without this permission, the query editor falls back to ranking suggestions using only recent browser history.
> [!NOTE]
> **Note:** Fields from data tables aren't included in usage-based or recency ranking because data tables don't have a fixed UDM schema. Instead, data table fields appear in alphabetical order in the **Global matches** section.
#### Manage auto-suggestion settings
To globally manage how Google SecOps displays automatic suggestions, do the following:
1. Click your profile avatar and select **User Preferences** from the list.
The **User Preferences** dialog appears.
2. In the dialog, click **Autosuggestion**.
3. To control the auto-suggestions shown in the query editor, adjust the following
settings:
- **Enable suggestions while typing**: Enables auto-suggestion.
- **Rank recently used fields first**: Displays your most recently and frequently used fields (based on browser session history, user-level usage, and tenant-level usage) at the top of the list.
- **Suggest immediate child fields**: Completes nested fields incrementally, one child node at a time.
- **Suggest all available paths**: Displays the full, expanded paths for all nested field suggestions.
4. Click **Save**.
### Control query output with `select` and `unselect`
You can use the `select` and `unselect` keywords in a YARA-L 2.0 search query to project or exclude specific UDM event and Entity Context Graph (ECG) fields directly from storage, reducing response payload size and improving query latency:
- **`select`** : Returns only the specified leaf fields and `outcome` variables, along with mandatory metadata fields.
- **`unselect`** : Returns all fields except the specified leaf fields and `outcome` variables.
Queries that don't include `select` or `unselect` return full UDM and entity payloads. Selective field projection applies to standalone UDM event and standalone ECG entity searches; multi-event joins, UDM-entity joins, and aggregate queries aren't affected. For additional syntax examples, see [Control columns with select and unselect keywords](https://docs.cloud.google.com/chronicle/docs/investigation/select-unselect.md.txt).
#### Supported and mandatory fields
- **Supported fields** : Specify `outcome` variables or full leaf field paths for UDM events (for example, `principal.hostname`, `target.ip`, `security_result.severity`) and ECG entities (for example, `graph.entity.hostname`, `graph.entity.ip`, `graph.metadata.entity_type`, `graph.relations.entity_type`).
- **Mandatory fields** : To preserve event identity, timeline ordering, and entity validity intervals, Google SecOps always returns the following core metadata fields, even if you omit them from `select` or include them in `unselect`:
- **UDM events** : `metadata.id`, `metadata.event_timestamp`, `metadata.enrichment_state`
- **ECG entities** : `graph.metadata.entity_type`, `graph.metadata.interval.start_time`
- **Map fields and repeated list indexing** : Field projection and exclusion operate at the container level for map fields (`additional.fields` and `extracted.fields`) and repeated lists rather than filtering individual map keys or single array positions:
- **With `select`** : Specifying a map key (such as `select: additional.fields["env"]` or `extracted.fields["src"]`) or a list index (such as `select: principal.ip[0]` or `about[0].file.md5`) returns the entire map (`additional.fields` or `extracted.fields`) or the entire repeated field or sub-field across all list elements.
- **With `unselect`** : Specifying a map key (such as `unselect: additional.fields["env"]`) or a list index (such as `unselect: principal.ip[0]` or `about[0].file.md5`) excludes the entire map (removing all other keys in that map) or excludes the repeated field or sub-field across all list elements, not only index `0`. Don't include any key from `additional.fields` or `extracted.fields` in `unselect` if you need other keys from that map.
#### Impact on search results, UI, and APIs
Using `select` or `unselect` affects search results across the Google SecOps web interface, Chronicle API (`udmSearch` and `StreamSearch`), and Search long-running operations (LRO) API (`PaginatedSearchResults`). It isn't supported in the legacy Backstory API.
- **Events table, Column Manager, and Aggregations** : Only projected fields (along with **Timestamp** and **Event Status**) are available to view, aggregate, filter, or add as columns.
- **Event Viewer** : Displays only the projected UDM and entity fields alongside the raw log, and disables **Add to Columns** for unprojected fields.
- **Sorting** : You can sort results only on projected fields, mandatory metadata fields (`metadata.event_timestamp` and `metadata.enrichment_state`), and composite quick columns (**Hostname** , **IP** , and **User** ) when their underlying fields are projected. In API requests, setting `sort_column` to an unprojected or excluded field returns an `INVALID_ARGUMENT` (`400`) error.
#### Examples
- **Include only specific UDM event fields (`select`)**:
principal.hostname != "" and target.ip != ""
select: principal.hostname, principal.ip, target.ip, security_result.severity
- **Include only specific ECG entity fields (`select`)**:
graph.entity.hostname != ""
select: graph.entity.hostname, graph.entity.ip, graph.entity.asset.asset_id
- **Exclude specific fields (`unselect`)**:
metadata.event_type = "NETWORK_HTTP" and principal.hostname != ""
unselect: target.hostname, target.ip, security_result.category_details
### Find a UDM field for a search query (UDM Lookup)
When writing a search query, you might not know the exact UDM field name or value to include. The *UDM Lookup* feature lets you quickly find a UDM field name that contains a text string in the name or that stores a specific string value. You can select one or more results that UDM Lookup returns and use the results as a starting point for a search query, append the results to an existing query, or save the results to the clipboard.
> [!NOTE]
> **Note:** UDM Lookup isn't intended to be used to search other data types, such as bytes, boolean, or numeric.
To use UDM Lookup, do the following:
1. On the **SIEM Search** page, click **UDM Lookup** . The **UDM Lookup** dialog opens.
2. Select one or both of the following **Match On** options, to specify the scope of data to search:
- **UDM Fields** : Search for text matching field names, for example, `network.dns.questions.name` or `principal.ip`.
- **Values** : Search for text strings inside stored log values, for example, `dns` or `google.com`.
3. Click in the search **Enter exact string to match on** field, and enter the string to match on. As you type, search results appear in the dialog.
The results vary when matching on **UDM Fields** versus **Values** as follows:
- Searching with *Match On* **UDM Fields** names returns an exact match found anywhere in the schema definition.

**Figure 2.** Search with *Match On* **UDM Fields** names in the **UDM Lookup** dialog.
- Searching with *Match On* **Values** searches your ingested log telemetry and
returns two types of results:
- **Full value matches**: For common text fields (such as applications,
hostnames, URLs, IP addresses, and usernames), UDM Lookup displays the
complete matching value with your search string highlighted in yellow,
along with the latest log ingestion timestamp.
- **Possible value matches** : For fields that contain long, complex, or
unstructured text (such as command lines, descriptions, detection
fields, and custom fields), UDM Lookup indicates that the search term
appears in that field in your historical telemetry. Instead of showing a
single full value, the result displays the UDM field name followed by
`(Possible value match)`.

**Figure 3.** Search with *Match On* **Values** in the **UDM Lookup** dialog.
4. In the list of results, you can do the following:
- Click the name of a UDM field to see a description of that field.
- Select one or more results by clicking the checkbox next to the UDM field name.
- Click the **Reset** button to deselect all selected fields in the results list.
5. Do one of the following:
- To copy the selected results to the clipboard, click **Copy UDM** . You can then close the
**UDM Lookup** dialog and paste contents of the clipboard into the query editor.
- To append the selected results onto the query in the query editor, click **Append to search**. Google SecOps then converts the selected results to a search query as the UDM field name or a name-value pair.
If you append multiple results, Google SecOps adds each result to the end of the existing query in the query editor using the `OR` operator.
The appended query string is different depending on the type of match
returned by UDM Lookup:
- If the result matches a text string in a UDM field name, the full UDM
field name is appended to the query. For example:
`principal.artifact.network.dhcp.client_hostname`
- If the result is a *full value match*, the name-value pair contains an
exact equality condition with the full value.
- If the result is a **Possible value match**, the name-value pair contains
the UDM field name and a case-insensitive regular expression containing
your search term.
6. Edit the query in the query editor if needed.
### UDM Lookup search behavior and field coverage
UDM Lookup helps you discover field names and search for historical values across your ingested log data. This section explains how search works across both modes, provides query examples, and describes field coverage boundaries.
#### Search modes: UDM Fields versus Values
UDM Lookup provides two distinct search modes:
- **UDM Fields mode** : *Match On* **UDM Fields** searches the UDM schema definition to help you locate the correct field path.
You can find field names across all data types, including text fields (`principal.hostname`), numeric ports (`target.port`), boolean flags (`security_result.is_alert`), and event categories (`metadata.event_type`).
Example: Typing `port` displays fields like `network.ip_port`, `principal.port`, `target.port`, and `src.port`.
- **Values mode** : *Match On* **Values** searches your ingested event logs for matching text values:
- **Exact value match** : For common identifiers and text fields (such as hostnames, IP addresses, domains, and usernames), UDM Lookup finds the exact value in your data and generates an equality condition (for example, `principal.hostname = "example.com"`).
- **Possible value match (Regular expression)** : For long text, command lines, URLs, registry keys, and file paths, UDM Lookup returns a *Possible value match* with a regular expression (for example, `principal.process.command_line = /powershell/ NOCASE`).
#### Field coverage gaps and how to search directly
When searching by **Values** , UDM Lookup searches text fields in raw, unenriched event data. Certain data types and high-volume identifier fields don't return matches in **Values** mode. To search for these fields, enter your expression directly in the query editor.
This section includes the following:
- [Numeric, boolean, timestamp, and byte fields](https://docs.cloud.google.com/chronicle/docs/investigation/udm-search.md.txt#numeric-boolean-timestamp-byte-fields)
- [Excluded identifier fields](https://docs.cloud.google.com/chronicle/docs/investigation/udm-search.md.txt#excluded-identifier-fields)
- [Fields with possible value matches (regular expressions)](https://docs.cloud.google.com/chronicle/docs/investigation/udm-search.md.txt#possible-value-match-fields)
- [Enriched fields and Entity Graph](https://docs.cloud.google.com/chronicle/docs/investigation/udm-search.md.txt#enriched-fields-entity-graph)
##### Numeric, boolean, timestamp, and byte fields
UDM Lookup value search does not return matches for non-text data types. To search on these fields, write the condition directly in the search bar:
| Field category | Example UDM fields | Direct search example |
|---|---|---|
| Port numbers and status codes | `network.ip_port`, `principal.port`, `target.port`, `network.http.response_code` | `network.ip_port = 443` `network.http.response_code = 403` |
| Metrics and risk scores | `security_result.risk_score`, `network.sent_bytes`, `network.received_bytes` | `security_result.risk_score >= 80` `network.sent_bytes > 50000000` |
| Boolean flags | `security_result.is_alert`, `network.dns.answers.is_authoritative` | `security_result.is_alert = true` |
| Predefined enums | `metadata.event_type`, `network.ip_protocol` | `metadata.event_type = "USER_LOGIN"` `network.ip_protocol = "TCP"` |
| Timestamps | `metadata.event_timestamp.seconds`, `metadata.ingested_timestamp` | Filter using the [**Time Range** menu](https://docs.cloud.google.com/chronicle/docs/investigation/udm-search.md.txt#setDateTime) or query: `metadata.event_timestamp.seconds > 1700000000` |
| Event IDs (raw bytes) | `metadata.id` | `metadata.id = "..."` |
| Geographic coordinates | `principal.location.latitude`, `principal.location.longitude` | Filter by regional location fields: `principal.location.country_or_region = "US"` |
##### Excluded identifier fields
The following high-entropy and session tracking fields don't return matches when searching by **Values**:
| Excluded field category | UDM fields | Direct search example |
|---|---|---|
| Process IDs | `*.pid` (for example `principal.process.pid`, `target.process.pid`), `*.product_specific_process_id` | `target.process.pid = "4128"` |
| Session and connection IDs | `network.session_id`, `network.parent_session_id`, `metadata.product_log_id` | `network.session_id = "sess-9481"` |
| Detection rule IDs | `security_result.rule_id` | `security_result.rule_id = "rule_suspicious_login"` |
| Resource and asset IDs | `*.resource.id` (including cloud ARNs and URIs), `*.asset_id` | `target.resource.id = "arn:aws:s3:::my-bucket"` |
| Ingestion labels | `metadata.base_labels.*`, `metadata.enrichment_labels.*` | `metadata.base_labels.log_types = "WINEVTLOG"` |
##### Fields with possible value matches (regular expressions)
For fields that contain long, complex strings with many path separators or arguments, UDM Lookup returns a *Possible value match* regular expression (`/.../ NOCASE`) rather than an exact full-value match:
- **Command lines** : `principal.process.command_line`, `target.process.command_line`
- **File paths** : `principal.process.file.full_path`, `target.file.full_path`
- **Web and network URLs** : `principal.url`, `target.url`, `network.http.referral_url`
- **Registry keys** : `principal.registry.registry_key`, `target.registry.registry_key`
- **Free-form descriptions** : `metadata.description`, `security_result.description`, `security_result.summary`
- **User-Agent strings** : `network.http.user_agent`
- **Dynamic custom fields** : `additional.fields.value.*`
##### Enriched fields and Entity Graph
UDM Lookup searches raw log data ingested after August 10, 2023. It does not return values from:
- **Downstream enrichments** : Such as GeoIP location resolution, WHOIS data, Safe Browsing verdicts, or VirusTotal scores. To search these, filter directly on the enriched field path (for example, `target.ip_geo_artifact.country_or_region = "US"`).
- **Entity Graph objects** : Data in the `graph.*` namespace.
- **Historical data prior to cutoff** : Logs ingested before August 10, 2023. To search older data, use direct search queries on the **SIEM Search** page.
### Use data tables in a search
You can use the [*data tables*](https://docs.cloud.google.com/chronicle/docs/investigation/data-tables.md.txt) feature in a search. This lets you use your own
existing databases of threat information in conjunction with a search to hunt for
threats in your enterprise.
For example, if you have a database called `suspicious` with a column of IP
addresses that you know are problematic, you can reference that database in the search query
instead of manually entering individual IP addresses in the query:
events:
$e.principal.ip in %suspicious.ip
You can narrow your results by searching for specific metadata in addition to IP
addresses, for example, you might be specifically concerned with changes to user
resources:
events:
$e.metadata.event_type = "USER_RESOURCE_UPDATE_CONTENT"
$e.principal.ip in %suspicious.ip
You can narrow a search against interrelated UDM fields and match
against multiple data table columns. The following example searches
for `NETWORK_CONNECTION` events where the security result is `ALLOW`. It then
matches those events against the `hostnames` column and the `ip` column in the
`badApps` data table.
events:
$e.metadata.event_type = "NETWORK_CONNECTION"
$e.security_result.action = "ALLOW"
$e.target.asset.asset_id = $assetid
// Event hostname matches at least one value in table column hostname.
$e.target.hostname in %badApps.hostname
// Event IP matches at least one value in table column ip.
$e.target.ip in %badApps.ip
#### View data table rows in a search
When you use a data table in a YARA-L 2.0 search, the results reference the data table rows that are linked to the matching events. These results are displayed in the [**Events** panel](https://docs.cloud.google.com/chronicle/docs/investigation/udm-search.md.txt#events-tab). The current state of the data table and its rows are shown when you view the results.
Use the [**Column Manager**](https://docs.cloud.google.com/chronicle/docs/investigation/udm-search.md.txt#column-manager) to select which data table and columns to
display in the results.
For more information, see [Use data tables](https://docs.cloud.google.com/chronicle/docs/investigation/data-tables.md.txt).
## Understand the query run process
If the query in the query editor is valid, the Google SecOps console enables the **Run Search** button.
After you click **Run Search**, the in-progress query is displayed with a circular status icon.
While a search is in progress, you can run additional (concurrent) searches in the query editor with some [limitations](https://docs.cloud.google.com/chronicle/docs/investigation/udm-search.md.txt#search-api-quotas). Google SecOps continues running your previous searches and runs the new searches in parallel.
> [!IMPORTANT]
> **Important:** Concurrent searches and stored results require the search history feature to be active. If you have previously disabled search history, you can enable it again by clicking **History** \> **Opt into search history**.
Completed queries are displayed with a green check mark icon, along with a counter indicating the number of events returned by the query.
Click a completed query to display the results. The [search results](https://docs.cloud.google.com/chronicle/docs/investigation/udm-search.md.txt#results-overview) are displayed below the query editor.
The search results are cached and only include the data available at the query run time.
## Manage your search history
Your search history is saved to your Google SecOps account.
> [!IMPORTANT]
> **Important:** Concurrent searches and stored results require the search history feature to be active.
- To manage your search history, on the **SIEM Search** page, click **History** to open the dialog and do the following:
- View a list of all the searches in your history.
- Click an item from the list to load it into the query editor.
- Type in the search bar to find a search in your history.
- Filter searches by clicking **Filter** next to the search bar and filter searches by **Language** ---containing: **YL2** and **SQL** filters `AND` **Search type** ---containing: **UDM** , **Raw log** , and **Stats** filters.
- Show completed and in-progress stored results only or not (using the **Show Completed \& In-Progress Stored Results Only** checkbox).
- Clear the search history.
- To clear the search history, click **More** and select **Clear History**.
- Opt out of search history or opt back in to search history:
- To opt out of search history, click **Opt out of search history** and then select **Opt-Out Only** to disable search history, or **Opt-Out and Clear** to disable search history and delete the saved search history.
- If you have previously disabled search history, you can enable it again by clicking **Opt into search history**.
- To delete an individual search from your search history, see [Delete a saved search](https://docs.cloud.google.com/chronicle/docs/investigation/udm-search.md.txt#delete-search).
> [!NOTE]
> **Note:** Search history records the search-execution mode (**Basic Mode** or **Advanced Mode** ) for each query and restores that mode when you rerun the search from the **History** dialog. For more information, see [Understand the search-execution modes](https://docs.cloud.google.com/chronicle/docs/investigation/udm-search.md.txt#search-execution-modes).
## Save and use a metrics query
> [!NOTE]
> **Note:** This feature is covered by [Pre-GA Offerings Terms](https://chronicle.security/legal/service-terms/) of the Google Security Operations Service Specific Terms. Pre-GA features might have limited support, and changes to pre-GA features might not be compatible with other pre-GA versions. For more information, see the [Google SecOps Technical Support Service guidelines](https://chronicle.security/legal/technical-support-services-guidelines/) and the [Google SecOps Service Specific Terms](https://chronicle.security/legal/service-terms/).
> If this feature isn't visible in your environment, see [Manage preview features](https://docs.cloud.google.com/chronicle/docs/secops/preview-features-manage.md.txt) or contact your system administrator.
Google SecOps classifies metrics queries with the **STATS** badge.
- To save a search as a metric, click **More** next to **Run Search** and click **Save as Metric** . The **Rules \& Detections** page opens, displaying your metrics query in the **Metrics** tab. You can then save the metric or disable it. After saving a metric query, it can't be edited or deleted. Metrics can be disabled at any time.
You can use a metrics query to establish typical behavior patterns and identify outlying activity. If you have a metrics query in the query editor that tracks critical operational trends, click **More** \> **Save as Metric**. This saves the query as a continuous time-series metric that can be embedded into custom dashboards or referenced in threshold alerts.
**Example metrics query**:
metric metric_1784196814306 {
(metadata.event_type = "NETWORK_FLOW" OR
metadata.event_type = "NETWORK_CONNECTION" OR
metadata.event_type = "NETWORK_DNS" OR
metadata.event_type = "NETWORK_HTTP")
outcome:
$timestamp = timestamp.get_timestamp(metadata.event_timestamp.seconds)
$hostname = principal.hostname
$event_type = metadata.event_type
$user = principal.user.userid
$principal_process = principal.process.file.full_path
$principal_cmdline = principal.process.command_line
$target_process = target.process.file.full_path
$target_cmdline = target.process.command_line
$target_url = target.url
$target_ip = target.ip[0]
order:
$timestamp
}
## Manage your searches (Search Manager)
Use the **Search Manager** dialog to manage your searches.
- To open the **Search Manager** , on the **SIEM Search** page, click **Search Manager**.
### Search-type badges
The **Saved** list in the **Search Manager** lists all the saved searches and displays a badge with the search type: **UDM** , **RAW** , **JOIN** , **STATS** , **CASE** , **CASE HISTORY** , and **ECG**.
### Search Manager actions
In the **Saved** list, you can perform the following actions:
- **Filter [saved](https://docs.cloud.google.com/chronicle/docs/investigation/udm-search.md.txt#save-search) searches** : Click **Filter** next to the search bar and filter searches by **Source** ---containing: **Google SecOps defined** , **Authored by me** , and **Shared with me** `AND` **Language** ---containing: **YL2** and **SQL**.
- **Sort searches** : Click list_arrow **Sort** next to the search bar and sort by **Name (A - Z)** , **Name (Z - A)** , **Oldest - Newest** , or **Newest - Oldest**.
- **Add a search** : Click add_2 **Add** next to the search bar and construct a new search in the adjacent query editor. The query editor in the **Search Manager** supports the same UDM-editing and automatic-suggestion and completion tools as when you [construct a query manually in the query editor](https://docs.cloud.google.com/chronicle/docs/investigation/udm-search.md.txt#construct-query-manually).
- **[Share](https://docs.cloud.google.com/chronicle/docs/investigation/udm-search.md.txt#share-search) or [delete](https://docs.cloud.google.com/chronicle/docs/investigation/udm-search.md.txt#delete-search) searches that *you* authored**.
- **Edit a search that was authored by you** : When a search is selected in the **Saved** list, the query editor displays the query, along with the **Title** box and the **Description** box. The query editor supports the same UDM-editing and automatic-suggestion and completion tools as when you [construct a query manually in the query editor](https://docs.cloud.google.com/chronicle/docs/investigation/udm-search.md.txt#construct-query-manually).
### Save a search
Saved searches and search history are:
- Stored with your Google SecOps account.
- Only viewable and accessible by the individual user unless you use the [Share a search](https://docs.cloud.google.com/chronicle/docs/investigation/udm-search.md.txt#share-search) feature to share your search with your organization.
To save a search, do the following:
1. On the **SIEM Search** page, do one the following:
- If there's a valid query in the query editor, click **More** next to **Run Search** and click **Save Search** . The **Search Manager** dialog opens.
- Click **Search Manager** . The **Search Manager** dialog opens.
2. In the **Title** box, enter a name for the search. Google recommends giving your saved search a meaningful name and a plain text description of what you're searching for.
3. Optional: In the **Description** box, enter a description for the search.
4. Optional: Specify placeholder variables in the format `${}`
using the same format as is used for variables in YARA-L. If you add a
variable to a search, you must also include a prompt to help the user
understand the required information to enter before they run the search. All
variables must be populated with values prior to a search being run.
For example, you could add `metadata.vendor_name = ${vendor_name}` to your
search. For `${vendor_name}`, you need to add a prompt for future users,
such as `Enter the name of the vendor for your search`. Each time a user
loads this search in the future, they are prompted to enter the vendor name
prior to running the search.
5. Click **Save edits** when you're finished.
- To view saved searches, click **Search Manager** and view the **Saved** list.
### Retrieve and run a saved search
To retrieve and run a saved search, do the following:
1. On the **SIEM Search** page, click **Search Manager** and select a search from the **Saved** list to the left.
2. Optional: Delete a search by clicking **More** and selecting **Delete Search** . You can only delete searches that *you* authored.
3. You can change the name of the search and the description. Click **Save edits** when you're finished.
4. Click **Load search**. The search is loaded into the main search field.
5. Select the [search-execution mode](https://docs.cloud.google.com/chronicle/docs/investigation/udm-search.md.txt#choose-search-execution-mode): **Basic Mode** or **Advanced Mode**.
6. Click **Run Search**.
### Delete a saved search
You can only delete searches that *you* authored.
To delete a saved search, do the following:
1. On the **SIEM Search** page, click **Search Manager** and select a search from the **Saved** list to the left.
2. Click **More** and select **Delete Search**.
3. Click **Delete Search**.
### Share a search or stop sharing it
Shared searches let you share searches with your team. You can't share with only one person. If you share your search, it is shared with your whole organization.
You can't edit a shared search that you didn't author.
To share a search, do the following:
1. On the **SIEM Search** page, click **Search Manager** and select a search from the **Saved** list to the left.
2. Click the search you want to share.
3. Click **More** on the right side of the search.
4. Click **Share With Your Organization**. A confirmation message appears: "If you share, everyone in your organization can use this search".
5. Click **Share**.
If you want the search to only be visible to you, click **More** and click **Stop Sharing**. If you stop sharing, only you can use this search.
## Search results---overview
When you click **Run Search** on the **SIEM Search** page, Google Security Operations evaluates your query across your environment and categorizes and displays the results below the query editor.
The UI elements for search results vary depending on the following:
- The search type (which is, according to its badge: **UDM** , **RAW** , **JOIN** , **STATS** , **CASE** , or **CASE HISTORY**).
- The search-execution mode (**Basic Mode** or **Advanced Mode** ). When you run a search in **Basic Mode** , the **SIEM Search** page displays only the **Results** tab and hides the **Alerts \& Detections** , **Overview** , and **Visualize** tabs. For more information, see [Understand the search-execution modes](https://docs.cloud.google.com/chronicle/docs/investigation/udm-search.md.txt#search-execution-modes).
The **SIEM Search** page displays the following tabs for search results:
- [**Results**](https://docs.cloud.google.com/chronicle/docs/investigation/udm-search.md.txt#results-tab): Displayed for all search types.
- [**Alerts \& Detections**](https://docs.cloud.google.com/chronicle/docs/investigation/udm-search.md.txt#alerts-and-detections-tab): Displayed only for UDM, RAW, and JOIN search results.
- [**Overview**](https://docs.cloud.google.com/chronicle/docs/investigation/udm-search.md.txt#overview-tab): Displayed only for UDM, RAW, and JOIN search results.
- [**Visualize**](https://docs.cloud.google.com/chronicle/docs/investigation/udm-search.md.txt#visualize-tab): Displayed only for STATS search results.
The title of each results tab includes the count in parentheses, for example, **Results (1,118)** ---or **Results (100,000+)** if the number of results exceeds the [specified maximum](https://docs.cloud.google.com/chronicle/docs/investigation/udm-search.md.txt#max-search-results) (in this case 100k).
Clicking between tabs instantly shifts your workspace view while preserving your search query and time range.
## View and manage information in the Results tab
The **Results** tab serves as your primary workspace for viewing and managing search results. You can use the **Results** tab for:
- Deep-dive log hunting
- Viewing raw telemetry
- Generating pivot tables from event data
- Analyzing high-frequency field value distributions
- Exporting data to CSV files
The **Results** tab includes the following elements, depending on the search type:
- Tabbed panels with the following charts:
- [**Activity Over Time**](https://docs.cloud.google.com/chronicle/docs/investigation/udm-search.md.txt#activity-over-time-chart) chart: Displayed for UDM, JOIN, CASE, CASE HISTORY, and ECG search results.
- [**Trend Over Time**](https://docs.cloud.google.com/chronicle/docs/investigation/udm-search.md.txt#trend-over-time-chart-in-results-tab) chart: Displayed for RAW search results.
- [**Prevalence**](https://docs.cloud.google.com/chronicle/docs/investigation/udm-search.md.txt#prevalence-tab) tab: Displayed for UDM search results.
- [**Activity heatmap**](https://docs.cloud.google.com/chronicle/docs/investigation/udm-search.md.txt#activity-heatmap-tab) tab: Displayed for UDM search results.
- [**Aggregations**](https://docs.cloud.google.com/chronicle/docs/investigation/udm-search.md.txt#aggregations-panel-in-results-tab) panel: Displayed for all types of search results.
- Panels with the following tables, according to the search type:
- [**Events**](https://docs.cloud.google.com/chronicle/docs/investigation/udm-search.md.txt#events-tab) table and [**Pivot**](https://docs.cloud.google.com/chronicle/docs/investigation/udm-search.md.txt#pivot-table) sub-tab: Displayed only for UDM search results. The **Events** table displays normalized UDM event telemetry and raw log records matching your query within the selected time window. The **Pivot** sub-tab lets you create and use a pivot table to perform multidimensional mathematical grouping and summarization (`sum`, `count`, `avg`, `stddev`) on the event results.
- [**Raw Logs**](https://docs.cloud.google.com/chronicle/docs/investigation/udm-search.md.txt#raw-logs-tab): Displayed only for RAW search results.
- [**Stats**](https://docs.cloud.google.com/chronicle/docs/investigation/udm-search.md.txt#stats-tab): Displayed only for STATS search results.
- [**Joins**](https://docs.cloud.google.com/chronicle/docs/investigation/udm-search.md.txt#joins-tab): Displayed only for JOIN search results.
- [**Cases**](https://docs.cloud.google.com/chronicle/docs/investigation/udm-search.md.txt#cases-tab): Displayed only for CASE search results.
- [**Case History**](https://docs.cloud.google.com/chronicle/docs/investigation/udm-search.md.txt#case-history-tab): Displayed only for CASE and CASE HISTORY search results.
- [**Timed Data** and **Timeless Data**](https://docs.cloud.google.com/chronicle/docs/investigation/udm-search.md.txt#timed-and-timeless-data): Displayed only for ECG search results.
For information about the supported functions and tools for these tables, see [Use common tools for tables](https://docs.cloud.google.com/chronicle/docs/investigation/udm-search.md.txt#common-table-functions). Supported functions include managing the columns in the table that the tab displays, downloading search results, and more.
> [!TIP]
> **Tip:** Click **View Options** to hide or unhide the charts and the **Aggregations** panel.
> [!NOTE]
> **Note:** In **Basic Mode** , timeline charts, the **Prevalence** tab, and the **Activity heatmap** table are bypassed and hidden to accelerate event retrieval, but the **Events** panel and **Aggregations** panel remain active. For more information, see [Understand the search-execution modes](https://docs.cloud.google.com/chronicle/docs/investigation/udm-search.md.txt#search-execution-modes).
### Use the Activity Over Time chart
The **Activity Over Time** tab includes a chart (a histogram) of event and alert volume over time.
> [!NOTE]
> **Note:** The **Activity Over Time** tab is displayed only for UDM, JOIN, CASE, CASE HISTORY, and ECG search results.
The width of each bar depends on the time interval searched. For example, each
bar represents 10 minutes when the search spans 24 hours of data. This chart is
updated dynamically as you modify the existing search.
> [!NOTE]
> **Note:** The maximum search window is up to 365 days for YARA-L 2.0 searches and 90 days for SQL searches, from the start to end time.
The chart supports the following:
- **Time range adjustment** : Drag the slider controls on the timeline to narrow the visible time window instantly. The results grid and **Aggregations** panel update without rerunning the query against the backend.
- **View the events and alerts for a single bar's time-window** : Click a bar to narrow the focus of the chart, the **Aggregations** panel, and the **Events** table to the time-window of that bar. This action creates a filter, which is displayed next to the filter_list **Add filter** button. To display all the results again, delete the filter.
- **Details popup** : Clicking one of the bars opens a popup with the time, and the values for **Queried Events** , **Filtered Events** , **Queried Alerts** , and **Filtered Alerts**.
### Use the Trend Over Time chart
The **Trend Over Time** tab includes a chart (a histogram) of raw-log volume over time. The width of each vertical bar dynamically scales based on your overall search window (for example, each bar might represent 10 minutes for a 24-hour search window).
> [!NOTE]
> **Note:** The **Trend Over Time** tab is displayed only for RAW search results.
The chart supports the following:
- **Time range adjustment** : Drag the slider controls on the timeline to narrow the visible time window instantly. The results grid and **Aggregations** panel update without rerunning the query against the backend.
- **View how many parsed, unparsed, and unknown logs were detected in a single bar's time-window** : *Unknown* means that one or more logs were detected at the time but the number is indeterminate. Click a bar to narrow the focus of the chart and the **Aggregations** panel to the time-window of that bar. This action creates a filter, which is displayed next to the filter_list **Add filter** button. To display all the results again, delete the filter.
- **Details popup** : Clicking one of the bars opens a popup with the time, and the values for **Parsed Logs** and **Unparsed Logs** (or **Unknown** when the log count is indeterminate).
### Use the Prevalence tab
The **Prevalence** tab appears only if your search includes a domain.
The **Prevalence** tab displays the prevalence of domains associated with your
search within your enterprise. It combines a list of low-prevalence domains with
an interactive chart. The tab appears only if your UDM search includes a domain.
> [!NOTE]
> **Note:** The **Prevalence** tab is displayed only for UDM search results.
The list of low-prevalence domains includes the following columns:
- **Low prevalence domains** : Displays the domain names associated with your
search results. Click
arrow_upward to sort the
domains alphabetically (Z to A), and
arrow_downward for
alphabetically (A to Z).
- **Prevalence ≤ 10** : Displays the total occurrence count for each domain
with a prevalence of 10 or fewer. Click
arrow_upward to sort the
counts numerically in descending order, and
arrow_downward for ascending
order.
On the chart, hold the pointer over a circle to display the specific domain and
narrow your search to events associated with that domain only.
### Use the Activity heatmap tab
The **Activity heatmap** tab displays event data in a visual timeline grid to
highlight where events are most concentrated over the given time range. The
Y-axis displays the dates within your search timeframe, and the X-axis displays
the time of day in hourly intervals (from 00:00 to 23:00).
> [!NOTE]
> **Note:** The **Activity heatmap** tab is displayed only for UDM search results.
A color gradient legend indicates the volume of events in a specific hour,
where lighter colors indicate fewer events and darker colors indicate a higher
density. You can also adjust the density indicator to view or hide hourly slots
by adjusting the horizontal slider. Click the up or down arrows on the side
panel to scroll through the dates and adjust the specific time window.
### Use the Aggregations panel to refine search results
The **Aggregations** panel summarizes high-frequency values, which you can use to refine your search results.
> [!NOTE]
> **Note:** The **Aggregations** panel is displayed for all types of search results.
The **Aggregations** panel includes two collapsible lists: **UDM Fields** (which is a list of matching UDM fields) and another list of fields that is according to the search type (for example, **Log Fields** for raw-log searches, **Stats Fields** , **Case Fields** , and so on). For UDM searches, the **Aggregations** panel contains the **UDM Fields** list and the [**Grouped Fields** list](https://docs.cloud.google.com/chronicle/docs/investigation/udm-search.md.txt#aggregations-panel-grouped-fields).
To pin a field to the top of the **Aggregations** list, hold the pointer over a field and click the keep **Pin field** icon.
You can search for specific fields or field values using the panel's searchSearch field.
Each field displays the "match count", that is, the number of records that have the same value for that field. The contents of the lists are sorted from highest to lowest match count, and in alphabetical order within the same match count. You can search the lists for fields and expand a field item.
To filter search results with aggregations, do the following:
1. In the **Aggregations** panel, select a field from a list to display the list values for that field.
2. Select a value from the list and click more_vert **More**.
3. Select a filter option:
- **Show only** : The corresponding adjacent table updates to display only matching records, and the `= "value"` filter is displayed next to the filter_list **Add filter** button.
- **Filter out** : The corresponding adjacent table updates with the matching records filtered out, and the `!= "value"` filter is displayed next to the filter_list **Add filter** button.
- **Copy**: Copies the field-value pair to your clipboard.
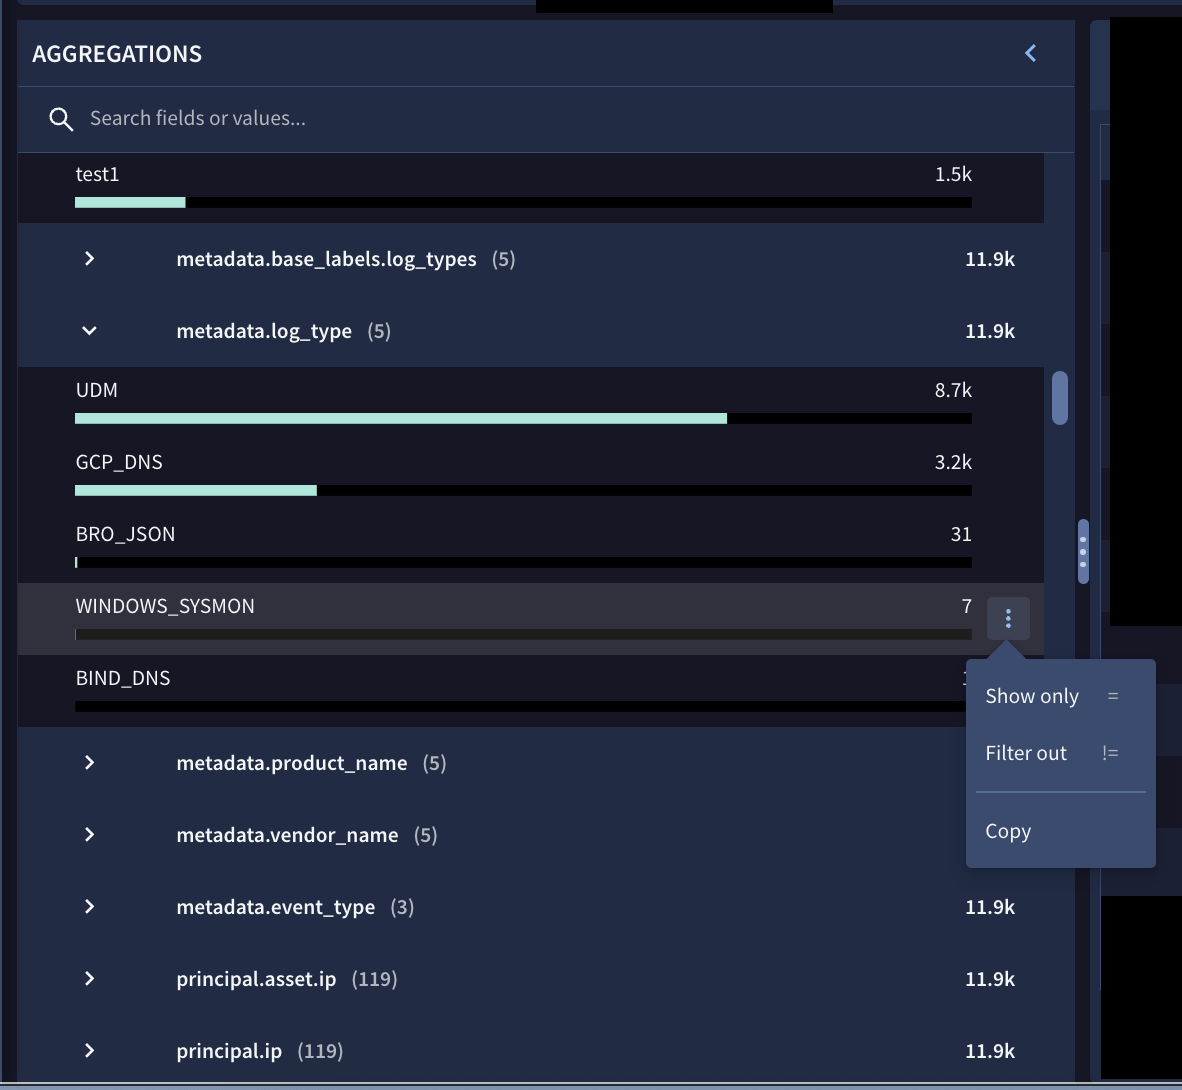
**Figure 4.** Example of filtering fields using the **Aggregations** panel.

**Figure 5.** filter_list **Add filter** button with two existing filters (one shown and one in the **+1 More** list).
4. Optional: If you selected **Show only** or **Filter out** in the previous step and you want to automatically incorporate the filter into the query editor and run the search again, click **Apply to search and run**.
#### Use grouped fields in the Aggregations panel of the Results tab
The **Aggregations** panel for UDM searches includes the **Grouped Fields** list. Grouped fields act as powerful category aliases that combine related UDM fields without requiring you to type each one separately. For more information about grouped fields, see [Search grouped fields](https://docs.cloud.google.com/chronicle/docs/investigation/search-syntax-reference.md.txt#search-grouped-fields).
| Grouped field alias | Associated UDM fields included in alias |
|---|---|
| `domain` | `about.administrative_domain` `about.asset.network_domain` `network.dns.questions.name` `network.dns_domain` `principal.administrative_domain` `principal.asset.network_domain` `target.administrative_domain` `target.asset.hostname` `target.asset.network_domain` `target.hostname` |
| `email` | `intermediary.user.email_addresses` `network.email.from` `network.email.to` `principal.user.email_addresses` `security_result.about.user.email_addresses` `target.user.email_addresses` |
| `file_path` | `principal.file.full_path` `principal.process.file.full_path` `principal.process.parent_process.file.full_path` `target.file.full_path` `target.process.file.full_path` `target.process.parent_process.file.full_path` |
| `hash` | `about.file.md5` `about.file.sha1` `about.file.sha256` `principal.process.file.md5` `principal.process.file.sha1` `principal.process.file.sha256` `security_result.about.file.sha256` `target.file.md5` `target.file.sha1` `target.file.sha256` `target.process.file.md5` `target.process.file.sha1` `target.process.file.sha256` |
| `hostname` | `intermediary.hostname` `observer.hostname` `principal.asset.hostname` `principal.hostname` `src.asset.hostname` `src.hostname` `target.asset.hostname` `target.hostname` |
| `ip` | `intermediary.ip` `observer.ip` `principal.artifact.ip` `principal.asset.ip` `principal.ip` `src.artifact.ip` `src.asset.ip` `src.ip` `target.artifact.ip` `target.asset.ip` `target.ip` |
| `namespace` | `principal.namespace` `src.namespace` `target.namespace` |
| `process_id` | `principal.process.parent_process.pid` `principal.process.parent_process.product_specific_process_id` `principal.process.pid` `principal.process.product_specific_process_id` `target.process.parent_process.pid` `target.process.parent_process.product_specific_process_id` `target.process.pid` `target.process.product_specific_process_id` |
| `user` | `about.user.userid` `observer.user.userid` `principal.user.user_display_name` `principal.user.userid` `principal.user.windows_sid` `src.user.userid` `target.user.user_display_name` `target.user.userid` `target.user.windows_sid` |
### Use the Events panel
Use the **Events** panel to view, sort, and manage the events that match your UDM search.
For information about the supported functions and tools for the **Events** panel, see [Use common tools for tables](https://docs.cloud.google.com/chronicle/docs/investigation/udm-search.md.txt#common-table-functions). Supported functions include managing the columns in the table that the tab displays, downloading search results, and more.
By default, after you run a search, the **Events** table displays key columns (referred to as *quick fields* ), for example, **Event Status** , **Timestamp** , **Type** (`udm.metadata.event_type`), **Summary** , **User** (`udm.principal.user.userid` or `target.user.userid`), **Hostname** (`udm.principal.hostname` or `target.hostname`). Depending on your query scope and log source, the table can also dynamically surface relevant quick fields such as **Action** (`udm.security_result.action`).
> [!NOTE]
> **Note:** For events associated with alerts, the **Event Status** column displays an **Alert** chip---with a count when multiple alerts apply.
#### Inspect granular details of a single event (Event Viewer and raw log correlation)
- To inspect granular details of a single event, click in the row. The **Event Viewer** opens.
For more information, see [Use the Event Viewer for UDM and RAW results](https://docs.cloud.google.com/chronicle/docs/investigation/udm-search.md.txt#event-viewer).
### Pivot tab---build a pivot table
You can use a pivot table to perform multidimensional mathematical grouping and summarization against your search results.
To open and configure a pivot table, do the following:
1. Run a UDM search.
2. On the **Results** tab, click the **Pivot** sub-tab. The **Pivot Settings** panel opens.
3. Under **Group By** , click add **Field** to select up to five UDM fields for row grouping. Special transform options appear based on the field type:
- **String fields** : Option to force lowercase. You can display the results using the **Default** capitalization or using lowercase only by selecting **Lowercase** from the menu.
- **Hostname fields** :
- **Registered domain** : Displays only the registered domain name (such as `google.com`, `nytimes.com`, `youtube.com`).
- **Top N-level domain** : Specify which level of the domain to display. For example, using a value of `1` displays only the top level domain (such as `com`, `gov`, or `edu`). Using a value of `3` displays the next two levels of the domain names (such as `google.co.uk`).
- **IP fields** : Option to group by **CIDR prefix length in bits**. You can specify 1 through 32 for IPv4 addresses. For IPv6 addresses, you can specify values up to 128.
- **Timestamp fields**: Option to group by time resolution (milliseconds, seconds, minutes, hours, days).
4. Under **Values**, specify a value for your pivot from the list of fields in your results. You can specify up to five values.
5. For each field that you specify for **Values** , you must select one of the following **Summarize By** options:
- **Avg** (average)
- **Count**
- **Count distinct**
- **Max**
- **Min**
- **Sum**
- **Stddev** (standard deviation)
The **Summarize** options aren't universally compatible with the **Group by** fields. For example, the **Sum** , **Avg** , **Stddev** , **Min** , and
**Max** options can only be applied to numeric fields. If you attempt to
associate an incompatible **Summarize** option with a **Group By** field,
you receive an error message.
Specify a value of **Event count** to return the number of events identified for this particular search and pivot table.
6. Under **Order by** , specify one or more UDM fields and select one or more sorts by using the **Ascending** or **Descending** option.
7. Click **Apply** when you're ready. The results are displayed in the **Pivot** panel.
8. Optional: To download and save the contents of the pivot table, see [Download search results from a table](https://docs.cloud.google.com/chronicle/docs/investigation/udm-search.md.txt#download-csv).
### Use the Raw Logs panel
Use the **Raw Logs** panel to view, sort, and manage the logs that match your search, which evaluates raw, unparsed log telemetry. The primary diagnostic objective is monitoring ingestion and parsing health---that is, monitoring how many logs were parsed versus how many logs were unparsed versus *unknown* (which means that one or more logs were detected at a certain time but the number is indeterminate).
For information about the supported functions and tools for this tab, see [Use common tools for tables](https://docs.cloud.google.com/chronicle/docs/investigation/udm-search.md.txt#common-table-functions). Supported functions include managing the columns in the table that the tab displays, downloading search results, and more.
#### Inspect granular details of a single raw log (Event Viewer and raw log correlation)
- To inspect granular details of a single raw log, click in the row. The **Event Viewer** opens.
For more information, see [Use the Event Viewer for UDM and RAW results](https://docs.cloud.google.com/chronicle/docs/investigation/udm-search.md.txt#event-viewer).
### Use the Stats panel
Use the **Stats** panel to view, sort, and manage the statistics that match your search.
The **Stats** panel supports only a **Column Selector** where you can add or remove columns.
For information about the supported functions and tools for this tab, see [Use common tools for tables](https://docs.cloud.google.com/chronicle/docs/investigation/udm-search.md.txt#common-table-functions). Supported functions include downloading search results, and more.
### Use the Joins panel
Use the **Joins** panel to view, sort, and manage the items that match your search.
For information about the supported functions and tools for this tab, see [Use common tools for tables](https://docs.cloud.google.com/chronicle/docs/investigation/udm-search.md.txt#common-table-functions). Supported functions include managing the columns in the table that the tab displays, downloading search results, and more.
### Use the Cases panel
Use the **Cases** panel to view, sort, and manage the cases that match your search.
For information about the supported functions and tools for this tab, see [Use common tools for tables](https://docs.cloud.google.com/chronicle/docs/investigation/udm-search.md.txt#common-table-functions). Supported functions include managing the columns in the table that the tab displays, downloading search results, and more.
### Use the Case History panel
Use the **Case History** panel to view, sort, and manage the case histories that match your search.
For information about the supported functions and tools for this tab, see [Use common tools for tables](https://docs.cloud.google.com/chronicle/docs/investigation/udm-search.md.txt#common-table-functions). Supported functions include managing the columns in the table that the tab displays, downloading search results, and more.
### Use the Timed Data and Timeless Data panels
Use the **Timed Data** and **Timeless Data** panels to view, sort, and manage results from ECG searches. The **Timed Data** panel displays results for entities that have a defined time range---that is, they have a value for `metadata.interval.end_time` during ingestion. The **Timeless Data** panel displays results for entities that don't have a defined time range---that is, they have no value for `metadata.interval.end_time`.
> [!IMPORTANT]
> **Important:** The ECG database stores timed and timeless entities separately. When you run an ECG search, Google SecOps creates a union of the timed and timeless data stores and returns the top results from each, up to the configured maximum number of results. The data of the timed entities is sorted according to the most recent timestamp, but the order of the data of the timeless entities can't be known. Therefore, it's possible that the interface displays only timeless entities, or only timed entities, or a different mix of them each time the query is run.
### Use the Event Viewer for UDM and RAW results
- To inspect granular details of a single event or raw log, click in a row of the **Events** table or **Raw Logs** table. The **Event Viewer** opens.
The **Event Viewer** includes the following tabs:
- [**Event Fields**](https://docs.cloud.google.com/chronicle/docs/investigation/udm-search.md.txt#event-fields-tab)
- [**Raw Log**](https://docs.cloud.google.com/chronicle/docs/investigation/udm-search.md.txt#raw-log-tab)
- [**Alerts**](https://docs.cloud.google.com/chronicle/docs/investigation/udm-search.md.txt#alerts-tab): Displayed only for UDM results from the **Events** table
- [**Entities**](https://docs.cloud.google.com/chronicle/docs/investigation/udm-search.md.txt#entities-tab)
- [**Tags**](https://docs.cloud.google.com/chronicle/docs/investigation/udm-search.md.txt#tags-tab): Displayed only for UDM results from the **Events** table
#### Use the Event Fields tab
By default, the **Event Fields** tab displays UDM event fields in a hierarchical tree structure (**Tree view** ), with a checkbox header that shows the number of selected fields (for example, `0 Selected`).
Use the **Event Fields** tab to do the following:
- View a field definition. Hold the pointer over the field name to view its definition.
- Pin a field for quick access. In the field list, select a field, and click keep **Pin** . The field is then displayed in the **Pinned** list. Fields remain in the main field list, and their hierarchy in the **Pinned** list is shown in dot-delimited notation with the `udm` prefix (for example, `udm.metadata.event_type`).
- Add to columns or copy multiple fields. Select the checkbox next to a node or field, then choose **Add To Columns** or **Copy**.
- Perform the following actions:
- **Filters** : Apply the following filters to items in the field list:
- **Fields**
- **Show unenriched fields**
- **Show enriched fields**
- **Show additional fields**
- **Show extracted fields**
- **Enrichment Log Sources**: The available options depend on the event.
- **Copy**: To copy the selected UDM fields and UDM values to the system clipboard.
- **Add To Columns**: Add the UDM field as a column.
Each UDM field is labeled with an icon indicating whether the field contains enriched or unenriched data. The icon labels are the following:
- **U**: Unenriched fields contain values populated during the normalization process using data from the original raw log.
- **E** : Enriched fields contain values that Google SecOps populates to provide additional context about artifacts in a customer environment. For more information, see [Enrich event and entity data with Google SecOps](https://docs.cloud.google.com/chronicle/docs/event-processing/data-enrichment.md.txt).
The display of each enriched field can show all associated sources. This information is useful for validation and troubleshooting, and may be required for auditing and compliance purposes. You can also filter fields according to their enrichment source.

**Figure 6.** Enriched and unenriched UDM fields in the **Event Fields** tab of the **Event Viewer**, showing sources of enriched fields.

**Figure 7.** Use the filter in the **Event Fields** tab to show or hide fields according to various attributes.
#### Use the Raw Log tab
The **Raw Log** tab displays the original raw log in any of the following formats:
- Raw
- JSON
- XML
- CSV
- Hex/ASCII
#### Use the Alerts tab
The **Alerts** tab displays the alerts associated with the event.
The **Alerts** tab is displayed only for UDM results from the **Events** table.
#### Use the Entities tab
The **Entities** tab displays the entities associated with the event.
Click an entity to display the **Entity context** panel, which can include the
following items:
- Asset name
- First time seen
- Last time seen
- IP addresses
- MAC addresses
- Number of alerts
- Highest alert count by rule
- Alerts-over-time bar graph
- **Open Alerts \& IOCs** link
- **View in Alerts Tab** link
#### Use the Tags tab
The **Tags** tab displays the investigation tags and comments associated with
the event, and lets you add or edit tags and comments.
The **Tags** tab is displayed only for UDM results from the **Events** table.
## View and manage information in the Alerts \& Detections tab
> [!NOTE]
> **Note:** The **Alerts \& Detections** tab is displayed only when you run a search in **Advanced Mode** . In **Basic Mode** , Google SecOps bypasses detection correlation and hides this tab. For more information, see [Understand the search-execution modes](https://docs.cloud.google.com/chronicle/docs/investigation/udm-search.md.txt#search-execution-modes).
Use the **Alerts \& Detections** tab for:
- Threat hunting across all rule executions
- Comparing actionable alerting triggers against low-noise behavioral precursors
- Scoping incident boundaries in one consolidated view
The **Alerts \& Detections** tab surfaces both alerts and detections that match your active search criteria. By combining both alerts and detections in one tab, you can inspect high-severity alerts right alongside underlying behavioral rule hits to uncover low-noise precursors that didn't cross the alerting threshold independently.
*Alerts* are UDM events and third-party connector telemetry tagged with alerting thresholds or high-severity notifications. The **Alerts** count displays UDM log telemetry that triggered an alerting rule (`alert_state` = `"ALERTING"`), along with high-priority notifications ingested from third-party security connectors (such as CrowdStrike or SOAR webhooks).
*Detections* are all alerting (`ALERTING`) and non-alerting (`NOT_ALERTING`) rule execution outputs generated by YARA-L 2.0 rules across your environment. The tab surfaces the comprehensive rule execution outputs generated by your YARA-L 2.0 detection engine across both alerting and non-alerting rule hits. Every rule-generated alert is also a detection (`ALERTING`), but the **Detections** count also includes all informational, background, or non-alerting rule hits (`NOT_ALERTING`).
The count in the tab header categorizes rule execution matches by alert status. For example, if the tab header is **Alerts (43) \& Detections (0)** , this means there are 43 matches where `alerting_rule = true` and zero non-alerting (`NOT_ALERTING`) rule executions.
The **Alerts \& Detections** tab includes the following panels:
- [**Trend over time** chart](https://docs.cloud.google.com/chronicle/docs/investigation/udm-search.md.txt#trend-over-time-chart-in-alerts-and-detections-tab)
- [**Aggregations** panel](https://docs.cloud.google.com/chronicle/docs/investigation/udm-search.md.txt#aggregations-panel-in-alerts-and-detections-tab)
- [**Detections** panel](https://docs.cloud.google.com/chronicle/docs/investigation/udm-search.md.txt#detections-panel)
> [!TIP]
> **Tip:** Click **View Options** to hide or unhide the chart and the **Aggregations** panel.
### Use the Trend over time chart
The **Trend over time** chart in the **Alerts \& Detections** tab includes a histogram of detection volume over time. The width of each vertical bar dynamically scales based on your overall search window (for example, each bar might represent 10 minutes for a 24-hour search window).
The chart groups all rule execution matches across time under a single aggregated series labeled **Detections**.
> [!NOTE]
> **Note:** The tab header displays the count values and divides findings by alert state (for example, **Alerts (43) \& Detections (0)** ), whereas the **Trend over time** chart aggregates all detection occurrences as **Detections** bars.
The chart supports the following:
- **Time range adjustment**: Drag the slider controls on the timeline to narrow the visible time window instantly. The results grid and aggregations update without rerunning the query against the backend.
- **View the aggregations and detections for a single bar's time-window** : Click a bar to narrow the focus of the chart, the **Aggregations** panel, and the **Detections** table to the time-window of that bar. This action creates a filter, which is displayed next to the filter_list **Add filter** button. Delete the filter to display all the results again.
- **Details popup** : Clicking one of the bars opens a dialog with the time, and the values for **Queried Detections** and **Filtered Detections**.
### Use the Aggregations panel to refine detections
The contents of the **Aggregations** panel in the **Alerts \& Detections** tab summarize high-frequency detection-result values, which you can use to refine your search results.
The **Aggregations** panel includes three collapsible lists: **Detection
Fields** , **UDM Fields** (which is a list of matching UDM fields), and **Entity
Fields**.
Each field displays the "match count", that is, the number of alert-detections that have the same value for that field. The contents of the lists are sorted from highest to lowest match count, and in alphabetical order within the same match count. You can search the lists for fields and expand a field item.
You can pin a field to the top of the **Aggregations** list by holding the pointer over a field and clicking the keep **Pin field** icon.
#### Search alert-detection results in the Aggregations panel
You can search for specific fields or field values using the **Aggregations** panel's searchSearch field. This can help you focus on the alerts that are most important to you.
The following are key alert attributes for filtering alerts in the **Aggregations** panel:
- Case
- Name
- Priority
- Severity
- Status
- Verdict
#### Filter alert-detection results in the Aggregations panel
To filter alert-detection results with aggregations, do the following:
1. In the **Aggregations** panel, select a field from a list to display a list of values for that field.
2. Select a value from that list and click more_vert **More**.
3. Select a filter option:
- **Show only** : The **Detections** table updates to display only matching alerts, and the `= "value"` filter is displayed next to the filter_list **Add filter** button.
- **Filter out** : The **Detections** table updates with the matching alerts filtered out, and the `!= "value"` filter is displayed next to the filter_list **Add filter** button.
- **Greater than** (for integer fields only): The **Detections** table updates to display alerts with a value greater than this one, and the `> "value"` filter is displayed next to the filter_list **Add filter** button.
- **Greater than or equal to** (for integer fields only): The **Detections** table updates to display alerts with a value greater than or equal to this one, and the `>= "value"` filter is displayed next to the filter_list **Add filter** button.
- **Less than** (for integer fields only): The **Detections** table updates to display alerts with a value less than this one, and the `< "value"` filter is displayed next to the filter_list **Add filter** button.
- **Less than or equal to** (for integer fields only): The **Detections** table updates to display alerts with a value less than or equal to this one, and the `<= "value"` filter is displayed next to the filter_list **Add filter** button.
- **Copy**: Copies the field-value pair to your clipboard.
- To delete a filter and update the alert-detection results, delete the filter that is displayed next to the filter_list **Add filter** button.
### Use the Detections panel
Use the **Detections** panel to view, sort, and manage the items that match your search.
For information about the supported functions and tools for this tab, see [Use common tools for tables](https://docs.cloud.google.com/chronicle/docs/investigation/udm-search.md.txt#common-table-functions). Supported functions include managing the columns in the table that the tab displays, downloading search results, and more.
#### Inspect granular details of a single alert (Alert Viewer)
- To inspect granular details of a single alert, click in a row of the **Detections** table. The **Alert Viewer** opens.
The **Alert Viewer** includes the following tabs:
- [**Detection Fields**](https://docs.cloud.google.com/chronicle/docs/investigation/udm-search.md.txt#alert-viewer-detection-fields-tab)
- [**Details**](https://docs.cloud.google.com/chronicle/docs/investigation/udm-search.md.txt#alert-viewer-details-tab)
- [**Variables**](https://docs.cloud.google.com/chronicle/docs/investigation/udm-search.md.txt#alert-viewer-variables-tab)
- [**Entities**](https://docs.cloud.google.com/chronicle/docs/investigation/udm-search.md.txt#alert-viewer-entities-tab)
- To go to another page in the Google SecOps console with details of the alert, click **View details**.
##### Use the Detection Fields tab
By default, the **Detection Fields** tab displays detection fields in a hierarchical tree structure (**Tree view** ), with a checkbox header that shows the number of selected fields (for example, `0 Selected`).
Use the **Detection Fields** tab to do the following:
- View a field definition. Hold the pointer over the field name to view its definition.
- Pin a field for quick access. In the field list, select a field, and click keep **Pin** . The field is then displayed in the **Pinned** list. Fields remain in the main field list, and their hierarchy in the **Pinned** list is shown in dot-delimited notation with the `collection` prefix (for example, `collection.created_time`).
- Add to columns or copy multiple fields. Select the checkbox next to a node or field, then choose **Add To Columns** or **Copy**.
- Perform the following actions:
- Apply filters to the field list.
- **Add To Columns**: Add the field as a column.
- **Copy**: To copy the selected fields and values to the system clipboard.
##### Use the Details tab
The **Details** tab displays the details of the alert. The set of detail fields vary according to the specific alert.
Example detail fields:
- Name (always Alert)
- Type
- Severity
- Risk Score
- Status
- Priority
- Detected
- Detection window
- Created
- Rule
- Rule Set
- Description
- Tags
##### Use the Variables tab
The **Variables** tab displays the field, type, and value of each variable associated with the alert.
##### Use the Entities tab
The **Entities** tab is displayed only when there's an entity associated with the alert.
The **Entities** tab displays the entities associated with the alert.
Click an entity to display the **Entity context** panel, which can include the
following items:
- Asset name
- First time seen
- Last time seen
- IP addresses
- MAC addresses
- Number of alerts
- Highest alert count by rule
- Alerts-over-time bar graph
- **Open Alerts \& IOCs** link
- **View in Alerts Tab** link
## View and manage information in the Overview tab
> [!NOTE]
> **Note:** The **Overview** tab is displayed only when you run a search in **Advanced Mode** . In **Basic Mode** , Google SecOps bypasses Entity Context Graph (ECG) resolution and hides this tab. For more information, see [Understand the search-execution modes](https://docs.cloud.google.com/chronicle/docs/investigation/udm-search.md.txt#search-execution-modes).
Use the **Overview** tab to do the following:
- Check entity history (first seen, last seen, and MAC addresses)
- Verify if observed indicators overlap with active security operation cases or alerts
The **Overview** tab displays the consolidated Entity Context Graph (ECG), asset
or user details, and investigation overview for indicators of compromise (IOCs)
or entities matching your active search window. The information presented varies
depending on the information type.
The **Overview** tab displays entity information in one of the following
predefined information types:
- [Asset details](https://docs.cloud.google.com/chronicle/docs/investigation/udm-search-investigate-entity.md.txt#asset-details): IP and MAC addresses, first and last seen timestamps, alerts, **Relevant
IOCs** , and **Associated Entities** for an asset.
- [Domain details](https://docs.cloud.google.com/chronicle/docs/investigation/udm-search-investigate-entity.md.txt#domain-details): WHOIS and VirusTotal context, alerts, **Resolved IPs** , **Sub-domains and
sibling domains** , **Prevalence of Assets** , and **Associated Entities** for a domain.
- [File details](https://docs.cloud.google.com/chronicle/docs/investigation/udm-search-investigate-entity.md.txt#file-details): File hashes and size, **VirusTotal Properties \& Metadata** , alerts, **Relevant IOCs** , **Prevalence of Assets** , and **Associated Entities** for a file.
- [IP details](https://docs.cloud.google.com/chronicle/docs/investigation/udm-search-investigate-entity.md.txt#ip-details): First and last seen timestamps, VirusTotal context, alerts, **Relevant
IOCs** , **Prevalence of Assets** , and **Associated Entities** for an external IP address.
- [User details](https://docs.cloud.google.com/chronicle/docs/investigation/udm-search-investigate-entity.md.txt#user-details): User identity details (full name, title, email address), first and last seen timestamps, alerts, and **Associated Entities** for a user.
For complete details about the panels displayed for each entity type and example
UDM search queries, see [Investigate an entity using SIEM
Search](https://docs.cloud.google.com/chronicle/docs/investigation/udm-search-investigate-entity).
## View and manage information in the Visualize tab
Use the **Visualize** tab to turn the data from your STATS search results into a chart, graph, or table.
## Use common tools for tables
On the **SIEM Search** page, most panels that contain a single table support the same common functions and tools.
This section describes the following common functions and tools:
- Search box. Use the search box to find matching results in the adjacent table.
- [Manage table columns and share column sets (Column Manager)](https://docs.cloud.google.com/chronicle/docs/investigation/udm-search.md.txt#column-manager).
- **Wrap Text** - **Unwrap Text** button. It's useful to wrap text to see entire long strings in a column.
- [Download search results from a table](https://docs.cloud.google.com/chronicle/docs/investigation/udm-search.md.txt#download-csv).
- **Rows per page** tool at the bottom of the table. You can use this tool to improve browser stability and performance when loading a large number of result records (*rows* ), Google SecOps provides paginated search results. Use the **Rows per page** list, on the **Events** table, to select the number of rows to display per page (10 to 1,000 events).
### Manage table columns and share column sets (Column Manager)
To use a consistent view when analyzing event data, you can create, save, and share custom column sets for the following tables on the **SIEM Search** page:
- In the **Results** tab, for the following tables: **Events** , **Raw Logs** , **Joins**
- In the **Alerts \& Detections** tab, for the **Detections** table.
To use this functionality, your user account or Identity and Access Management role must have all five of the following permissions:
- `chronicle.googleapis.com/savedColumnSets.create`
- `chronicle.googleapis.com/savedColumnSets.update`
- `chronicle.googleapis.com/savedColumnSets.delete`
- `chronicle.googleapis.com/savedColumnSets.list`
- `chronicle.googleapis.com/savedColumnSets.get`
> [!NOTE]
> **Note:** The [**Stats** tab](https://docs.cloud.google.com/chronicle/docs/investigation/udm-search.md.txt#stats-tab) supports only a **Column Selector** where you can only add or remove columns. The **Stats** tab doesn't support the **Column Manager** functionality.
#### Create a column set
The steps to create a column set differ slightly depending on which table you are working with.
To create a column set for the **Events** , **Raw Logs** , or **Joins** table, do the following:
1. Click **Columns** to open the **Column Manager**.
2. Click the filter_alt **Filter** icon to specify whether to show non-applicable columns.
3. Click the **Show Selected** toggle to display only the selected columns in the **Events Columns** tab.
4. On the **Events Columns** tab, add or remove columns for your column set. You can browse or search fields across collapsible sections (which vary depending on the type of the search result)---for example, **Quick Fields** (the most-common fields per data type), **Grouped Fields** , **All Event Fields** , and **All Entity Fields**. Toggle checkboxes to show or hide columns.
5. Arrange the columns, and then click **Save** . The **Save Column Set** dialog opens.
6. Select one of the following options:
- **Save**: Enter a new name for your column set.
- **Replace**: If you have modified a previously saved set, you can overwrite the existing set with your changes.
7. Click **Save** . The column set is listed in the **Column Sets** tab.
To create a column set for the **Detections** table, do the following:
1. Click **Columns** to open the **Column Manager**.
2. Click the filter_alt **Filter** icon to specify whether to show non-applicable columns.
3. From the **Table Type** list, select the table type for which you want to create a column set:
- **Detections**
- **Events**
- **Entities** (View columns by expanding table rows.)
Making changes to a specific table type will only apply to tables and subtables of that type.
4. Click the **Show Selected** toggle to display only the selected columns in the corresponding tab (**Detections Columns** , **Events Columns** , or **Entities Columns**).
5. On the corresponding tab, add or remove columns for your column set. You can browse or search fields across collapsible sections (which vary depending on the type of the search result). Toggle checkboxes to show or hide columns.
6. Arrange the columns, and then click **Save** . The **Save Column Set** dialog opens.
7. Select one of the following options:
- **Save**: Enter a new name for your column set.
- **Replace**: If you have modified a previously saved set, you can overwrite the existing set with your changes.
8. Click **Save** . The column set is listed in the **Column Sets** tab.
#### Share a column set
To share a column set with all other users in your Google SecOps tenant:
1. Click **Columns** to open the **Column Manager**.
2. On the **Events Columns** tab, add or remove columns for your column set. You can browse or search fields across collapsible sections (which vary depending on the type of the search result)---for example, **Quick Fields** (the most-common fields per data type), **Grouped Fields** , **All Event Fields** , and **All Entity Fields**. Toggle checkboxes to show or hide columns.
3. Arrange the columns, and then click **Share** . The **Share Column Set** dialog opens.
4. Select one of the following options:
- **Share New**: Enter a new name for the column set to be shared.
- **Share Existing**: Select a previously saved set from the list.
5. Click **Share** . The column set is listed in the **Column Sets** tab with a **SHARED** badge.
#### Load a saved column set
To load a saved set of columns, do the following:
1. Click **Columns** to open the **Column Manager**.
2. Select the **Column Sets** tab.
3. Select the column set to load and click **Apply**.
#### Delete a saved column set
To delete a saved set of columns, do the following:
1. Click **Columns** to open the **Column Manager**.
2. Select the **Column Sets** tab.
3. Select the column set, click **More** \> **Delete**.
### Download search results from a table
You can download and save a CSV file that contains the contents of a table displayed in the **SIEM Search** page. For the **Events** table or a pivot table, there's also an option to bundle the original raw logs, which gives you precise correlation between parsed UDM records and their source telemetry. This feature is designed for teams that require external analysis processing, audit trails for compliance where you must preserve the relationship between normalized data and original ingestion, or external correlation.
To download search results (up to the [specified maximum number of search results](https://docs.cloud.google.com/chronicle/docs/investigation/udm-search.md.txt#max-search-results)) from the **Events** table:
1. Optional: Use the [**Column Manager**](https://docs.cloud.google.com/chronicle/docs/investigation/udm-search.md.txt#column-manager) to specify which UDM fields to include in the CSV. The **Raw Log** column is appended based on your selection.
2. Click **Download** at the top of the table and select one of the following:
- **Download as CSV**: Downloads the matching events (and according to the displayed exact number of specified events).
- **Download as CSV (with raw logs)**: Downloads the matching events and appends original unparsed log strings as a dedicated column next to each normalized UDM record (and according to the displayed exact number of specified events).
3. Save the file.
To download search results (up to the [specified maximum number of search results](https://docs.cloud.google.com/chronicle/docs/investigation/udm-search.md.txt#max-search-results)) from tables on the **Results** tab, other than the **Events** panel or **Pivot** panel:
1. Click **Download** at the top of the table and select **Download as CSV**. This downloads the matching results (and according to the displayed exact number of specified events).
2. Save the file.
To download search results (up to the [specified maximum number of search results](https://docs.cloud.google.com/chronicle/docs/investigation/udm-search.md.txt#max-search-results)) from the **Detections** table:
1. Click **More** (or **Download** ) at the top of the table and select **Download as CSV**. This downloads the matching results (and according to the displayed exact number of specified events).
2. Save the file.
#### Supported fields when saving a CSV
You can download the following fields to a CSV file from the platform:
- `user`
- `hostname`
- `process name`
- `timestamp`
- `raw log`: Valid only when raw logs are enabled for the customer
- All fields starting with `udm.additional`
#### Valid field types when saving a CSV
You can download the following field types to a CSV file:
- `double`
- `float`
- `int32`
- `uint32`
- `int64`
- `uint64`
- `bool`
- `string`
- `enum`
- `bytes`
- `google.protobuf.Timestamp`
- `google.protobuf.Duration`
#### Unsupported fields when saving a CSV
Fields meeting any of the following criteria can't be downloaded to CSV:
- **Field type**: Data types defined as a Message or Group in the UDM proto.
- **Field depth**: Fields nested more than 10 levels deep.
- **Specific UI fields**: The following fields shown in the UI aren't supported for direct download:
- **Event Fields**:
- Event Status
- Event Summary
- Event Type
> [!NOTE]
> **Note:** To download Event Type, select the `metadata.event_type` field in the **Column Manager**.
- **Entity Context Graph**:
- First Seen
- Last Seen
- Timestamp
- **Federated Search**:
- Instance Code
## Limits and quotas
Google SecOps enforces limits on search queries to ensure platform stability and consistent performance across programmatic and web interfaces. These limits apply to both Backstory and Chronicle APIs.
### Search and API quotas
The following limits apply to the number of search queries and simultaneous operations per tenant:
- **Queries per hour** (QPH): Web console interface limit of 1,000 QPH; programmatic API access limit of 2,000 QPH.
- **Simple queries** (spanning \< 24 hours, single source, no stats): Maximum concurrency limit of 180 simultaneous queries per tenant.
If your simple-query concurrency pool exhausts, your operations will automatically overflow into your available complex-query quota.
- **Complex queries** (spanning \> 24 hours, multi-source, or including stats): Maximum concurrency limit of 180 simultaneous queries per tenant.
- **UDM field prompt limit**: A single query is limited to referencing a maximum of 100 UDM fields inside the prompt.
#### Quota errors
When a limit is reached, the web interface displays a persistent quota error notification. For programmatic access, API calls (such as `instances.udmSearch`) return an HTTP status `429 RESOURCE_EXHAUSTED` error containing a `google.rpc.QuotaFailure` message that details the specific limit you exceeded.
### Result-set and display limits
Use [**Settings**](https://docs.cloud.google.com/chronicle/docs/investigation/udm-search.md.txt#max-search-results) \> **Maximum Results** \> **Max Results to Return** to adjust the backend limit (1 to 1,000,000, default 30,000).
To ensure consistent platform stability and fast response times across web and API interfaces, Google SecOps enforces the following limits:
| Search type or data source | Maximum number of returned results | Web console display behavior |
|---|---|---|
| UDM event search | 1,000,000 records | Surfaced directly in the **Events** panel inside the **Results** tab. Displays the latest records across paginated rows (10 to 1,000 per page). |
| Data Tables and Joins | 1,000,000 records | Correlated rows surface in the **Events** panel inside the **Results** tab based on the **Column Manager** configuration. |
| Cases and Case History | 1,000,000 records | Surfaced directly in the **Cases** and **Case History** panels inside the **Results** tab. Surfaced in the **Overview** context or using search cases queries. |
| Stats | 100,000 records (UI and long-running operation API only) | Surfaced directly in the **Stats** panel inside the **Results** tab. Charts render top values for readability; displays warning notice when exceeding visual limits. |
| Pivot aggregations (**Results** \> **Pivot**) | 100,000 records | Charts render top values for readability; displays warning notice when exceeding visual limits. |
| Rule detections | 100,000 records | Surfaced directly in the combined **Alerts \& Detections** tab. |
| Entity Context Graph (ECG) | 1,000,000 records | Surfaced in the **Timed Data** and **Timeless Data** panels inside the **Results** tab. The table in the **Timed Data** panel displays entities that have a defined time range. The table in the **Timeless Data** panel displays entities that don't have a defined time range. It's possible that the interface displays only timeless entities, or only timed entities, or a different mix of them each time the query is run. For more information, see [Use the Timed Data and Timeless Data panels](https://docs.cloud.google.com/chronicle/docs/investigation/udm-search.md.txt#timed-and-timeless-data). |
## Understand the search-execution modes
This section describes the two search-execution modes in detail.
### Differences between Basic Mode and Advanced Mode
The following table shows the differences between **Basic Mode** and **Advanced Mode** on the **SIEM Search** page:
| Capability or dimension | Basic Mode | Advanced Mode |
|---|---|---|
| Visible results tabs | **Results** only | **Results** , **Alerts \& Detections** , **Overview** , and **Visualize** |
| Timeline charts | Hidden (bypasses bucket aggregation) | Displayed (**Activity Over Time** and **Trend Over Time** charts, **Prevalence** tab, and **Activity heatmap** table---that is, with event count, alert count, joins, and ECG charts) |
| Prevalence scoring | Bypassed | Enabled (calculates enterprise prevalence) |
| Correlated detections | Bypassed | Enabled (correlates triggered YARA-L 2.0 detections) |
| Entity Context Graph (ECG) | Bypassed | Enabled |
| Relative latency profile | Minimal wait time for interactive feedback | Standard wait time to compute full enrichment |
### Understand the backend differences between Basic Mode and Advanced Mode
**Basic Mode** accelerates interactive threat investigations, hypothesis validation, and ad hoc log analysis by dedicating compute resources exclusively to raw event retrieval and field aggregation. **Basic Mode** uses a streamlined, fast-path execution pipeline that bypasses secondary enrichment steps during search execution. This approach reduces end-to-end search wait times while preserving full data fidelity and query syntax parity.
In **Advanced Mode**, Google SecOps computes auxiliary analytics alongside core event retrieval, including timeline bucket aggregations, cross-enterprise indicator prevalence scoring, YARA-L 2.0 detection and alert correlations, and Entity Context Graph (ECG) resolution. Although these enrichments are useful for broad situational awareness, these secondary enrichment pipelines add processing and rendering latency when you search high-volume telemetry.
### Backend and UI optimizations in Basic Mode
When you run a query in **Basic Mode**, Google SecOps optimizes both the backend search execution and the frontend rendering as follows:
- **Fast-path backend execution** :
- **Bypasses prevalence calculations** : Searches in **Advanced Mode** evaluate historical prevalence for indicators (such as domains, IP addresses, and file hashes) across your enterprise. **Basic Mode** skips this auxiliary calculation, reducing processing time by up to 20 seconds on high-volume event streams.
- **Suppresses detection enrichment**: The backend sets detection correlation limits to zero, eliminating secondary lookups against the rules engine during event retrieval.
- **Prunes timeline aggregation**: Google SecOps skips granular bucketed histogram calculations, bypassing timeline aggregation tasks and streaming matching events directly to the client.
- **Streamlined interface** :
- **Focused tab presentation** : The results interface displays only the **Results** tab and hides the **Alerts \& Detections** , **Overview** , and **Visualize** tabs to eliminate tab-switching latency.
- **Hidden chart widgets** : Collapsible timeline charts and visual panels (the **Activity Over Time** and **Trend Over Time** charts, the **Prevalence** tab, and the **Activity heatmap** table) are automatically hidden to maximize vertical screen space for the **Events** panel and **Event Viewer**.
- **Field aggregation parity** : The **Aggregations** panel remains active and interactive, so you can inspect value-distribution counts, apply **Show only** or **Filter out** filters, and narrow result subsets without leaving **Basic Mode**.
### UI and workflow details for the search-execution modes
The following list describes how the search-execution modes are exposed in the UI and the workflow:
- **Persistent browser preference** : Google SecOps saves the selected search-execution mode in your browser's local storage (`searchMode`) across browser refreshes, tabs, and sessions. For example, if you select **Basic Mode** , subsequent searches continue to run in **Basic Mode** until you switch modes.
- **Shareable URL state** : The active search-execution mode is reflected in the page URL query parameter (`&searchMode=SEARCH_MODE`, where `SEARCH_MODE` is `FAST` for **Basic Mode** or `ADVANCED` for **Advanced Mode**). When you share an investigation URL with team members, the search-execution mode specified in the shared URL takes precedence over the search-execution mode that is selected in the browser of the target user.
- **Search history tracking** : Each executed query in the [**History**](https://docs.cloud.google.com/chronicle/docs/investigation/udm-search.md.txt#history) dialog records its search-execution mode. Selecting and rerunning a query from **History** automatically restores the search-execution mode that was used when the query was run.
## Optimize and refine your search results
This section outlines performance limitations and expectations, and provides self-service fixes for common issues with the **SIEM Search** page in Google Security Operations.
> [!TIP]
> **Tip:** To accelerate interactive event retrieval and query iteration when you don't need timeline charts, prevalence scoring, or detection correlations, select **Basic Mode** in the query editor. For more information, see [Understand the search-execution modes](https://docs.cloud.google.com/chronicle/docs/investigation/udm-search.md.txt#search-execution-modes).
### Performance optimization and best practices
To optimize query speed and minimize timeout risks:
- **Narrow your time window first**: Time is the most effective filter. Querying the exact 2-hour window of an incident runs exponentially faster than searching a 30-day window.
- **Query exact UDM fields instead of grouped aliases** : Although grouped fields (`ip = "1.2.3.4"`) are convenient, they force the engine to check 15+ underlying fields (`principal.ip`, `target.ip`, `observer.ip`). If you know an IP address belongs to the destination server, query `target.ip = "1.2.3.4"` directly.
- **Avoid leading wildcards in regular expressions** : Queries starting with a wildcard (`principal.hostname = /.*server-.*/`) prevent index lookups and force full table scans. Anchor your regular expression whenever possible (`principal.hostname = /^prod-server-.*/`).
- **Leverage indexed metadata** : Filter by `metadata.event_type` (`NETWORK_CONNECTION`, `PROCESS_LAUNCH`, `USER_LOGIN`) or `metadata.log_type` early in your `AND` chain to prune irrelevant log sources instantly.
- **Use `limit: N` for rapid data sampling and quick previews** : You can add the `limit: N` keyword directly to your query (for example, `metadata.event_type = "USER_LOGIN" limit: 50`) for rapid data sampling and quick previews.
- **Use `select` and `unselect` to reduce payload size** : Project only the leaf fields you need or exclude large unnecessary fields to improve query latency. For details, see [Control query output with `select` and `unselect`](https://docs.cloud.google.com/chronicle/docs/investigation/udm-search.md.txt#select-unselect).
### Best practices for broad searches
If your search is too broad, Google SecOps displays a warning message indicating that not all search results can be shown. In such cases, the system retrieves only the latest results, up to the search limit of one million events and 1,000 alerts. However, there may be many more matching events and alerts that aren't displayed.
To capture all relevant results, refine your search by applying additional filters, for example:
- Narrow the time range to reduce the dataset size.
- Use specific search queries or filters instead of broad terms.
- Query precise UDM fields instead of grouped fields when you need results for a single field.
### Debug and refine queries
This section describes how to debug and refine queries.
#### View runtime errors
If your query returns an error, the specific runtime error message appears
persistently in the **Results** panel. This persistent display ensures the error
context remains visible, helping you troubleshoot and resolve the error.
#### Limit your search results
You can limit search results by adding the `limit` keyword with the maximum
number of search results you want to display. This is useful for generating
quick previews of data, performance optimization, or when you only need a subset
of the results. For example, if you add `limit: 25` to your search, it limits the results to a maximum of 25.
> [!NOTE]
> **Note:** You can also add the `limit` keyword to custom dashboards.
#### Investigate large datasets
Google SecOps supports returning and navigating up to 1 million results.
This lets you investigate large datasets directly in the web interface without
exporting results. For large searches, the visible fields are limited by default.
> [!NOTE]
> **Note:** After results load, you can apply filters to refine the data without rerunning the search. This helps you narrow the result sets quickly.
#### Result limits for data sources
The following table lists the maximum number of results returned for each data source:
| Search type or Data source | Maximum number of events or rows in search results |
|---|---|
| UDM | 1,000,000 |
| ECG | 1,000,000 |
| Data table | 1,000,000 |
| UDM to UDM join | 1,000,000 |
| UDM to ECG join | 1,000,000 |
| UDM to Data table join | 1,000,000 |
| Cases and case history | 1,000,000 |
| Stats | 100,000 |
| Detections | 100,000 |
> [!NOTE]
> **Note:** The limits are the same whether you're using the platform or the API. See [Asynchronous Search APIs](https://docs.cloud.google.com/chronicle/docs/investigation/search-lro-api.md.txt) for information about the API limits.
#### Add a filter to refine your query
To add a filter to refine your query, do the following:
1. On the **SIEM Search** page, click filter_list**Add filter** . A dialog opens that lets you select a field, and show (`=`) or filter-out (`!=`) field values.
2. Configure the dialog parameters.
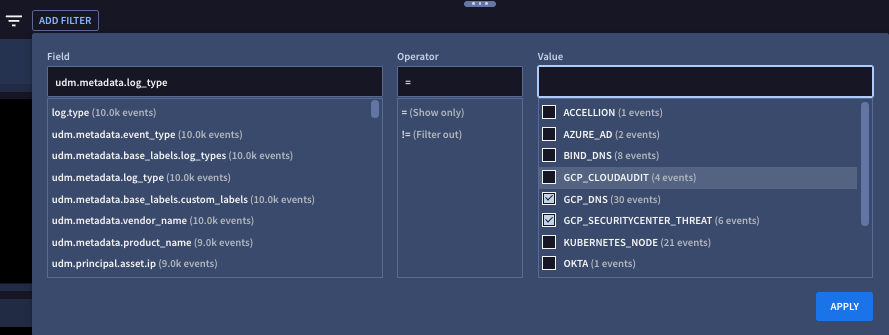
**Figure 8.** Example of the filter dialog.
3. Click **Apply** . The filter is displayed next to the filter_list **Add filter** button and any search results are filtered accordingly.
4. Optional: Do one of the following:
- If you want to automatically incorporate the filter into the query editor and run the search, click **Apply to search and run**.
- If you want to delete the filter, click **Clear**.
> [!NOTE]
> **Note:** The **Clear** button is only available before you click **Apply to search and run**.
## Troubleshooting
If you receive a generic error message, such as `Error: Search has encountered an error and could not load data`, take the following steps to resolve the issue:
- Connect to Google SecOps from a different network. For example, use a cloud VM to help identify any network issues.
- Make sure Chronicle API calls are allowed by your organization's firewall or proxy configuration or policy.
- Verify that no data limit is configured for Search API calls, as searches can return large datasets.
- Check for any configured timeouts. Search queries can run asynchronously and can require more time to return data. If timeouts are set, ensure they allow a sufficient duration, such as 60 minutes, before the query times out.
If the error persists, contact [Customer Support](https://console.cloud.google.com/support).
## What's next
For more information about search queries, see the following:
- [Understand search
syntax](https://docs.cloud.google.com/chronicle/docs/investigation/search-syntax-reference) contains details and examples on the YL2 syntax needed to construct and query data values, escapes, and operators in the query editor.
- [Search best
practices](https://docs.cloud.google.com/chronicle/docs/investigation/udm-search-best-practices).
- [Search cases and case history in unified
search](https://docs.cloud.google.com/chronicle/docs/investigation/search-and-search-case-history).
- [Generate UDM Search queries with
Gemini](https://docs.cloud.google.com/chronicle/docs/investigation/generate-udm-search-queries-gemini).
- [Use context-enriched data in
search](https://docs.cloud.google.com/chronicle/docs/investigation/use-enriched-data-in-search).
For more information about search results, see the following:
- [Investigate an entity using SIEM
Search](https://docs.cloud.google.com/chronicle/docs/investigation/udm-search-investigate-entity).
- [Investigate detections in
Search](https://docs.cloud.google.com/chronicle/docs/investigation/investigate-detections-in-search) describes how to use the **Alerts \& Detections** tab on the **SIEM Search** page.
- [Understand data availability for
search](https://docs.cloud.google.com/chronicle/docs/investigation/expected-data-availability-for-search) details the data ingestion lifecycle, including end-to-end data flow and latency, and how these factors impact the availability of recently ingested data for querying and analysis.
- [UDM search compared with rule
results](https://docs.cloud.google.com/chronicle/docs/investigation/udm-search-vs-rules-results) describes how to compare UDM search query results with live detection rules.
**Need more help?** [Get answers from Community members and Google SecOps professionals.](https://security.googlecloudcommunity.com/)