You can use an *external backend* when the content is hosted either on-premises
or in another cloud. The external backend lets you serve the content from Google's
Cloud CDN.
This document walks through the process of setting up third-party object
storage---such as Amazon Simple Storage Service (Amazon S3) or Azure Blob Storage---as an external
backend for Cloud CDN. External backends and Cloud CDN work in
conjunction with an external Application Load Balancer.
> [!NOTE]
> **Note:** If your content is already in a [Cloud Storage](https://docs.cloud.google.com/storage/docs) bucket, see [Set up Cloud CDN with a backend
> bucket](https://docs.cloud.google.com/cdn/docs/setting-up-cdn-with-bucket) for configuring Cloud CDN with Cloud Storage. You can also easily migrate or automate transfers from third-party storage services to Cloud Storage with [Storage Transfer Service](https://docs.cloud.google.com/storage-transfer/docs/create-manage-transfer-program).
## Architecture
To create the external backend, you create an [internet network endpoint group
(NEG)](https://docs.cloud.google.com/load-balancing/docs/negs/internet-neg-concepts) that points to the
third-party storage service as the backend for the load balancer. Internet NEGs
are used for external backends.
To set up the third-party storage bucket as a backend, you must do the following:
1. Prepare the third-party storage bucket to serve content.
2. Create an internet NEG that uses the bucket's FQDN.
3. Configure the external Application Load Balancer with the internet NEG as the backend.
4. Test the setup.
## Prepare the bucket to serve content
Before you begin the setup in Google Cloud, make sure that the bucket
is configured correctly. These instructions assume that you are using an
Amazon S3 bucket and have the required permissions to make changes to
the Amazon S3 bucket and objects.
1. Make sure that either the
[Amazon S3 bucket and the objects in the bucket are public](https://aws.amazon.com/premiumsupport/knowledge-center/read-access-objects-s3-bucket/)
or that you have configured
[private origin authentication](https://docs.cloud.google.com/cdn/docs/configure-private-origin-authentication)
for the Amazon S3 bucket.
2. Make sure that the content meets the cacheability requirements listed in
[Cacheable content](https://docs.cloud.google.com/cdn/docs/caching#cacheability).
If you need to add object metadata, see the AWS knowledge base---for example,
[Editing object metadata](https://docs.aws.amazon.com/AmazonS3/latest/user-guide/add-object-metadata.html).
3. You will need the Amazon S3 bucket's endpoint (the FQDN) when you set up
the internet NEG. To get the endpoint information, follow the instructions provided
in the AWS knowledge base---for example,
[Accessing a bucket](https://docs.aws.amazon.com/AmazonS3/latest/userguide/access-bucket-intro.html).
You can also get the Amazon S3 endpoint URL from the object's overview page.
## Create an internet NEG that uses the bucket's hostname
For simplicity, this example uses the FQDN `backend.example.com`. Make
sure to replace this with your third-party storage bucket's FQDN, which might
look something like `http://unique-name-bucket.s3-us-west-1.amazonaws.com/`.
This guide uses an example to describe the fundamentals of using an external
backend (sometimes called a *custom origin*) in an external Application Load Balancer. An
external backend is an endpoint that is external
to Google Cloud. When you use an external backend with
an external Application Load Balancer, you can improve performance by using
Cloud CDN caching.
The guide steps through how to configure a global external Application Load Balancer with a
Cloud CDN-enabled backend service that proxies to an
external backend server at `backend.example.com`.
In the example, the load balancer accepts HTTPS requests from clients and
proxies these requests as HTTPS to the external backend. This example assumes
that the external backend supports HTTPS.
Other options would be to configure a load balancer to accept HTTP or HTTPS
requests, and use HTTPS when proxying requests to the external backend.
This guide assumes that you have already set up a load balancer and you are
adding a new external backend. For more information, see
[Set up a classic Application Load Balancer with a managed instance group
backend](https://docs.cloud.google.com/load-balancing/docs/https/ext-https-lb-simple).
Figure 1 shows a sample architecture.
[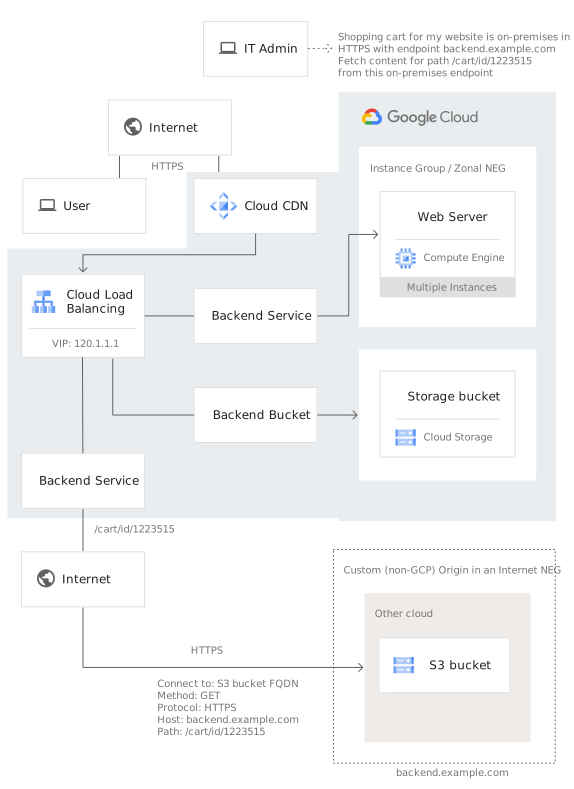](https://docs.cloud.google.com/static/cdn/images/cdn-amzn-s3.svg) **Figure 1.** S3 bucket use case for external backends.
In the diagram, `www.example.com` has a load balancer frontend with the IP
address `120.1.1.1`. When there is a cache miss, user requests for
`/cart/id/1223515` are fetched from the external backend by way of HTTPS. All
other incoming traffic is directed to either the Google Cloud backend
service with Compute Engine VMs or to the backend bucket, based on the
URL map.
## Before you begin
Before following this guide, familiarize yourself with the following:
- [Internet network endpoint groups overview](https://docs.cloud.google.com/load-balancing/docs/negs/internet-neg-concepts),
which includes the limitations.
- [External backends specified by using internet NEGs](https://docs.cloud.google.com/cdn/docs/ext-backend-internet-neg-overview)
### Permissions
To follow this guide, you need to create an internet network endpoint
group (NEG) and create or modify an external Application Load Balancer in a project.
You should be either a project [owner or
editor](https://docs.cloud.google.com/iam/docs/roles-overview#basic), or you should have both of the
following [Compute Engine IAM roles](https://docs.cloud.google.com/compute/docs/access/iam).
| Task | Required role |
|---|---|
| Create and modify load balancer components | [Network Admin](https://docs.cloud.google.com/compute/docs/access/iam#compute.networkAdmin) |
| Create and modify NEGs | [Compute Instance Admin](https://docs.cloud.google.com/compute/docs/access/iam#compute.instanceAdmin) |
## Configure a load balancer with an external backend
This section shows you how to configure and test an internet NEG.
### Setup overview
Setting up an internet NEG involves doing the following:
- Defining the internet endpoint in an internet NEG.
- Adding an internet NEG as the backend to a backend service.
- Defining which user traffic to map to this backend service by configuring your external Application Load Balancer's URL map.
- Allowlisting the necessary IP ranges.
This example creates the following resources:
- A forwarding rule with the `120.1.1.1` IP address directs incoming requests to a target proxy.
- The `networkTier` of the forwarding rule must be `PREMIUM`.
- The target proxy checks each request against the URL map to determine the appropriate backend service for the request.
- For external backends, the target proxy must be `TargetHttpProxy` or `TargetHttpsProxy`. This example uses `TargetHttpsProxy`.
- Cloud CDN enabled (optional) on the backend service allows caching and serving responses from Cloud CDN caches.
- This example includes a [custom
header](https://docs.cloud.google.com/load-balancing/docs/custom-headers), which is required when the external backend expects a particular value for the HTTP request's `Host` header.
The setup looks like the following.
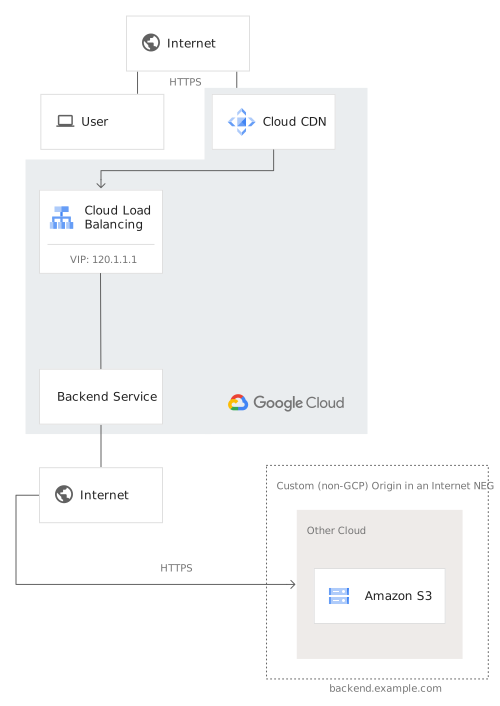 **Figure 2.** Cloud CDN with an Amazon S3 bucket backend.
### Create the NEG and internet endpoint
### Console
1. In the Google Cloud console, go to the **Network endpoint groups** page.
[Go to Network endpoint groups](https://console.cloud.google.com/compute/networkendpointgroups/list)
2. Click **Create network endpoint group**.
3. Enter the name of the network endpoint group: `example-fqdn-neg`.
4. For **Network endpoint group type** , select **Network
endpoint group (Internet)**.
5. For **Default port** , enter `443`.
6. For **New network endpoint** , select **Fully qualified domain name and
port**.
7. For the FQDN, enter `backend.example.com`.
8. For **Port type** , select **Default** , and verify that **Port
number** is `443`.
9. Click **Create**.
### gcloud
1. Create an internet NEG, and set the `--network-endpoint-type` to
`internet-fqdn-port` (the hostname and port where your external backend
can be reached):
```
gcloud compute network-endpoint-groups create example-fqdn-neg \
--network-endpoint-type="internet-fqdn-port" --global
```
2. Add your endpoint to the NEG. If a port isn't specified, the port
selection defaults to port `80` (HTTP) or `443` (HTTPS; HTTP/2) depending
on the protocol configured in the backend service. Make sure to include
the `--global` flag:
```
gcloud compute network-endpoint-groups update example-fqdn-neg \
--add-endpoint="fqdn=backend.example.com,port=443" \
--global
```
3. List the created internet NEG:
```
gcloud compute network-endpoint-groups list --global
```
Output:
```
NAME LOCATION ENDPOINT_TYPE SIZE
example-fqdn-neg global INTERNET_FQDN_PORT 1
```
4. List the endpoint within that NEG:
```
gcloud compute network-endpoint-groups list-network-endpoints example-fqdn-neg \
--global
```
Output:
```
INSTANCE IP_ADDRESS PORT FQDN
backend.example.com
```
### Add an external backend to a load balancer
The following example updates an existing load balancer.
In the existing load balancer, the default service is a Google Cloud
service. The example modifies the existing URL map by adding a path matcher that
sends all requests for `cart/id/1223515` to the `images` backend service, which
is associated with the internet NEG.
### Console
#### Create the backend service and add the internet NEG
1. In the Google Cloud console, go to the **Load balancing** page.
[Go to Load balancing](https://console.cloud.google.com/networking/loadbalancing/list)
2. To add the backend service to an existing load balancer, select your classic Application Load Balancer, click **Menu** , and then select **Edit**.
3. Click **Backend configuration**.
4. In the **Backend services \& backend buckets** menu, select **Create a backend service**.
5. Set the name of the backend service to `images`.
6. For **Backend type** , select **Internet network endpoint group**.
7. Select the protocol that you intend to use from the load balancer to the internet NEG. For this example, select **HTTPS**.
8. Under **New backend \> Internet network endpoint group** , select `example-fqdn-neg`, and then click **Done**.
9. Select **Enable Cloud CDN**.
10. Optional: Modify the [cache mode](https://docs.cloud.google.com/cdn/docs/using-cache-modes) and [TTL](https://docs.cloud.google.com/cdn/docs/using-ttl-overrides) settings.
11. In **Advanced configurations** , under **Custom request headers** , click **Add header** .
1. For **Header name** , enter `Host`.
2. For **Header value** , enter `backend.example.com`.
12. Click **Create**.
13. Keep the window open to continue.
#### Attach the backend service to an existing URL map
1. Click **Host and path rules**.
2. The first row or rows have Google Cloud services in the right column, and one of them is already populated with the default rule `Any unmatched (default)` for **Hosts** and **Paths**.
3. Ensure that there is a row with `images` selected in the right column. If it doesn't exist, click **Add host and path rule** , and select `images`. Populate the other fields as follows:
1. In **Hosts** , enter `*`.
2. In **Paths** , enter `/cart/id/1223515`.
#### Review and finalize
1. Click **Review and finalize**.
2. Compare your settings to what you intended to create.
3. If everything looks correct, click **Update**.
### gcloud
1. Create a new backend service for the NEG:
```
gcloud compute backend-services create images \
--global \
--enable-cdn \
--cache-mode=CACHE_MODE \
--protocol=HTTP2
```
Set the [cache mode](https://docs.cloud.google.com/cdn/docs/using-cache-modes) by replacing
CACHE_MODE with one of the following:
- `CACHE_ALL_STATIC`: automatically caches [static
content](https://docs.cloud.google.com/cdn/docs/caching#static)
- `USE_ORIGIN_HEADERS` (default): requires the origin to set [valid
caching headers](https://docs.cloud.google.com/cdn/docs/caching#cacheability) to cache content
- `FORCE_CACHE_ALL`: caches all content, ignoring any `private`,
`no-store`, or `no-cache` directives in `Cache-Control` response
headers
2. Configure the backend service to add the custom request header
`Host: backend.example.com` to the request:
```
gcloud compute backend-services update images \
--custom-request-header "Host: backend.example.com" --global
```
3. Use the `backend-services add-backend` command to add the internet NEG
to the backend service:
```
gcloud compute backend-services add-backend images \
--network-endpoint-group "example-fqdn-neg" \
--global-network-endpoint-group \
--global
```
4. Attach the new backend service to the load balancer's URL map by
[creating a new matching rule](https://docs.cloud.google.com/sdk/gcloud/reference/compute/url-maps/add-path-matcher)
to direct requests to that backend:
```
gcloud compute url-maps add-path-matcher EXAMPLE_URL_MAP \
--default-service=GCP_SERVICE_EXAMPLE \
--path-matcher-name=CUSTOM_ORIGIN_PATH_MATCHER_EXAMPLE \
--backend-service-path-rules=/CART/ID/1223515=IMAGES
```
Replace the following:
- `EXAMPLE_URL_MAP`: the name of your existing URL map
- `GCP_SERVICE_EXAMPLE`: the name of an existing default backend service
- `CUSTOM_ORIGIN_PATH_MATCHER_EXAMPLE`: the name of this new path rule
- `/CART/ID/1223515`: the path
- `IMAGES`: the name of the new backend service with the attached internet NEG
### Allowlist the necessary IP ranges
To allow an external Application Load Balancer to send requests to your internet NEG, you must
query the `_cloud-eoips.googleusercontent.com` DNS TXT record by using a tool
like `dig` or `nslookup`.
For example, run the following `dig` command:
```
dig TXT _cloud-eoips.googleusercontent.com | grep -Eo 'ip4:[^ ]+' | cut -d':' -f2
```
The output contains two IP ranges, as follows:
34.96.0.0/20
34.127.192.0/18
> [!CAUTION]
> **Caution:** These IP ranges are subject to change.
Note the IP ranges and ensure that these ranges are allowed by your firewall or
cloud access control list (ACL).
For more information, see [Authenticating
requests](https://docs.cloud.google.com/load-balancing/docs/negs/internet-neg-concepts#authenticating_requests).
## Connect your domain to your load balancer
After the load balancer is created, note the IP address that is associated with
the load balancer---for example, `30.90.80.100`. To point your domain to your
load balancer, create an `A` record by using your domain registration service. If
you added multiple domains to your SSL certificate, you must add an `A` record
for each one, all pointing to the load balancer's IP address. For example, to
create `A` records for `www.example.com` and `example.com`, use the following:
```
NAME TYPE DATA
www A 30.90.80.100
@ A 30.90.80.100
```
If you use Cloud DNS as your DNS provider, see
[Add, modify, and delete records](https://docs.cloud.google.com/dns/docs/records).
## Test the external Application Load Balancer
> [!NOTE]
> **Note:** It might take a few minutes for the load balancer configuration to propagate globally after you first deploy it.
Now that you have configured your load balancer, you can start sending
traffic to the load balancer's IP address. If you configured a domain, you can
send traffic to the domain name as well. However, DNS propagation can take time
to complete so you can start by using the IP address for testing.
1. In the Google Cloud console, go to the **Load balancing** page.
[Go to Load balancing](https://console.cloud.google.com/networking/loadbalancing/list)
2. Click on the load balancer that you just created.
3. Note the IP address of the load balancer.
4. If you created an **HTTP load balancer** , you can test your load balancer
by using a web browser at `http://IP_ADDRESS`.
Replace `IP_ADDRESS` with the
[load balancer's IP address](https://docs.cloud.google.com/cdn/docs/setting-up-cdn-with-third-party-storage#ip-address). You
should be directed to the `helloworld` service home page.
If you created an **HTTPS load balancer** , you can test your load balancer
by using a web browser at `https://IP_ADDRESS`.
Replace `IP_ADDRESS` with the
[load balancer's IP address](https://docs.cloud.google.com/cdn/docs/setting-up-cdn-with-third-party-storage#reserving_external_ip_addresses). You
should be directed to the `helloworld` service home page.
If that does not work and you are using a Google-managed certificate,
confirm that your certificate resource's status is ACTIVE. For more
information, see [Google-managed SSL certificate resource
status](https://docs.cloud.google.com/load-balancing/docs/ssl-certificates/google-managed-certs#certificate-managed-status).
Alternatively, you can use `curl` from your local machine's command line.
Replace `IP_ADDRESS` with the [load balancer's IPv4
address](https://docs.cloud.google.com/cdn/docs/setting-up-cdn-with-third-party-storage#ip-address).
If you're using a Google-managed certificate, test the domain that points to
the load balancer's IP address. For example:
```
curl -s 'https://www.example.com:443' --resolve www.example.com:443:IP_ADDRESS
```
5. Optional: If you are using a custom domain, you might need to wait for the
updated DNS settings to propagate. Then, test your domain (for example,
`backend.example.com`) in the web browser.
For help with troubleshooting, see [Troubleshooting external backend and internet
NEG issues](https://docs.cloud.google.com/load-balancing/docs/https/troubleshooting-ext-https-lbs#external-backends-internet-neg).
## Test Cloud CDN
### Test 1: Hitting the bucket endpoint directly
This test uses the `time` and `wget` commands from a VM. The example downloads
`/cart/id/1223515/image.jpg` from the bucket `backend.example.com`.
From the output, you can see that the overall request takes 780 ms. This is the
time to retrieve a 3.3 MB image from Amazon S3 directly.
```
time wget backend.example.com/cart/id/1223515/image.jpg
```
```
--2020-06-26 18:22:46-- backend.example.com/cart/id/1223515/image.jpg
Resolving backend.example.com (backend.example.com)... 52.219.120.233
Connecting to backend.example.com (backend.example.com)|52.219.120.233|:80... connected.
HTTP request sent, awaiting response... 200 OK
Length: 3447106 (3.3M) [image/jpeg]
Saving to: '/cart/id/1223515/image.jpg.47'
/cart/id/1223515/image.jpg.47 100%[==============================================================================================================================================>] 3.29M 6.25MB/s in 0.5s
2020-06-26 18:22:47 (6.25 MB/s) - '/cart/id/1223515/image.jpg.47' saved [3447106/3447106]
real 0m0.780s
user 0m0.003s
sys 0m0.012s
```
### Test 2: First request through Cloud CDN
This test uses the load balancer's IP address to retrieve the
`/cart/id/1223515/image.jpg` file. Because this is the first request, it should
be a miss and Cloud CDN should fetch the image from the origin, which
is Amazon S3. From the output, you can see that the request took 844 ms.
```
time wget http://LOAD_BALANCER_IP_ADDRESS/cart/id/1223515/image.jpg
```
```
--2020-06-26 18:19:27-- http://LOAD_BALANCER_IP_ADDRESS/cart/id/1223515/image.jpg
Connecting to LOAD_BALANCER_IP_ADDRESS:80... connected.
HTTP request sent, awaiting response... 200 OK
Length: 3447106 (3.3M) [image/jpeg]
Saving to: '/cart/id/1223515/image.jpg.44'
/cart/id/1223515/image.jpg.44 100%[==============================================================================================================================================>] 3.29M 8.23MB/s in 0.4s
2020-06-26 18:19:28 (8.23 MB/s) - '/cart/id/1223515/image.jpg.44' saved [3447106/3447106]
real 0m0.844s
user 0m0.003s
sys 0m0.012s
```
### Test 3: Second request through CDN
Now we will make one more request using this load balancer IP. This time, we
should get a cached response so it should be faster than the first 2 tests.
We are again using the same LB IP LOAD_BALANCER_IP_ADDRESS. From the
output, we can see that the request took just 18ms.
> [!NOTE]
> **Note:** Make sure to make the second request from the same client. Because of the globally distributed infrastructure, you might hit a PoP that does not have the image in its cache. It might take more than two attempts to get a cached response.
```
time wget http://LOAD_BALANCER_IP_ADDRESS/cart/id/1223515/image.jpg
```
```
--2020-06-26 18:19:29-- http://LOAD_BALANCER_IP_ADDRESS/cart/id/1223515/image.jpg
Connecting to LOAD_BALANCER_IP_ADDRESS:80... connected.
HTTP request sent, awaiting response... 200 OK
Length: 3447106 (3.3M) [image/jpeg]
Saving to: '/cart/id/1223515/image.jpg.45'
/cart/id/1223515/image.jpg.45 100%[==============================================================================================================================================>] 3.29M --.-KB/s in 0.008s
2020-06-26 18:19:29 (423 MB/s) - '/cart/id/1223515/image.jpg.45' saved [3447106/3447106]
real 0m0.018s
user 0m0.001s
sys 0m0.010s
```
### Verify by using logs
Logs for Cloud CDN are associated with the external Application Load Balancer that your
Cloud CDN-enabled backends are attached to. Using the logs, you can
check whether a request is a hit or a miss. You can read more about
Cloud CDN logs in [Viewing logs](https://docs.cloud.google.com/cdn/docs/logging).
## Limitations
- The third-party bucket and the objects must be public. Alternatively, you can
keep your bucket and objects private if you [configure
private origin authentication](https://docs.cloud.google.com/cdn/docs/configure-private-origin-authentication).
External backends don't support other methods for content authentication, such as
signed URLs or signed cookies.
- When using an external backend service that expects a particular value for
the HTTP request's `Host` header, you must configure the backend service to
set the `Host` header to that expected value. If you don't configure a custom
request header, a backend service preserves the `Host` header that the
client used to connect to the Google Cloud external Application Load Balancer. For
general information about custom headers, see
[Configure custom request headers](https://docs.cloud.google.com/load-balancing/docs/https/custom-headers#working-with-request).
For a specific example, see
[Configuring a load balancer with an external backend](https://docs.cloud.google.com/load-balancing/docs/negs/setting-up-internet-negs#config-lb-external-backend).
## What's next
- To check whether Cloud CDN is serving responses from cache, see [Logs and metrics for caching](https://docs.cloud.google.com/cdn/docs/logging).
- To learn about which content is cacheable or non-cacheable, see the [Caching overview](https://docs.cloud.google.com/cdn/docs/caching).
- To find GFE points of presence, see [Cache locations](https://docs.cloud.google.com/cdn/docs/locations).
- To set up cache policies in URL maps, see [Configure a Cloud CDN cache policy](https://docs.cloud.google.com/load-balancing/docs/https/setting-up-global-traffic-mgmt#cdn-cache-policy).